
Part 11. Sharing Your Mac with Multiple Users
Mac OS X is designed to be a multiuser operating system, meaning each user of a single Mac has his or her own account. Each user is either a standard user or an admin user. Admin users can change preferences, install programs, and modify files—in other words, they can make changes that affect all users rather than just the user who implements them. Standard users can only read and modify their own files, and they can only change their own settings.
Your account can be customized with your choice of name, password, and login picture (used both in the login dialog box and for Internet messaging with iChat). You also get your very own home folder, named with the short version of your login name. Your home folder is where you can put all your documents, music, pictures, and so on, and you can keep other users from reading, moving, or even seeing what files are in your home folder. When you do want to share files, you can put them in specific places where other users have access to them. Because customizations—such as the desktop picture, screen saver module, monitor resolution, and clock settings—apply only to the user who sets them up, you can also setup user accounts to create different configurations of your Mac for specific purposes, rather than for different people.
In this part, you’ll learn how to create user accounts and change their attributes, as well as how to log in and log out. You’ll also learn how to add login items—programs and files that open when you log in—and how to manage security with passwords.

Account and Security Setup

Creating and Deleting Users
Each user of a Mac gets his or her own account, with separate preferences, home folder, and login identity. Each account can have a customized level of access to system functions, and each account is password protected so that only its user can change its settings.
![]()
Tip: Setting Limits
When you create a new user account, you control the access that user has to most functions. In the Accounts pane, click Parental Controls. On the System tab, choose the programs and functions you want to make available to the user. On the Content tab, turn on monitoring to limit access to adult content, and on the Mail & iChat tab, set limits on email and instant messaging use. The Time Limits and Logs tabs contain controls for how much time the user can work on the Mac, and for keeping track of what the user does.
![]()
![]()
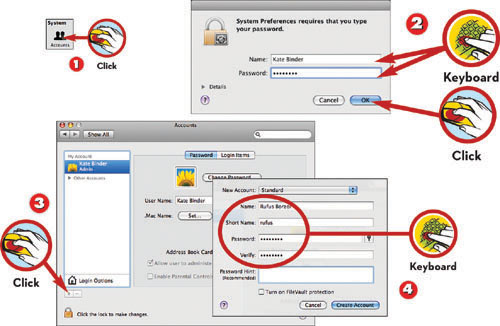
![]() Choose Apple menu, System Preferences, and click Accounts to see the accounts preferences.
Choose Apple menu, System Preferences, and click Accounts to see the accounts preferences.
![]() If the preferences are locked, click the closed padlock button to unlock them; then enter an admin name and password and click OK.
If the preferences are locked, click the closed padlock button to unlock them; then enter an admin name and password and click OK.
![]() To create a new user, click the Add User button.
To create a new user, click the Add User button.
![]() Enter the new user’s name, a short version of the name (such as initials), and a password.
Enter the new user’s name, a short version of the name (such as initials), and a password.
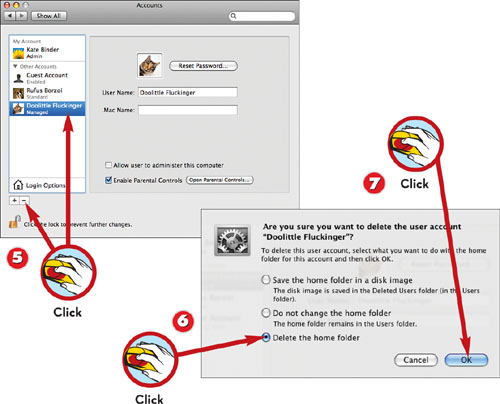
![]() To delete a user, click a name in the list and then click the Delete User button.
To delete a user, click a name in the list and then click the Delete User button.
![]() Choose what you want to do with the user’s files: archive them, level them in place, or delete them.
Choose what you want to do with the user’s files: archive them, level them in place, or delete them.
![]() Click OK in the confirmation dialog box.
Click OK in the confirmation dialog box.
![]()
Tip: The Stuff They Leave Behind
When you delete a user, one of your options is to save the user’s files as a disk image that’s placed in the Deleted Users folder in the Users folder. Double-click the disk image to see the saved files. If the user was using FileVault, enter the user’s password. FileVault or no FileVault, drag the disk image file to the Trash to delete the files.
Making a User an Admin
Each Mac has at least one admin user—the first user identity created on your Mac is automatically an admin. You can make any other user an admin as well, so that user can control system preferences and make changes to the Mac’s setup.

Note: Admins Beget Admins
Only admin users can create other admin users. If you’re not an admin user, you’ll need to ask someone who is already designated as an admin on your Mac to give you that status.

![]()
![]()
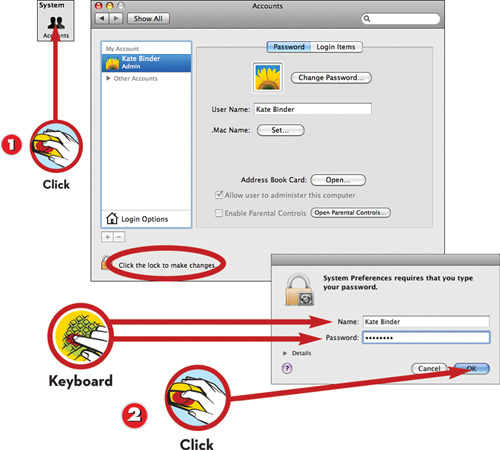
![]() Choose Apple menu, System Preferences, and click Accounts to see the accounts preferences.
Choose Apple menu, System Preferences, and click Accounts to see the accounts preferences.
![]() If the preferences are locked, click the closed padlock button to unlock them; then type an admin name and password and click OK.
If the preferences are locked, click the closed padlock button to unlock them; then type an admin name and password and click OK.
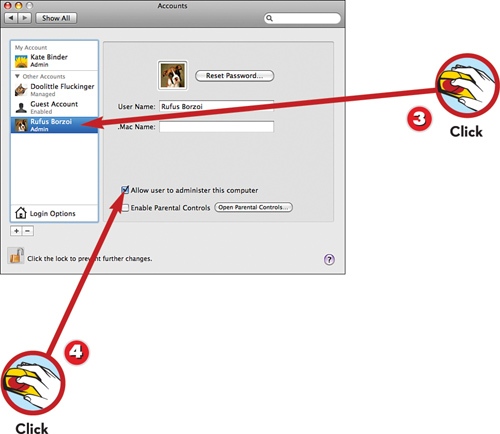
![]() Click a name in the account list.
Click a name in the account list.
![]() Click the Allow user to administer this computer check box.
Click the Allow user to administer this computer check box.
Note: Wherefore Admin, Anyway?
To home users the term admin user can seem strange. It’s a result of Mac OS X’s emphasis on accommodating multiple users of a single Mac. In most multiuser situations, such as computer labs, only authorized administrators should be able to change the Mac’s setup.
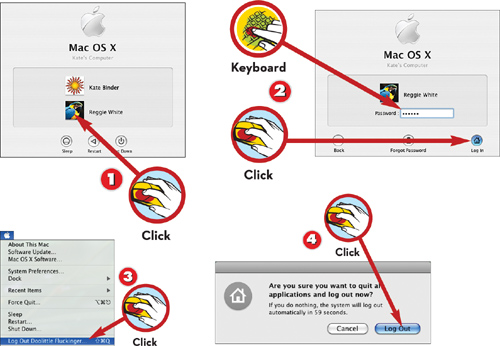
Logging In and Out
Depending on your preferences, you might need to log in to your Mac every day, or you might hardly ever see the login screen. Either way, you do need to remember your login name and password so you can log in when needed—after another user has logged out or after major changes are made to your system.
![]()
![]()
![]() In the Login dialog box, click your name in the list of users.
In the Login dialog box, click your name in the list of users.
![]() Type your password and click Log In.
Type your password and click Log In.
![]() To log out, choose Apple menu, Log Out.
To log out, choose Apple menu, Log Out.
![]() Click Log Out in the confirmation dialog box. All the applications quit, along with the Finder, and you’re returned to the Login dialog box.
Click Log Out in the confirmation dialog box. All the applications quit, along with the Finder, and you’re returned to the Login dialog box.
![]()
Tip: Skipping the Login
Click Login Options at the bottom of the Accounts preferences panel in System Preferences; then choose a user from the Automatically log in pop-up menu.
![]()
Tip: Faster Switching
Mac OS X’s fast user switching feature displays a menu of users; choosing a new user switches instantly to that account. Click Enable fast user switching in the Login Options tab of the Accounts System Preferences panel.
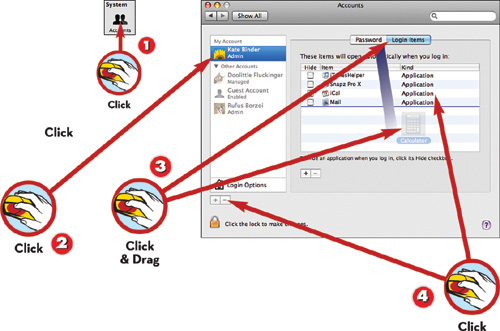
Adding Startup Items
When you log in, your Mac sets itself up the way you like things. One service it can perform for you when you log in is starting up programs you use all the time, such as your email client, your contact manager, and other constant companions. To make this happen, you add these programs to your login items.
![]()
![]()
![]() In System Preferences, click Accounts to see the accounts preferences.
In System Preferences, click Accounts to see the accounts preferences.
![]() Click to select the account for which you want to add login items.
Click to select the account for which you want to add login items.
![]() Click the Login Items tab and then drag programs, documents, bookmark files, or folders into the window from the Finder.
Click the Login Items tab and then drag programs, documents, bookmark files, or folders into the window from the Finder.
![]() Click an item and click the Remove button to remove it from the list.
Click an item and click the Remove button to remove it from the list.
![]()
Tip: What a Drag
Drag items up and down in the login list to change the order in which they start up. Check the box next to each item to hide it as it starts up—you won’t see its windows until you switch to the program.
Note: Be Creative
Login items don’t have to be programs; you can open any file at login. Examples of files you might want to open every time you use your Mac include a sound file of your favorite song, the novel you’re working on, or your recipe database.
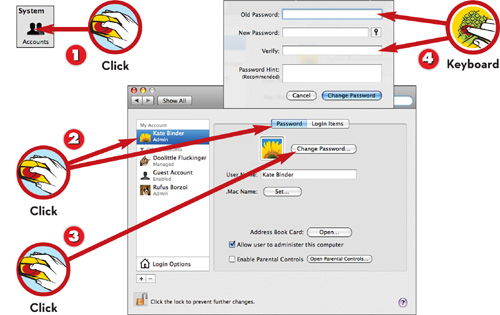
Resetting Your Password
Because you need a password to access files on your Mac, be sure to choose a password you can’t forget, and take advantage of the Hint feature to provide yourself with a memory-jogging phrase when you need it. If the worst does happen and you just can’t figure out your password, here’s how to remedy the situation.

Caution: Don’t Make It Too Easy
This might seem obvious, but if you enter a hint for your password, don’t make the hint too obvious. Even if you’re tempted to just use the password itself for the hint, don’t!
![]()
![]()
![]() If you’re logged in, choose Apple menu, System Preferences and click Accounts to see the accounts preferences.
If you’re logged in, choose Apple menu, System Preferences and click Accounts to see the accounts preferences.
![]() Click your username in the list and then click the Password tab.
Click your username in the list and then click the Password tab.
![]() Click Change Password.
Click Change Password.
![]() Type your old password and the new password in the Password and Verify fields.
Type your old password and the new password in the Password and Verify fields.
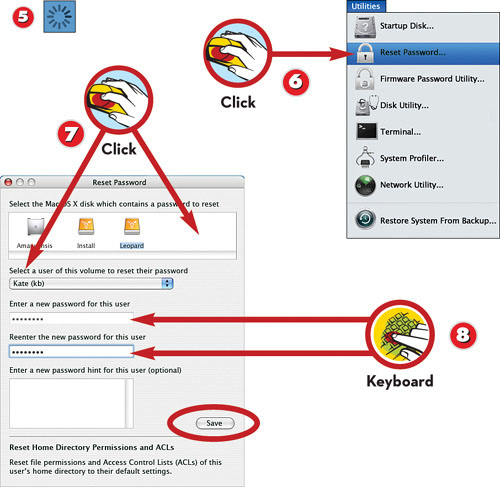
![]() If you have forgotten the Mac’s main admin password (the one used by its first admin user), insert the Mac OS X Install Disc and restart. Press C on your keyboard until you see the spinning gear symbol.
If you have forgotten the Mac’s main admin password (the one used by its first admin user), insert the Mac OS X Install Disc and restart. Press C on your keyboard until you see the spinning gear symbol.
![]() When the Installer starts up, choose Utilities, Reset Password.
When the Installer starts up, choose Utilities, Reset Password.
![]() Choose the hard drive where your system software resides and then select your name.
Choose the hard drive where your system software resides and then select your name.
![]() Enter the new password twice and click Save.
Enter the new password twice and click Save.
Note: A Little Help from a Friend
If you forget your password and can’t log in or access your home folder (when you’re using FileVault), an admin user can change the password for you.
Caution: Safe and Secure
Keep your system CD in a safe place so it’s not accessible to people who might want to reset the password to gain access to files that aren’t theirs.
Sharing Files with Other Users
Some files are meant to be read and even modified by multiple users—a family calendar or a committee report in progress, for example. You can share these files in two designated places, with different results. And you can send copies of your files to other users via their Drop Box folders.
Note: Skipping It
Why all this rigmarole, you ask? The point is to keep your files as safe as you want them to be. If you want to skip the security routine, you can keep your Mac logged in with a single user account and give all users the password.
Note: It’s Good to Share
Files you might share in a Public folder or in the Shared folder within the Users folder include databases (of recipes, addresses, or clients, for example), templates for letters or memos that everyone uses, and logo graphics.
![]()

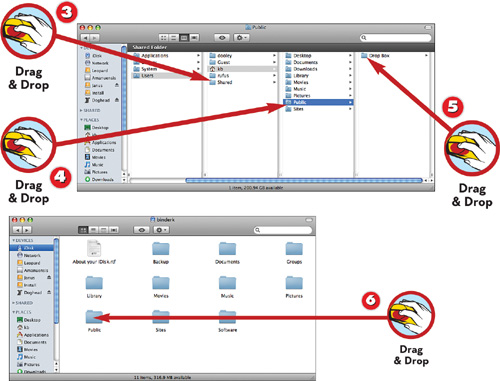
![]()
![]() To enable network users to access the Public folder in your home folder, open System Preferences and click Sharing.
To enable network users to access the Public folder in your home folder, open System Preferences and click Sharing.
![]() In the Services list, check the box labeled File Sharing to share files with other Mac users on your network.
In the Services list, check the box labeled File Sharing to share files with other Mac users on your network.
![]() Put files you want all your Mac’s users to be able to modify in the Shared folder in the Users folder.
Put files you want all your Mac’s users to be able to modify in the Shared folder in the Users folder.
![]() Put files that you want all your Mac’s users to be able to read but not change in the Public folder in your home folder.
Put files that you want all your Mac’s users to be able to read but not change in the Public folder in your home folder.
![]() To give another user of your computer a copy of a file, put the file in that user’s Drop Box folder inside his or her Public folder.
To give another user of your computer a copy of a file, put the file in that user’s Drop Box folder inside his or her Public folder.
![]() To share a file with other Mac users on the Internet, copy it to the Public folder on your iDisk.
To share a file with other Mac users on the Internet, copy it to the Public folder on your iDisk.
Note: Flying Blind
When you drag a file into another user’s Drop Box, the Mac warns that you won’t be able to see the result of the operation. This is its way of saying that you can’t open another user’s Drop Box folder to see what’s in it.
Note: Large Attachments
Many email providers limit the size of file attachments. To send someone a larger file than will fit through your provider’s email gateway, put it on your iDisk (step 6) and create a File Sharing web page where she can snag the file.