Terms you’ll need to understand
![]() Route Based on the Originating Virtual Port ID
Route Based on the Originating Virtual Port ID
![]() Route Based on Source MAC Hash
Route Based on Source MAC Hash
![]() Notify Switches
Notify Switches
![]() Promiscuous Mode
Promiscuous Mode
![]() Port Trunking
Port Trunking
![]() 802.1Q VLAN Tagging
802.1Q VLAN Tagging
![]() Link Status
Link Status
![]() Beacon Probing
Beacon Probing
![]() Traffic Shaping
Traffic Shaping
![]() NIC Teaming
NIC Teaming
Concepts and techniques you’ll need to master
![]() Understanding port groups and policies
Understanding port groups and policies
![]() Understanding virtual switch security policies
Understanding virtual switch security policies
![]() Understanding how NIC teaming works
Understanding how NIC teaming works
![]() Understanding how failover works
Understanding how failover works
Just as physical machines connect to physical networks, virtual machines connect to virtual networks. In turn, virtual networks connect to the physical network. Virtual networking is the bridge by which physical connectivity is made possible to virtual machines. Similar to physical machines that require an entire networking infrastructure and framework to connect different devices and create different environments, virtual networking mimics physical networking by creating a virtual environment and a virtual framework for virtual machines.
In this chapter, we discuss all the components that make up virtual networking and how it facilitates communications for virtual machines.
Virtual switches (vSwitches) are the inevitable route that all communications inbound to or outbound from an ESX host must go through. Virtual switches make up the IP networking backbone of an ESX deployment. Whether you are seeking to implement IP storage or simply connect virtual machines to virtual machines, communications must pass through a virtual switch. Similarly, when the Service Console, which is the management interface of ESX, wants to access the ESX host, it too goes through a virtual switch.
You can quickly see how virtual switches are the beating heart of the infrastructure, and it is by leveraging them that you are able to create different scenarios. For example, you could create an isolated environment where VMs can communicate only with other VMs on the same ESX host, you could create a DMZ-like environment, or you could provide fault tolerance and High Availability through virtual switches. Virtual switches have the following characteristics:
• Virtual switches are software objects that reside on the VMkernel of every ESX host.
• Virtual switches in ESX 3.5 can have a minimum of 8 ports and a maximum of 1,016 ports. Similar to physical switches that have available ports on them for physical devices to connect to, virtual switches also have that functionality. The advantage with virtual switches is the port density is much higher, and you can customize your virtual switches with the port capacity you need. With physical switches, that is not an easy task to do; you would have to swap out the switch for another. Virtual switches give you the flexibility to add or remove ports as you need.
• Virtual switches can be serviced by one or more physical NICs. More NICs provide fault tolerance, High Availability, and more, as you will see throughout this chapter.
• Virtual NICs that connect to virtual switches have unique MAC addresses just like every physical network interface card (NIC) connecting to a physical switch has its own unique MAC address.
• Virtual switches support 802.1q (known as VLAN Tagging), which allows VMs connected to a virtual switch to communicate with different VLANs in your network infrastructure. This topic is covered in greater detail in the “VLANs in Virtual Networking” section in this chapter.
• Virtual switches also support different port groups or connection types that outline the communication of this virtual switch, such as Service Console, VMkernel, or virtual machine communications.
EXAM ALERT
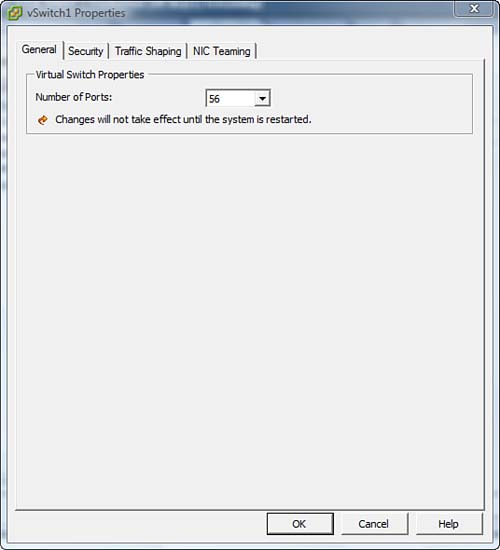
By default, when you are creating a virtual switch, and unless you manually change it, the virtual switch is created with 56 ports.
Virtual switches are to virtual machines what physical switches are to physical devices. The virtual switches concept was created in the image of physical switches, so they share many similarities. However, they do differ somewhat in functionality and capability. Let’s start off by examining the similarities between physical and virtual switches:
• They both maintain MAC address tables.
• They both check each frame’s MAC address destination upon receiving it.
• They both forward frames to one or more ports.
• They both avoid unnecessary deliveries.
Now that you recognize the similarities, let’s outline the differences:
• Virtual switches do not require or support the Spanning Tree Protocol.
• Virtual switches cannot be connected to one another the same way physical switches can be. You can connect VMs to a virtual switch, but you cannot connect another virtual switch.
• A virtual switch’s forwarding data table is unique to each virtual switch.
• Virtual switch isolation prevents loops in the switch configuration.
There are three different types of virtual switches that you can configure, depending on the case or scenario that you need to implement. Within the framework of these three virtual switch types, you can create isolated environments, a DMZ, fault tolerance, High Availability, and you can maximize throughput for optimal performance and for those bandwidth-hungry applications. In the following sections, we discuss the following three virtual switch types and their usage scenarios:
• Internal Virtual Switch
• Single Adapter Virtual Switch
• Multiple adapter virtual switch, also known as NIC teaming
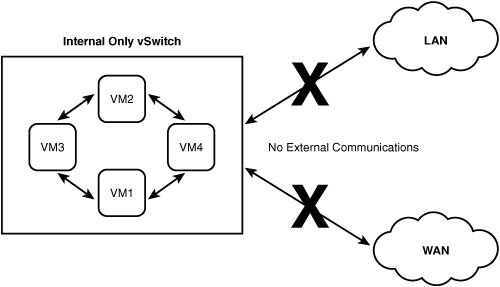
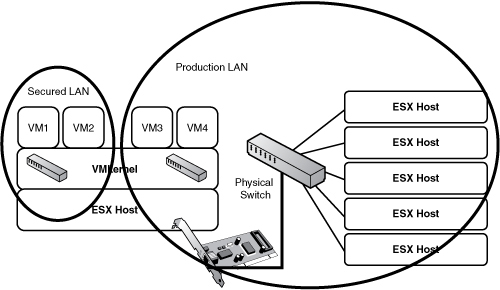
An internal virtual switch is used to provide communication to virtual machines that are on a single ESX host. In other words, when you deploy an internal virtual switch, virtual machines on the ESX host can communicate with one another but are completely isolated from the rest of the network and are unable to communicate with other VMs on other ESX hosts or any other devices on the network. Figure 4.1 shows a sample of this configuration. A possible usage scenario for this type of virtual switch is isolating a single application for testing purposes where you build a series of VMs on a single ESX host that are required by this application, and then you test against this application before allowing to communicate with the rest of the production network.
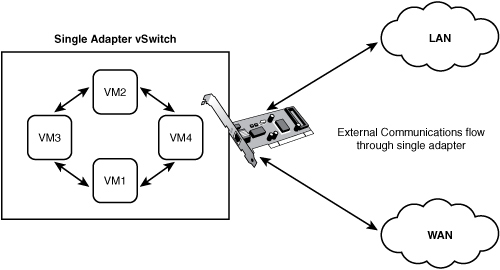
A single adapter virtual switch is one that is supported or serviced by a single physical NIC. This NIC is what allows the virtual switch and the VMs access to the rest of the network. Figure 4.2 shows an example of how this can be implemented.
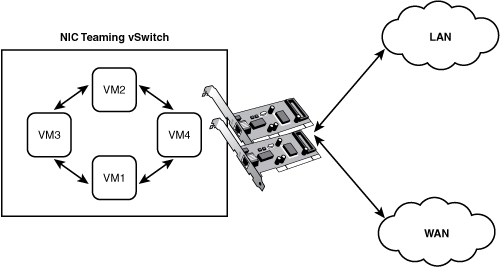
NIC teaming, or multiple adapter virtual switches, is a virtual switch that is supported by two or more NICs. This type of virtual switch allows for fault tolerance and High Availability. This is a typical scenario for mission-critical applications that you want to make sure have the maximum resources available to them and built-in failover and packet distribution. Figure 4.3 shows a sample configuration.
Now that we have covered the types of virtual switches, let’s get down to the virtual switch ports. Ports on a virtual switch can be configured to handle different connection types as follows:
• Service Console
• VMkernel
• Virtual machine
This capability is helpful and allows the virtual switch to be a multifunction object rather than an object that does just one static task. To make things easier for you from a management standpoint, you have at your disposal what are known as port groups. A port group is a collection of ports on the vSwitch that all have the same connection type. So, instead of configuring each port individually on the vSwitch, you group them and give them a particular connection type.
In the following sections we explore the different port groups that can be configured and their usage scenarios.
EXAM ALERT
The virtual switch port types touch on many aspects of virtualization with ESX, from networking to the different kinds of storage. For this reason, the exam will focus on the port types, so make sure you understand when each is used.
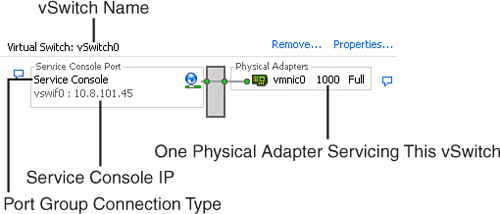
The Service Console connection type allows for communication to and from the Service Console. During the installation of ESX 3.5, a Service Console port labeled vswif0 is automatically associated with vSwitch0, as illustrated in Figure 4.4. The Service Console requires that you configure the IP stack, including a dedicated IP address, a subnet mask, and a default gateway.
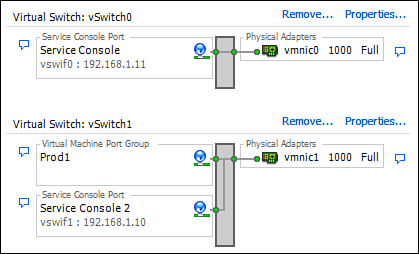
Because the Service Console is a critical component, you might want to think of providing some redundancy, and as such, two scenarios exist to help facilitate that, as follows:
• Multiple Service Console ports: Create a Service Console port group on two different virtual switches that are serviced by two different physical NICs and assign each service console a different IP address. This creates a redundant second entry point into your ESX host should the primary fail. Figure 4.5 illustrates this scenario.
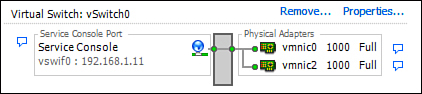
• Service Console NIC Team: Add a second physical NIC to the same virtual switch where the original Service Console port groups reside, and therefore, you create redundancy at the physical level. If a NIC fails, the second one picks up seamlessly. In this scenario, you do not need a second IP address because it is being shared. Figure 4.6 illustrates this scenario clearly.
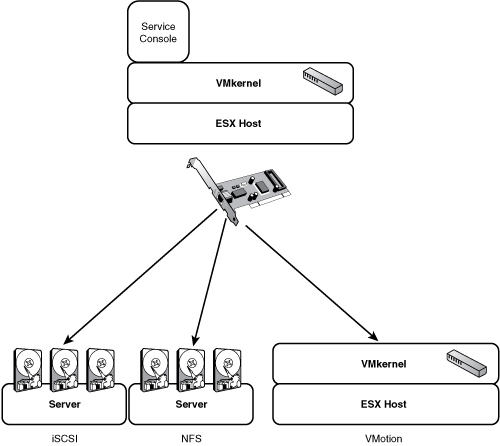
A VMkernel port group connection type allows you to configure communication for technologies like VMotion, iSCSI, and NAS/NFS. This connection type requires you to configure the IP stack. The reason behind this is that these technologies will more than likely be connecting to different VLANs or different networks altogether. Figure 4.7 gives an example of how this works.
A virtual machine (VM) port group opens communication between the VMs configured on the virtual switch and the rest of the physical network by connecting the virtual switch to the physical switch by way of the NIC or NICs configured to support the virtual switch. Figure 4.8 shows this configuration scenario.
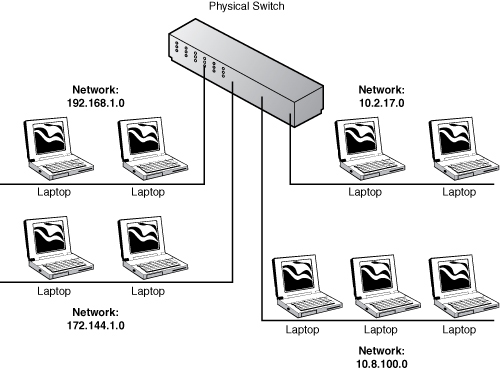
A virtual local area network (VLAN) is a logical grouping of several different LANs. Traditionally, a LAN spans a single segment, whereas a VLAN, being a logical entity represented in software, is capable of breaking this barrier and extending beyond the single segment limitation of a LAN by grouping different LANs together.
Using VLANs allows you to dictate which ports on the switch are connected to which IP segment, thereby reducing the need for additional hardware. You are now capable of allocating different ports on the switch to different subnets. Figure 4.9 further clears up this issue.
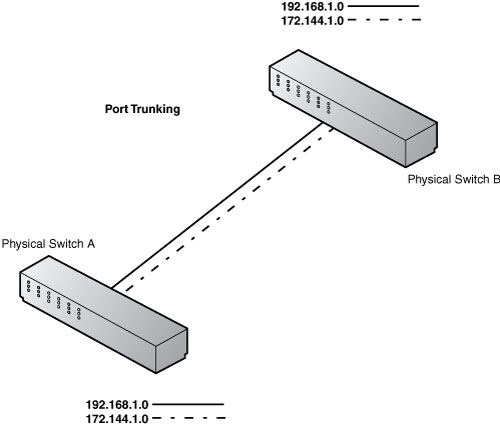
A trunk port is a port on the physical switch that you configure to be aware of other VLANs that exist on other switches. Anything that plugs into this port is able to pass IP communications to all the visible VLANs. Traditionally, a switch could see and give access only to a single IP segment or subnet. With port trunking, you can now configure multiple ports on multiple switches to be part of the same VLAN. This characteristic helps overcome geographic limitations and eases management. Figure 4.10 illustrates trunk ports.
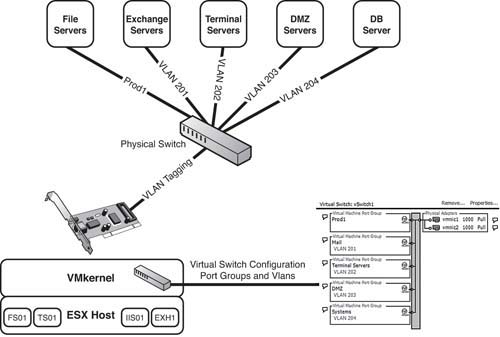
ESX has built-in support for 802.1Q VLAN tagging. The first thing you do to get 802.1Q VLAN tagging to work is to connect a physical NIC to a port that is configured as a trunk port on the physical switch. You then assign this NIC to a vSwitch. What you have accomplished so far, then, is making all the VLANs that are configured on that trunked port visible to the vSwitch.
Now you create port groups on this virtual switch. Port groups, as the name implies, are groupings of several ports and are configured to see a particular VLAN by configuring a VLAN ID in the port group that matches the VLAN ID assigned on the physical switch. Now when you try to add virtual machines to these port groups, your VMs are part of the VLAN assigned to that port group. Figure 4.11 illustrates VLAN tagging.
Virtual switches allow you some flexibility to configure them for optimal performance and maximized security. These settings can also be configured for each of the port groups configured on the virtual switch. When closely examining a virtual switch or port group properties, you find the following tabs:
• General
• Security
• Traffic Shaping
• NIC Teaming
You can get to these tabs by clicking Properties of a vSwitch in the Networking tab on the ESX host. You can then select the appropriate port group and edit its settings or select the vSwitch and edit its settings.
We examine security, traffic shaping, and NIC teaming in greater detail in the sections to follow, but first look at Figure 4.12, which shows the contents of the General tab. The General tab is the place where you limit the number of ports you want this virtual switch to have. After you modify the number of ports on the switch, you must restart the system before your changes will take effect.
Three types of Layer 2 security policies can be configured on virtual switches or port groups from the Security tab:
• Promiscuous Mode: If set to Accept, this setting would pass all the unicast frames that pass through the virtual switch to a virtual machine connected to that virtual switch. This setting is set to Reject by default to prevent frames destined for a particular VM from being read by other VMs. You should enable this mode only if you are running troubleshooting tests or running intrusion detection systems that require the system to investigate these frames.
• MAC Address Changes: If set to Reject, this setting would deny incoming IP traffic from reaching the VM if the MAC address defined in the guest operating system does not match the MAC address listed in the VM’s configuration file or vmx, as illustrated in Figure 4.13. By default, this setting is set to Accept.

• Forged Transmits: This setting is the same as the MAC Address Changes setting, except it controls the outgoing IP traffic rather than the incoming. If set to Reject, this setting would deny outgoing IP traffic from the VM if the MAC address specified in the guest OS does not match the MAC address listed in the VM’s configuration file or vmx. By default, this setting is set to Accept.
When applying security to a virtual switch or to a port group, you need to understand the policy processing and what takes precedence over what. You can apply the policy as follows:
• Virtual Switch: When applying to the virtual switch, the policy propagates to all the port groups configured on this virtual switch.
• Port Group: When applied to a port group, a policy overrides the policy applied to the virtual switch and takes precedence over it.
Traffic shaping gives you greater control over the amount of outgoing bandwidth available to virtual machines and enables you to tweak it and prioritize it. Traffic shaping is a great feature and can be useful in some cases in which adding more physical NICs is not permitted. However, given the relatively cheap cost of adding network interface cards, it would be much easier to add more NICs and increase network bandwidth using NIC teaming than it is to tweak bandwidth with traffic-shaping policies.
Traffic shaping is disabled by default; however, should the need arise for traffic shaping and should you need to enable it, you have three configurable settings that can help you tweak bandwidth:
• Average Bandwidth: Defines the average bandwidth this virtual switch should handle over time. It basically establishes the normal bandwidth load value for this vSwitch. It measures this in kilobits per second (kbps).
• Peak Bandwidth: Defines the maximum bandwidth that a virtual switch can handle. Packets received after the maximum has been reached are queued and processed as bandwidth is available. If the queue becomes full, any packets after that are bounced. This parameter is also set in kbps.
• Burst Size: Allows you to configure in kilobytes what you want the maximum burst size to be under normal conditions. The burst size also queues packets if the maximum is reached, and if the queue is full, any other packets are dropped.
NIC teaming provides for fault tolerance, redundancy, and load balancing of outgoing IP traffic from the virtual switch. You can adjust the settings on the NIC Teaming tab of the vSwitch Properties window, as shown in Figure 4.14.
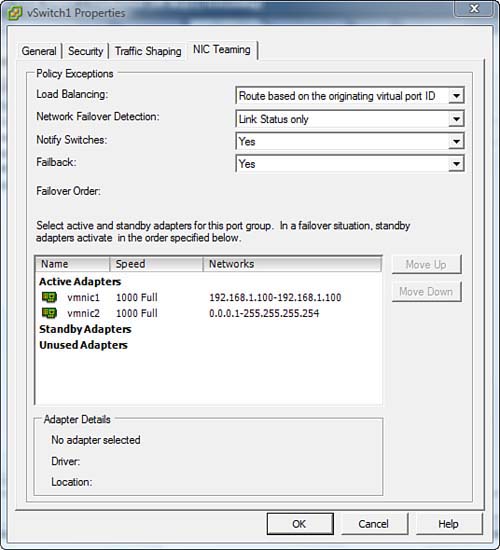
You can select load-balancing policies in the Load Balancing drop-down list. There are four load-balancing policies that you can configure the virtual switch to take advantage of, as follows:
• Route Based on the Originating Virtual Port ID: This setting configures communications based on the virtual port where the VM is connected on the virtual switch. In essence, because every VM is configured on a virtual port ID and because this port ID rarely changes, communications are consistent.
EXAM ALERT
The exam might have a question about whether the port ID will change in the event of a VMotion. The answer is yes because the VM is moving from one vSwitch to another and a completely new host. Keep that in mind.
• Route Based on Source MAC HASH: This setting configures communications uplink based on the MAC address of the VM from which the traffic originated. This method has low overhead; however, in this setting, VMs cannot take advantage of multiple physical NICs’ bandwidth, and they are limited to the bandwidth of the NIC to which they are connected.
• Route Based on IP Hash: When this setting is selected, each packet’s source and destination IP addresses are hashed, and an uplink communication link is selected based on that hashing. This setting has a higher CPU utilization overhead but provides an advantage by allowing a single VM to take advantage of multiple physical NICs’ bandwidth and has better load balancing of traffic across physical NICs. It also requires that the physical switches be configured for EtherChannel or 802.3AD.
• Use Explicit Failover Order: If this policy is selected, the topmost physical NIC in the list is always used, and if it becomes unavailable, the second NIC on the list takes over.
ESX 3.5 has built-in capabilities that would notify it when a network failover was detected from one physical NIC to the other, and you can configure this either based on virtual switch or port groups in one of two ways:
• Link Status: This method determines if there is a connection by whether a connection is detected on the port. If a cable is connected to the port, it reports the connection as a success; if not, it fails over.
• Beacon Probing: In addition to doing Link Status, this method is similar to a heartbeat in that it continuously sends packets between the adapters, and if a heartbeat is missed, it assumes there is an issue and fails over.
The Notify Switches option is a great performance tweak. When set to Yes, it notifies physical switches of changes such as the following:
• Physical NIC failover occurs where a virtual NIC is now using a different physical NIC to pass its communication.
• A new physical NIC was added to a NIC team.
This feature is especially helpful because, without it, virtual machines would experience latency and slowness as the physical switches update their lookup tables. This is especially helpful after VMotions and, of course, in the event of failovers.
CAUTION
Do not set the Notify Switches option to Yes if you will be using Microsoft Network load balancing in Unicast mode. Check out the VMware knowledgebase article 1556 for more information. The knowledgebase is located at http://kb.vmware.com.
The Failback policy determines what happens when a failed physical NIC is functional again. There are two options:
• If this policy is set to Yes, when a failed adapter is restored to a functioning state, it immediately seizes the role of active physical NIC and retires the current active one to standby mode.
• If this policy is set to No, when a failed adapter is restored, it goes into standby mode and does not become active again until the next time a failover occurs.
When the Explicit Failover Order option is selected, you can manually control what happens in the event of a failover. For example, in the Active adapters, the topmost adapter is always the first one to be used; however, you can control which adapter is on top. The Standby adapters are the ones that are used in the event the active adapter fails; again, you can control which one is used first. The Unused adapters are simply out of commission and should not be used.
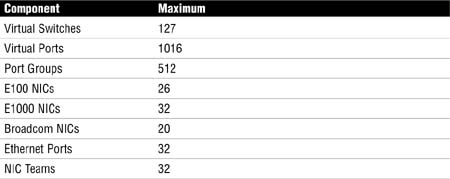
It is an inevitability that the VCP exam will include questions regarding networking maximums. Table 4.1 provides these figures to help make sure you are aware of them both for the exam and later for your day-to-day administration and design of ESX environments.
Table 4.1. Networking Maximums
1. If you want to use iSCSI, what type of port group would you need to configure on a virtual switch?
![]() A. Virtual Machine
A. Virtual Machine
![]() B. Service Console
B. Service Console
![]() C. VMkernel
C. VMkernel
![]() D. vSwitch
D. vSwitch
2. Select the three types of security policies that can be applied to either virtual switches or port groups.
![]() A. IP Hash
A. IP Hash
![]() B. MAC Address Changes
B. MAC Address Changes
![]() C. Forged Transmits
C. Forged Transmits
![]() D. Promiscuous Mode
D. Promiscuous Mode
3. What is the default number of ports for a virtual switch?
![]() A. 24
A. 24
![]() B. 56
B. 56
![]() C. 48
C. 48
![]() D. 54
D. 54
4. Select the three load-balancing methods that can be used.
![]() A. Route Based on IP Hash
A. Route Based on IP Hash
![]() B. Route Based on the Originating Port ID
B. Route Based on the Originating Port ID
![]() C. NIC teaming
C. NIC teaming
![]() D. Route Based on Source MAC Hash
D. Route Based on Source MAC Hash
5. Which load-balancing method distributes load more efficiently and allows VMs to take advantage of more than a single NIC’s available bandwidth?
![]() A. IP Hash
A. IP Hash
![]() B. MAC Hash
B. MAC Hash
![]() C. Port ID
C. Port ID
![]() D. NIC teaming
D. NIC teaming
6. Which two methods are used to detect a network failure?
![]() A. Notify Switches
A. Notify Switches
![]() B. Link Status
B. Link Status
![]() C. Alarm Notification
C. Alarm Notification
![]() D. Beacon Probing
D. Beacon Probing
7. What is the maximum number of ports that can be configured on a virtual switch?
![]() A. 1,014
A. 1,014
![]() B. 1,015
B. 1,015
![]() C. 1,016
C. 1,016
![]() D. 1,018
D. 1,018
8. True or false: When you are using virtual switches, every virtual machine has its own MAC address.
![]() A. True
A. True
![]() B. False
B. False
9. True or false: If you edit the properties of a virtual switch and modify the virtual port count, you need to reboot the ESX host.
![]() A. True
A. True
![]() B. False
B. False
10. What are the two circumstances under which physical switches are notified of a change?
![]() A. When a new physical NIC is added to a virtual switch
A. When a new physical NIC is added to a virtual switch
![]() B. When a new physical NIC is removed from a virtual switch
B. When a new physical NIC is removed from a virtual switch
![]() C. When a physical NIC failover occurs
C. When a physical NIC failover occurs
![]() D. When a virtual NIC failover occurs
D. When a virtual NIC failover occurs
Answers to Exam Prep Questions
1. Answer C is correct. To configure iSCSI, you need to create a port group on your virtual switch that is of type VMkernel.
2. Answers B, C, and D are correct. MAC Address Changes, Promiscuous Mode, and Forged Transmits are the three security policies.
3. Answer B is correct. The default number of ports that are configured with a virtual switch is 56. In ESX Server 3.0, the default number of ports for the first vSwitch was 24 and subsequent switches would default at 56.
4. Answers A, B, and D are correct. The three types of load-balancing methods are Route Based on IP Hash, Route Based on Originating Port ID, and Route Based on Source MAC Hash.
5. Answer A is correct. Route based on IP Hash is the ideal method if you want the most efficient bandwidth load balancing; it also allows VMs to take advantage of multiple physical NIC’s bandwidth capabilities. It does, however, add a CPU load and requires the physical switches to be configured for EtherChannel.
6. Answers B and D are correct. Link Status and Beacon Probing are the two methods by which a network failure is detected.
7. Answer C is correct. The maximum number of virtual ports that can be assigned to a virtual switch is 1,016.
8. Answer A, True, is correct. Each virtual machine is assigned its unique MAC address.
9. Answer A, True, is correct. When you modify the virtual port count of an existing virtual switch, the changes do not take effect until after the ESX host is rebooted.
10. Answers A and C are correct. Notify Switches notifies physical switches when a physical NIC failover occurs or when a new physical NIC is added to a virtual switch.