Terms you’ll need to understand
![]() Graphical mode
Graphical mode
![]() Diagnostic data
Diagnostic data
![]() Text mode
Text mode
![]() Secure Shell (SSH)
Secure Shell (SSH)
![]() Network Time Protocol (NTP)
Network Time Protocol (NTP)
Concepts and techniques you’ll need to master
![]() Installing ESX 3.5
Installing ESX 3.5
![]() ESX 3.5 post-installation configurations
ESX 3.5 post-installation configurations
![]() Troubleshooting ESX Server issues that may arise after a fresh install
Troubleshooting ESX Server issues that may arise after a fresh install
One of the basic tasks you need to perform as a VMware Certified Professional is properly installing ESX 3.5 and also knowing the different methods that are available for installing it. In this chapter, we look at the prerequisites and different methodologies of installing ESX Server.
Before we dig deep into the steps of installing ESX 3.5, let’s look at the minimum hardware requirements needed to install the software. Keep in mind, this is the minimum you need to install the software. This is by no means a recommended hardware configuration. ESX servers in the real world are beefy servers, which is what allows them to host so many virtual machines. The requirements are as follows:
• 2 Intel or AMD x86 processors with clock speeds of 1500 MHz or higher
• 1GB of physical memory or RAM
• 1 network interface card (NIC)
• 1 RAID LUN, Fiber Channel LUN, SCSI LUN, or SCSI disk with at least 4GB of free space
With ESX 3.5 you can install and boot from the following disks:
• SCSI disk
• IDE disk
• SATA disk
• Storage Area Networks (SANs)
NOTE
ESX 3.5 supports 10GB ethernet cards; make sure you check the compatibility guides for the models supported and the vendors.
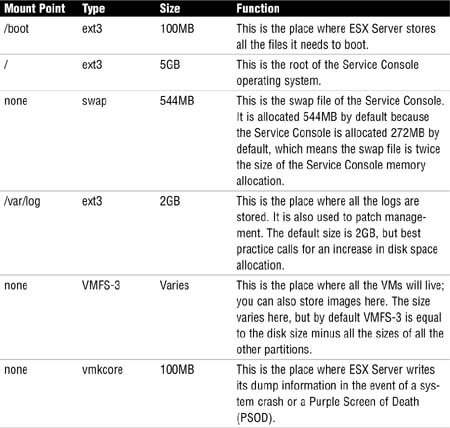
As with any operating system deployment, disk partitioning is critical with ESX 3.5. Knowing how to partition the disk to best fit the operating system is just as important. Now because ESX 3.5 has a console operating system based on Red Hat Linux, familiarity with the Linux file system is necessary.
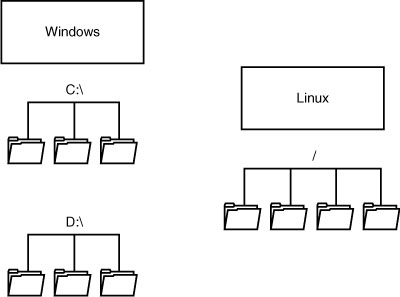
The Linux file system is a single hierarchy file system where everything is mounted under the root represented by /. This means that if you were adding a new partition, this partition would show up in a directory under the root and is known as a mount point. This differs from a typical Windows file system where every new partition is its own root represented by a letter, for example, C: or D:. With Windows, every drive letter is the equivalent of the root in Linux. Figure 2.1 shows a comparison between a Windows file system and a Linux file system hierarchy.
Also note here that an x86 disk can have a total of four primary partitions, which is a limitation because you need more partitions to satisfy the different operating system architecture. That being said, if you take the fourth partition and make it into an extended partition rather than a primary, you now have more partitions and are no longer limited. You do this at no sacrifice to performance. It is also important to note here that IDE disks can have a maximum of 63 partitions, whereas SCSI disks can have a maximum of 15 partitions.
Table 2.1 lists the different partition configurations, their types, and what they do.
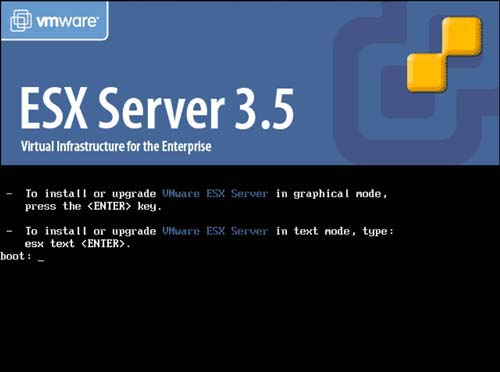
To kick-start this installation, you need to configure the server to boot from a CD-ROM. Pop in the VMware ESX 3.5 CD, and the first screen should look similar to the one in Figure 2.2.
The first choice you need to make is one of the following:
• Graphical mode, as its name suggests, guides you through the installation with a graphical user interface in which you can use your mouse. This is the default mode.
• Text mode is a lightweight installation method that skips on the rich and colorful graphics and relies solely on a text-based installation, which also means you will not have the use of the mouse. This method is ideal for ESX installations over slow networks.
For the purposes of this demonstration, choose the graphical mode. Up next, you are presented with a screen similar to that shown in Figure 2.3 that will prompt you to validate the installation media from which you are attempting this install. Your options here are to either test the media for errors or skip the test and continue with the installation.
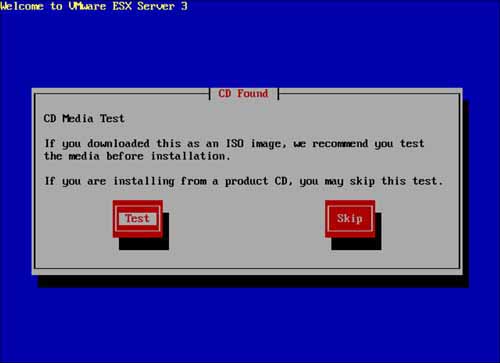
As we have used our media CD many times while preparing for this example, we will go ahead and select Skip and continue with the installation. The next two screens will prompt you to select the type of keyboard and mouse that you have. We elect to stay with the default selection for these prompts.
The next screen, as shown in Figure 2.4, prompts you to initialize the device that will hold the partitions to be used to install ESX Server. This step is important because you have to be cautious not to initialize a device that might hold data. This means that if you have more than one device connected to the server, such as a SAN LUN, you should select No for this prompt. Otherwise, you will lose all data on this device.
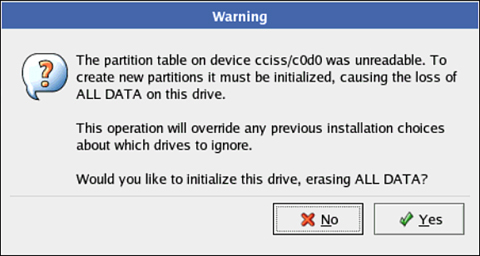
For the purposes of this example, click Yes and continue the installation.
CAUTION
VMware best practice recommends that you disconnect any devices or LUNs prior to starting the setup of ESX 3.5 to minimize the potential for loss of data.
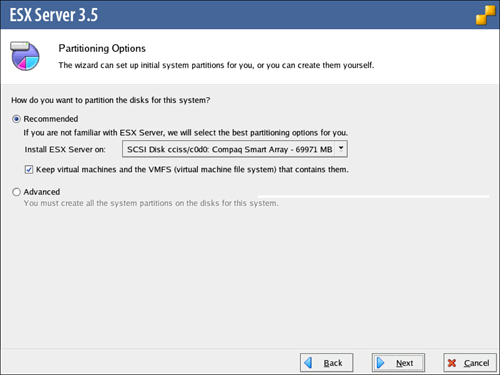
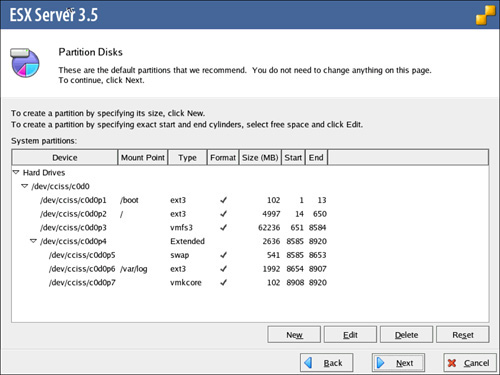
Before moving on with the installation, you need to accept the terms of the license agreement and then click Next to continue. As you can see in Figure 2.5, you are now tasked with partitioning the disk. You can choose Recommended or Advanced. Choosing Advanced forces you to manually create all the partitions, so instead select Recommended. In the next step, the setup wizard allows you to make any changes necessary to the partition tables before they are committed. By doing this, you let setup do all the work for you and then you can make final tweaks as you see fit. Before you move on to the next screen, we strongly recommend you select the check box next to Keep Virtual Machines and the VMFS (Virtual Machine File System) That Contains Them. This setting preserves any VMFS from damage or loss. Now you are ready to proceed, so choose Next.
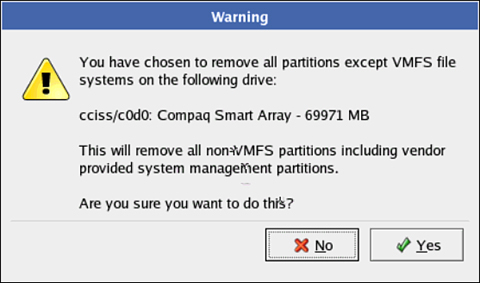
The next screen, as shown in Figure 2.6, is a warning screen informing you that setup is about to wipe out any partitions on this device with the exception of VMFS. Click Yes to proceed.
Up next is a critical part of the installation, as shown in Figure 2.7. You are now presented with a blueprint of how setup intends on partitioning the disk. It is in this step that you make any final modifications before you commit the changes. For example, if you want to increase the swap space to 1600MB, this would be the time. You can highlight the swap partition, select Edit, and input the number you desire. Choose Next to continue.
As the installation moves on, as shown in Figure 2.8, you are now prompted to select the boot configuration. Make sure that the setup wizard has elected to boot from the same drive as the one you chose to partition in earlier steps.
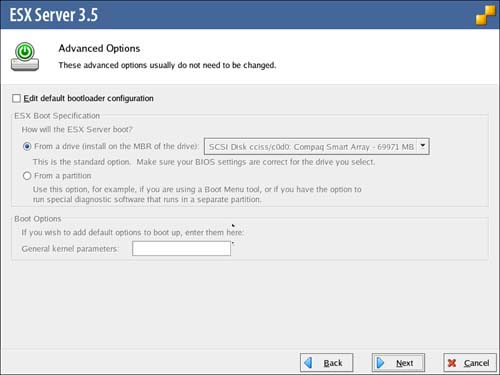
CAUTION
The Master Boot Record (MBR) must always be configured on the same drive as the Service Console.
The setup now prompts you to assign the server network settings, as shown in Figure 2.9. You need to supply an IP address, a subnet mask, a default gateway, primary and secondary DNS entries, and a hostname in the form of a fully qualified domain name (FQDN) for this server. You also have the option to configure a VLAN ID for this server. By default, a check box is selected next to Create a Default Network for Virtual Machines. This means that the NIC that you have configured will be shared between the Service Console and virtual machines. Best practice calls for the separation of the Service Console NIC from that of the virtual machines. This option can be modified at any time after the installation has been completed. Therefore, keep the default and click Next to continue.
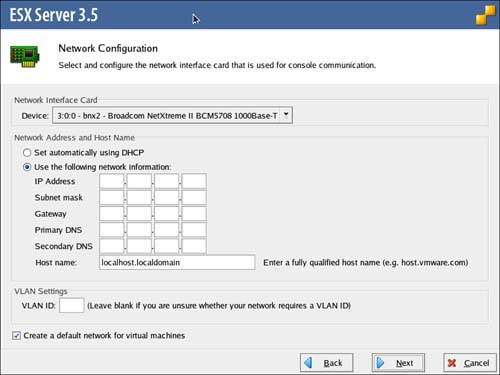
CAUTION
Selecting the wrong physical NIC will result in your server being inaccessible, so make sure that the device you select is the correct one that you want to use for the Service Console.
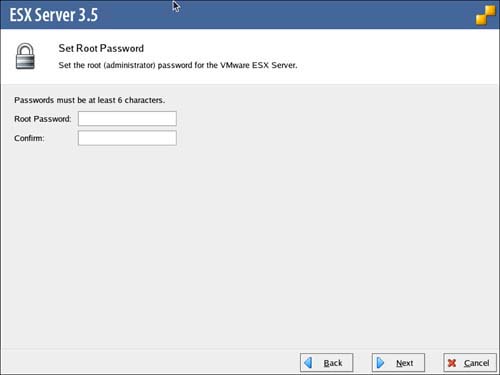
Time zone selection is next. Make sure you choose the time zone in which your server resides and click Next to continue. As you can see in Figure 2.10, you are now prompted to enter a password for the root account, which is the administrator account on the ESX Server. Enter a strong password and click Next to continue.
You are one step away from the end of the journey. This is the place where you are provided with a summary of all the settings you chose during the setup wizard’s run to the install. Go over the settings one last time, and if all looks correct, click Next to continue. This kicks off the installation of ESX 3.5.
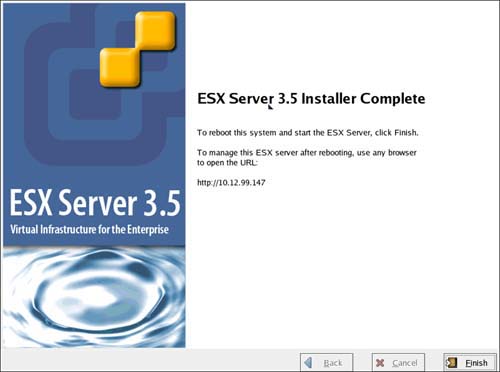
When the installation is complete, a screen similar to the one shown in Figure 2.11 is displayed. Click Finish to restart ESX 3.5.
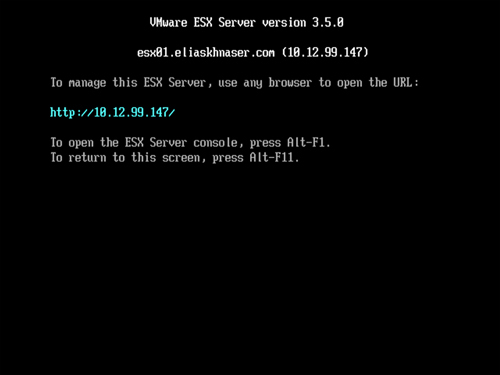
After the server reboots, you are provided with information that you need to remotely connect to the ESX Server, as shown in Figure 2.12.
When ESX 3.5 is up and running, you need to complete a few post-installation configurations before you begin further advanced configurations or prior to putting the server in full production. We cover the following:
• Accessing ESX Server using the VI client
• Accessing ESX Server using SSH
• Modifying Service Console memory allocation
• Configuring NTP Client on ESX Server
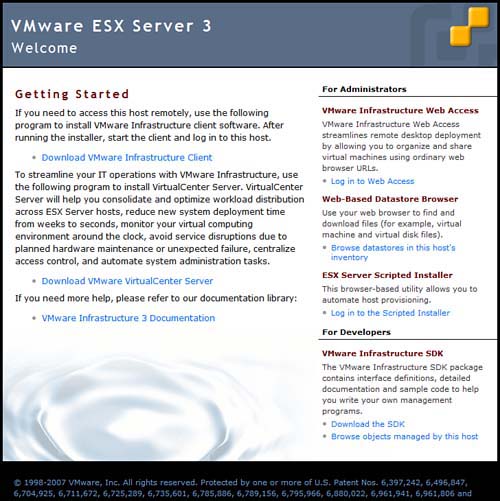
You can download the Virtual Infrastructure (VI) client from any ESX Server by opening a supported Internet browser such as Internet Explorer or Firefox and pointing to the IP address or FQDN of the server. This leads you to a screen similar to the one shown in Figure 2.13. From here, you can click Download VMware Infrastructure Client. This prompts you to download or run the setup package. Go ahead and install it now.
EXAM ALERT
At the time of this writing, the VI client is a 32-bit application. Make sure you double-check this point prior to taking the exam just in case VMware releases a 64-bit version and happens to put a question on the exam in this regard.
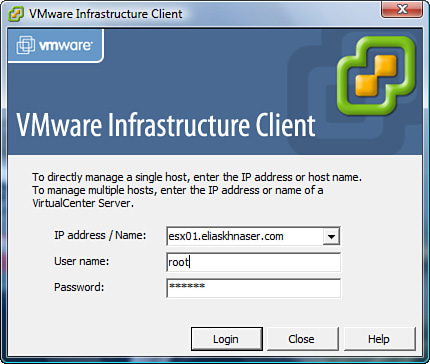
After you install the VI client, you can run it, which brings you to a screen similar to the one shown in Figure 2.14. Enter the IP address or FQDN of your ESX Server host. Enter root for username and the password you assigned during setup. Click Login.
The VI client is your graphical user interface into ESX Server’s hardware and software configuration.
Secure Shell (SSH) access allows you to remotely access your ESX Server and configure and manage it from a command line. You will find this type of access useful in many circumstances in which you need advanced configurations that the VI client does not provide or it would be much easier to accomplish using SSH.
By default, ESX 3.5 denies SSH access to the root user. This is done in accordance with security best practices. It is recommended that you create a generic account that you use to log in to the server using SSH and then switch the user to root, thereby acquiring root permissions. That being said, some may want to bypass this step and login as root. Although we don’t recommend this method, we demonstrate how you can configure it. The two options for SSH access are
• Create a user account that can access the server using SSH.
• Enable SSH root access.
After the installation of ESX 3.5, you will notice that you cannot access the server using SSH even with the root account. This security best practice measure is enabled to deny hackers the ability to perform a brute force attack on the server. Because root does not have SSH access, you need to create a user account on the ESX host that does have SSH access to make administration of the box easier.
Creating a user account on the ESX Server is an easy task. Remember that the Service Console that manages ESX runs a modified version of Linux; therefore, ESX Server host user accounts are Linux accounts and can be created in the same manner as you would a Linux account. For the purposes of this example, use the VMware VI client to create the account, even though you can create it through the command line using Linux commands. The following steps show how to accomplish this:
To enable SSH access using root, you need to have console access to the ESX Server and follow these steps:
1. Type vi /etc/ssh/sshd_config. This command launches the vi editor in Linux and allows you to edit the file sshd_config.
2. Change the parameter PermitRootLogin no to PermitRootLogin yes.
3. Press the Esc button, and then type :wq, so the command should look like Esc :wq, which saves the files and exits the editor.
4. At the command prompt, type service sshd restart, which restarts the SSHD service.
5. Using your SSH client, try logging in using root.
The Service Console is allocated 272MB of memory by default after the installation of ESX Server. Best practice calls for the increase of this memory, especially if you will be using third-party applications, because this will eat away from the 272MB dedicated to the SC. The maximum memory you can allocate to the SC is 800MB, and the minimum is 272. To modify the SC memory, follow these steps:
Time is of the essence in ESX Server. It is a critical component to configure and should be a top priority because time synchronization issues can affect backups, authentication, performance charting, SSH key expiration, and more. To avoid all these nuisances, follow these steps to configure the Network Time Protocol (NTP) client:
1. Launch the VI client and log in to the ESX Server.
2. In the right pane, select the Configuration tab.
3. Click the Time Configuration link.
4. Click Properties.
5. Check NTP Client Enabled.
6. Click Options.
7. Select NTP Settings in the left pane.
8. Click Add and add the hostname or IP address of your NTP server.
9. Select the check box next to Restart NTP Service to apply the changes.
10. Click OK.
11. Verify the NTP Client is running and the correct NTP servers are configured.
The reality is that issues may come up with installation. Knowing how to properly deal with them and what tools are at your disposal makes the troubleshooting process a little bit easier. In this section we tackle common issues, covering what to look for and what to do in certain circumstances.
If this is a new ESX Server installation that is experiencing problems after installation, the most likely cause is hardware. Hardware can be a combination of things. Hardware issues include
• The hardware you are using is not compatible with ESX 3.5. Check the compatibility guide and make sure your hardware is compatible.
• Hardware problems can also be caused by a faulty CPU, for example, or a bad memory module, so make sure that the hardware you are using is healthy and is not faulting. Do so by testing the hardware and software configuration for a few days prior to putting the server in production.
Misconfigurations are also an issue that you need to examine carefully because they may cause problems. For example, if you did not properly configure the correct physical NIC during installation, the server will be rendered inaccessible because there will be no communication with it. Therefore, checking your existing configuration should be your second step.
Microsoft has its infamous Blue Screen of Death, and VMware has its Purple Screen of Death (PSOD). If a PSOD occurs, that is bad and the server console will go, as you might have guessed, purplish. Two of the most common reasons for PSOD are
• CPU problems
• Memory problems
When a PSOD occurs, information is dumped to a file after ESX Server reboots and is recorded in the vmkcore partition in binary format. This dump file, as with any other, can be sent to VMware support for analysis and advanced troubleshooting.
In the event of a server crash, you need to go through the normal steps of troubleshooting the problem. For example, determine if anything changed recently that could cause the server to crash. Variables can include hardware changes. Has anything changed in the environment where ESX is hosted, has the temperature changed, have you had a power loss? You also need to check whether any external devices such as LUNs have been disconnected and finally make sure you take a screen capture of any console errors that may appear because this will help VMware support staff as they troubleshoot the problem.
Finally, using the VI client, you can export diagnostic data that you can send to VMware support. To do this, follow these steps:
1. Launch and log in to the ESX Server.
2. From the File menu, select File > Export Diagnostic Data.
3. Choose a folder where you want to save the data.
4. The diagnostic data is stored in a folder called VMware VirtualCenter-support-date@time and contains the following:
• A folder named viclient-support-date@time.tgz, which contains VI Client’s log files
• A file named esx-support-date@time.tgz, which contains ESX Server diagnostic data
1. Choose the five partitions that are required for ESX Server installation.
![]() A. /boot
A. /boot
![]() B. /var
B. /var
![]() C. /etc
C. /etc
![]() D. swap
D. swap
![]() E. /
E. /
![]() F. vmfs
F. vmfs
![]() G. vmkcore
G. vmkcore
2. Choose the correct partition type of the swap partition.
![]() A. none
A. none
![]() B. ext3
B. ext3
![]() C. vmfs
C. vmfs
![]() D. swap
D. swap
3. True or false: The vmkcore partition has a mount point of /vmkcore.
![]() A. True
A. True
![]() B. False
B. False
4. What is the default size of the /var/log partition?
![]() A. 500MB
A. 500MB
![]() B. 2,000MB
B. 2,000MB
![]() C. 5,000MB
C. 5,000MB
![]() D. Varies
D. Varies
5. True or false: By default, ESX Server’s Service Console does not allow root access via an SSH client.
![]() A. True
A. True
![]() B. False
B. False
6. What is the default amount of memory allocated to the Service Console?
![]() A. 256
A. 256
![]() B. 272
B. 272
![]() C. 800
C. 800
![]() D. 1600
D. 1600
7. What is the default size of the swap partition?
![]() A. 544
A. 544
![]() B. 572
B. 572
![]() C. 574
C. 574
![]() D. 576
D. 576
8. How many primary partitions can you have on an x86 disk?
![]() A. 3
A. 3
![]() B. 4
B. 4
![]() C. 5
C. 5
![]() D. 6
D. 6
9. What is the maximum number of partitions that you can have on a SCSI disk?
![]() A. 15
A. 15
![]() B. 25
B. 25
![]() C. 45
C. 45
![]() D. 63
D. 63
10. Why should the ESX log files be stored on a different partition?
![]() A. For better performance
A. For better performance
![]() B. To prevent the / from being filled
B. To prevent the / from being filled
![]() C. Easier access to the files
C. Easier access to the files
![]() D. Partition will be shared with other hosts
D. Partition will be shared with other hosts
Answers to Exam Prep Questions
1. Answers A, D, E, F, and G are correct. /var and /etc are not required partitions for the installation of ESX 3.5.
2. Answer D is correct. In this case, none, ext3, and vmfs are not the correct partition type for swap.
3. Answer B, False, is correct. Vmkcore does not need a mount point.
4. Answer B is correct. By default, setup suggests that the /var/log partition have a 2,000MB size.
5. Answer A, True, is correct. By default, the Service Console does not allow root access via SSH.
6. Answer B is correct. The minimum amount of memory that can be allocated to the Service Console is 272. The maximum amount of memory that can be allocated is 800, so 1600 is incorrect.
7. Answer A is correct. The default size of the swap partition is twice the size of the default memory allocated to the SC. Because, by default, the SC is allocated 272, the correct size is 544.
8. Answer B is correct. You can house only four primary partitions on an x86 disk.
9. Answer A is correct. On a SCSI disk, you can have a total of 15 partitions. On an IDE drive, you can have a total of 63 partitions.
10. Answer B is correct. The logs are stored on a separate partition to prevent them from taking up all the disk space available for the root file system.