
Chapter 11: Advanced Post-Production and Artistic Creativity
Choosing a Photograph to Enhance
Enhancing a Photograph with Texture in PSE
Color Pop in PSE by Mary Schannen
Black-and-white Action in PSE by Shana Rae
Brightening and Balancing Skin Tones in PSE by Annie Manning
Sunflare Lightroom Workflow by Nichole Van
Photoshop and Lightroom Possibilities by Ginny Felch
Resources
Since the earliest days of photography, artists have been altering the straight out of camera image by etching, layering, or sandwiching negatives or steeping the final prints in countless chemicals. Just as with painters, the simple representation is often not enough to satisfy creative hunger.
So far in this book, you have learned to produce a more vibrant photograph by learning to see brilliant and defining light, to compose elements of the photograph, and to evoke captivating expressions.
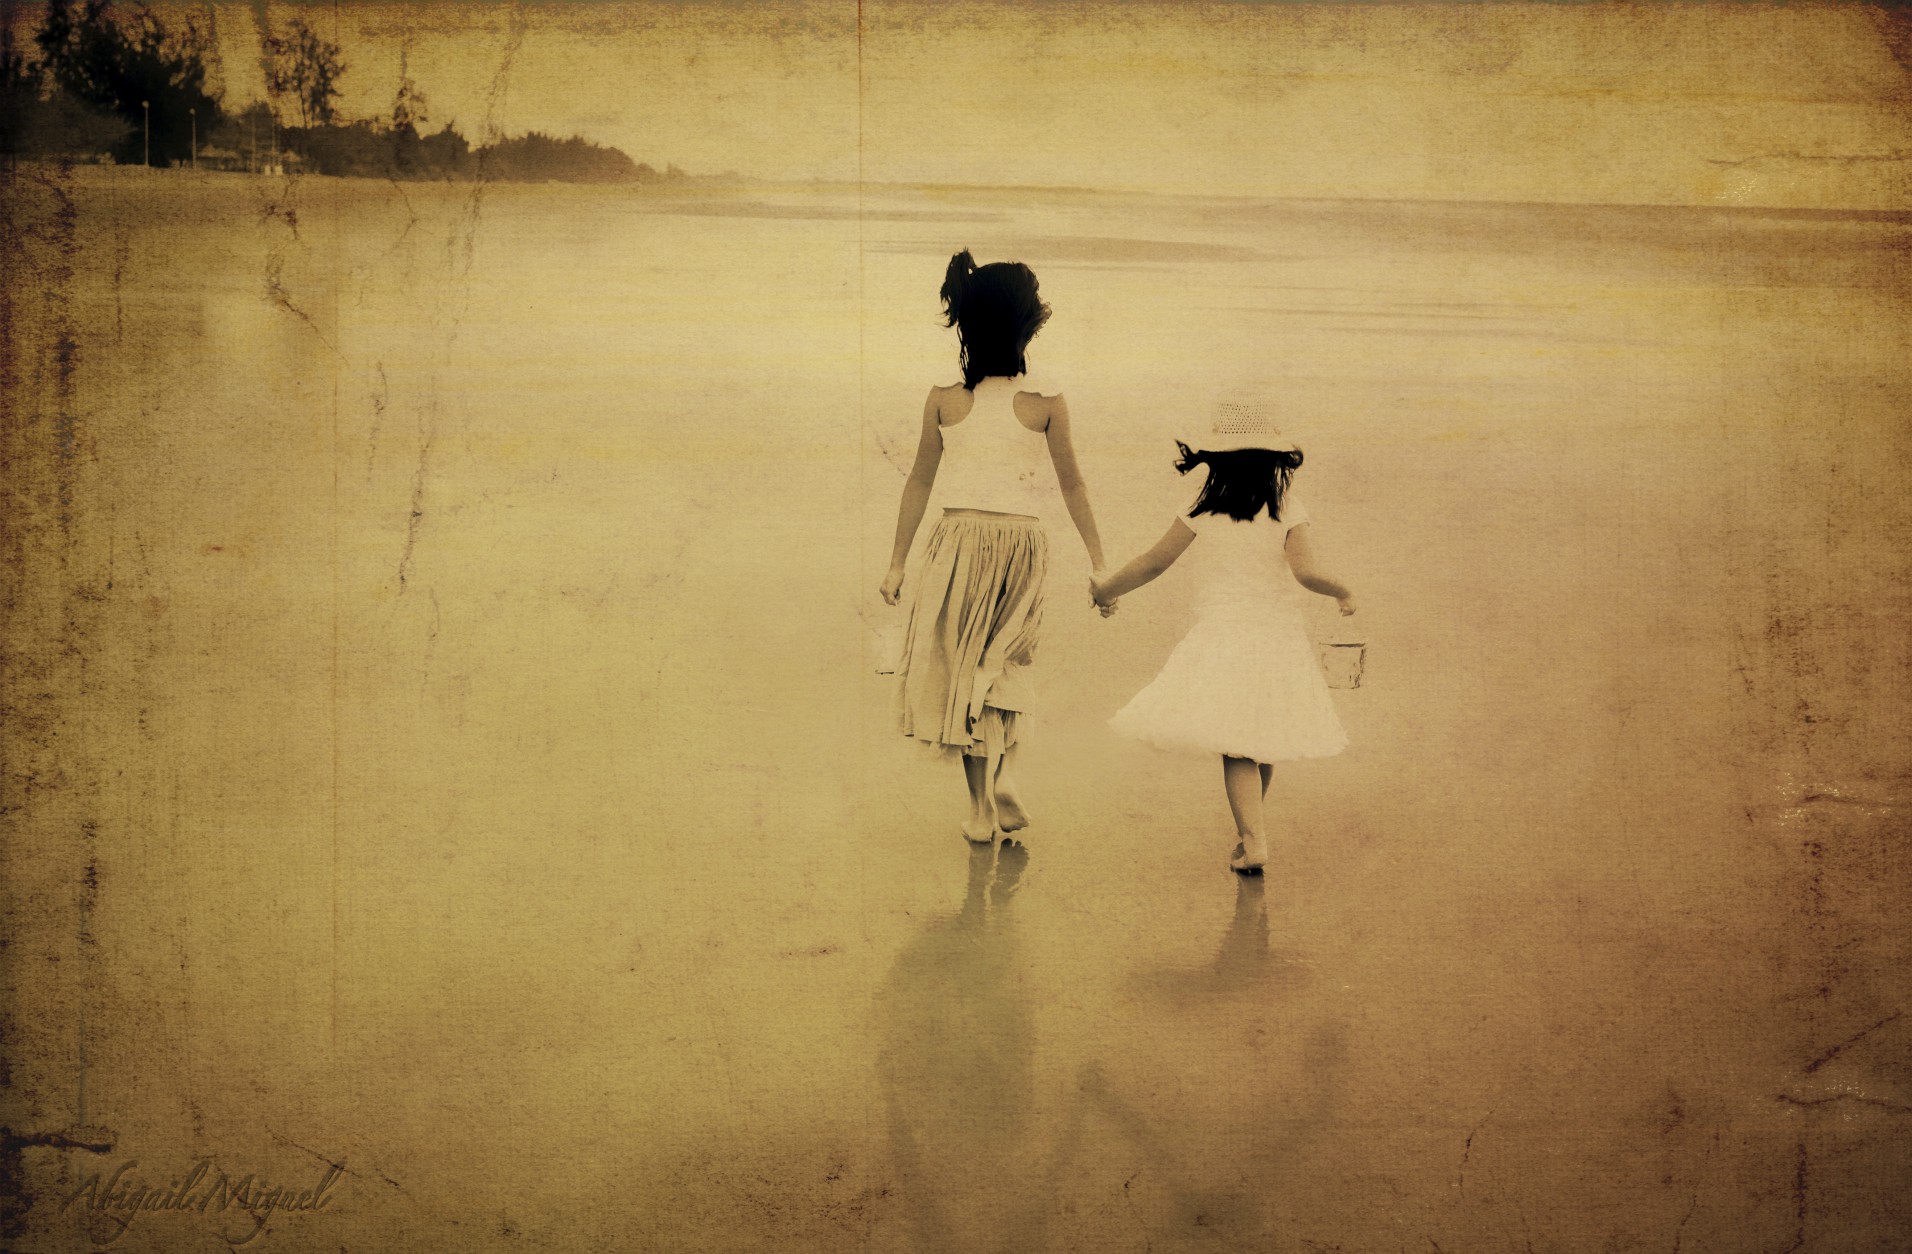
This bonus chapter explores how some contemporary photography artists use their more advanced digital skills, along with the products of creative online entrepreneurs, to enhance their original images, as in 11-1 and 11-2. Hopefully you will find it inspiring enough to take some of your images into post-processing software and play away.
11-1
ABOUT THIS PHOTO The stunning golden look of this photograph was created by merging a photograph of two girls on a very smooth beach with two Florabella textures (Moulon Rouge and Vintage Screen). The result is completely unique and has received a great deal of attention on the Internet. Taken at ISO 320, f/3.2, and 1/125 second. ©Abigail Roma Miguel / www.fourangelsphotography.blogspot.com
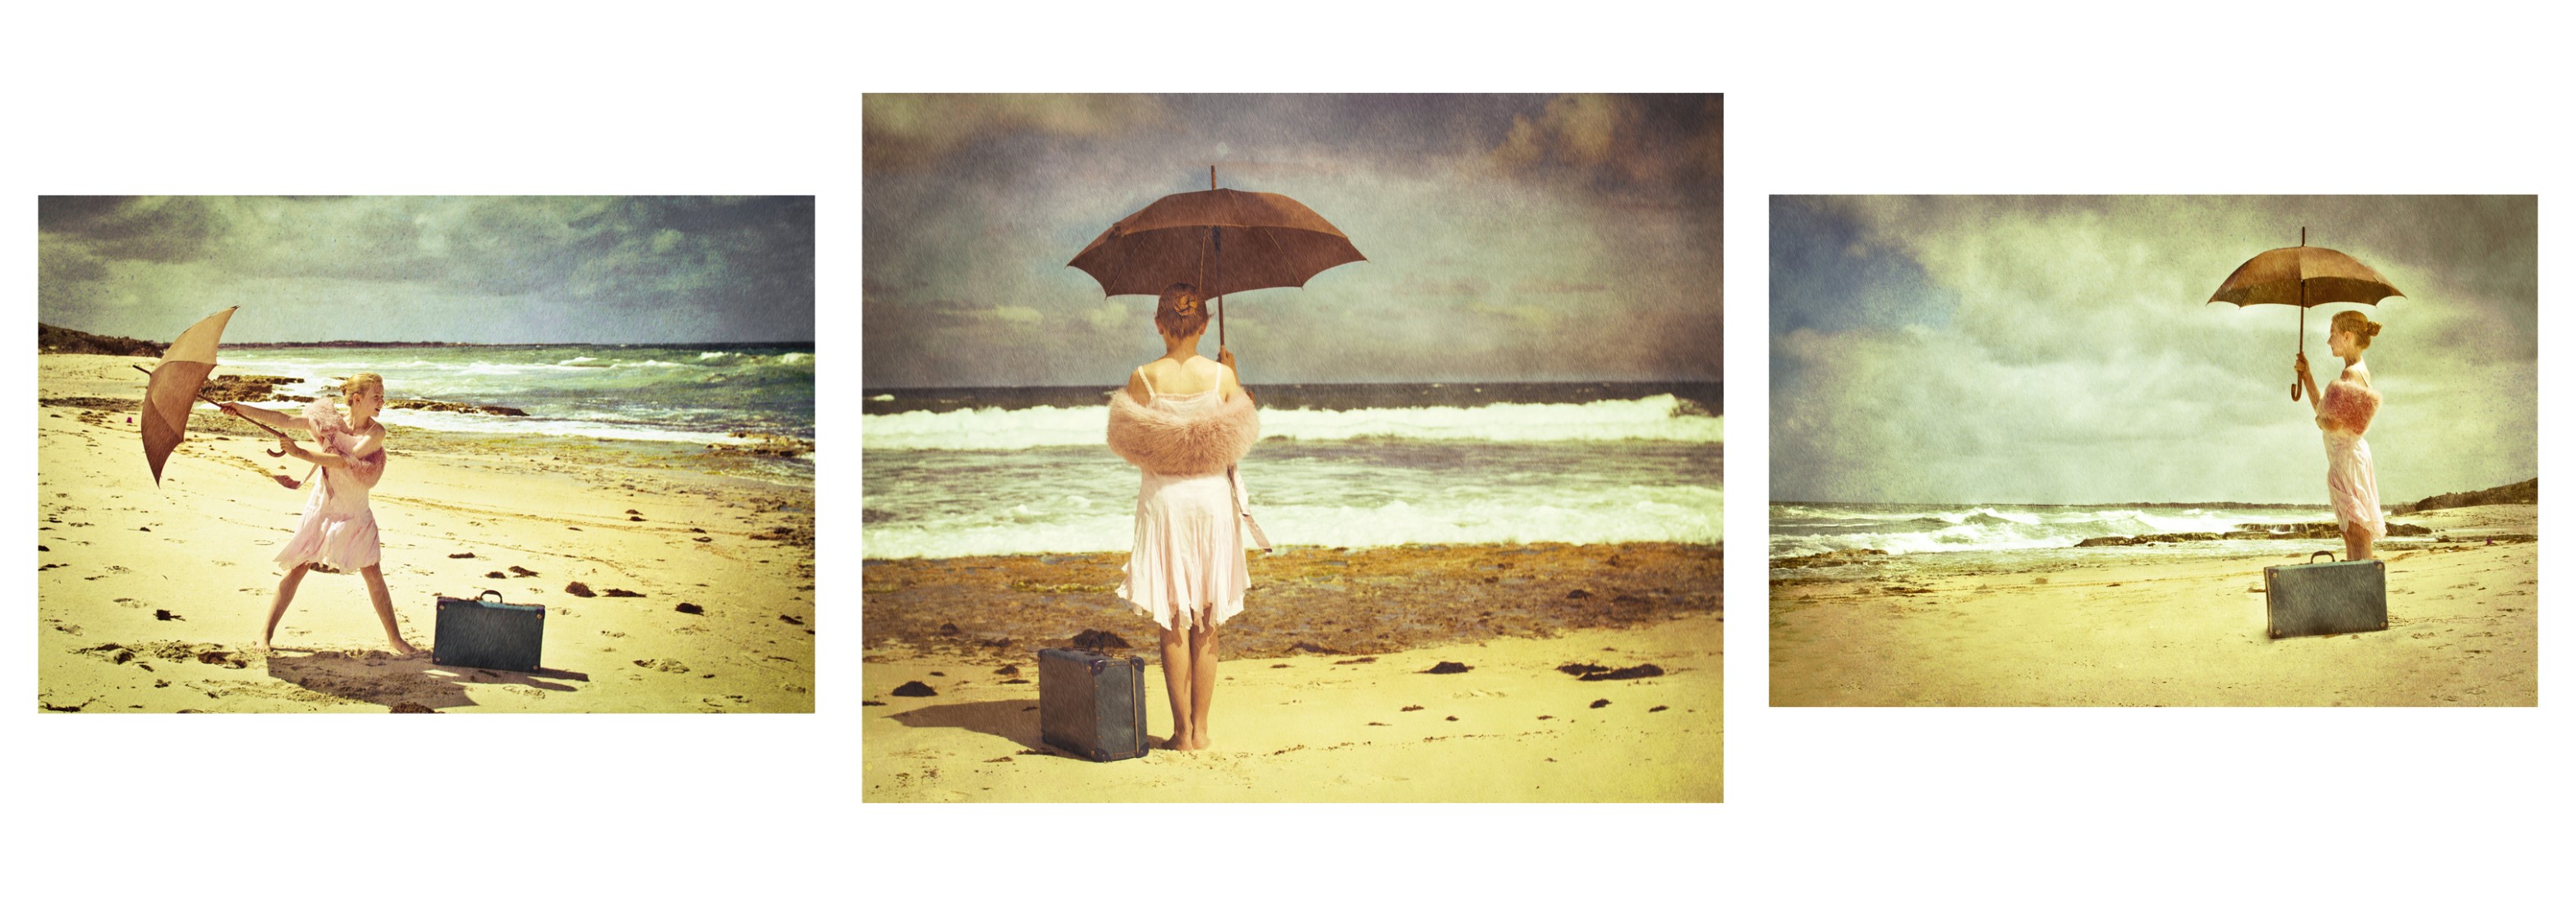
11-2
ABOUT THIS PHOTO This award-winning triptych is an innovative treatment of three photographs put together for a vintage look, inspired by artist Jack Vettriono. In Lightroom, the photographer used the Yesteryear preset and Nichole Van’s Powder Texture. Left to right: Taken at ISO 400, f/4.5, and 1/8000 second; taken at ISO 400, f/4, and 1/8000; taken at ISO 400, f/16, 1/640 second. ©Liz Ansley / http://web.me.com/lizansley
When you are very skilled with Photoshop, the tools are so complete and vast that you can intricately create any look or correction you wish, However, many of the online vendors who are very popular with the mamarazzi set have cut to the chase and enabled photographers to arrive at enhanced and embellished images with the fairly simple use of actions, presets (Lightroom), and texture files.
Some of the possibilities include:
Added sky
Brightened eyes
Brighter skin tones
Color pop
Color shifts
Moody textures; for example, 11-1 and 11-3
Painterly look
Sepia toning
Sun flare
Vintage look; for example, 11-1
In this chapter, you will see examples of a few artists and how they work in post-production. Again, while most photographers who eventually decide to enhance their photographs choose Adobe Photoshop and Lightroom, some demonstrations here utilize the entry software Adobe Photoshop Elements (PSE). It is reasonably priced, accessible to most budgets, and friendly to beginners.
To clarify, Photoshop Elements (PSE) is Adobe’s entry-level software and is reasonably priced so it is accessible to most beginners. Adobe Photoshop is a more advanced, state-of-the-art software, priced for professionals and devotees who desire detailed and specific editing (it is six times the cost of PSE). The learning curve is steep if you want to take advantage of all its features. Adobe Lightroom (twice the cost of PSE) is a great choice for photographers who process thousands of images (wedding photographers) and photographers who wish to enhance and embellish their photographs at the push of a button. The current versions of PSE, Photoshop, and Lightroom handle RAW files or JPEGs. Some photographers use the combination of Lightroom and Photoshop.
Once you master PSE, you will easily be able to transition into more sophisticated, state-of-the-art software and have a better understanding of why you might need it.
What Is an Action?
According to Nichole Van, “An action is a like a small program that replicates a series of steps in Adobe PSE and Photoshop. Actions allow you to adjust selective parts of an image and ensure that each specific part of a photo looks correct. Actions give you complete, tight control over the final outcome.” You can create your own actions, but some photographers prefer to purchase them from vendors (see the list of vendors at the end of the chapter).
Choosing a Photograph to Enhance
While you can certainly begin with any photograph that you wish, the following suggestions will most likely produce the best results.
• Start out with a photograph that has merit all by itself, as in 11-3. Don’t get into the habit of using these techniques thinking that you can start with an inferior photograph and magically turn it into an outstanding piece of art.
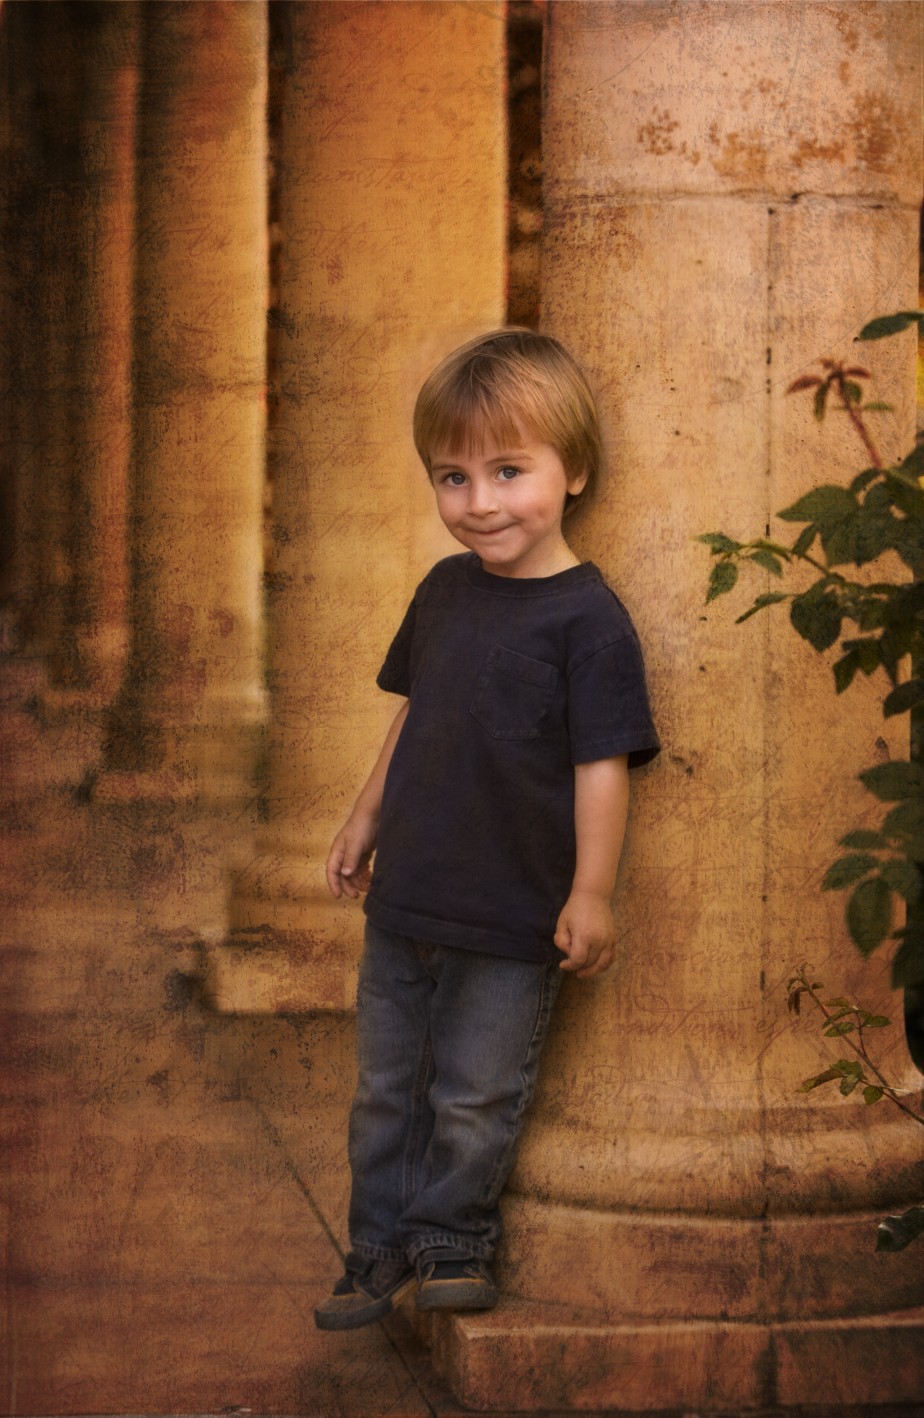
11-3
ABOUT THIS PHOTO A contemporary play on a classic portrait of this boy was done by using an old architectural background using fun and casual clothing. The original capture was combined with my favorite textures in PSE after I did some basic editing in Photoshop. Taken at ISO 400, f/5.0, and 1/200 second. ©Ginny Felch / www.photographingchildren.com
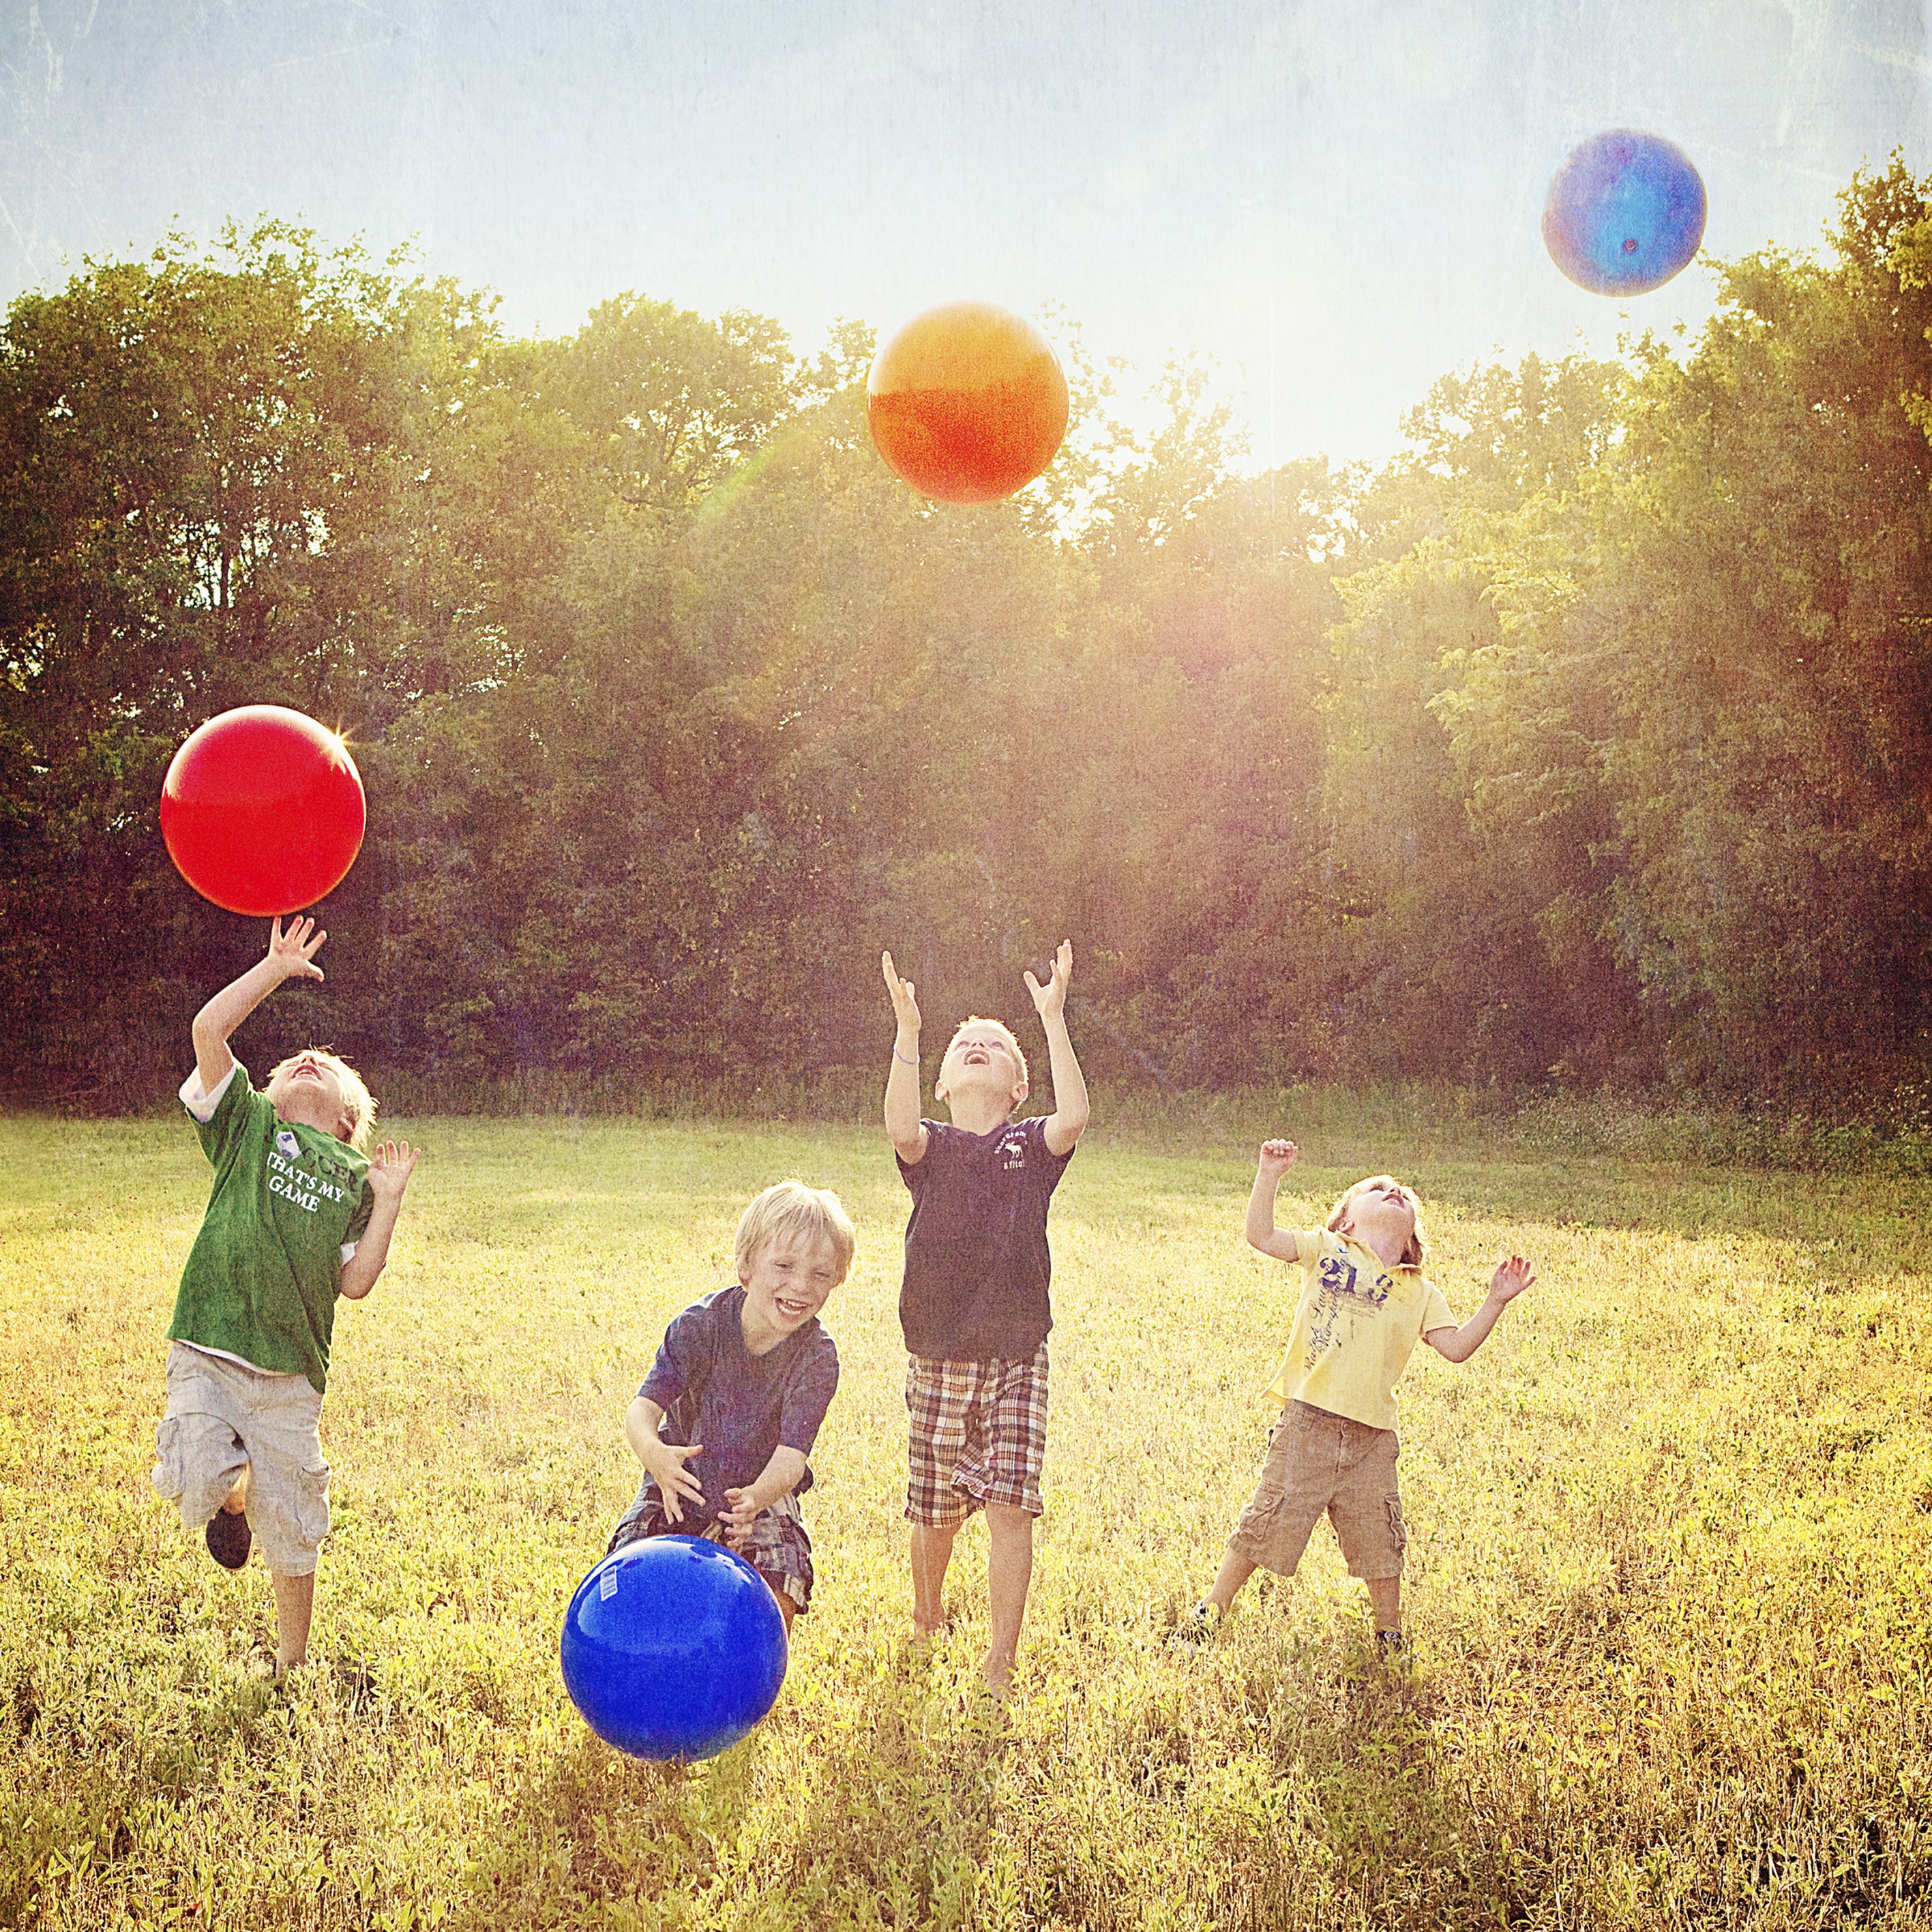
• You might want to start out with a photograph that is more pictorial in nature, as in 11-4, rather than one that is a close-cropped head and shoulder. These techniques are meant to add a mood to an already evocative image that contains interesting backgrounds and full bodies.
Be very careful to avoid adding blotchy textures to skin tones unless you know you are taking the risk of having unsavory results, such as mottled-looking skin. Of course, you can learn to erase the texture from the skin, but do be conscious of the risk.
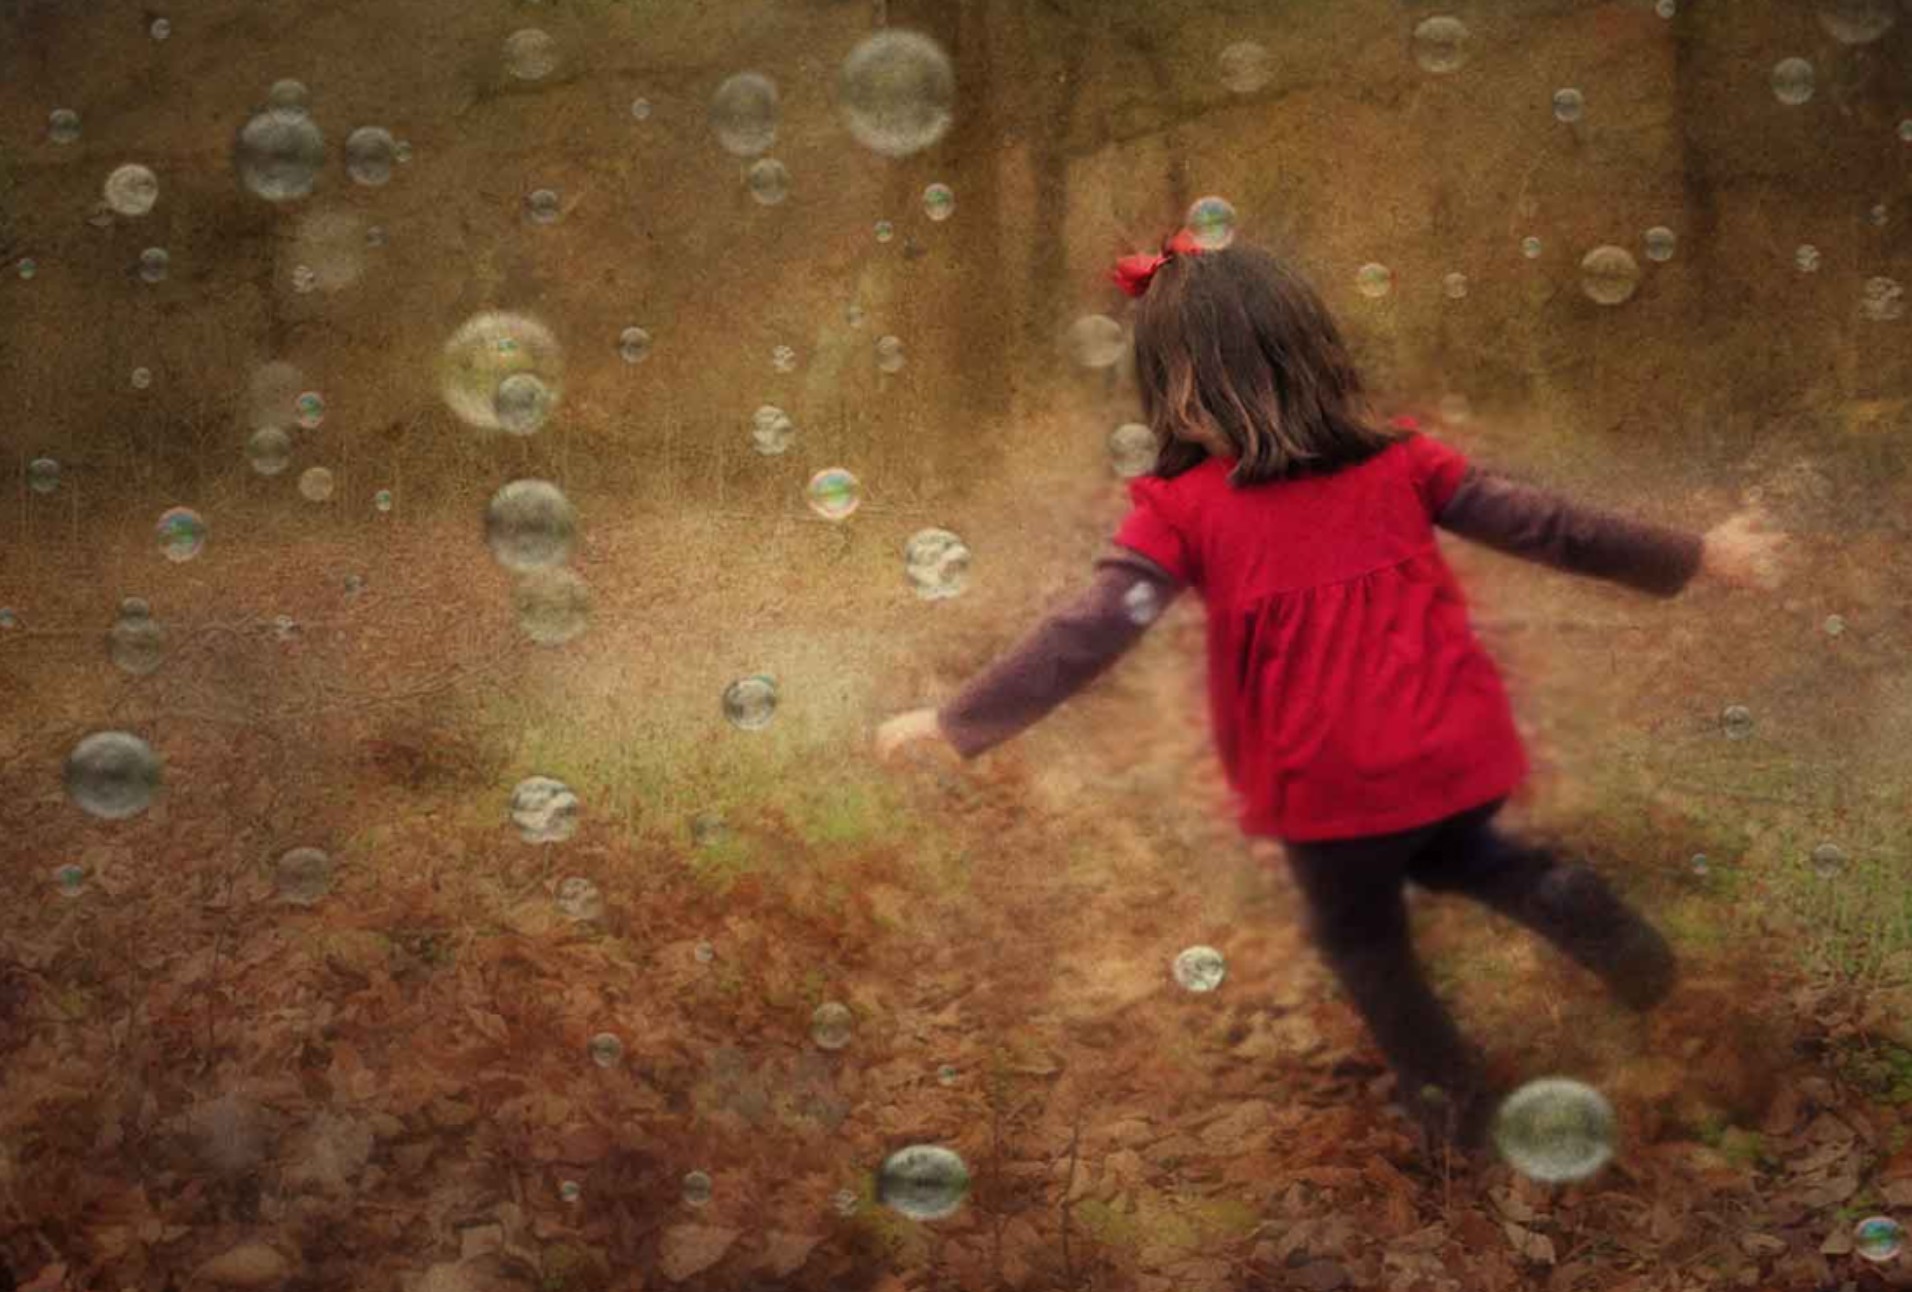
11-4
ABOUT THIS PHOTO Mary Schannen loves to experiment and play with Photoshop and has developed skills much admired by her fans on Flickr. She created her own bubbles and added Nichole Van’s NV Dolci_06 texture. Taken at ISO 500, f/ 5.6, and 1/ 320 second. ©Mary Schannen / www.melangephoto.com
• If you think the photograph you have chosen needs adjustments, cropping, and/or re-sizing, make these changes before you begin your enhancement post-processing. You will be able to do some adjustments later, but it is helpful to start out with what you think you will need.
Keep in mind that embellishing and enhancing your photographs can ultimately be extraordinarily creative; it is a process of discovery and intuitive response. Even if each artist starts with the same tools and the same photograph, the final product is as unique as an individual fingerprint, as in 11-5.
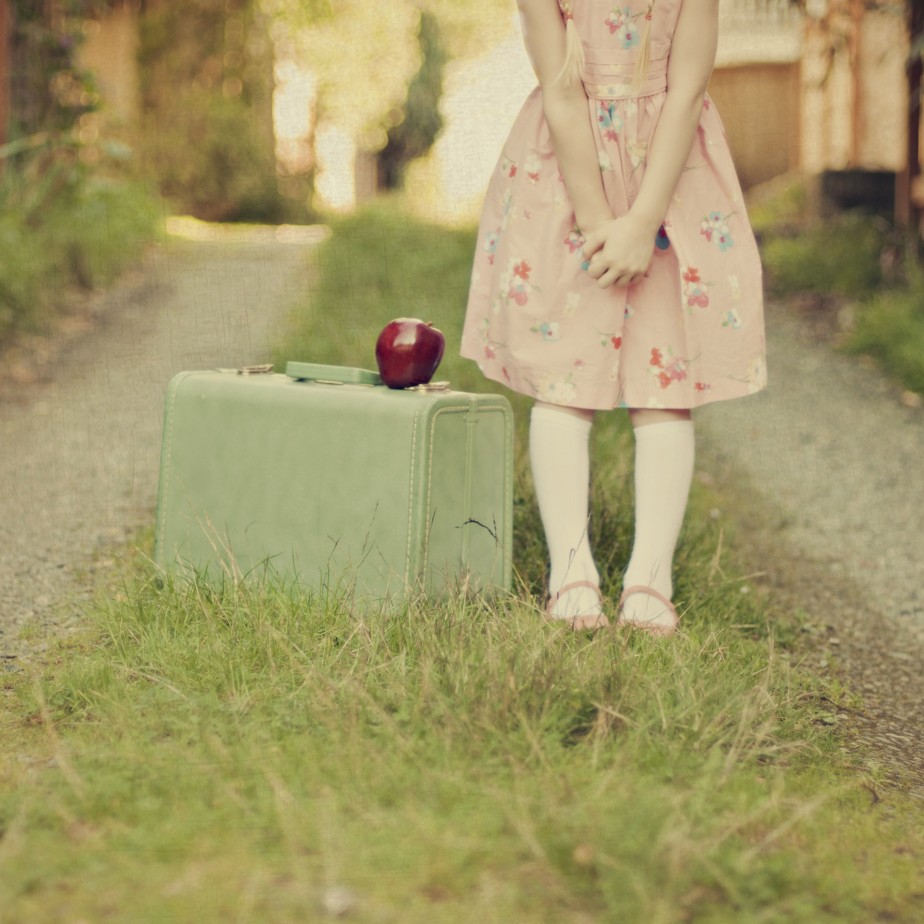
11-5
ABOUT THIS PHOTO This vintage-looking photograph suggests quite a story. It was created using Starlet from Florabella actions. Taken at ISO 200, f/2.8, and 1/160 second. ©Valeria Spring / www.theredballoonphotography.com
Only you will know when you have reached that “aha” moment, as in 11-6, when what you see before your eyes is utterly satisfying.
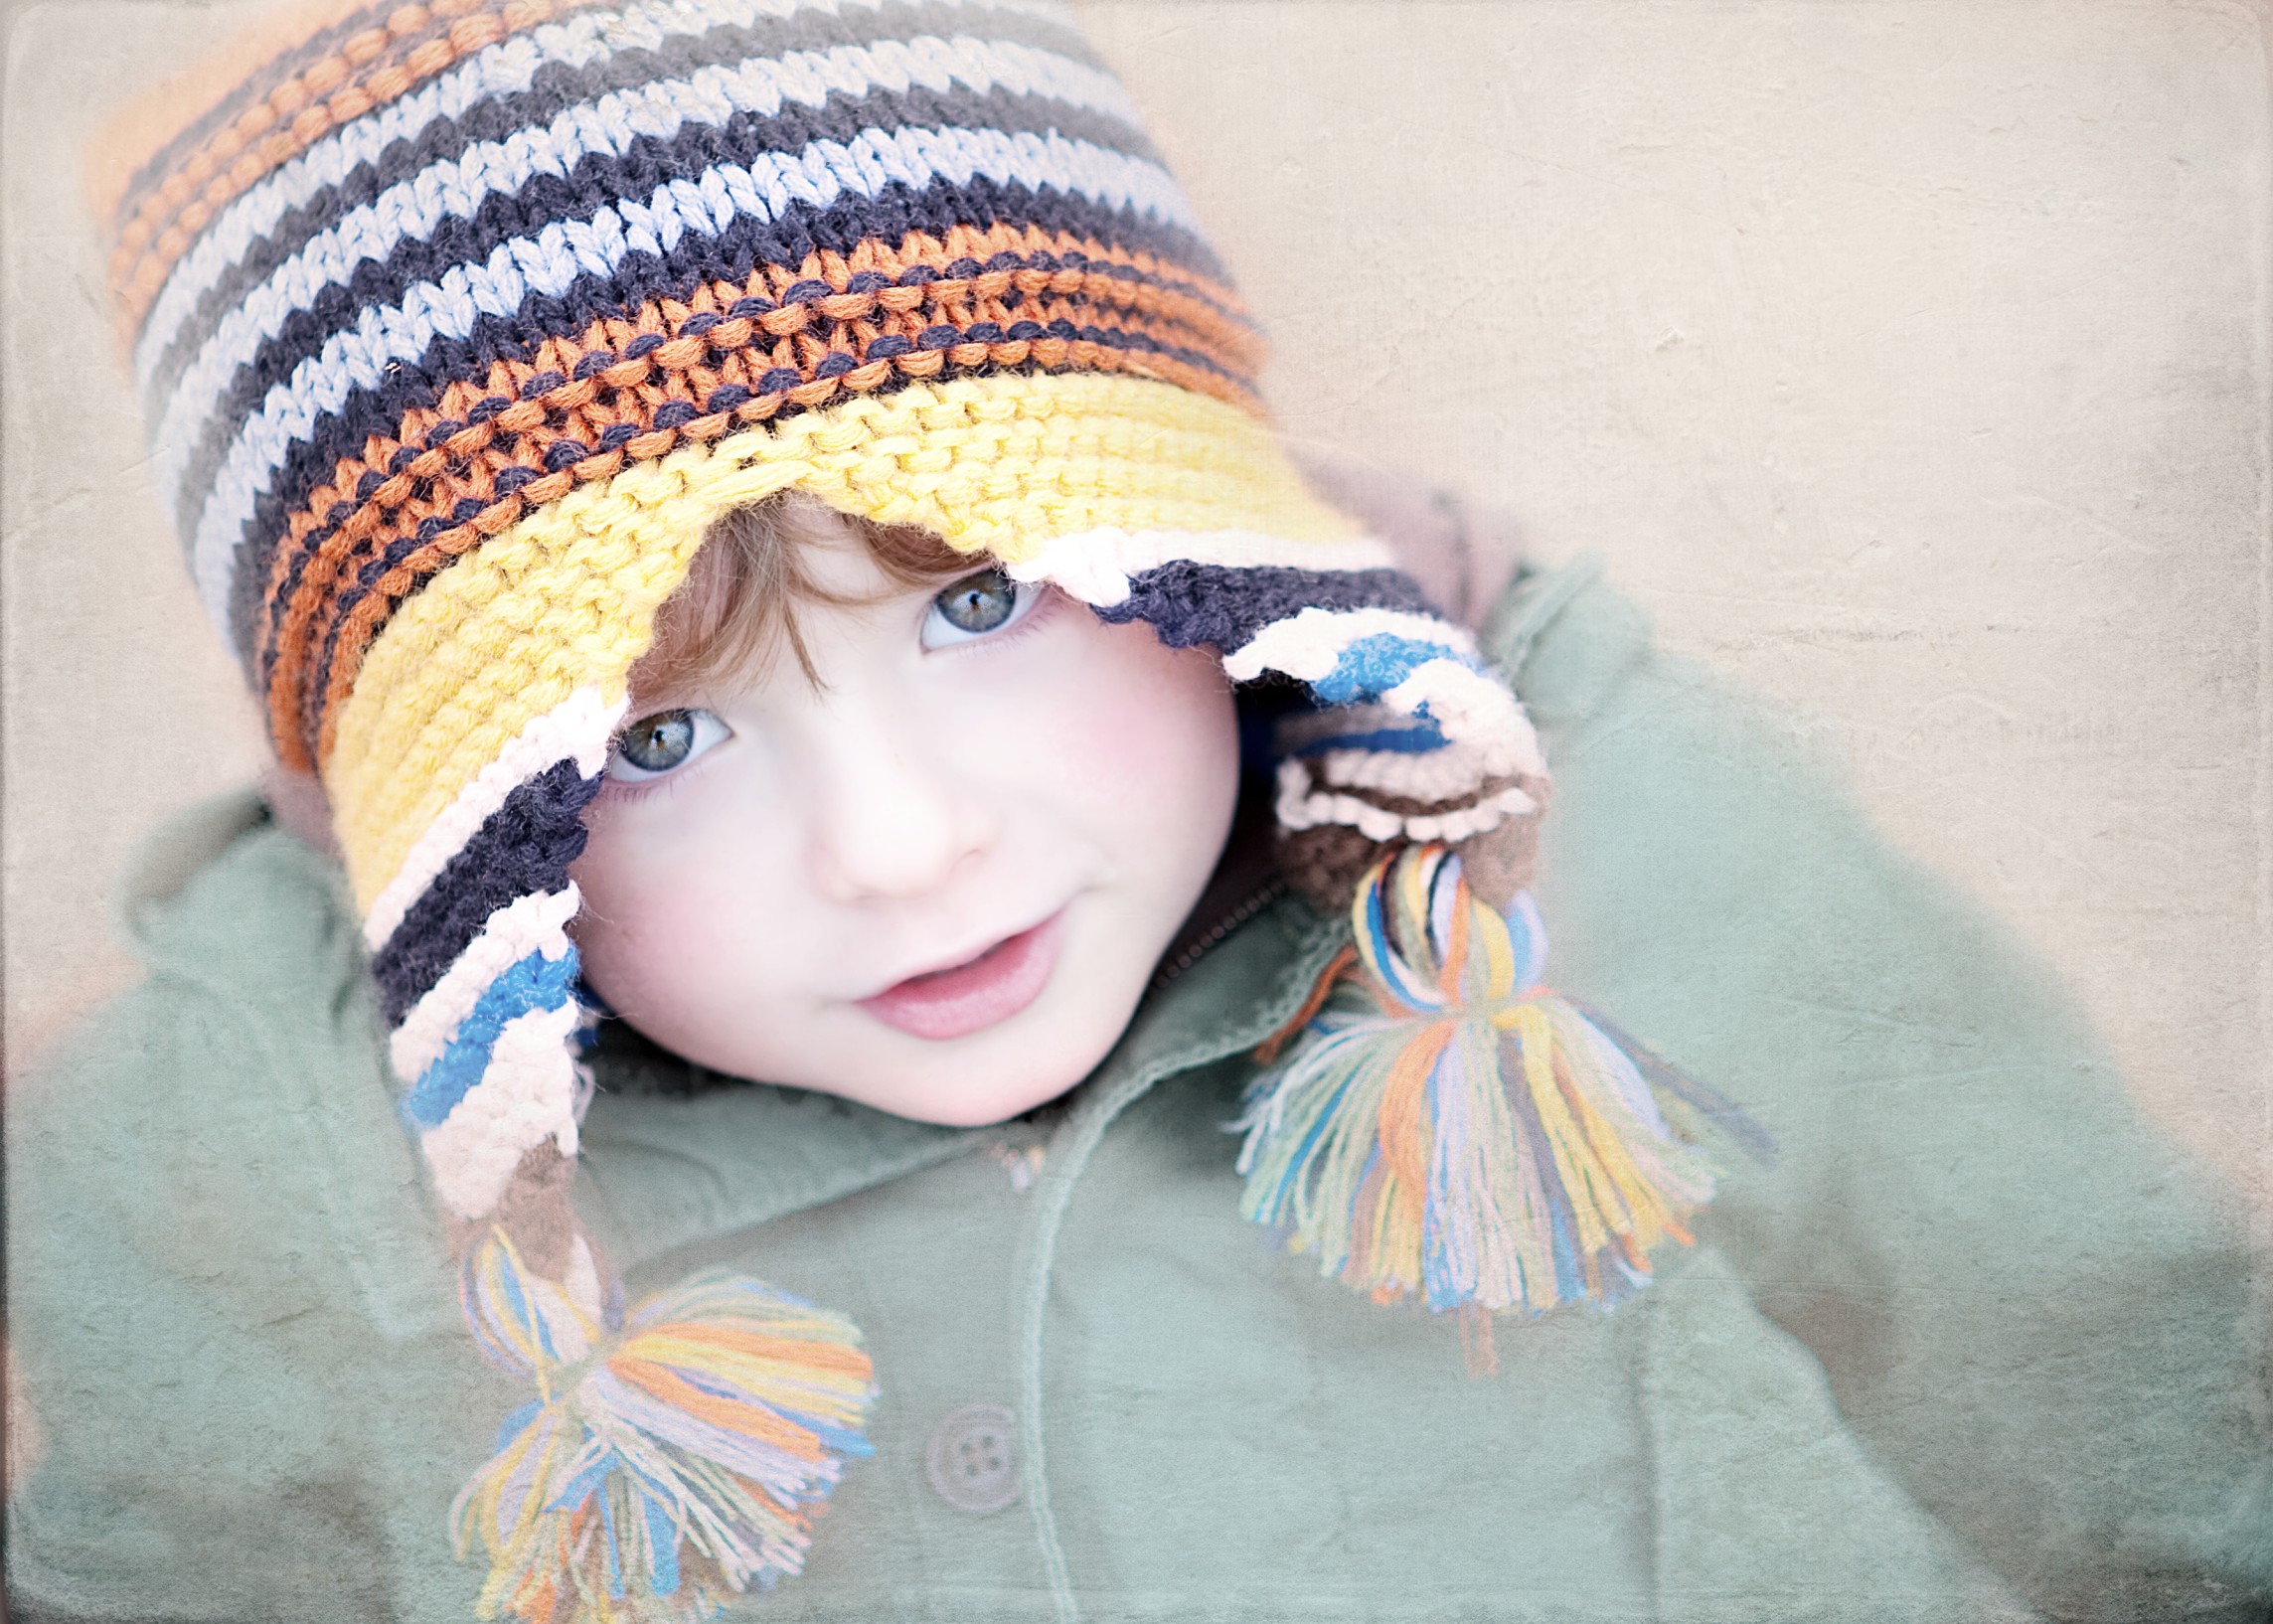
11-6
ABOUT THIS PHOTO This charming little guy just sparkles in his knit hat. The production really makes the color and expression sing; the image was created using Jessica Drossin’s Opening and MCP eye actions. Taken at ISO 200, f/2.8, and 1/160 second. ©Mary Schannen / www.melangephoto.com
Enhancing a Photograph with Texture in PSE
For this demonstration, my beach gesture study taken on a very foggy day is the before photograph. I felt this image reflected a quintessential story of typical, unselfconscious playtime at the shore.
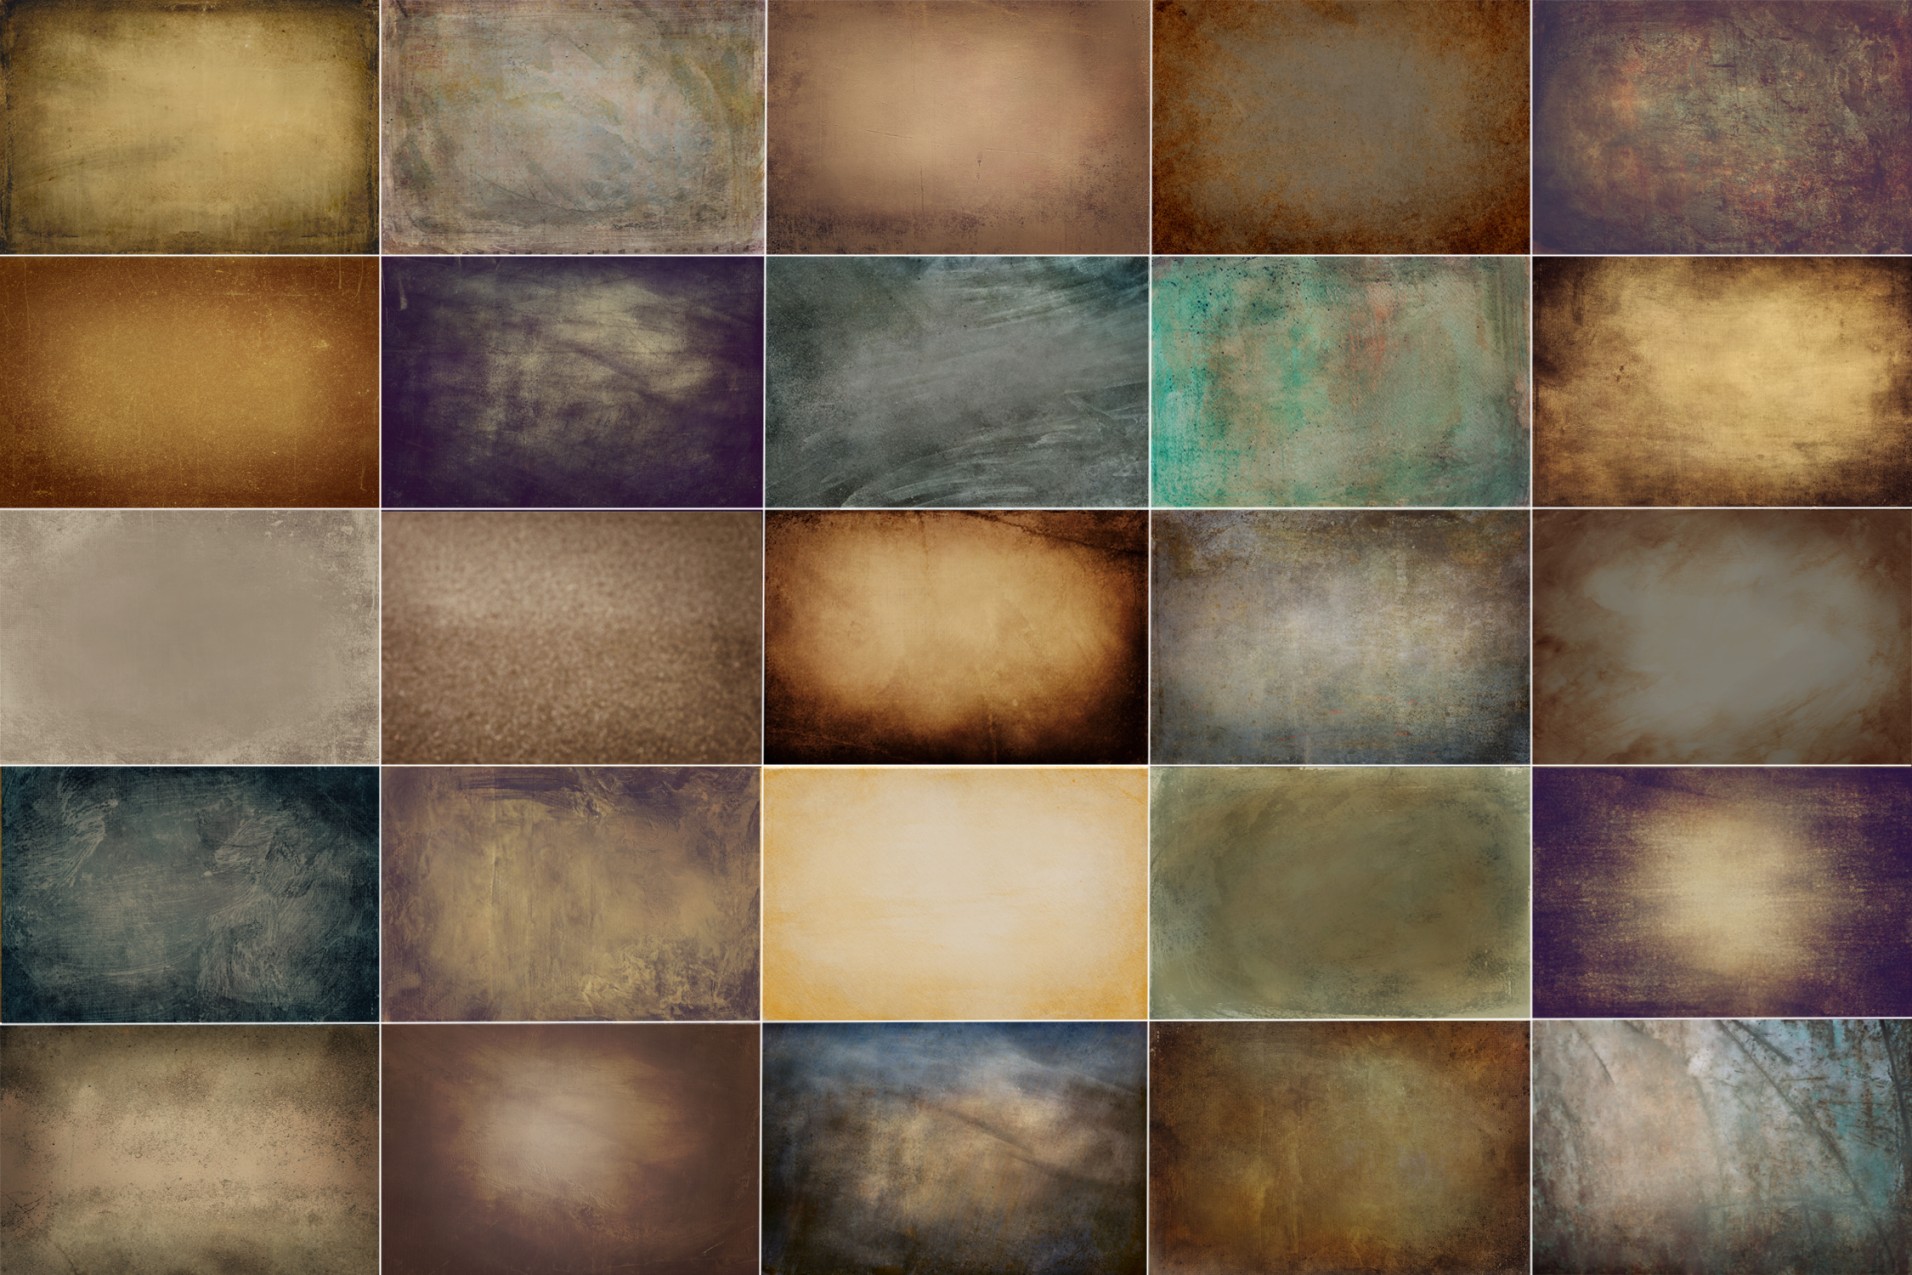
Because it felt like a timeless image, I wanted to add more of a mood by adding one of my favorite textures. I collect textures on my camera and from vendors (see 11-7) everywhere I go, knowing that one of them could well provide the feeling I seek in my imagery.
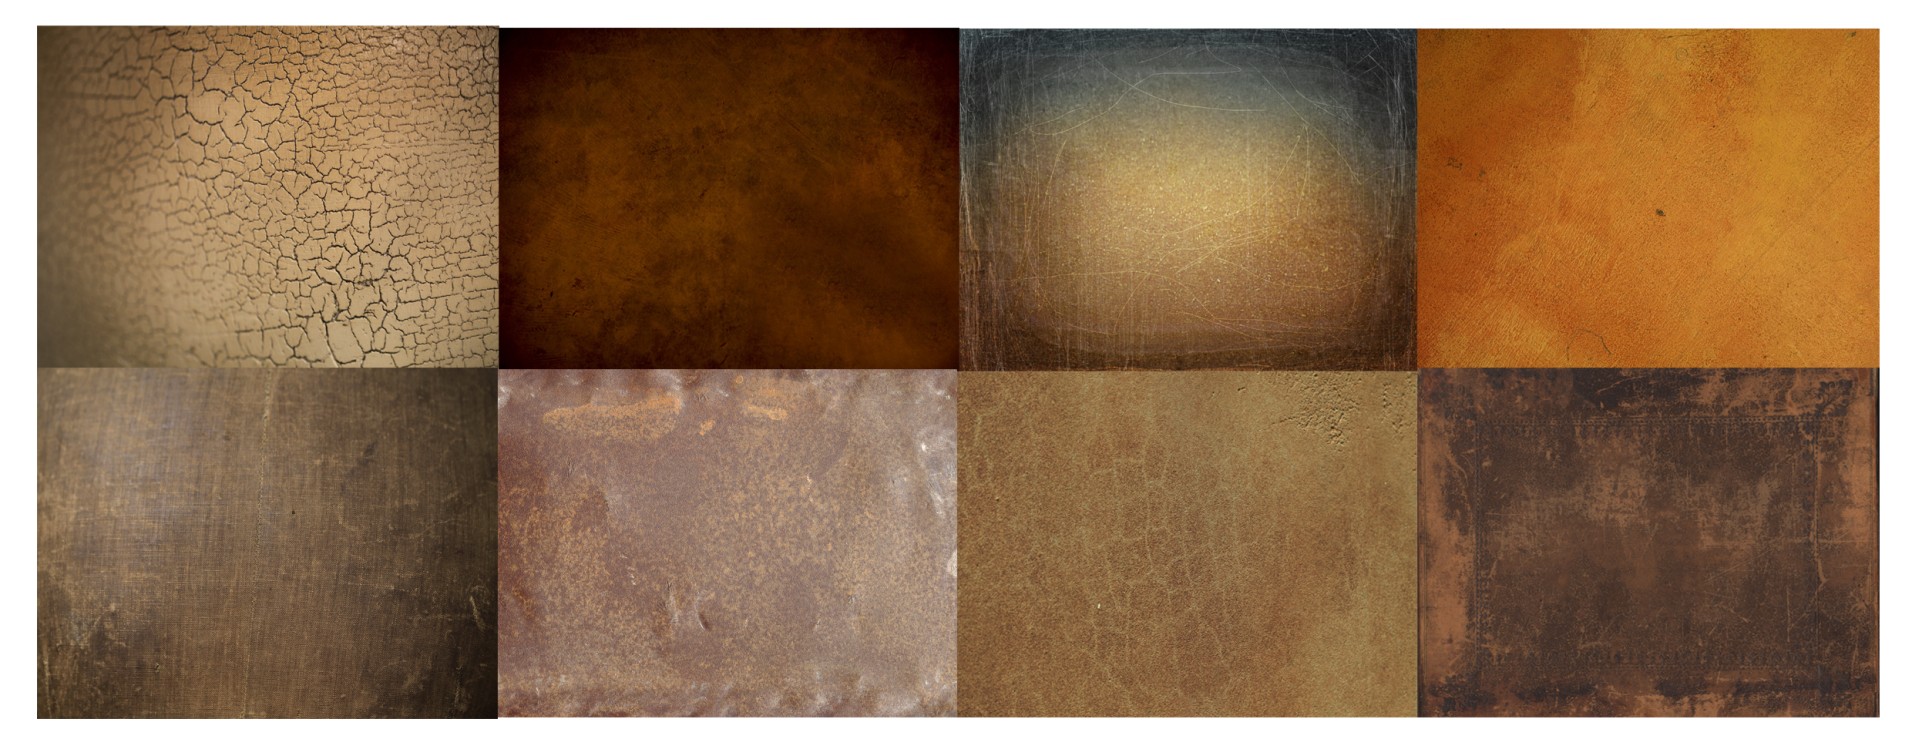
11-7
ABOUT THIS PHOTO These are some examples of textures that I keep in my archive to use as a layering effect with portraits of children. I photograph walls, old books, and interesting textured surfaces wherever I go. I also buy them from the vendors/online boutiques. ©Ginny Felch / www.photographingchildren.com
To add a texture to your photograph, follow these steps:
1. Import the original photograph and the texture photograph into PSE by choosing File⇒Open (find in archives). See 11-8.
2. Highlight and double-click the before photograph.
3. Drag the texture photograph from the Project Bin up to the workspace. Your original image will be obscured. See 11-9.
4. The layers workspace is found in the lower right-hand corner. Directly under Layers, you will see Normal. You can scroll down through each “blending mode” and see the results of the layering on the original photograph. You can also adjust the opacity in each mode. You are seeking the “aha!” moment. I decided on the Multiply blending mode, using 100-percent opacity. See 11-10.
5. In the upper right-hand corner, choose Edit⇒Guided for a full menu of editing possibilities.
6. Click Adjust Levels, then click the Create Levels Adjustment Layer, and then click OK. See 11-11.
7. Tweak the levels while watching the effect on the image and find your “aha” moment.
8. Once you are certain your photograph is satisfactory and final, flatten the layers to take up less room. Then save the new version of your image.
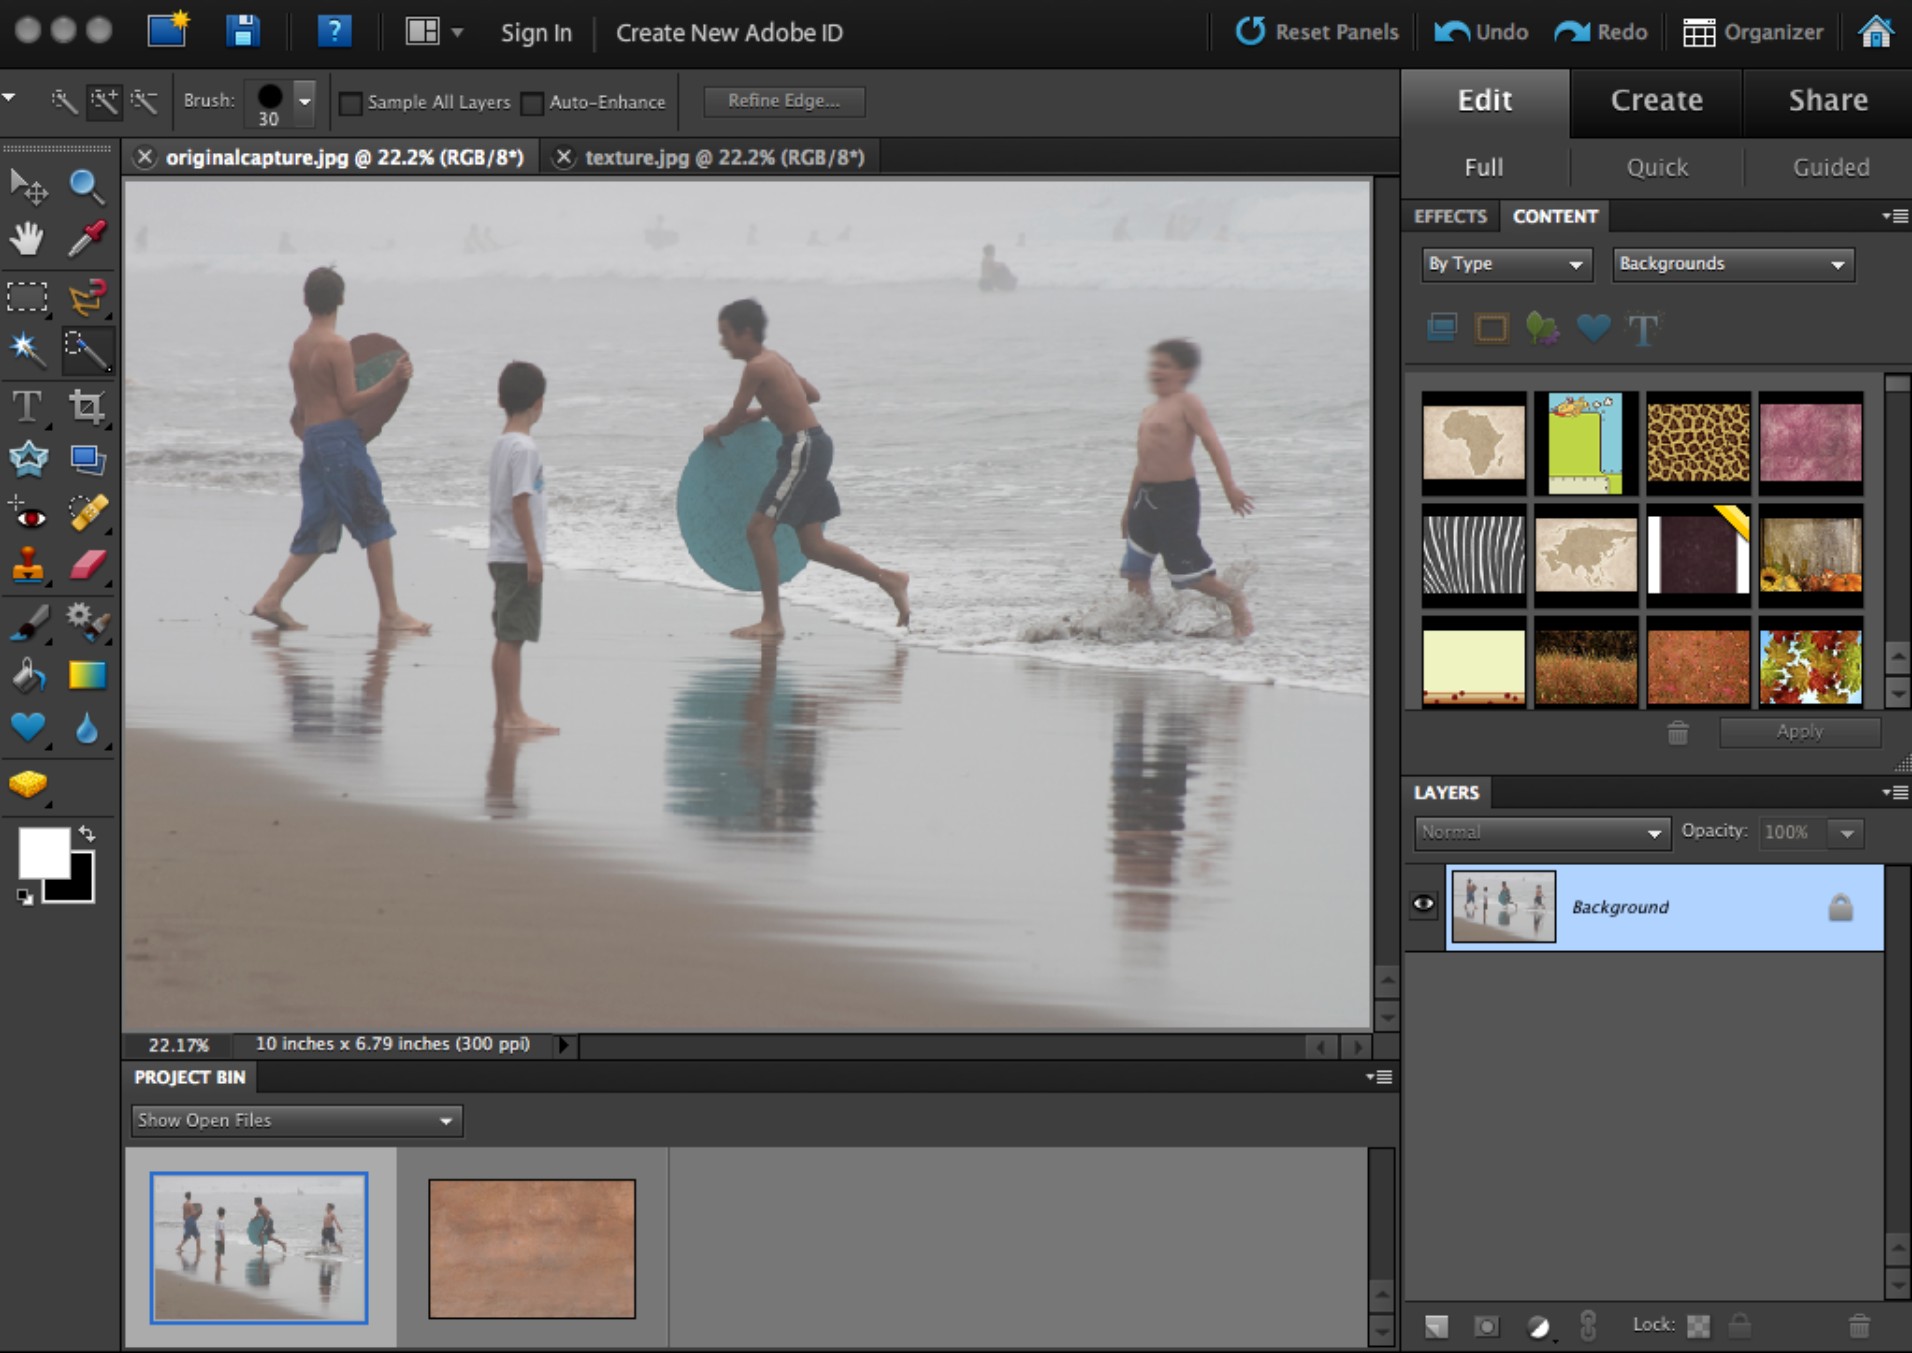
11-8
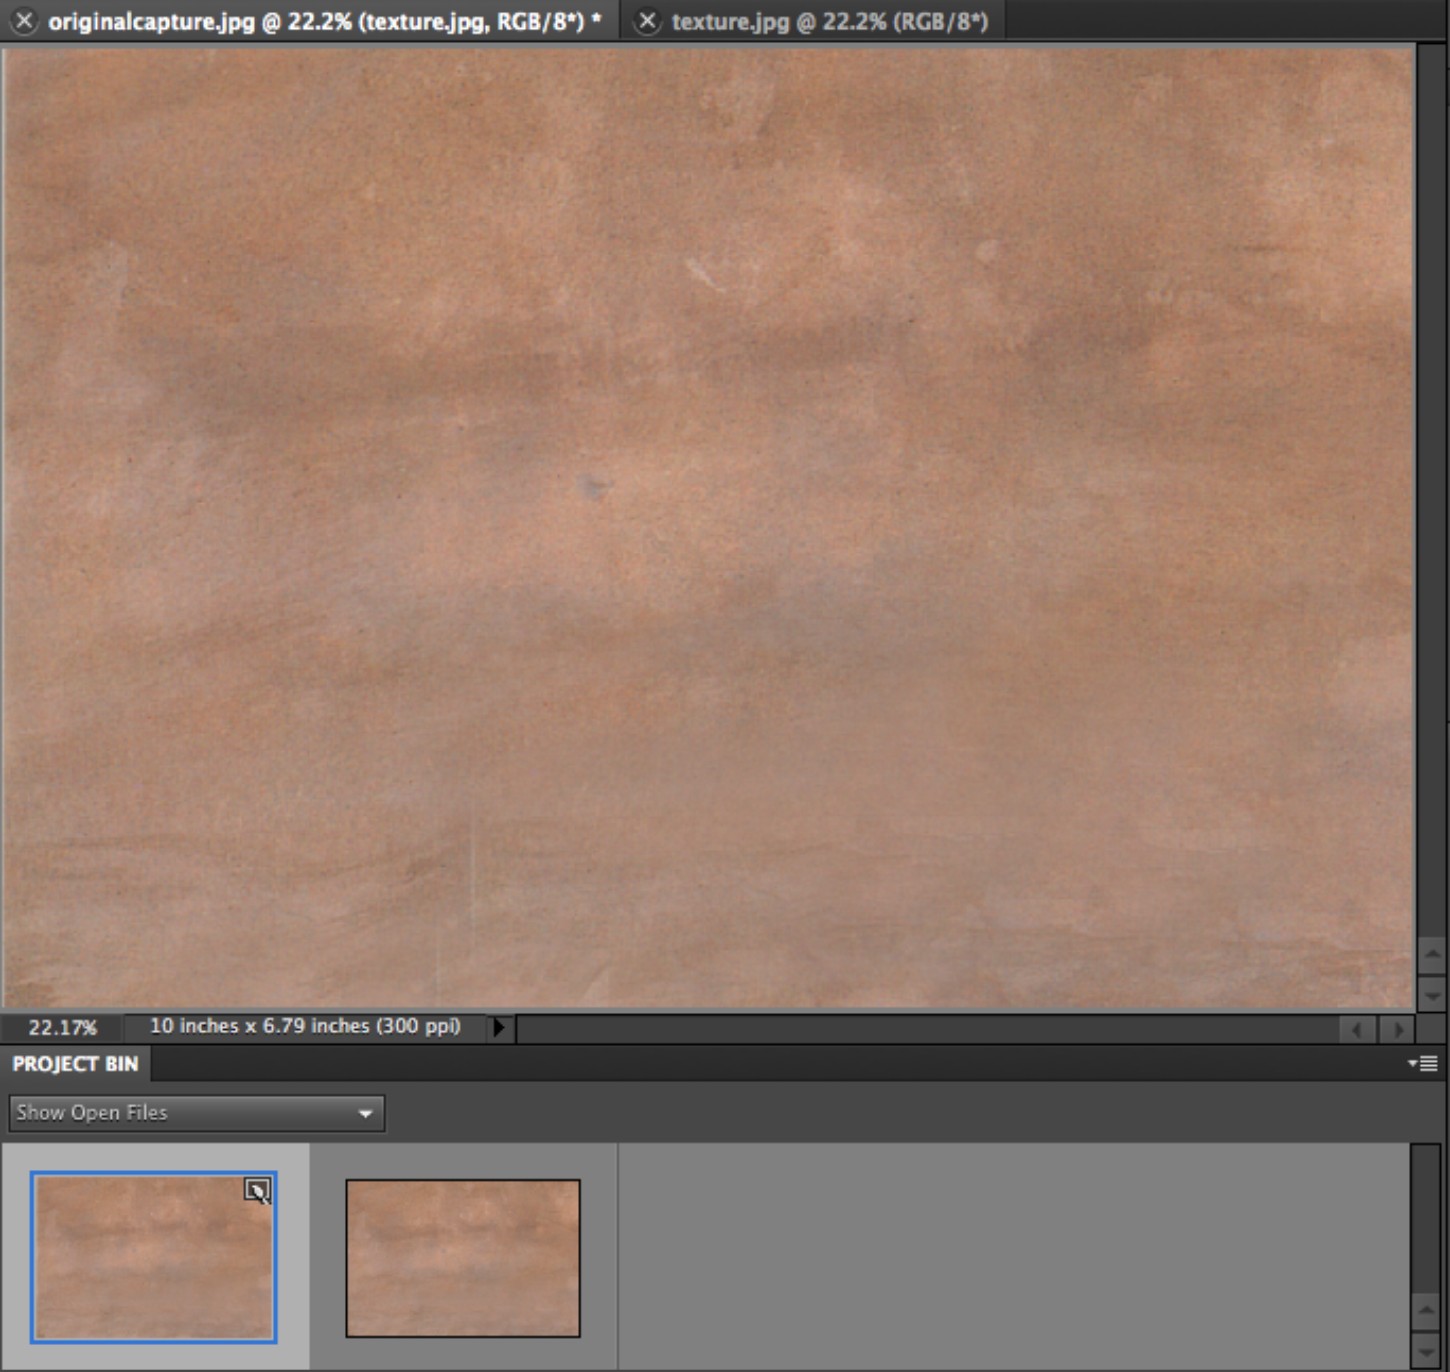
11-9
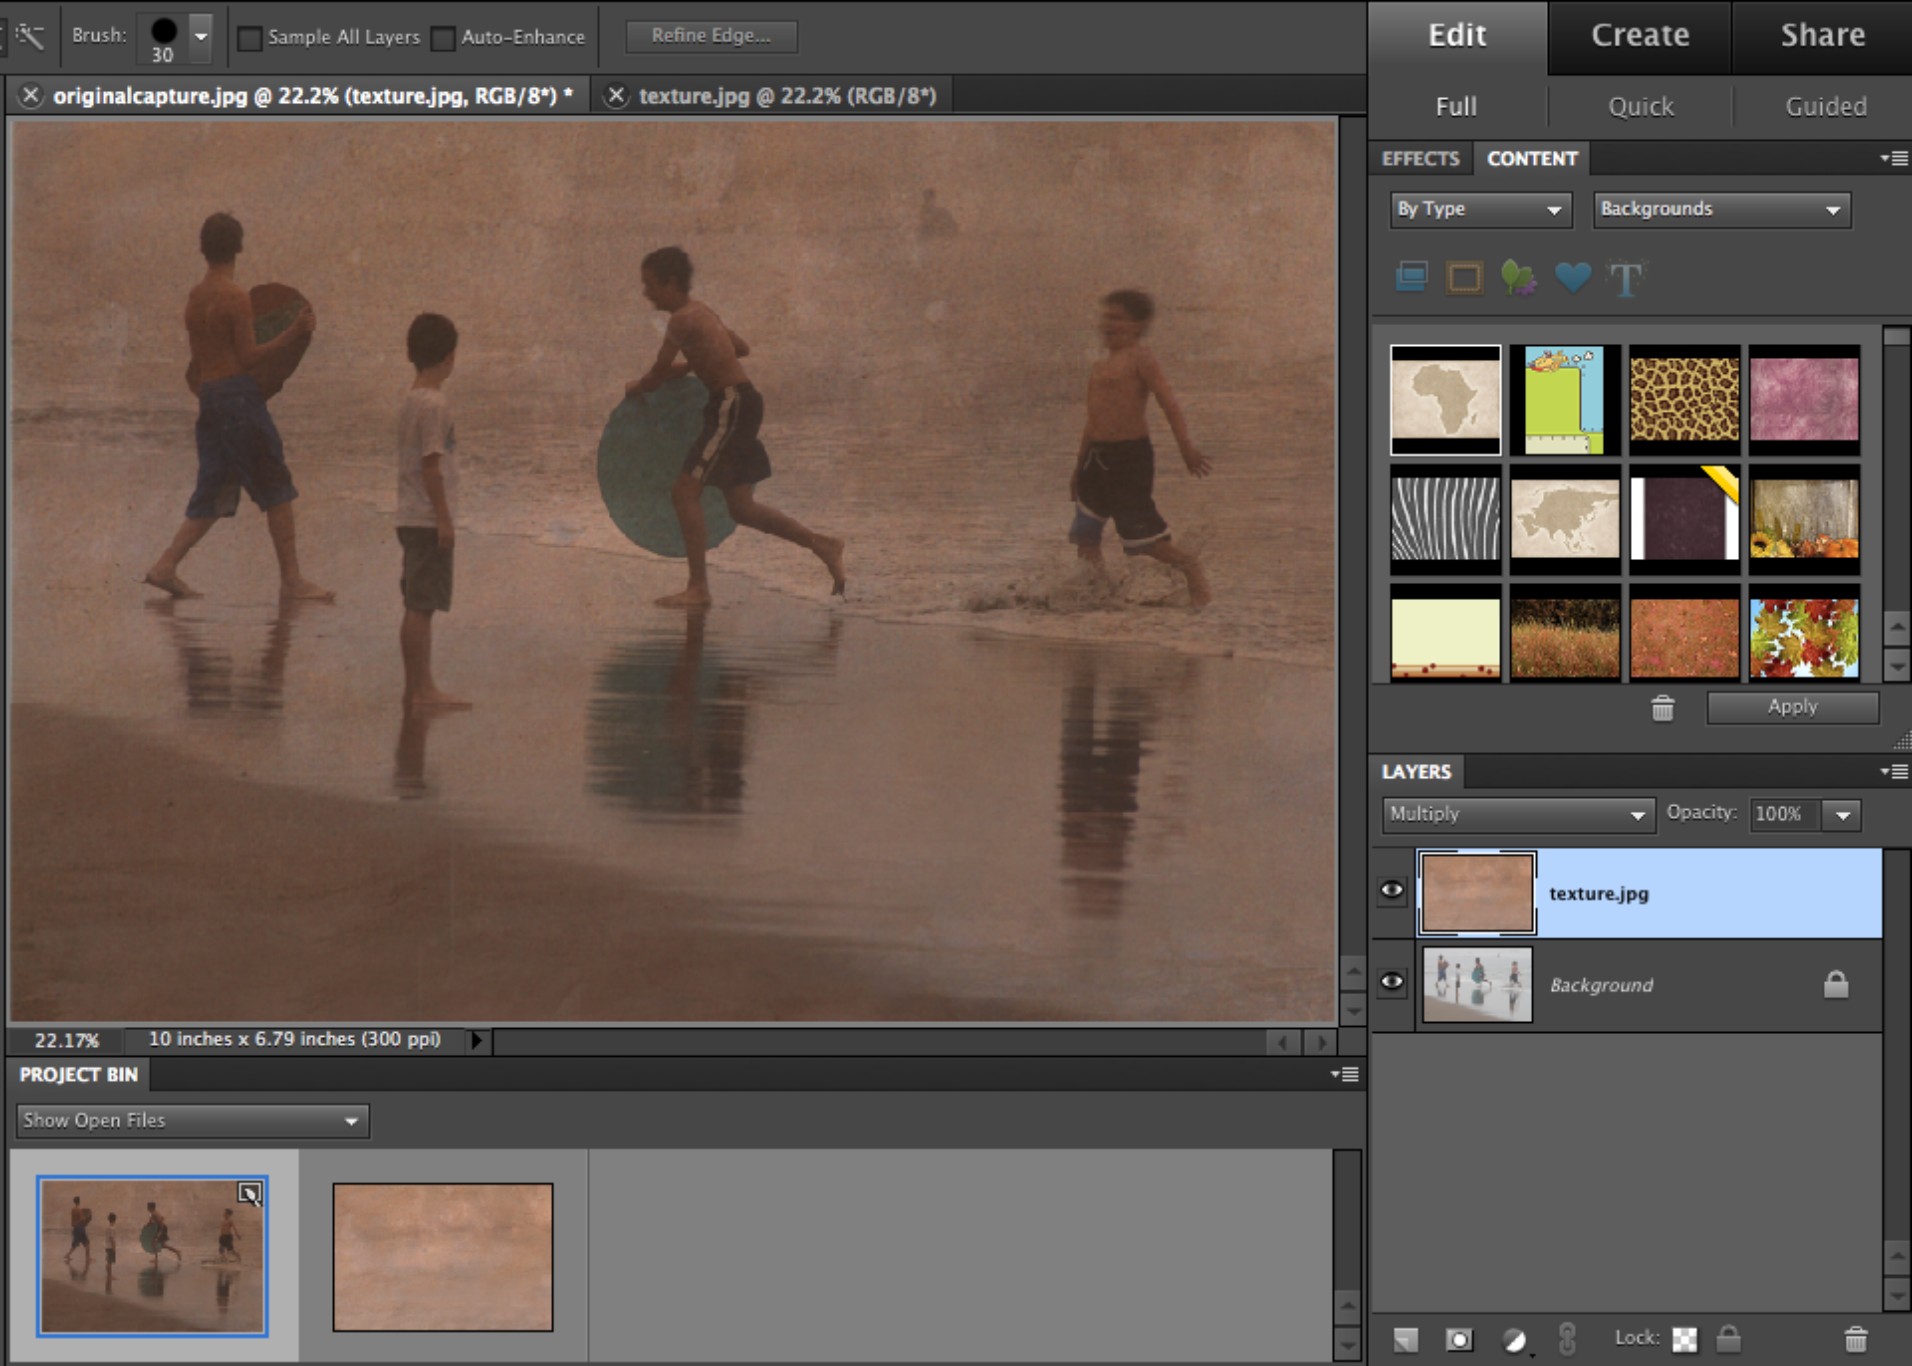
11-10
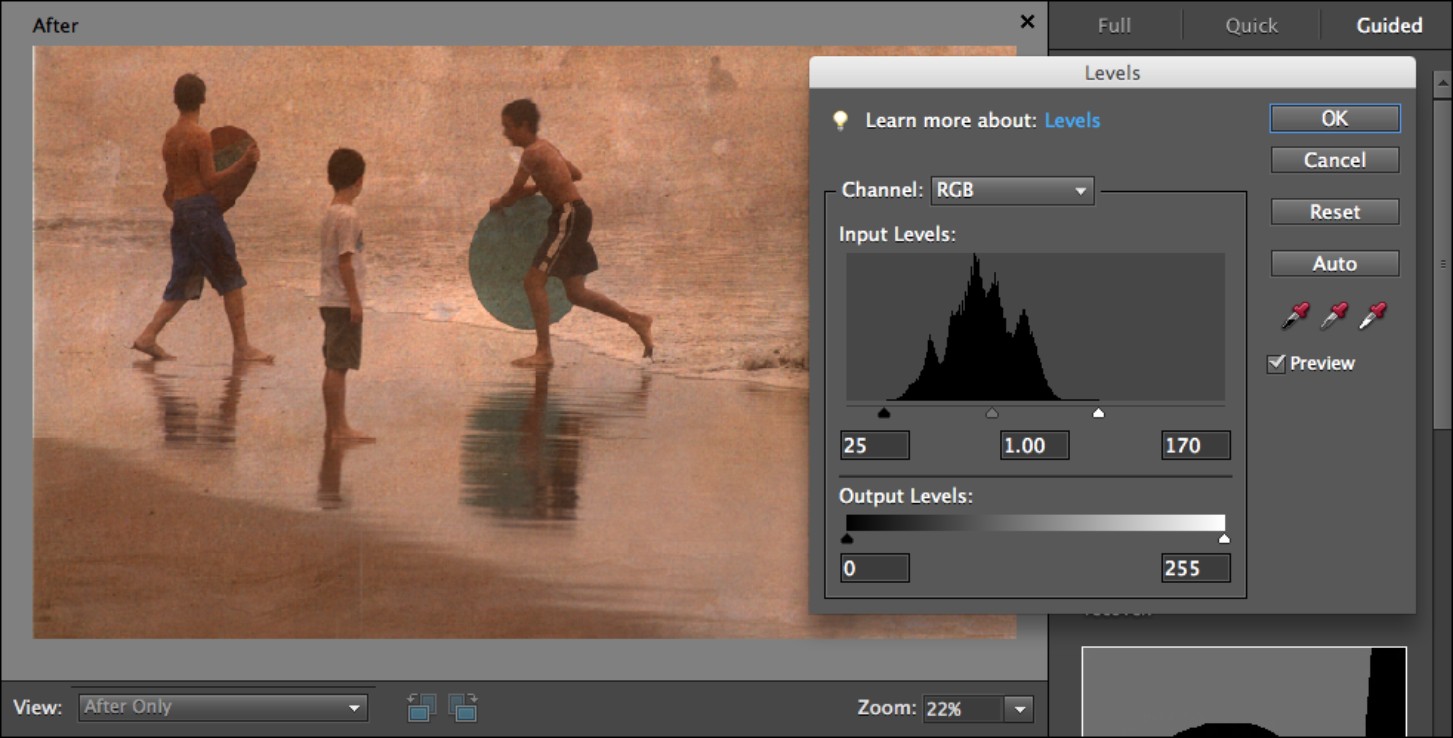
11-11
ABOUT THESE IMAGES Figures 11-8 through 11-11 illustrate the process I used to add a texture to my original photograph. They correspond with the numbered steps as indicated. Original photograph was taken at ISO 200, f/4.0, and 1/125 second. ©Ginny Felch / www.photographingchildren.com
Color Pop in PSE by Mary Schannen
Mary Schannen of Melange Photo used this workflow to add a boost to the color in the photograph of her son. She is quite the post-production wizard, and was greatly inspired by the first edition of this book to move into photography. Her workflow is as follows:
1. Import the original photograph and the texture photograph into PSE by choosing File⇒Open (find in archives). Crop the photo. See 11-12.
2. Choose Layers⇒New adjustment layer⇒Levels. Move the left slider toward the right slightly and the right slider toward the middle (see 11-13). This effect increases contrast slightly. Then choose Layer⇒Flatten from the upper menu.
3. Choose Layer⇒Duplicate, and change the blending mode to Soft Light. Change the opacity to 71 percent or to suit your taste. You can try the Overlay mode also. See 11-14.
4. Select the eraser tool and brush over the hair to erase the effect there. Make sure your soft-light layer is highlighted. Choose Layer⇒Flatten from upper menu.
5. Choose Layer⇒Duplicate Layer from upper menu. Then choose Filter⇒other⇒High Pass. Move the slider so just a slight line appears through the gray. The image on the screen will be gray with a slight outline of the elements in the photo. See 11-15.
6. Change the mode to Soft Light (or overlay). Lower opacity if it appears overly sharp. File⇒Flatten from the upper menu. File⇒Save from upper menu, and you are done. See 11-16.
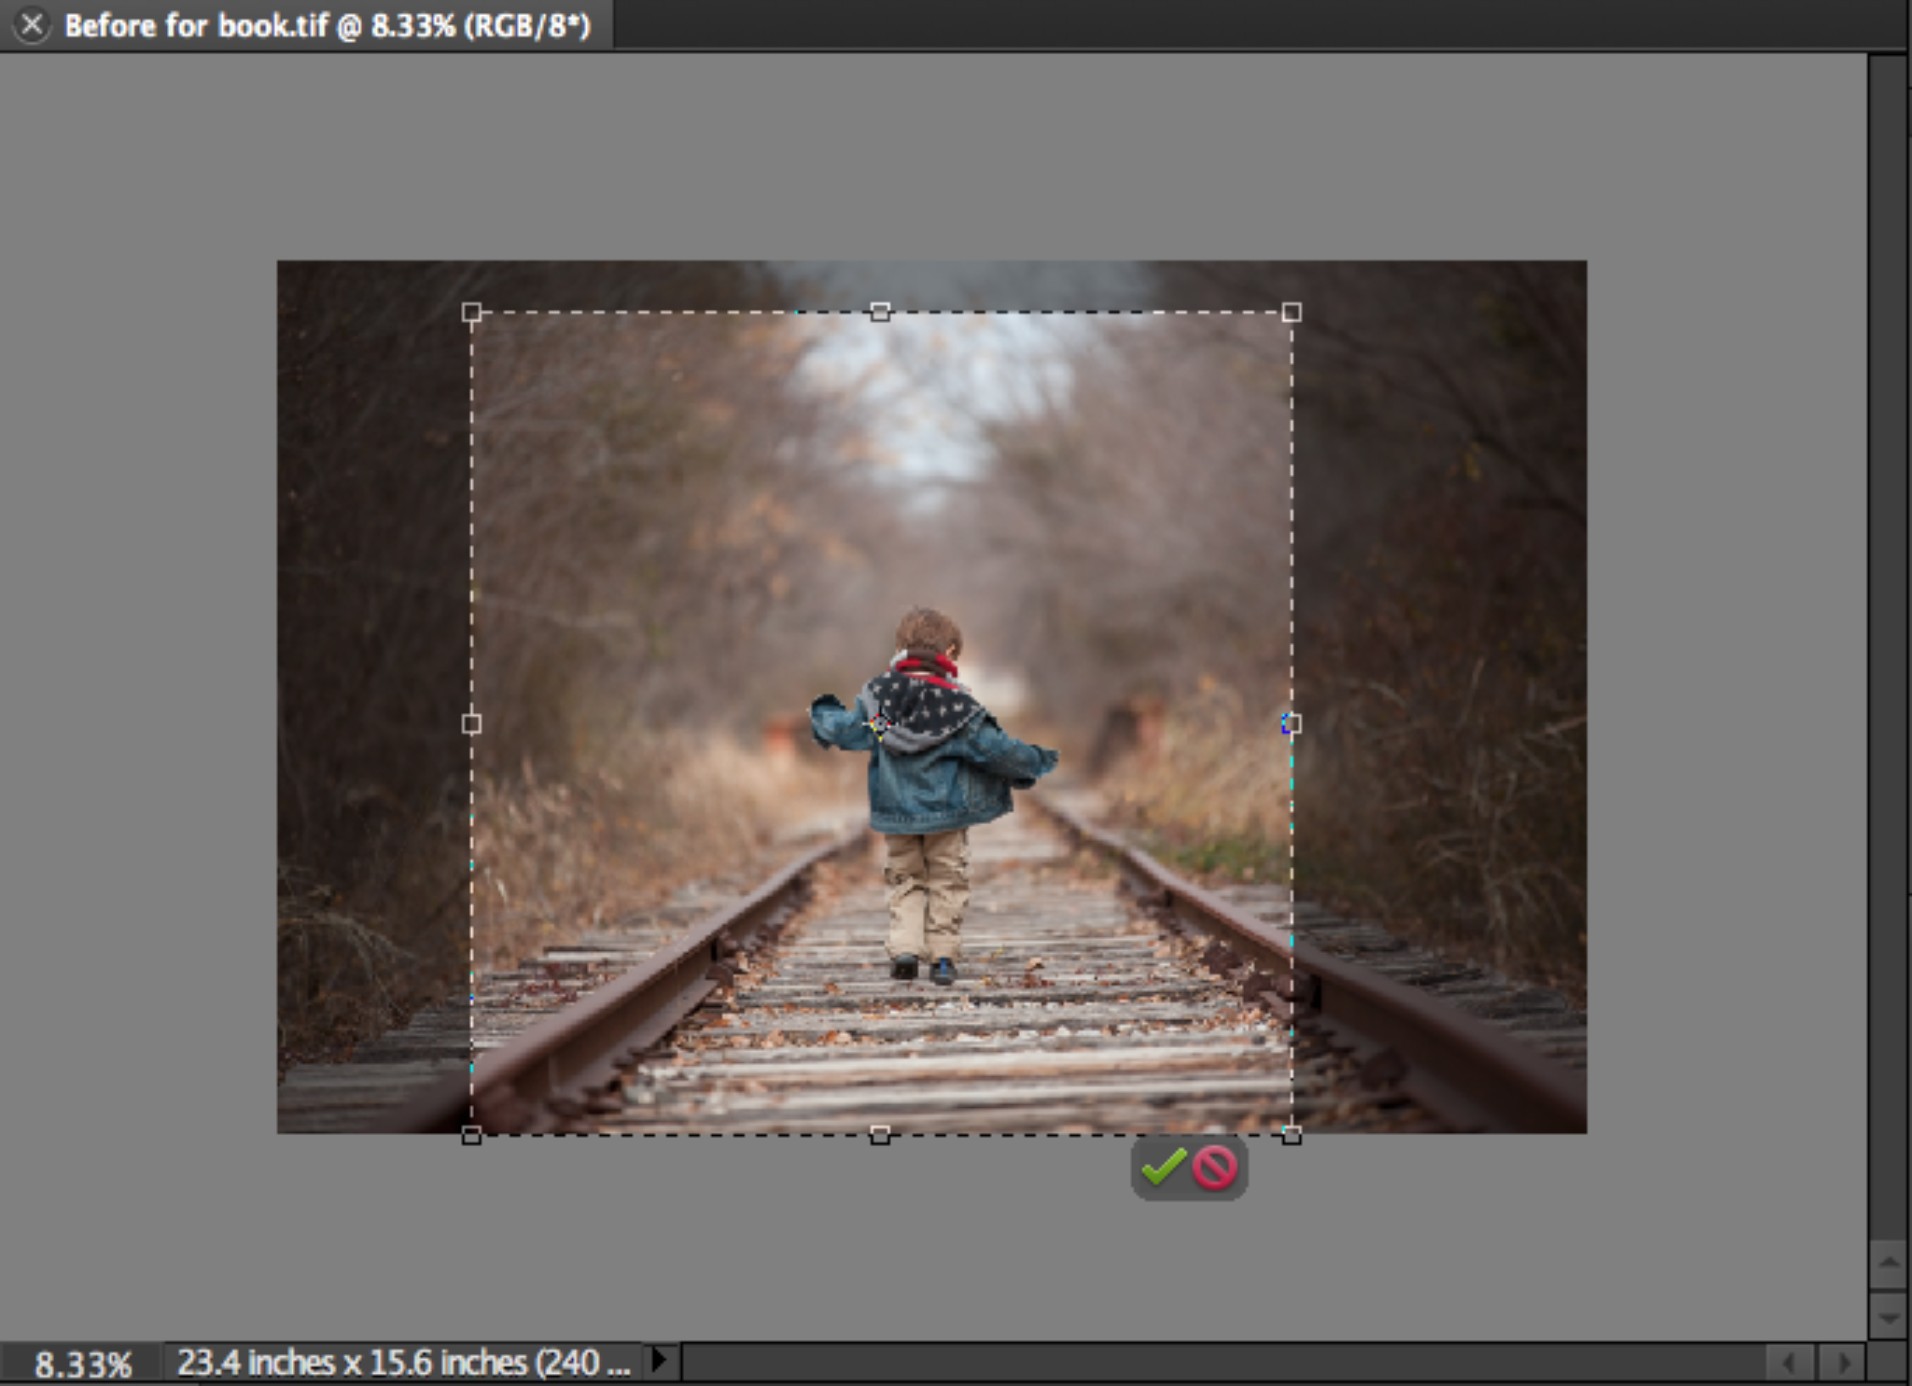
11-12
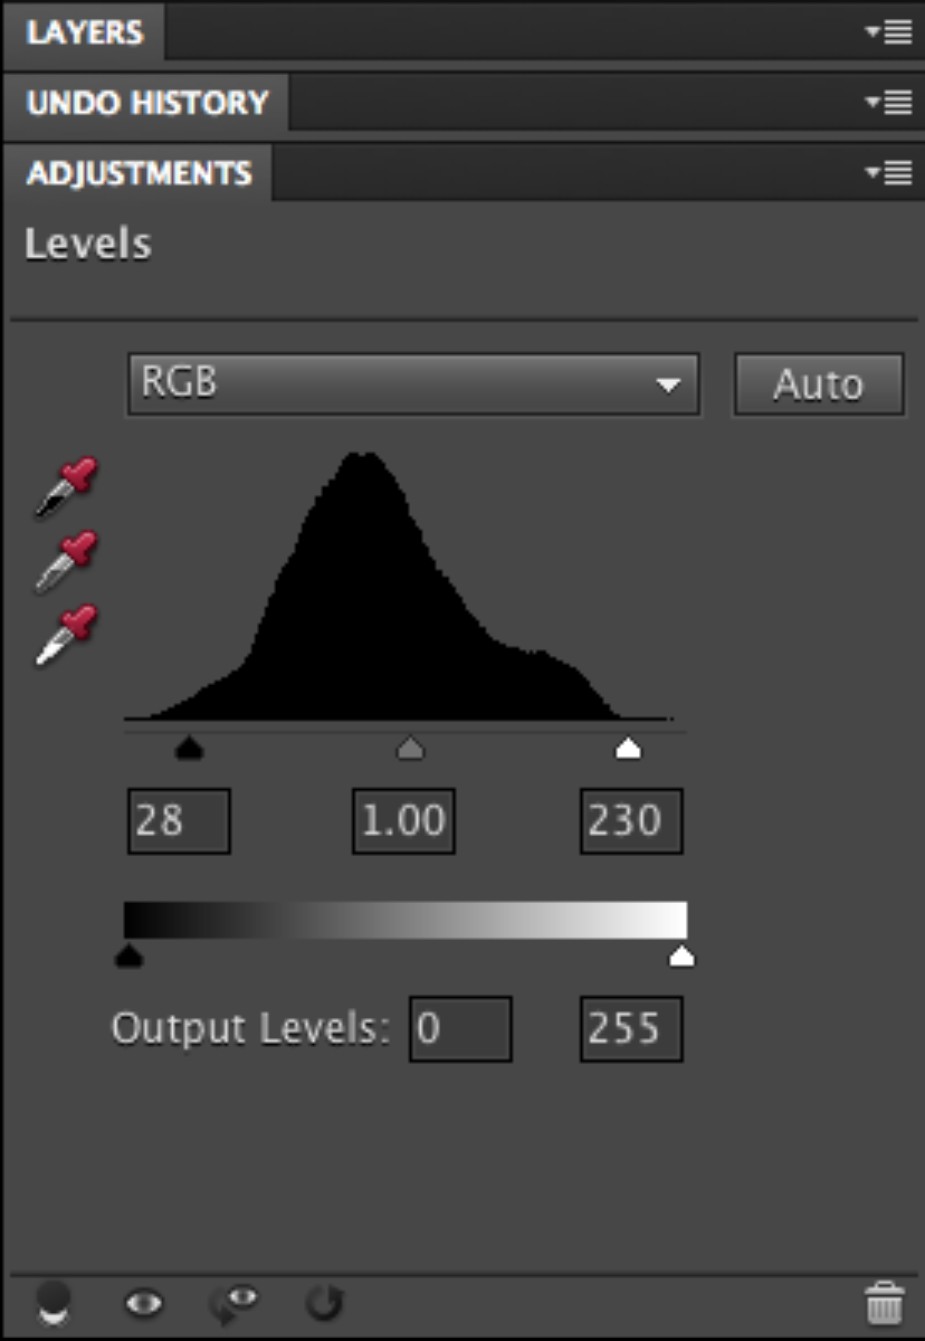
11-13
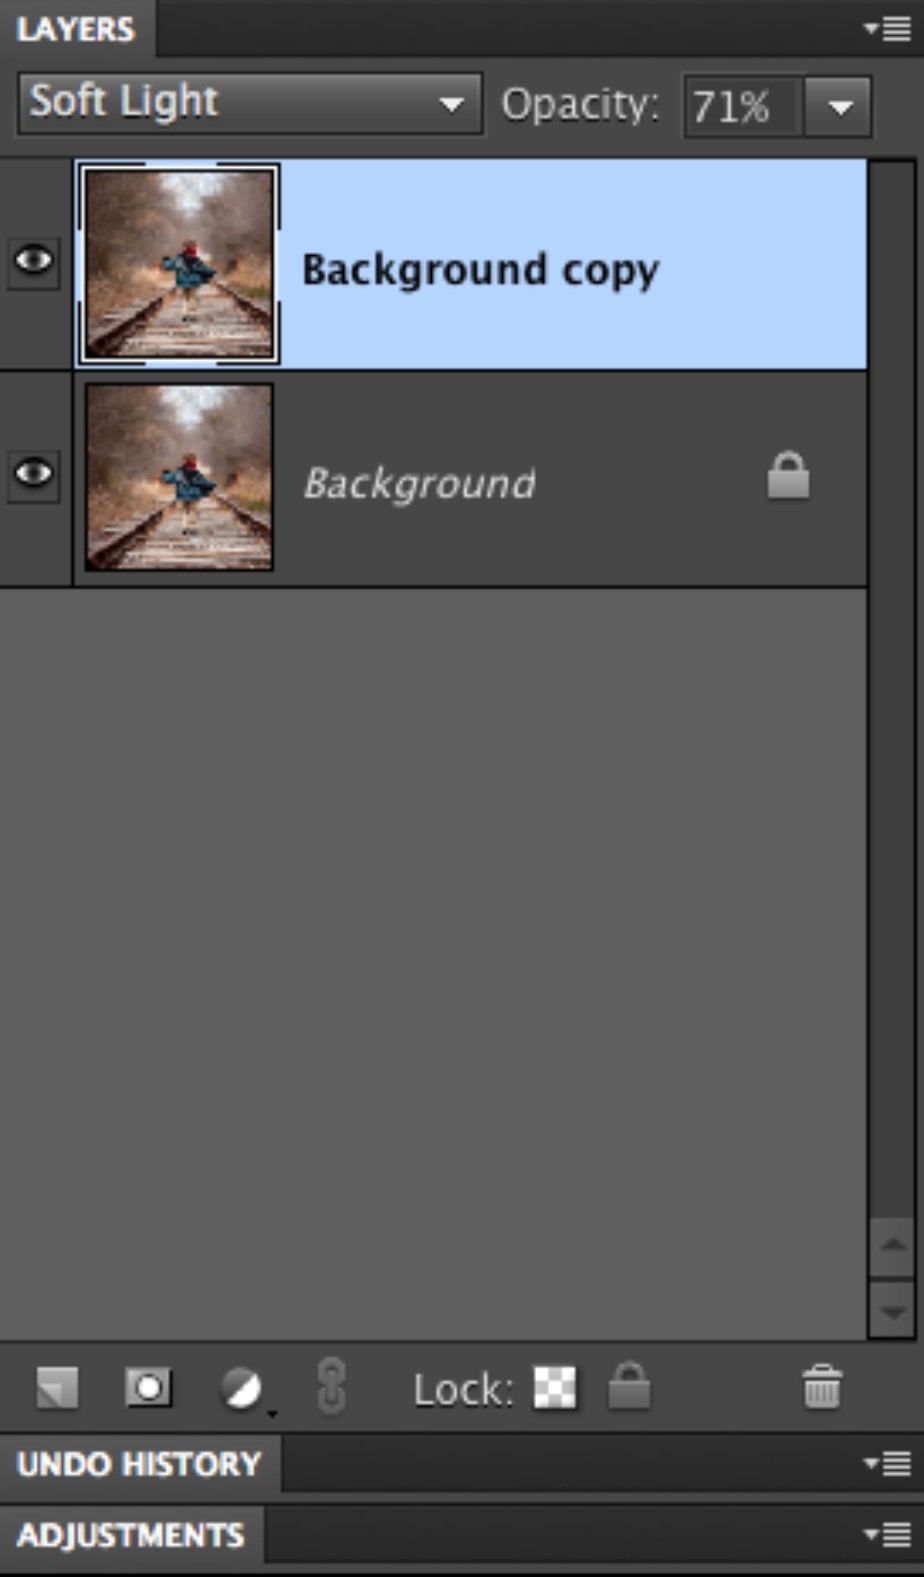
11-14

11-15
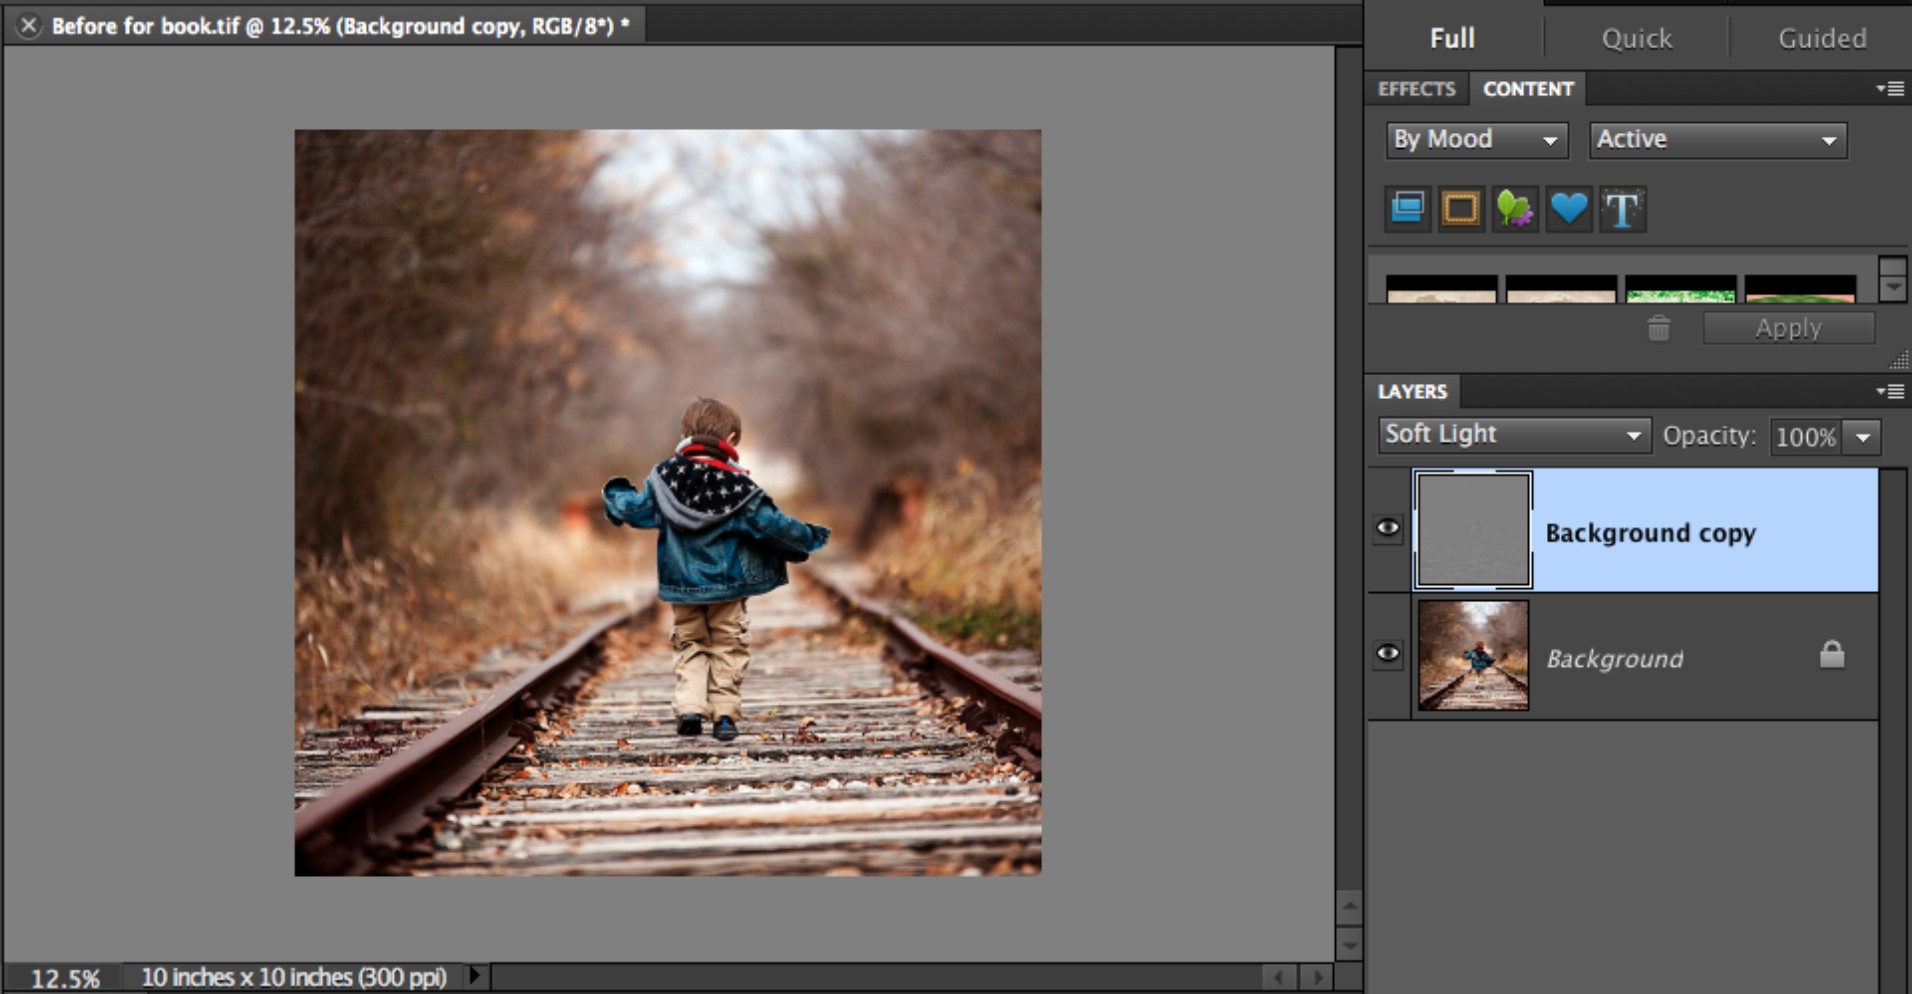
11-16
ABOUT THESE IMAGES Figures 11-12 through 11-16 illustrate the process Mary used to enhance the color of the original photograph. They correspond with the numbered steps as indicated. Original photograph was taken at ISO 200, f2.8, and 1/1600 second. ©Mary Schannen / www.melangephoto.com
Black-and-White Action in PSE by Shana Rae
Shana Rae is a photographer, artist, and entrepreneur who is very successful with her Florabella collection of actions and textures (see the resources at the end of this chapter). She used these steps to convert a stunning color photograph with her B/W Blush from Luxe II set of actions. They are installed already in PSE.
1. Import the original photograph into PSE from the Library. See 11-17.
2. Choose Edit⇒Guided Activities.
3. Choose Automated Actions⇒Action Player. See 11-18.
4. Select the action set Florabella Luxe II and then the action B/W Blush. Click Play Action. See 11-19.
5. Flatten layers if you wish (Layers⇒flatten), and save File⇒Save. Voila – the final image! See 11-20.
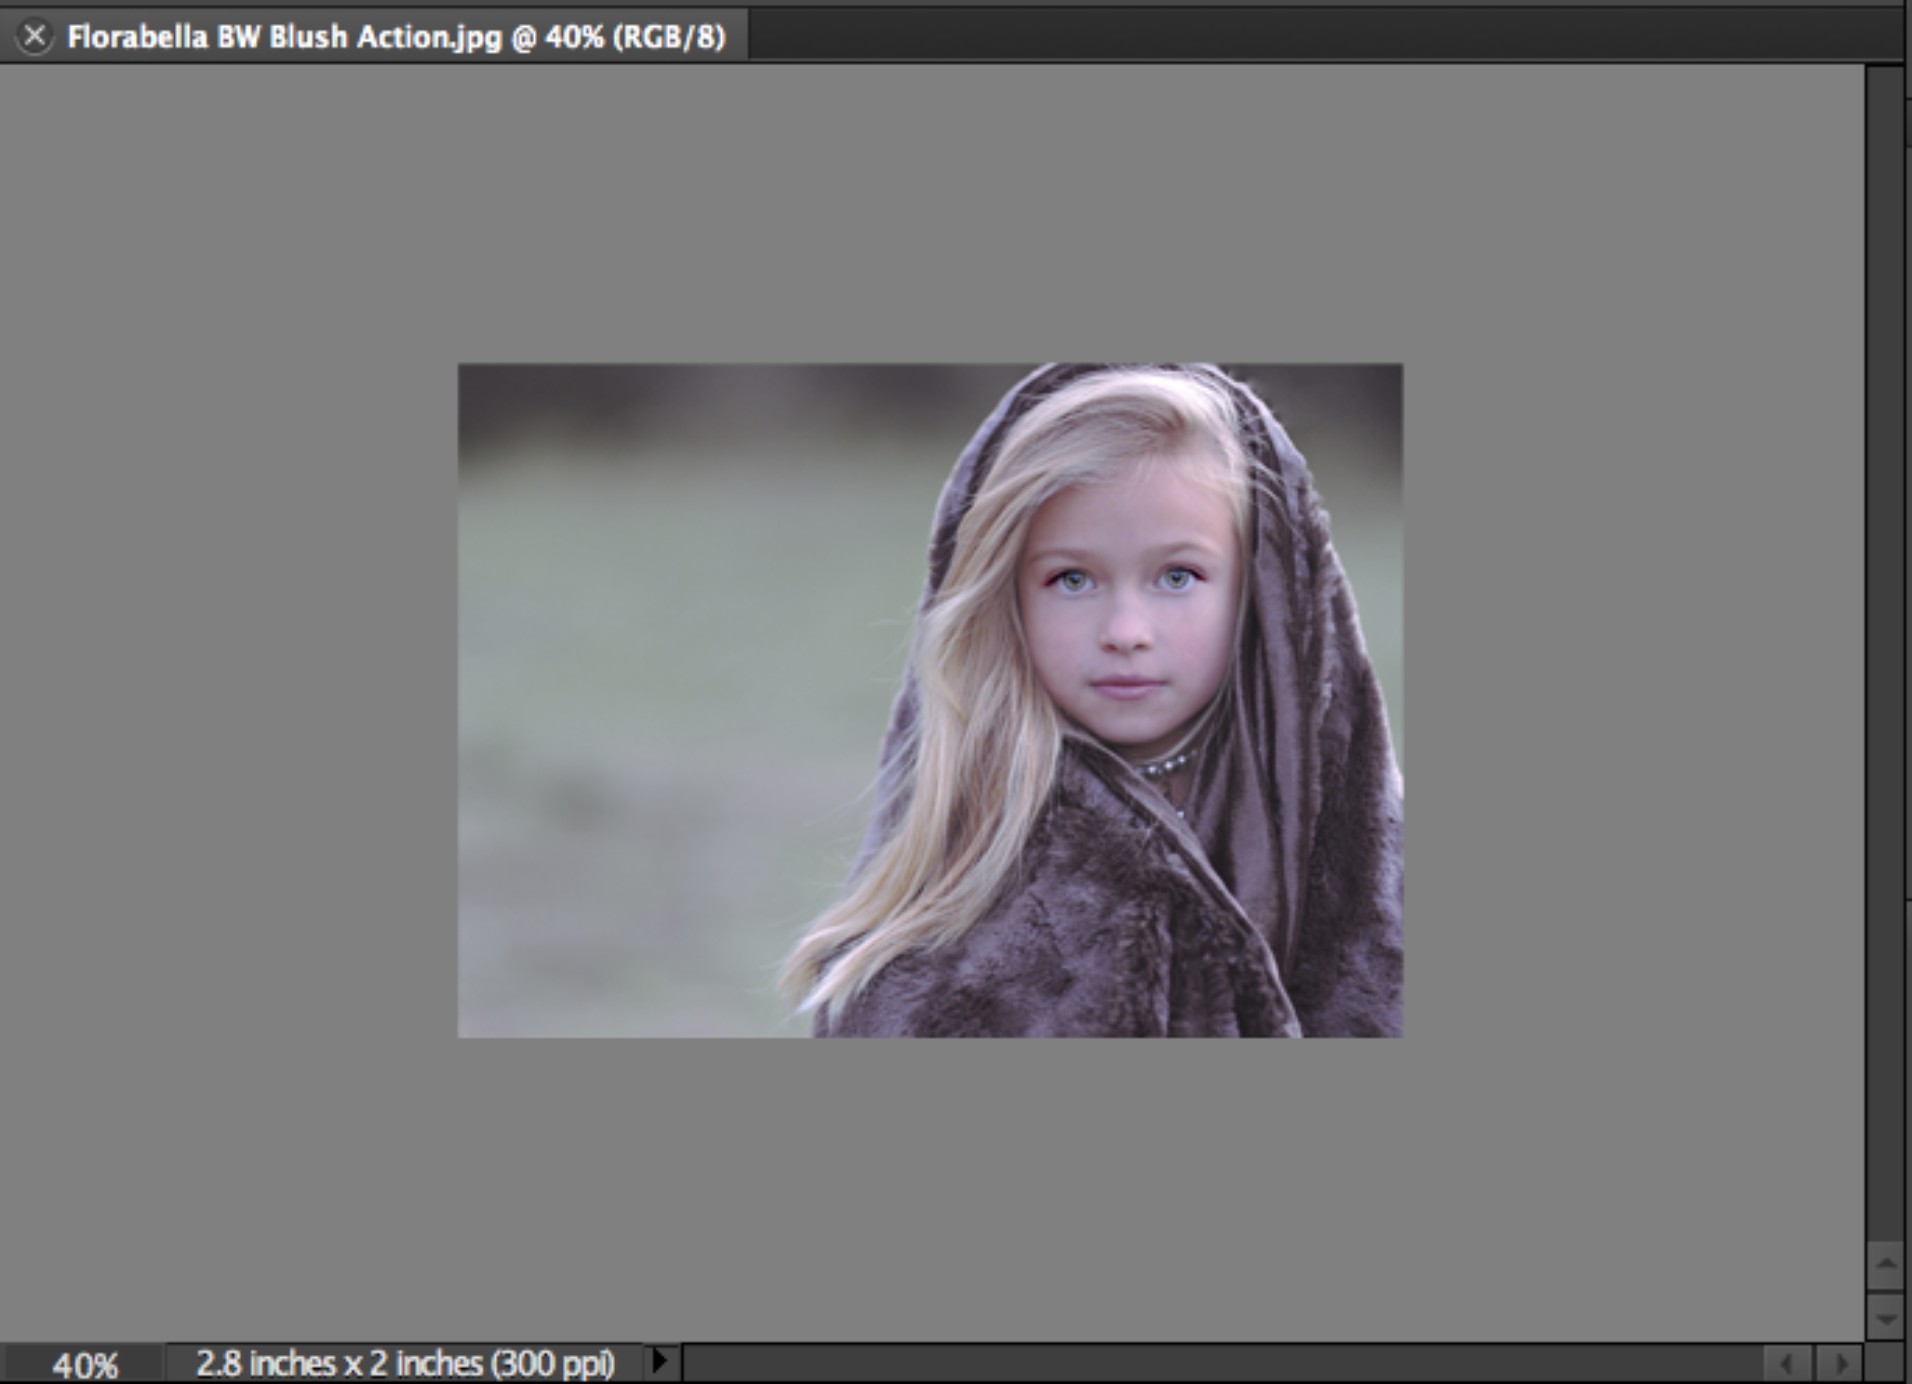
11-17
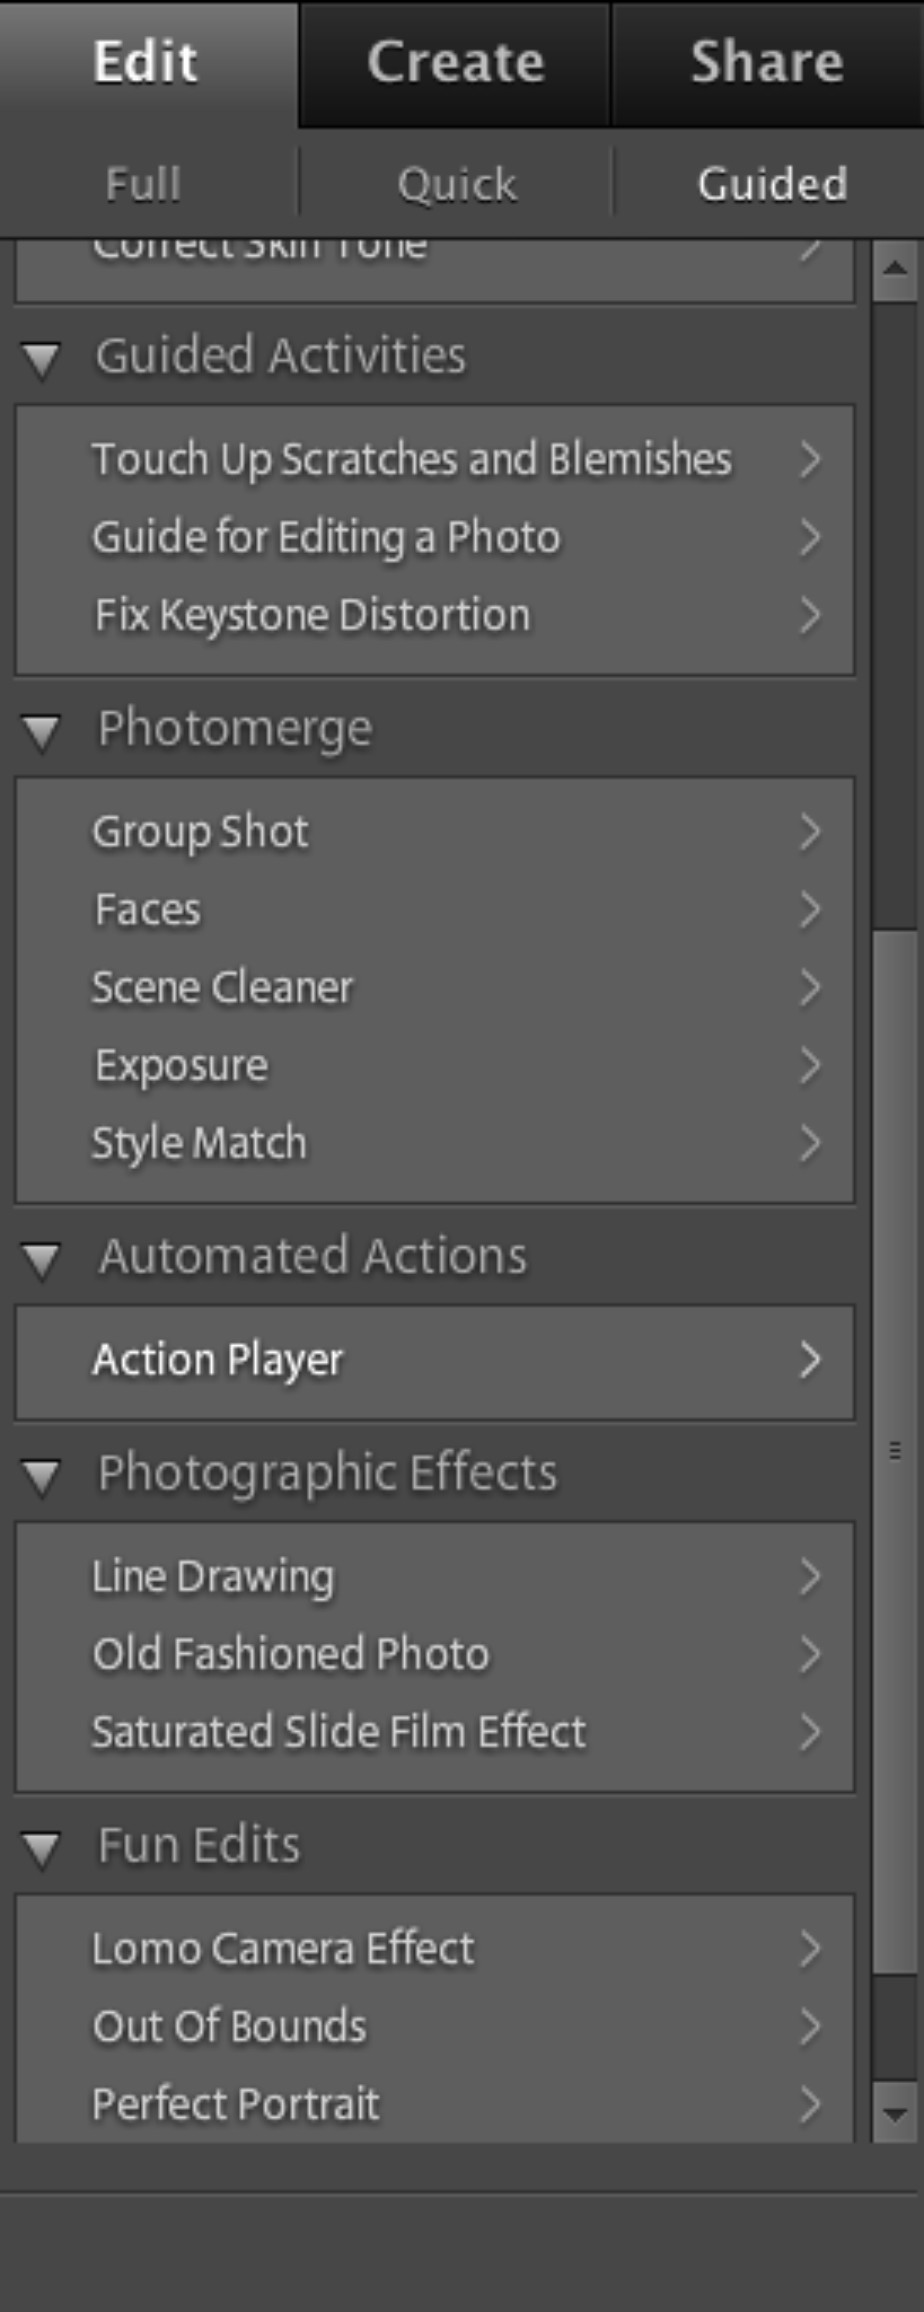
11-18
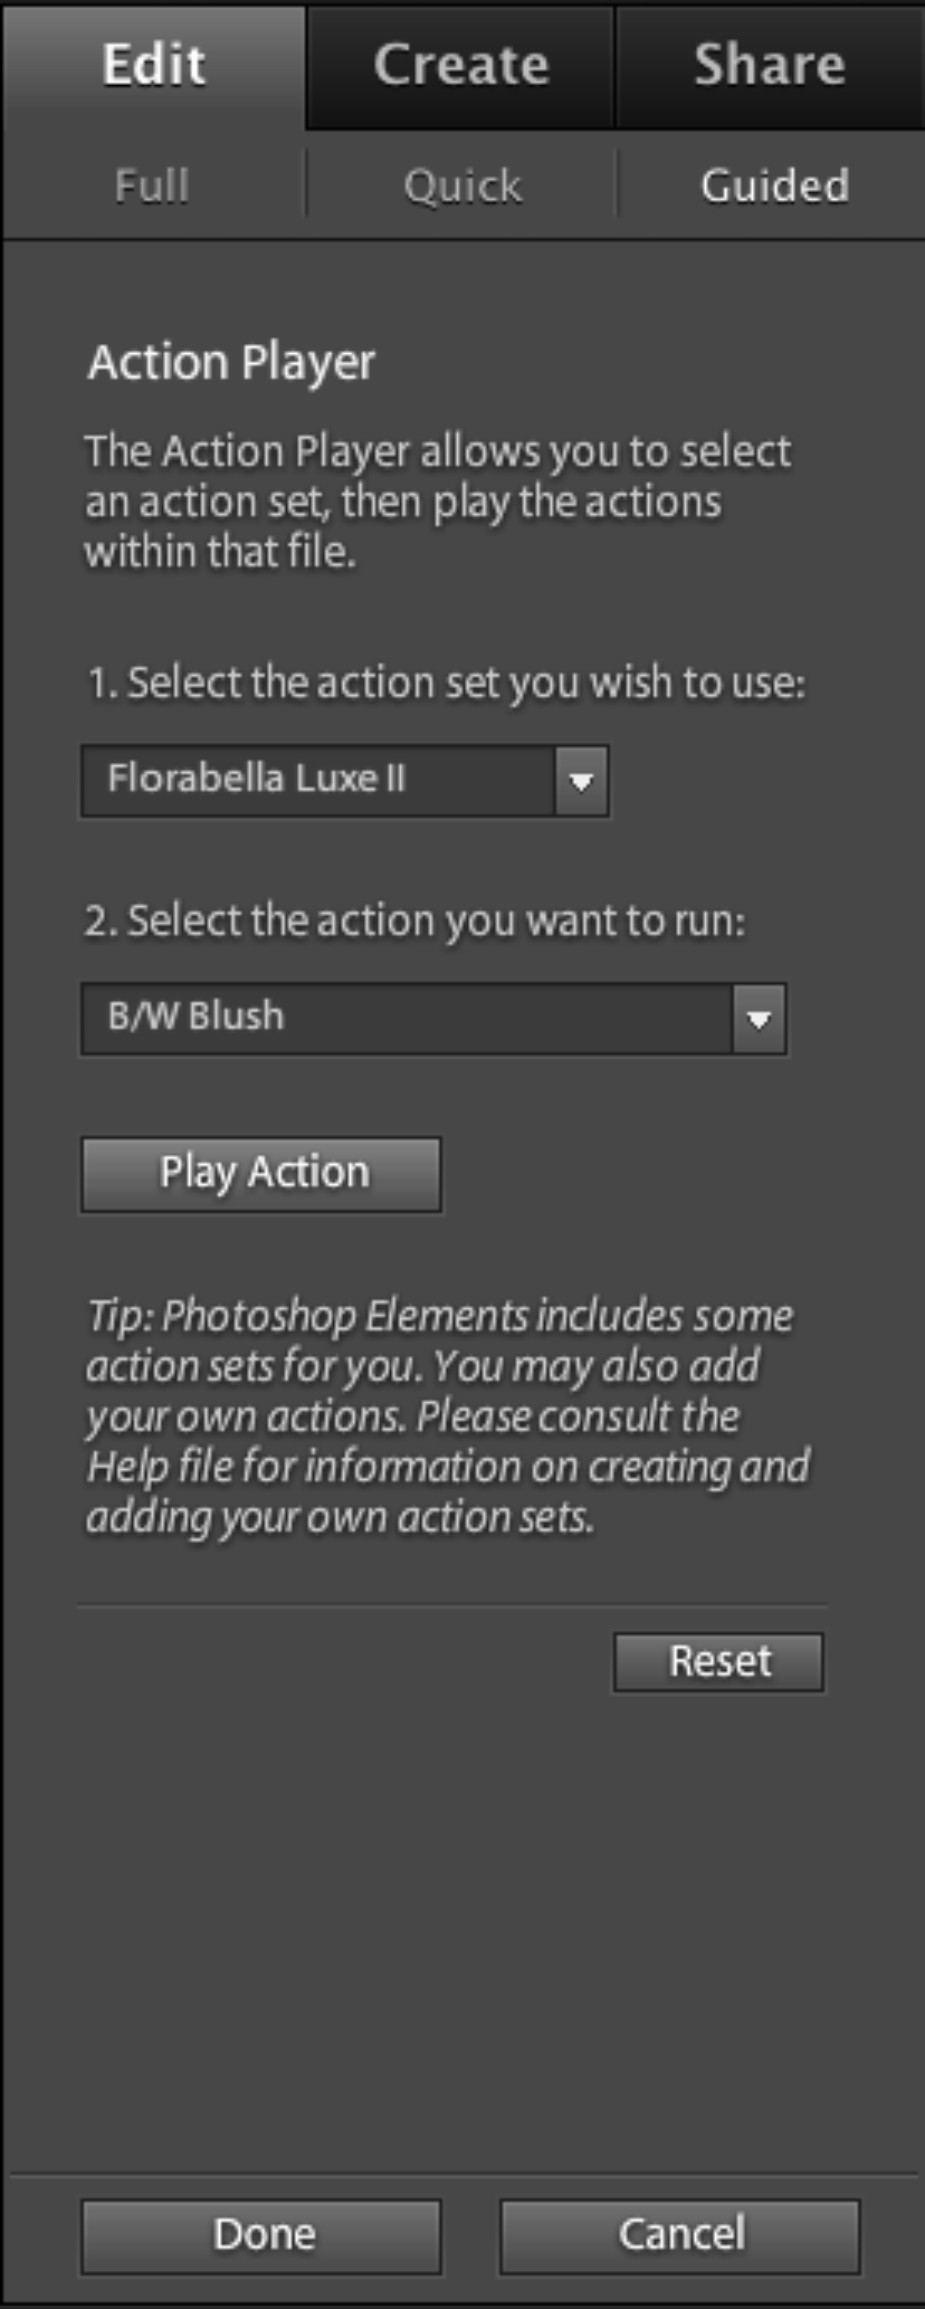
11-19
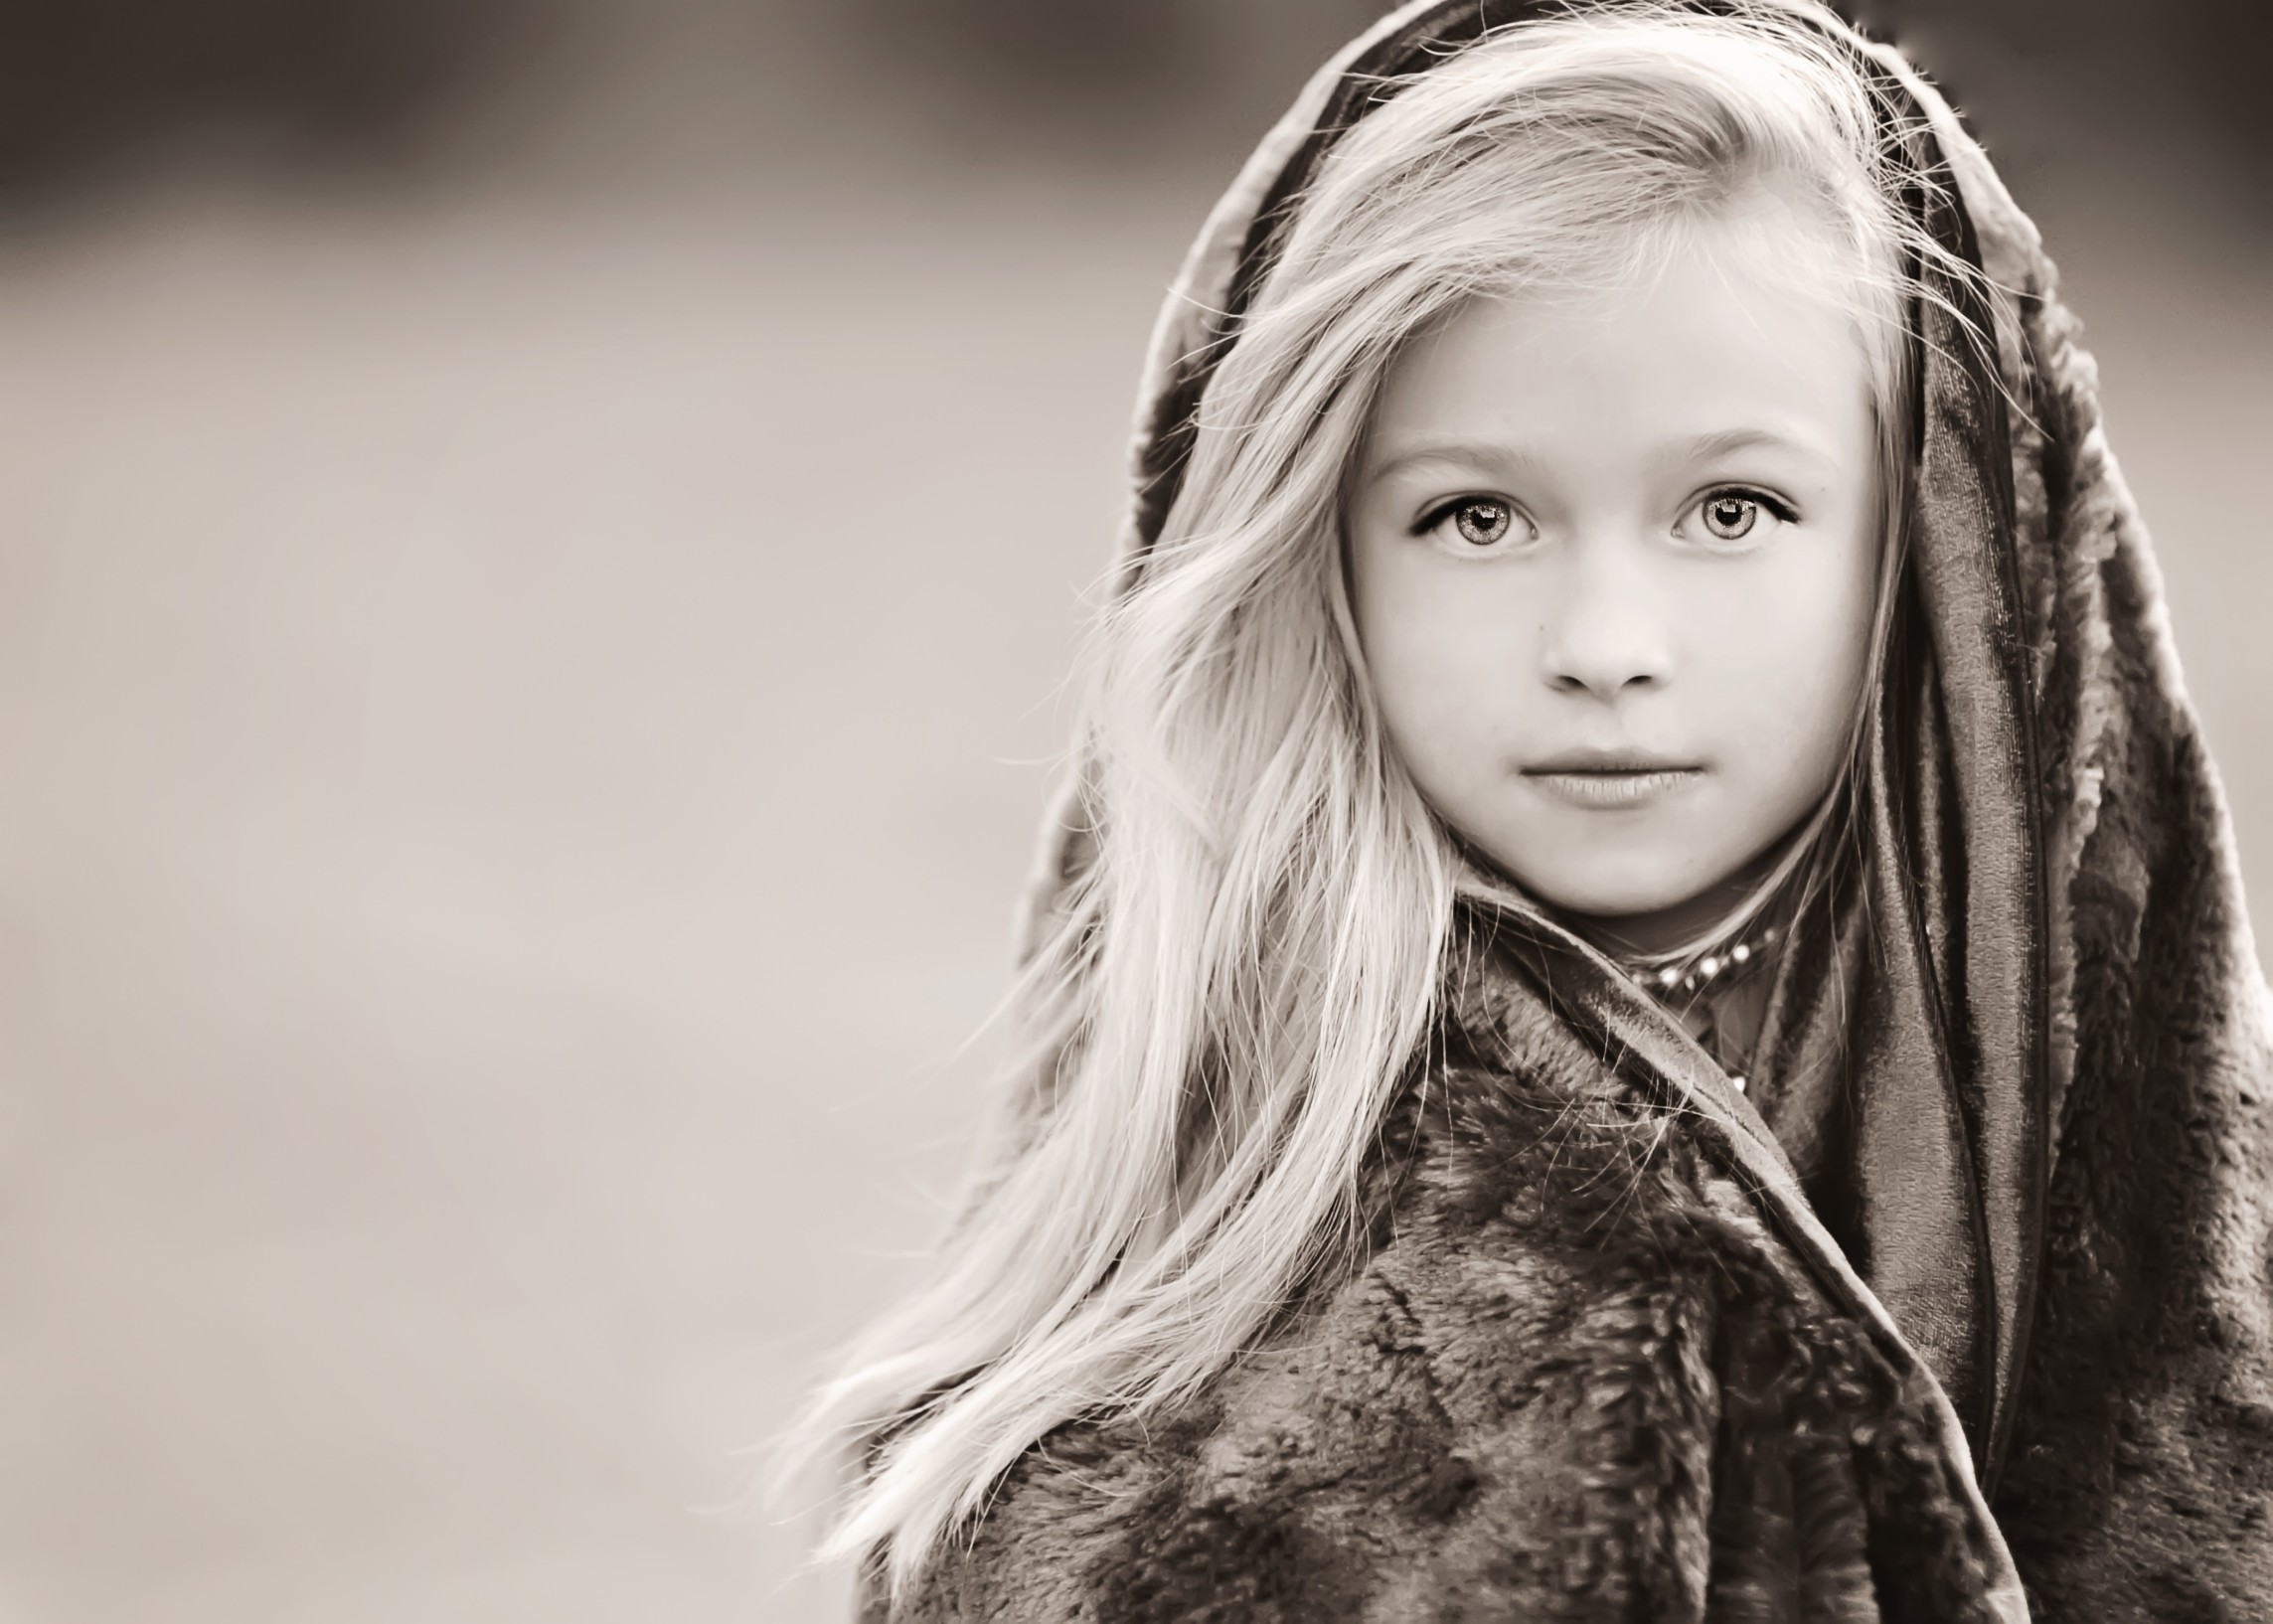
11-20
ABOUT THESE IMAGES Figures 11-17 through 11-20 illustrate the process used to use a black-and-white action on the original photograph. They correspond with the numbered steps as indicated. Original photograph was taken at ISO 1600, f/1.6, and 1/160 second. ©Shana Rae / www.florabellacollection.com
Brightening and Balancing Skin Tones in PSE by Annie Manning
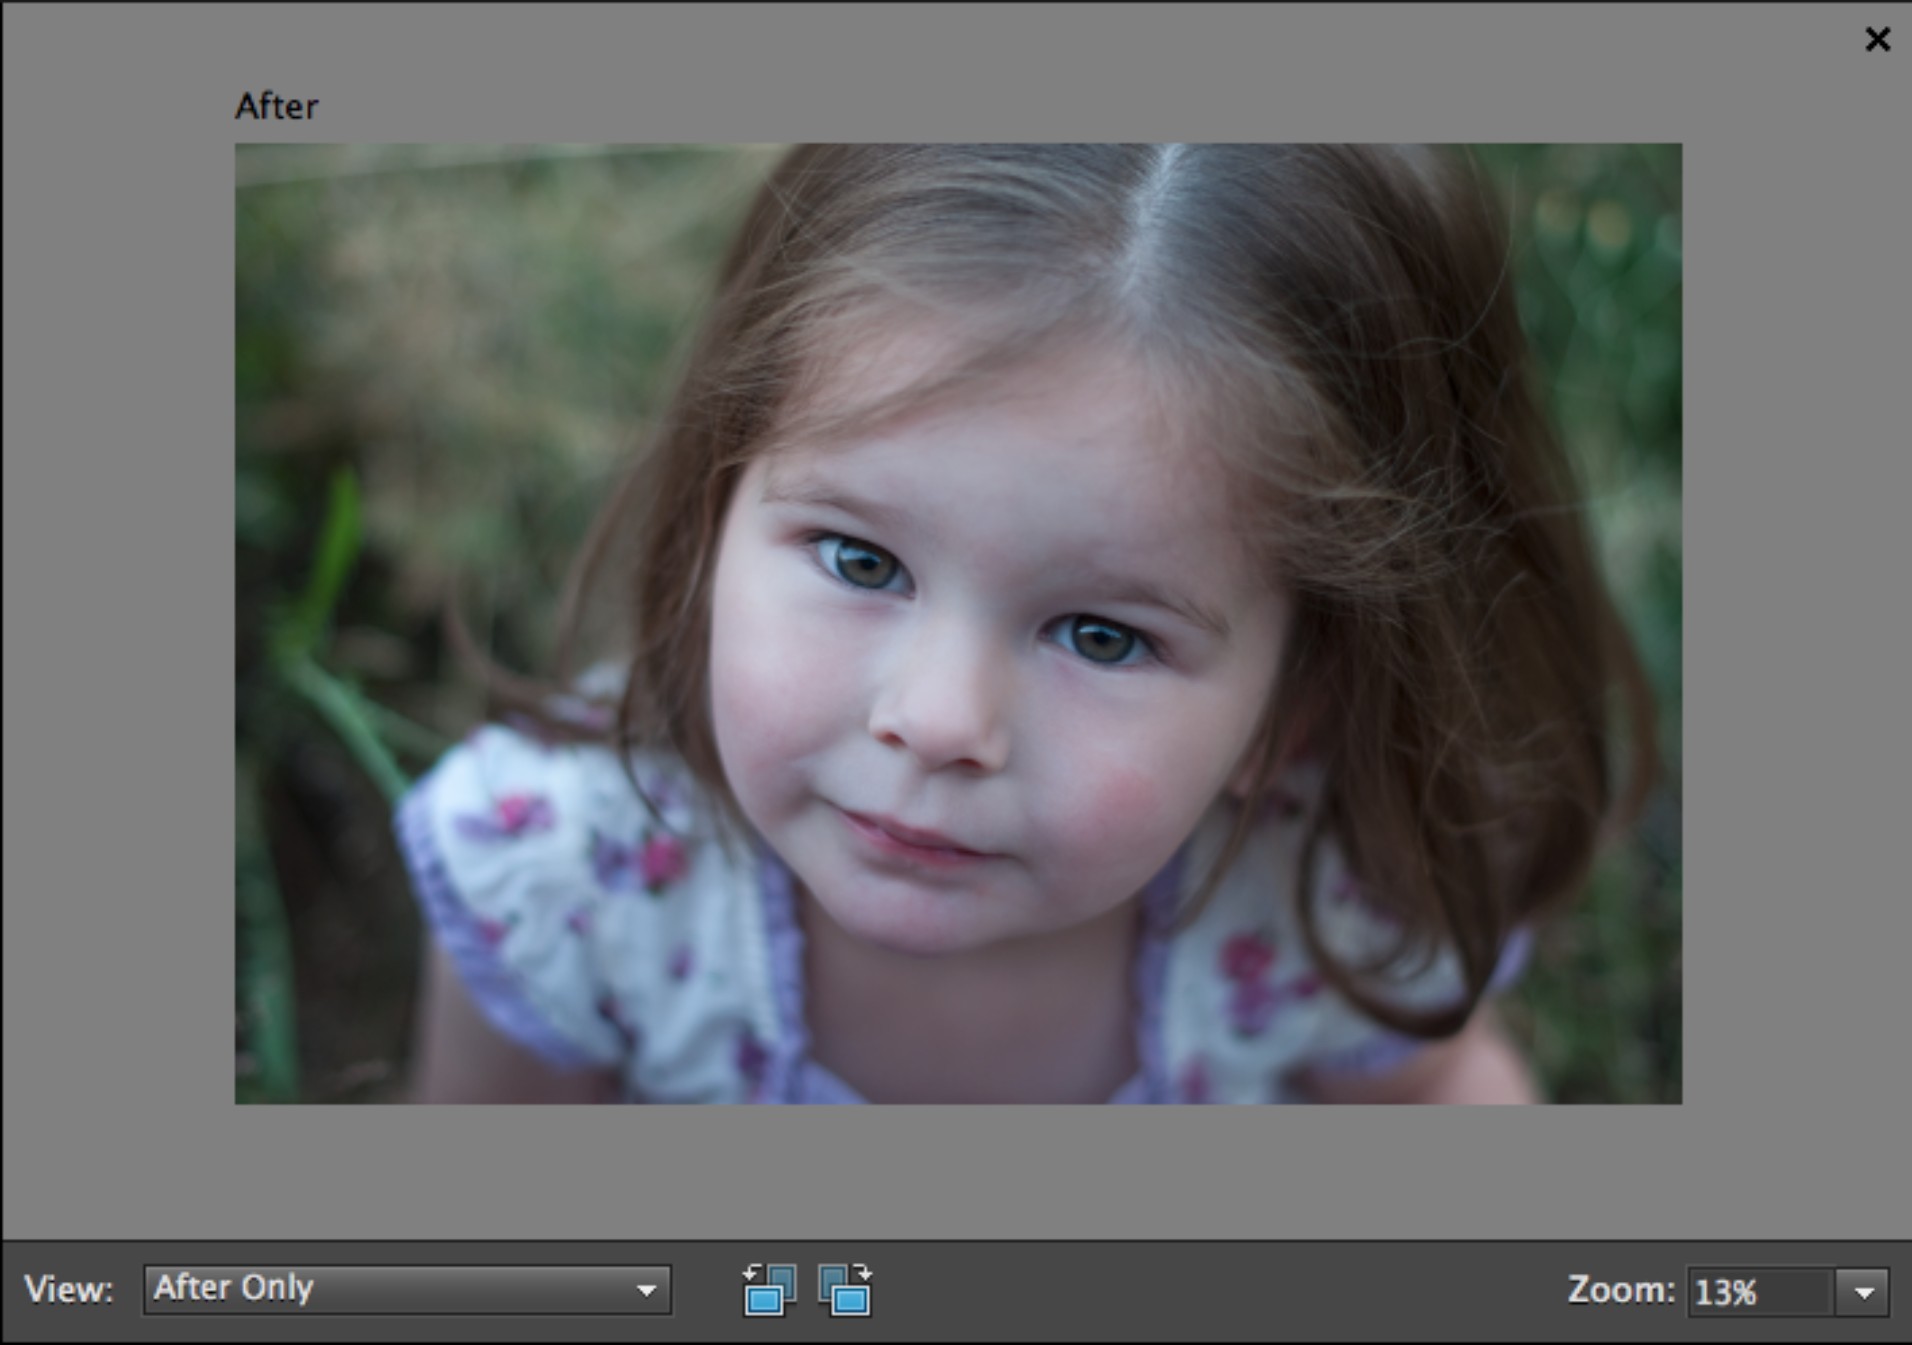
A current trend is to increase the highlights in the skin tones to a point where there are almost no details. There are many ways of doing this, but artist, photographer, and vendor Annie Manning of Paint the Moon has developed an action that really makes it simple. Her workflow in PSE to develop the underexposed “before” capture to the refined and dazzling “after” image is as follows:
1. Import the photo into PSE (see 11-21).
2. Chose Edit⇒Guided and scroll down to Action Player. Scroll to find Banish the Cyan to get rid of some of the cyan cast.
3. Choose Edit⇒Full to see layers, and adjust the new layer up to 70 percent.
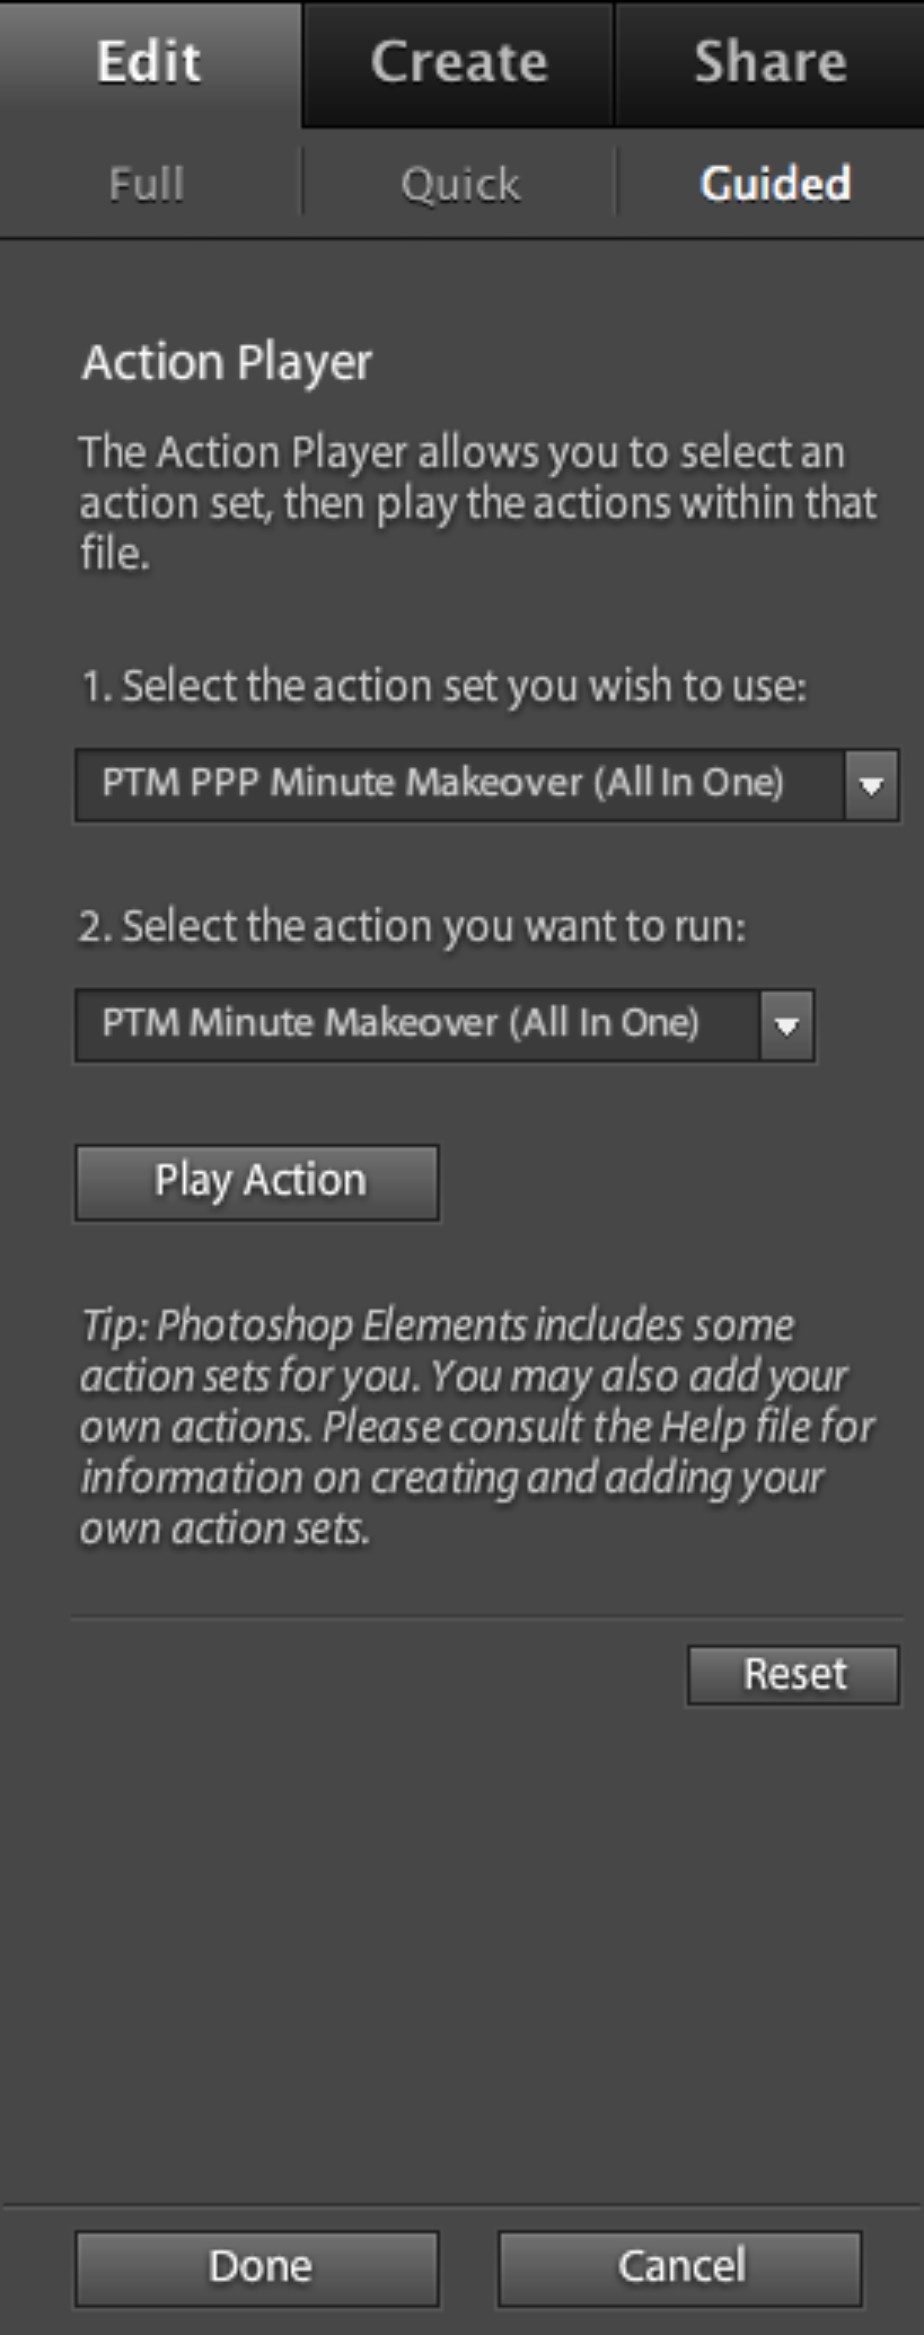
4. Choose Edit⇒Guided, then choose Action Player.
5. Choose the PTM PPP Minute Makeover (All in One) action. See 11-22. This all-in-one action can brighten, correct skin tone, warm/cool, retouch skin, eyes, teeth, and sharpen.
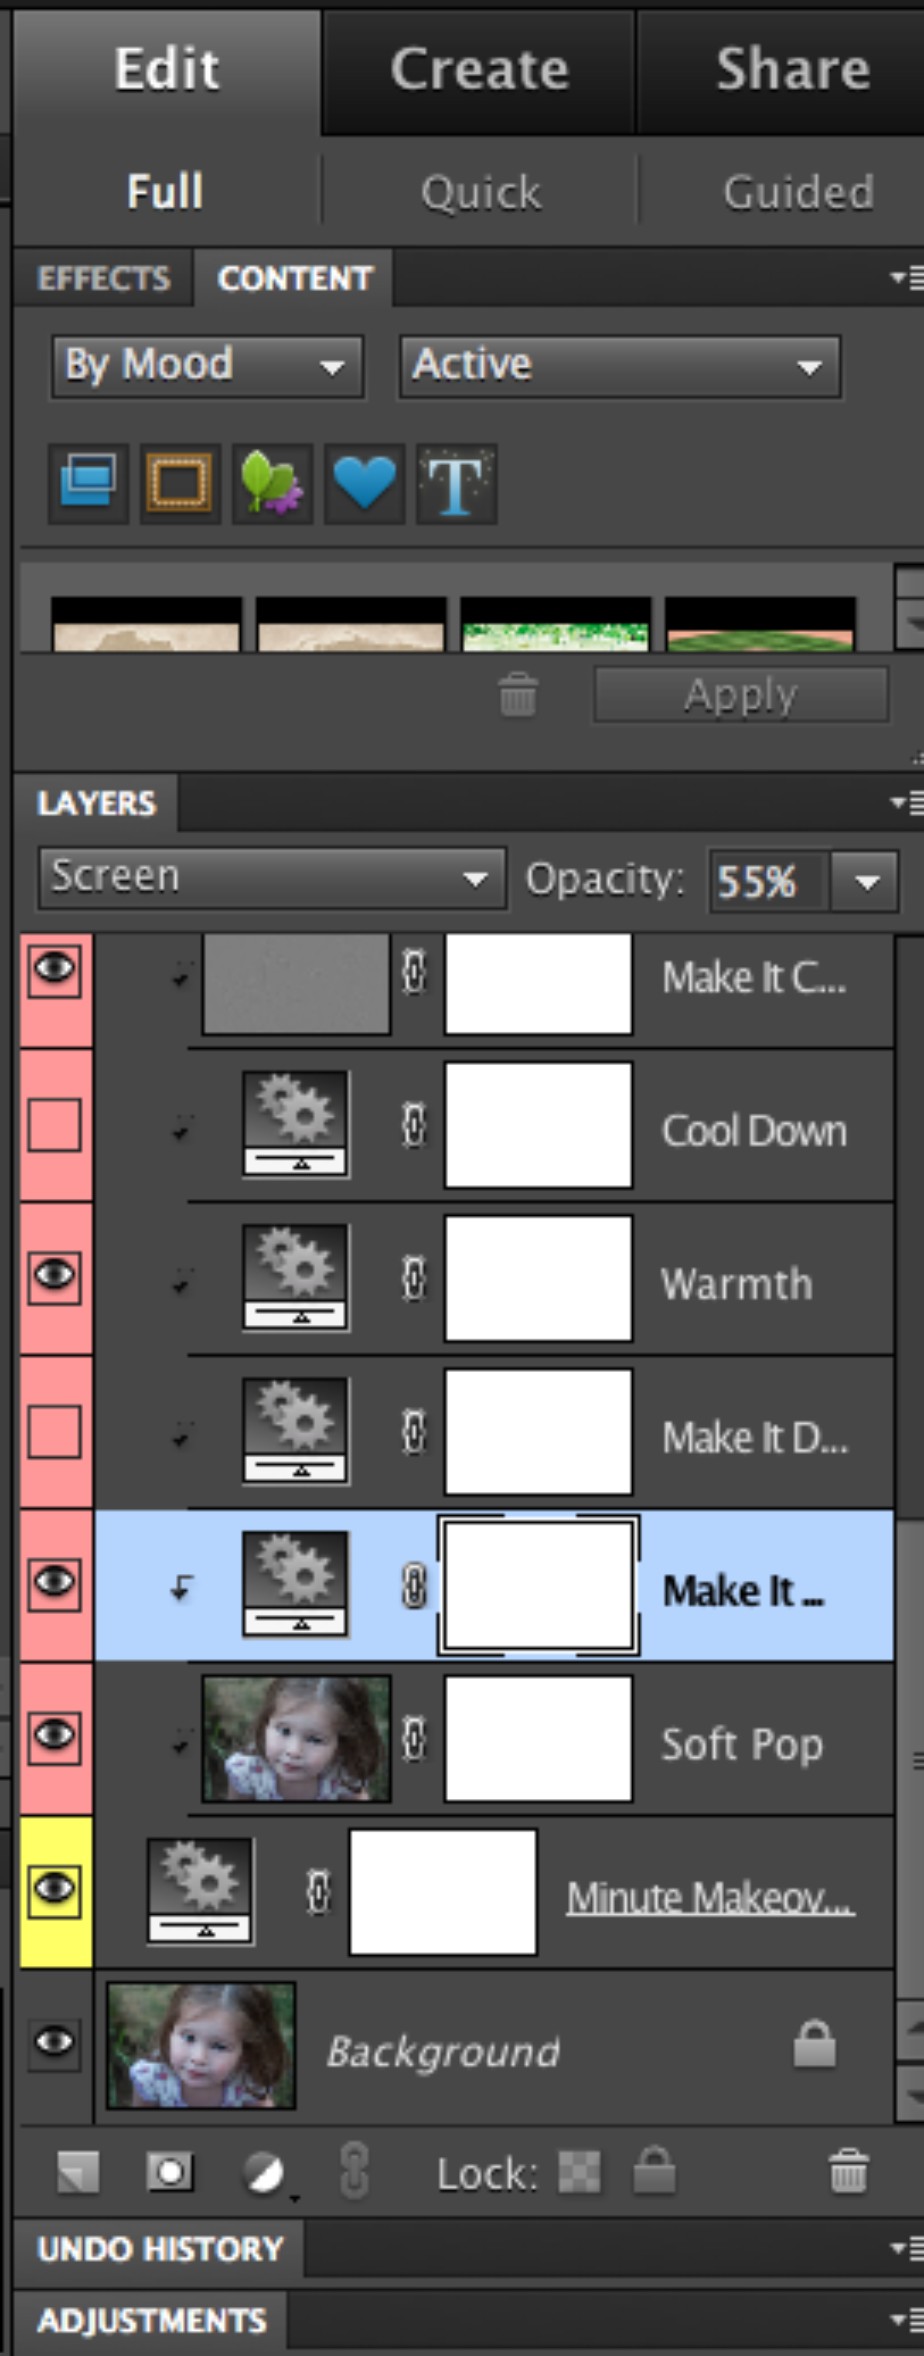
6. Choose Edit⇒Full to get back to your layers. Click on the eye icons to choose various options such as Make It Crisp, Warmth, Make It Lighter, and Soft Pop. Adjust the opacity on the Warmth layer to 100 percent and the Make it Lighter layer to 55 percent. See 11-23.
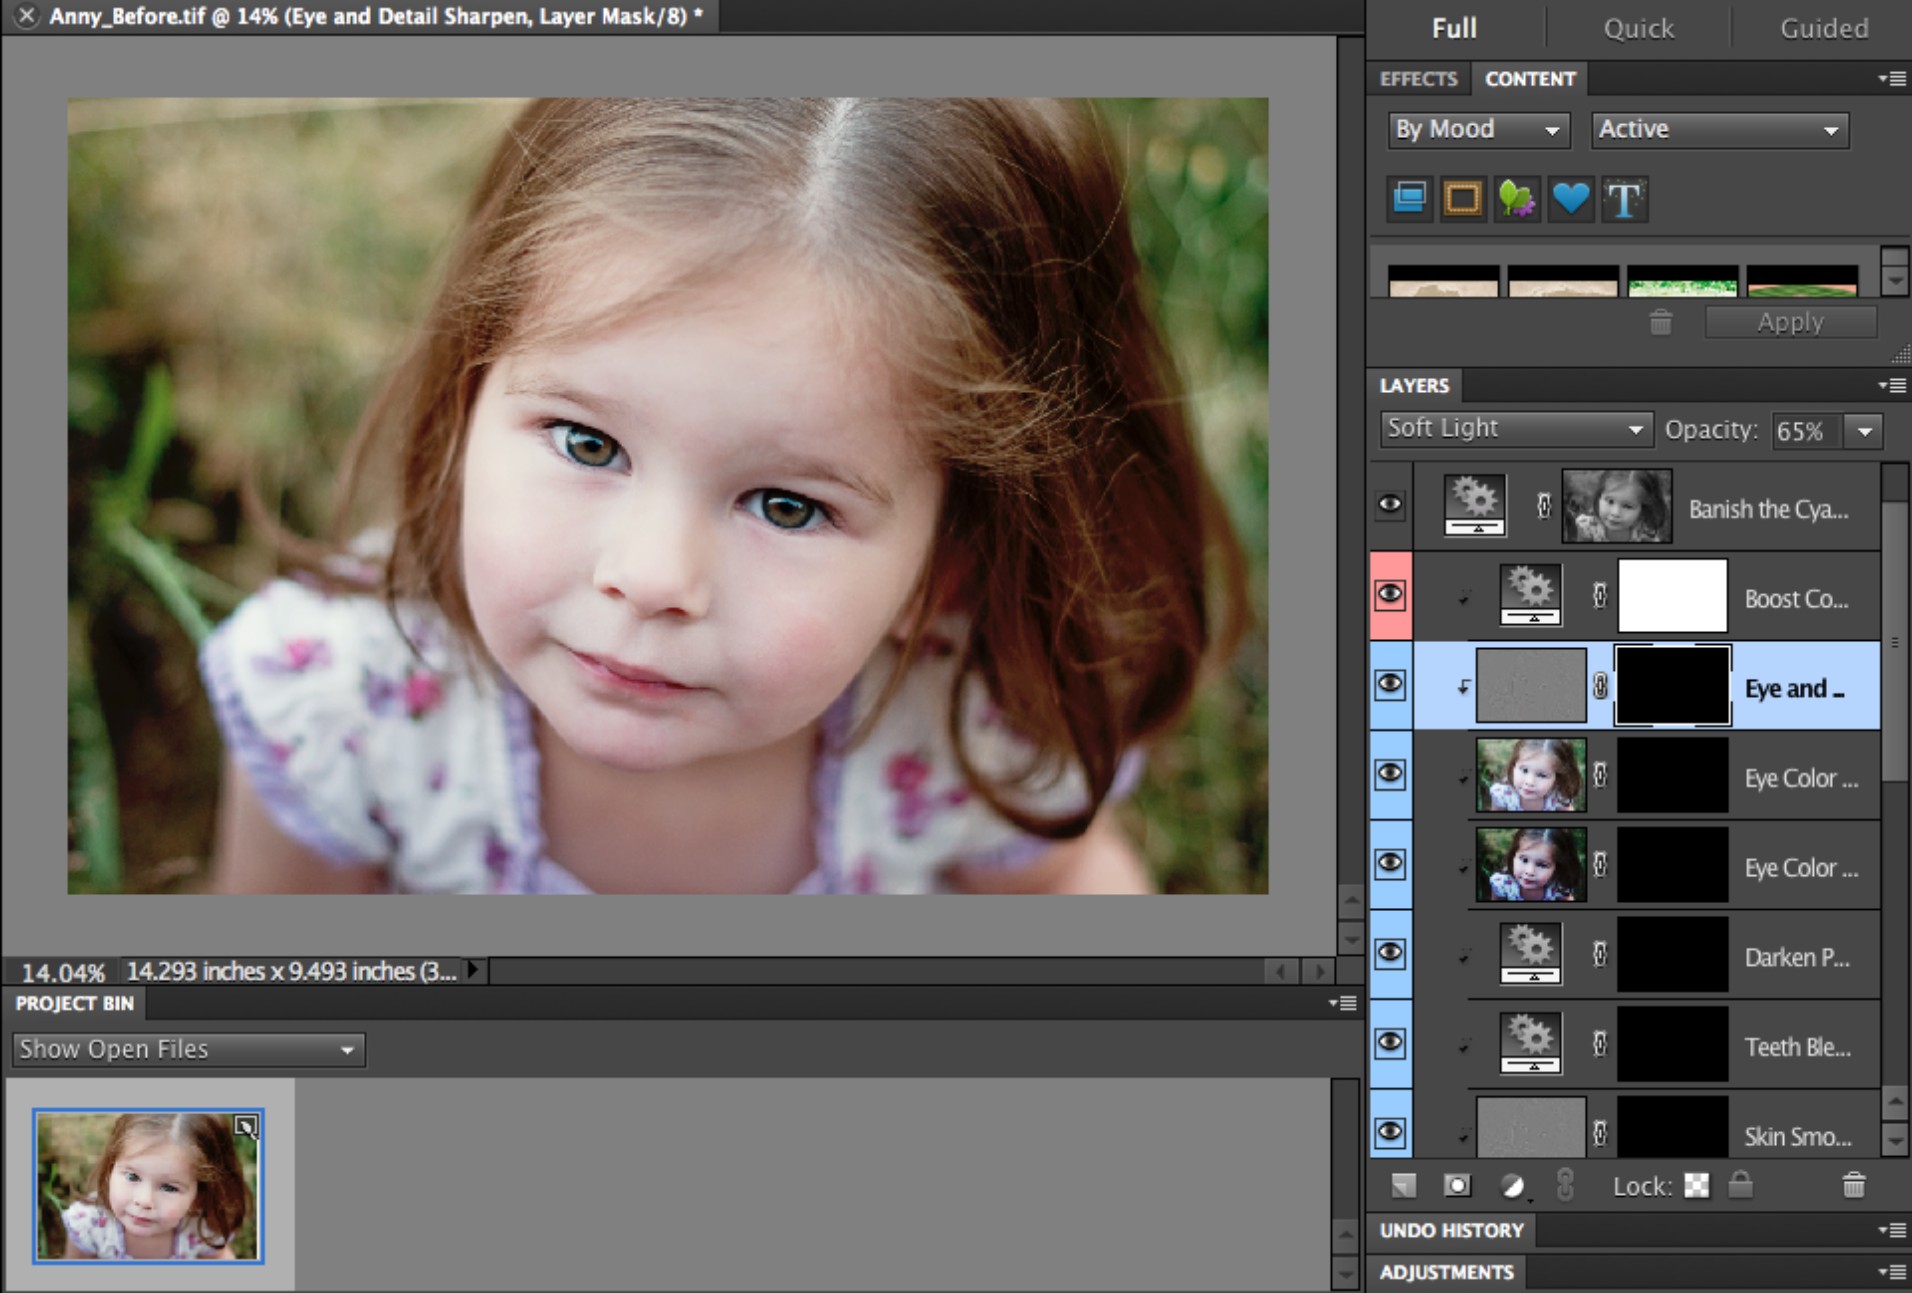
7. Brush over the subject’s eyes using a soft white brush while in the Eye and Detail Sharpen layer. See 11-24.
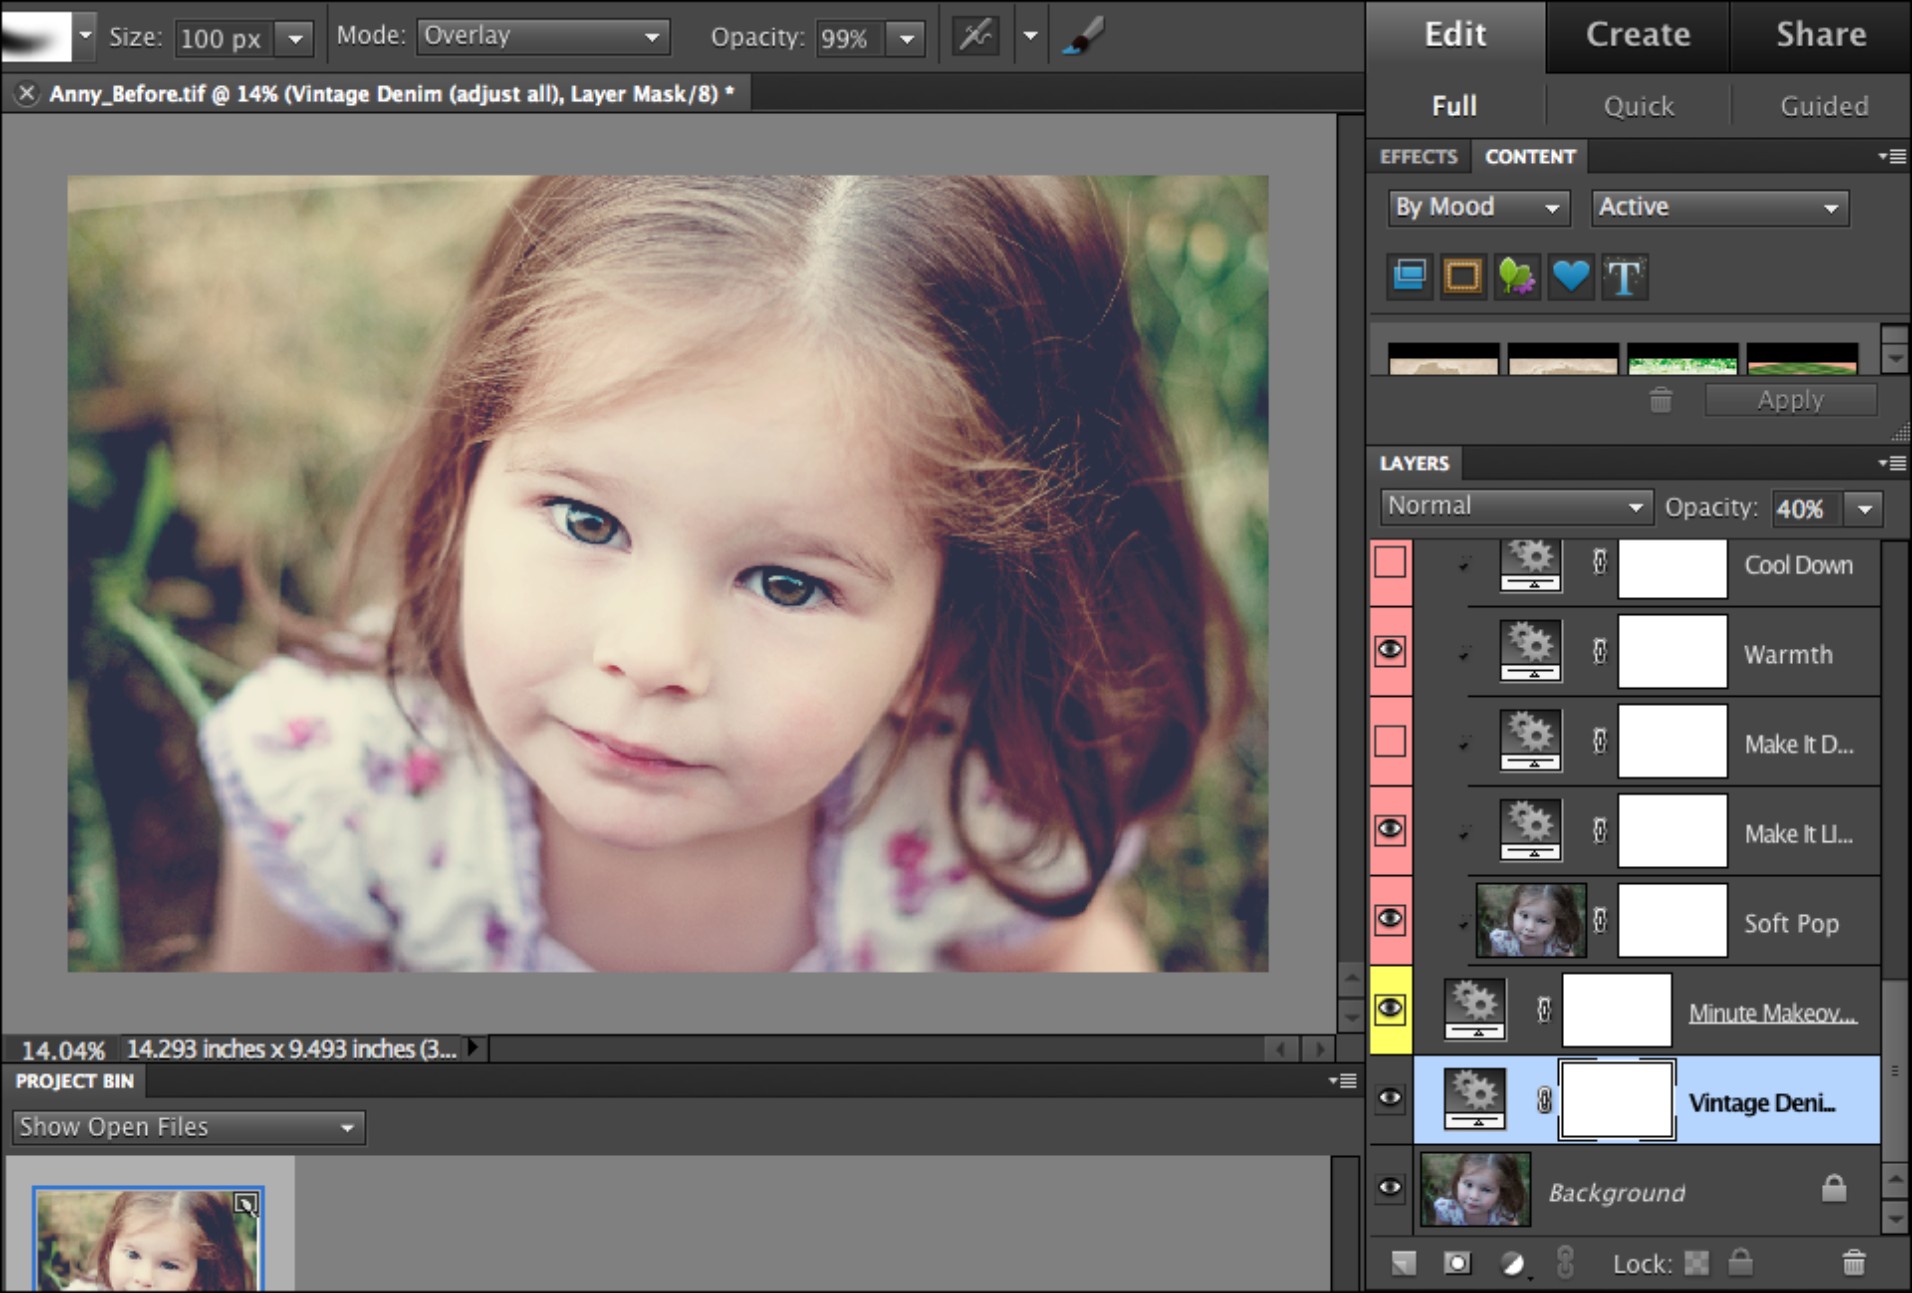
8. Choose Edit⇒Guided, then Action Player, and run the Vintage Denim action.
9. Choose Edit⇒Full and lower the opacity of that layer to 40 percent. Voila! See 11-25.
11-21
11-22
11-23
11-24
11-25
ABOUT THESE IMAGES Figures 11-21 through 11-25 illustrate the process Annie Manning used to brighten the skin tones on her original photograph. They correspond with the numbered steps as indicated. Original photograph was taken at ISO 250, f/1.8, and 1/500 second. ©Annie Manning / www.paintthemoon.net
Sunflare Lightroom Workflow by Nichole Van
Nichole Van, photographer and teacher, uses her own set of Lightroom Presets to demonstrate her workflow. A preset is a file that contains settings that create an effect. Her presets were previously installed in Lightroom to add to the software’s default presets.
Nichole talks about her concept: “I love how the prairie grass looks mid-summer, all shades of green and gold and cream. So I actually designed the child’s dress to match the colors of the prairie: sage green and cream. From there, I just wanted images of her in the scene, walking through the grass, lost in nature. I wanted her to be a part of it all and to blend with the scenery.”
To emulate Nichole’s sunflare, follow these steps:
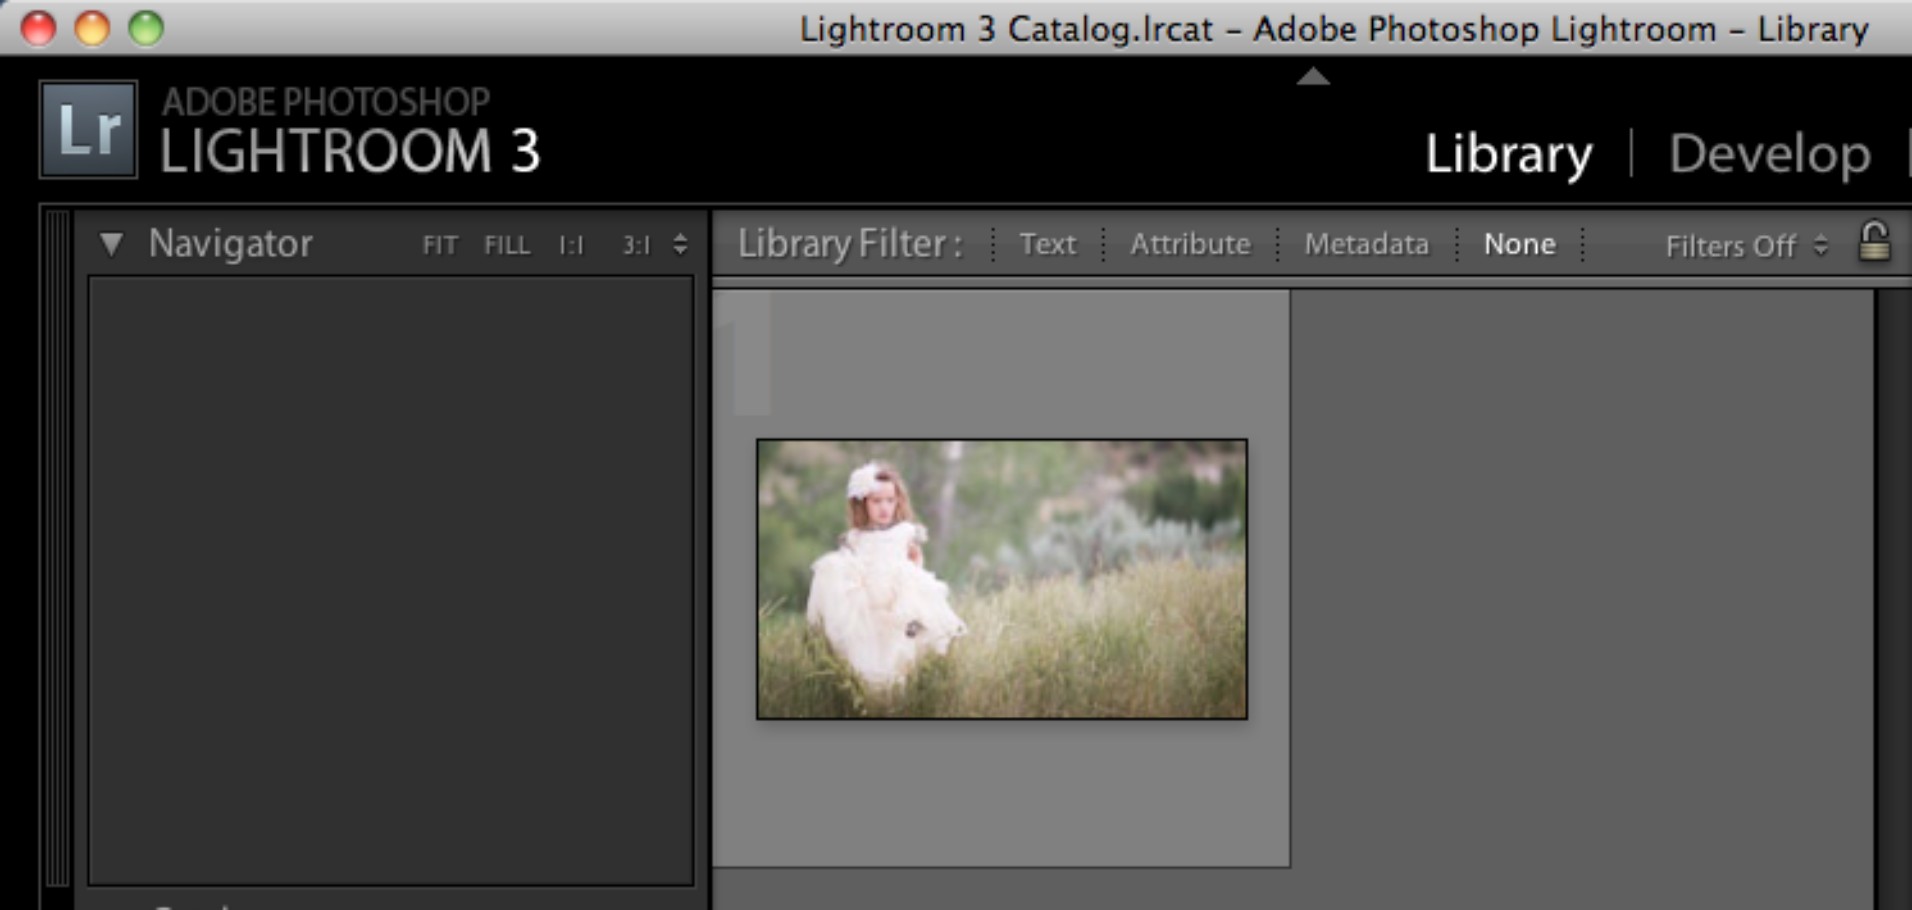
1. Import the original photograph into Adobe Lightroom from the Library Menu. See 11-26.
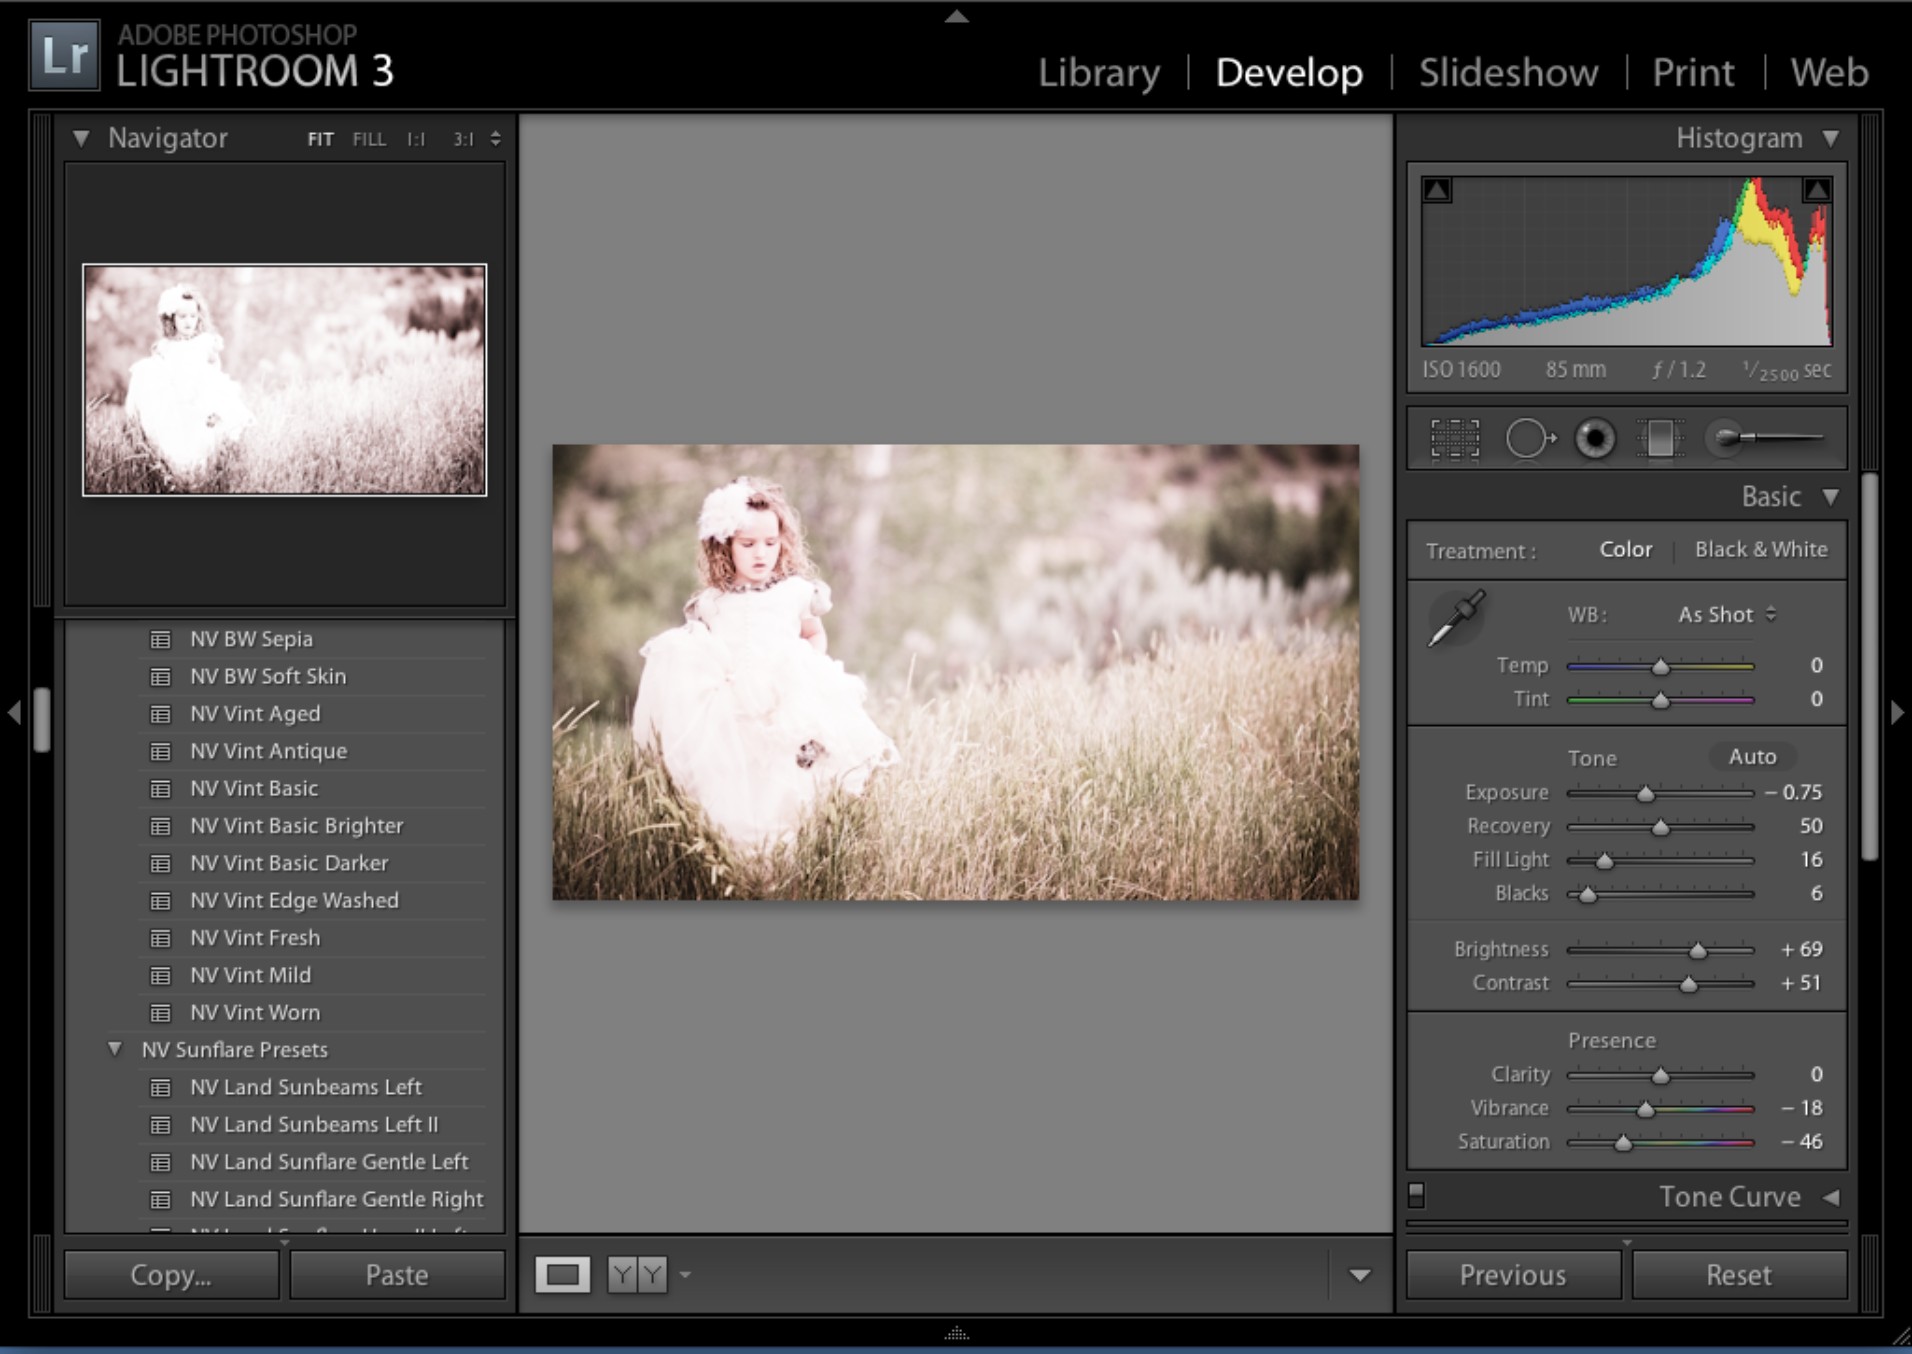
2. In the Develop menu, find the list of presets on the left side of the page. Apply the NV Vint Fresh preset from the BW and Vintage presets. Reduce the Exposure slider to –0.75. Reduce the Blacks slider to 6. Adjust the Recovery slider to 50. See 11-27.
3. Apply NV Land Sunflare II Right. This last step is the trickiest because you’re going to add a tone to the image.
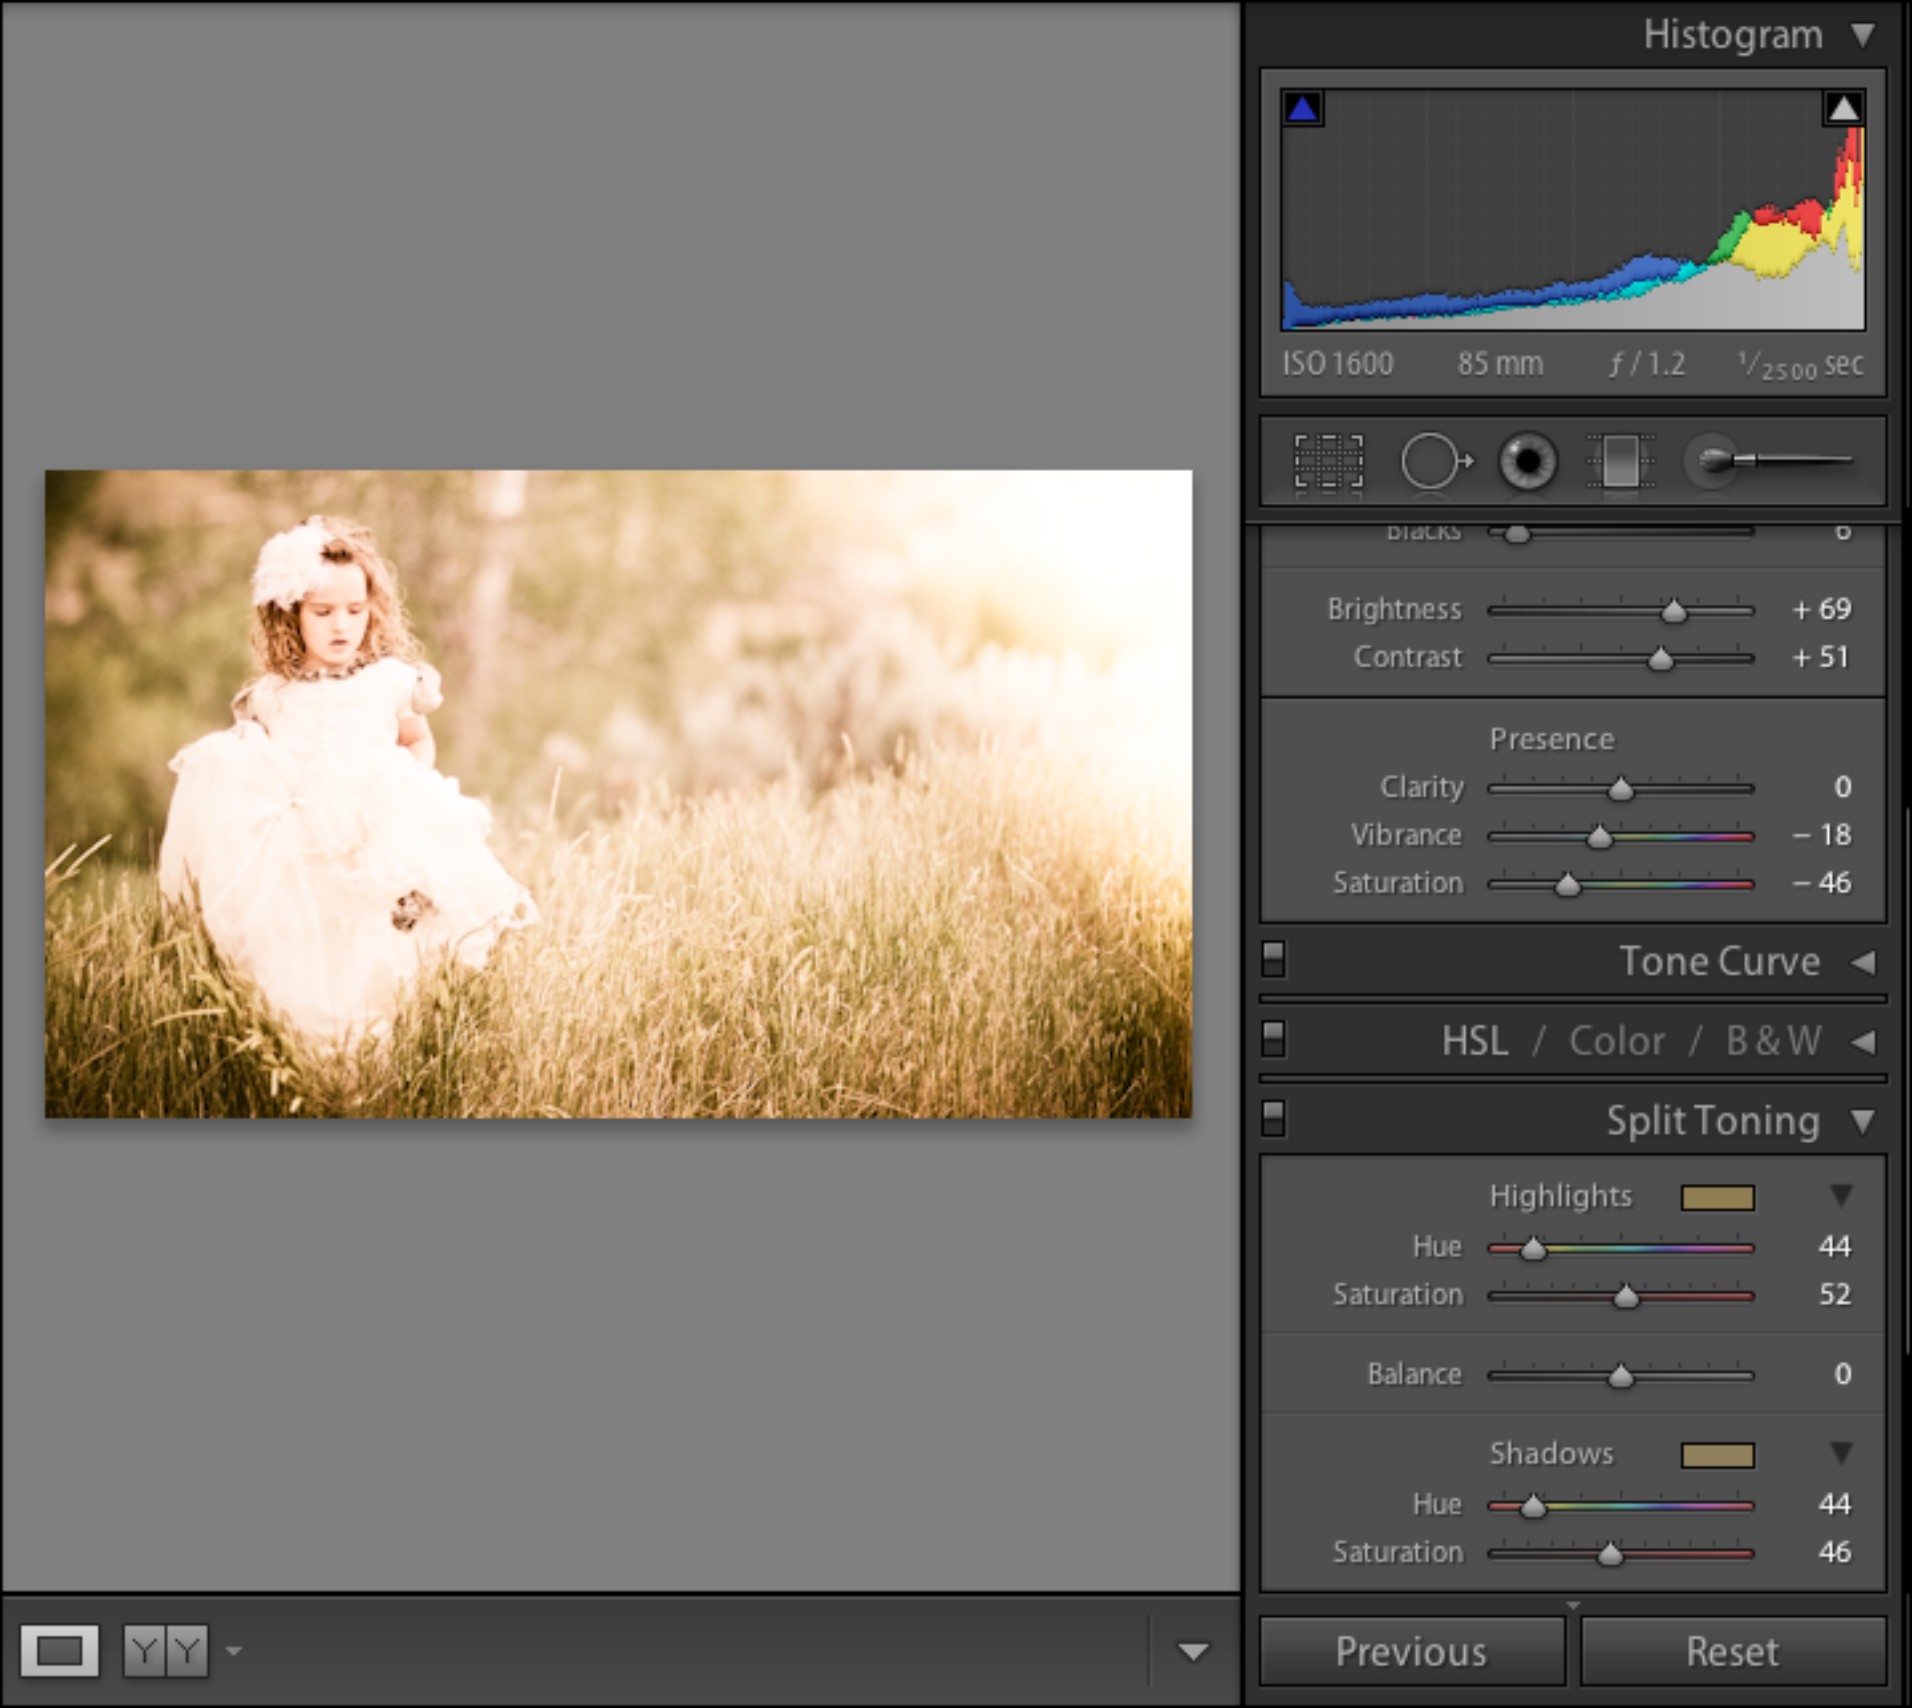
4. Use the gray vertical bar on the right to scroll down through the Treatment sidebar until you come to Split Toning.
5. Change the Highlights Hue to 44 and the Saturation to 52.
6. Change the Shadows Hue to 44 and the Saturation to 46. See 11-28. And there you have your completed sunflare.
11-26
11-27
11-28
ABOUT THESE IMAGES Figures 11-26 through 11-28 illustrate the process Nichole Van used to add a sunflare to her original photograph. They correspond with the numbered steps as indicated. Original photograph was taken at ISO 1600, f/1.2, and 1/2500 second. ©Nichole Van / www.nicholev.com.
Photoshop and Lightroom Possibilities by Ginny Felch
As you can see by now, there is a myriad of possibilities, both very simple and very complicated, for photographic embellishment and enhancement in post-production software. Next, I thought it would be fun to show you some images that I have enjoyed in both Adobe Photoshop and Lightroom.
It’s all about experimentation and play, going with your intuition, your muse, your conceptual ideas. The network of photographers, sharing and supporting one another, that has developed since the publication of my first book is dazzling and exciting. You can get information for free and you can pay for online classes, but you will never run out of tools for your creative toolbox.
Enjoy these renditions that have come out of some fairly extensive Photoshop editing (as in 11-29) as well as pre-loaded presets for Lightroom at the push of a button (as in 11-30). Then decide how you wish to go forward into Neverland. Remember: Always begin with a photograph with integrity!
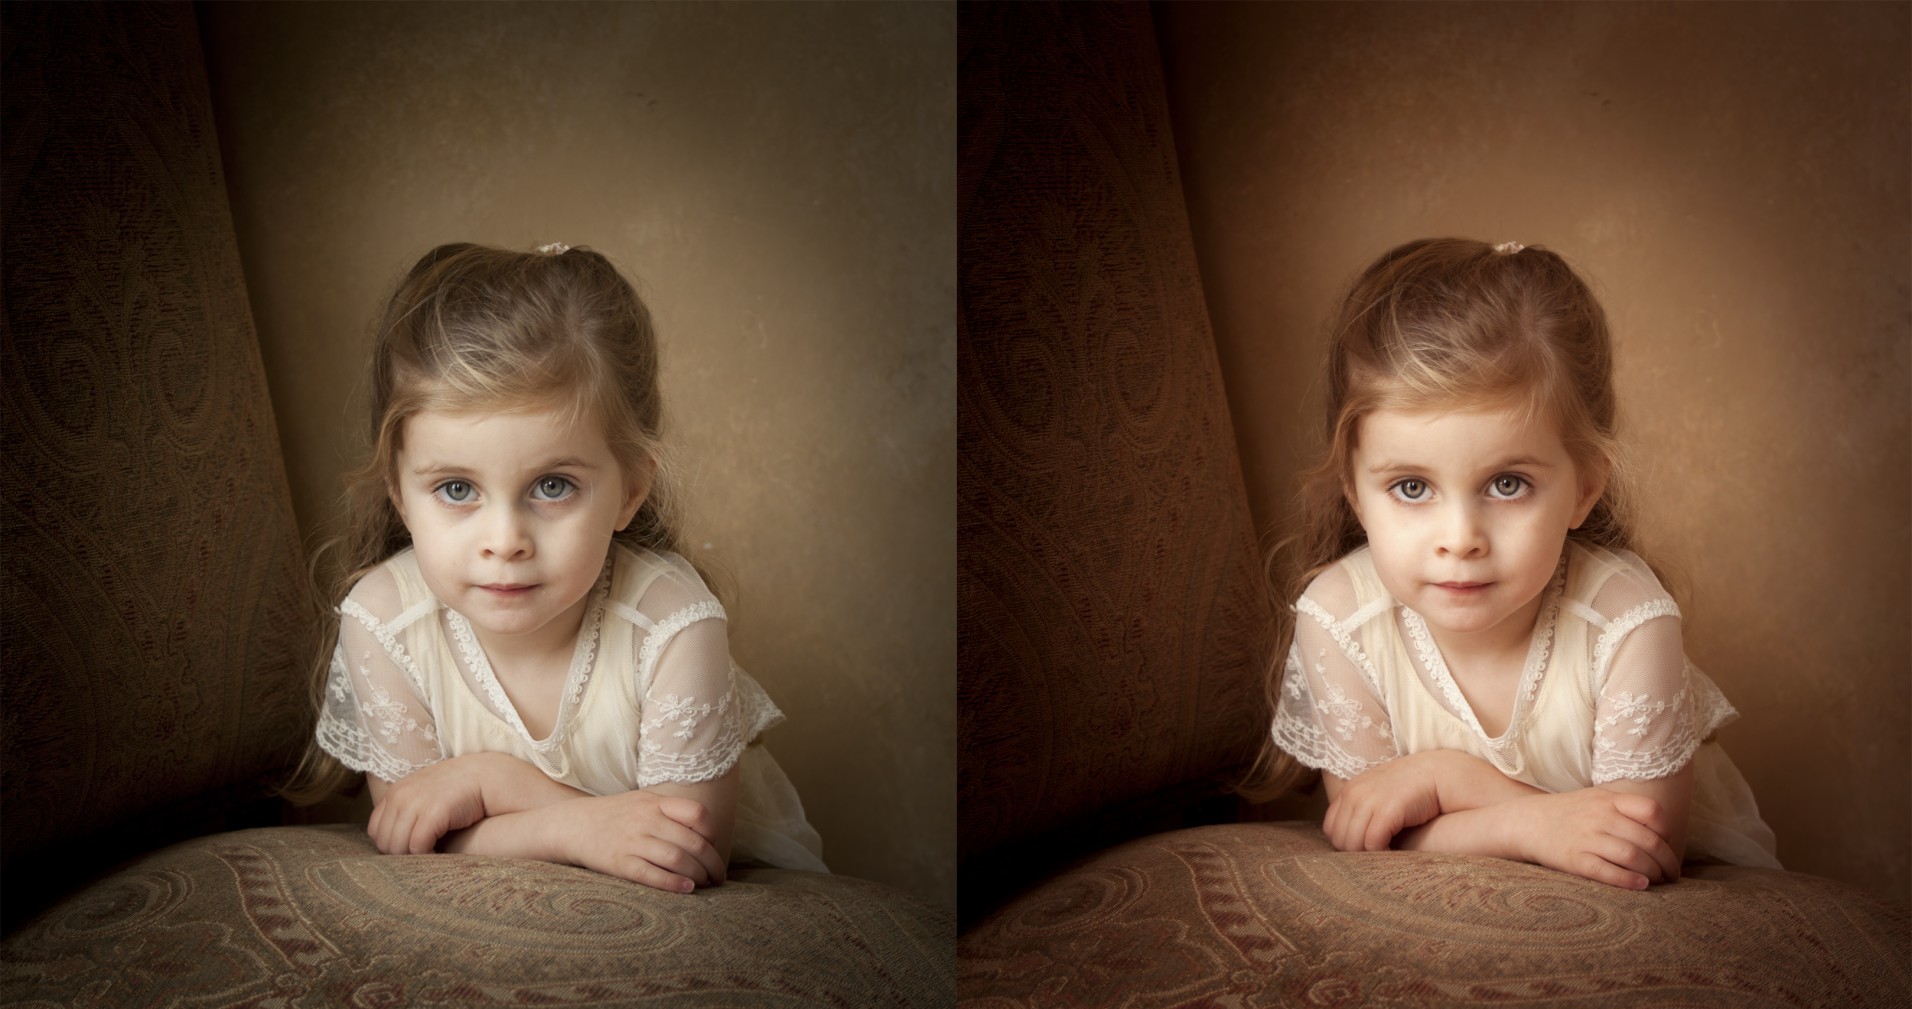
11-29
ABOUT THIS PHOTO This shows the original capture and then the post-production version with a great deal of intricate Photoshop editing to warm up, sharpen, vignette, and remove unwanted shadows. I have been using Photoshop since its initial version! Taken at ISO 200, f/4.0, and 1/100 second. ©GinnyFelch / www.photographingchildren.com
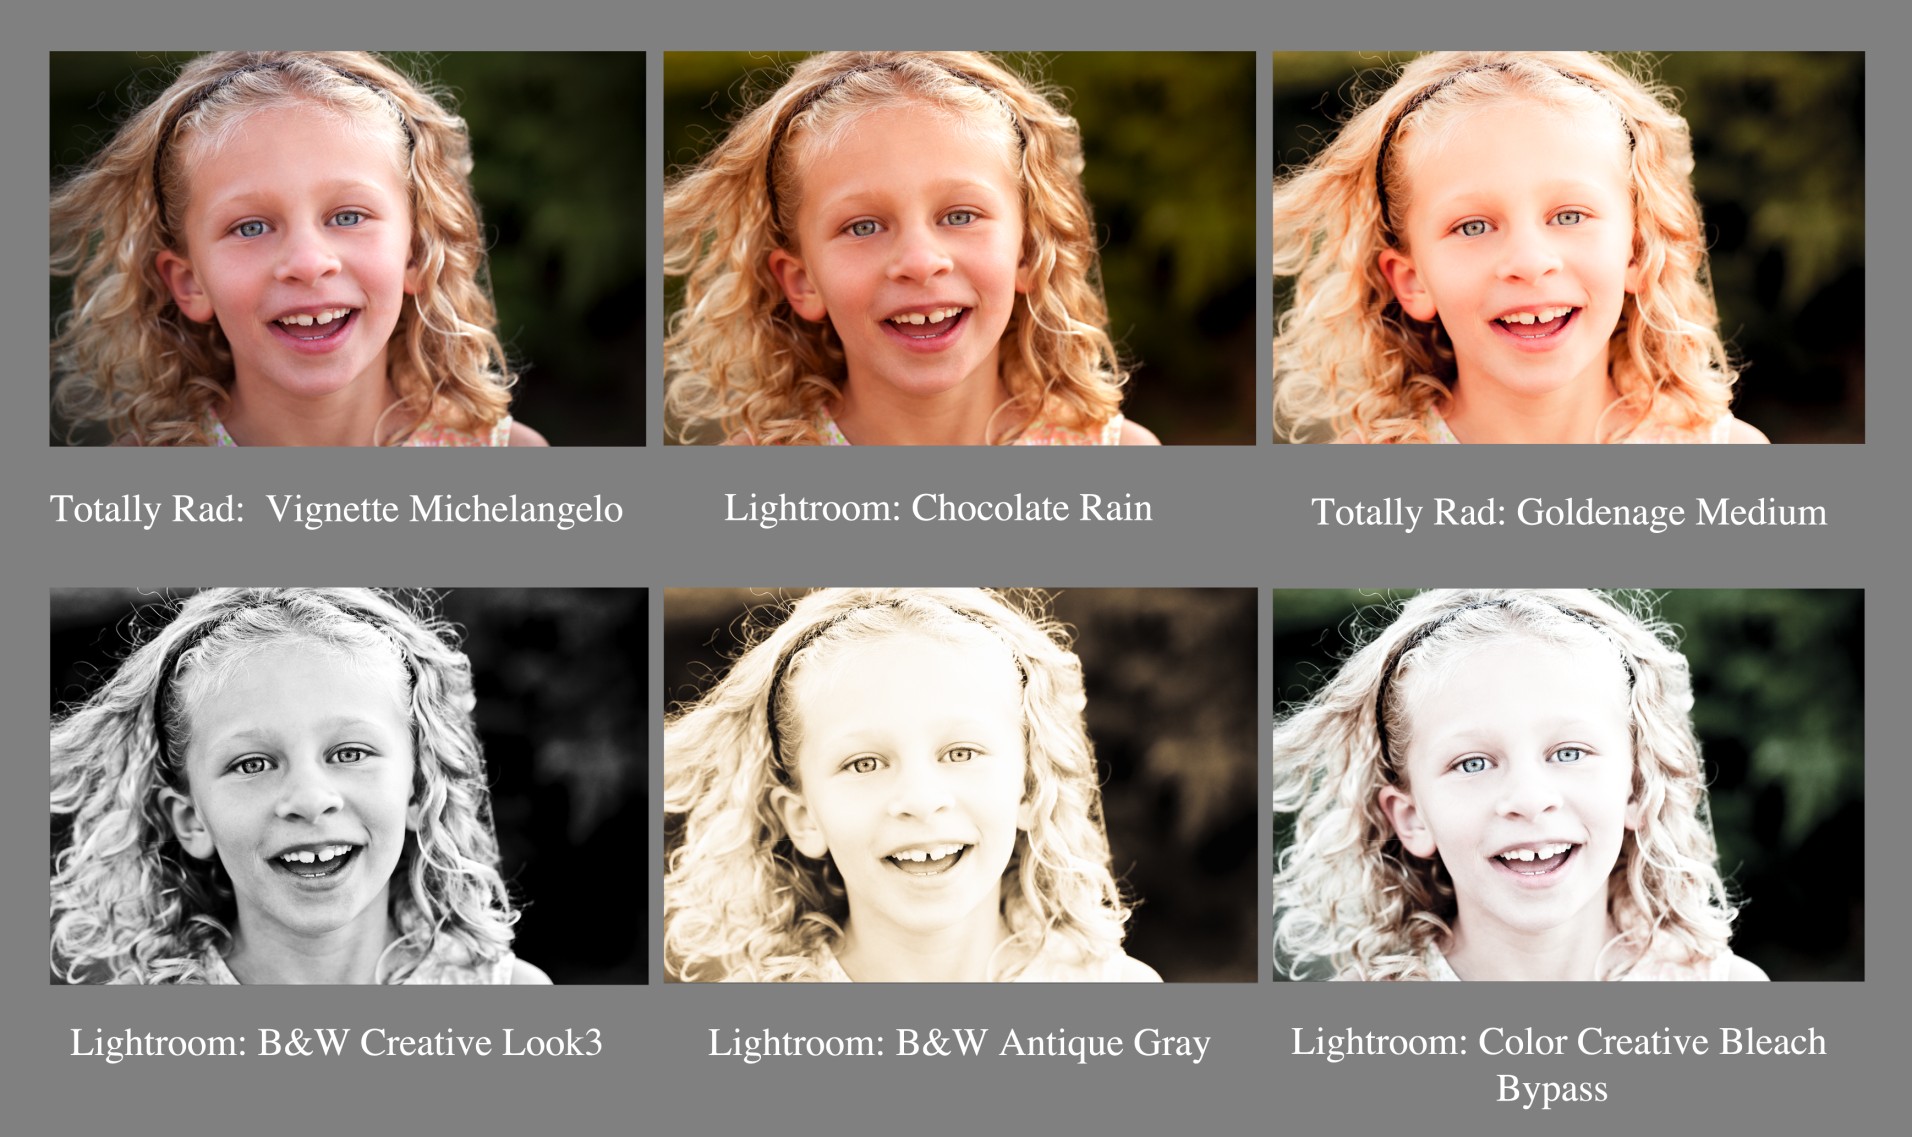
11-30
ABOUT THIS PHOTO By simply pushing a button in Lightroom, you can access a myriad of presets one by one and see which effect takes your breath away. Lightroom comes equipped with default presets (you can see them in the left-hand column of the Development menu), and you can also purchase others online. ©Ginny Felch / www.photographingchildren.com
Resources
Below you will find the resources that I have gathered with the help of Mary Schannen, who is my inspiration for finding and using online boutique offerings.
Textures
First are the textures, which are used to add via layers in post-production to create unique photographs.
• Beth Armsheimer. http://betharmsheimertextures.blogspot.com
• Digital Artistry. http://sarahgardnerphotography.blogspot.com/p/new.html
• Flickr. www.flickr.com; do a search for free textures and multiple people come up
• Flourish. http://shop.nicholev.com
• Flora Bella. www.florabellacollection.com
• Flypaper. http://flypapertextures.blogspot.com
• From the Treetop. http://fromthetreetop.com/blog/2010/10/introducing-ftt-vintage-textures-overlays-1-fine-art-photographer
• Inspired by Nadia. http://inspiredbynadia.com/nadia-stalgic
• Jessica Drossin. www.jessicadrossintextures.blogspot.com; see 11-31
11-31
ABOUT THIS PHOTO A gorgeous palate of colors and textures is an example of the products that Jessica Drossin has in her online shop. www.jessicadrossinphotography.com/yhg
• Kaleidoscope. http://kaleidoscope.pattibrownphotography.com
Actions
The resources for actions I recommend are listed below.
• MCP. www.mcpactions.com
• Flora Bella. www.florabellacollection.com
• Child’s Play. http://childsplayactions.com
• Journey. www.fallintoblue.com/actions
• Oh So Posh. www.ohsoposhphotography.com/artstore
• Bohemian Secret. www.bohemiansecret.net
• Lilyblue. http://leahzawadzki.lilyblue.com/actions
• Totally Rad. www.gettotallyrad.com
• Paint the Moon. http://paintthemoon.net/blog
Workshops
The workshops listed here are some of the current popular and inspiring classes taught by talented and entrepreneurial photographers.
• MCP. www.mcpactions.com/workshops.html
• Phaunt U. www.photoshopnaked.com
• Flourish. http://shop.nicholev.com
• Bloom. www.everythingbloom.com
• Online Natural Light Workshop. http://thelightworkshop.wordpress.com
• Crave Photography. http://cravemyphotography.com/blog/mentoring-4
• Erin Cobb Clean Color. http://erincobb.com/ThePigBear/?page_id=3762
• Fly: The Guide. http://angiewarren.com/mentoring
• Captivate. www.captivatephotogs.com/?page_id=15
• 503 Workshops. www.503photography.com/#/workshop-home
• Pinkletoes. www.pinkletoes4photographers.com
Educational and social networking forums
Forums and social networking are very commonly used by beginning and amateur photographers of children who wish to show their own work for critique and improvement. These are highly recommended:
• Bloom. http://thebloomforum.com
• ilovephotography.com. http://ilovephotography.com/forums
• Clickinmoms. www.clickinmoms.com
Giving back through charities
Many children’s photographers love to use their blogs and networking to gather attention and support for their own charities. Here are some examples.
• Now I Lay Me Down to Sleep. www.nowilaymedowntosleep.org
• Tiny Sparrow. http://tinysparrowfoundation.org
• Little Angels. www.nordstromphoto.com/blog/category/little_angels_by_lori_nordstrom
Assignment
Experiment with Textures
Start out by creating your own texture file by photographing something you feel will make an interesting image when coupled with a photograph you have in your archives. Be sure to have an intention of some kind, i.e., to make the photograph more painterly or moody. In the process, you may find that you might like to have a number of textures on hand to have the opportunity to play a bit.
Open both the original photograph and the texture file in to PSE or Photoshop in layers as seen in the demonstrations in this chapter. As you shift through the blending modes and opacity, you will most likely come up with something that you really like. You might even want to try using two layers! This is what I love about this creative process – everyone will arrive at a different place and thus have a unique photograph.
For this assignment, I found a 12-year-old print of my great-nephew. I photographed it with my camera first and opened the file in Photoshop. Then I opened up one of my own favorite textures and layered it with the original photograph. I finally arrived at what I had intended – a photograph that looks like an old tintype. Shown here are the original, the texture I used, and the final product.
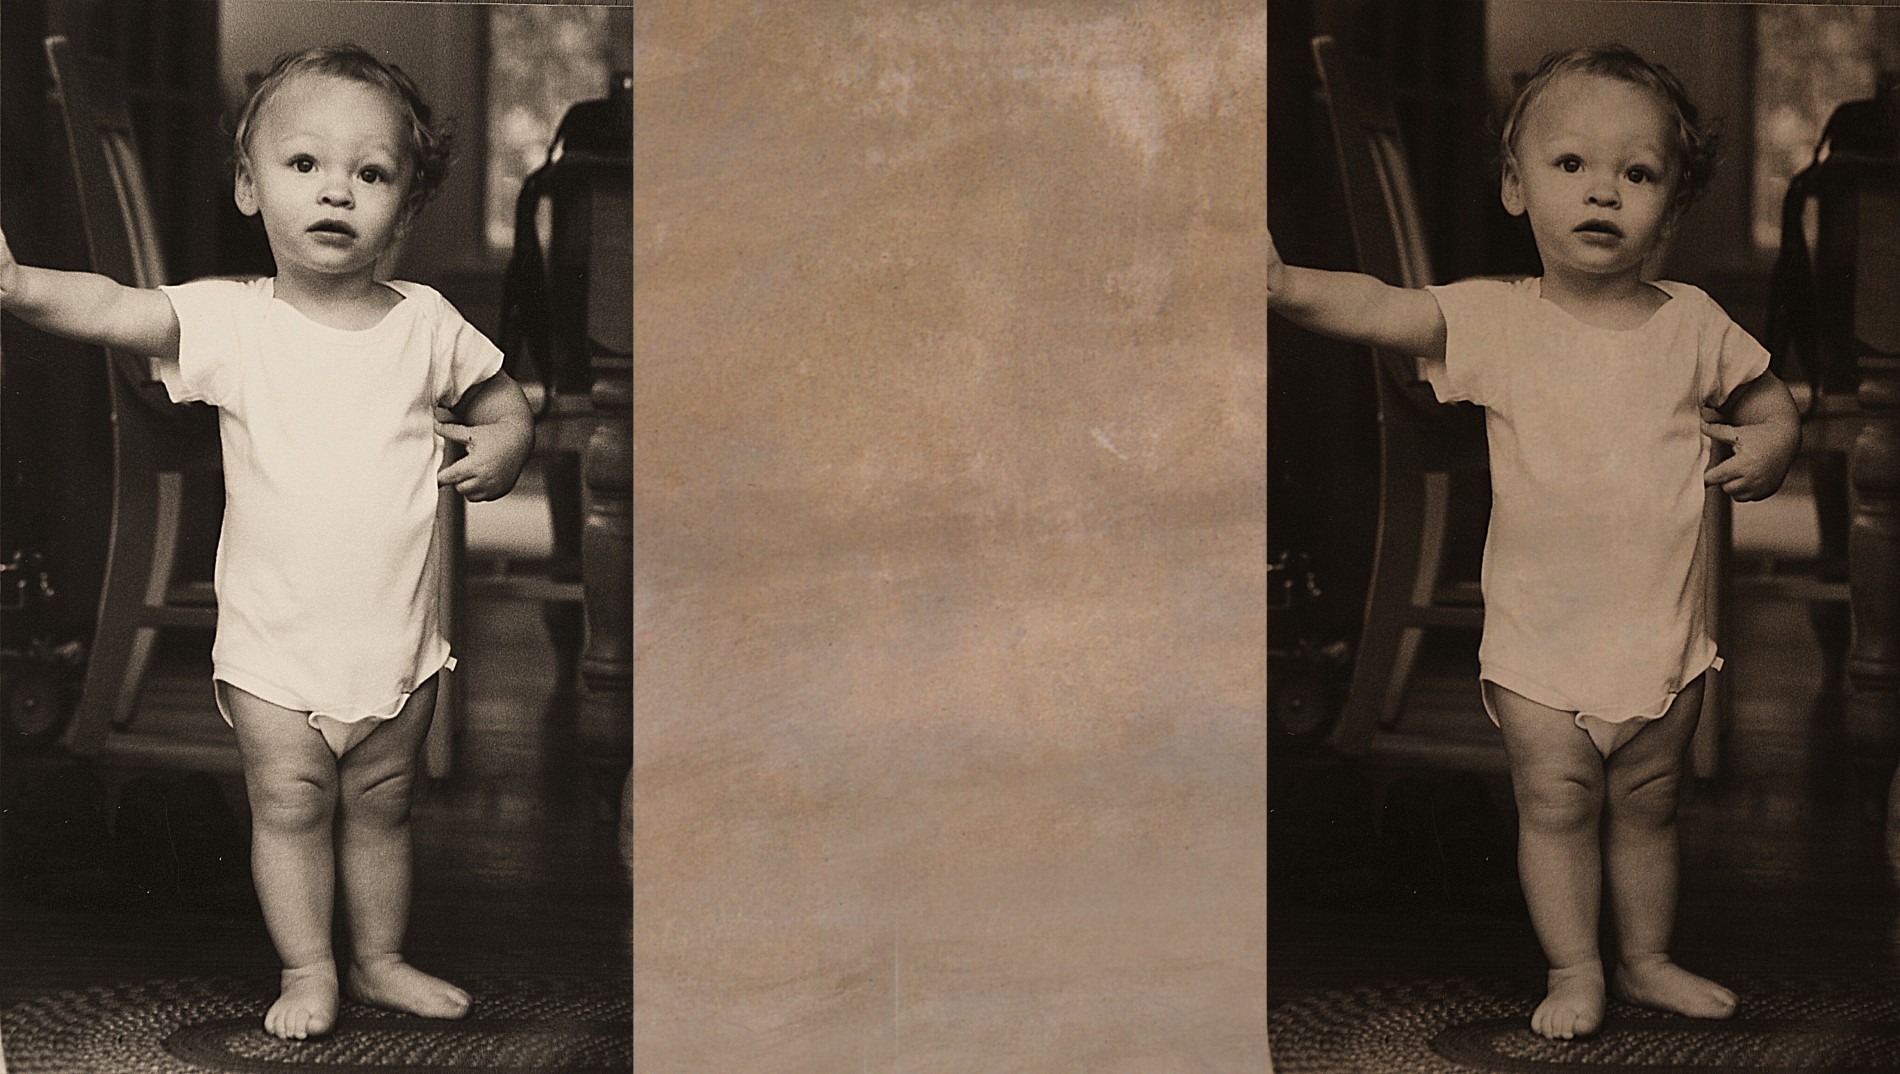
©Ginny Felch / www.photographingchildren.com
Remember to visit www.pwsbooks.com after you complete this assignment and share your favorite photo! It’s a community of enthusiastic photographers and a great place to view what other readers have created. You can also post comments, read encouraging suggestions, and get feedback.

©Andrea Joki / www.ajatonjoki.com