
Chapter 14
Programming the Canvas
WHAT YOU WILL LEARN IN THIS CHAPTER:
- Identifying the IOS user agent
- Drawing rectangles and other shapes
- Drawing images onto a canvas
The unique platform capabilities of the IOS enable developers to create innovative applications inside Safari that go beyond the normal “web app” fare. Safari’s support for the canvas element opens drawing and animation capabilities in an ordinary HTML page that were previously available only by using Flash or Java. The canvas element is part of the Web Hypertext Application Technology Working Group (WHATWG) specification for HTML 5.0 (or HTML5).
However, after you begin to open up these capabilities you need to be sure that you are working with an IOS device rather than a standard desktop browser that may not provide HTML5 support. Consequently, you need to be able to identify the user agent for IOS devices.
When you are trying to identify the capabilities of the browser requesting your website or application, you generally should avoid detecting the user agent; instead you should use object detection. However, if you are developing an application designed exclusively for iPhone or need to be certain of the browser being used then user agent detection is a valid option. Therefore, this chapter assumes you are creating a Safari-specific application.
The Safari user agent string for iPhone closely resembles the user agent for Safari on other platforms. However, it contains an iPhone platform name and the mobile version number. Depending on the version of Safari on IOS, it looks something like this:
Mozilla/5.0 (iPhone; U; CPU OS 3_2 like Mac OS X; en-us)
   AppleWebKit/531.21.10 (KHTML, like Gecko)
   Version/4.0.4 Mobile/7B334b Safari/531.21.10
Here’s a breakdown of the various components of the user agent:
- The platform string (iPhone; U; CPU like Mac OS X; en-us): Notice the like Mac OS X line, which reveals some of the underpinnings of the iPhone.
- The WebKit engine build number: AppleWebKit/420+. This Safari version number is provided on all platforms (including Mac and Windows).
- The marketing version: (Version/4.0.4). This Safari version number is provided on all platforms (including Mac and Windows).
- OS X build number: Mobile/7B334b.
- Safari build number: Safari/531.21.10.
The iPad and iPod touch user agents are similar, but distinct with iPad or iPod as the platform. For example:
Mozilla/5.0 (iPad; U; CPU OS 3_2 like Mac OS X; en-us)
  AppleWebKit/531.21.10 (KHTML, like Gecko) Version/4.0.4 Mobile/7B334b
   Safari/531.21.10

Mozila/5.0 (iPod; U; CPU like Mac OS X; en)
   AppleWebKit/420.1 (KHTML, like Geckto)
   Version/3.0 Mobile/3A101a Safari/419.3
The version numbers change, obviously, when Apple updates Safari, but the string structure stays the same.
To test whether the device is an iPhone or iPod touch, you need to perform a string search on iPad, iPhone, and iPod. The following function returns true if the user agent is an IOS device:
function isAppleMobile() {
  result ((navigator.platform.indexOf("iPhone") != -1) ||
          (navigator.userAgent.indexOf("iPod") != -1)  ||
          ((navigator.userAgent.indexOf("iPad") != -1))
}
Be sure not to test for the string Mobile within the user agent, because a non-Apple mobile device (such as Nokia) might be based on the WebKit-based browser.
If you need to do anything beyond basic user agent detection and test for specific devices or browser versions, however, consider using WebKit’s own user agent detection script available for download at trac.webkit.org/projects/webkit/wiki/DetectingWebKit. By linking WebKitDetect.js to your page, you can test for specific devices (iPhone and iPod touch) as well as software versions. Here’s a sample detection script:
<!DOCTYPE html PUBLIC "-//W3C//DTD XHTML 1.0 Strict//EN"
         "http://www.w3.org/TR/xhtml1/DTD/xhtml1-strict.dtd">
<html xmlns="http://www.w3.org/1999/xhtml">
<head>
<title>User Agent Detection via WebKit Script</title>
<meta name="viewport" content="width=320; initial-scale=1.0;
  maximum-scale=1.0; user-scalable=0;">
<script type="application/x-javascript" src="WebKitDetect.js"></script>
</head>
<body>
<p id="log"></p>
</body>
<script type="application/x-javascript">
function addTextNode(str) {
  var t = document.createTextNode(str);
  var p = document.getElementById("log");
  p.appendChild(t);
}
if ( WebKitDetect.isMobile() ) {
  var device = WebKitDetect.mobileDevice();
  // String found in Settings/General/About/Version
  var minSupport = WebKitDetect.mobileVersionIsAtLeast("1C28");
  switch( device ) {
    case 'iPhone':
      if ( minSupport ) {
        addTextNode('If this were a real app, I launch its URL right now.'),
        break;
      }
      else {
        addTextNode('Please upgrade your iPhone to the latest update before
running this application.'),
        break;
      }
    case 'iPod':
   addTextNode('If this were a real app, I would launch its iPod touch version.'),
    default:
     addTextNode( 'This mobile device is not supported by this application.
Go to your nearest Apple store and get an iPhone.'),
    case 'iPad:
      addTextNode('If this were a real app, I would launch its iPad version.'),
    default:
     addTextNode( 'This mobile device is not supported by this application.
Go to your nearest Apple store and get an iPad.'),
  }
}
else {
  addTextNode( 'Desktop computers are so 1990s. Go get an IOS device.' );
}
</script>
</html>
With the WebKitDetect.js script included, the WebKitDetect object is accessible. Begin by calling its isMobile() method to determine whether the device is or is not a mobile device. Next, check to ensure that the mobile version is the latest release and save that result in the minSupport variable. The switch statement then evaluates the mobile devices. If it is an iPhone, then it checks to see if minSupport is true. If it is true then a real application would begin here. If minSupport is false then the user is notified to update his or her iPhone to the latest software version. The remaining two case statements evaluate for an iPhone or an unknown mobile device. The final else statement is called if the device is not a mobile computer.
C++ and other traditional software programmers have long worked with a canvas on which they could draw graphics. In contrast, web developers typically program the presentation layer using HTML and CSS. Unless they used Flash or Java, developers had no real way to actually draw graphical content on a web page. However, both desktop and mobile versions of Safari support the canvas element to provide a resolution-dependent bitmap region for drawing arbitrary content. The canvas element defines a drawing region on your web page that you then draw on using a corresponding JavaScript canvas object.
The canvas frees you as an application developer to not only draw anything you want to but also to use canvas as a way to render graphs, program games, or add special effects. On Mac OS X, the canvas is often used for creating Dashboard widgets. On IOS, Apple makes use of the canvas for both the Clock and Stocks built-in applications.
Canvas programming can be a mindset difference for web developers who are used to manipulating existing graphics rather than creating them from scratch. It is the loose equivalent of a Photoshop expert beginning to create content using an Adobe Illustrator-like program in which all of the graphics are created in a non-visual manner.
Think of a canvas as a rectangular block region of a page in which you have full control over what is drawn on it. The canvas is defined using the canvas element:
<canvas id="theCanvas" width="300" height="300"/>
Except for the src and alt attributes, the canvas element supports all the same attributes as the img tag. Although the id, width, and height attributes are not required, they should be defined as a sound programming practice. The width and height are usually defined in pixels, although they can also be defined as a percentage of the viewport.
You can place multiple canvas elements on a page, just as long as each one has its own unique ID.
After a canvas region is defined on your web page, you can then draw inside of the flat two-dimensional surface using JavaScript. Just like a web page, the canvas has an origin (0,0) in the top-left corner. By default, all of the x,y coordinates you specify are relative to this position.
As the first step in working with the canvas, you first need to get a 2d context object. This object, which is responsible for managing the canvas’ graphics state, is obtained by calling the getContext() method of the canvas object:
var canvas = document.GetElementById("theCanvas");
var context = canvas.getContext("2d");
Or, because you don’t normally work directly with the canvas object, you can also combine the two lines:
var context = document.GetElementById("theCanvas").getContext("2d");
All of the drawing properties and methods you work with are called from the context object. The context object has many properties (see Table 14-1) that determine how the drawing looks on the page.
TABLE 14-1: Context Properties
| PROPERTY | DESCRIPTION |
| fillStyle | Provides CSS color or style (gradient, pattern) of the fill of a path. |
| font | Specifies the font used. |
| globalAlpha | Specifies the level of transparency of content drawn on the canvas. Floating-point value is between 0.0 (fully transparent) and 1.0 (fully opaque). |
| globalCompositeOperation | Specifies the compositing mode to determine how the canvas is displayed relative to background content. Values include copy, darker, destination-atop, destination-in, destination-out, destination-over, lighten, source-atop, source-in, source-out, source-over, and xor. |
| lineCap | Defines the end style of a line. String values include butt for flat edge, round for rounded edge, square for square ends. (Defaults to butt.) |
| lineJoin | Specifies the way lines are joined together. String values include round, bevel, miter. (Defaults to miter.) |
| lineWidth | Specifies the line width. Floating-point value is greater than 0. |
| miterLimit | Specifies the miter limit for drawing a juncture between line segments. |
| shadowBlur | Defines the width that a shadow covers. |
| shadowColor | Provides CSS color for the shadow. |
| shadowOffsetX | Specifies the horizontal distance of the shadow from the source. |
| shadowOffsetY | Specifies the vertical distance of the shadow from the source. |
| strokeStyle | Defines the CSS color or style (gradient, pattern) when stroking paths. |
| textAlign | Determines the text alignment. |
| textBaseline | Specifies the baseline of the text (top, hanging, middle, alphabetic, ideographic, or bottom). |
There are several techniques for drawing on the canvas. Perhaps the most straightforward is by drawing a rectangle. To do so, you work with three context methods:
- context.fillRect(x,y,w,h) draws a filled rectangle.
- context.strokeRect(x,y,w,h) draws a rectangular outline.
- context.clearRect(x,y,w,h) clears the specified rectangle and makes it transparent.
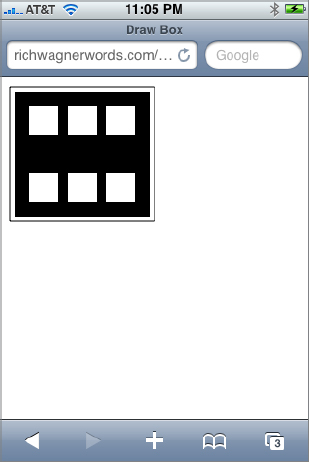
For example, suppose you would like to draw a rectangular box with a set of squares inside of it and a rectangular outline on the outside. Here’s a JavaScript function that draws that shape:
function draw()
{
var context = document.getElementById('myCanvas').getContext('2d'),
    context.strokeRect(10,10,150,140);
    context.fillRect(15,15,140,130);
    context.clearRect(30,30,30,30);
    context.clearRect(70,30,30,30);
    context.clearRect(110,30,30,30);
    context.clearRect(30,100,30,30);
    context.clearRect(70,100,30,30);
    context.clearRect(110,100,30,30);
}
After the context is obtained, strokeRect() creates a rectangular outline starting at the coordinate (10,10) and is 150 × 140 pixels in size. The fillRect() method paints a 140 × 130 rectangle starting at coordinate (15,15). The six clearRect() calls clear areas previously painted by fillRect(). Figure 14-1 shows the result.
The full page source is shown in the following code:
<!DOCTYPE html PUBLIC "-//W3C//DTD XHTML 1.0 Strict//EN"
         "http://www.w3.org/TR/xhtml1/DTD/xhtml1-strict.dtd">
<html xmlns="http://www.w3.org/1999/xhtml">
<head>
<title>Draw Box</title>
<meta name="viewport" content="width=320; initial-scale=1.0;
     maximum-scale=1.0; user-scalable=0;">
<script type="application/x-javascript">
function draw()
{
    var context = document.getElementById('myCanvas').getContext('2d'),
    context.strokeRect(10,10,150,140);
    context.fillRect(15,15,140,130);
    context.clearRect(30,30,30,30);
    context.clearRect(70,30,30,30);
    context.clearRect(110,30,30,30);
    context.clearRect(30,100,30,30);
    context.clearRect(70,100,30,30);
    context.clearRect(110,100,30,30);
}
</script>
</head>
<body onload="draw()">
<canvas id="myCanvas" width="300" height="300" style="position:absolute;
   left:0px; top:0px; z-index:1"/>
</body>
</html>
Code snippet BIDHJ-Ch14-Ex1.html
You draw non-rectangular shapes by creating a path for that shape and then either stroking (drawing) a line along the specified path or else filling (painting) in the area inside of the path. Much like an Etch A Sketch drawing, paths are composed of a series of subpaths, such as a straight line or an arc that together form a shape.
When you work with paths, the following methods are used for drawing basic shapes:
- beginPath() creates a new path in the canvas and sets the starting point to the coordinate (0,0).
- closePath() closes an open path and attempts to draw a straight line from the current point to the starting point of the path. The use of closePath() is optional.
- stroke() draws a line along the current path.
- fill() closes the current path and paints the area within it. (Because fill() closes the path automatically, you don’t need to call closePath() when you use it.)
- lineTo(x,y) adds a line segment from the current point to the specified coordinate.
- moveTo(x,y) moves the starting point to a new coordinate specified by the x,y values.
Using these methods, you can create a list of subpaths to form a shape. For example, the following code creates two triangles next to each other; one is empty and one is filled. An outer rectangle surrounds both triangles. Here’s the code:
function drawTriangles()
{
var context = document.getElementById('myCanvas').getContext('2d'),
// Empty triangle
context.beginPath();
context.moveTo(10,10);
context.lineTo(10,75);
context.lineTo(100,40);
context.lineTo(10,10);
context.stroke();
context.closePath();

// Filled triangle
context.beginPath();
context.moveTo(110,10);
context.lineTo(110,75);
context.lineTo(200,40);
context.lineTo(110,10);
context.fill();

// Outer rectangle
context.strokeRect(3,3,205,80);
}
Figure 14-2 shows the results.

NOTE If you are new to canvas programming, drawing complex shapes on the canvas can take some getting used to. You may find it helpful initially to go low tech and use a piece of graph paper to sketch out the shapes you are trying to draw and calculate the x,y coordinates using the paper grid.
The JavaScript canvas enables you to go well beyond drawing with straight lines, however. You can use the following methods to create more advanced curves and shapes:
- arc(x, y, radius, startAngle, endAngle, clockwise) adds an arc to the current subpath using a radius and specified angles (measured in radians).
- arcTo(x1, y1, x2, y2, radius) adds an arc of a circle to the current subpath by using a radius and tangent points.
- quadratricCurveTo(cpx, cpy, x, y) adds a quadratic Bézier curve to the current subpath. It has a single control point (the point outside of the circle that the line curves toward) represented by cpx, cpy. The x,y values represent the new ending point.
- bezierCurveTo(cp1x, cp1y, cp2x, cp2y, x, y) adds a cubic Bézier curve to the current subpath using two control points.
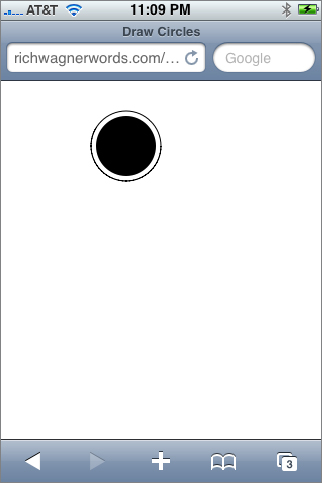
Using arc(), I can create a filled circle inside of an empty circle using the following code:
function drawCircles()
{
var context = document.getElementById('myCanvas').getContext('2d'),

// Create filled circle
context.beginPath();
context.arc(125,65,30,0, 2*pi, 0);
context.fill();

// Create empty circle
context.beginPath();
context.arc(125,65,35,0, 2*pi, 0);
context.stroke();
context.endPath();
}
The arc() method starts the arc shape at coordinate (125,65) and draws a 30px radius starting at 0 degrees and ending at 360 degrees at a counterclockwise path.
Figure 14-3 displays the circle shapes that are created when this script is run.
In addition to lines and other shapes, you can also draw an image onto your canvas by using the drawImage() method. The image can reference either an external image or another canvas element on the page. There are actually three ways in which you can call this method. The first variant simply draws an image at the specified coordinates using the size of the image:
context.drawImage(image, x, y)
The second method enables you to specify the dimensions of the image with the w and h arguments:
context.drawImage(image, x, y, width, height)
TRY IT OUT: Drawing an Image onto the Canvas
To draw an image onto the canvas, use the following steps.
1. Create the following HTML document in your text editor and then save the document as BIDHJ-Ch14-Ex2.html.
<!DOCTYPE html PUBLIC "-//W3C//DTD XHTML 1.0 Strict//EN"
         "http://www.w3.org/TR/xhtml1/DTD/xhtml1-strict.dtd">
<html xmlns="http://www.w3.org/1999/xhtml">
<head>
<title>Draw Image</title>
<meta name="viewport" content="width=320; initial-scale=1.0;
   maximum-scale=1.0; user-scalable=0;">
</head>
<body>
<canvas id="myCanvas" width="300" height="300"
   style="position:absolute; left:0px; top:0px; z-index:1"/>
</body>
</html>
Code snippet BIDHJ-Ch14-Ex2.html
2. Add the following JavaScript code inside the document:
<script type="application/x-javascript">
function drawImg()
{
var context = document.getElementById('myCanvas').getContext('2d'),
var img = new Image();
img.src = 'images/beach.jpg';
img.onload = function()
{
context.drawImage( img, 0, 0 );
}
}
</script>
Code snippet BIDHJ-Ch14-Ex2.html
3. Add an onload event handler to the body element and then save the file:
<body onload="drawImg()">
Code snippet BIDHJ-Ch14-Ex2.html
How It Works
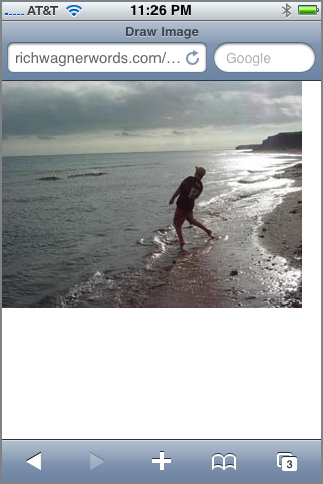
When the document is loaded, it calls the drawImg() function. In the function, context and img objects are created. However, the drawImage() method of the context object is not called until after the image is loaded.
Figure 14-4 shows the image displayed inside of the canvas. Keep in mind that this is not an HTML img element, but the external image file drawn onto the context of the canvas.
Advanced Drawing
There is a variation of the drawImage() method that is slightly more complex. Here’s the syntax:
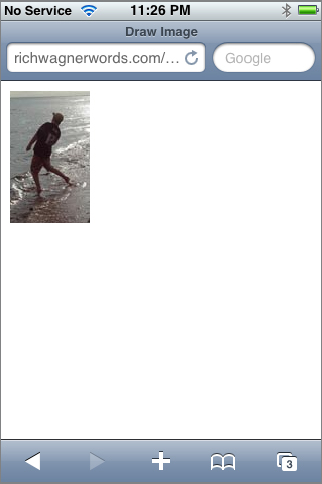
context.drawImage(image, sourcex, sourcey, sourceWidth, sourceHeight,
   destx, desty, destWidth, destHeight)
In this variant, the method draws a subsection of the image specified by the source rectangle (sourcex, sourcey, sourceWidth, sourceHeight) onto a destination rectangle specified by the final arguments (destx, desty, destWidth, destHeight). For example, suppose you just want to display the rock thrower in Figure 14-4 rather than the entire picture. Using this expanded syntax of drawImage(), you extract a 79 × 131px rectangle from the original picture starting at the coordinate (151, 63). You then paint the same sized rectangle at coordinate (10, 10) on the canvas. Here is the updated code:
function drawImg(){
  var canvas = document.getElementById('myCanvas'),
  var context = canvas.getContext('2d'),
  var img = new Image();
  img.src = 'images/beach.jpg';
  img.onload = function() {
    context.drawImage( img, 151, 63, 79, 131, 10, 10, 79, 131 );
  }
}
Figure 14-5 shows the result.
Drawing with Encoded Images
You can also use a data: URI encoded image to eliminate the need for an external image file for canvas painting. For example, start with an online image encoder, such as the one available at www.scalora.org/projects/uriencoder. Using this tool, you encode the image, as shown in Figure 14-6.
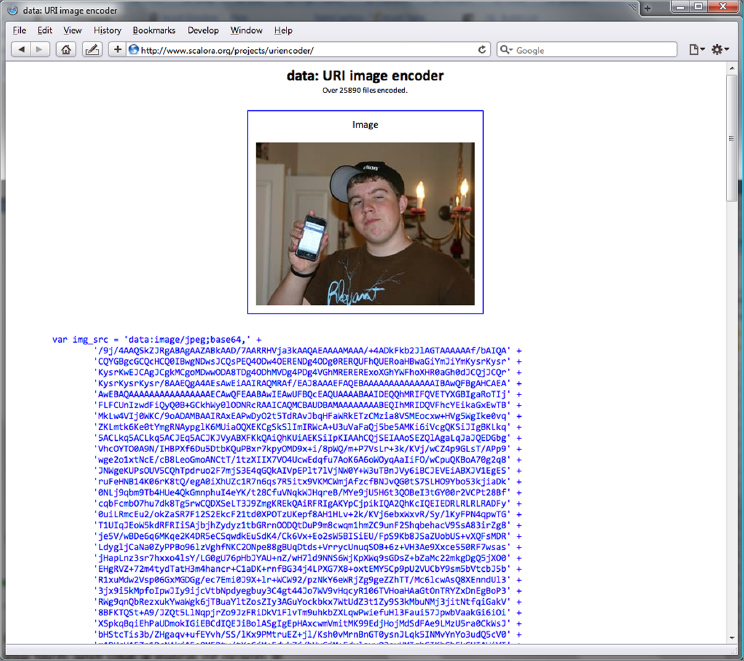
You can then integrate the outputted encoded string into the script code as the image object’s source (much of the encoded text for this example has been removed for space reasons):
function drawImg(){
var img_src = 'data:image/jpeg;base64,'+
'/9j/4AAQSkZJRgABAgAAZABkAAD/7AARRHVja3kAAQAEAAAAMAAA/+4ADkFkb2JlAGTAAAAAAf/bAIQA'+
'CQYGBgcGCQcHCQ0IBwgNDwsJCQsPEQ4ODw4OERENDg4ODg0RERQUFhQUERoaHBwaGiYmJiYmKysrKysr'+
'KysrKwEJCAgJCgkMCgoMDwwODA8TDg4ODhMVDg4PDg4VGhMRERERExoXGhYWFhoXHR0aGh0dJCQjJCQr'+
'KysrKysrKysr/8AAEQgA4AEsAwEiAAIRAQMRAf/EAJ8AAAEFAQEBAAAAAAAAAAAAAAIBAwQFBgAHCAEA'+
'AwEBAQAAAAAAAAAAAAAAAAECAwQFEAABAwIEAwUFBQcEAQUAAAABAAIDEQQhMRIFQVETYXGBIgaRoTIj'+
'FLFCUnIzwdFiQyQ0B+GCkhWy0lODNRcRAAICAQMCBAUDBAMAAAAAAAABEQIhMRIDQVFhcYEikaGxEwTB'+
'MkLw4VIj0WKC/9oADAMBAAIRAxEAPwDyO2t5TdRAvJbqHFaWRkETzCMzia8VSMEocxw+HVg5WgIke0vq'+
'ZKLmtk6Ke0tYmgRNAypglK6MUiaOQXEKCgSkSlImIRWcA+U3uVaFaQj5be5AMKi6iVcgQKSiJIgBKLkq'+
'5ACLkq5ACLkq5ACJEq5ACJKJVyABXFKkQAiQhKUiAEKSiIpKIAAhCQjSEIAAoSEZQlAgaLqJaJQEDGbg'+
'VhcOYTO0A9N/IHBPXf6Du5DtbKQuPBxr7kpyOMD9x+i/8pWQ/m+P7VsLr+3k/KVj/wCZ4p9GLsT/APp9'+
'OmIIzR8p0jsHErPNY1jQxowbgpW5TOudxkfm2LyN7zi5R8u5IlvIJAPYhPvRHNDkfsTEXnpO1tXXcu4X'+
'rOpY7TC67ljOT3g6YYj+Z5CsLL1B6lvPUcTTdyPmmma18IPyg2vnb08tLW1Xendsu7v08+K2idI7cdwg'+
'hl0jAQwMMz9R4CrhmrqT07centnvNyaz6neJ2O1Ob8NvHJ+oWfiIriV2cfHfZV1lJe+zX0+BwcvLx77q'+
'0Ws/9dE/r4Z1M5u8zX7zaQwnRbwuj6IpgOrKZtQH+9Qt7AG87g0ClLmYAf8AyOVptdp1vU9iJcI7SOG4'+
'm1cGQRNld/4qpguDcbg64lo8zPkmdq/FR0gPtWPIpTnG6+PRf3N+PDUZ28cv/wBP+wF8a3cnGhDa9rQG'+
'n7FHfknnwyCBk7h5JXODXE4ktpqw8V13Z3VqY23MToTK3qMDsKtOFfaFg02248fidCaSSnw+AwE5FHJK'+
'8MYKuOPIADMk8AOKft7a7EzIxZOnlkAfHG5j6uacjpbQlpVlJuh28fTRWVtb3rD/AFB6OsUFCI/nl3eV'+
'VeNRNnCXgTbkcxVbm/H5kaBn09jNcwQNuomPZFLdPJDWudiGRsqCa0zPsUKW7nlFCQxnFjAGtFewLZv9'+
'Y3EOxWt4yxtRNPM+Jw0DSTG0fM0tpj5lRyerdzeySLo2jYpfijFtHT3hbcleNKqXI9JhV7mPFfls7N8S'+
'w4l27YfQoySSTmTxS0XONXF1AKmtAKDwCTCq5TqDM0jm6SQRliATQDTnRABRKEqG2wwhF3euK5AAkJT7'+
'lyRACJOK4lCD5jjkgQYxNEkhp5R4pNWkVGaCpOJzKcBIuCRKkOaBirqmlOGdF1SuwSGenAp+U/IPco4K'+
'duHhls9xya0krZHP0Kbc7k9Nlow4yCslPw8vFdZQgDLioUTnTSumdm817hwVrbUHgsnlnVVbak6BoACl'+
'tywUWM44J8O9ipCZz60VLvc/Tt3mvBWssoaM1nN3c65kZA3OV7WD/caIYkZ6/wBpvdvbFJcN8l03qxyD'+
'I6vNpPaFDIBHby5r1q9261vLF1jcN1RaQ0c2loo1ze0LzDddtn2y8fazCtMWP4PacnBJCsoK84Yc8ihJ'+
'4HNE7t45psk6gDmEyGeibFul7snoqO7tdIDhcyOLhUdR0sUMOHZ5lVbDvO4Xd/fyXtw+461lOJNZqMhS'+
'jchSvBO31yGf4422AHGa5fXuY6R32kLP7XeiyuxM8F0T2vilAz0SN0mnaM12X5HW3Cpaqq1b7ZOKnErU'+
'57bU7O9kn1wzf7fBt9pDPudwDNdbna6YoWsLi2GFjWSup/E6lexQrR8M/pq93G7gbd3AdNBFduYGOdEG'+
'lzHUAwAJIw7lQWPq7dba4MshbdQuPmhkGAYRpc2NwoWVbhhgrrbmnfrXc4LS5kc6b6ZvSdGyJsMQkNWM'+
'axxaaCuQFfFaU5aXxTWLe3u9ZMr8N+NbrvE19yelU4jwKpkcMVtbXWirLG0bcVPGaSWRsbSPzmvc1X+3'+
'emYtw2fZru9A0NdNeX9w8+YxF3Uax1eD8yqrcd22yz3C92qe1N3tzGQWvy39N4NsDVzTjm5xVZuXqndL'+
'xs9tFK6322UgMtGkUaxrQxrNVK0o3FZ7+Ljb3e6Ft2r/ACX6YNdnNyJbfZL3bn/jZaefuZ6BZ+p9svLG'+
'43Nhi+rtnTR2keHUERLWMcWA6tJzPYsp61sWTGHeLZ8cwlAivei7W1k1ARjn5gciskCpdhul/t7nus5j'+
'D1BpkAALXDhVrgRUcCov+WuSuy9YT6rv3gvj/D+1ffx2yuj0jtJO3d4isLHbqaZbQPM7eIllDZHA9orp'+
'8FUpQ/W8ulJLnnU5+bqnEnE41SEAU0mtQCcKUPJc17bnPTReSwdVK7axq8tvxeWcVyTilUFnLly5AHJC'+
'lJQlAjkhPtSoCUwEJQB2LkvFNu8rimhMPVq8EtUDCKdiJApCqhOaXguSKOCVCi4I6h0P/9k=';
  var canvas = document.getElementById('myCanvas'),
  var context = canvas.getContext('2d'),
  var img = new Image();
  img.src = img_src;
  img.onload = function() {
    context.drawImage( img, 10, 10 );
  }
}
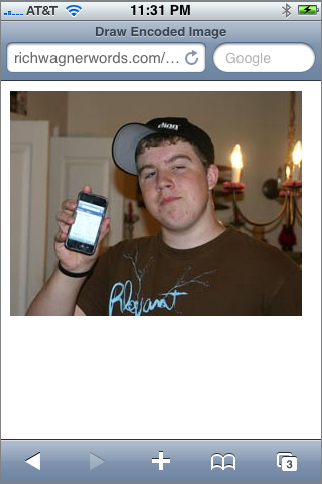
Figure 14-7 shows the rendered image.
The fillStyle and strokeStyle properties of the context object provide a way for you to set the color, alpha value, or style of the shape or line you are drawing. (Refer to Table 14-1 for a list of all context properties.) If you would like to set a color value, you can use any CSS color, such as the following:
context.fillStyle="#666666";
context.strokeStyle=rgb(125,125,125);
After you set fillStyle or strokeStyle, it becomes the default value for all new shapes in the canvas until you reassign it.
You can also use rgba(r,g,b,a) to assign an alpha value to the shape you are filling in. The r, g, and b parameters take an integer value between 0–255, whereas a is a float value between 0.0 and 1.0 (0.0 being fully transparent, and 1.0 being fully opaque). For example, the following code draws two circles in the canvas. The large circle has a 90 percent transparency value, and the smaller circle has a 30 percent transparency value:
function drawTransCircles()
{
var context = document.getElementById('myCanvas').getContext('2d'),
// Large circle-90% transparency
context.fillStyle = "rgba(13,44,50, 0.9)";
context.beginPath();
context.arc(95,90,60,0, 2*pi, 0);
context.fill();
// Smaller circle-30% transparency
context.fillStyle = "rgba(0,0,255, 0.3)";
context.beginPath();
context.arc(135,120,40,0, 2*pi, 0);
context.fill();
}
Alternatively, you can set the context.globalAlpha property to set a default transparency value for all stroke or fill styles. Remember, the value should be a float number between 0.0 and 1.0.
You can use an external image to create an image pattern on the back of a canvas element using the createPattern() method. The syntax is the following:
patternObject = context.createPattern(image, type)
The image argument references an Image object or a different canvas element. The type argument is one of the familiar CSS pattern types: repeat, repeat-x, repeat-y, and no-repeat. The method returns a Pattern object.
TRY IT OUT: Drawing an Image Pattern
Use the following steps to create an image pattern on the canvas.
1. Create the following HTML document in your text editor and then save the document as BIDHJ-Ch14-Ex2.html.
<!DOCTYPE html PUBLIC "-//W3C//DTD XHTML 1.0 Strict//EN"
         "http://www.w3.org/TR/xhtml1/DTD/xhtml1-strict.dtd">
<html xmlns="http://www.w3.org/1999/xhtml">
<head>
<title>Draw Image</title>
<meta name="viewport" content="width=320; initial-scale=1.0;
   maximum-scale=1.0; user-scalable=0;">
</head>
<body>
<canvas id="myCanvas" width="300" height="300"
   style="position:absolute; left:0px; top:0px; z-index:1"/>
</body>
</html>
Code snippet BIDHJ-Ch14-Ex3.html
2. Add the following JavaScript code inside the document:
<script type="application/x-javascript">
function drawPattern()
{
    var context = document.getElementById('myCanvas').getContext('2d'),
    var pImg = new Image();
    pImg.src = 'images/tech.jpg';
    // call when image is fully loaded
    pImg.onload = function() {
      var pat = context.createPattern(pImg,'repeat'),
      context.fillStyle = pat;
      context.fillRect(0,0,300,300)
    }
}
</script>
Code snippet BIDHJ-Ch14-Ex3.html
3. Add an onload event handler to the body element and then save the file:
<body onload="drawPattern()">
Code snippet BIDHJ-Ch14-Ex3.html
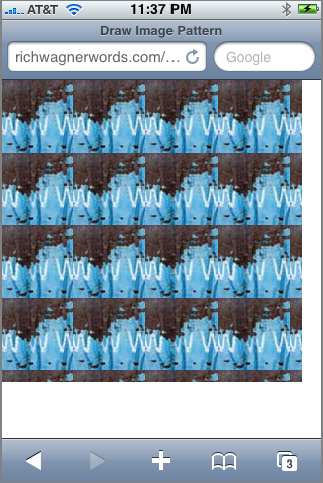
How It Works
When the document is loaded, it calls the drawPattern() function. In the function, an Image object is created and assigned a source. However, before this image can be used in the pattern, you need to ensure it is loaded. Therefore, you place the rest of the drawing code inside the Image object’s onload event handler. Much like the gradient examples shown earlier, the Pattern object that is created with createPattern() is then assigned to fillStyle. Figure 14-8 shows the results.
EXERCISES
1. How can you identify the user agent of an iPad?
2. What is the difference between stroking and filling?
3. What is a drawing path composed of?
4. Why would you consider drawing an encoded image onto a canvas?
Answers to the Exercises can be found in the Appendix.
• WHAT YOU LEARNED IN THIS CHAPTER
| TOPIC | KEY CONCEPTS |
| Identifying an IOS device in the user agent | iOS devices have similar user agent strings, but distinctively identify whether it is an iPhone, iPad, or iPod touch. |
| Creating a canvas on an HTML page | A canvas element defines a rectangular block region on a page that gives you full control via JavaScript over what gets drawn on it. |
| Drawing shapes | Rectangular shapes are drawn using the context object’s fillRect(), strokeRect(), and clearRect() methods. Non-rectangular shapes are drawn by creating a path for that shape and then either stroking (drawing) a line along the specified path or else filling (painting) in the area inside of the path. |
| Drawing images | Use the context object’s drawImage() method to draw an image. The image can reference either an external image or another canvas element on the page. |