Chapter 2: Camera Setup and Image Playback
Among the first things I do when I get a new camera is go through the menus, and set up the camera for shooting. Setup takes only a few minutes, and it saves a lot of time during shooting to have the settings the way you like them. This chapter explains setup options ranging from setting the image quality and customizing file numbering, to transmitting images wirelessly. In this chapter, I also cover how to add your copyright to image data, register the camera battery, and different ways to play back images.
Also, be sure to read Chapter 6 for additional ways to customize the camera using Custom Functions. Setting up for Live View ( ![]() ) and Movie (
) and Movie ( ![]() ) modes are detailed in Chapters 7 and 8, respectively.
) modes are detailed in Chapters 7 and 8, respectively.
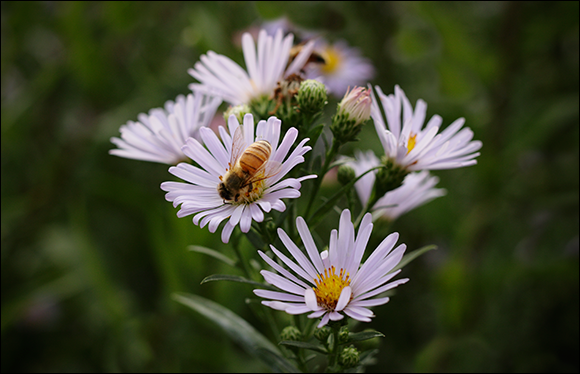
A bee takes advantage of late summer flowers. Exposure: ISO 200, f/5.0, 1/800 second.
SD Cards
The 70D is compatible with all types of Secure Digital (SD) memory cards. Also, the camera complies with the Ultra-High Speed-l (UHS) standard, so you can use new UHS SDHC/SDXC cards for fast performance and high capacity. There are many different types of cards, and the type you choose may depend in part on whether you shoot movies or still images. This section helps you decide on the type of SD card to buy.
The names of SD cards indicate their maximum capacity. For example, an SD card has up to a 2GB capacity, although lower capacities are also available. An SD High Capacity (HC) card ranges from 4 to 32GB, and an SD Extended Capacity (SDXC) card ranges from 32GB to a whopping 2 terabytes (TB). If you shoot primarily still images with the 70D, then an SDHC or SDXC card up to 32GB is sufficient for most shooting. I use a midrange-capacity card to keep from putting too many images on a single card — going back to the wise adage of not keeping all your eggs in one basket.
In this book, SD card is used as a general term to refer to all types of SD cards.
In addition to capacity, you have also have to consider the card speed. If you use the 70D primarily for still-image recording, then with the 70D’s high 20-megapixel resolution, a faster card will not slow you down especially when shooting a large burst of images.
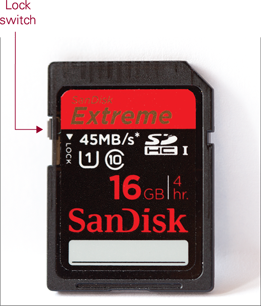
2.1 Be sure the lock switch on the memory card is set to the up position so that images can be written to and erased from it.
If you’re using the 70D to record movies, then card speed is a compelling consideration because it helps ensure a constant minimum write speed for video so that the movies play back smoothly. The card speed depends on the movie compression method you choose. Compression methods are covered in Chapter 8, but in short, the IPB method offers higher compression, and thus, a smaller file size. If you shoot movies with the IPB method, then a 6 MB/second or faster card will ensure that they are recorded properly. If you choose the ALL-I lower-compression method, then you need a 20 MB/second or faster card.
As you shop for SD cards, it pays to know that the card speeds vary by manufacturer, so check reviews for real-life data on a specific card and its advertised speed. Currently, the SDXC UHS-l and SDHC UHS-l are at the top end of the scale.
Be sure to go to Shooting menu 1 (![]() ), highlight Release shutter without card, and then select Disable. This prevents you from taking pictures with no SD card in the camera.
), highlight Release shutter without card, and then select Disable. This prevents you from taking pictures with no SD card in the camera.
Selecting Image Quality and Processing In-Camera
Many considerations factor into the image type and quality settings you choose. If you like to have ready-to-print images straight out of the camera, and if you want to maximize the number of images you can get on the SD card, then shooting JPEG images will meet your needs. However, if you want control over the image appearance and you want to get the maximum image quality, then shooting RAW images is the best option.
Of course, there are times when you need to switch between file types and image resolution. For example, when I shoot weddings, I choose full-resolution RAW format for the portraits and the images during the ceremony. However, for the reception, I change the image quality to medium JPEG because these images are seldom printed larger than 5 × 7 inches. Your needs may be different, so consider how you can use the options to suit your workflow and give you the best quality prints at the size you need. The next sections detail the advantages and disadvantages of each option to help you decide what works best for you.
JPEGs
JPEG is the default file format on the 70D, and it is a commonly used format for images on the web and some commercial printing services. JPEG offers efficient, high-quality file compression that saves space on an SD card. It also offers quick display of image files on the camera’s LCD monitor and on the computer. Unlike RAW files, JPEG files can be displayed without special viewing programs or preprocessing, making image files compatible across computer platforms for easy viewing.
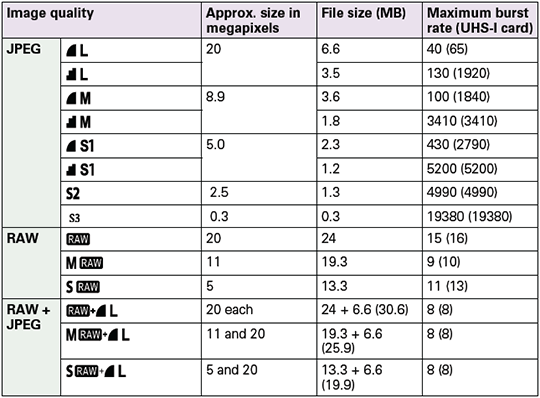
JPEG is the image-quality option to choose when you want to get the maximum burst rate from the camera for sports and action shooting. For example, when you shoot the highest-quality JPEG images, the burst rate is 65 shots at 7 frames per second (fps) with a UHS-I card. With non-UHS-I cards, the maximum burst is 40. By comparison, the maximum burst rate with full-resolution RAW files is approximately 16 shots with a UHS-I card. (If you’re shooting RAW+JPEG, the burst rate is 8 shots.)
The 70D offers three JPEG compression levels: Large, Medium, and Small each with a compression level of fine or normal. The image recording size changes accordingly with three image-recording sizes: 20, 8.9, or 5.0 megapixels. There are also Small 2 (![]() , 2.5 megapixels) and Small 3 (
, 2.5 megapixels) and Small 3 (![]() , 0.3 megapixels) sizes intended for use in digital photo frames, web display, and e-mail messages. Of course, the higher the compression and the smaller the image size, the more images that can be captured in a continuous shooting burst, and the more images will fit on a SD card. The trade-off with high compression and low image size is that image quality suffers proportionally and noticeably.
, 0.3 megapixels) sizes intended for use in digital photo frames, web display, and e-mail messages. Of course, the higher the compression and the smaller the image size, the more images that can be captured in a continuous shooting burst, and the more images will fit on a SD card. The trade-off with high compression and low image size is that image quality suffers proportionally and noticeably.
Despite the small size and portability of JPEG files, there are disadvantages. JPEG is known as a lossy file format because it discards some image data to reduce the file size. The higher the compression level, the more image data is discarded, and the smaller the image file size. Conversely, the lower the compression level, the less data discarded and the larger the file size. While data loss isn’t ideal, the amount of data lost at a low compression level is typically not noticeable in prints.
If you edit JPEG images on the computer and continue to save them as JPEGs, data loss continues to occur. To preserve image data during editing, be sure to save JPEG images as TIFFs or in another lossless file format before you begin editing.
Also, when you shoot JPEG images, the 70D processes or edits the images in the camera before storing them on the media card. This image processing determines the color rendering, contrast, and sharpness, and it applies any automatic exposure adjustments you’ve chosen, so you get a finished, printable file. You can then use the image as is, or you can edit it on the computer. While you can’t control the in-camera image processing, you have some control by choosing one of the seven Picture Styles. Each style has unique settings for sharpness, contrast, saturation, and color tone, and you can modify those settings.
Picture Styles and color spaces are described in Chapter 5.
Another aspect to consider with JPEG capture is the data lost when the camera converts the image bit depth. Every 70D image is captured as a 14-bit file that delivers 16,384 colors in each of the three color channels: Red, Green, and Blue. However, the JPEG file format doesn’t support 14-bit files, so the 70D automatically converts JPEG images to 8-bit files with only 256 colors per channel. While the conversion from 14- to 8-bit is done judiciously using internal camera algorithms, the fact remains that much of the image color information is discarded in the process.
Combine this data loss with the automatic in-camera processing and JPEG compression, and you get a file that has one-third or more of the image data discarded before it’s written to the media card. Certainly, the JPEG image files are smaller, but with the data loss, the files are not as rich as RAW files, and they offer less latitude and stability when you edit them on the computer. Depending on the output, the data loss may not be problematic. However, for files destined for maximum printing size, RAW offers a much richer file.
The Small 2 ( ![]() ) and Small 3 (
) and Small 3 ( ![]() ) JPEG options produce images at a diminutive 3.5 × 5.1 inches, a size that fits a digital photo frame. If you shoot only JPEGs, I don’t recommend choosing these small sizes. However, if you shoot RAW, adding a small JPEG file is a convenient way to have a file small enough to e-mail, post online, or use in a digital photo frame right out of the camera.
) JPEG options produce images at a diminutive 3.5 × 5.1 inches, a size that fits a digital photo frame. If you shoot only JPEGs, I don’t recommend choosing these small sizes. However, if you shoot RAW, adding a small JPEG file is a convenient way to have a file small enough to e-mail, post online, or use in a digital photo frame right out of the camera.
RAW files
When you want to get the highest image quality that the 70D can deliver, then your best option is to set the image quality to RAW ( ![]() ). RAW files are captured and stored on the media card with little in-camera processing and images suffer no loss of data from compression. Unlike JPEG files, RAW files are not converted in the camera to 8-bit, but rather they are captured and stored as 14-bit images. The only settings the camera applies to RAW images are the aperture, ISO, and shutter speed. Other settings such as Picture Style and white balance are noted in the file, but they are not applied unless you process the images in Canon Digital Photo Professional (DPP), a program included on the CD that comes with the camera.
). RAW files are captured and stored on the media card with little in-camera processing and images suffer no loss of data from compression. Unlike JPEG files, RAW files are not converted in the camera to 8-bit, but rather they are captured and stored as 14-bit images. The only settings the camera applies to RAW images are the aperture, ISO, and shutter speed. Other settings such as Picture Style and white balance are noted in the file, but they are not applied unless you process the images in Canon Digital Photo Professional (DPP), a program included on the CD that comes with the camera.
In Figure 2.2, the inset histograms show the image as an 8-bit JPEG file in the sRGB color space on the left. The histogram shows that there is clipping in the highlights. The histogram on the right is a 14-bit file in the Adobe RGB color space. The clipping doesn’t occur with the greater bit depth and larger color space.
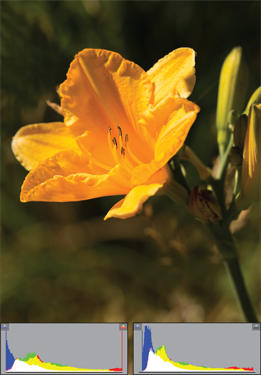
2.2 A comparison of the image histogram with the image in the sRGB color space on the left and the Adobe RGB color space on the right. Exposure: ISO 400, f/5.0, 1/4000 second.
The big advantage of shooting RAW is that you can adjust key image settings such as white balance, brightness, contrast, and saturation after the image is captured. These adjustments are made during RAW image conversion.
You convert RAW images using Canon Digital Photo Professional (DPP), Adobe Camera Raw (a plug-in for Adobe Photoshop), Adobe Lightroom, or Apple Aperture. During conversion, you can adjust the image color, brightness, tonal range, contrast, and color saturation to your liking. If you use Digital Photo Professional, you can also apply a Picture Style, Auto Lighting Optimizer ( ![]() ), lens correction settings, and other options with the same effect as applying them in the camera.
), lens correction settings, and other options with the same effect as applying them in the camera.
In addition, if images have blown highlights — areas where the highlights went to solid white with no image detail — you can often recover some or all of the detail in the blown highlights during conversion. If an image is underexposed, you can brighten it during conversion. All the adjustments made during RAW-image conversion are nondestructive, as if you made the adjustments in the camera.
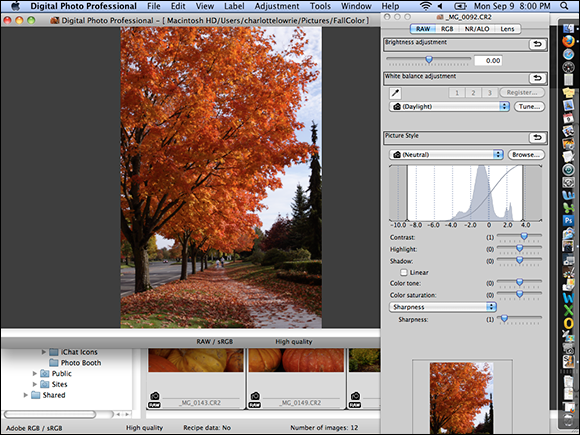
2.3 The Digital Photo Professional RAW editing window with the tool palette on the right.
With RAW files, you begin with a rich 14-bit file that you can save as a 16-bit file in a RAW conversion program. A 16-bit file can withstand image editing much better than an 8-bit JPEG file. Less-robust JPEG files can suffer posterization, or the loss of smooth gradation among tonal levels, including stretching tonal ranges and the loss of image detail from compressing tonal ranges during image editing.
Some people complain that the full-resolution RAW file at 24-plus MB takes up too much space on the memory card and on the computer. When compared to the Large/Fine JPEG that weighs in at approximately 6.6 MB, RAW files are hefty. If file size is a concern, but you still want the option to make key changes to images after shooting, then you can opt to use Canon’s Medium ( ![]() ) or Small RAW (
) or Small RAW ( ![]() ) image-recording options, both of which offer the same advantages as full-size RAW files, but at a smaller image size. The 70D offers Medium RAW (
) image-recording options, both of which offer the same advantages as full-size RAW files, but at a smaller image size. The 70D offers Medium RAW ( ![]() ) at 11 megapixels (19.3MB file), or Small RAW (
) at 11 megapixels (19.3MB file), or Small RAW ( ![]() ) at 5.0 megapixels (13.31MB file).
) at 5.0 megapixels (13.31MB file).
RAW capture has drawbacks, however. RAW files lack the portability of JPEG files. You cannot edit RAW files unless you’ve installed Digital Photo Professional or another RAW conversion program, such as Adobe Lightroom or Photoshop’s Camera Raw plugin. RAW files also add steps to the workflow because they must be converted and saved in another format, such as TIFF, PSD, DNG, or even JPEG. Finally, as previously noted, RAW image file sizes are considerably larger than JPEG images.
When you know the advantages and disadvantages of JPEG and RAW capture, you are in a better position to choose when and whether you want to shoot JPEG or RAW images for various shooting scenarios. Table 2.1 later in this chapter details the options that you can select on the 70D and their effect on the burst rate during continuous shooting.
RAW+JPEG
Another image quality option is to shoot both RAW and JPEG files. The advantage of RAW+JPEG capture is having a pre-edited JPEG file that you can print directly from the SD card or quickly post online for client viewing. You also have a RAW file, either full size or smaller, that you can later convert and edit.
Of course, RAW+JPEG fills up media cards much faster. For example, on an 8GB card, you can store approximately 200 full-size RAW and Large Fine JPEG ( ![]() ) images; whereas if you shoot only Large Fine JPEGs (
) images; whereas if you shoot only Large Fine JPEGs ( ![]() ), you can store approximately 1,000 images on the card.
), you can store approximately 1,000 images on the card.
When you capture both JPEG and RAW, the images are saved with the same file number in the same folder. They are distinguished by the file extensions of .jpg for the JPEG image and .CR2 for RAW ( ![]() ), Medium RAW (
), Medium RAW ( ![]() ), or Small RAW (
), or Small RAW ( ![]() ).
).
RAW+JPEG capture also slows down the continuous high-speed shooting burst rate, as shown in Table 2.1. Estimates in Table 2.1 are approximate, and vary according to image factors, including ISO, Picture Style, and Custom Function settings, as well as card brand, type, and speed.
Table 2.1 Image Quality, Size Options, and Burst Rates
To set the image format and quality, follow these steps:
1. On Shooting menu 1 (![]() ), highlight Image quality, and then press the Setting button (
), highlight Image quality, and then press the Setting button (![]() ). The Image quality screen appears.
). The Image quality screen appears.
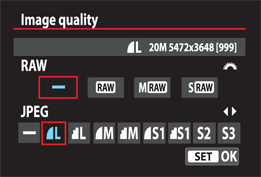
2.4 The Image quality screen enables you to select RAW file options using the Main dial, and JPEG options using the Quick Control dial.
2. Turn the Main dial (![]() ) to highlight the RAW option you want. If you don’t want to capture RAW images, then select the minus sign.
) to highlight the RAW option you want. If you don’t want to capture RAW images, then select the minus sign.
3. Turn the Quick Control dial (![]() ) to highlight the JPEG option you want, and then press the Setting button (
) to highlight the JPEG option you want, and then press the Setting button (![]() ). If you don’t want to capture JPEG images, select the minus sign.
). If you don’t want to capture JPEG images, select the minus sign.
To capture RAW+JPEG, choose a JPEG and RAW option in steps 2 and 3, respectively.
Processing RAW images in-camera
While shooting only RAW images is a fine option, what happens if you need a JPEG version of a RAW file while you’re in the field to transmit to a website or to an agency? That’s not a problem because the 70D enables you to process a full-size RAW file in the camera and save it as a JPEG. And if you want, you can process and save multiple JPEG files from a RAW file. While you don’t have as much control over RAW conversion in-camera as you do on a computer, this option is handy when shooting only full-resolution RAW images that you need to print directly from the SD card — something you can’t do with RAW files. It’s also ideal when you want to post an image on the web or send it in an e-mail.
Only full-size RAW files can be processed in-camera. Small ( ![]() ) and Medium RAW (
) and Medium RAW ( ![]() ) files can only be converted in Digital Photo Professional or another conversion program. Also, in-camera RAW processing can be used only when the camera is in a Creative Zone mode, such as Shutter-priority AE (
) files can only be converted in Digital Photo Professional or another conversion program. Also, in-camera RAW processing can be used only when the camera is in a Creative Zone mode, such as Shutter-priority AE ( ![]() ) or Aperture-priority AE (
) or Aperture-priority AE (![]() ).
).
If you choose in-camera RAW conversion, you process the RAW file in the camera and save it as a JPEG. The original RAW image is also retained unaltered on the media card so you can convert it later. There is a good range of adjustments for RAW conversion in the camera. If the image was shot in Live View mode ( ![]() ) with an aspect ratio of 4:3, 16:9, or 1:1, the image is displayed with that aspect ratio.
) with an aspect ratio of 4:3, 16:9, or 1:1, the image is displayed with that aspect ratio.
In most cases, you can see the effect of the adjustments you make on the image preview. To verify the effect of subtle changes, press the Magnify button ( ![]() ), and then press the Multi-controller (
), and then press the Multi-controller ( ![]() ) to move around the image to check the changes. Here are the adjustments you can make when processing a RAW file to a JPEG in the 70D:
) to move around the image to check the changes. Here are the adjustments you can make when processing a RAW file to a JPEG in the 70D:
• Brightness (![]() ). Use this adjustment to brighten or darken the image 1/3-stop at a time up to plus or minus 1 stop. You can preview the brightness adjustments you make on the LCD screen.
). Use this adjustment to brighten or darken the image 1/3-stop at a time up to plus or minus 1 stop. You can preview the brightness adjustments you make on the LCD screen.
• White balance (![]() ). You can change the White balance option or choose the Color temp. option (
). You can change the White balance option or choose the Color temp. option ( ![]() ). If you choose the Color temp. (
). If you choose the Color temp. ( ![]() ) option, press the Info. button (
) option, press the Info. button ( ![]() ), turn the Main dial (
), turn the Main dial ( ![]() ) to set the color temperature, and then press the Setting button (
) to set the color temperature, and then press the Setting button ( ![]() ).
).
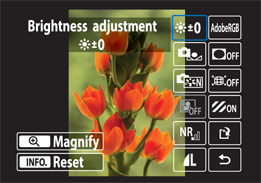
2.5 The processing options.
• Picture Style (![]() ). Use this option to change the Picture Style and to change the parameters for the style. Turn the Quick Control dial (
). Use this option to change the Picture Style and to change the parameters for the style. Turn the Quick Control dial ( ![]() ) to choose a style. To change a style’s parameters, highlight the Picture Style icon (
) to choose a style. To change a style’s parameters, highlight the Picture Style icon ( ![]() ), press the Setting button (
), press the Setting button ( ![]() ), and then press the Info. button (
), and then press the Info. button ( ![]() ). Press up or down on the Multi-controller to select a parameter, and then press left or right on the Multi-controller (
). Press up or down on the Multi-controller to select a parameter, and then press left or right on the Multi-controller ( ![]() ) to change the setting. The parameters are Sharpness, Contrast, Saturation, and Color tone. Press the Setting button (
) to change the setting. The parameters are Sharpness, Contrast, Saturation, and Color tone. Press the Setting button ( ![]() ) twice to exit the screen.
) twice to exit the screen.
• Auto Lighting Optimizer (![]() ). Adjust this setting to change the brightness and contrast of the image automatically. Three levels are available, as well as an Off option. If you have Highlight tone priority (
). Adjust this setting to change the brightness and contrast of the image automatically. Three levels are available, as well as an Off option. If you have Highlight tone priority ( ![]() ) enabled on Shooting menu 3 (
) enabled on Shooting menu 3 ( ![]() ), then Auto Lighting Optimizer (
), then Auto Lighting Optimizer ( ![]() ) can’t be adjusted.
) can’t be adjusted.
• High ISO speed noise reduction (![]() ). You can choose to apply a Low, Standard, or High level of noise reduction to images shot at high ISO settings. Alternately, you can choose Disable/OFF to apply no noise reduction at high ISO speed settings.
). You can choose to apply a Low, Standard, or High level of noise reduction to images shot at high ISO settings. Alternately, you can choose Disable/OFF to apply no noise reduction at high ISO speed settings.
• Image quality (![]() ). Use this option to set the image quality of the JPEG file that will be saved from the RAW image conversion.
). Use this option to set the image quality of the JPEG file that will be saved from the RAW image conversion.
• Color space (![]() ). This option enables you to choose either the sRGB or Adobe RGB color space. If you choose Adobe RGB, the appearance of the image on the LCD screen does not change because the LCD screen isn’t compatible with Adobe RGB; but the print reflects the color space you choose.
). This option enables you to choose either the sRGB or Adobe RGB color space. If you choose Adobe RGB, the appearance of the image on the LCD screen does not change because the LCD screen isn’t compatible with Adobe RGB; but the print reflects the color space you choose.
Color spaces are detailed in Chapter 5.
• Peripheral illumination correction (![]() ). If you select the Enable option, then any darkening of the four corners, or vignetting, is corrected automatically. You can also use Digital Photo Professional to apply stronger vignetting correction when you edit the image on the computer.
). If you select the Enable option, then any darkening of the four corners, or vignetting, is corrected automatically. You can also use Digital Photo Professional to apply stronger vignetting correction when you edit the image on the computer.
• Distortion correction (![]() ). This option corrects lens distortion, such as the barrel or pincushion distortion where the center of the image bows out or in, respectively, or other lens distortions that can happen with different lenses. If you correct the distortion, the edges of the image are cropped, making the image appear slightly larger, and making it a somewhat lower resolution due to the crop. The correction process can soften the image a bit, so you may then want to adjust the Picture Style (
). This option corrects lens distortion, such as the barrel or pincushion distortion where the center of the image bows out or in, respectively, or other lens distortions that can happen with different lenses. If you correct the distortion, the edges of the image are cropped, making the image appear slightly larger, and making it a somewhat lower resolution due to the crop. The correction process can soften the image a bit, so you may then want to adjust the Picture Style ( ![]() ) sharpness parameter before printing the image.
) sharpness parameter before printing the image.
• Chromatic aberration correction (![]() ). When this option is enabled, it corrects a lens phenomenon that bends different-colored light rays at different angles. This phenomenon causes unwanted color along the edges of elements in the image such as a purple or magenta fringe. To see the effect, press the Magnify button (
). When this option is enabled, it corrects a lens phenomenon that bends different-colored light rays at different angles. This phenomenon causes unwanted color along the edges of elements in the image such as a purple or magenta fringe. To see the effect, press the Magnify button ( ![]() ) to enlarge the image, and then look at the edge of an object, especially one that has high contrast, such as a tree limb against the sky. Press the Reduce button (
) to enlarge the image, and then look at the edge of an object, especially one that has high contrast, such as a tree limb against the sky. Press the Reduce button ( ![]() ) on the back of the camera to zoom out when you finish.
) on the back of the camera to zoom out when you finish.
If you don’t like the adjustments, press the Info. button ( ![]() ) to return to the original image settings.
) to return to the original image settings.
Before you begin, turn off Multiple exposure shooting mode ( ![]() ), Wi-Fi on the Setup 3 menu (
), Wi-Fi on the Setup 3 menu ( ![]() ), and be sure the camera isn’t connected to a computer. Then set the Mode dial to one of the Creative Zone modes such as Aperture-priority AE (
), and be sure the camera isn’t connected to a computer. Then set the Mode dial to one of the Creative Zone modes such as Aperture-priority AE ( ![]() ) or Shutter-priority AE (
) or Shutter-priority AE ( ![]() ) mode.
) mode.
To convert a RAW image to JPEG in-camera, follow these steps:
To display images as an index, press the Index/Reduce button ( ![]() ), and then turn the Main dial (
), and then turn the Main dial ( ![]() ) to find the image you want.
) to find the image you want.
2. On Playback menu 1 (![]() ), highlight RAW image processing, and then press the Setting button (
), highlight RAW image processing, and then press the Setting button (![]() ). The camera displays the options for converting the image.
). The camera displays the options for converting the image.
3. Press the Setting button (![]() ), press up, down, left, or right on the Multi-controller (
), press up, down, left, or right on the Multi-controller (![]() ) to select an option you want to adjust, and then turn the Quick Control dial (
) to select an option you want to adjust, and then turn the Quick Control dial (![]() ) to adjust the setting. You can also press the Setting button (
) to adjust the setting. You can also press the Setting button ( ![]() ) to display a screen with all settings for the adjustment. Then, make the adjustment and press the Setting button (
) to display a screen with all settings for the adjustment. Then, make the adjustment and press the Setting button ( ![]() ).
).
4. Select Save (![]() ), and then press the Setting button (
), and then press the Setting button (![]() ). The Save as new file screen appears.
). The Save as new file screen appears.
5. Select OK twice. With the first OK, a message appears giving you the folder and file number for the new image. A screen appears so you can convert another RAW image if you want.
Improving Image Quality
One of the main concerns in photography is getting the highest image quality that the camera can deliver. In addition to the factors that photographers consider first such as image resolution, exposure accuracy, level of fine detail, and tonal range and reproduction, there are other factors that influence the overall quality of the image. Those factors include the level of digital noise, the presence of color fringing or chromatic aberration, and lens vignetting that occurs from light falloff at the corners of the frame. With the 70D, you can deal with these quality issues directly in the camera.
Reducing digital noise in-camera
From the beginning of digital photography, noise has been an issue. Digital noise appears as unwanted multicolor pixels, particularly in the shadow areas, and as grain similar to film grain. Noise is always present in an electronic device that receives a signal. When you increase the ISO, the signal from the sensor is electronically amplified, and the amplification process creates its own electronic noise. Image data is also amplified. As you increase the signal-to-noise ratio (SNR) by cranking up the ISO, the noise also increases. Conversely, when the SNR is low, there is less noise.
Also, anything that heats up the image sensor also increases digital noise. For example, long exposures heat up the image sensor, thus producing digital noise. High ambient temperatures can also introduce digital noise. Another source of digital noise is underexposure that pushes the tonal range toward the shadows where digital noise is most prevalent.
As with other Canon EOS dSLRs, the 70D inherits the ability to reduce digital noise generated by both high ISO settings and long exposures. However, on the 70D, there is also a new Multi Shot Noise Reduction option ( ![]() ) tucked into the High ISO speed noise reduction option on Shooting menu 4 (
) tucked into the High ISO speed noise reduction option on Shooting menu 4 ( ![]() ). This approach to taming noise involves the camera making four images in quick succession, which are then aligned and merged to average out the noise. When all is said and done, you get a single JPEG that has higher quality (less noise) than a single image using the High level of noise reduction would have.
). This approach to taming noise involves the camera making four images in quick succession, which are then aligned and merged to average out the noise. When all is said and done, you get a single JPEG that has higher quality (less noise) than a single image using the High level of noise reduction would have.
I try to balance low-light exposures to keep the ISO sensitivity and the exposure time as low as possible. For Figure 2.6, I set the ISO at 5000 after checking that the exposure time was a relatively fast 1/50 second. I used the Standard level for the High ISO speed Noise Reduction option, and the digital noise was very low.
For high ISO settings, you can choose one of these noise reduction options:
• Off. The camera performs some noise reduction on all images, not just high ISO images. With this option, no additional noise reduction is applied. Choose this option if you prefer to apply noise reduction during RAW image conversion or during image editing on the computer.
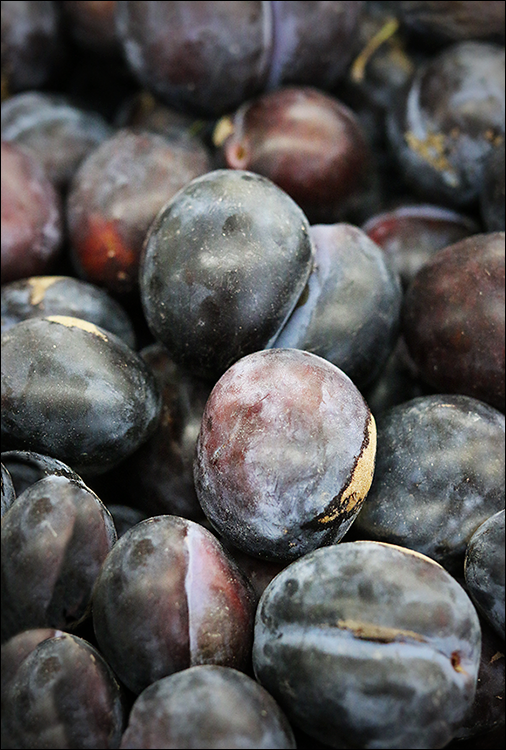
2.6 The Standard noise reduction level worked well for this image. Exposure: ISO 5000, f/4.0, 1/320 second.
• Low. A minimum of noise reduction is applied to images. You may not see much difference between this option and Standard.
• Standard. This is the default setting that applies some color (chroma) and luminance noise reduction to images shot at all ISO sensitivity settings. If you use high ISO settings infrequently, this is a good option for everyday shooting in case you forget to set this option for the few times when you increase the ISO. This option is effective at moderately high ISO settings.
• High. More aggressive noise reduction is applied, and the loss of fine detail in the image may be noticeable. In addition, using this option can reduce the burst rate in Continuous drive modes ( ![]() ).
).
• Multi Shot Noise Reduction (![]() ). As mentioned previously, when you choose this option the camera takes four quick shots and merges them. Because digital noise is random, the camera can use the four shots to average out the noise in the final JPEG image it creates. In the right situations, this is a good choice because it minimizes noise without causing the smeared or watercolor look that high noise reduction settings can cause. Multi Shot Noise Reduction (
). As mentioned previously, when you choose this option the camera takes four quick shots and merges them. Because digital noise is random, the camera can use the four shots to average out the noise in the final JPEG image it creates. In the right situations, this is a good choice because it minimizes noise without causing the smeared or watercolor look that high noise reduction settings can cause. Multi Shot Noise Reduction ( ![]() ) isn’t the solution for every situation because it requires a rock-steady camera and subject. However, it can be an excellent choice with a tripod and still subjects. Multi Shot Noise Reduction (
) isn’t the solution for every situation because it requires a rock-steady camera and subject. However, it can be an excellent choice with a tripod and still subjects. Multi Shot Noise Reduction ( ![]() ) does come with some caveats, however. It works only with JPEG capture, and cannot be used during movie recording, when in the Bulb exposure mode (
) does come with some caveats, however. It works only with JPEG capture, and cannot be used during movie recording, when in the Bulb exposure mode ( ![]() ), or in Basic Zone camera modes, such as Portrait (
), or in Basic Zone camera modes, such as Portrait ( ![]() ) and Landscape (
) and Landscape ( ![]() ). Also, you can’t use it with Long Exposure Noise Reduction, Multiple Exposure, and HDR mode (
). Also, you can’t use it with Long Exposure Noise Reduction, Multiple Exposure, and HDR mode ( ![]() ) shooting. Multi Shot Noise Reduction (
) shooting. Multi Shot Noise Reduction ( ![]() ) isn’t a sticky setting. In other words, when you turn off the camera, it switches back to the default Standard setting. You can expect Multi Shot Noise Reduction (
) isn’t a sticky setting. In other words, when you turn off the camera, it switches back to the default Standard setting. You can expect Multi Shot Noise Reduction ( ![]() ) to take longer than single-shot noise reduction options, and the camera will display a Busy icon (
) to take longer than single-shot noise reduction options, and the camera will display a Busy icon ( ![]() ).
).
Likewise, if you use long exposures, you can apply noise reduction in the camera. You have the following three settings from which you can choose:
• Off. No noise reduction is performed. Use this setting if you want to apply noise reduction later during image conversion or editing, if necessary.
• AUTO. Noise reduction is applied for exposures of 1 second and longer if the camera detects noise. This is a good setting for everyday shooting. With this setting and the next setting, the noise reduction process takes as long as the original exposure. So, if the original exposure was 1 minute, then the noise reduction will take 1 minute as well. In a departure from previous cameras, you can continue shooting during the noise reduction process as long as you see the number 1 or a higher number as the maximum burst indicator in the viewfinder. Just be sure that you don’t turn off the camera during the noise reduction process. Also, although you can continue shooting, the camera performance will be noticeably slower until the noise reduction process is finished.
• ON. The camera applies noise reduction for 1-second and longer exposures. This setting can reduce noise that isn’t detected with the Auto setting. In Live View shooting mode ( ![]() ), the LCD screen displays a Busy icon (
), the LCD screen displays a Busy icon ( ![]() ), and you can’t continue shooting until noise reduction is finished. Images shot at ISO 1600 and higher may have more grain with this setting than with the other two.
), and you can’t continue shooting until noise reduction is finished. Images shot at ISO 1600 and higher may have more grain with this setting than with the other two.
The steps for setting noise reduction for high ISO settings and long exposures are similar, so I’ve combined them in the following steps:
1. On Shooting menu 4 (![]() ), highlight either Long exp. noise reduction or High ISO speed NR, and then press the Setting button (
), highlight either Long exp. noise reduction or High ISO speed NR, and then press the Setting button (![]() ). The Long exp. noise reduction or High ISO speed NR screen appears. If you can’t select Multi Shot Noise Reduction (
). The Long exp. noise reduction or High ISO speed NR screen appears. If you can’t select Multi Shot Noise Reduction ( ![]() ), check to see if the recording quality is set to RAW (
), check to see if the recording quality is set to RAW ( ![]() ). If it is, then you need to choose a JPEG option instead.
). If it is, then you need to choose a JPEG option instead.
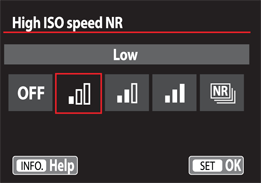
2.7 The High ISO speed noise reduction options.
2. Turn the Quick dial (![]() ) to select the setting you want.
) to select the setting you want.
3. Press the Setting button (![]() ).
).
Correcting vignetting and color fringing
Characteristics of the lenses you use can also affect the overall image quality. Depending on the lens you use, you may notice some light falloff that creates darkening of the four corners of the frame. Light falloff describes the effect of less light reaching the corners of the frame as compared to the center of the frame, and that darkening effect is known as vignetting. Vignetting is most likely to happen with wide-angle lenses, when you shoot at a lens’s maximum aperture, or when an obstruction such as the lens barrel rim or a filter reduces the light reaching the frame corners. Vignetting can be corrected by using the Lens Peripheral illumination correction option on the 70D.
You can correct vignetting for JPEG images in the camera. RAW images can be corrected during conversion in Digital Photo Professional, a RAW conversion program provided on the EOS Digital Solution Disk that comes with the 70D. Some photographers prefer not to correct vignetting. In fact, sometimes they add it because it directs the viewer’s eye inward toward the subject, as shown in Figure 2.8.
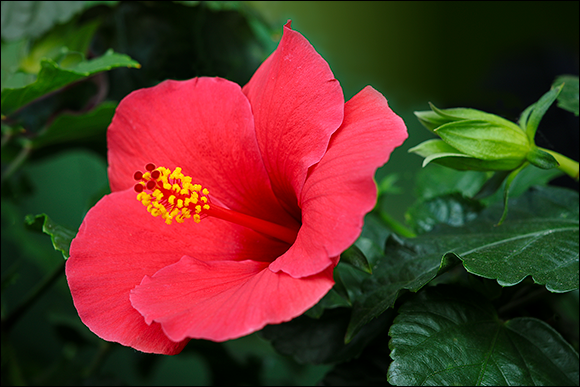
2.8 In this image, vignetting helps frame the subject. Exposure: ISO 100, f/5.6, 1/40 second.
You may want to test your lenses for vignetting before applying correction. To test the lens, photograph an evenly lit white subject, such as a white paper background or wall, at the lens’s maximum aperture and f/8.0, and then examine the images for dark corners. Then you can enable Lens Peripheral illumination correction, repeat the shot, and compare the results.
Because the 70D comes preloaded with lens correction information for approximately 25 lenses, enabling the options for Lens Peripheral illumination correction and Chromatic Aberration Correction will automatically apply the corrections if you’re using one of the registered lenses. You can also add correction settings for lenses that are not preregistered by registering them using the EOS Utility, a program included on the EOS Digital Solution Disk that comes with the camera. In any case, the correction data for the lens you’re using has to be registered with the camera for the correction to have any effect.
If you use Lens Peripheral illumination correction for JPEG images, the amount of correction applied is just shy of the maximum amount. If you shoot RAW images, you can apply the maximum correction in Digital Photo Professional (DPP). Also, the amount of correction for JPEG images decreases as the ISO sensitivity setting increases. If the lens has little vignetting, the difference in using Peripheral illumination correction may be difficult to detect. If the lens does not communicate distance information to the camera, then less correction is applied.
For non-Canon lenses, disable both the Peripheral illumination correction and Chromatic Aberration Correction options, even if the lens appears to have correction information.
You can also correct for color fringing, which is also called chromatic aberration. The aberration appears as a red/cyan or blue/yellow fringe or outline around high-contrast edges within the image. Fringing is only one of several types of chromatic aberration.
When using these corrections, they are applied when images are taken and cannot be applied to images you’ve already shot. If you’re shooting in Live View mode ( ![]() ) with the corrections and magnified view, you won’t be able to see the corrections on the image on the LCD screen. However, the corrections will be applied to the final image. Also, if you’re using a Canon lens that doesn’t transmit distance information to the camera, then the correction amount will be lower than for lenses that supply the information.
) with the corrections and magnified view, you won’t be able to see the corrections on the image on the LCD screen. However, the corrections will be applied to the final image. Also, if you’re using a Canon lens that doesn’t transmit distance information to the camera, then the correction amount will be lower than for lenses that supply the information.
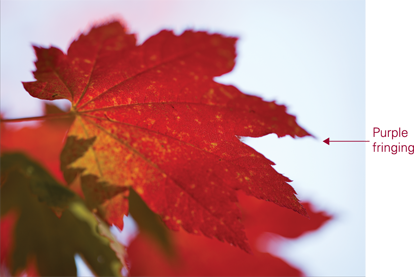
2.9 Purple fringing is most often seen along high-contrast edges, as shown here. Exposure: ISO 200, f/2.8, 1/500 second.
Both Peripheral illumination correction and/or Chromatic Aberration Correction are turned on by default. However, if you want to see if correction data is available for the lens you’re using, or if you want to turn off either option, follow these steps:
1. On Shooting menu 2 (![]() ), highlight Lens aberration correction, and then press the Setting button (
), highlight Lens aberration correction, and then press the Setting button (![]() ). The Lens aberration correction screen appears showing the lens currently mounted to the 70D, and whether correction data is available. If correction data is not available, there is no need to continue with the remaining steps until you register the lens using the EOS Utility.
). The Lens aberration correction screen appears showing the lens currently mounted to the 70D, and whether correction data is available. If correction data is not available, there is no need to continue with the remaining steps until you register the lens using the EOS Utility.
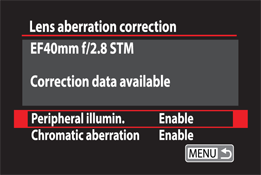
2.10 The Lens aberration correction options set to Enable.
2. Select Peripheral illumin., and then press the Setting button (![]() ). The Enable and Disable options appear.
). The Enable and Disable options appear.
3. If you want to turn off the correction, select Disable. If you’ve turned it off previously and want to use it again, select Enable, and then press the Setting button ( ![]() ).
).
4. Select Chromatic aberration, and then press the Setting button (![]() ). The Enable and Disable options appear.
). The Enable and Disable options appear.
5. If you want to turn off the correction, select Disable. If you’ve turned it off previously and want to use it again, select Enable to correct chromatic aberration, and then press the Setting button ( ![]() ). If you’re shooting RAW with chromatic aberration correction in effect, then the correction may not be apparent when you play back the image. For the most effective view of the correction, view the image in Digital Photo Professional.
). If you’re shooting RAW with chromatic aberration correction in effect, then the correction may not be apparent when you play back the image. For the most effective view of the correction, view the image in Digital Photo Professional.
Working with Folders and Files
In addition to the default folder that the 70D creates automatically, you have the option to create additional folders to organize images on the SD card. Creating additional folders is a handy way to keep images from two or more shooting sessions separate.
Also, by default, the 70D names image files, but you can determine how the file number is used. Setting up folders and file numbering options helps make your workflow as efficient as possible.
Creating and selecting folders
Those who like to keep their pictures organized on SD cards will welcome the generous folder creation option on the 70D. You can create as many as 999 folders on the SD card, and each folder can store up to 9,999 images.
When image 9,999 is recorded within a folder on the SD card, the camera displays an error message, and you cannot continue shooting until you replace the card, regardless of whether the card contains additional free space. This may sound innocuous, but it can cause missed shots. If the camera stops shooting unexpectedly, try replacing the SD card.
New folders must be created within the main folder, and folders can be created either in the camera or on the computer. Here are the folder guidelines for either option:
• Creating folders in-camera. Folders created in the camera are numbered sequentially starting from the folder that the camera automatically creates, 100CANON. If you create a new folder, the next folder is incremented by one, for example, 101CANON. When you create folders in the camera, the folder naming structure is preset and cannot be changed. If you insert an SD card from another Canon EOS dSLR, the folder will keep its existing name until you format the media card in the 70D.
• Creating folders on the computer. You can also create folders on the memory card by opening it on the computer and creating a new folder named DCIM. Within the DCIM folder you can create additional folders and get more flexibility in folder naming. However, you must follow the camera’s naming conventions. Each folder must begin with a unique three-digit number from 101 to 999. Then you can use a combination of up to five letters (upper- and/or lowercase) and an underscore to complete the folder name. No spaces are allowed in folder names and the same three-digit number can’t be repeated. So, you can create a folder named 102CKL_D, but not one named 102SKL_D because the three digits are the same.
If you format the SD card, the folders you created either in-camera or on the computer are erased, along with all images. The only folder that isn’t erased is the default 100CANON folder. Thus, you need to create new folders after you format the card. To create a new folder, follow these steps:
1. On Setup menu 1 (![]() ), highlight Select folder, and then press the Setting button (
), highlight Select folder, and then press the Setting button (![]() ). The Select folder screen appears.
). The Select folder screen appears.
2. Select Create folder, and then press the Setting button (![]() ). The camera displays a confirmation message to create a folder with the next incremented number.
). The camera displays a confirmation message to create a folder with the next incremented number.
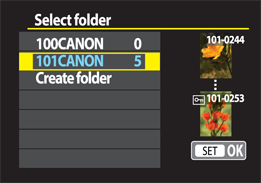
2.11 The Select folder screen.
3. Select OK, and then press the Setting button (![]() ). The Select folder screen appears with the newly created folder selected.
). The Select folder screen appears with the newly created folder selected.
To select a folder on the SD card, repeat step 1, and then choose the folder you want on the Select folder screen. This screen shows the number of images in each folder and previews the first image.
Choosing a file numbering option
There may be times when you want to change the camera’s default file-naming sequence or reset it, and you have three options. This section looks at each option, and some of the shooting scenarios in which each could offer an advantage.
By default, image filenames are prepended with IMG for both JPEG and RAW files, and movie files begin with MIV. JPEG files have the .jpg extension, RAW files use a .CR2 extension, and movie files use .mov.
Continuous file numbering
Continuous file numbering is the default setting on the 70D, and every file is numbered sequentially beginning with 0001 through 9999. Image files are stored in the 100CANON folder located at the top level on the SD card.
With Continuous file numbering, the file numbering continues uninterrupted unless you insert a media card that has images stored on it. If the highest file number on the card is higher than the last image number used on the 70D, file numbering typically continues from the highest-numbered image on the media card. This numbering sequence continues even after you insert an empty, formatted SD card. For example, although I had taken only 300 images with the 70D, when I inserted an SD card from another Canon EOS camera, the next image file number on the 70D was 4521, the next higher number on the SD card. Likewise, if an SD card contains multiple folders with images in them, the numbering sequence begins with the highest-numbered existing image in the folder that is being used.
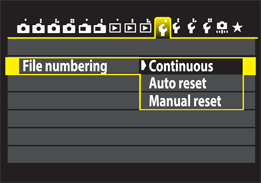
2.12 The File numbering options.
If you insert an SD card that has a file number lower than the last highest file number taken on the 70D (stored in the camera’s internal memory), file numbering continues from the last highest file number recorded and stored in the 70D’s internal memory. In short, the camera uses the last highest number from either the card or the number stored in memory. If you want to keep file numbering continuous for this camera, always insert a freshly formatted SD card. Continuous file numbering is the default option, and it works well for many photographers — myself included.
Auto reset
With this option, the file numbering resets when you insert a media card or create a new folder on a media card. When you use Auto reset, image file numbers are reset to begin at 0001 if the card is freshly formatted.
Auto reset is handy for keeping images organized by subject when photographing different subjects on the same day. For example, if I’m photographing a wedding and someone asks me to make a family portrait, then I create a separate folder on the media card and save the family portrait to the new folder while keeping the original folder for the wedding pictures. Because the file numbers reset in each folder, it’s easy to check each folder to see how many images I’ve taken for each subject. Additionally, the images are presorted when it’s time to download them to the computer.
However, the Auto reset option isn’t as straightforward as it seems. If you insert an SD card with existing images stored on it, the camera uses the highest existing image number, and continues numbering from there. So, if you want Auto reset to reset to 0001, be sure to format the SD card in the camera before shooting. In short, it pays to start a shooting day with an adequate supply of freshly formatted SD cards, and not swap them between cameras.
Manual reset
If you choose the Manual reset option, the 70D automatically creates a new folder and begins numbering images at 0001. By its name, it seems that you could force file numbering to reset to 0001 for a fresh start. That does happen, if the default 100CANON folder is empty. However, if the 100CANON folder has images in it, when you choose Manual reset, the camera creates a new folder and starts image numbering at 0001 in that folder. That behavior is also true for media cards that have multiple folders with images in each folder.
When is Manual reset handy? I use it anytime I want to quickly create a new folder and begin shooting at image number 0001. Using the same example as previous, if I’m shooting a wedding and have a request for a guest’s portrait, I can select Manual reset and know that the camera will automatically create a new folder for the portraits, and record them to the new folder. This saves me the step of creating the folder needed with Auto reset. Of course, I have to remember to switch back to the wedding folder when I finish the portraits.
After you choose Manual reset, the 70D returns to the File numbering option that was in effect before the numbering was manually reset, either Continuous or Auto reset. Also, the new folder created is the next sequential number from the existing highest folder number on the SD card.
To change File numbering, go to Setup menu 1 ( ![]() ), select File numbering, and then press the Setting button (
), select File numbering, and then press the Setting button ( ![]() ). Select the option you want, and then press the Setting button (
). Select the option you want, and then press the Setting button ( ![]() ) again.
) again.
The 70D’s built-in wireless function is a welcome feature for many reasons, one of which is that you can wirelessly upload images to your iOS or Android smartphone, tablet, computer, and websites via online storage services, such as Canon’s Image Gateway. You can also print images by sending them from the SD card to a wireless-enabled printer. The 70D Wi-Fi function also supports transferring images between Wi-Fi-enabled Canon cameras — and that’s not all.
With Canon’s free EOS Remote app, you can also control the camera remotely with your smartphone or tablet. The live scene is streamed from the 70D to your smartphone or tablet, where you can change exposure settings, focus on the subject, and trip the shutter — all without touching the camera. And finally, you can use the wireless function to preview images on a Digital Living Network Alliance- (DLNA) enabled device such as a TV.
When using Wi-Fi, Movie mode ( ![]() ) is disabled, as well as use of the USB connection.
) is disabled, as well as use of the USB connection.
The 70D’s built-in Wi-Fi:
• Supports IEEE 802.11 b/g/n standards.
• Has a range of approximately 98.4 feet.
• Has a transmission frequency of 2412 to 2462 MHz, with channels 1 to 11 supported.
• Supports Wi-Fi Protected Setup.
• Security supports authentication methods including Open system, Shared key, WPA-PSK, WPA2-PSK, and encryption (WEP, TKIP, and AKES).
With the Wi-Fi function on the camera, you can set up, name, and save three connection profiles although the 70D can be connected to only one device at a time. In addition, the 70D can serve as an access point for connecting your mobile devices to the camera’s network. You can also have the 70D connect to an existing wireless network, such as the wireless network in your home or studio.
It is beyond the scope of this book to provide details on all of the functions of connecting to different types of wireless networks and configuring the settings, but the following sections will help get you started using Wi-Fi with your 70D. While the connection process may seem daunting at first, once you have successfully made one connection, the process for connecting to other devices is similar. In this section, I detail the basic Wi-Fi setup on the camera, and then provide steps for connecting to a smartphone and the Canon Gateway website to upload images.
Getting started
A few settings on the camera prepare it for wireless use. These include enabling Wi-Fi, setting a nickname or ID, for the camera, and setting up Wi-Fi functions for each connection. Follow these steps to set up the general Wi-Fi settings:
1. On Setup menu 3 (![]() ), select Wi-Fi, press the Setting button (
), select Wi-Fi, press the Setting button (![]() ), select Enable, and then press the Setting button (
), select Enable, and then press the Setting button (![]() ) again. When Wi-Fi is enabled, Movie recording and USB connections are disabled automatically. If you cannot select the Wi-Fi option, make sure the camera is disconnected from printers, computers, GPS’s, or any other device. Then, try this step again.
) again. When Wi-Fi is enabled, Movie recording and USB connections are disabled automatically. If you cannot select the Wi-Fi option, make sure the camera is disconnected from printers, computers, GPS’s, or any other device. Then, try this step again.
2. On Setup menu 2 (![]() ), select Auto power off, and then press the Setting button (
), select Auto power off, and then press the Setting button (![]() ). Time options appear after which the camera turns off if it hasn’t been used.
). Time options appear after which the camera turns off if it hasn’t been used.
3. Select a long delay before power off, and if you’re transferring images, select Disable. If the camera turns off, the Wi-Fi connection is lost, although it is restored automatically when you awaken the camera.
Every network requires that devices be identified. To identify the 70D on a network, you have to give it a nickname that is then used by devices that connect with the camera. Before you begin, make sure Wi-Fi is enabled on Setup menu 3 ( ![]() ). To register a nickname, follow these steps:
). To register a nickname, follow these steps:
1. On Setup menu 3 (![]() ), select Wi-Fi function, and then press the Setting button (
), select Wi-Fi function, and then press the Setting button (![]() ). The Wi-Fi function screen appears with a message confirming that you want to register a nickname.
). The Wi-Fi function screen appears with a message confirming that you want to register a nickname.
2. Press the Setting button (![]() ) to select OK. A screen with a keyboard appears.
) to select OK. A screen with a keyboard appears.
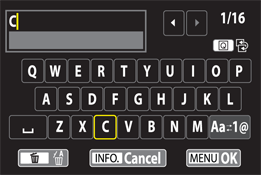
2.13 The keyboard screen.
3. Press the Quick Control button (![]() ) to activate the keyboard, and then turn the Quick Control dial (
) to activate the keyboard, and then turn the Quick Control dial (![]() ) to select the first character (you can use up to 16) you want for the nickname. You can use the direction keys on the Multi-controller (
) to select the first character (you can use up to 16) you want for the nickname. You can use the direction keys on the Multi-controller ( ![]() ) to select characters, or just touch the character on the screen.
) to select characters, or just touch the character on the screen.
To enter lowercase characters and two sets of numbers and symbols, select the box at the far bottom right of the keyboard. Then, press the Setting button ( ![]() ) one or more times to switch between input modes, or just touch the box one or more times.
) one or more times to switch between input modes, or just touch the box one or more times.
5. When you finish entering the nickname, press the Menu button (![]() ), select OK, and then press the Setting button (
), select OK, and then press the Setting button (![]() ). The Wi-Fi function screen appears. If you ever need to change the nickname, go to the Wi-Fi function screen, press the Info. button (
). The Wi-Fi function screen appears. If you ever need to change the nickname, go to the Wi-Fi function screen, press the Info. button ( ![]() ), and then select Edit nickname on the General sett. screen.
), and then select Edit nickname on the General sett. screen.
To keep from disconnecting a Wi-Fi connection, don’t use the shooting controls, such as the shutter or Playback ( ![]() ) buttons, or the Mode dial. Also, don’t turn the LCD screen to face the camera.
) buttons, or the Mode dial. Also, don’t turn the LCD screen to face the camera.
Connecting to a smartphone
One of the handy functions that built-in wireless offers is the ability to connect the camera to your smartphone. When you do this, you can view pictures on the camera’s SD card, transfer downsized pictures from the camera to the phone, and control the camera from your smartphone using Canon’s free EOS Remote app.
It doesn’t take long to figure out ways to use these new capabilities to your advantage. With remote control, you can place the camera in places and positions where you could not shoot with the viewfinder or in Live View mode ( ![]() ). As you decide where to place the camera, keep in mind that the maximum transmission range is 98.4 feet.
). As you decide where to place the camera, keep in mind that the maximum transmission range is 98.4 feet.
If you decide to change the exposure settings, the EOS Remote app enables you to set the aperture in Aperture-priority AE exposure mode ( ![]() ), the shutter speed in Shutter-priority AE exposure mode (
), the shutter speed in Shutter-priority AE exposure mode ( ![]() ), and the aperture and shutter speed in Manual exposure mode (
), and the aperture and shutter speed in Manual exposure mode ( ![]() ). In all modes, you can change the ISO. In the Aperture-priority AE (
). In all modes, you can change the ISO. In the Aperture-priority AE ( ![]() ) and Shutter-priority AE (
) and Shutter-priority AE ( ![]() ) modes, you can also set exposure compensation. Plus, you can move the AF point and focus remotely.
) modes, you can also set exposure compensation. Plus, you can move the AF point and focus remotely.
Make sure that both the phone or device and the camera have good battery charges before you begin the connection process. If you’ve enabled touchscreen functionality, you can simply touch the screen to select most of the options in these steps. Steps for connecting may differ depending on the model of your phone. To connect your smartphone to the 70D, follow these steps:
1. Download the free Canon EOS Remote app onto your iOS or Android smartphone or tablet. Before going to the next step, make sure that you know how to enable additional Wi-Fi connections on your device. For example, on the iPhone 5, enabling additional Wi-Fi networks is done using the Wi-Fi option on the Settings screen.
2. Start the EOS Remote app, and then tap the icon in the upper left of the Home screen to open the Settings screen. The Settings screen appears.
3. For the Show AF button option, choose ON, and then tap the Home button in the upper-left corner of the screen. Turning on the Show AF button option enables you to set the focus on the camera using the mobile device.
4. On the 70D, go to Setup menu 3 (![]() ) and select Wi-Fi function. The Wi-Fi function screen appears with options for wireless connections.
) and select Wi-Fi function. The Wi-Fi function screen appears with options for wireless connections.
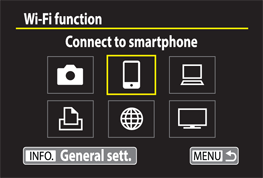
2.14 The Wi-Fi function screen with Connect to smartphone selected.
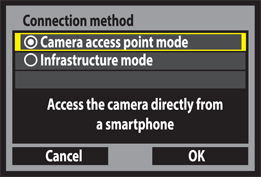
2.15 The Connection method screen.
5. Turn the Quick Control dial (![]() ) to select Connect to smartphone, and then press the Setting button (
) to select Connect to smartphone, and then press the Setting button (![]() ). The Connection method screen appears.
). The Connection method screen appears.
6. Choose Camera as access point mode, and then choose OK. The Network Settings screen reappears.
7. Select Easy connection, and then choose OK. A message appears telling you to connect to the access point using the information provided on the screen.
8. On the smartphone, go to the Wi-Fi settings or the equivalent screen on your phone, and then tap the camera’s network that appears with the nickname you chose for the camera. A screen for the password or encryption key appears.
9. Enter the encryption key or other information displayed on the 70D into the smartphone, and then choose Join (or the option presented on your device). The connection is made, and a check mark appears next to the name of the camera’s network.
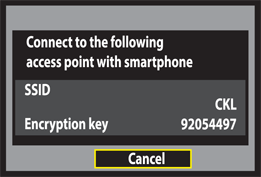
2.16 The network ID nickname and Encryption key screen provided on the 70D. Enter this encryption key on the smartphone to join the camera’s network.
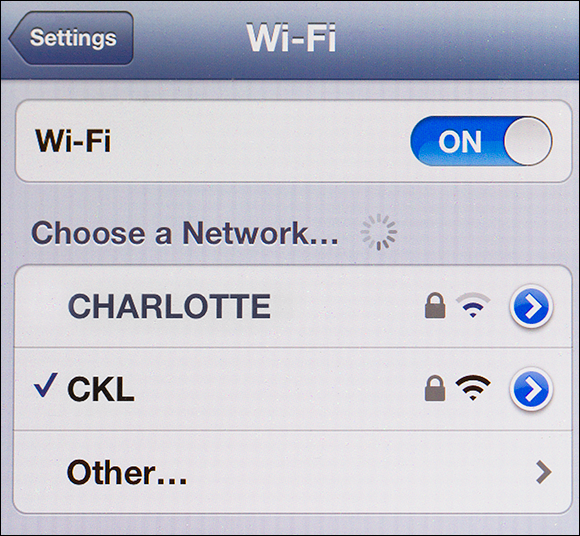
2.17 The smartphone Wi-Fi Settings screen with the camera’s network active.
10. On the smartphone Home screen, start the EOS Remote app. The text at the top of the Home screen displays a message that the phone is connected to the 70D. You can click the camera connection and verify the network settings.
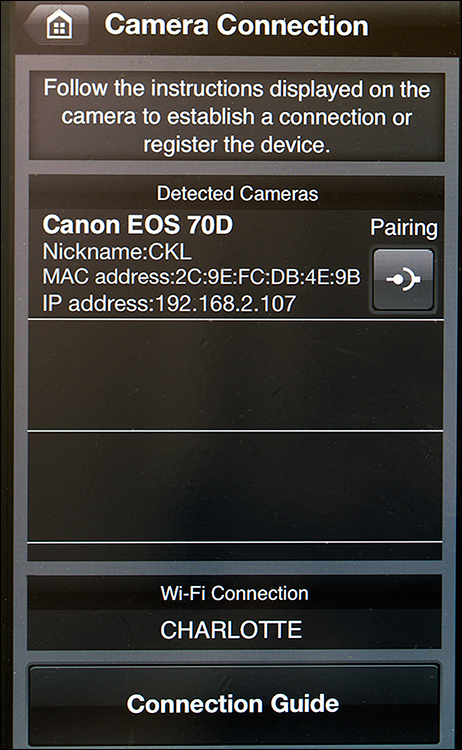
2.18 The Camera connection screen on the EOS Remote app.
With the camera and phone now connected, you can view images on the camera’s SD card, or you can use the phone or tablet to control the camera and take pictures.
To view images on the SD card, follow these steps:
1. On the EOS Remote app home screen, tap Camera Image Viewing. An index of images on the SD card appears along with the date the image was captured.
2. To view a single image, tap the image once to display it at a larger size. A ribbon of controls appears at the bottom of the screen. With these controls, you can e-mail the displayed image, rate it from one to five stars, or delete it.
3. In Single image view, press the Download button in the lower-left corner of the screen to download the currently displayed picture from the camera’s SD card to the phone. The camera downloads the picture to the phone and automatically reduces the size to 2.5 megapixels (1.3MB, 1920 × 1280 pixels). The size is reduced regardless of whether you’re shooting Large JPEG or RAW images. To transfer images at full resolution, it’s best to transmit from the camera to the computer directly, or into a Wi-Fi hotspot, and then transmit to the Canon iMAGE Gateway.
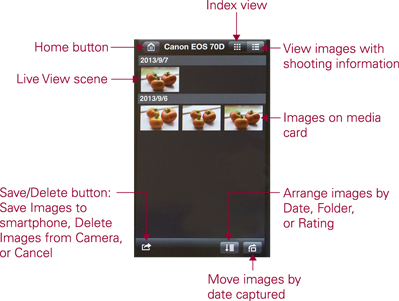
2.19 The image viewing screen.
In addition to viewing images, you can control the camera from the smart device by following these steps:
1. On the EOS Remote screen, tap Remote Shooting. A live view from the camera appears on the phone screen, along with a shutter and focus button. The size of the screen reflects the LCD size.
2. To change the exposure, tap the double-arrow icon on the lower-right side of the screen, and then tap the exposure option you want to change. A slider for the chosen control appears. Just drag the marker to change the setting. In Aperture-priority AE mode ( ![]() ), you can change the aperture. In Shutter-priority AE mode (
), you can change the aperture. In Shutter-priority AE mode ( ![]() ), you can change the shutter speed. In Manual mode (
), you can change the shutter speed. In Manual mode ( ![]() ), you can change both the aperture and shutter speed. In Program AE mode (
), you can change both the aperture and shutter speed. In Program AE mode ( ![]() ), you can only change the ISO and set Exposure compensation. In Bulb mode (
), you can only change the ISO and set Exposure compensation. In Bulb mode ( ![]() ), you can change the aperture. In all modes, you can change the ISO setting.
), you can change the aperture. In all modes, you can change the ISO setting.
The drive mode for remote shooting is whatever is currently set on the 70D. Thus, if High-speed continuous drive mode ( ![]() ) is set on the camera, you can press and hold the shutter button to fire a burst of images at 7 frames per second (fps) from the smartphone.
) is set on the camera, you can press and hold the shutter button to fire a burst of images at 7 frames per second (fps) from the smartphone.
3. To move the AF point, tap the phone screen, and then to focus, tap the focus button on the phone. When focus is established, a green rectangle appears in the AF point.
4. To make the picture, press the shutter button.
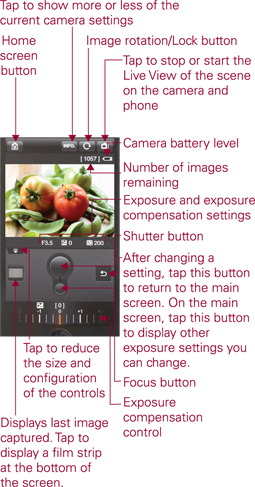
2.20 The remote control screen on a smartphone with the Exposure compensation control activated. This screen changes depending on the controls you choose.
Once you capture images, you can return to the EOS Remote app to review and rate them, or save them to the smart device. From there, you can share them as you would any other photo on your phone or tablet.
You can also specify which images on the camera’s SD card can be viewed on mobile devices. On the Setup menu 3 ( ![]() ), select Wi-Fi function, and then choose Connect to Phone (
), select Wi-Fi function, and then choose Connect to Phone ( ![]() ). On the Connect to smartphone screen, choose Review/change settings, and then select Viewable imgs. On the Viewable imgs screen, select Images from past days, Select by rating, or File number range to limit the images that can be viewed on the mobile device. If you choose Images from past days, you can then specify either Images shot today, or set a specific number of days past.
). On the Connect to smartphone screen, choose Review/change settings, and then select Viewable imgs. On the Viewable imgs screen, select Images from past days, Select by rating, or File number range to limit the images that can be viewed on the mobile device. If you choose Images from past days, you can then specify either Images shot today, or set a specific number of days past.
Uploading wirelessly to the Web
Another advantage of wireless functionality is the ability to upload images to the web. With the 70D wireless feature, however, you need to use Canon iMAGE Gateway. Canon iMAGE Gateway is a free service that provides a bridge for you to upload images to iMAGE Gateway. From there, you can share images via e-mail, or with other websites, including Facebook, Twitter, and YouTube.
In addition to providing a bridge, the iMAGE Gateway enables you to store images, create albums, and print images. It offers a nice selection of useful features including up to 10GB of online storage space; just be sure to explore all the options scattered throughout the site.
The first step is setting up an account with Canon iMAGE Gateway. If you have not installed the programs on the EOS Digital Solutions Disk to your computer, be sure to install them now. At the end of the installation, you have an opportunity to register the 70D with Canon, and at that time, you can set up an account for the web service. Alternately, you can go to the Canon website at www.usa.canon.com/cusa/consumer and click the Sign In link at the top of the left column. Click Register Now to set up an account. You may be asked to upload pictures as the first step. If so, you can upload some pictures that you have on hand. With an account setup, you can move on to setting up the connection and uploading images to the website.
The next tasks assume that you have a Canon account that includes iMAGE Gateway, that you are signed into that account, and that you’ve installed the EOS Utility program. You will also need the interface cable provided in the camera box. Follow these steps to connect the camera to the Canon iMAGE Gateway and other websites:
1. On Setup menu 3 (![]() ), choose Wi-Fi, and then choose Disable. Wi-Fi must be disabled to connect the camera with a USB cord, which is the next step.
), choose Wi-Fi, and then choose Disable. Wi-Fi must be disabled to connect the camera with a USB cord, which is the next step.
2. Turn off the camera, connect the interface cable to the camera and the computer, and then turn on the camera. The EOS Utility window appears.
3. Click the Web Service Settings option on the EOS Utility screen. If the latest SSL certificate hasn’t been downloaded, a message appears asking you to download. Click OK, and then wait for the download to finish. The login screen for Canon iMAGE Gateway appears.
4. On the Login screen, type your Username and Password, and then click Login. The Setup Web Services first message appears.
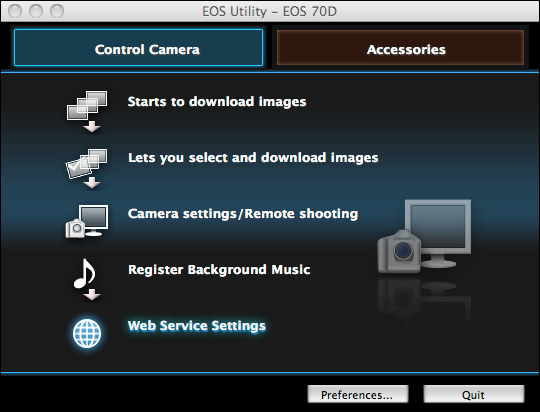
2.21 The EOS Utility window with Web Service Settings selected.
5. Click OK, and then click the Edit button next to the service you want to use. The options are Facebook, Twitter, YouTube, and e-mail.
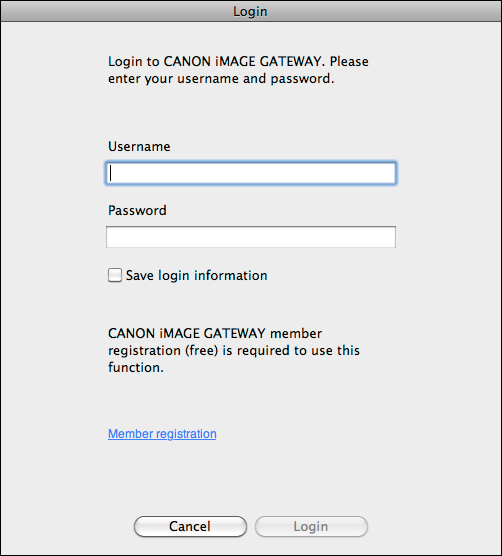
2.22 The Login screen for Canon iMAGE Gateway.
6. Complete the link settings questions, and then click the Back button.
7. Repeat the process for each service you want to use, and then click Finish. The EOS Utility window appears with the Web Services you chose in the right column.
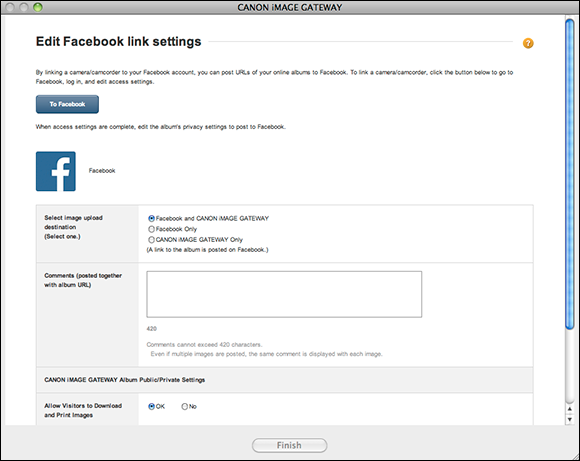
2.23 The Edit Facebook link settings page on the Canon iMAGE Gateway website.
8. To add the web services to the camera, click one of the web services listed in the right column, and then click the arrow in the center column to add the service to Camera column on the left (see Figure 2.24).
9. Repeat step 8 for each service, and then click OK. You have to choose the services one at a time to move them into the Camera column. Now the camera and the iMAGE Gateway site are configured so that you can post images to the services you set up.
10. Turn off the camera and disconnect it from the computer.
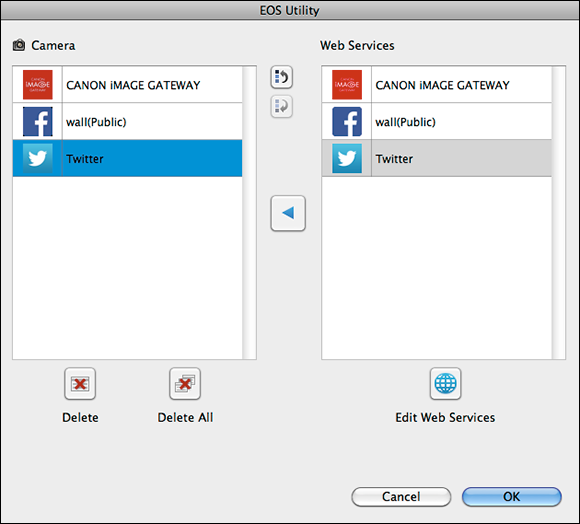
2.24 The EOS Utility window with Web Services added to the camera.
To upload images and videos to websites, follow these steps:
1. On Setup menu 3 (![]() ), choose Wi-Fi, press the Setting button (
), choose Wi-Fi, press the Setting button (![]() ), choose Enable, and then press the Setting button (
), choose Enable, and then press the Setting button (![]() ) again.
) again.
2. On Setup menu 3 (![]() ), choose Wi-Fi function, and then press the Setting button (
), choose Wi-Fi function, and then press the Setting button (![]() ). The Wi-Fi function screen appears.
). The Wi-Fi function screen appears.
3. Select the Upload to Web service option, and then press the Setting button (![]() ). The Upload to Web service screen appears with the web services you set up.
). The Upload to Web service screen appears with the web services you set up.
4. Select the service you want, and then press the Setting button (![]() ). The Wireless LAN setup method screen appears.
). The Wireless LAN setup method screen appears.
5. Select Find network, and then choose OK. The Select wireless network screen appears with the network(s) it detected.
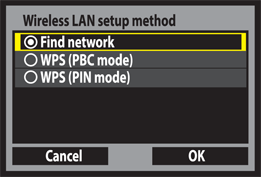
2.25 The Wireless LAN setup method screen.
6. Choose the network you want, and then choose OK. The Key index screen appears.
7. Choose a number, and then select OK. The Key format screen appears.
8. Choose the key format your network requires, and then choose OK. The keyboard appears.
9. Enter the network passcode, and then choose OK. The IP address set. screen appears.
10. Choose Auto setting, and then choose OK. A Connecting message appears. A message then appears confirming that the settings have been configured.
11. Select OK. The camera LCD displays the most recently captured image. You can only upload JPEG images, but the preview images are both JPEG and RAW images, if you shoot RAW. So, if you get an error message saying the image can’t be uploaded, it’s likely because it is a RAW file. To help find JPEG files, press the Info. button ( ![]() ) several times until the image data includes the file type.
) several times until the image data includes the file type.
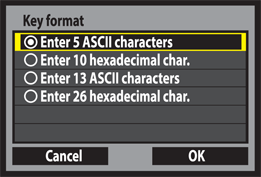
2.26 The Key format screen.
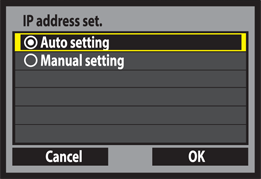
2.27 The IP address set screen.
12. Choose Set at the bottom of the screen. A ribbon of options then appears at the bottom of the screen so that you can resize the image, send the selected image, or send the image shown.
13. To resize the image, choose Resize image, and then press the Setting button (![]() ). The Resize image options appear at the bottom of the screen.
). The Resize image options appear at the bottom of the screen.
14. Choose the option you want, and then press the Setting button (![]() ). If you’re uploading for Web display, choose the Resize:S2 or Resize:S3 option. If you want to send a full-resolution image to a printer, then choose the Orig size option. The Send options appear.
). If you’re uploading for Web display, choose the Resize:S2 or Resize:S3 option. If you want to send a full-resolution image to a printer, then choose the Orig size option. The Send options appear.
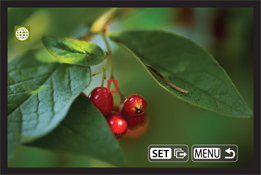
2.28 An image selected for Web upload.
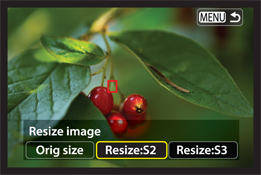
2.29 The image resize options.
15. Select Send selected or Send img shown, and then press the Setting button (![]() ). A progress screen appears as the image is uploaded to the website, and then a message saying the images were sent appears.
). A progress screen appears as the image is uploaded to the website, and then a message saying the images were sent appears.
16. Choose OK. The Upload to Web service screen appears so that you can choose another web service and upload another image.
In addition to the wireless tasks I’ve detailed here, you can also print images to a wireless printer, transfer images to another 70D or an EOS 6D camera, or display images on a DLNA viewing device, such as a TV. Now that you’ve had practice connecting the camera to other devices and local networks, you can use similar steps to connect printers and compatible wireless-enabled Canon cameras.
Controlling the camera remotely
One of the standard ways to shoot studio portraits and commercial still-life shots is to connect, or tether, the camera to a computer, and then use the EOS Utility to control the camera. The EOS Utility is a program provided on the EOS Digital Solution Disk that comes with the camera. With the camera connected to the computer, the photographer had the advantage of viewing the scene on the large computer monitor and making adjustments to camera settings directly from the computer. The problem was that the length of the cable limited mobility. With the Wi-Fi function on the 70D, the short cable is no longer a restriction though the wireless range is limited to 98.4 feet.
While remote shooting with the EOS Utility isn’t suited for every subject, it is a good option for indoor portraits, and some in-studio and outdoor still-life subjects. If you use this type of shooting often, then you can set this as one of the three connection profiles for easy retrieval.
Before you begin, make sure that the computer is already connected to the network and that you’ve installed the Canon EOS Digital Solution Disk on the computer.
Windows users should check page 61 in the Wi-Fi Instruction Manual for details on setting the Firewall before using the Pairing Software to establish a connection between the camera and computer.
The following steps use the Easy connection method to connect the camera to a local wireless network. If this method does not work, then you may need technical information about your network, including the IP address and a PIN. Follow these steps to connect the camera to a local wireless network and control it remotely from the computer:
1. On Setup menu 3 (![]() ), select Wi-Fi function, select Remote control (EOS Utility
), select Wi-Fi function, select Remote control (EOS Utility ![]() ), and then press the Setting button (
), and then press the Setting button (![]() ). The Wireless LAN setup method screen appears.
). The Wireless LAN setup method screen appears.
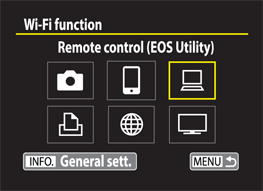
2.30 The Remote control (EOS Utility) option.
2. Select Find network, and then choose OK. The Select wireless network screen appears with a list of local networks it found. If it did not find the network you want, you can choose the Search again option, or you can choose the Enter connection option to connect to the network manually.
3. Select the network you want to use, and then select OK. The Key index screen appears.
4. Select a number, and then select OK. The Key format screen appears.
5. Select the key format you want, and then select OK. Before you make a choice on this screen, you need to know what format that your local network uses. For example, my LAN uses 10 hexidecimal characters. Check the documentation that came with your router to find the key format the network uses. The keyboard screen appears in the appropriate format.
6. Enter the passcode for your network, and then press the Menu button (![]() ) to select OK. The IP address set. screen appears with two options.
) to select OK. The IP address set. screen appears with two options.
7. Select Auto setting, and then select OK. Optionally, if you want to enter the network information, choose Manual setting on this screen. The Start pairing devices message appears.
8. On your computer, open the EOS Utility folder, and then start the WFTPairing.app. This folder is copied to your computer when you set up the EOS Digital Solutions Disk programs. On a Mac, you’ll find the WFTPairing.app in the EOS Utility folder (Applications/Canon Utilities/EOS Utility). When the WFTPairing.app starts, a small icon appears on the taskbar.
9. Click the pairing icon, and then choose Select Camera from the drop-down menu. The WFT Pairing Software dialog box appears showing the camera model, and the MAC and IP addresses.
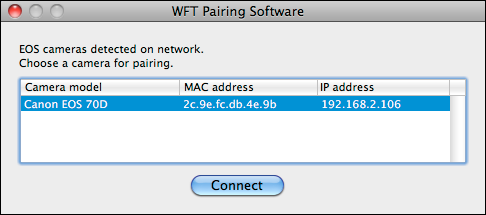
2.31 The WFT Pairing Software dialog box.
10. Click Canon EOS 70D, and then click Connect. A message appears on the computer saying to check the camera’s LCD for further steps. The 70D displays a message saying that the computer was found and that the camera is now connected to the computer.
11. On the 70D LCD screen, choose OK. A message appears saying that settings are configured. Click Settings name if you want to change the name from the default Set 1 to something more descriptive. On the computer, the EOS Utility program appears.
12. On the EOS Utility window, click Camera settings/Remote shooting. The Remote Live View control panel appears on the computer monitor.
13. On the Remote Live View control panel, click Live View shoot. The reflex mirror flips up to preview the scene on the computer screen in the Remove Live View window. Now, you can use the settings in this window and the EOS 70D control panel to change the white balance, autofocus mode, exposure settings, Picture Style, metering mode, and so on, just as you would if you set the controls on the camera body. There is also a live histogram so that you can adjust settings to get the best exposure. To change a setting, just double-click (or click) the setting in either window, and then make the changes you want.
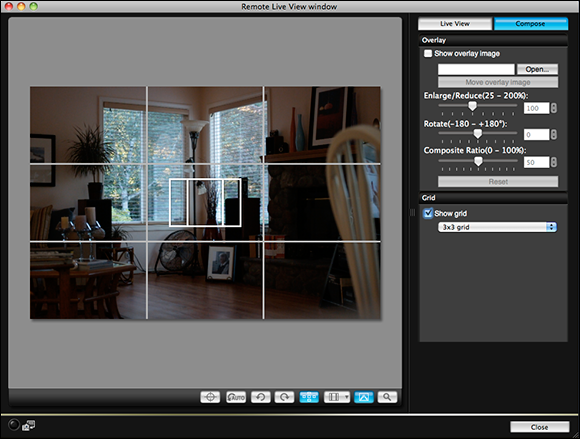
2.32 The Remote Live View window with the grid displayed.
14. Press the shutter button on the computer screen to take the picture. The Digital Photo Professional main window opens with the image selected. You can then edit the picture or continue shooting.
Miscellaneous Setup Options
Throughout the camera menus, there are many setup options that you can use to make shooting more enjoyable and efficient. You may have already implemented these settings, but in case you missed some, this section covers them.
General options
In the following tables, I include both camera options that you can set only once, and others that you may need to set for specific shooting scenarios.
There are fewer menus and options available in the automatic shooting modes.
To change general setup options, press the Menu button ( ![]() ), turn the Main dial (
), turn the Main dial ( ![]() ) to choose a menu, and then follow the instructions in Tables 2.2 through 2.7.
) to choose a menu, and then follow the instructions in Tables 2.2 through 2.7.
Table 2.2 Shooting Menu 1 Options
|
Turn the |
Press |
Turn the |
|
VF grid display |
Disable, Enable |
Choose Enable to display a grid in the viewfinder to help you ensure that the lines in the scene you’re shooting are square (straight) with the frame. The grid also helps you compose the image using the Rule of Thirds. |
|
Viewfinder level |
Hide, Show |
Choose Show to display a small level on the LCD screen and at the bottom of the viewfinder to help you avoid tilting the camera. |
|
Beep |
Enable, Touch to |
Choose Enable to hear a beep when the camera achieves focus, during touch-screen actions, and when using the Self-timer. Choose Touch to |
|
Image review |
Off, 2 sec., 4 sec., 8 sec., and Hold |
Longer review durations of 4 or 8 seconds have a negligible impact on battery life except during travel when battery power may be at a premium. |
Table 2.3 Playback Menu 3 Options
|
Turn the |
Press |
Turn the |
|
Highlight alert |
Disable, Enable |
Choosing Enable causes blown highlights to blink on the preview image displayed on the LCD screen. This is a handy way to know quickly if you need to set some negative exposure compensation and reshoot to retain highlight detail. |
|
AF point display |
Enable, Disable |
Choosing Enable displays the AF point or points that achieved focus in red on the preview image. This helps you verify that the focus is set exactly where you want it in the image. |
|
Playback grid |
Off, 3 × 3, 6 × 4, 3 × 3+diag |
Choosing 3 × 3 or 6 × 4 overlays a grid on the playback screen so you can see if the horizontal and vertical lines in the scene are square. The 3 × 3+diag option adds an X-shape on top of the 3 × 3 grid to aid in checking composition. |
Table 2.4 Setup Menu 1 Options
|
Turn the |
Press |
Turn the |
|
Auto rotate |
On for camera and computer, On for computer, or Off |
Choose On to rotate vertical images to the correct orientation automatically on the LCD screen and computer monitor. Choose On to rotate images only on the computer monitor. Choose Off for no rotation on the camera or computer. Choosing either of the first two options displays the image at a reduced size. |
Table 2.5 Setup Menu 2 Options
|
Turn the |
Press |
Turn the |
|
LCD brightness |
Seven brightness levels |
Watch both the preview image and the grayscale chart as you turn the |
|
LCD off/on btn |
Remains on, Shutter btn. (Unavailable during movie recording) |
Choosing Remains on causes the Shooting functions setting screen to appear on the LCD screen when you press the shutter button halfway to focus. This screen shows all of the settings for the camera, and from it you can turn the Mode dial to see the settings for any of the exposure modes. Press the |
|
Date/Time/Zone |
Date (year, month, day), Time (hour, min., sec.), Daylight saving time, Time zone |
Setting these options is the first step after powering on the camera for the first time. You can revisit these settings if you’re traveling to other time zones to reset the options for the current location. |
Table 2.6 Setup Menu 3 Options
|
Turn the |
Press |
Turn the |
|
Feature guide |
Enable, Disable |
Choosing Enable displays a brief description of the currently selected modes, and exposure settings, functions, and options on the camera. Choosing the Enable option dismisses the descriptive text. I recommend using the guide to help you learn the 70D. |
|
Touch control |
Standard, Sensitive, Disable |
Sets the touch sensitivity of the LCD touch screen. The default is Standard, and it is very responsive, but you may prefer the Sensitive setting. The Sensitive setting may respond slower if you use quick touches. |
|
|
Displays camera settings, Electronic level, Displays shooting functions |
Choose an option to determine which screen is displayed by pressing the |
Table 2.7 Setup Menu 4 Options
|
Turn the |
Press |
Turn the |
|
Sensor cleaning |
Auto cleaning: Enable, Disable, Clean now, Clean manually |
Choose Auto cleaning/Enable to have the sensor cleaned every time you power the camera on and off. Choose Clean now to clean the sensor again, say, after changing a lens or if you do not use auto cleaning. Choose Clean manually to use specially designed tools to clean the image sensor yourself. With this option, press |
|
Clear all camera settings |
Return all camera settings to the factory defaults |
Choose this function when you have settings that are not working well, or you feel that you’ve gone too far in making changes to camera settings. All the shooting (autofocus, metering, ISO, drive mode, and so on) and menu (Image quality, White balance, Color space, Image review time, and so on) settings are reset to their original settings. Custom Function settings remain unchanged. |
|
firmware ver. * |
Displays the current version of firmware installed in the 70D |
Choose this function when you want to check the current version of firmware installed in the camera. The screen also provides the lens version. To update firmware, choose the Camera option. |
|
* Be sure to check the Canon website periodically for firmware updates. |
||
The LP-E6 is a very reliable battery with a long life. You can expect to get approximately 1300 shots per battery charge at 73-degree temperatures with viewfinder shooting and no flash use. With 50 percent flash use, expect approximately 920 shots per charge. For movies, you can expect approximately 1 hour and 20 minutes of recording time.
Adding copyright information
Copyright identifies your ownership of images. On the 70D, you can append your copyright information to the metadata that is embedded with each image that you shoot. While including your copyright is a great first step in identifying ownership of the images you make, the process is not complete until you register your images with the United States Copyright Office. For more information, visit www.copyright.gov.
To include your copyright and the camera owner’s name on your images, follow these steps:
1. On Setup menu 4 (![]() ), highlight Copyright information, and then press the Setting button (
), highlight Copyright information, and then press the Setting button (![]() ). The Copyright information screen appears.
). The Copyright information screen appears.
2. Highlight the option you want, such as Enter author’s name or Enter copyright details, and then press the Setting button (![]() ). A screen appears in which you can enter the name or details.
). A screen appears in which you can enter the name or details.
3. Press the Quick Control button (![]() ) to activate the keyboard, use the direction keys on the Multi-controller (
) to activate the keyboard, use the direction keys on the Multi-controller (![]() ) to move the cursor to the letter you want to enter, and then press the Setting button (
) to move the cursor to the letter you want to enter, and then press the Setting button (![]() ). The currently selected letter is shown with a yellow rectangle. You can change the input mode to lowercase, numbers, or two sets of symbols by selecting the input mode key (
). The currently selected letter is shown with a yellow rectangle. You can change the input mode to lowercase, numbers, or two sets of symbols by selecting the input mode key ( ![]() ) one or more times.
) one or more times.
4. Press the Setting button (![]() ) to insert the letter in the top portion of the screen. To delete a character, press the Erase button (
) to insert the letter in the top portion of the screen. To delete a character, press the Erase button ( ![]() ). You can enter up to 63 characters, numbers, and symbols in the text area.
). You can enter up to 63 characters, numbers, and symbols in the text area.
5. Press the Menu button (![]() ), and then choose OK when a confirmation message appears. The Copyright information screen appears, in which you can type copyright details or the author’s name, whichever you didn’t choose in Step 2.
), and then choose OK when a confirmation message appears. The Copyright information screen appears, in which you can type copyright details or the author’s name, whichever you didn’t choose in Step 2.
Playing Back and Rating Content
Viewing images and movies immediately after capture is the best way to know if the exposure, focus, color, composition, and other factors are on track. Of course, viewing images and movies on the 70D is as simple as pressing the Playback button ( ![]() ). If you’re in Single image display, you can choose how much shooting and file information appears with the image. If you’ve turned on the Highlight alert and AF-point display options, the preview image shows these as well, with localized areas of overexposure displayed as blinking highlights.
). If you’re in Single image display, you can choose how much shooting and file information appears with the image. If you’ve turned on the Highlight alert and AF-point display options, the preview image shows these as well, with localized areas of overexposure displayed as blinking highlights.
To move through images and movies on the SD card, turn the Quick dial ( ![]() ) counterclockwise to view the next most recent image or movie, or clockwise to view the first. You can change the playback display by pressing the Info. button (
) counterclockwise to view the next most recent image or movie, or clockwise to view the first. You can change the playback display by pressing the Info. button ( ![]() ) once to cycle through each of these four image-playback displays:
) once to cycle through each of these four image-playback displays:
• Single image. The image fills the LCD screen with no shooting information overlaid. If you’re showing subjects or friends the images you’ve captured, this display option provides a clean, uncluttered view of the image.
• Single image with basic shooting information. This also displays a large preview image, and overlays the shutter speed, aperture, exposure compensation, and folder and file numbers.
• Histogram(s). This display shows the three RGB (Red, Green, Blue) color channel histograms or a Brightness histogram, depending on what you selected on Playback menu 3 ( ![]() ). This display includes limited shooting and file information.
). This display includes limited shooting and file information.
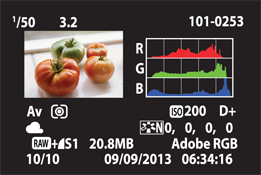
2.33 The playback screen with RGB histograms and image data displayed.
• Shooting information display. This display includes the Bright-ness or RGB histogram — whichever was not included in the previous display. With this display, you can check the tonal distribution and bias, and verify key camera settings, including the exposure mode, metering mode, white balance, file size, image recording quality, and the current image number relative to the total number of shots on the media card.
The amount of shooting information displayed during playback depends on the exposure mode you used. Pictures made in automatic exposure modes, such as Portrait ( ![]() ) and Landscape (
) and Landscape ( ![]() ), display less information than those made with semiautomatic and manual exposure modes, such as Aperture-priority AE (
), display less information than those made with semiautomatic and manual exposure modes, such as Aperture-priority AE ( ![]() ) and Manual (
) and Manual ( ![]() ) modes.
) modes.
Rating content
When you rate images and movies, it makes it easy to find your favorites because you can search images and movies by the rating you give them. You can also use the ratings to select images for in-camera slide shows and movie playbacks. If you use ImageBrowser, a program provided on the EOS Digital Solution Disk that comes with the camera, then you can also sort content by rating level on the computer.
To rate content, follow these steps:
1. On Playback menu 2 (![]() ), highlight Rating, and then press the Setting button (
), highlight Rating, and then press the Setting button (![]() ). An image appears on the LCD screen with rating options displayed at the top.
). An image appears on the LCD screen with rating options displayed at the top.
2. Turn the Quick dial (![]() ) to move to the image you want to rate, and then press the up or down key on the Multi-controller (
) to move to the image you want to rate, and then press the up or down key on the Multi-controller (![]() ) to select a rating. One or more stars appear on the image to reflect the rating.
) to select a rating. One or more stars appear on the image to reflect the rating.
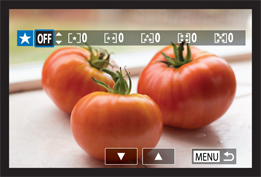
2.34 Image preview with the ratings options displayed.
3. To continue rating images, repeat step 2, and then press the Menu button (![]() ).
).
Searching and moving through multiple files
To move through multiple images and movies quickly, you can display them as an index with either four or nine images per screen. Alternately, you can jump through images by a specified number of images at a time, and by date, folder, movies, or stills (still images).
Here’s how to use both options:
• Display as an index. To display images as an index, press the Playback button ( ![]() ). Then, press the Index/reduce button (
). Then, press the Index/reduce button ( ![]() ) to display four images. Press it again to display nine images. Turn the Main dial (
) to display four images. Press it again to display nine images. Turn the Main dial ( ![]() ) to move to the next or previous index page. To show fewer images, press the Magnify button (
) to move to the next or previous index page. To show fewer images, press the Magnify button ( ![]() ) one or more times. Press the Setting button (
) one or more times. Press the Setting button ( ![]() ) to display just the selected image.
) to display just the selected image.
• Jump through images. Select Playback menu 2 ( ![]() ), select Image jump w/
), select Image jump w/![]() , and then press the Setting button (
, and then press the Setting button ( ![]() ). On the Image jump w/
). On the Image jump w/![]() screen, turn the Quick dial (
screen, turn the Quick dial ( ![]() ) to select the method for jumping — 1 image, 10 images, 100 images, Date, Folder, Movies, Stills, or Rating — and then press the Setting button (
) to select the method for jumping — 1 image, 10 images, 100 images, Date, Folder, Movies, Stills, or Rating — and then press the Setting button ( ![]() ). Press the Playback button (
). Press the Playback button ( ![]() ) to begin image playback, and then turn the Main dial (
) to begin image playback, and then turn the Main dial ( ![]() ) to display the jump scroll bar and to jump by the method you selected.
) to display the jump scroll bar and to jump by the method you selected.
You can also play back content as a slide show. Just go to Playback menu 2 ( ![]() ), select Slide show, and then choose the images or movies you want. Then, select the Setup button to set the display time, use repeat, choose a transition effect, or use background music.
), select Slide show, and then choose the images or movies you want. Then, select the Setup button to set the display time, use repeat, choose a transition effect, or use background music.
Erasing and Protecting Content
Deleting unwanted images and movies frees up space on an SD card when you need it, but only erase images and movies you’re sure you don’t want to keep. You can also protect images and movies to avoid accidentally deleting them.
Erasing files
The 70D offers three ways to erase images and movies: One file at a time, all files in a folder, or all files on the SD card. If you want to permanently erase a single image or movie, just navigate to the file you want to delete, press the Erase button ( ![]() ), highlight Erase, and then press the Setting button (
), highlight Erase, and then press the Setting button ( ![]() ).
).
To select and erase multiple files at a time, follow these steps:
1. On Playback menu 1 (![]() ), highlight Erase images, and then press the Setting button (
), highlight Erase images, and then press the Setting button (![]() ). The Erase images screen appears.
). The Erase images screen appears.
In step 2 for erasing multiple images, you can also select to erase All images in folder or All images on card, and then press the Setting button ( ![]() ) to erase the specified images and movies.
) to erase the specified images and movies.
3. Press the Setting button (![]() ) to add a check mark next to the current file and mark it for deletion. You can also turn the Quick dial (
) to add a check mark next to the current file and mark it for deletion. You can also turn the Quick dial ( ![]() ) to move to the file you want to delete, and then press the Setting button (
) to move to the file you want to delete, and then press the Setting button ( ![]() ). You cannot mark files with protection applied.
). You cannot mark files with protection applied.
4. Press the Erase button (![]() ). The Erase Images screen appears with a message asking if you want to erase the selected images.
). The Erase Images screen appears with a message asking if you want to erase the selected images.
5. Select OK, and then press the Setting button (![]() ). The marked files are erased, and the Erase Images screen appears.
). The marked files are erased, and the Erase Images screen appears.
Protecting files
Applying protection to images and movies helps prevent them from being accidentally erased on the SD card, much like setting a document on the computer to read-only status. Protected images can’t be deleted using the Erase options detailed previously, but they are erased when you format the SD card. When you download a protected image, you’re asked to confirm that you want to move or copy read-only files, which indicates that the images have protection applied. As with erasing images, you can protect images and movies by selecting them individually, or by protecting all images in a folder or on the SD card.
You can protect images and movies by following these steps:
1. On Playback menu 1 (![]() ), highlight Protect images, and then press the Setting button (
), highlight Protect images, and then press the Setting button (![]() ). The Protect images screen appears with options. You can select images and movies individually, or you can protect all files in the folder or on the SD card. This is also the menu to return to if you want to remove protection.
). The Protect images screen appears with options. You can select images and movies individually, or you can protect all files in the folder or on the SD card. This is also the menu to return to if you want to remove protection.
2. Highlight Select images, and then press the Setting button (![]() ). The last captured file appears on the LCD screen. A small blue key icon appears at the top left of the file.
). The last captured file appears on the LCD screen. A small blue key icon appears at the top left of the file.
3. Press the Setting button (![]() ) to protect the displayed file, or turn the Quick dial (
) to protect the displayed file, or turn the Quick dial (![]() ) to move to the file you want to protect, and then press the Setting button (
) to move to the file you want to protect, and then press the Setting button (![]() ). Another gray key icon (
). Another gray key icon ( ![]() ) appears at the top middle of the file to show that it is protected.
) appears at the top middle of the file to show that it is protected.
4. To protect additional files, turn the Quick dial (![]() ) to scroll to the one you want to protect, and then press the Setting button (
) to scroll to the one you want to protect, and then press the Setting button (![]() ).
).
