
Chapter 13: Controlling Multitasking
There are two broad meanings of multitasking in iOS. First, it refers to running multiple applications at the same time by allowing one or more applications to run “in the background.” Second, it refers to when a single application runs multiple operations simultaneously. Both are important parts of many iOS applications, and this chapter discusses both.
You discover the best practices for multitasking and the major iOS frameworks for multitasking: run loops, threads, operations, and Grand Central Dispatch (GCD). If you’re familiar with thread-based multitasking from other platforms, you find out how to reduce your reliance on explicit threads and make the best use of iOS’s frameworks that avoid threads or handle threading automatically. Perhaps most importantly, you learn how to give your users the illusion of multitasking without wasting system resources.
In this chapter, I assume that you understand the basics of running tasks in the background and that you’re familiar with beginBackgroundTaskWithExpirationHandler:, registering an app as location aware, and similar background issues. If you need information about the fundamental technologies, see “Executing Code in the Background” in the iOS Application Programming Guide (developer.apple.com).
Similarly, this chapter assumes that you have at least a passing familiarity with operation queues and Grand Central Dispatch, though you may never have used them in real code. If you’ve never heard of them, I suggest you skim the Concurrency Programming Guide before continuing.
You can find the sample code for this chapter in the projects SimpleGCD, SimpleOperation, and SimpleThread.
Best Practices for Backgrounding: With Great Power Comes Great Responsibility
In iPhoneOS 3, only one third-party application could run at a time. When the user left your application, it was terminated. This ensured that third-party background applications couldn’t waste resources like memory or battery. Apple wanted to make sure that the iPhone didn’t suffer the same performance and stability problems of earlier mobile platforms, most pointedly Windows Mobile.
Starting with iOS 4, Apple began to permit third-party applications to run in the background, but only in limited ways. This continued Apple’s focus on not allowing third-party applications to destabilize the platform or waste resources. It can be very frustrating, but the policy has generally met its goal. iOS remains focused on the user, not the developer.
Your application should give the illusion that it’s always running, even though it isn’t. Although your application may be terminated without warning any time it’s suspended, it should give the impression that nothing has changed when it launches again. This means that you need to avoid displaying a splash screen during loading and that you need to save sufficient state when you enter the background to resume seamlessly if terminated. NSUserDefaults is a good place to stash small amounts of data during applicationWillResignActive:. Larger data structures need to be written to files, usually in ~/Library/Caches. See the section “When We Left Our Heroes: State Restoration,” later in this chapter, to find out how to do much of this work automatically.
Reducing your app’s memory footprint is important when going into the background, and so is minimizing the time required to resume. If throwing away your cached information makes resuming from the background as expensive as launching from scratch, there isn’t any point to suspending. Be thoughtful about what you throw away and how long it will take you to re-create it. Everything you do drains the battery, so always look to avoid wasteful processing, even if it doesn’t visibly delay your app.
When your application is suspended, it doesn’t receive memory warnings. If its memory footprint is very large, your application is likely to be terminated when there is memory pressure, and you won’t have an opportunity to do anything about it. NSCache and NSPurgeableData are invaluable in addressing this issue. NSPurgeableData is an NSData object that you can flag as currently in use or currently purgeable. If you store it in an NSCache object and mark it as purgeable with endContentAccess, the OS saves it until there is memory pressure. At that point, it discards that data, even if your app is suspended at the time. This saves you the cost of throwing away this object and re-creating it every time the user leaves your app briefly, while ensuring that it can be thrown away if needed.
A lot of framework data is automatically managed for you when your app goes into the background. The data for images loaded with imageNamed: are discarded automatically and reread from disk when needed again. Views automatically throw away their backing stores (their bitmap cache). You should expect your drawRect: methods to be called when you resume. There is a major exception to this rule: UIImageView doesn’t discard its data, and this can be quite a lot of memory. If you have a large image shown in a UIImageView, you should generally remove it before going into the background. However, decompressing images can be very expensive, so you don’t throw them away too often. There’s no one right answer. You need to profile your application.
In Instruments, the VM Tracker is useful for determining how much memory you’re using while the application is in the background. It’s part of the Allocations template. First, create a “memory pressure” app that displays a massive image. Then run your program with the VM Tracker. Note the amount of memory you’re using. Press the Home button and note the amount of memory you’re using now. This is what you’re releasing when you go into the background. Now, launch the memory pressure app. Note how much memory you release. Ideally, your background usage should be less than your normal usage, without being so low that you delay resuming. Your usage under memory pressure needs to be as low as possible.
In Instruments, you see two kinds of memory: dirty memory and resident memory. Dirty memory is the memory that iOS can’t automatically reclaim when you go into the background. Resident memory is your total current memory utilization. Both are important for different reasons. Minimizing dirty memory reduces the likelihood that you’ll be terminated in the background. Reducing it should be your primary focus. Your application needs to consume as few resources as possible when it’s not the foreground application. NSCache and NSPurgeableData are excellent tools for reducing dirty memory. Resident memory is your entire memory footprint. Minimizing this helps prevent low memory warnings while you’re in the foreground.
In the Instruments VM Tracker, you may see references to Memory Tag 70. That refers to memory for decompressed images and is primarily caused by UIImage.
Memory is important, but it’s not the only resource. Avoid excessive network activity, disk access, or anything else that will waste battery life. Generally, you want to complete any user-initiated download using beginBackgroundTaskWithExpirationHandler:. Users don’t want to have to sit and stare at your application while their data downloads; they want to go play a game. However, you want to abort or pause any downloads that weren’t requested by the user, provided that you can resume them later.
Some actions are forbidden while in the background. The most significant ones are OpenGL calls. You must stop updating OpenGL views when you go into the background. A subtle issue here is application termination. The application is allowed to run for a brief time after applicationWillTerminate: is called. During that time, the application is “in the background” and must not make OpenGL calls. If it does, it’s killed immediately, which could prevent it from finishing other application-termination logic.
Be sure to shut down your OpenGL updates when the application is terminating as well as when going into the background. GLKViewController automatically handles all of this for you. The OpenGL Game template in Xcode uses GLKViewController.
Running in the background creates new challenges for developers, but users expect this key feature. Just be sure to keep the user as your top priority, test heavily, and watch your resource utilization. Your application should delight, even when it’s not onscreen.
When We Left Our Heroes: State Restoration
As discussed in the previous section, your application needs to give the illusion that it is always running, even when it’s terminated in the background. If the user is in the middle of typing a message and flips over to another application, that message should be waiting when the user returns. Before iOS 6, this often meant storing a lot of values in NSUserDefaults. For example, you need to keep track of which tab is visible, the entire navigation controller stack, the position of the scrollbar, and the partially entered text. The work isn’t that difficult, but it is very tedious and somewhat error prone.
In iOS 6, UIKit will handle much of this work for you if you request it to do so. The system is called state restoration. It’s an opt-in, so you have to tell UIKit that you want it. In this example, you start with a simple, existing app called “FavSpots,” available in the sample code. The final version is in the project “FavSpotsRestore” in the same directory. This application lets you bookmark places on a map and add a name and some notes, which are saved in Core Data. To implement state restoration, do the following:
1. Opt in by requesting state saving and restoring in the application delegate.
2. Modify the application delegate’s startup handling if needed.
3. Assign restoration identifiers to all the view controllers.
4. Add state encoders and decoders to view controllers with state.
5. Implement UIDataSourceModelAssociation for the table view controller.
This example represents a fairly common set of problems, but it doesn’t cover every situation that state restoration can handle. For full details, see “State Preservation and Restoration” in the iOS App Programming Guide, and the other references in the “Further Reading” section at the end of the chapter.
While implementing state preservation, always remember that state preservation is a way to store only state. You never use it to store data. The information stored in state preservation may be thrown away at any time (and the OS is somewhat aggressive in throwing state preservation away if it suspects a problem). Do not encode actual data objects in the state preservation system. You need to encode identifiers that will allow you to later fetch those data objects. I explain this topic more in the section “State Encoders and Decoders,” later in this chapter.
Note that all the code in this section assumes that you’re exclusively targeting iOS 6. If you’re targeting earlier versions, you’ll need to check that certain methods exist before calling them, particularly setRestorationIdentifier:.
Testing State Restoration
Before adding state restoration, you need to understand how programs behave without it, and how to test it to make sure it’s working. When the user presses the Home button, your app may not immediately terminate. It typically moves to the background state, and later may be moved to the suspended state. In either case, however, your program is still in memory. When the user returns to your application, it typically resumes exactly where it left off. The same screen is showing, any text the user has entered is still in the text fields, and so on. The goal of state restoration is to achieve this same user experience even though the program terminates while in the background. A common error while implementing state restoration is mistaking this default behavior for your restoration code.
In order to properly test state restoration, you need to make sure that the application actually terminates, but you also need to make sure that it terminates in a way that allows state restoration to happen. In order for state restoration to run, three things must be true:
• State preservation must have successfully completed. This means that the application needs to have entered the background before being terminated.
• The application must not have been forced to quit. If you double-tap the Home button and delete the app from the “recent apps” list, the state preservation files are deleted. The assumption is that if the user force-quit the app, there may have been a serious bug and state restoration might create an endless loop.
• The application must not have failed launching since the last state preservation. This means that if your application terminates during startup, the state preservation information will be deleted. Otherwise a small bug in your state restoration code could lead to an unlaunchable app.
With these things in mind, here is the correct way to test state restoration:
1. Run the app in Xcode and navigate to whatever situation you want to test.
2. Press the Home button in the simulator or on the device.
3. Stop the app in Xcode.
4. Relaunch the app.
I also recommend adding some logging to application:willEncodeRestorableStateWithCoder: and application:didDecodeRestorableStateWithCoder: in the application delegate just so you can see when state preservation and restoration are running.
Opting In
State preservation doesn’t automatically apply to old programs. Requesting it is trivial. Just add the following to your application delegate.
AppDelegate.m (FavSpotsRestore)
- (BOOL)application:(UIApplication *)application
shouldSaveApplicationState:(NSCoder *)coder {
return YES;
}
- (BOOL)application:(UIApplication *)application
shouldRestoreApplicationState:(NSCoder *)coder {
return YES;
}
It’s possible to add conditional logic here, but this should be rare.
Startup Changes
There are some subtle startup changes due to state restoration. You may need to perform some initialization work prior to state restoration and some after state restoration. There is a new method, application:willFinishLaunchingWithOptions:, that is called prior to state restoration. After state restoration is complete, Cocoa will call application:didFinishLaunchingWithOptions:. You need to think carefully about which logic should go in each.
You can save application-level state in application:willEncodeRestorableStateWithCoder:. View controllers manage the majority of state preservation, but you may need to store some global state. You can then restore this state in application:didDecodeRestorableStateWithCoder:. I will explain encoding and decoding state in the section “State Encoders and Decoders.”
This change doesn’t apply to the FavSpots project.
Restoration Identifiers
Every subclass of UIView and UIViewController can have a restoration identifier. These identifiers do not have to be unique, but the full restoration path of every restorable object must be unique. The restoration path is a sequence of restoration identifiers, starting at the root view controller and separated by slashes like an URL. The restoration path gives the system a way to glue the UI back together, encoding things like the entire navigation controller stack. For example, you might encounter the path RootTab/FirstNav/Detail/Edit indicating a tab bar controller with a navigation controller in one of its tabs. The navigation controller has a root view controller of Detail, and Edit has been pushed on top of that.
For custom, unique view controller classes, I recommend using the name of the custom class. For standard classes like UITabBarController, I recommend using some more descriptive name to make them unique.
If you use storyboards, managing restoration identifiers is very simple. For each view controller you want to save, set the name as the storyboard ID in the Identity pane. Then select “Use Storyboard ID” for the Restoration ID. See Figure 13-1 for an example. Although you can have different storyboard and restoration identifiers, doing so is confusing and should be avoided.
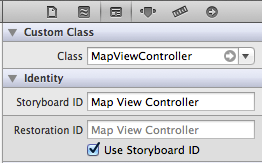
Figure 13-1 Setting the Restoration Identifier
You need to assign a restoration identifier to every view controller and view that you want to save. This will typically be most of your view controllers. If you have a particular view controller that wouldn’t make sense to come back to, you can leave its identifier blank, and the user will be returned to the parent.
Most views should be reconfigured by their view controller, but sometimes it’s useful to save the view’s state directly. Several UIKit views support state restoration, specifically UICollectionView, UIImageView, UIScrollView, UITableView, UITextField, UITextView, and UIWebView. These will save their state, but not their contents. So a text field will save the selection range but will not save the text. See the documentation for each view for information on exactly what state it saves.
In FavSpots, add restoration identifiers to all of the view controllers, the table view, the text field, and both text views.
State Encoders and Decoders
The heart of state restoration is the encoding and decoding state. Much like NSKeyedArchiver, the state restoration system will pass an NSCoder to each object via encodeRestorableStateWithCoder: and decodeRestorableStateWithCoder:.
Unlike NSKeyedArchiver, the goal of the restoration system is not to store the entire object. You want to store only the information required to reconstruct your state. For example, if you have a PersonViewController that displays a Person object, don’t encode the Person object. You only encode a unique identifier that will allow you to look up that object in the future. If you’re using iCloud syncing or a network data source of any kind, it’s possible that the record you stored will have been modified, moved, or deleted by the time you restore. Your restoration system should deal gracefully with a missing object.
If you’re using Core Data, the best way to save references to your object is [[obj objectID] URIRepresentation]. Once an object has been saved, this identifier is guaranteed to be unique and persistent. However, if the object hasn’t been saved yet, the objectID may be temporary. You need to check [objectID isTemporary] prior to relying on it. Generally, you save prior to state preservation. Luckily, applicationDidEnterBackground: is called prior to state preservation, so if you save your context there, all your identifiers will be permanent.
It bears repeating that you need to save user-provided data in a persistent store, not in state preservation. If your user has started writing a long review comment, don’t rely on the state preservation system to save that draft. State preservation data can be deleted at any time. If you can’t put the data into the persistent store yet, at least write it to a file in Library/Application Support so you don’t lose it.
Here are the changes for FavSpots in MapViewController. It needs to save the region being viewed and the tracking mode. The various RN methods on NSCoder are from a category to simplify encoding MKCoordinateRegion. Notice the use of containsValueForKey: to distinguish between a missing value and 0. You may be restoring state from a previous version of your program, so be tolerant of missing keys.
MapViewController.m (FavSpotsRestore)
- (void)encodeRestorableStateWithCoder:(NSCoder *)coder {
[super encodeRestorableStateWithCoder:coder];
[coder RN_encodeMKCoordinateRegion:self.mapView.region
forKey:kRegionKey];
[coder encodeInteger:self.mapView.userTrackingMode
forKey:kUserTrackingKey];
}
- (void)decodeRestorableStateWithCoder:(NSCoder *)coder {
[super decodeRestorableStateWithCoder:coder];
if ([coder containsValueForKey:kRegionKey]) {
self.mapView.region =
[coder RN_decodeMKCoordinateRegionForKey:kRegionKey];
}
self.mapView.userTrackingMode =
[coder decodeIntegerForKey:kUserTrackingKey];
}
TextEditViewController just needs a Spot object. In order to protect the user’s notes (which could be lengthy), TextEditViewController automatically saves them when the application resigns active. This happens prior to state preservation, which makes state preservation very simple. It just stores the URI for the object ID. Notice that in decodeRestoreableStateWithCoder:, you don’t use an accessor. This method is very similar to init in that you need to be very careful of side effects. As a general rule, add this method to the short list of places that direct ivar access is appropriate. Here are the additions to TextEditViewController and the helper methods to encode and decode Spot.
TextEditViewController.m (FavSpotsRestore)
- (void)encodeRestorableStateWithCoder:(NSCoder *)coder {
[super encodeRestorableStateWithCoder:coder];
[coder RN_encodeSpot:self.spot forKey:kSpotKey];
}
- (void)decodeRestorableStateWithCoder:(NSCoder *)coder {
[super decodeRestorableStateWithCoder:coder];
_spot = [coder RN_decodeSpotForKey:kSpotKey];
}
NSCoder+FavSpots.m (FavSpotsRestore)
- (void)RN_encodeSpot:(Spot *)spot forKey:(NSString *)key {
NSManagedObjectID *spotID = spot.objectID;
NSAssert(! [spotID isTemporaryID],
@”Spot must not be temporary during state saving. %@”,
spot);
[self encodeObject:[spotID URIRepresentation] forKey:key];
}
- (Spot *)RN_decodeSpotForKey:(NSString *)key {
Spot *spot = nil;
NSURL *spotURI = [self decodeObjectForKey:key];
NSManagedObjectContext *
context = [[ModelController sharedController]
managedObjectContext];
NSManagedObjectID *
spotID = [[context persistentStoreCoordinator]
managedObjectIDForURIRepresentation:spotURI];
if (spotID) {
spot = (Spot *)[context objectWithID:spotID];
}
return spot;
}
DetailViewController is more complicated. It includes an editable text field. Usually, I recommend saving any changes to the persistent store as I did in TextEditViewController, in which case saving state is simple. The name is very short, however, and losing it would not be a great burden on the user, so I will demonstrate here how you can store this kind of data in the preservation system.
This is complicated because the value of the text field can be set two ways. If you’re restoring, you use the restored value; if you’re not restoring, you use the value from Core Data. This means you have to keep track of whether you’re restoring, as shown here.
DetailViewController.m (FavSpotsRestore)
@property (nonatomic, readwrite, assign, getter = isRestoring) BOOL restoring;
...
- (void)encodeRestorableStateWithCoder:(NSCoder *)coder {
[super encodeRestorableStateWithCoder:coder];
[coder RN_encodeSpot:self.spot forKey:kSpotKey];
[coder RN_encodeMKCoordinateRegion:self.mapView.region
forKey:kRegionKey];
[coder encodeObject:self.nameTextField.text forKey:kNameKey];
}
- (void)decodeRestorableStateWithCoder:(NSCoder *)coder {
[super decodeRestorableStateWithCoder:coder];
_spot = [coder RN_decodeSpotForKey:kSpotKey];
if ([coder containsValueForKey:kRegionKey]) {
_mapView.region =
[coder RN_decodeMKCoordinateRegionForKey:kRegionKey];
}
_nameTextField.text = [coder decodeObjectForKey:kNameKey];
_restoring = YES;
}
...
- (void)configureView {
Spot *spot = self.spot;
if (! self.isRestoring || self.nameTextField.text.length == 0) {
self.nameTextField.text = spot.name;
}
if (! self.isRestoring ||
self.mapView.region.span.latitudeDelta == 0 ||
self.mapView.region.span.longitudeDelta == 0) {
CLLocationCoordinate2D center =
CLLocationCoordinate2DMake(spot.latitude, spot.longitude);
self.mapView.region =
MKCoordinateRegionMakeWithDistance(center, 500, 500);
}
self.locationLabel.text =
[NSString stringWithFormat:@”(%.3f, %.3f)”,
spot.latitude, spot.longitude];
self.noteTextView.text = spot.notes;
[self.mapView removeAnnotations:self.mapView.annotations];
[self.mapView addAnnotation:
[[MapViewAnnotation alloc] initWithSpot:spot]];
self.restoring = NO;
}
In general, it’s easier and less error-prone to save the data directly to the persistent store, but if you need the ability to cancel edits of very small amounts of data, the preceding approach is useful.
Table Views and Collection Views
UITableView and UICollectionView have a special problem for state restoration. The user basically wants the view to return to the same state it was left in, but the underlying data may have changed. The specific records being displayed may be in a different order, or records may have been added or removed. In all but the simplest cases, it may be impossible to restore a table view to its exact previous state.
To make restoration predictable, UIKit restores table and collection views such that the first index shown represents the same record. So if a record representing “Bob Jones” was at the top of the screen when your application quit, then that’s the record that should be at the top of the screen when you resume. All the other records on the screen may be different, and even the “Bob Jones” record might display a different name, but it should be the same record.
To achieve this, UIKit uses the protocol UIDataSourceModelAssociation. This protocol maps an index path to a string identifier. UIKit doesn’t care how you perform this mapping. During state preservation, it will ask you for the identifier for an index path. During state restoration, it will ask you for the index path for an identifier. The index paths do not need to match, but the referenced object should. The easiest way to implement this is using Core Data’s objectID and taking the URIRepresentation, which returns a string. Without Core Data, you’ll need to devise your own mapping that is guaranteed to be consistent and unique.
MasterViewController.m FavSpots
- (NSString *)modelIdentifierForElementAtIndexPath:(NSIndexPath *)idx
inView:(UIView *)view {
if (idx && view) {
Spot *spot = [self.fetchedResultsController objectAtIndexPath:idx];
return [[[spot objectID] URIRepresentation] absoluteString];
}
else {
return nil;
}
}
- (NSIndexPath *)
indexPathForElementWithModelIdentifier:(NSString *)identifier
inView:(UIView *)view {
if (identifier && view) {
NSUInteger numberOfRows =
[self tableView:self.tableView numberOfRowsInSection:0];
for (NSUInteger index = 0; index < numberOfRows; ++index) {
NSIndexPath *indexPath = [NSIndexPath indexPathForItem:index
inSection:0];
Spot *spot = [self.fetchedResultsController
objectAtIndexPath:indexPath];
if ([spot.objectID.URIRepresentation.absoluteString
isEqualToString:identifier]) {
return indexPath;
}
}
}
return nil;
}
Although the preceding code matches the documentation, as of iOS 6 Beta 4, I’m unable to get UIKit to restore the table view scroll using it. This may be a bug in the code or may be a bug in iOS. Watch iosptl.com/code for updates.
Advanced Restoration
In the previous sections, I discussed the common problems facing state restoration. I assumed the use of an application using storyboards and with a typical view controller hierarchy. But state restoration can handle more complicated situations.
Although storyboards are definitely the easiest way to manage state restoration, you also can perform state restoration without them. First, you can set restoration identifiers in XIB files rather than the storyboard. Alternatively, you can set the restoration identifier at runtime by calling setRestorationIdentifier:. Setting this to nil prevents preserving its state.
You can also change which class handles restoration. By default, the view controller is created using the storyboard, but you may require different initialization for restoration. You can set the restorationClass property to the Class of whatever object you want to construct your view controller. This is normally the view controller’s class (such that view controllers create themselves). If this property is set, the view controller will be re-created by calling +viewControllerWithRestorationIdentifierPath:coder: rather than pulling it from the storyboard. You are responsible for creating the view controller in that method and returning it. If you return nil, this view controller will be skipped. The system will still call decodeRestorableStateWithCoder: on the resulting object, unless the object you return isn’t of the same class as the object that was encoded (or a subclass of that object). See “Restoring Your View Controllers at Launch Time” in the iOS App Programming Guide for full details.
State preservation and restoration is a powerful system for simplifying this complicated problem. It relies heavily on you using UIKit in “normal” ways. If you use storyboards, Core Data, and don’t get overly “clever” in how you use view controllers, it will do much of the work for you.
Introduction to Multitasking and Run Loops
So far in this chapter, I’ve discussed how your application can multitask with other applications. For the rest of the chapter, I’ll discuss how to multitask within your application. As iOS devices add additional CPU cores, multitasking is becoming a key part of harnessing their power.
The most basic form of multitasking is the run loop. This is the form of multitasking that was originally developed for NeXTSTEP.
Every iOS program is driven by a do/while loop that blocks waiting for an event, dispatches that event to interested listeners, and repeats until something tells it to stop. The object that handles this is called a run loop (NSRunLoop).
You almost never need to understand the internals of a run loop. There are mach ports and message ports and CFRunLoopSourceRef types, and a variety of other arcana. These are incredibly rare in normal programs, even in very complex programs. What’s important to understand is that the run loop is just a big do/while loop, running on one thread, pulling events off of various queues and dispatching them to listeners one at a time on that same thread. This is the heart of an iOS program.
When your applicationWillResignActive: method, IBAction, or any other entry point to your program is called, it’s because an event fired somewhere that traced its way to a delegate call that you implemented. The system is waiting for you to return so it can continue. While your code is running on the main thread, scroll views can’t scroll, buttons can’t highlight, and timers can’t fire. The entire UI is hanging, waiting for you to finish. Keep that in mind when you’re writing your code.
This doesn’t mean everything is on the main run loop. Each thread has its own run loop. Animations generally run on background threads, as does much of NSURLConnection network handling. But the heart of the system runs on a single, shared run loop.
Although each thread has a run loop, this doesn’t mean that each thread processes its run loop. Run loops only execute their do/while loop in response to commands like runUntilDate:. The call to UIApplicationMain in main.m of almost every project runs the main run loop.
NSTimer relies on the run loop to dispatch messages. When you schedule an NSTimer, it asks the current run loop to dispatch a selector at a certain time. Each time the run loop iterates, it checks what time it is and fires any timers that have expired. Delay-action methods like performSelector:withObject:afterDelay: are implemented by scheduling a timer.
Most of the time, all of this happens behind the scenes, and you don’t need to worry about the run loop very much. UIApplicationMain sets up the main thread’s run loop for you and keeps it running until the program terminates.
Although it’s important to understand the basics of run loops, Apple has developed better approaches to handling common multitasking problems. Most of these are built on top of Grand Central Dispatch. The first step toward these better approaches is breaking your program into operations, as I discuss in the next section.
Developing Operation-Centric Multitasking
Many developers from other platforms are used to thinking in terms of threads. iOS has good objects for dealing directly with threads, particularly NSThread, but I recommend avoiding them and moving toward operation-centric multitasking. Operations are a much more powerful abstraction than threads and can lead to substantially better and faster code if used correctly. Threads are expensive to create and sustain, so threaded designs often employ a small to moderate number of long-lived threads. These threads perform heavyweight operations such as “the network” or “the database” or “the calculations.” Because they’re focused on large areas of responsibility, they need access to lots of inputs and outputs, and that means locking. Locking is very expensive and a significant source of bugs.
Of course, threaded programs don’t have to be written this way. It would be better if you spawned short-lived threads that focus on a single input and output, minimizing the need for locking. But threads are expensive to spawn, so you need to manage a thread pool. And small operations often have ordering dependencies, so ideally you create some kind of queue to keep things straight. Now, what if you could take the thread pool and the queue and let the operating system worry about them? That’s exactly what NSOperation is for. It’s the solution you come to by optimizing threaded programs to minimize locking. But operations can be better than that. Instead of worrying about the mechanics of semaphores and mutexes, you worry about the work you want to do.
An operation is an encapsulated unit of work, often expressed in the form of an Objective-C block. Blocks are more fully covered in Chapter 23. Operations support priority, dependencies, and cancelation, so they’re ideal for situations where you need to schedule some work that might not actually be required. For example, you may want to update images in a scrolling view, favoring images currently onscreen and canceling updates for images that have been scrolled off-screen. In the following example, you’ll create a UICollectionView that contains random fractals. These are very expensive to calculate, so you’ll generate them asynchronously. In order to improve display performance, you’ll calculate the fractal at various resolutions, displaying a low-resolution fractal quickly and then improving the resolution if the user stops scrolling.
In this example, you’ll use an NSOperation subclass to generate Julia sets (a kind of fractal) and display them in a UICollectionView. The work being done by the operation is somewhat complicated, and so it’s nice to put it in its own file. For smaller operations, you could put the work into an inline block. The sample code is available in the project JuliaOp. Here is the basic structure of the operation’s main method (I skipped the actual mathematics in the interest of space).
JuliaOperations.m (JuliaOp)
- (void)main {
// ...
// Configure bits[] to hold bitmap data
// ...
for (NSUInteger y = 0; y < height; ++y) {
for (NSUInteger x = 0; x < width; ++x) {
if (self.isCancelled) {
return;
}
// ...
// Calculate Julia values and update bits[]
// May iterate up to 255 times per pixel.
// ...
}
}
// ...
// Create bitmap and store in self.image
// ...
}
Some key features of this operation:
• All required data is given to the operation before it starts. The operation doesn’t need to interact with other objects during its run, so there’s no need for locking.
• When the operation is complete, it stores its result in a local ivar. Again, this avoids the need for locking. You could use a delegate method here to update something outside the operation, but as you’ll see shortly, completion blocks can be a simpler approach.
• The operation periodically checks isCancelled so it can abort if requested. This is an important point. Calling cancel on a running operation does not cause it to stop running. That would leave the system in an unknown state. It’s up to you to check isCancelled and abort in whatever way is appropriate. It’s possible for an operation to return YES for both isExecuting and isCancelled.
I’ll talk more about cancellation shortly. First, I’ll discuss how this operation is created and queued in JuliaCell. Each cell in the UICollectionView creates a separate operation for each resolution. The operation is just responsible for taking a set of input values and a resolution and returning an image. The operation doesn’t know anything about how that image will be used. It doesn’t even know that other resolutions are being calculated. In the UICollectionViewController, you configure each cell by passing the row as a random seed and a queue to work with.
CollectionViewController.m (JuliaOp)
- (UICollectionViewCell *)collectionView:(UICollectionView *)collectionView
cellForItemAtIndexPath:(NSIndexPath *)indexPath {
JuliaCell *
cell = [self.collectionView
dequeueReusableCellWithReuseIdentifier:@”Julia”
forIndexPath:indexPath];
[cell configureWithSeed:indexPath.row queue:self.queue];
return cell;
}
The queue is just a shared NSOperationQueue that you create in the UICollectionViewController. I’ll explain maxConcurrentOperationCount and countOfCores() in the section “Setting Maximum Concurrent Operations.”
self.queue = [[NSOperationQueue alloc] init];
self.queue.maxConcurrentOperationCount = countOfCores();
In JuliaCell, you configure the cell by creating a set of operations and adding them to the queue.
JuliaCell.m (JuliaOp)
- (void)configureWithSeed:(NSUInteger)seed
queue:(NSOperationQueue *)queue {
// ...
JuliaOperation *prevOp = nil;
for (CGFloat scale = minScale; scale <= maxScale; scale *= 2) {
JuliaOperation *op = [self operationForScale:scale seed:seed];
if (prevOp) {
[op addDependency:prevOp];
}
[self.operations addObject:op];
[queue addOperation:op];
prevOp = op;
}
}
Notice that each operation is dependent on the previous operation. This ensures that the high-resolution image isn’t scheduled before the low-resolution image. Every cell creates several operations, and all the operations from all the cells are put onto the same queue. NSOperationQueue automatically orders the operations to manage dependencies.
In operationForScale:seed:, you configure the actual operation for a given resolution.
JuliaCell.m (JuliaOp)
- (JuliaOperation *)operationForScale:(CGFloat)scale
seed:(NSUInteger)seed {
JuliaOperation *op = [[JuliaOperation alloc] init];
op.contentScaleFactor = scale;
CGRect bounds = self.bounds;
op.width = (unsigned)(CGRectGetWidth(bounds) * scale);
op.height = (unsigned)(CGRectGetHeight(bounds) * scale);
srandom(seed);
op.c = (long double)random()/LONG_MAX + I*(long double)random()/LONG_MAX;
op.blowup = random();
op.rScale = random() % 20; // Biased, but simple is more important
op.gScale = random() % 20;
op.bScale = random() % 20;
__weak JuliaOperation *weakOp = op;
op.completionBlock = ^{
if (! weakOp.isCancelled) {
[[NSOperationQueue mainQueue] addOperationWithBlock:^{
JuliaOperation *strongOp = weakOp;
if (strongOp && [self.operations containsObject:strongOp]) {
self.imageView.image = strongOp.image;
self.label.text = strongOp.description;
[self.operations removeObject:strongOp];
}
}];
}
};
if (scale < 0.5) {
op.queuePriority = NSOperationQueuePriorityVeryHigh;
}
else if (scale <= 1) {
op.queuePriority = NSOperationQueuePriorityHigh;
}
else {
op.queuePriority = NSOperationQueuePriorityNormal;
}
return op;
}
The operation has various data associated with it (c, blowup, and the various scales). These are configured once, on the main thread, so there are no race conditions.
The completionBlock is a convenient way to handle the operation’s results. The completion block is called whenever the block finishes, even if it’s cancelled. That’s why you check isCancelled before dealing with the results. Because the UI updates are processed on the main thread, it’s possible that this cell will have scrolled off the screen and been reused prior to the UI update code running. That’s why you check that the operation still exists and that it’s still one of the operations that this cell cares about (containsObject:) before applying the UI changes. Exactly how much of this kind of double-checking code is required depends on your specific problem.
Finally, you set the priority based on the scale. This encourages low-resolution images to be generated prior to high-resolution images.
Because this is a UICollectionView, the cells may be reused at any time. When that happens, you want to cancel all the current operations, which is easily done with cancel:
- (void)prepareForReuse {
[self.operations makeObjectsPerformSelector:@selector(cancel)];
[self.operations removeAllObjects];
self.imageView.image = nil;
self.label.text = @””;
}
At the same time, you remove all the operations from the operations ivar, ensuring that any pending operations won’t update the UI. Remember that all of the methods in JuliaOp except for the completionBlock run on the main thread (and the completionBlock moves the UI calls to the main thread as well). This minimizes locking concerns, improving reliability and performance.
Setting Maximum Concurrent Operations
Finally, there is the matter of maxConcurrentOperationCount. NSOperationQueue tries to manage the number of threads it generates, but in many cases, it doesn’t do an ideal job. This is likely your fault (and my fault, but read on). The common cause of trouble is flooding the main queue with lots of small operations when you want to update the UI.
Apple suggests in the “Asynchronous Design Patterns” session from WWDC 2012 that you use fewer operations. For instance, they suggest that in JuliaOp, you use a single operation to manage one full screen of images. If the user scrolls, you could cancel that one operation rather than the many I’ve generated (including their many small main-thread updates). The problem is that then you don’t get any parallelism on a multi-core machine, which was the whole point of using operation queues.
In my experience, creating small operations as I demonstrate in JuliaOp, even if you have to cancel them later, makes coding much simpler and the code much more robust and understandable. The problem is that NSOperationQueue will schedule too many of them at a time. If you explicitly tell NSOperationQueue not to schedule more CPU-bound operations than you have CPUs, simple code runs very fast.
My recommendation may change in the future, but for CPU-bound operations, I recommend setting maxConcurrentOperationsCount to the number of cores. You can determine this with the function countOfCores:
unsigned int countOfCores() {
unsigned int ncpu;
size_t len = sizeof(ncpu);
sysctlbyname(“hw.ncpu”, &ncpu, &len, NULL, 0);
return ncpu;
}
Multitasking with Grand Central Dispatch
Grand Central Dispatch (GCD) is at the heart of multitasking in iOS. It is used throughout the system layer for nearly everything. NSOperationQueue is implemented on top of GCD, and the basic queue concept is similar. Rather than adding an NSOperation to NSOperationQueue, you add a block to a dispatch queue.
Dispatch queues are more low-level than operation queues, however. There’s no way to cancel a block once it is added to a dispatch queue. Dispatch queues are strictly first-in-first-out (FIFO), so there’s no way to apply priorities or reorder blocks within a queue. If you need those kinds of features, definitely use NSOperationQueue instead of trying to re-create them with GCD.
You can do many things with dispatch queues that you cannot do with operations. For example, GCD offers dispatch_after, allowing you to schedule the next operation rather than sleeping. The time is in nanoseconds, which can lead to some confusion because nearly every time interval in iOS is in seconds. Luckily, Xcode automatically provides a conversion snippet if you type dispatch_after and press Enter. Using nanoseconds is optimized for the hardware, not the programmer. Passing the time in seconds would require floating point math, which is more expensive and less precise. GCD is a very low-level framework and does not waste many cycles on programmer convenience.
GCD and ARC
In iOS 6, GCD objects are ARC-compatible, which means you no longer use dispatch_retain or dispatch_release to manage them. Most of the time this is great because you can now have GCD strong properties that correctly auto-synthesize. But sometimes it can be a problem in existing code. In particular, if you’ve been storing GCD objects like dispatch_queue in context pointers or dispatch_queue_set_specific, things are more complicated. (See the later section “Queue-Specific Data” for details on dispatch_queue_set_specific.) Apple hasn’t given guidance on how to convert this code. I’m currently recommending the following approach. This may change as I develop more code in this space.
Consider the case where you have attached a sub-queue as a set_specific property (non-ARC):
dispatch_queue_t subqueue = dispatch_queue_create(...);
dispatch_queue_set_specific(queue, &kSubqueueKey, (void*)subqueue,
(dispatch_function_t)dispatch_release);
Under ARC, I currently recommend this approach:
dispatch_queue_t subqueue = dispatch_queue_create(...);
void* subqueuePtr = (void*)CFBridgingRetain(subqueue);
dispatch_queue_set_specific(queue, &kSubqueueKey, subqueuePtr,
(dispatch_function_t)CFBridgingRelease);
I believe this correctly employs the intent of CFBridgingRetain and CFBridgingRelease to move objects in and out of ARC.
If you have complex GCD code and don’t want to rework it for ARC, you can opt out of ARC for GCD objects by passing -DOS_OBJECT_USE_OBJC=0 to the compiler. See /usr/include/os/object.h for more details.
Sources and Timers
A dispatch source provides an efficient way to handle events. You register an event handler, and when the event occurs, you are notified. If the event occurs multiple times before the system is able to notify you, the events are coalesced into a single event. This is highly useful for low-level, high performance I/O, but it’s very rare for an iOS app developer to need this functionality. Similarly, dispatch sources can respond to UNIX signals, file system changes, changes in other processes, and mach port events. Many of these are very useful on Mac, but again, don’t often apply to iOS developers. There are custom sources, but they have significant restrictions in what information they can pass, and I have yet to find a case where they are useful on iOS.
One dispatch source, however, is very useful on iOS: the timer source. GCD timers are based on dispatch queues rather than run loops like NSTimer, which means that they are much easier to use in multithreaded apps. Because they use blocks rather than selectors, GCD timers don’t require a separate method to process the timer. They also make it easier to avoid retain cycles with repeating GCD timers.
RNTimer (https://github.com/rnapier/RNTimer) implements a simple GCD timer that avoids retain loops (as long as the block doesn’t capture self), and automatically invalidates when deallocated. It creates a timer dispatch source with dispatch_source_create and ties it to the main dispatch queue. This means that the timer will always fire on the main thread. You could, of course, use a different queue for this if you like. It then sets the timer and the event handler and calls dispatch_resume to start the timer. Because dispatch sources often require configuration, they’re created in a suspended state and begin delivering events only when they’re resumed. Following is the full code.
RNTimer.m (RNTimer)
+ (RNTimer *)repeatingTimerWithTimeInterval:(NSTimeInterval)seconds
block:(dispatch_block_t)block {
RNTimer *timer = [[self alloc] init];
timer.block = block;
timer.source = dispatch_source_create(DISPATCH_SOURCE_TYPE_TIMER,
0, 0,
dispatch_get_main_queue());
uint64_t nsec = (uint64_t)(seconds * NSEC_PER_SEC);
dispatch_source_set_timer(timer.source,
dispatch_time(DISPATCH_TIME_NOW, nsec),
nsec, 0);
dispatch_source_set_event_handler(timer.source, block);
dispatch_resume(timer.source);
return timer;
}
- (void)invalidate {
if (self.source) {
dispatch_source_cancel(self.source);
dispatch_release(self.source);
self.source = nil;
}
self.block = nil;
}
- (void)dealloc {
[self invalidate];
}
Creating Synchronization Points with Dispatch Barriers
GCD offers a rich system of serial and concurrent queues. With some thought, you can use these to create many things other than simple thread management. For instance, GCD queues can be used to solve many common locking problems at a fraction of the overhead.
A dispatch barrier creates a synchronization point within a concurrent queue. While it’s running, no other block on the queue is allowed to run, even if it’s concurrent and other cores are available. If that sounds like an exclusive (write) lock, it is. Non-barrier blocks can be thought of as shared (read) locks. As long as all access to the resource is performed through the queue, barriers provide very cheap synchronization.
For comparison, you could manage multithreaded access with @synchronize, which takes an exclusive lock on its parameter, as shown in the following code.
- (id)objectAtIndex:(NSUInteger)index {
@synchronized(self) {
return [self.array objectAtIndex:index];
}
}
- (void)insertObject:(id)obj atIndex:(NSUInteger)index {
@synchronized(self) {
[self.array insertObject:obj atIndex:index];
}
}
@synchronized is easy to use, but very expensive even when there is little contention. There are many other approaches. Most are either complicated and fast or simple and slow. GCD barriers offer a nice tradeoff.
- (id)objectAtIndex:(NSUInteger)index {
__block id obj;
dispatch_sync(self.concurrentQueue, ^{
obj = [self.array objectAtIndex:index];
});
return obj;
}
- (void)insertObject:(id)obj atIndex:(NSUInteger)index {
dispatch_barrier_async(self.concurrentQueue, ^{
[self.array insertObject:obj atIndex:index];
});
}
All that is required is a concurrentQueue property, created by calling dispatch_queue_create with the DISPATCH_QUEUE_CONCURRENT option. In the reader (objectAtIndex:), you use dispatch_sync to wait for it to complete. Creating and dispatching blocks in GCD has very little overhead, so this approach is much faster than using a mutex. The queue can process as many reads in tandem as it has cores available. In the writer, you use dispatch_barrier_async to ensure exclusive access to the queue while writing. By making the call asynchronous, the writer returns quickly, but any future reads on the same thread are guaranteed to return the value the writer set. GCD queues are FIFO, so all requests on the queue before the write are completed first, then the write runs alone, and only then are requests that were placed on the queue after the write processed. This prevents writer starvation and ensures that immediately reading after a write always yields the correct result.
Queue Targets and Priority
Queues are hierarchical in GCD. Only the global system queues are actually scheduled to run. You can access these queues with dispatch_get_global_queue and one of the following priority constants:
• DISPATCH_QUEUE_PRIORITY_HIGH
• DISPATCH_QUEUE_PRIORITY_DEFAULT
• DISPATCH_QUEUE_PRIORITY_LOW
• DISPATCH_QUEUE_PRIORITY_BACKGROUND
All of these queues are concurrent. GCD schedules as many blocks as there are threads available from the HIGH queue. When the HIGH queue is empty, it moves on to the DEFAULT queue, and so on. The system creates and destroys threads as needed, based on the number of cores available and the system load.
When you create your own queue, it is attached to one of these global queues (its target). By default, it is attached to the DEFAULT queue. When a block reaches the front of your queue, the block is effectively moved to the end of its target queue. When it reaches the front of the global queue, it’s executed. You can change the target queue with dispatch_set_target_queue.
Once a block is added to a queue, it runs in the order it was added. There is no way to cancel it, and there is no way to change its order relative to other blocks on the queue. But what if you want a high-priority block to “skip to the head of the line”? As shown in the following code, you create two queues, a high-priority queue and a low-priority queue, and make the high-priority queue the target of the low-priority queue.
dispatch_queue_t
low = dispatch_queue_create(“low”, DISPATCH_QUEUE_SERIAL);
dispatch_queue_t
high = dispatch_queue_create(“high”, DISPATCH_QUEUE_SERIAL);
dispatch_set_target_queue(low, high);
Dispatching to the low-priority queue is normal:
dispatch_async(low, ^{ /* Low priority block */ });
To dispatch to the high-priority queue, suspend the low queue and resume it after the high-priority block finishes:
dispatch_suspend(low);
dispatch_async(high, ^{
/* High priority block */
dispatch_resume(low);
});
Suspending a queue prevents scheduling any blocks that were initially put on that queue, as well as any queues that target the suspended queue. It won’t stop currently executing blocks, but even if the low-priority block is next in line for the CPU, it won’t be scheduled until dispatch_resume is called.
You need to balance dispatch_suspend and dispatch_resume exactly like retain and release. Suspending the queue multiple times requires an equal number of resumes.
Dispatch Groups
A dispatch group is similar to dependencies in NSOperation. First, you create a group:
dispatch_group_t group = dispatch_group_create();
Notice that groups have no configuration of their own. They’re not tied to any queue. They’re just a group of blocks. You usually add blocks by calling dispatch_group_async, which behaves like dispatch_async.
dispatch_group_async(group, queue, block);
You then register a block to be scheduled when the group completes using dispatch_group_notify:
dispatch_group_notify(group, queue, block);
When all blocks in the group complete, block will be scheduled on queue. You can have multiple notifications for the same group, and they can be scheduled on different queues if you like. If you call dispatch_group_notify and there are no blocks on the queue, the notification will fire immediately. You can avoid this situation by using dispatch_suspend on the queue while you configure the group and then dispatch_resume to start it.
Groups aren’t actually tracking blocks as much as they’re tracking tasks. You can increment and decrement the number of tasks directly using dispatch_group_enter and dispatch_group_leave. So, in effect, dispatch_group_async is really no more than this:
dispatch_async(queue, ^{
dispatch_group_enter(group);
dispatch_sync(queue, block);
dispatch_group_leave(group);
});
Calling dispatch_group_wait blocks the current thread until the entire group completes, which is similar to a thread join in Java.
Queue-Specific Data
Much like associative references discussed in Chapter 3, queue-specific data allows you to attach a piece of data directly to a queue. This approach can sometimes be a useful and extremely fast way to pass information in and out of a queue. This is combined with dispatch data, discussed in the next section, to allow extremely high-performance data passing that reduces memory copying and allocation/deallocation churn.
Like associative references, queue-specific data uses a unique address as its key, rather than a string or other identifier. This unique address is usually achieved by passing the address of a static char. Unlike associative references, queue-specific data does not know how to retain and release. You have to pass it a destructor function that it calls when the value is replaced. For memory you’ve allocated with malloc, the destructor is free. It’s cumbersome to use queue-specific data with Objective-C objects under ARC, but Core Foundation objects are a bit easier to use, as demonstrated here. (See the earlier section “GCD and ARC” for more information on using ARC-managed objects.) In this example, value is released automatically when the queue is destroyed or if another value is set for kMyKey.
static char kMyKey;
CFStringRef *value = CFStringCreate...;
dispatch_queue_set_specific(queue,
&kMyKey,
(void*)value,
(dispatch_function_t)CFRelease);
...
dispatch_sync(queue, ^{
CFStringRef *string = dispatch_get_specific(&kMyKey);
...
});
One nice thing about queue-specific data is that it respects queue hierarchies. So if the current queue doesn’t have the given key assigned, dispatch_get_specific automatically checks the target queue, then that queue’s target queue, and on up the chain.
Dispatch Data
Dispatch data is the foundation of one of the most powerful low-level performance advances added in iOS 5, and you’ll likely never need to use it directly. Dispatch data are blocks of noncontiguous, immutable memory buffers that can be joined very quickly and split between blocks with minimal copying. Buffers can also be incrementally released as they’re processed, improving memory usage.
This is an incredibly robust system and is the basis for a feature called dispatch I/O, which promises significant I/O performance improvements on multicore iOS devices, and particularly on the Mac. However, in most cases, you’ll get most of the benefit for free by using the higher-level abstractions without taking on the complexity of using dispatch I/O directly. My recommendation is to leave this technology alone while it finishes maturing and Apple works out the best patterns for using it. You may want to start looking at it now if your application needs to process very large amounts of data very quickly and you’ve found that memory allocation or disk access are your major bottlenecks. These types of problems are common for the OS, but less common at the application layer. See the “Further Reading” section for links to more information.
Summary
The future of iOS development is multitasking. Apps will need to do more operations in parallel to leverage multicore hardware and provide the best experience for users. Traditional threading techniques are still useful, but operation queues and Grand Central Dispatch are more effective and promise greater performance with less contention and less locking. Learning to manage your internal multitasking and behaving appropriately when multitasking with other applications are fundamental parts of today’s iOS development.
Further Reading
Apple Documentation
The following documents are available in the iOS Developer Library at developer.apple.com or through the Xcode Documentation and API Reference.
iOS App Programming Guide, “Executing Code in the Background”
iOS App Programming Guide, “State Preservation and Restoration”
Concurrency Programming Guide
File System Programming Guide. “Techniques for Reading and Writing Files.” The section “Processing a File Using GCD” includes example code explaining dispatch I/O channels.
Threading Programming Guide
WWDC Sessions
The following session videos are available at developer.apple.com.
WWDC 2011, “Session 320: Adopting Multitasking in Your App.”
WWDC 2011, “Session 210: Mastering Grand Central Dispatch.”
WWDC 2012, “Session 208: Saving and Restoring Application State on iOS.”
WWDC 2012, “Session 712: Asynchronous Design Patterns with Blocks, GCD, and XPC.”
Other Resources
Ash, Mike. NSBlog. Mike Ash is one of the most prolific writers on low-level threading issues. Although some of this information is now dated, many of his blog posts are still required reading.http://mikeash.com/pyblog/
• Friday Q&A 2010-01-01: “NSRunLoop Internals”
• Friday Q&A 2009-07-10: “Type Specifiers in C, Part 3”
• Friday Q&A 2010-07-02: “Background Timers”
• Friday Q&A 2010-12-03: “Accessors, Memory Management, and Thread Safety”
CocoaDev, “LockingAPIs.” CocoaDev collects much of the accumulated wisdom of the Cocoa developer community. The “Locking APIs” page includes links and discussion of the available technologies and tradeoffs.www.cocoadev.com/index.pl?LockingAPIs