
Chapter 24: Going Offline
The iPhone can connect to the Internet from nearly anywhere. Most iOS apps use this capability, which makes these apps one of the best Internet-powered devices ever made. However, because it’s constantly on the move, connectivity, reception, or both can be poor. This poses a problem for iOS developers, who need to ensure that their apps’ perceived response time remains more or less constant, as though the complete content were available locally. You do this by caching your data locally. Caching data means saving it temporarily so that it can be accessed faster than making a round trip to the server. That’s easier said than done, and most apps don’t get this right.
This chapter shows you the caching techniques you can use to solve the problem of slow performance caused by poor or unavailable connectivity. In Chapter 14, you found that Internet-connected apps fall into two major categories. The first category of apps behaves like a front end to an online web service. The iHotelApp in Chapter 14 is one such app. In this chapter, you add caching support to the iHotelApp that you developed in Chapter 14. The second category of apps synchronizes user-generated content with a remote server and optionally downloads the most recent “n” items from the server. iOS 5 introduced a new cloud platform specifically targeting the second category of apps. Chapter 25 introduces you to iCloud where you’ll also discover ways to sync users’ data across all their devices through iCloud and other similar competing services, such as Parse.
Reasons for Going Offline
The main reason why your app might need to work offline is to improve the perceived performance of the app. You go offline by caching your app’s content. You can use two kinds of caching to make your app work offline. The first is on-demand caching, where the app caches request responses as and when they’re made, much as your web browser does. The second is precaching, where you cache your contents completely (or a recent “n” items) for offline access.
Web service apps like the one developed in Chapter 14 use on-demand caching techniques to improve the perceived performance of the app rather than to provide offline access. Offline access just happens to be an added advantage. Twitter and foursquare are great examples of this. The data that these apps bring in often becomes stale quickly. How often are you interested in a tweet that was posted a couple of days ago or in knowing where a friend was last week? Generally, the relevance of a tweet or a check-in is important only for a couple of hours, but loses some or all of its importance after 24 hours. Nevertheless, most Twitter clients cache tweets, and the official foursquare client shows you the last state of the app when you open it without an active Internet connection.
You can even try this on your favorite Twitter client, Twitter for iPhone, Tweetbot, or whatever you prefer: Open a friend’s profile and view his timeline. The app fetches the timeline and populates the page. While it loads the timeline, you see a loading spinner. Now go to a different page and come back again and open the timeline. You will see that it’s loaded instantly. The app still refreshes the content in the background (based on when you previously opened it), but instead of showing a rather uninteresting spinner, it shows previously cached content, thereby making it appear fast. Without this caching, users will see the spinner for every single page, which slowly frustrates them. Whether the Internet connection is fast or slow, it’s your responsibility as an iOS developer to mitigate this effect and provide the perception that the app is loading fast. This goes a long way toward improving your customers’ satisfaction and thereby boosting your app’s ratings on the App Store.
The other kind of caching gives more importance to the data being cached and the ability to edit the cached items on the fly without connecting to the server. Examples include apps such as Google Reader clients, read-later apps such as Instapaper, and so on.
Strategies for Caching
The two caching techniques discussed in the previous section—on-demand caching and precaching—are quite different when it comes to design and implementation. With on-demand caching, you store the content fetched from the web service locally on the file system (in some format), and then for every request, you check for the presence of this data in the cache and perform a fetch from the server only if the data isn’t available (or is stale). Hence, your cache layer will behave more or less like cache memory on your processor. The speed of fetching the data is more important than the data itself. On the other hand, when you precache, you save content locally for future access. With precaching, a loss of data or a cache-miss is not acceptable. For example, consider a scenario where the user has downloaded articles to read while on the subway, only to find that they’re no longer present on her device.
Apps like Twitter, Facebook, and foursquare fall into the on-demand category, whereas apps like Instapaper and Google Reader clients fall into the precaching category.
To implement precaching, you’ll probably use a background thread that accesses data and stores it locally in a meaningful representation so that local cache can be edited without reconnecting to the server. Editing can be either “marking items as read” or “favoriting items” or a similar operation on the item. By meaningful representation, I mean you save your contents in a way that allows you to make these kinds of modifications locally without talking to the server and then are able to send the changes back once you’re connected again. This capability is in contrast to apps like foursquare where you cannot become a Mayor of a place without an Internet connection, though you can see the list of your Mayorships without an Internet connection (if it is cached). Core Data (or any structured storage) is one way to do this.
On-demand caching works like your browser cache. It allows you to view content that you’ve viewed/visited before. You can implement on-demand caching by caching your data models (to create a data model cache) when you open a view controller on-demand rather than on a background thread. You can also implement on-demand caching when a URL request returns a successful (200 OK) response (to create a URL cache). There are advantages and disadvantages of both the methods, and I show you the pros and cons of each of them in the “Data Model Cache” and “URL Cache” sections later in this chapter.
A quick-and-dirty way of deciding whether to go for on-demand caching or precaching is to determine whether you might ever post-process any data after downloading it. Post-processing could be in the form of either user-generated edits or updates made to downloaded data, such as rewriting image links in an HTML page to point to locally cached images. If your app requires any of the above-mentioned post-processing, you must implement precaching.
Storing the Cache
Third-party apps can save information only to the application’s sandbox. Because cache data is not user-created, it should be saved to the NSCachesDirectory instead of the NSDocumentsDirectory. A good practice is to create a self-contained directory for all your cached data. In this example, you’ll create in the Library/caches folder a directory named MyAppCache. You can create this directory using the following code:
NSArray *paths = NSSearchPathForDirectoriesInDomains(NSCachesDirectory,
NSUserDomainMask, YES);
NSString *cachesDirectory = [paths objectAtIndex:0];
cachesDirectory = [cachesDirectory
stringByAppendingPathComponent:@”MyAppCache”];
The reason for storing the cache in the caches folder is that iCloud (and iTunes) backups exclude this directory. If you create large cache files in the Documents directory, they get uploaded to iCloud during backup and use up the limited space (about 5GB at the time of this writing) fairly quickly. You don’t want to do that—you want to be a good citizen on your user’s iPhone, right? NSCachesDirectory is meant for that.
Precaching is implemented using a higher-level database such as raw SQLite or an object serialization framework such as Core Data. You need to carefully choose the technology based on your requirements. I offer suggestions on when to use URL cache or data model cache and when to use Core Data in the “Which Caching Technique Should You Use?” section later in this chapter. Now, I’ll show you the implementation-level details of a data model cache.
Implementing Data Model Caching
You implement data model caching using the NSKeyedArchiver class. In order to archive your model objects using NSKeyedArchiver, the model class must conform to the NSCoding protocol.
NSCoding Protocol Methods
- (void)encodeWithCoder:(NSCoder *)aCoder;
- (id)initWithCoder:(NSCoder *)aDecoder;
When your models conform to NSCoding, archiving them is as easy as calling one of the following methods:
[NSKeyedArchiver archiveRootObject:objectForArchiving toFile:archiveFilePath];
[NSKeyedArchiver archivedDataWithRootObject:objectForArchiving];
The first method creates an archive file specified at the path archiveFilePath. The second method returns an NSData object. NSData is usually faster because there’s no file-access overhead, but it is stored in your application’s memory and will soon use up memory if it’s not checked periodically. Periodic caching to flash memory on the iPhone is also not advisable because cache memory, unlike hard drives, comes with limited read/write cycles. You need to balance both in the best possible way. You will learn in detail about caching using archives later in the “Data Model Cache” section later in this chapter.
The NSKeyedUnarchiver class is used to unarchive your models from a file (or a NSData pointer). You can use either one of the following class methods, depending on from where you have to unarchive.
[NSKeyedUnarchiver unarchiveObjectWithData:data];
[NSKeyedUnarchiver unarchiveObjectWithFile:archiveFilePath];
These four methods come in handy when converting to and from serialized data.
Use of any of the NSKeyedArchiver/NSKeyedUnarchiver methods requires that your models implement the NSCoding protocol. However, doing so is so easy that you can automate implementing the NSCoding protocol using tools such as Accessorizer. (See the “Further Reading” section at the end of this chapter for a link to Accessorizer at the Mac App Store.)
The next section explains strategies that can be used for precaching. You learned previously that precaching requires that you use a more structured data format. I introduce both Core Data and SQLite here.
Core Data
Core Data, as Marcus Zarra says, is more of an object serialization framework than just a database API:
It’s a common misconception that Core Data is a database API for Cocoa. . . . It’s an object framework that can be persisted to disk (Zarra, 2009).
For a good, in-depth explanation of Core Data, read Core Data: Apple’s API for Persisting Data on Mac OS X by Marcus S. Zarra (Pragmatic Bookshelf, 2009. ISBN 9781934356326).
To store data in Core Data, first create a Core Data model file and create your Entities and Relationships; then write methods to save and retrieve data. Using Core Data, you get true offline access for your app, such as Apple’s built-in Mail and Calendar apps. When you implement precaching, you must periodically delete data that’s no longer needed (stale); otherwise, your cache will start growing and hurt the app’s performance. Synchronizing local changes is done by keeping track of changesets and sending them back to the server. There are many algorithms for changeset tracking, and the one I recommend is the one used by the Git version control system (I don’t cover syncing your cache with a remote server because it’s beyond the scope of this book).
Using Core Data for On-Demand Caching
Although technically you can use Core Data for on-demand caching, I advise against using it as such. The benefit Core Data offers is individual access to the models’ properties without unarchiving the complete data. However, the complexity of implementing Core Data in your app defeats the benefits; moreover, for on-demand cache implementation, you probably wouldn’t require individual access to the models’ properties.
Raw SQLite
SQLite can be embedded into your app by linking against the libsqlite3 libraries, but it has significant drawbacks. All sqlite3 libraries and Object Relational Mapping (ORM) mechanisms are almost always going to be slower than Core Data. In addition, while sqlite3 is thread-safe, the binary bundled with iOS is not. So unless you ship a custom-built sqlite3 library (compiled with the thread-safe flag), it becomes your responsibility to ensure that data access to and from the sqlite3 database is thread-safe. Because Core Data has so much more to offer and has thread-safety built in, I suggest avoiding native SQLite as much as possible on iOS.
The only exception for using Raw SQLite over using Core Data in your iOS app is when you have application-specific data in the resource bundle that is shared by all other third-party platforms your app supports—for example, a location database for an app that runs on iPhone, Android, BlackBerry, and, say, Windows Phone. But again, that’s not caching, either.
Which Caching Technique Should You Use?
Of the different techniques available to save data locally, three of them stand out: URL cache, data model cache (using NSKeyedArchiver), and Core Data.
If you’re developing an app that needs to cache data to improve perceived performance, you should implement on-demand caching (using a data model cache or URL cache). On the other hand, if you need your data to be available offline and in a more meaningful way so that editing offline data is possible, use a higher-level serialization like Core Data.
Data Model Cache Versus URL Cache
On-demand caching can be implemented using either a data model cache or a URL cache. Both have advantages and disadvantages, and choosing which to use depends on the server implementation. A URL cache is implemented like a browser’s cache or a proxy server’s cache. It works best when your server is correctly designed and conforms to the HTTP 1.1 caching specifications. If your server is a SOAP server (or servers implemented like RPC servers, other than a RESTful server), you need to use data model caching. If your server adheres to the HTTP 1.1 caching specification, use URL caching. Data model caching allows the client (iOS app) to have control over cache invalidation, whereas when you implement a URL cache, the server dictates invalidation through HTTP 1.1 cache control headers. Although some programmers find this approach counter-intuitive and complicated to implement, especially on the server, it’s probably the right way to do caching. As a matter of fact, MKNetworkKit provides native support for the HTTP 1.1 caching standard.
Cache Versioning and Invalidation
When you cache data, you need to decide whether to support version migration. If you’re using an on-demand caching technique, version migration might be necessary if you use a data model cache. But the easiest way is to delete the cache when the user downloads the new version because old data is not important. On the other hand, if you have implemented precaching, chances are that you have cached multiple megabytes of data, and it only makes sense to migrate them to the new version. With Core Data, data migration across versions is easy (at least compared to raw sqlite).
When you’re using URL cache-based on-demand caching, URL responses are stored against the URLs as raw data. Versioning never becomes a problem. A change in version is either reflected by a URL change or invalidated from the server through cache-control headers.
In the following sections, I show you how to implement the two different types of on-demand caching: data model caching (using AppCache) and URL caching (using MKNetworkKit). You can download the complete source code located in this chapter’s files on the book’s website.
Data Model Cache
In this section you add on-demand caching to the iHotelApp from Chapter 14 by implementing a data model cache. On-demand caching is done as and when the view disappears from the hierarchy (technically, in your viewWillDisappear: method). The basic construct of the view controller that supports caching is shown in Figure 24-1. You can get the complete code for AppCache Architecture from the downloaded source code for this chapter. From this point on, I’m assuming that you’ve downloaded the code and have it available to use.
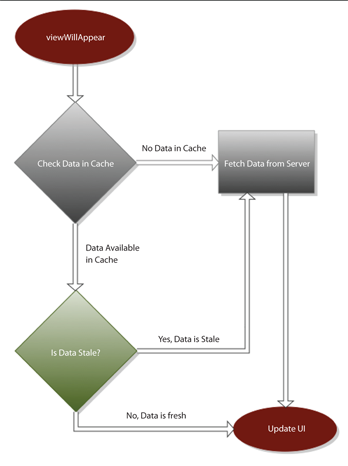
Figure 24-1 Control flow in your view controller that implements on-demand caching
In your viewWillAppear method, check your cache for the data necessary to display this view. If it’s available, fetch it and update your user interface with cached data. Now, check whether your data from the cache is old. Your business rules should dictate what’s new and what’s old. If you decide that the content is old, show the data on the UI, and in the background, fetch data from the server and update the UI again. If the data is not available in the cache, fetch the data from the server while showing a loading spinner. After fetching data, update your UI.
The preceding flowchart assumes that what you show on the UI are models that can be archived. Implement the NSCoding protocol in the MenuItem model in the iHotelApp. The NSKeyedArchiver mandates that this protocol be implemented, as illustrated by the following code snippets.
NSCoding encodeWithCoder Method for the MenuItem Class (MenuItem.m)
- (void)encodeWithCoder:(NSCoder *)encoder
{
[encoder encodeObject:self.itemId forKey:@”ItemId”];
[encoder encodeObject:self.image forKey:@”Image”];
[encoder encodeObject:self.name forKey:@”Name”];
[encoder encodeObject:self.spicyLevel forKey:@”SpicyLevel”];
[encoder encodeObject:self.rating forKey:@”Rating”];
[encoder encodeObject:self.itemDescription forKey:@”ItemDescription”];
[encoder encodeObject:self.waitingTime forKey:@”WaitingTime”];
[encoder encodeObject:self.reviewCount forKey:@”ReviewCount”];
}
initWithCoder Method for the MenuItem Class (MenuItem.m)
- (id)initWithCoder:(NSCoder *)decoder
{
if ((self = [super init])) {
self.itemId = [decoder decodeObjectForKey:@”ItemId”];
self.image = [decoder decodeObjectForKey:@”Image”];
self.name = [decoder decodeObjectForKey:@”Name”];
self.spicyLevel = [decoder decodeObjectForKey:@”SpicyLevel”];
self.rating = [decoder decodeObjectForKey:@”Rating”];
self.itemDescription = [decoder
decodeObjectForKey:@”ItemDescription”];
self.waitingTime = [decoder decodeObjectForKey:@”WaitingTime”];
self.reviewCount = [decoder decodeObjectForKey:@”ReviewCount”];
}
return self;
}
As mentioned previously, you can generate the NSCoding protocol implementation using Accessorizer.
Based on the cache flow flowchart you saw in Figure 24-1, you have to implement the actual caching logic in the viewWillAppear: method. The following code added to viewWillAppear: implements that.
Code Snippet in the viewWillAppear: of Your View Controller That Restores Your Model Objects
from Cache
NSArray *paths = NSSearchPathForDirectoriesInDomains(NSCachesDirectory,
NSUserDomainMask, YES);
NSString *cachesDirectory = [paths objectAtIndex:0];
NSString *archivePath = [cachesDirectory
stringByAppendingPathComponent:@”AppCache/MenuItems.archive”];
NSMutableArray *cachedItems = [NSKeyedUnarchiver
unarchiveObjectWithFile:archivePath];
if(cachedItems == nil)
self.menuItems = [AppDelegate.engine localMenuItems];
else
self.menuItems = cachedItems;
NSTimeInterval stalenessLevel = [[[[NSFileManager defaultManager]
attributesOfItemAtPath:archivePath error:nil]
fileModificationDate] timeIntervalSinceNow];
if(stalenessLevel > THRESHOLD)
self.menuItems = [AppDelegate.engine localMenuItems];
[self updateUI];
The logical flow of the caching mechanism is as follows:
1. The view controller checks for previously cached items in the archive file MenuItems.archive and unarchives it.
2. If the MenuItems.archive is not present, the view controller makes a call to fetch data from server.
3. If MenuItems.archive is present, the view controller checks the archive file modification date to determine how stale this cached data is. If it’s old (as determined by your business requirements), fetch the data again from the server. Otherwise, display the cached data.
Next, the following code added to the viewDidDisappear method saves (as NSKeyedArchiver archives) your models to the Library/Caches directory.
Code Snippet in the viewWillDisappear: of Your View Controller That Caches Your Models
NSArray *paths = NSSearchPathForDirectoriesInDomains(NSCachesDirectory,
NSUserDomainMask, YES);
NSString *cachesDirectory = [paths objectAtIndex:0];
NSString *archivePath = [cachesDirectory stringByAppendingPathComponent:@”AppCache/MenuItems.archive”];
[NSKeyedArchiver archiveRootObject:self.menuItems toFile:archivePath];
As the view disappears, you save the contents of the menuItems array to an archive file. Take care not to cache this if you didn’t fetch from the server in viewWillAppear:.
So, just by adding fewer than ten lines in the view controller (and a bunch of Accessorizer-generated lines in the model), you add caching support to your app.
Refactoring
When you have multiple view controllers, the preceding code will probably get duplicated. You can avoid that duplication by abstracting out the common code and moving it to a new class called AppCache. This AppCache is the heart of the application that handles caching. By abstracting out common code to AppCache, you can avoid duplicated code in viewWillAppear: and viewWillDisappear:.
Refactor this code so that your view controller’s viewWillAppear/viewWillDisappear block looks like the following code. The lines in bold show the changes made while refactoring, and I explain them following the code.
Refactored Code Snippet in the viewWillAppear: of Your View Controller That Caches Your Models Using the AppCache Class. (MenuItemsViewController.m)
-(void) viewWillAppear:(BOOL)animated {
self.menuItems = [AppCache getCachedMenuItems];
[self.tableView reloadData];
if([AppCache isMenuItemsStale] || !self.menuItems) {
[AppDelegate.engine fetchMenuItemsOnSucceeded:^(NSMutableArray
*listOfModelBaseObjects) {
self.menuItems = listOfModelBaseObjects;
[self.tableView reloadData];
} onError:^(NSError *engineError) {
[UIAlertView showWithError:engineError];
}];
}
[super viewWillAppear:animated];
}
-(void) viewWillDisappear:(BOOL)animated {
[AppCache cacheMenuItems:self.menuItems];
[super viewWillDisappear:animated];
}
The AppCache class abstracts the knowledge of staleness from the view controller. It also abstracts exactly where the cache is stored. Later in this chapter, you modify this AppCache to introduce another layer of cache where the content is stored in memory.
Because the AppCache class abstracts out exactly where the cache is stored, you don’t have to worry about copying and pasting code that gets the application’s cache directory. In case your app is like the iHotelApp example, you also can easily add security to the cached data by creating subdirectories for every user. The helper method in AppCache then currently returns the cache directory that can be modified to return the correct subdirectory for the currently logged-in user. This way, data cached by user 1 will not be visible to user 2, who logs in later.
The complete code listing is available from the source code download for this chapter on the book’s website.
Cache Versioning
The AppCache class you wrote in the last section, abstracted out on-demand caching from your view controllers. When the view appears and disappears, caching happens behind the scenes. However, when you update the app, you might change your model classes, which means that any previously archived data will no longer be restored on your new models. As you learned earlier, in on-demand caching, your data is not that important, and you can delete it when you update the app. I’ll show you a code snippet that can be used to delete the cache directory when version upgrades are performed.
Invalidating the Cache
First, save the application’s current version somewhere. NSUserDefaults is a candidate. To detect version updates, every time the app launches, check whether the previously saved version is older than the app’s current version. If it is, delete the cache folder and resave the new version to NSUserDefaults. Following is the code for doing so. Add it to your AppCache init method.
Code Snippet in the AppCache Initialize Method That Handles Cache Versioning (AppCache.m)
+(void) initialize
{
NSString *cacheDirectory = [AppCache cacheDirectory];
if(![[NSFileManager defaultManager] fileExistsAtPath:cacheDirectory])
{
[[NSFileManager defaultManager] createDirectoryAtPath:cacheDirectory
withIntermediateDirectories:YES
attributes:nil
error:nil];
}
double lastSavedCacheVersion = [[NSUserDefaults standardUserDefaults]
doubleForKey:@”CACHE_VERSION”];
double currentAppVersion = [[AppCache appVersion] doubleValue];
if( lastSavedCacheVersion == 0.0f || lastSavedCacheVersion <
currentAppVersion)
{
[AppCache clearCache];
// assigning current version to preference
[[NSUserDefaults standardUserDefaults] setDouble:currentAppVersion
forKey:@”CACHE_VERSION”];
[[NSUserDefaults standardUserDefaults] synchronize];
}
}
Note that this code depends on a helper method that gets the application’s current version. You can read the version from your app’s Info.plist file using this block of code:
Code to Get the Current App Version from the Info.plist File (AppCache.m)
+(NSString*) appVersion
{
CFStringRef versStr =
(CFStringRef)CFBundleGetValueForInfoDictionaryKey
(CFBundleGetMainBundle(), kCFBundleVersionKey);
NSString *version = [NSString stringWithUTF8String:CFStringGetCStringPtr
(versStr,kCFStringEncodingMacRoman)];
return version;
}
The preceding code calls a method to clear the cache directory. The following snippet illustrates that.
Code Snippet That Clears All Cached Files from the Cache Directory (AppCache.m)
+(void) clearCache
{
NSArray *cachedItems = [[NSFileManager defaultManager]
contentsOfDirectoryAtPath:[AppCache
cacheDirectory] error:nil];
for(NSString *path in cachedItems)
[[NSFileManager defaultManager] removeItemAtPath:path error:nil];
}
Again, the cache invalidation and versioning issue is also abstracted out of the view controllers using the AppCache architecture. Now, go ahead and create an in-memory cache for the AppCache class. An in-memory cache improves the performance of caching drastically, but at the expense of memory. However, because on iOS, only one app runs in the foreground, this shouldn’t be a problem.
Creating an In-Memory Cache
Every iOS device shipped so far has included flash memory, and this flash memory has one little problem: It has limited read-write cycles before it wears out. Although this limit is generally very high compared to the device’s life span, it’s still important to avoid writing to and reading from flash memory too often. In the previous example, you were caching directly to disk when the view was hidden and reading directly from disk whenever the view was shown. This behavior could tax the flash memory on users’ devices. To avoid this problem, you can introduce another cache layer, which uses the device RAM instead of flash (NSMutableDictionary).
In the “Implementing Data Model Caching” section, you read about two methods for creating archives: one for saving them to a file and one for saving them as NSData objects. You will use the second method, which gives you a NSData pointer that you can store in a NSMutableDictionary rather than as flat files in the file system. The other advantage you get by introducing an in-memory cache layer is slightly higher performance when you archive and unarchive contents. Although this sounds complicated, it isn’t really. In this section, you look at how to add a transparent in-memory cache to the AppCache class. (In-memory cache is transparent in the sense that the calling code—the ViewController—doesn’t even know about its presence and doesn’t need any code changes.) You also design a Least Recently Used (LRU) algorithm to save the cached data back to disk.
The following list outlines the steps you follow to create the in-memory cache. These steps are explained in more detail in the following sections.
1. Add variables to hold your cached data in memory.
2. Limit the size of the in-memory cache and write the least recently used items to a file and remove it from in-memory cache. RAM is limited, and when you hit the limit, you’ll get a memory warning. Failing to release memory when you receive this warning will crash your app. You obviously don’t want that to happen, right? So you set a maximum threshold for the memory cache. When anything is added to the cache after it’s full, the last used object (least recently used) should be saved to file (flash memory).
3. Handle memory warnings and write the in-memory cache to flash memory (as files).
4. Write all in-memory cache to flash memory (files) when the app is closed or quit or when it enters the background.
Designing the In-Memory Cache for AppCache
You start designing the AppCache class by adding the variables to hold the cache data. Add an NSMutableDictionary for storing your cache data, an NSMutableArray to keep track of recently used items, in chronological order, and an integer that limits the maximum size of this cache, as shown in the following code.
Variables in AppCache
static NSMutableDictionary *memoryCache;
static NSMutableArray *recentlyAccessedKeys;
static int kCacheMemoryLimit;
Now you have to make changes to the cacheMenuItems: and getCachedMenuItems methods in AppCache to save the model objects transparently to this in-memory cache.
+(void) cacheMenuItems:(NSMutableArray*) menuItems
{
[self cacheData:[NSKeyedArchiver archivedDataWithRootObject:menuItems]
toFile:@”MenuItems.archive”];
}
+(NSMutableArray*) getCachedMenuItems
{
return [NSKeyedUnarchiver unarchiveObjectWithData:[self dataForFile:@”MenuItems.archive”]];
}
Instead of writing directly to the file, the preceding code calls a helper method, cacheData:toFile:. This method will save the NSData from the NSKeyedArchiver to the in-memory cache. It also checks and removes the least recently accessed data and saves it to file when the prefixed memory limit for the number of in-memory items is reached. The implementation for this is shown in the following code.
Helper Method That Transparently Caches Data to In-Memory Cache (AppCache.m)
+(void) cacheData:(NSData*) data toFile:(NSString*) fileName
{
[memoryCache setObject:data forKey:fileName];
if([recentlyAccessedKeys containsObject:fileName])
{
[recentlyAccessedKeys removeObject:fileName];
}
[recentlyAccessedKeys insertObject:fileName atIndex:0];
if([recentlyAccessedKeys count] > kCacheMemoryLimit)
{
NSString *leastRecentlyUsedDataFilename = [recentlyAccessedKeys
lastObject];
NSData *leastRecentlyUsedCacheData =
[memoryCache objectForKey:leastRecentlyUsedDataFilename];
NSString *archivePath = [[AppCache cacheDirectory]
stringByAppendingPathComponent:fileName];
[leastRecentlyUsedCacheData writeToFile:archivePath atomically:YES];
[recentlyAccessedKeys removeLastObject];
[memoryCache removeObjectForKey:leastRecentlyUsedDataFilename];
}
}
Similarly to the preceding code, which caches data (cacheData:toFile:), in the following code, you need to write a method that checks the in-memory cache and returns this data, instead of directly reading from a file. The method should access the file only if it isn’t present in the in-memory cache.
Helper Method That Transparently Retrieves the Cached Data from In-Memory Cache (AppCache.m)
+(NSData*) dataForFile:(NSString*) fileName
{
NSData *data = [memoryCache objectForKey:fileName];
if(data) return data; // data is present in memory cache
NSString *archivePath = [[AppCache cacheDirectory]
stringByAppendingPathComponent:fileName];
data = [NSData dataWithContentsOfFile:archivePath];
if(data)
[self cacheData:data toFile:fileName]; // put the recently accessed
data to memory cache
return data;
}
This method also saves the data read from flash memory back to in-memory cache, which is just as a Least Recently Used caching algorithm works.
Handling Memory Warnings
For the most part, the AppCache is now complete, and you’ve added a transparent in-memory cache without modifying the calling code. However, you need to do one more important thing. Because you’re retaining data used by views in AppCache, the memory consumption of your app continues to grow, and the chances of receiving a memory warning become very high. To avoid this situation, you handle the memory warning notifications in AppCache. In the static initialize method, add a notification observer to UIApplicationDidReceiveMemoryWarningNotification:
[[NSNotificationCenter defaultCenter] addObserver:self
selector:@selector(saveMemoryCacheToDisk:)
name:UIApplicationDidReceiveMemoryWarningNotification object:nil];
Now write a method to save the in-memory cache items to files:
+(void) saveMemoryCacheToDisk:(NSNotification *)notification
{
for(NSString *filename in [memoryCache allKeys])
{
NSString *archivePath = [[AppCache cacheDirectory]
stringByAppendingPathComponent:filename];
NSData *cacheData = [memoryCache objectForKey:filename];
[cacheData writeToFile:archivePath atomically:YES];
}
[memoryCache removeAllObjects];
}
This method ensures that your AppCache doesn’t eat up the available system memory, and is faster than writing directly to files from your view controller.
Handling Termination and Entering Background Notifications
You also need to ensure that your in-memory cache is saved when the app quits or enters the background. This gives an added advantage to your on-demand caching: offline access.
Now, you add the third and final step, which is to watch for the app’s resigning active or closing notifications and handle memory warnings as you did in the previous section. No extra methods are needed; just add observers in the initialize method for UIApplicationDidEnterBackgroundNotification and UIApplicationWillTerminateNotification. This is to ensure that your in-memory cache is saved to the file system.
Observing Notifications and Saving In-Memory Cache to Disk (AppCache.m)
[[NSNotificationCenter defaultCenter] addObserver:self
selector:@selector(saveMemoryCacheToDisk:)
name: UIApplicationDidEnterBackgroundNotification object:nil];
[[NSNotificationCenter defaultCenter] addObserver:self
selector:@selector(saveMemoryCacheToDisk:)
name: UIApplicationWillTerminateNotification object:nil];
Remember to call removeObserver in dealloc as well. For the complete AppCache code, download the code sample from the book’s website.
Whew! That was a bit of overload. But it’s not finished yet. I told you that on-demand caching can be implemented using a data model cache or a URL cache. The AppCache implementation you learned about earlier is a data model cache. I’ll now show you how to implement a URL cache. But don’t worry; implementing a URL cache is much simpler on the client side. Most of the heavy lifting and cache invalidation is done remotely on the server, and the server dictates cache invalidation through cache control headers.
Creating a URL Cache
You implement a URL cache by caching the responses for every URL request made by the app. This cache is very similar to the AppCache you implemented in the previous section. The difference is that the key and value you stored in the cache will differ. A data model cache uses a filename as the key and the archives of the data models as values. A URL cache uses the URL as the key and the response data as value. Most of the implementation will be very similar to the AppCache you wrote earlier, except for caching invalidation.
A URL cache works like a proxy server in the way it handles caching. As a matter of fact, MKNetworkKit handles the HTTP 1.1 caching standard transparently for you. But you still need to understand how it works under the hood.
Earlier, I told you that the server dictates caching invalidation for a URL cache. The HTTP 1.1 (RFC 2616 Section 13) specification explains the different cache control headers that a server might send. The RFC specifies two models, an expiration model and a validation model.
Expiration Model
The expiration model allows the server to set an expiry date after which the resource (your image or response) is assumed to be stale. Intermediate proxy servers or browsers are expected to invalidate or expire the resource after this set amount of time.
Validation Model
The second model is a validation model where the server usually sends a checksum (Etag). All subsequent requests that get fulfilled from cache should be revalidated with the server using this checksum. If the checksum matches, the server returns an HTTP 304 Not Modified status.
Example
Here’s an example of both the expiration model and the validation model, along with tips on when to use which model on your server. Although this information may be beyond the usual scope of iOS developers, understanding how caching works will help you become a better developer. If you’ve ever configured your server, you’ve already written something like this to your nginx.conf file.
nginx Configuration Setting for Specifying an Expiration Header
location ~ .(jpg|gif|png|ico|jpeg|css|swf)$ {
expires 7d;
}
This setting tells nginx to emit a cache control header (Expires or Cache-Control: max-age=n) that instructs the intermediate proxy servers to cache files ending with jpg and others for 7 days. On API servers, the sysadmin probably does this, and on all your image requests you see the cache control header. Caching your images on your device by respecting these headers is probably the right way to go, rather than invalidating all images in your local cache every few days.
While static responses, images, and thumbnails use the expiration model, dynamic responses mostly use the validation model for controlling cache invalidation. This requires computing the checksum of the response objects and sending it along with the Etag header. The client (your iOS app) is expected to send the Etag on the IF-NONE-MATCH header for every subsequent request (revalidates its cache). The server, after computing the checksum, checks whether the checksum matches the IF-NONE-MATCH header. If yes, the server sends a 304 Not Modifed, and the client serves the cached content. If the checksum is different, the content has indeed changed. The server can be programmed either to return the complete content or a change set explaining what was exactly changed.
Let me give you an example to make this clear. Assume that you’re writing an API that returns the list of outlets in the iHotel App. The endpoint /outlets return you the list of outlets. On a subsequent request, the iOS client sends the Etag. The server fetches the list of outlets again (probably from the database) and computes the checksum of the response. If the checksum matches, there were no new outlets added, and the server should send a 304 Not Modified. If the checksum is different, a couple of things could have happened. A new outlet may have been added or an existing outlet may have been closed. The server may choose to send you the complete list of outlets again or to send you a change set that contains the list of new outlets and the list of closed outlets. The latter is more efficient (though it’s slightly more complicated in terms of implementation) if you don’t foresee frequent changes to outlets.
The World Wide Web increased from a dozen computers in 1990 to billions of computers worldwide within a decade. The one driving factor was the HTTP protocol being built with scalability and caching, and the fact that every major browser adhered to these HTTP standards. With the computing world becoming more and more app-centric, your web service application needs to reimplement what browsers did to help the Web grow. Adhering to some of these simple standards would go a long way in improving the performance of your application and thereby pushing the limits of what it can do.
Caching Images with a URL Cache
A URL cache like the preceding one is transparent to the data it caches. This means that it’s immaterial to a URL whether you cache images or music or videos or URL responses. Just remember that when you use a URL cache for caching images, the URL of the image becomes the key and the image data becomes the cached object. The advantage you get here is superior performance because a URL cache doesn’t post-process responses (like converting them to JPEGs or PNGs). This fact alone is a good reason to use a URL caching for caching your images.
Summary
In this chapter, you read about the various types of caching and learnt the pros and cons of different methods of caching. Caching goes a long way in improving the performance of an app, and yet a majority of the apps on App Store don’t implement it properly. The techniques you discovered (for both iOS and your API server) in this chapter can help you push the limits and take your app to the next level.
For information about synchronizing your local data with a remote server, turn to Chapter 25.
Further Reading
Apple Documentation
The following documents are available in the iOS Developer Library at developer.apple.com or through the Xcode Documentation and API Reference.
Archives and Serializations Programming Guide
iCloud
Books
The Pragmatic Bookshelf | Core Datahttp://pragprog.com/titles/mzcd/core-data
Other Resources
Callahan, Kevin, Accessorizer. Mac App Store. 2011http://itunes.apple.com/gb/app/accessorizer/id402866670?mt=12