
Chapter 2: Getting Comfortable with Xcode 4 and the LLVM Compiler
Apple officially announced Xcode 4 at WWDC 2010 (June 2010), and the beta version was available to attendees. It was in beta for quite a while (around nine months), and a Gold Master was made available through the iOS/Mac developer center in February 2011. Weeks later, in March, Xcode 4 was officially released, and developers who subscribe to the iOS or Mac developer programs were able to get it for free. Others were able to buy it from the Mac App Store.
Xcode 4 is a completely rewritten IDE (integrated development environment) replacing Xcode 3. The major features include, but are not limited to, single window editing, navigators, integrated Interface Builder, an integrated Git version control system, and schemes (a new way to configure and share build settings in your product). You learn in detail about every major feature in this chapter.
Xcode 4 features are not just skin deep—they come with some huge compiler-level changes as well. The LLVM compiler is the new brain behind Xcode. Apple made LLVM-GCC the default compiler in the original version of Xcode. Beginning with Xcode 4.0 and in the version that is released with iOS 5 (Xcode 4.2), LLVM 3.0 was the default compiler; it uses Clang as its front end. Using Clang as the front end over GCC has several advantages, and several new features of Xcode 4 were added because of this change. With Xcode 4.5 (released with iOS 6), Apple made LLVM 4 the default compiler. LLVM 4 brings in some new literals giving some syntactic sugar to Objective-C. Later in this chapter, I’ll introduce you to the new Objective-C literals added in LLVM 4.
Because Apple has switched both the default compiler and the debugger to LLVM, you should know how to harness the power of the new compiler to increase your coding and debugging speed and how to use the IDE to be more productive. The most important feature of the LLVM compiler is better and faster compilation with the Clang front end, which provides better code completion support.
iOS 5 introduced a new memory management called Automatic Reference Counting or ARC, and moving forward, ARC will probably be the only memory management technique supported by Apple. Automatic Reference Counting is a memory management model where the compiler automatically inserts retains and releases appropriately for you. This means that you don’t have to worry about managing memory and focus or writing the next great app. You’re relieved from worrying about leaks, for the most part. While that is true to some extent, migrating an existing application written using the older, reference-counting memory management model isn’t easy. Fortunately, Xcode 4.2 and above has a built-in migration tool (Convert to Objective-C ARC) that will help you to convert your existing code base to support the ARC compiler.
This chapter covers the important features of the IDE, the new features offered by the LLVM 4 Compiler, the built-in integrated version control system, schemes (new to Xcode 4), writing readable and commentable project configuration files, the features of the Xcode 4 Organizer, and finally, the Convert to Objective-C ARC migration tool.
Getting to Know the User Interface
Xcode 4 features a whole new iTunes-like user interface (UI). The toolbar is gone in favor of iTunes-like Play/Stop buttons. The build setting chooser is gone in favor of the new schemes selector. There’s a new LCD-like status display similar to iTunes. In this section, I briefly show you the five most important aspects of the Xcode 4 UI and how to get the most out of it.
You can access seven navigators by clicking the buttons highlighted in Figure 2-1. You can also access them via the shortcut keys Cmd-1 through Cmd-7.
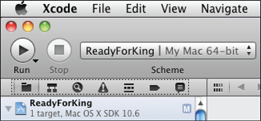
Figure 2-1 The Xcode navigator items
You can access the same navigators from Xcode’s View menu item, as shown in Figure 2-2.
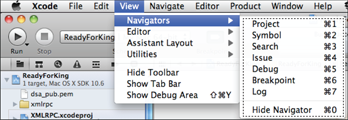
Figure 2-2 Accessing the new navigators from the menu bar
Figure 2-3 highlights the three important parts of Xcode 4’s user interface. The first view is the navigator pane showing the first navigator, the project navigator. You access the list of files and frameworks in your project from the project navigator. The panel on the right side is the Xcode 4 workspace pane. The Xcode 4 workspace can edit more types of files than just Objective-C or property list files, and the project and build settings editor just happens to be one such editor. You can access the project and build settings editor by selecting the project file from the project navigator. Additional navigators are symbol, search, issue, debug, breakpoint, and log. You look at them in detail later in this chapter.
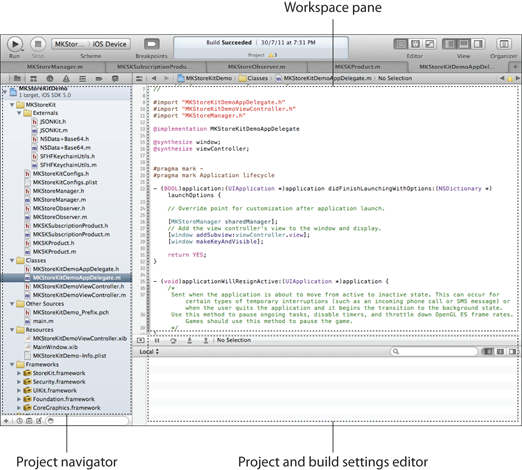
Figure 2-3 Xcode 4 window showing several opened tabs and important parts of the user interface
Tabbed Editor
Xcode 4 supports opening multiple tabs within the same window. This means that you will spend less time searching for the window that displays your source file. Figure 2-3 shows Xcode 4’s tabbed editor in action.
The tabbed editor in Xcode 4 behaves differently from tabbed editors in, for example, Eclipse, Visual Studio, or TextMate. Think of Xcode 4’s tabs as virtual workspaces instead of just file editors. The navigator pane’s file selection and search criteria are preserved when you switch back and forth between tabs. I recommend opening three to four tabs, each showing a related group of files. For example, you can use one tab to show your model classes, another tab for your view controllers, a third tab for Interface Builder files, and maybe, if you use Core Data, a fourth tab for showing Core Data-related files. Use tabs to make the workspace to suit your thought process or workflow. Going to work on your Core Data files? Switch to the Core Data tab. Going to work on Interface Builder? Switch to the Interface Builder tab.
Changes to Key Bindings
Xcode 4 has changed most of its keyboard shortcuts from Xcode 3 and they are different from other IDEs as well. Three commonly used shortcuts for debugging are changed to F6 (Step over), F7 (Step into), and F8 (Step out). The shortcut for Build and Run is Cmd-R. Initially when you get started with Xcode 4, these are the most important shortcuts that you should remember.
For a good, comprehensive list of keyboard shortcuts, I recommend Cocoa Samurai’s list, available for download at http://cocoasamurai.blogspot.com/2011/03/xcode-4-keyboard-shortcuts-now.html, and another by The Pragmatic Studio, available at http://pragmaticstudio.com/media/Xcode4Shortcuts.pdf.
Project Settings Editor
The project settings editor also allows you to edit your project and target’s settings. Furthermore, adding additional frameworks to your product and passing command-line arguments are all now a part of this build settings panel of the project settings editor.
Integrated Version Control
Xcode 4 integrates the Git version control system. Git is arguably one of the most powerful distributed version control systems as of this writing. Later in this chapter, you find out how to get the best out of your version control system.
Workspaces
Xcode 4 supports the concept of workspaces and allows you to create a workspace and add multiple projects within it. For example, if you’re writing a Mac + iOS app, you can share a wealth of code. Instead of manually copying and pasting code, you can extract the common code into a separate static library project and add it to the workspace. The primary advantage of a workspace is implicit dependencies. This means that when you build your Mac app (or iOS app), Xcode 4 automatically detects that it’s dependent on your static library project and builds it first, without you explicitly requesting it to do so.
All in One Window
Xcode 4 is a single window IDE like Eclipse or Visual Studio. Every file you use in your project can be opened without “switching” to it using Mac’s Exposé. With full-screen editing in Lion, you will appreciate the single window IDE and find yourself spending less time switching or searching for a window.
The IDE, as you saw earlier in this chapter, consists of a set of navigators, a workspace area, and the utility area. There are seven navigators that replace the functionality of the Groups and Files view.
The workspace area is where you edit your files, which can be either source code or .plist files or even Interface Builder (IB) files. There are three different kinds of editors: the standard editor that you use for editing files, the assistant editor for editing files related to the current file in standard editor, and a versions editor that shows version history of a file.
The utility area is akin to the Inspector pane found on most other applications. Below the utility area is the library from which you can drag user interface elements into your IB or code snippets into your source code. It’s time to take a closer look at the different navigators available in Xcode 4.
Navigating the Navigators
Seven navigator panes are built into Xcode 4. These features were also present in Xcode 3 (in the Groups and Files view), but are presented in a more meaningful way in Xcode 4.
In Xcode 3, there was a single view—the Groups and Files view—where you did pretty much everything. You chose the file to edit, edited project settings, added frameworks, accessed breakpoints and debug logs, and did a lot more all from the same view. Xcode 4 groups these actions into seven different navigators.
All navigators have a filter and scope box (shown in Figure 2-4) that can be accessed using Cmd-Option-J. This shortcut puts the focus on the filter and scope box below the navigator from where you can search for a project file. The keyboard shortcut works for all navigators, so if you’re in, say, the symbol navigator, you can use this to quickly filter symbols. The filter box might have additional buttons to restrict the scope, and sometimes (as in the debug navigator) it might be replaced with a UI that looks different but offers the same functionality.

Figure 2-4 Xcode navigator showing the filter and scope bar
You can press the shortcut key Cmd-Option-J to quickly jump to the filter and scope box.
Navigators provide a clear separation of duties on the UI. For example, there is a dedicated navigator for breakpoints, a dedicated navigator for issues, and another for logs. Although it might be difficult to switch to the new separate navigators, you will appreciate them once you become accustomed to them.
Some features, like the capability to create smart groups, were dropped probably because few people use them. However, if you have a project in Xcode 3 that uses smart groups, opening it in Xcode 4 and saving it doesn’t remove them from the project file. So when you open the project again on Xcode 3, you will still see your smart groups.
Project Navigator
The project navigator, as the name suggests, helps you locate your source code files, frameworks, and targets. Similarly to Xcode 3 and most other IDEs, the project navigator also serves as the source code control UI. This means that when you add files to the project navigator, they are automatically added to your source control (if you use one), and the project navigator also updates the UI with the files’ source control status. You can jump to the project navigator with the Cmd-1 shortcut.
Symbol Navigator
You can jump to the symbol navigator with the Cmd-2 shortcut. The symbol navigator makes it easy to locate a specific symbol or class in your project. The Clang front end of the LLVM compiler integrates well with Xcode 4 and has made browsing through symbols in the project faster.
Search Navigator
The search navigator is functionally exactly the same as the Xcode 3’s Find and Replace feature. You can access this navigator with the traditional Cmd-Shift-F shortcut or the navigator shortcut Cmd-3.
Issue Navigator
When you build your project, compiler warnings, error messages, or analyzer warnings appear on the issue navigator. The issue navigator on Xcode 4 is clear of build log messages and they are moved to a separate navigator called the log navigator. The log navigator maintains every build log in chronological order. You can access the issue navigator using the navigator shortcut Cmd-4.
Debug Navigator
The debug panel in Xcode 3, which you access by pressing Cmd-Shift-Y, is equivalent to Xcode 4’s debug navigator. You can access the debug navigator in Xcode 4 using the navigator shortcut Cmd-5. The most important addition is the scope slider. Instead of the filter and scope search box present in other navigators, the debug navigator uses a scope slider. Drag the scope slider to customize your scope preference.
Breakpoint Navigator
The sixth navigator is the breakpoint navigator. On Xcode 3, this was managed in a separate window. The nifty addition here is the capability to quickly add a symbolic breakpoint or an exception breakpoint. You can access the breakpoint navigator using the shortcut Cmd-6.
A noteworthy feature of the breakpoint navigator is the capability to share your breakpoints with coworkers. From the breakpoint navigator, Cmd-click the project file and click Share Breakpoints.
Log Navigator
The log navigator maintains a log of every build, and you can even search for entries in a log that was created several builds ago. You can access the log navigator using the shortcut Cmd-7.
Help from Your Assistant
Xcode 4 has three main editors, and they are akin to multiwindow document editing present in other competing IDEs. The two editors that augment Xcode 4’s standard editor are the assistant editor and the versions editor. The best thing about the assistant editor is that, when you turn in on, it intelligently knows the file most relevant to the file you’re currently working with.
For example, when you’re editing a Core Data model, turning on the assistant editor opens the corresponding Core Data’s model file. Similarly, when you’re editing an Interface Builder file, it opens the corresponding header file.
A common action like adding an IBAction declaration in your header and coming back to the Interface Builder to connect it can be done easily within the same window using the assistant editor. The assistant editor also provides quick access to other related files like the superclass, subclass, and siblings.
Integrated Interface Builder
Prior to Xcode 4, Interface Builder was a standalone application, and the most common mistake a programmer made was failing to sync Interface Builder and Xcode properly. For example, forgetting to save an Interface Builder connection could crash your app at runtime. Additionally, the very fact that there are two applications for writing iOS apps confuses developers coming from an Eclipse or Visual Studio background. Those difficulties are in the past because Xcode 4 integrates Interface Builder right into the main IDE, and it’s now very easy to sync your user interface with the controller code.
Interface Builder Panels
Interface Builder on Xcode 3 usually has multiple windows floating around. At a bare minimum, you have the main document window, the library panel, the inspector, and the actual user interface view. In Xcode 4, the library and inspector are brought into the utility area. The document window is docked to the left. Figure 2-5 shows a classical Interface Builder file open in Xcode 4. The navigator panel, which is normally open, is closed in Figure 2.5 to illustrate the other panels of Interface Builder.
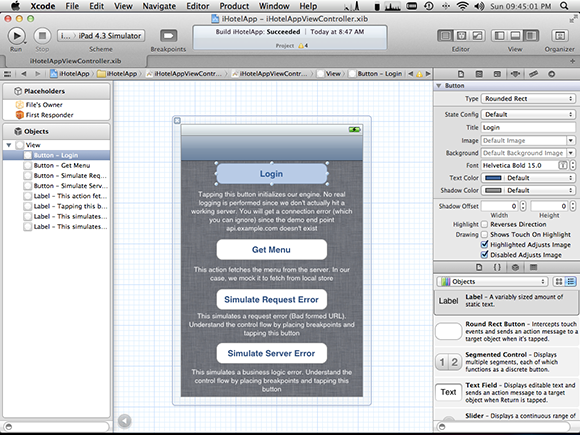
Figure 2-5 Xcode 4 Interface Builder
The left pane now contains the objects in the Interface Builder file. The utility area shows properties for the selected object.
When you turn on the assistant editor, Xcode 4 will automatically open the correct header file for you.
Generating Code Using Assistant Editor and Integrated Interface Builder
The most important feature that has been added to Xcode 4’s integrated Interface Builder is the capability to generate properties (IBOutlet) or event handling (IBAction) code directly from IB. When the assistant editor is open, all you have to do is command-click and drag objects to the header file to generate properties, or command-click and drag events from the utility area to the header to generate IBActions. If your drag destination is valid, Xcode shows an insertion marker and adds the code right in—no connections needed. It’s all done for you.
LLVM Compiler: A Tryst with the Brain
Xcode 3 and prior versions were not as “intelligent” compared to competing IDEs such as Eclipse or Visual Studio. The main reason for this is that Xcode 3 used GCC as the compiler. Although GCC is a good compiler, it doesn’t offer much interoperability with the IDE. A compiler normally has a front end that converts source code into an intermediate representation and expands preprocessor macro definitions. It also has a back end that generates code and optimizes it. The GCC compiler is essentially a back-end compiler, which means that when you provide it with source code, it generates compiled binary for the given source. The GCC compiler was primarily developed for compiling code and not for parsing it. Essentially, this means that Apple has to write its own version of parsers to assist you with debugging. GCC is GPL licensed and what that means is that Apple’s version of parsers cannot use the same GCC code without changing the Xcode license to GPL. Because Apple’s parsers and GCC are from different code bases, there were always some discrepancies between what the GCC compiler “thinks” and what Xcode “thinks.”
The Clang Front End
To alleviate this problem, Apple switched to the LLVM compiler last year. When Xcode 4.2 debuted with iOS 5, the default compiler was LLVM compiler 3.0. Although LLVM is not as “efficient” as GCC in code generation, it’s more modular and extensible. LLVM is also more than twice as fast in terms of compile time (thereby increasing your productivity). A number of front ends have been developed for LLVM, and one of these is Clang, which is heavily funded by Apple. (Clang stands for C language.) Clang supports incremental compilation, which means that the IDE can actually compile the code as you type and show you near-instantaneous compilation errors. You will find this very useful when you start using Xcode 4. Moreover, the modular nature of Clang makes it easy to support code refactoring and features like Edit All in Scope.
I’m a Bug! Fix Me
LLVM’s tighter integration with the IDE also helps Xcode 4 to offer suggestions about what the developer must do when the compiler encounters an error. This feature is called Fix-it.
Figure 2-6 shows a suggestion to remove the closing square brackets to match the number of opening brackets.
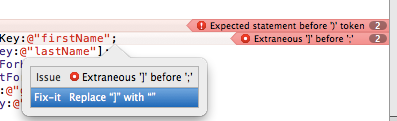
Figure 2-6 Xcode 4 Fix-it in action
What’s New in LLVM 4
One other reason for Apple to move from GCC to LLVM is to have more control over the Objective-C programming language. With Xcode 4.4, Apple is aiming to make Objective-C more concise by adding literals. Apple can make this kind of language change only if it has control over the compiler, and LLVM gives Apple the power to change Objective-C.
Literals
Literals aren’t something new, and Objective-C has had literals for a long time. Take a look at the declaration syntax of a simple NSString.
NSString
String Declaration
NSString *greeting = [[NSString alloc] initWithCString:”Hello World!”
encoding:NSUTF8StringEncoding]; // without using literals
// second method using literals
NSString *greeting = @”Hello World!”;
Now, note that, instead of using a method to create a string, we prefix it with an @ symbol. This kind of declaration is called a literal. In LLVM 4, Apple has added similar syntax for creating an NSNumber directly from scalar values, collection literals for NSArray and NSDictionary that help in concise creation of objects, and finally object subscripting that adds a concise syntax for accessing arrays and dictionaries. I show you these syntactic changes in the next couple of sections.
NSNumber from Scalars
NSNumber is a Foundation object while the numbers 1, 2, and 3 are scalars. To convert a scalar value to a Foundation object, you have to box the scalar value (in any language, not just Objective-C). You used to declare a NSNumber using the following syntax:
NSNumber *myNumber = [NSNumber numberWithInt:3];
NSNumber *yesValue = [NSNumber numberWithBOOL:YES];
With LLVM 4, you can simplify this couple of lines using the following syntax:
NSNumber *myNumber = @3;
NSNumber *yesValue = @YES;
The compiler automatically takes care of boxing the scalar values to Foundation objects. Note that you shouldn’t wrap the scalars within double quotes. Doing so, like @”3”, will make it an NSString whereas @3 is an NSNumber. By default, any scalar number is treated as a signed integer and any scalar decimal is treated as a double. As shown in the following code, you can instruct the compiler to convert the scalar to a float (instead of double) by suffixing the decimal with F and to a unsigned integer (instead of signed) by suffixing it with a U. On similar lines, L and LL, respectively, mean long and long long.
NSNumber *valueOfPi = @3.14F // declaring a float
NSNumber *radius = @3U // declaring a unsigned integer
If you’re using Objective-C++, you can use @true and @false for declaring Boolean true and false.
The next literal that you learn will help you declare collections in a concise way.
Collection Literals (NSArray and NSDictionary)
Collection literals added to LLVM 4 allow you to declare an NSArray using the following syntax.
Creating an Array of Strings Using Literals
NSString *str1 = @”Hello”;
NSString *str2 = @”World”;
NSString *str3 = @”!”;
NSArray *myArray1 = [NSArray arrayWithObjects:str1, str2, str3, nil]; // create a new array with old method
NSArray *myArray2 = @[str1, str2, str3]; // create a new array
The preceding code snippet shows how to create a new array using literals. myArray1 is created using the old method, and myArray2 is created using literals. With literals, you no longer have to nil terminate your arrays. The compiler does that automatically for you. If str2 or str3 were nil, and if the compiler could deduce that, a warning would be issued. Otherwise, a runtime error would occur.
You can combine collection literals with the NSNumber scalar conversion literals that you read about in the previous section to easily create an array of numbers, as illustrated in the following code snippet:
NSArray *arrayOfIntegers = @[@1, @2, @3, @4, @5];
Creating a dictionary also follows a similar syntax.
Creating a Dictionary Using Literals
NSDictionary *dictionary = @[@”key1”:@”value1”,
@”key2”:@”value2”,
@”key3”:@”value3”];
Again, no element within this can be nil.
Object Subscripting (NSArray and NSDictionary)
In traditional C or C++, you access elements within an array using the subscript operator.
int a[5] = {1, 2, 3, 4, 5};
int firstElement = a[0];
Although this works for scalar arrays, until LLVM 4, NSArray and NSDictionary did not support subscript access to elements. For accessing an element within an NSArray, you use the objectAtIndex: method, and for accessing the value of an object associated with a key, you use the valueForKey: or objectForKey: method. With LLVM 4, Apple has introduced literals that allow subscripted object access. This is illustrated in the following code.
Accessing an Array Element Using a Subscript
NSArray *array = @[@1, @2, @3, @4, @5];
int elementAt3 = array[3];
LLVM 4 supports array-style subscripts that take integers as subscripts and dictionary-style subscripts that take a Foundation object pointer as a subscript. You use the dictionary style subscript to access values in a dictionary.
Accessing a Dictionary Element Using a Subscript
NSDictionary *dictionary = @[@”key1”:@”value1”,
@”key2”:@”value2”,
@”key3”:@”value3”];
int elementAt3 = dictionary [@”key3”];
Boxed Literals
Clang 3.2 also supports something called boxed literals that allow enums to be accessed using a literal. As of this writing, Apple’s LLVM compiler (including LLVM 4) doesn’t support this feature. It might in a future release.
Any array or dictionary created using literals is immutable by default. To create a mutable array, you have to resort back to [NSMutableArray arrayWithObjects:…, nil] or make a mutable copy using the mutableCopy method.
Literals and Availability
The new literals just explained are available from LLVM 4 onward. However, if you’re a purist and want to write code that works with the older LLVM 3.1 and LLVM 4 compilers, you can use the __has_feature macro.
__has_feature Macro
#if __has_feature(objc_array_literals)
//code that uses LLVM 4 literals
#else
//fallback code that uses the older technique
#endif
Two other similar macros can be used to check the availability of dictionary literals and object subscripting, as illustrated in the following code.
Macro to Check Availability of Dictionary Literals and Object Subscripting
#if __has_feature(objc_dictionary_literals)
#endif
#if __has_feature(objc_subscripting)
#endif
I recommend avoiding conditional compilation. Since the compiler is available free of cost, most developers will be upgrading soon. If you still think you need to support the older LLVM 3.1 compiler, avoid using the new literal syntax altogether.
Auto Synthesis of Instance Variables
The LLVM 4 compiler adds one other nifty feature that automatically synthesizes ivars (instance variables) if you don’t declare them explicitly.
For example, for the list of properties shown here
@property (strong, nonatomic) MPMoviePlayerController *moviePlayer;
@property (assign, nonatomic) int currentSegment;
@property (nonatomic, copy) void (^completionHandler)();
you would normally have to synthesize ivars in the implementation file, as illustrated here.
@synthesize moviePlayer = _moviePlayer;
@synthesize currentSegment = _currentSegment;
@synthesize completionHandler = _completionHandler;
With the new LLVM compiler, you can now type less code and can omit this ivar synthesis. The LLVM 4 compiler automatically synthesizes them for you. If you explicitly write a synthesizer, the LLVM 4 compiler is intelligent enough not to synthesize the ivar again. Do note that the default synthesizer generated by the LLVM 4 compiler has a leading underscore prefix.
The runtime method, setValue:forKey:used by KVC, writes to an ivar specified by key prefixed with a leading underscore if an ivar specified in the forKey argument is not declared. As such, [myObject setValue:@1 forKey:@”number”]; will set the value of 1 to the ivar _number if an ivar named number (without the leading underscore) is not declared. The auto-synthesized ivars in LLVM 4.0 might be troublesome in some cases like lazy read/write ivars. In those cases, synthesize your ivars explicitly by prefixing them with a double underscore. This edge case applies to read-only properties as well. To prevent your read-only properties from being written to using runtime KVC methods, prefix their synthesizers with a double underscore. Apple uses the double underscore prefix for lazily loaded properties (NSManagedObjectContext and NSPersistentStoreCoordinator) in your application delegate if you use Core Data.
Git Your Versions Here
Another interesting feature addition to Xcode 4 is the integrated Git version control system. Git is a distributed version control system written by Linus Torvalds (yes, the same guy behind the Linux kernel) primarily to maintain the Linux kernel repository. The distributed nature, speed, reliability, cheap branching, and ability to easily do nonlinear software development encouraged more and more users to adopt Git.
Integrated Git Version Control System
Git is primarily a command-line system, much like most other UNIX/Linux systems. Don’t fret. Xcode 4 has built-in support for Git, and the project navigator even shows the commit statuses of your file. However, the decision to use Git over any other version control system shouldn’t be based solely on this. The main reasons I advocate using Git for your next iOS app are its cheap branching and its nonlinear development support.
Versions Editor
The versions editor is the third type of editor available in Xcode 4. (As mentioned previously in this chapter, the other two editor types are the standard editor and the assistant editor.) The integrated versions editor comes in handy when you want to visually analyze differences between two versions of a file. If your project uses Git (or SVN), you can compare a file with a previous revision from its repository. The versions editor allows you to pick any older version of a file by scrubbing through a timeline resembling the classical Time Machine UI. With OS X Lion, Apple might even consider adding local versions support to Xcode, and you would be able to compare local versions of files in addition to the versions in the repository.
Git Best Practices
Apple’s AppStore is a walled garden, and if you’re an active developer, Apple has probably rejected you at least once. Imagine a product development with, say, ten features. Out of these ten features, you develop four for version 1.0, another two for version 1.5, and the remaining four for version 2.0. You have submitted version 1.0 and are working on the fifth and sixth features. A couple of weeks into development, you get a reply from Apple that your app is rejected. Now, assume that the third feature violates some of Apple’s policies and isn’t allowed in its current state. In a traditional SCM system, you check out the old code, work on the fix, and submit the fix to Apple. You then come back to your code that has the fifth and sixth features added and painstakingly merge these bug fixes into your latest-and-greatest code. Although SVN and other source code control systems offer branching, it’s quite hard to use, and as the size of projects grows, branching becomes an expensive operation (both timewise and disk-usagewise). With Git, this kind of merging, branching, and parallel development is very easy, mostly because of the way Git stores change sets.
For a deeper introduction to Git, I recommend reading Pro Git or Version Control with Git. (See the “Further Reading” section at the end of the chapter for details.) The first book gives you an in-depth understanding about how Git works; the second helps you get started with and make the best use of Git in your project.
Follow these steps when using Git in your next iOS app:
1. Let your master branch reflect your latest-and-greatest code for the version available on the App Store.
2. For every new version you’re working on, create a new branch.
3. For every major feature you implement, create a branch from the version branch.
4. Merge the feature branch with the version branch when the feature is complete.
5. Merge your version branch with the master whenever you submit your app to the App Store.
6. Optionally, tag your master branch after the app is approved.
When you follow these steps, you can easily fix bugs and issues with a particular version and merge your changes with the latest branch you’re working on, all within couple of minutes.
For example, if Apple were to reject your app, all you would need to do is check out the master branch, make your fixes, resubmit to the App Store, check out your current working branch, and merge the changes you made in the master to it. With Git, nonlinear development gets really easy. Try using it. You will not regret it.
Schemes
The most powerful yet most confusing addition to Xcode 4 is schemes. In Xcode 3, there is a build configuration selection combo box, where you specify an active configuration, an active target, an active executable, the active architecture (instruction set), and the target device before running the app. Even the default set of options has an overwhelmingly high combination of selections, and for complicated project settings, choosing the right executable for the right target or device and instruction set becomes challenging. To top it off, Xcode 3 even allows choosing a wrong executable as active for a given target. Schemes have been introduced in Xcode 4 to help developers handle these issues easily. A scheme is a single entity that combines all of the above-mentioned settings. A scheme is a set of instructions for building a product. The product can be (in most cases will be) a collection of targets with its own build configurations. You can also use your existing xcconfig files for those targets. You learn about xcconfig configuration files later in this chapter.
Why Schemes?
The previous method of choosing four different options whenever you want to build something makes doing it right every time difficult. At times, you may have built and submitted the debug version of the app to the App Store or debugged the release configuration of the app, only to find your breakpoints weren’t getting hit. With schemes in place, all you have to do is choose your scheme, and every other option is automatically applied. When you’re building your product for debugging, you obviously don’t want to strip off debug statements. On the other hand, when you’re building for the App Store, you almost always want to optimize your build for performance and strip off debug statements. That holds good for Ad Hoc deployments as well. Wait! It doesn’t end there. These schemes can also be shared among coworkers by committing into the repository.
Think of Schemes as Implementing Your Intentions
With schemes, you can automatically choose the correct configuration for a target by choosing a scheme that matches your intent. That is, if your intent is, “I want to debug this product,” choose the Run scheme. If your intent is, “I want to submit this product to AppStore/Adhoc distribution,” choose the Archive scheme.
With schemes, you select one option based on your intent. All your other settings are applied automatically. With some tweaks, you can customize the settings that are applied when a scheme is created. You will find out more about this in the next section.
Creating a Scheme
The easiest way to create a scheme is to let Xcode 4 automatically create one for you. When you open a project created on Xcode 3 in Xcode 4, it automatically creates a default scheme. Every scheme has its own unique settings panel that allows you to customize or tweak the default scheme setting. The following list discusses actions in a scheme.
• Run—The Run action builds the included targets using the debug build configuration. On the settings panel of this action, you can change the debugger you want to use (GDB or LLDB) and the build configuration, the default being Debug. The Run action’s settings panel is where you specify command-line arguments, provide default data, or provide mock location data (using GPX files) to your app. You can also enable diagnostics-related arguments like Enabling Zombies or Guard Malloc from here (from Xcode 4.1 onward).
To take it even further, you can duplicate the scheme and try different debuggers (and/or settings) on each.
• Test—The Test action runs your test targets. On the settings panel, you can customize which tests should be executed. Schemes are fully integrated with the OCUnit Objective-C testing framework and tests written will show up on the settings panel. Test failures show up on the issue and log navigators instead of the console, which means that navigating to the correct method that caused the test case to fail is now easier.
By duplicating this scheme, you can create two test schemes: one testing your model classes and one testing, say, your helper methods.
• Profile—The Profile action builds your target and attaches it to Instruments. When you choose this, Instruments automatically launches and shows you the list of instruments available. You can edit the scheme to always launch the Time Profiler tool or the Leaks tool (or any other tool) automatically.
You can duplicate the profile scheme so that you have two schemes: one launching Leaks and the other launching Time Profiler.
• Analyze—The Analyze action runs the Clang static analyzer on your code and warns you of potential memory leaks. There isn’t much to customize here except the build configuration to use for this scheme.
• Archive—The Archive action is used for making xcarchive files (or ipa files) used for submitting to the App Store. Archives automatically appear on the Xcode organizer from which you can validate/submit to the App Store. With a dedicated Archive scheme, you’re no longer required to create an Ad Hoc build configuration or an “App Store” build configuration for your product like you do in Xcode 3. These specific distribution configurations differ in most cases from the release configuration only by the signing certificate. Because the signing happens later, you can use the release configuration for archiving your apps. Signing it for submitting to the App Store or for Ad Hoc distribution is done through the Xcode organizer.
Sharing Your Schemes
By default, a scheme created by Xcode 4 is saved to the project bundle under the xcuserdata directory. Normally, this directory is excluded from repositories, which means schemes generated on your machine stay on your machine. In some cases, you might want to share schemes with coworkers. To do so, go to the Manage scheme options panel and select the Shared checkbox for every scheme you want to share. This is illustrated in Figure 2-7.
When you check the Shared option, your schemes are copied over to the xcshareddata directory. By adding this directory to your repository, you can share your custom schemes with coworkers.

Figure 2-7 Sharing schemes
Schemes are actually a better way to customize your IDE or environment than Xcode 3’s method of using multiple configurations. Give it a try and you will like it.
Build Configurations You Can Comment
In most projects, you depend on Xcode’s build settings panel to edit/change your build settings. But this build settings panel has one major drawback: You cannot easily comment on a particular change you made on your project’s configuration. Xcode provides an alternative way to do this by using xcconfig files.
Creating an xcconfig File
An xcconfig file is a plaintext file that contains build configurations for your target. Start by adding a Debug configuration file to your project. You can choose this from the templates in the new file wizard’s Other section. Figure 2-8 illustrates this.
Name the file debug.xcconfig. Now open the build settings editor and select Basic and Levels as options. Copy these build settings to the configuration file you just created. You can select a row and use Cmd-C to copy and paste them in the configuration file.
Repeat these steps for the Release configurations in another file called release.xcconfig. Once you create this basic configuration, you can set all settings to default in the build settings editor.
Now, you need to tell Xcode to use this build configuration file instead of the specified build settings. To do so, select the project and then, in the project settings editor, choose the project again. In the Info panel, expand the configuration section and choose your config file.
That’s it. You have now created a build configuration file that’s readable and commentable that you can share with coworkers through your SCM. Ready to refactor this?
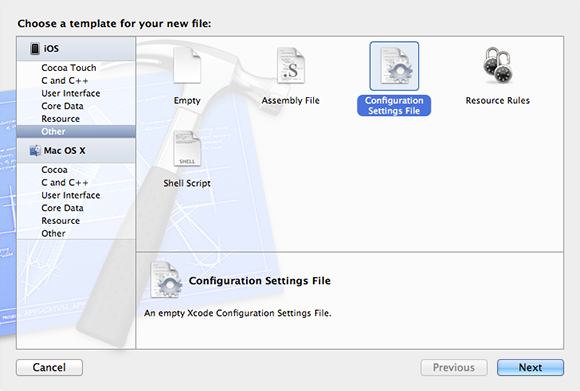
Figure 2-8 Adding a new configuration file
Refactoring the Build Configuration File
When you created the build configuration file, you probably noticed that many identical settings appear on both the debug and release configurations. You can easily avoid duplicating them by creating a shared.xcconfig file and copying those settings to it. Once you’re done with the shared.xcconfig file, remove those entries from the debug.xcconfig and release.xcconfig files. Now use the include statement to add the shared.xcconfig entries to both files:
#include “shared.xcconfig”
This will automatically import all the shared settings into both the configuration files. Now when you run your app, everything should work. You can even add this to every new project you create or even to Xcode’s new project templates.
Migrating Your Code to Objective-C ARC
ARC is easily the most important addition to iOS so far. Code compiled under ARC crashes less, and with ARC, it’s very easy to avoid most of the common memory leaks and related crashes. __weak references can automatically ensure that your pointers are nil-ed as soon as they are deallocated. New technologies come in every day (both within and outside of Apple). But a majority of them don’t end up getting adopted by developers because they require a steep learning curve. A technology, no matter how good it is, gets adopted only if the learning curve is not steep. To increase the adoption rate of ARC, Apple provides a tool built right into Xcode (starting from version 4.2) that helps you migrate your existing code base to ARC. Although ARC sounds great theoretically, it’s not really that straightforward to use and a majority of open source code base (on sites like Github) hasn’t yet been migrated to ARC.
In this section, I show you how to use the Convert to Objective-C ARC tool to convert your code base to ARC. Using the tool as such is straightforward. But dealing with the ARC-related compilation errors generated by the tool could be intimidating even for some prolific developers. A little understanding of how ARC works internally will help you understand these ARC-related compilation errors. You will read more details about ARC in Chapter 5. Chapter 28 covers some internals, including how ARC works under the hood.
Using the Convert to Objective-C ARC Tool
From Xcode’s Edit menu, navigate to Refactor and click the Convert to Objective-C ARC option. Figure 2-9 illustrates this.
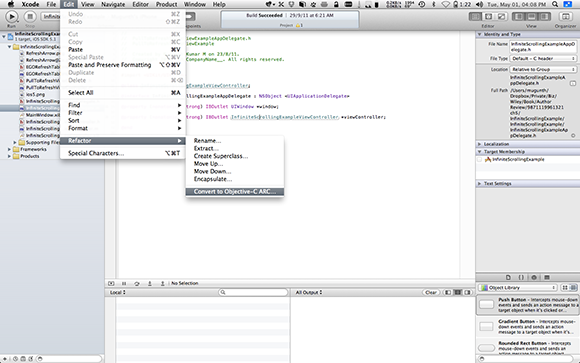
Figure 2-9 Invoking the Convert to Objective-C ARC tool
The Convert to Objective-C ARC tool opens with the first screen showing a list of targets in your project. ARC conversion is done for every target and not to individual classes or files. This means that, if you have already converted a target to ARC, converting another target within the same project (that is slightly different) is easier. Figure 2-10 shows the first step where you select the target and files within a target that need to be migrated to ARC.
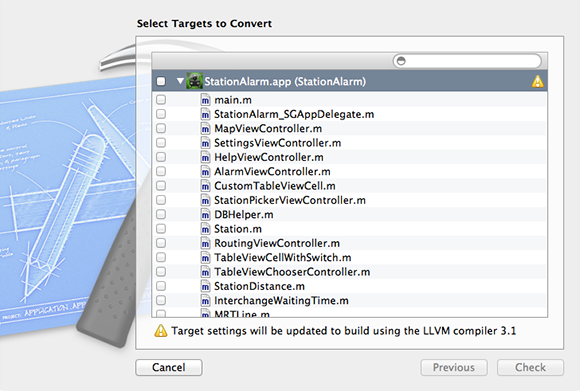
Figure 2-10 First step showing the list of targets and files within a target
Select the files that you want to migrate to ARC from here and click Check. The ARC migration tool performs a quick check, and if everything is fine, it converts your project and shows you a diff of the previous code to the new code. If you’re okay with the changes made by ARC, click OK.
Superficially speaking, the ARC migration tool works by analyzing your project’s code base and mostly removes calls to retain, release, and to your dealloc blocks. But ARC is a lot more than that. Chapter 5 covers ARC in depth and Chapter 28 covers the internals of ARC.
Xcode 4 Organizer
Xcode 4 Organizer is a one-stop shop for anything related to Xcode that’s not programming-specific. From Organizer, you can manage project repositories, perform SCM operations, and manage your application archives, provisioning profiles, and devices. Open the Organizer window by pressing Cmd-Shift-2 or clicking the rightmost button on your Xcode 4 toolbar. You will use the Xcode 4 Organizer mostly to access your application archives, submit your apps to the App Store, and manage your devices and provisioning profiles. Xcode 4 also has a new feature called Automatic Device Provisioning, discussed in the next section.
The first tab of Xcode 4 Organizer shows the list of devices and provisioning profiles currently loaded. Xcode 4 provides an easy way to export this list and import it on a new machine. If you ever want to migrate your developer settings to another computer, this is the place you should look for.
Automatic Device Provisioning
From the provisioning profiles list on the Devices tab, you can see a check box near the footer called Automatic Device Provisioning. When enabled, Xcode 4 can automatically download and install a developer certificate and a distribution certificate from your iOS developer program portal. Xcode 4 can also create a wild card provisioning profile (with an Implicit App ID) automatically, and that profile can be used for your apps that don’t require an Explicit App ID.
Apps with any of the following features cannot use the implicit App ID and, hence, cannot depend on Xcode’s Automatic Device Provisioning: Push Notification, Game Center, iCloud, and In App Purchases.
Viewing Crash Logs and Console NSLog Statements
The Devices tab shows you a list of devices that have been connected to your development machine at least once. When you expand a device by clicking the disclosure triangle, you will be able to see Device logs and screenshots for that device. When a device is connected, you will see additional entries like Console logs, provisioning profiles installed on the device, and a list of applications provisioned. (This includes apps you run via Xcode or apps that you install via Ad Hoc distribution.)
Viewing an Application’s Sandbox Data
With Xcode 4 (beginning with Xcode 4.2), you can view, delete, or add files to an app’s sandbox inside a device. This makes debugging on the device easier. To access the device’s sandbox, select the connected device from the left pane, choose Applications from the list, and choose the application for which you want to see the sandbox. Delete or add files from here or copy them locally to your computer.
Managing Repositories
Xcode 4 automatically adds the repositories for any project you have opened into the Repositories tab. The repositories section serves as a pretty good alternative for Git (or SVN) GUI access for most purposes.
If you’re a “Unix-y” person and prefer to use the command line, I suggest you stay away from any GUI tools, and use them only for viewing diffs. A quick, lightweight tool I recommend is GitX. It has a command line tool to “pipe” Git diff output and shows you a visual diff. My workflow has always been like this:
git diff | gitx
Accessing Your Application Archives
You can access your application archives from the Xcode 4 Organizer and validate or submit your apps from there. In the previous section, you saw how to archive an application using the Archive scheme action. This archive can be accessed from the Archives tab of Xcode 4 Organizer.
Viewing Objective-C and SDK Documentation
Organizer also makes it easy to access the SDK documentation. The Documentation tab of Organizer shows the list of docsets installed. In most cases, that will be the latest two iOS SDKs, the latest two Mac OS X SDKs, and the current Xcode library.
Summary
In this chapter, you learned about the important features of Xcode 4 IDE. Then you learned about the LLVM compiler, including the new LLVM literals and the Migrate to Objective-C ARC tool. You learned the right way to use your version control system and learned about an under-used yet powerful way to comment your project’s build settings using a separate configuration file. A major take-away from this chapter should be literals. The LLVM compiler is under heavy development right now, so there might be more literals and similar language and LLVM-related advancements coming in the near future.
Further Reading
Apple Documentation
The following documents are available in the iOS Developer Library at developer.apple.com or through the Xcode Documentation and API Reference.
Debugging with Xcode 4
Orientation to Xcode 4
Designing User Interfaces with Xcode 4
WWDC Sessions
The following session videos are available at developer.apple.com.
WWDC 2011, “Session 307: Moving to the Apple LLVM Compiler”
WWDC 2011, “Session 316: LLVM Technologies in Depth”
WWDC 2011, “Session 313: Mastering Schemes with Xcode 4”
WWDC 2012, “Session 402: Working Efficiently with Xcode”
Blogs
Cocoa Samurai. “Xcode 4 keyboard shortcuts now available!”http://cocoasamurai.blogspot.com/2011/03/xcode-4-keyboard-shortcuts-now.html
Pilky.me. “Xcode 4: the super mega awesome review”http://pilky.me/view/15
MK blog. (Mugunth Kumar). “Migrating your code to Objective-C ARC”http://blog.mugunthkumar.com/articles/migrating-your-code-to-objective-c-arc
Cocoaphony: Mac and iPhone, on the brain. (Rob Napier). “Building the Build System—Part 1—Abandoning the Build Panel”http://robnapier.net/blog/build-system-1-build-panel-360
Web Resources
GitX. (Mac OS X Git Client)http://gitx.frim.nl/
LLVM. “Objective-C Literals”http://clang.llvm.org/docs/ObjectiveCLiterals.html
The Pragmatic Studio. “Xcode 4 Shortcuts”http://pragmaticstudio.com/media/Xcode4Shortcuts.pdf
Books
Chacon, Scott. Pro Git (Apress 2009; ISBN 978-1430218333).http://git-scm.com/book
Loeliger, Jon. Version Control with Git: Powerful Tools and Techniques for Collaborative Software Development (O’Reilly Media 2009; ISBN 978-0596520120).http://oreilly.com/catalog/9780596520137