

10
Ten Features to Explore on a Rainy Day
In This Chapter
![]() Taking advantage of mirror lockup shooting
Taking advantage of mirror lockup shooting
![]() Tagging files with cleaning instructions and copyright data
Tagging files with cleaning instructions and copyright data
![]() Exploring more wireless features
Exploring more wireless features
![]() Playing around with special effects
Playing around with special effects
![]() Creating slide shows and video snapshots
Creating slide shows and video snapshots
![]() Trimming frames from the beginning and end of a movie
Trimming frames from the beginning and end of a movie
Consider this chapter the literary equivalent of the end of one of those late-night infomercial offers — the part where the host exclaims, “But wait! There’s more!” Options covered here aren’t the sort of features that drive people to choose one camera over another, and they may come in handy only for certain users on certain occasions. Still, they’re included at no extra charge with your camera, so check ’em out when you have a spare moment. Who knows? You may discover just the solution you need for one of your photography problems.
Because my publishers nixed the idea of making this book as long as War and Peace, I offer just brief introductions to features in this chapter. For more details, root around in your 70D camera box and look for a CD containing the camera manual in electronic (PDF) format. You also can download a copy from the Canon website if you lost the CD. For the United States version, go to www.usa.canon.com.
Enabling Mirror Lockup Shooting
One component in the optical system of a dSLR camera is a mirror that moves when you press the shutter button. The vibration caused by the mirror movement can result in image blur when you use a very slow shutter speed, shoot with a long telephoto lens, or take extreme close-ups, even if the camera is mounted on a tripod. To eliminate this possibility, your camera offers mirror lockup, which tells the camera to wait until the mirror movement is complete to record the shot. You can enable the Mirror Lockup feature only in the advanced exposure modes (P, Tv, Av, M, B, and C); look for it on Shooting Menu 2.
 Mirror lockup shooting requires two full presses of the shutter button. Press once to lock up the mirror, release the button, and press again to take the picture. (If you don’t press any buttons for 30 seconds after you lock up the mirror, it automatically flips back down.) Remember that while the mirror is up, you can’t see anything through the viewfinder; the mirror’s function is to display in the viewfinder the scene that the lens will capture, and mirror lockup prevents it from serving that purpose.
Adding Cleaning Instructions to Images
If spots appear in the same location in every shot and cleaning your lens doesn’t resolve the problem, you may have a dirty image sensor. Try running the camera’s automated cleaning routine, accessible through Setup Menu 4. Still seeing spots? The best solution is to take your camera to a repair shop for professional cleaning. (I don’t recommend that you clean the sensor yourself because you can easily ruin your camera if you don’t know what you’re doing.) Until you can have the camera cleaned, however, you can run your photos through a dust-removal filter found in Digital Photo Professional, a program that ships with your camera.
The first step is to help the camera locate the dust on the sensor. Set the Mode dial to one of the advanced exposure settings, select Dust Delete Data from Shooting Menu 4, and then take a picture of a white piece of paper, making sure that the paper fills the frame. The camera records a map of the dust spots to its internal memory and then attaches the data to every subsequent image, regardless of your exposure mode.
To clean a photo, open it in Digital Photo Professional and choose Tools⇒Start Stamp Tool. Your photo appears in an editing window; click the Apply Dust Delete Data button to start the dust-busting feature, which reads the attached dust data and tries to zap those spots into oblivion. The program’s Help system (choose Help⇒Digital Photo Professional Help) offers details.
Tagging Files with Your Copyright Claim
By using the Copyright Information feature on Setup Menu 4, you can add copyright information to the image metadata (extra data) recorded with the image file. You can view metadata in the Canon software; Chapter 6 shows you how.
This feature isn’t available in the fully automatic shooting modes. So set the Mode dial to P, Tv, Av, M, B, or C and then select Copyright Information from Setup Menu 4 to display the screen shown on the left in Figure 10-1. Select Enter Author’s Name to display the keyboard screen shown on the right in the figure.
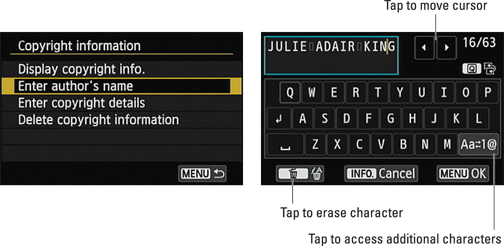
Figure 10-1: Look for the copyright function on Setup Menu 4.
Any time you see a keyboard screen, enter data by using these techniques:
![]() Touchscreen entry: Just tap the letters you want to enter. Tap the symbol labeled Tap to Access Additional Characters in the figure to switch the keyboard from displaying all uppercase letters, all lowercase letters, or numbers and symbols. To move the cursor, tap inside the text or tap the arrows at the end of the text entry box; to erase the character to the left of the cursor, tap the Erase icon.
Touchscreen entry: Just tap the letters you want to enter. Tap the symbol labeled Tap to Access Additional Characters in the figure to switch the keyboard from displaying all uppercase letters, all lowercase letters, or numbers and symbols. To move the cursor, tap inside the text or tap the arrows at the end of the text entry box; to erase the character to the left of the cursor, tap the Erase icon.
![]() Button-based typing: Enter text as follows:
Button-based typing: Enter text as follows:
 • Press the Q button to alternate between the text box and the keyboard.
• In the keyboard, use the Multi-controller, Quick Control dial, or Main dial to highlight the character you want to enter. Press Set to enter the character.
• In the text box, use the Multi-controller to move the cursor.
 • To delete a character, move the cursor just past the letter and press the Erase button.
Either way, after you enter your name, press the Menu button or tap the Menu icon. Then select Enter Copyright Details from the screen shown on the left in Figure 10-1 and enter your copyright data. You might want to add the word Copyright and the year, for example, or your company name.
To check the accuracy of your data, select Display Copyright Information from the screen shown on the left in Figure 10-1. You can later disable the copyright tagging by using the Delete Copyright Information option on the same screen.
Exploring Wi-Fi Functions
Your camera enables you to connect via a wireless network to various devices for picture sharing, printing, and downloading. To try out these features, visit Setup Menu 3 and set the Wi-Fi option to Enable, which then makes the Wi-Fi Function menu option available. Choose that option, as shown on the left in Figure 10-2, to launch the screen shown on the right, which is the starting point for all the Wi-Fi functions.
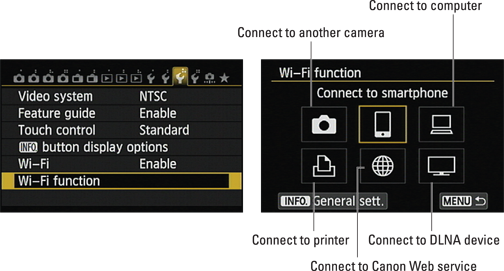
Figure 10-2: Launch Wi-Fi connections from this main control screen.
Chapter 6 explains how to connect your camera via Wi-Fi to your computer for picture downloading. That chapter includes initial setup steps you need to take for using all the Wi-Fi functions, so I don’t repeat them here. (Basically, you have to give your camera a nickname by entering data through the same type of keyboard described in the preceding section.)
After you get through the initial setup, you can take advantage of the following wireless features by selecting the icons indicated in the figure:
![]() Transfer images between cameras: You can connect to another camera that has compatible Wi-Fi features and then copy pictures from your memory card to the card on the other camera. The connection must be made through your wireless network; the cameras can’t talk directly to each other.
Transfer images between cameras: You can connect to another camera that has compatible Wi-Fi features and then copy pictures from your memory card to the card on the other camera. The connection must be made through your wireless network; the cameras can’t talk directly to each other.
![]() Connect to smartphone: Through this feature, shown selected on the right in Figure 10-2, you can view pictures on a compatible smartphone or tablet. Even better, you can transfer pictures so that you can display them on that device instead of having to drag your camera along every time you want to show off your work.
Connect to smartphone: Through this feature, shown selected on the right in Figure 10-2, you can view pictures on a compatible smartphone or tablet. Even better, you can transfer pictures so that you can display them on that device instead of having to drag your camera along every time you want to show off your work.
A couple of important points:
• You first need to download and install the Canon EOS Utility app on your phone or tablet. For Android-based devices, it’s available through Google Play; for Apple devices, search the App Store.
• You can transfer only low-resolution copies of your images to your phone or tablet. Don’t worry; they’ll be plenty large for viewing on your device and for uploading to Facebook or whatever social media site you use.
The app also makes it possible to use your smart device to trigger the camera’s shutter. The hitch is that there’s a noticeable delay between the time you tap the Take Picture control on the device and the time the picture is recorded, and you can’t really adjust any camera settings through the app.
![]() Remote control (EOS Utility): Select the icon labeled Connect to Computer in the figure to download your original files to your computer using the EOS Utility software, as I outline in Chapter 6.
Remote control (EOS Utility): Select the icon labeled Connect to Computer in the figure to download your original files to your computer using the EOS Utility software, as I outline in Chapter 6.
 You also can use the EOS Utility software to control the camera from your computer both wirelessly and via the USB cable that shipped with your camera. This feature is better than using the phone/tablet app because the computer-based software enables you to establish settings such as f-stop, shutter speed, white balance, and so on. If you shoot in Live View mode, you also can see the live preview on your computer monitor. You can even view pictures on the computer monitor in playback mode.
![]() Print from Wi-Fi printer: You can enjoy wireless printing if you have a printer hooked up to your Wi-Fi network and if that printer supports a technology known as PictBridge.
Print from Wi-Fi printer: You can enjoy wireless printing if you have a printer hooked up to your Wi-Fi network and if that printer supports a technology known as PictBridge.
![]() Upload to the Canon web service: This option connects the camera to Canon Image Gateway, the Canon online picture-storage and sharing site. You can upload photos to the site and also configure your gallery to share pictures via Facebook and other third-party sites. To use this function, you must set up an account (it’s free) and register your camera at the Canon Image Gateway web page.
Upload to the Canon web service: This option connects the camera to Canon Image Gateway, the Canon online picture-storage and sharing site. You can upload photos to the site and also configure your gallery to share pictures via Facebook and other third-party sites. To use this function, you must set up an account (it’s free) and register your camera at the Canon Image Gateway web page.
![]() View images on DLNA devices: If you have a television or media player that’s connected to your wireless network and carries the DLNA (Digital Living Network Alliance) specification, you can connect to the device for wireless playback.
View images on DLNA devices: If you have a television or media player that’s connected to your wireless network and carries the DLNA (Digital Living Network Alliance) specification, you can connect to the device for wireless playback.
Of all these features, I think the one people will appreciate most is being able to upload low-res pictures for playback on a smartphone or tablet. Fortunately, after you install the app, getting the two devices to connect is pretty easy, and using the app is fairly intuitive — which cannot be said about the other wireless functions. There’s a brief paper guide to Wi-Fi hookups in the camera box, but unless you’re a networking guru, you’re going to need to dig out the instructional manual on CD to find step-by-step instructions for using all the features with various types of wireless networks. Because the steps vary depending on your computer’s operating system and your wireless-network setup, I can’t be of much help with that part of the process.
 Be sure, too, to check the Canon website to make sure you have the latest copy of the Canon EOS Utility software. It was updated shortly after the camera was released, and at least in this office, things didn’t work correctly until I installed that update. (Go to the 70D product support page and look for the software link.)
Finally, remember that you can’t record movies while the Wi-Fi option on Setup Menu 3 is set to enable. The camera displays a warning screen when you turn on the Wi-Fi system, but it’s easy to forget that you enabled Wi-Fi and then find yourself locked out of movie shooting just as the perfect cinematic moment presents itself. So always turn off the Wi-Fi feature when you’re done using it. (You’ll also save battery power.)
Experimenting with Creative Filters
Enough of the dry technical stuff — time for something a bit more entertaining. With the Creative Filters, you can add special effects to your pictures. For example, I used this feature to create the three versions of the city scene shown in Figure 10-3.

Figure 10-3: I used the Creative Filters feature to create these variations on a city scene.
You can apply Creative Filters to copies of photos already on your memory card. This approach lets you experiment with different effects while keeping the original photo unaltered. Alternatively, you can add Creative Filters as you shoot in Live View, in which case you get only photos with the effect applied.
You can choose from the following filters:
![]() Grainy B/W: This filter turns your photos into old-fashioned, grainy, black-and-white photos.
Grainy B/W: This filter turns your photos into old-fashioned, grainy, black-and-white photos.
![]() Soft Focus: This filter blurs the photo so details look soft and fuzzy, as if you had rubbed petroleum jelly on the lens.
Soft Focus: This filter blurs the photo so details look soft and fuzzy, as if you had rubbed petroleum jelly on the lens.
![]() Fish-eye: This option distorts your photo so that it appears to have been shot using a fish-eye lens, as shown in the top-right example in Figure 10-3.
Fish-eye: This option distorts your photo so that it appears to have been shot using a fish-eye lens, as shown in the top-right example in Figure 10-3.
![]() Art Bold: Do you like your colors bold? Is over-the-top vivid your thing? Give this filter a try.
Art Bold: Do you like your colors bold? Is over-the-top vivid your thing? Give this filter a try.
![]() Water Painting: Sort of the opposite of Art Bold, this filter sucks some color out of your image. The resulting image looks similar to a painting done in pastel colors.
Water Painting: Sort of the opposite of Art Bold, this filter sucks some color out of your image. The resulting image looks similar to a painting done in pastel colors.
![]() Toy Camera: This filter creates an image with dark corners — called a vignette effect. Vignetting is caused by poor-quality lenses not letting enough light in to expose the entire frame of film (like in toy cameras). When you choose this effect, you can also add a warm (yellowish) or cool (blue) tint. For example, I applied the effect with a warm tint to create the lower-left variation in Figure 10-3.
Toy Camera: This filter creates an image with dark corners — called a vignette effect. Vignetting is caused by poor-quality lenses not letting enough light in to expose the entire frame of film (like in toy cameras). When you choose this effect, you can also add a warm (yellowish) or cool (blue) tint. For example, I applied the effect with a warm tint to create the lower-left variation in Figure 10-3.
![]() Miniature: This filter creates a trick of the eye by playing with depth of field. It blurs all but a very small area of the photo to create a result that looks something like one of those miniature dioramas you see in museums. I applied the filter to the city scene to produce the lower-right variation in Figure 10-3. This effect works best on pictures taken from a high angle.
Miniature: This filter creates a trick of the eye by playing with depth of field. It blurs all but a very small area of the photo to create a result that looks something like one of those miniature dioramas you see in museums. I applied the filter to the city scene to produce the lower-right variation in Figure 10-3. This effect works best on pictures taken from a high angle.
Here’s how to try out the filters:
![]() During playback: Press the Q button to enter Quick Control mode and then select the Creative Filters icon, labeled in Figure 10-4. Or choose Creative Filters from Playback Menu 1 and then press Set. You then see the current photo along with six icons representing the filters and one representing the setting that disables the effects, as shown in the figure. Use the Multi-controller or Quick Control dial to scroll through the icons. The name of the selected filter appears on the screen, but the image doesn’t change to reflect the filter’s effects.
During playback: Press the Q button to enter Quick Control mode and then select the Creative Filters icon, labeled in Figure 10-4. Or choose Creative Filters from Playback Menu 1 and then press Set. You then see the current photo along with six icons representing the filters and one representing the setting that disables the effects, as shown in the figure. Use the Multi-controller or Quick Control dial to scroll through the icons. The name of the selected filter appears on the screen, but the image doesn’t change to reflect the filter’s effects.
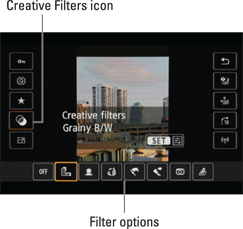
Figure 10-4: You can apply creative filters to existing photos.
After choosing a filter, press or tap Set to display a screen where you can play with various settings to affect the result of the filter. In some cases, you do see the result of your selection on this screen. Which controls appear depend on the effect; the only one that might stump you is the screen for the Miniature Effect. When you choose this filter, a box appears to indicate the area that will remain in sharp focus when the rest of the image is blurred. Use the Multi-controller to move the box up or down or just tap the spot on the screen where you want to position the box. To change the box orientation from horizontal to vertical, press the Info button or tap the Info icon.
To finish applying the effect, press Set or tap the Set icon. You see a confirmation screen; after you give the camera the go-ahead, it creates a copy of your image, applies the effect, and then displays a message telling you the folder number and last four digits of the file number of the altered photo. If you captured the original by using the Raw Quality setting, the altered image is stored in the JPEG format.
![]() Applying filters during shooting: First, set the camera to Live View mode and then set the camera to any exposure mode except the Handheld Night Scene or HDR Backlight Control scene (SCN) modes. Select one of the JPEG settings as the Image Quality option; the filters don’t work when Raw is the selected format. Also make sure that Auto Exposure Bracketing (AEB), White Balance Bracketing, and MultiShot Noise Reduction are turned off.
Applying filters during shooting: First, set the camera to Live View mode and then set the camera to any exposure mode except the Handheld Night Scene or HDR Backlight Control scene (SCN) modes. Select one of the JPEG settings as the Image Quality option; the filters don’t work when Raw is the selected format. Also make sure that Auto Exposure Bracketing (AEB), White Balance Bracketing, and MultiShot Noise Reduction are turned off.
After the live preview appears, enter Quick Control mode and select the Creative Filters icon. It’s the same one found on the Quick Control screen during playback (see Figure 10-4), except that it appears on the lower-right side of the screen in Live View. When you select it, the individual filter icons appear along the bottom of the screen. This time, as you scroll through the options, the preview updates to show you the result of the filter.
If you see an Info icon after selecting a filter, tap that icon or press the Info button to access the filter settings. Tap the return arrow or press Info again to return to the Quick Control screen; press the Q button to exit the Quick Control screen and return to shooting mode.
 For the Miniature effect, you see the focus-zone box after exiting Quick Control mode. Use the Multi-controller to position it. To change the orientation of the box, press the AF Point Selection button. After adjusting an effect, take the picture. The image is stored in the JPEG format.
Shooting in Multiple Exposure Mode
Through the Multiple Exposure option on Shooting Menu 4 (available only in the advanced exposure modes), you can capture two to nine images and then let the camera blend them into a single photo. I used this feature to create both images shown in Figure 10-5. For the first example, I blended a picture of some sheet music with a photo of piano keys. This example shows you the normal blending of the photos, which results in both images being partially transparent. For the second example, I shot both views of the watch against a solid black background and positioned the watch in each frame so the two views wouldn’t overlap in the blended image. Using this technique, you can make the subject appear as a solid object.
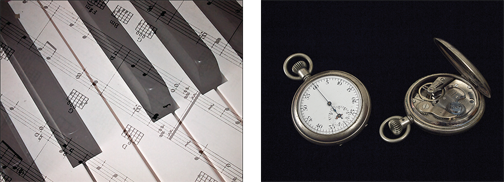
Figure 10-5: Here are two images I created using the Multiple Exposure feature on Shooting Menu 4.
When you choose the Multiple Exposure setting from the menu, you find the following options:
![]() Multiple Exposure: Enables or disables the feature.
Multiple Exposure: Enables or disables the feature.
![]() Multi-expos Ctrl: Varies the way photos are blended (experiment to see which one works best for your subject).
Multi-expos Ctrl: Varies the way photos are blended (experiment to see which one works best for your subject).
![]() No. of Exposures: Sets the number of shots to be recorded.
No. of Exposures: Sets the number of shots to be recorded.
![]() Continue Mult-exp: Tells the camera to use the feature for just one round of shooting or continue creating multiple exposures until you disable the feature.
Continue Mult-exp: Tells the camera to use the feature for just one round of shooting or continue creating multiple exposures until you disable the feature.
![]() Select Image for Multi. Expo.: Allows you to use an existing photo as the first image in your multiple exposure.
Select Image for Multi. Expo.: Allows you to use an existing photo as the first image in your multiple exposure.
Shooting in Live View mode makes shooting your exposures easier. After you take the first picture, it appears superimposed over the live view, which helps you know how to frame your next shot. See Chapter 4 for details of Live View shooting.
Although using the Multiple Exposure feature is a fun parlor trick, if you’re really into compositing (blending) photos, I suggest you shoot your images normally and then join them in your photo-editing program. You’ll have more control over how the images are blended, both in terms of where the subjects appear in the final image and at what opacity each subject appears.
Investigating Two More Printing Options
In addition to the wireless printing option discussed earlier in this chapter, you can access the following printing options through Playback Menu 1:
![]() Print Order: You select pictures from your memory card and then specify how many prints you want of each image. Then, if your photo printer has a card reader compatible with your memory card and supports DPOF (Digital Print Order Format), you just pop the card into the reader. The printer checks your “print order” and outputs just the requested prints. You also can print by connecting the camera to the printer using the USB cable supplied in the camera box.
Print Order: You select pictures from your memory card and then specify how many prints you want of each image. Then, if your photo printer has a card reader compatible with your memory card and supports DPOF (Digital Print Order Format), you just pop the card into the reader. The printer checks your “print order” and outputs just the requested prints. You also can print by connecting the camera to the printer using the USB cable supplied in the camera box.
![]() Photobook Set-up: Many photo-printing sites make it easy to print books featuring your favorite images; this feature is a nod to this trend. You can use it to tag photos that you want to include in a photobook. Then, if you use the Canon EOS Utility software to transfer pictures to your computer, tagged photos are dumped into a separate folder so that they’re easy to find. This feature works only when you download pictures by connecting the camera to the computer. In addition, it doesn’t work with Raw files.
Photobook Set-up: Many photo-printing sites make it easy to print books featuring your favorite images; this feature is a nod to this trend. You can use it to tag photos that you want to include in a photobook. Then, if you use the Canon EOS Utility software to transfer pictures to your computer, tagged photos are dumped into a separate folder so that they’re easy to find. This feature works only when you download pictures by connecting the camera to the computer. In addition, it doesn’t work with Raw files.
Presenting a Slide Show
The Slide Show function on Playback Menu 2 creates a slide show featuring the best images and movies on your memory card. You can play the show on the camera monitor or connect your camera to a TV and present the show to a roomful of people.
After you select the menu option, you see a screen where you can set up your show. First, specify which images or movies you want to include in the show. You can include just stills, just movies, files stored in a particular folder, files created on a specific date, or photos assigned a certain picture rating. (Chapter 5 explains how to rate photos.)
You also can adjust the display time for each photo (movies are always played in their entirety); set the show to play repeatedly until people beg you to stop; choose a slide transition effect; and even enable some background music. For this last option, you must first use the EOS Utility software that ships with your camera to transfer music files to the camera memory card.
During the show, control the display as follows:
![]() Pause playback: Press the Set button. While the show is paused, you can rotate the Quick Control dial or press the Multi-controller right/left to view the next or previous photo. Press Set again or tap the onscreen Set icon to restart playback.
Pause playback: Press the Set button. While the show is paused, you can rotate the Quick Control dial or press the Multi-controller right/left to view the next or previous photo. Press Set again or tap the onscreen Set icon to restart playback.
![]() Change the information display: Press the Info button.
Change the information display: Press the Info button.
![]() Adjust sound volume: Rotate the Main dial.
Adjust sound volume: Rotate the Main dial.
![]() Exit the show: Press the Menu button.
Exit the show: Press the Menu button.
Editing Movies
Although not a substitute for computer-based video-editing software, the 70D movie-edit feature makes it easy to remove unwanted frames from the beginning or end of a movie.
To access the editing tools, set the camera to playback mode and begin playing the movie. Then press the Set button or tap the Set icon to display the controls shown on the left in Figure 10-6. Tap the Edit icon (or highlight it and press Set) to enter the editing screen, shown on the right in the figure.
To trim frames from the start of a movie, select the Cut Beginning icon, labeled in Figure 10-6. The bar at the top of the screen becomes active, and little arrows appear under the bar. (Not shown in the figure.) You can tap those arrows to advance or rewind the movie clip frame by frame. Or, if it’s easier, press the Multi-controller left and right to do the job. When you reach the first frame you want to keep, tap or press Set. Then select the Save Edited Movie icon (labeled in Figure 10-6) and choose New File to save your trimmed movie as a new file instead of overwriting your original.
To trim the end of a movie, follow the same process but choose the Cut Ending icon (labeled in Figure 10-6) instead of the Cut Beginning icon. You can preview your edited clip by selecting the Play Edited Movie icon, also labeled in the figure.
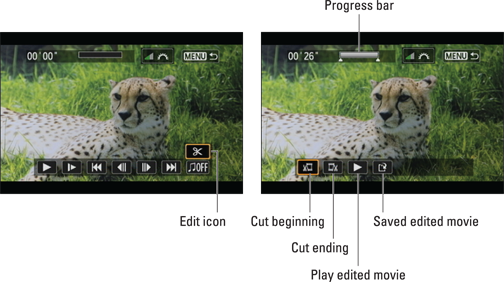
Figure 10-6: From the playback screen, tap the scissors icon to get to the editing functions.
Creating Video Snapshots
The Video Snapshot feature on Movie Menu 2 captures short video clips that are stitched into a single recording, called a video album. A few pertinent facts before I go any farther:
![]() Each clip can be no more than 8 seconds long. You also can record 2- and 4-second clips.
Each clip can be no more than 8 seconds long. You also can record 2- and 4-second clips.
![]() All clips in an album must be the same length.
All clips in an album must be the same length.
To create your first album, set the camera to Movie mode, pull up Movie Menu 2, and select Video Snapshot. You then see the screen shown in Figure 10-7. After setting Video Snapshot to Enable, select Album Settings and then select Create a New Album. You’re then presented with an option that enables you to set the length of the snapshot. After setting that option, highlight OK and press Set (or just tap the OK icon).
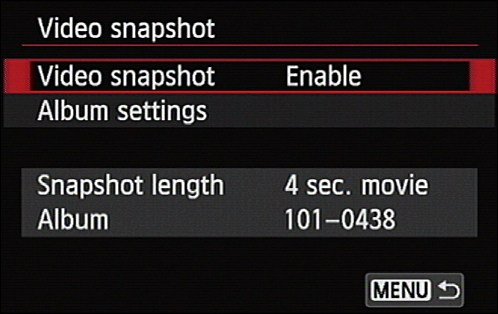
Figure 10-7: Video Snapshots are short movie clips combined into a single recording.
Press the shutter button halfway to exit the menu screens and then press the Start/Stop button to start recording your first snapshot. When you reach the maximum clip length, recording stops automatically. The monitor temporarily shuts off, and then you see the last frame of the clip along with a screen offering three options: Save as Album, Play Clip, or Delete Clip. Select the Save as Album option to store the clip in your first album.
When you record your second clip, you can choose to start a second, new album or add the clip to your existing album. Again, the option appears after the clip is recorded. To stop capturing snapshots, return to Movie Menu 2 and set the Video Snapshot option to Disable. You can then shoot regular movies again.
You also can use the Quick Control screen to enable and disable Video Snapshot recording. Just select the icon labeled in Figure 10-8. To disable snapshot shooting, tap the Off icon at the bottom of the screen. Tap the neighboring icon to enable the feature using the snapshot length that’s currently selected via Movie Menu 2. (You can’t adjust the length using the Quick Control options.)
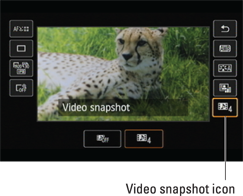
Figure 10-8: You also can enable and disable the Video Snapshot feature via the Quick Settings screen.
A few final notes about recording video snapshots:
![]() Sound recording: By default, audio is recorded; you can control audio recording through the Sound Recording option on Movie Menu 2, just as for regular movies. However, if you change the setting between recording snapshots, the camera creates a new album for the next snapshot.
Sound recording: By default, audio is recorded; you can control audio recording through the Sound Recording option on Movie Menu 2, just as for regular movies. However, if you change the setting between recording snapshots, the camera creates a new album for the next snapshot.
![]() Movie Recording Size: All clips in an album must use the same Movie Recording Size option (Movie Menu 2). If you change the setting, the camera automatically creates a new album for your next snapshot.
Movie Recording Size: All clips in an album must use the same Movie Recording Size option (Movie Menu 2). If you change the setting, the camera automatically creates a new album for your next snapshot.
![]() Autofocusing: Your options are the same as for normal movie recording; Chapter 4 has details.
Autofocusing: Your options are the same as for normal movie recording; Chapter 4 has details.
![]() Normal playback: To play a video snapshot after you exit the creation process, use the normal movie-playback steps, detailed at the end of Chapter 4.
Normal playback: To play a video snapshot after you exit the creation process, use the normal movie-playback steps, detailed at the end of Chapter 4.