Chapter 1
Using Checklists and Templates in Projects
In This Chapter
![]() The power of project checklists
The power of project checklists
![]() The types of checklist in this book
The types of checklist in this book
![]() Avoiding checklist pitfalls
Avoiding checklist pitfalls
![]() The templates and how to use them
The templates and how to use them
![]() Understanding the Project Structure
Understanding the Project Structure
This chapter, and indeed the whole of this first part of Project Checklists for Dummies, may seem a bit strange in a book of checklists. You may think that you just want to get going with your project and start ticking some boxes. However, to get the best out of the checklists and templates and use them really effectively you need to appreciate how to use them … and also how not to.
The checklists are designed to help you make sure that you have got everything right at different points in the project and haven’t missed out anything important. It’s so easy to make mistakes that are actually avoidable. As well as helping you to think things through for each project, the checklists also draw on lots of experience and help you make sure that you get it right for ‘this’ project, whether ‘this’ project is your first one or just your latest.
History repeats itself because nobody listens the first time.
Anonymous
If you’re new to projects, it will also pay you to go through the last part of this chapter to understand the project structure that the checklists are designed to fit in with. If you’re already familiar with project structure you can skip that section if you prefer.
Using the Checklists
When running any project you’ll find that checklists are a very powerful tool. They help you to ensure that you produce sound, well thought-out plans and control documents the first time around. That will not only save time and trouble later, but will also help you develop a deserved reputation as a thorough and effective Project Manager.
This section gives you a few pointers on using the checklists, including tackling problems where you want other staff to use them too, but where they are not quite as keen as you. Some don’t like things like project methods and checklists, and say that they have no need of them because of their experience and knowledge.
I like the example of an airline pilot here. Imagine that you’re standing in an airport waiting to check in for your flight over the Atlantic Ocean. The captain and co-pilot for your flight happen to walk past you and you overhear what the Captain is saying. ‘I’m not bothering with the pre-flight checklist on this trip. I’ve been flying aircraft for years, I’m very experienced and I’m sure I’ll remember everything important.’ You might feel slightly unhappy about that and start scanning the departure board to see if you can find an alternative flight. You certainly wouldn’t take the captain’s words as a sign of expertise and professionalism.
Using checklists is not unprofessional; rather the reverse. As far as you possibly can, you want to be sure that you get things right and that you don’t miss anything important. Quite apart from the consequences for the project if you get things wrong, avoiding problems will also save you a lot of time and hassle later.
I’m sure that you will use the project checklists in this book intelligently and appropriately, but to make absolutely sure you do, here are a few pitfalls to avoid.
- Use the checklists thoughtfully: Adjust them to the needs of your project, then use them. Otherwise you may be in danger of, for example, applying large project controls to a small project that simply doesn’t need them. Continuing with the aircraft analogy from the start of this section, different aircraft have different pre-flight checklists.
- Be extra careful in audit: Following on from the last point, if you’re using checklists to check up on someone else’s project (Project Audit) don’t apply some generic checklist to every project and ignore the individual project characteristics and specific control needs.
- Don’t get ‘tick happy’: The objective is not to fill up all the boxes with ticks, but to do the project work so that you can tick the boxes – if you see the difference. When you tick a box it should mean that the item is properly dealt with.
- Add to the checklists: If you need extra things on the checklists because of the nature of those projects, then add them.
- Take away from the checklists: As a reverse of the last point, if you never need to do something that’s on a checklist then take it off. Always keep the checklists relevant to what you are doing.
In short, keep your brain in gear and don’t drive up project overheads by doing unnecessary work because you haven’t thought through whether everything on a checklist is relevant to your project.
Using Lists As An Expert – Or Not
You’ll find the checklists useful if you’re a project expert – back to the analogy of an experienced aircraft pilot. You’ll also find them useful if you are less experienced in project management and need a bit of help. The format used for the lists in the book looks like this.
- Item: Explanation and help.
If you’re very experienced, you can just run down the bold headed items to be sure that you’ve covered everything you need to. If you’re less experienced, or just unsure of a particular point, you’ll see that each checklist item is followed by a short explanation to help you see why that item may be important in your project.
Understanding Checklist Types
There are four different types of checklist in the book. Although you’d probably have spotted that anyway, it helps to explain up front what the types are so you can watch out for them.
- Activity checklists: The activity checklists are to make sure that you are doing, or have done, everything you need to at a particular point in the project. For example, if you’re approaching the end of a Delivery Stage, have you done all the necessary checking and preparation for the ‘Stage Gate’ review?
- Thinking checklists: This type of checklist helps you think across different areas to make sure that you’ve looked into all the areas that you need to. For example, when considering who the stakeholders in your project are, have you remembered customers and suppliers?
- Completion checklists: The completion type of checklist is to make sure that you’ve got everything. So, when you’re doing the organisation chart of who is needed for the project, have you got all of the management roles covered or have you missed one?
- Information checklists: These tell you about the range of things in a particular area. For example, when you’re writing a Business Case for your project, you have to be really clear about the three sorts of benefit, because they’re very different. There’s a checklist to say what the three types of benefit are and to briefly explain each one.
Using Templates
Templates are helpful, they really are, but of course you should use them intelligently as you do the checklists. In fact the same do’s and don’ts apply that are in the bullet point list in the ‘Using the Checklists’ section earlier in this chapter. Templates can work powerfully for you in four ways:
- To save you significant time and effort ‘re-inventing the wheel’, such as in designing a document from scratch when it would be much quicker to use a template.
- Even if you can’t quite use the templates in this book ‘as is’, you can use them as a starting point and adapt them. That’s usually a whole lot faster and much less effort than starting from scratch. You’re bound to want quite a few of the sections even if you take a few out and add one or two others in.
- To help instruct others on how documents should be completed, improving the relevance and accuracy of the information that they enter.
- To help make sure that you haven’t missed anything.
Following on from the second point in the list, many people assume that their organisation and its projects are going to be very different from everyone else’s. In fact the core of project management is very similar, so you may well find that you only need minor changes to the templates, or even none at all, in which case you can relax and go home early today.
In each main part of this book you’ll find one or two chapters of templates for things like documents, reports and logs. You, or your project team members, then replace the ‘advice’ text in each section with the actual content. Easy, huh? And it’s that ease of use which again demonstrates the value of project templates.
On the For Dummies web site (www.dummies.com) we’re also making the templates available in Microsoft Word format. That way you can load a template straight into your computer and you don’t have to copy all of the information out of the book. Helpful of us and sensible too, don’t you think? But then that’s why you bought a For Dummies title in the first place.
Understanding Project Structure
To understand how the checklists are used at different points in the project, the first step is to be clear on what those points are.
Figure 1-1 shows the main parts of any project. Some of it may be familiar to you, such as the use of project stages – or you may know them as phases. Having said that, this book starts with the work that’s needed before the project gets underway; and that part is both extremely important and frequently underestimated. Before you dive in and check whether you are setting up the project correctly, you first need to establish whether it really is a project.
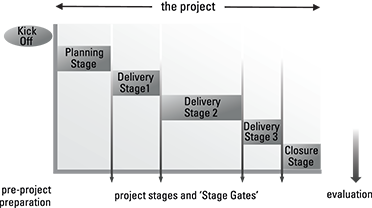
Figure 1-1: The Project and What Comes Before and After.
The next few sub-sections cover the elements of Figure 1-1 in turn.
Kicking off the project
Some people say that just about everything is a project: Even, they claim, making a cup of tea. That’s a common myth and it’s absolutely untrue, so don’t be fooled for a moment. Projects have overheads, such as the work needed for planning, risk management, quality management and progress control. Not all work justifies such overheads. Sometimes you can do things as ‘normal’ work, perhaps even using a few project techniques, and it doesn’t justify putting in full project controls and structure. If that’s the case it’s not a problem, it just isn’t a project.
Before starting a project, you need to do three important things:
- Get an understanding of what will be involved and make sure that the work is worth doing – one way or another.
- If the job is worth doing, decide whether it’s a project or should be tackled as ‘business as usual’ type work.
- If it does look like a project, get some idea of what resource will be needed, find out whether that resource is available and then when the project could start.
And guess what? A lot of the pre-project work in Kick Off is about those three exact things in the list above. Too many projects start. Many get a long way into planning or, even worse, begin the delivery work and then find out that actually the project isn’t worth doing. Getting into that position is bad news for two reasons. First, all of the people involved feel – very understandably – disappointed that all their hard work was a complete waste of effort. Second, your organisation has wasted valuable staff time and money. There may even be a strategic dimension to the impact. Another project may have been ruled out in favour of investing time and money in this one, and that project would have been genuinely worth doing. The strategic part of the impact can be very significant and it’s easy to underestimate it.
You’ll know from your own experience that most ideas sound great at first. It’s only when you start working on an idea that you begin to realise that it’s not quite as shiny and wonderful as you first thought and, to be brutally honest, there are an awful lot of drawbacks and problems. The idea of the Kick Off is to do a limited amount of work early on to investigate the idea and stop the project before it’s even started if you discover that it isn’t worthwhile after all.
Dealing with Kick Off in three steps
A good approach in Kick Off is to take it in three sequential steps. Don’t think that all this pre-project work is going to take a long time, though, because almost always it won’t. The approach actually reflects normal business handling of ideas.
- Rough out ‘the idea’ on a single sheet of paper.
Set down what it is and the advantages of doing the work. If that looks good when discussed with an organisational manager then …
- Work up the idea into a bit more detail and create a recommendation.
Your task here may include looking into a few different options for the way that the work is done and getting a bit of expert input if it’s needed to make sure that the recommendation is realistic and technically sound. When the recommendation is reviewed by organisational managers, if it still looks good then you can …
- Develop an Outline Charter (sometimes known as a Project Brief.)
This is a more detailed view and should be done by people including some with project experience not just business expertise. If, when the Outline is reviewed, it still looks good then the project can be started, a project team appointed and work begun in earnest on the full planning. If you’re not sure what documents like the Outline Charter are all about, then don’t worry a bit because they’re covered in Chapter 2.
The three steps can normally be completed in the space of two or three days, even for quite substantial projects. Notice too how the work increases through the steps. You only put more effort in if the idea is still looking good. If it turns out to be not such a good idea after all then the earlier you drop it the better, when less resource has been used investigating it.
Putting key roles in place
When the project starts it’s important to have project roles filled and defined clearly, so that people know what they are supposed to be doing and what everyone else is supposed to be doing too. There’s a checklist of roles for projects in Chapter 6. To make sense of later sections in this chapter though, I need to explain some now.
- Project Steering Group: The small group of senior managers with overall responsibility for the project, including its project governance (that it’s run properly). In a very small project, the Steering Group might be a single manager covering all of the roles.
- Sponsor: The chairperson of the Project Steering Group and the business manager ultimately responsible for the project.
- Project Manager: A manager with responsibility for the day-to-day running of the project. The Project Manager is accountable to the Project Steering Group and will attend all of its meetings. However the Project Manager isn’t a part of that group.
Finding the Kick Off checklists and templates
You can find checklists to help you with Kick Off in Part II. That includes one for the roles and responsibilities in the project because as part of your Kick Off work you need to start thinking about who is needed for the project. You’ll also find templates for the Idea, Recommendation and Outline in Chapter 7 within Part II.
Doing the Planning
If the Outline Charter (or just ‘Outline’ for short) shows that it’s worth starting the project off, then the first stage of the project should be a planning stage. It’s a bad mistake to rush into the work without proper plans. You’ll only waste time and get confused when things start to go wrong, such as when you discover additional work that you hadn’t realised would be needed. Also, you won’t be able to control the project. If you don’t know where you are supposed to be (because you haven’t got a plan) how can you tell whether you’re on track or not?
Planning the work of the project
You’ll normally need to develop a number of plans in the Planning Stage. For the project work itself you’re going to need two plans. The first is a Project Plan covering the whole project but at a high level of detail. The second is a more detailed Stage Plan for the first Delivery Stage – the one that comes immediately after the Planning Stage. That way, if the Steering Group gives permission to go ahead with the first Delivery Stage, the plan is in place and you can get going without having a long gap.
It’s easy to get plans wrong and, as touched on earlier in this section, that can so easily be because you’ve missed things. If you fail to spot part of the work needed in the project, then clearly it can cause you big problems later on. The project will get delayed while that extra, but essential, work is done. Perhaps you’ll need additional people to do the extra work too– even specialists. But what if those people aren’t available at short notice? No, it’s a lot better to have a good plan at the start and one that’s both complete and clear. What’s that you say? A checklist or two might help? Now there’s an idea.
Planning the other aspects
Unless your project is particularly small and straightforward, you’ll usually need other plans as well. For example, how will you manage risk in the project? To explain that and to put the necessary controls in place you can write a Risk Plan. These tactical plans all form part of what is often called the Project Management Plan (PMP). The more strategic documents such as the scope and the Business Case go into the Project Charter. You’ll remember from the ‘Kicking off the project’ section earlier in this chapter that there was an Outline Charter. Well, this is now the fully developed Charter. You’ll find checklists in the book to help you prepare both the Charter and the PMP, and templates too.
Avoiding Paper Mountains
Before you start to think that the planning sounds like a huge amount of electronic ‘paperwork’ remember that some of the plans may be quite short and simple, though still necessary. However, you always need to be careful to only produce what you really need to control the project. Clearly a small, simple, low-risk project will need much less in terms of planning and control than a large, high-risk and business critical one. The documentation should reflect those different control needs.
Locating the Planning Checklists and Templates
Part III covers planning and you’ll find checklists there covering three aspects: The plans themselves, the controls you need to set up and then the staff management aspects. There’s also a chapter of useful templates, Chapter 11.
Delivering Project Products
The next stage of the project, the Delivery Stage, is where all the main project work gets done. You will give one or more teams work assignments to build the project deliverables.
In terms of the project structure, the Delivery Stage repeats. In a very small project you may have a single Delivery Stage, but in most projects you’ll have several. Figure 1-1 shows three Delivery Stages, but you may well need more than that for your project, and you could need less.
The Delivery Stages are important. They give you clear units of work that you can then plan in detail as you approach them (the Stage Plans). They also provide a powerful Project Steering Group (PSG) control, because at the end of each stage the PSG will meet to check up on the project and ensure that it makes sense to carry on with the next stage. If it doesn’t, then the project must be stopped.
The PSG check at the end of each stage is usually called a Stage Gate. That’s a great term because it gives the clear picture of a barrier where you stop, but one that can be opened to allow you through to the next section. The Project Manager will attend to explain how things went on the stage just finishing, set down the current state of the project and then provide the plan for the next stage.
The term Stage Gate is used all over the world including in the USA, and by users of software such as Microsoft Project, where people usually refer to these sections of the project as phases rather than stages. But how on earth can you have a ‘Stage’ Gate at the end of a phase? Surely it should be a Phase Gate. It just goes to show that Project Managers influenced by the UK approach, and similar ones, which use stages and Stage Gates are more consistent, more logical, more intelligent … and of course more modest too.
Naming conventions aside, don’t underestimate the Stage Gate. It’s a very powerful control and is emphasised in most project approaches as well as the international ISO Standard. You’ll find a substantial checklist later in the book dealing with the Stage Gate, and it reflects the strong ISO emphasis.
 The main heading for this section refers to products. This book assumes that you’ll want to use the powerful product-based or product-led approach to planning. Before you start to think about the activities and resource you need in the project, you first investigate what it is that you are going to produce. So, you have to build a wall. What exactly do you mean by ‘wall’ then? Is it something like the Great Wall of China, or a small wall around a flower bed in your back garden? Until you’re clear on what you have to produce (the products), you can’t be accurate with planning the activities and resource. If you’re interested in reading more about this approach to planning (which is powerful for progress, financial and quality control as well as for planning) have a look at the UK edition of Project Management for Dummies (Wiley).
Finding the checklists and templates
Running a Delivery Stage is all about control, so you’ll find that Part IV is called Checklists for Project Control. In it you’ll find chapters with checklists for things like stage checks and Stage Gates. Then there are two chapters of templates. The first, Chapter 16, covers templates for control documents while Chapter 17 provides useful reporting templates. Part IV also includes the checklists and templates for the next two areas, closure and evaluation.
Closing the Project
In many projects you’ll find it sensible to have a Closure Stage. Some take the view that once the final delivery has been made at the end of the last Delivery Stage then that’s it, you turn the lights out and everyone can go home. More often than not though, there’s still work to be done and you’ll still need people on the project to do it. Typical closure work is the ‘handholding’ help you need to give the people using what the project delivered, to explain things and help while they get used to it all. Then there are often adjustments needed to project deliverables to fine-tune them. You’ll still need your project team members around to carry out those adjustments. On the project management side of things, you’ll also need to record how the project went and report things like the final cost.
Only when that ‘tidy-up’ work is all complete can you shut the project down and finally disband the teams.
Evaluating the Project
Even though the project is now closed, there’s another job to be done and that’s the evaluation. Sadly the evaluation work is often neglected but that doesn’t mean it’s unimportant. You can often do the final evaluation after a few weeks and you’ll normally be checking out two aspects:
- Measuring benefits: A check to see whether the benefits originally claimed for the project when it was started have actually materialised. You can think of this as the ‘Return on Investment’. What was the return in terms of business benefits?
- Looking at operational effectiveness: Do the project deliverables work well and have they proved appropriate for those using them after a period of time? For example, staff can be very happy with a new building at first. However, after a few weeks they’ve discovered that the layout is wrong and the building is very hard to work in. Equally, sometimes an initial negative reaction to deliverables can be reversed after a few weeks when staff find that actually the products are really excellent, but that they just took a bit of getting used to.