WHEN YOU’RE PLAYING computer games on your PC, one of the ways you can give the game commands is via the keyboard. You use different keys to give different commands—for example, you usually use the W, A, S and D keys to move the player around the game.
In this adventure you’ll learn how to use the keyboard with PyGame. You’ll also make a game in which, for the first time, you’ll move a player around the window. Okay—your player is just a dot on the screen at this stage, but it’s a good start! As the program develops throughout the adventure, you’ll add extra features like a ball that your player can “kick,” a goal and a points system.
The gameplay and graphics in this game are very simple, so during the adventure you may want to add more features to the game, like better graphics. Try using some of the things you learned in Adventure 5 to add that little bit extra to the game. You can also come back to the game and improve it after you’ve learned more in later adventures. You’ll be learning lots in the sound adventure in Adventure 9, for example, so you can add sound to the game once you know how to do that.
Using Keyboard Input
Using the keyboard with a PyGame program is very straightforward. When you press a key on PyGame it adds it to a list of the keys that you’ve pressed. By checking which keys are in this list, you can make your program do different things.
Let’s have a look at an example to understand this better:
- Open IDLE and create a new file with File ⇒New Window. Create a new folder and call it
Adventure 6. Save the program in the folder askeyboardExample.py. - Add this code to the file to set up the program and the window:
import pygame
pygame.init()
# Window setup
size = [400, 300]
screen = pygame.display.set_mode(size)
clock = pygame.time.Clock() - Next, you’re going to add a game loop to the program. This type of loop is called a game loop, as it handles all of the action in the game. Add this code to your program:
# Game loop
done = False
while not done: - Next, your program needs to check for keypresses and decide what to do with them. Add this code to your program:
    keys = pygame.key.get_pressed()

    # Display a message when the w key is pressed
    if keys[pygame.K_w]:
print "Hello" - Finally, you need to manage the player, close the window and set the frames per second. Add this code to your file:
    for event in pygame.event.get():
        if event.type == pygame.QUIT:
            done = True
    clock.tick(32)
pygame.quit() - Save the program and run it using Run⇒Run Module.
- When the program loads you should see a black screen. Press the w key. You should see “Hello” printed to the console, as in Figure 6-1.
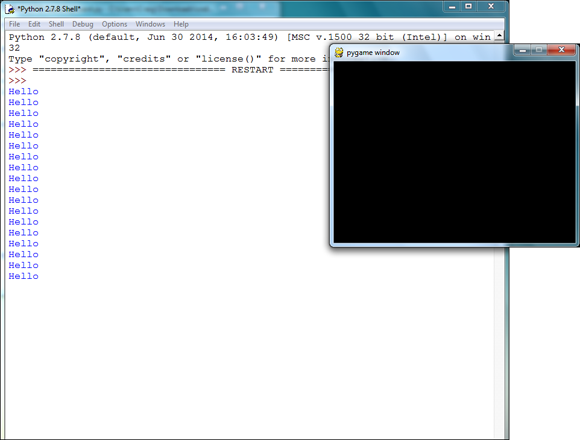
FIGURE 6-1 “Hello” is printed to the Python shell every time the w key is pressed.
Other Keys You Can Use
With PyGame you can use every key on the keyboard to control your programs. The letter keys are straightforward to work out. As you just did, all you have to do is replace the last letter of the code pygame.K_t with the letter you want to use. For example, if you wanted to use the x key, the code would be pygame.K_x. You don’t have to stick to the letters though! Table 6-1 shows you a few of the other keys you can use and how to do it.
Table 6-1 Keyboard Control Codes in PyGame |
|||
Key |
|
Key |
|
1 |
|
Escape |
|
Backspace |
|
Right Shift |
|
Space |
|
Left Shift |
|
Enter |
|
Up |
|
Creating the Game
Now you’re going to start making a little game in which you’ll use the keyboard to move a player around the screen. The player won’t be that complex—just a red dot on the screen. If you want to spend more time on this, why not think about what you learned in Adventure 5? You could always combine some shapes to make a much cooler picture of your player and use this instead of the red dot.
Figure 6-2 shows what the finished game will look like.
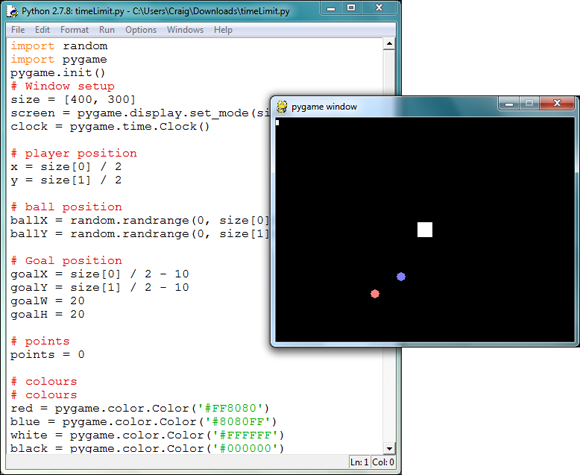
FIGURE 6-2 The finished game
Once you’ve got the movement set up with the keyboard, you’ll be adding more things to the game, like a ball and a goal. And an explosion!
This first part of the program will only move the player upwards. You’ll add the code to move it in other directions afterwards.
Let’s get going!
- Open IDLE and create a new file with File⇒New Window. Save the program as
movementGame.pyin theAdventure 6folder. - In the new window, input the following code to set up the
PyGameprogram:import pygame
pygame.init()
# Window setup
size = [400, 300]
screen = pygame.display.set_mode(size)
clock = pygame.time.Clock() - Next, you need your program to set a variable to represent the player’s starting position. Set this as half the width of the window and half the height of the window:
# player position
x = size[0] / 2
y = size[1] / 2 - Now you need to decide what colours you want to use for the player, ball, background and explosion. Add these three variables for the colours in your game:
# colours
red = pygame.color.Color('#FF8080')
blue = pygame.color.Color('#8080FF')
white = pygame.color.Color('#FFFFFF')
black = pygame.color.Color('#000000') - The next part of the program creates a game loop and draws black over the background. The game loop will also manage the keyboard inputs and drawing the game to the window. Add this to your program:
# Game loop
done = False
while not done:
screen.fill(black) - The next part of the game loop needs to manage the keypresses for the player. This code checks that the w key is pressed and changes the y variable by -1 to change the position of the player. Add this to your code:
    keys = pygame.key.get_pressed()

    #player movement
    if keys[pygame.K_w]:
y -= 1 - Next, the program draws the player using the updated y variable and updates the window display. Add this to your program:
    # draw player
    pygame.draw.circle(screen, red, [x, y], 6)
pygame.display.flip() - Finally, add this to code to your program to make sure the window can be closed and to limit the number of frames that are drawn per second:
    for event in pygame.event.get():
        if event.type == pygame.QUIT:
            done = True
    clock.tick(72)
pygame.quit() - Save the program and run it using Run⇒Run Module. You should get a window that looks like Figure 6-3, showing your player in position.
- Press the w key and the player should move up the screen. If you hold down the key the player will keep moving until you stop pressing the key. If you keep going the player will move off the screen and never return!
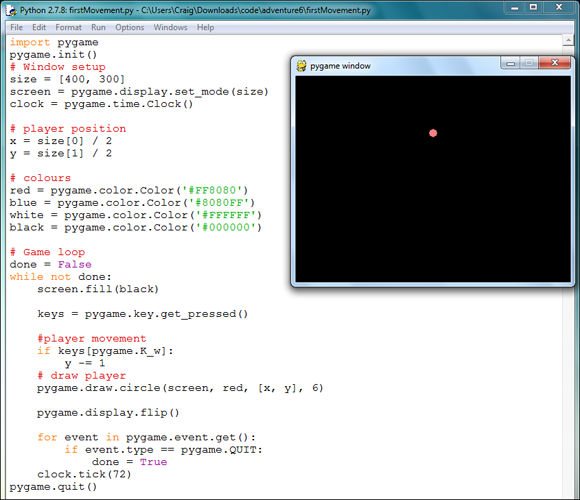
FIGURE 6-3 The small red dot will move upwards when the w key is pressed.
Introducing Full Movement
The game wouldn’t be very good if your player could only move upwards. Time to fix that. In this part of your adventure, you’ll add some code to enable the player to move up, down, left and right.
This will work when you press the w, a, s and d keys, which are normal movement controls for most modern computer games.
Let’s go!
- If
movementGame.pyis not already open, open it now. - Find the bit of the code that begins with the
#player movementcomment and theifstatement that checks the w key is pressed. It should look like this:#player movement
if keys[pygame.K_w]:
y -= 1 - Below that, add the following code to enable the player to move in the other directions:
    if keys[pygame.K_s]:
        y += 1
    if keys[pygame.K_a]:
        x -= 1
    if keys[pygame.K_d]:
x += 1 - Save the program and run it with Run⇒Run Module.
- When the program opens, you should now be able to move the player up, down, left and right by using the w, a, s and d keys (see Figure 6-4). Try out these keys to move the player. And here’s an extra trick: you can also hold down two keys at a time to make the player move diagonally.
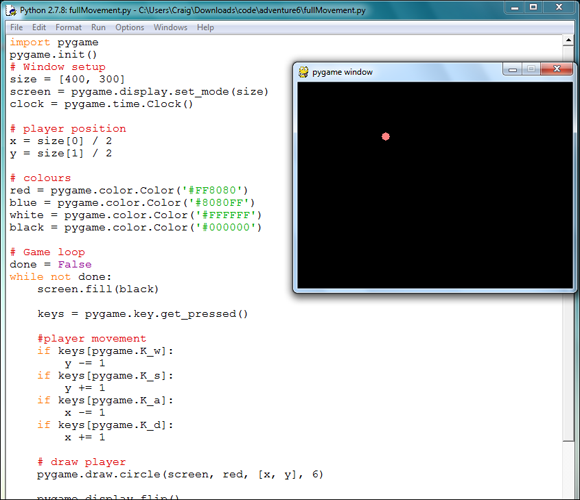
FIGURE 6-4 The small red dot will now move in different directions when you press the w, a, s and d keys.
Excellent! You’ve got a bit of movement in the game. But wait—at the moment the player disappears whenever you move them offscreen. We can’t have that. You’ll fix this in the next part of the program.
Moving the Player Offscreen
At the moment, when you reach the edge of the display the player will disappear out of sight. This is because the player’s co-ordinates, which are stored in the x and y variables, are bigger or smaller than the size of the screen.
This is quite straightforward to fix. To do it you’ll add a function that checks whether the player is off the screen. If they are, it will teleport them to the opposite side of the screen. In other words if the player disappears off the top of the screen, they’ll reappear at the bottom and vice versa. If they move off the right of the screen, they’ll reappear on the left. Here’s how:
- Make sure you have the
movementGame.pyprogram open. If you don’t, now’s the time to open it. - In your program, find the following lines of code:
# Game loop
done = False - Above that code, add the following functions:
def checkOffScreenX(x):
    if x > size[0]:
        x = 0
    elif x < 0:
        x = size[0]
    return x

def checkOffScreenY(y):
    if y > size[1]:
        y = 0
    elif y < 0:
        y = size[1]
return y - In order to make the function work, you’ll need to add a call to it in the game loop. Find these lines in your code:
    # draw player
pygame.draw.circle(screen, red, [x, y], 6) - Above that code, add the following code to run the code that checks whether the player has moved offscreen:
    # Check off screen
    x = checkOffScreenX(x)
y = checkOffScreenY(y) - Save the program and run it with Run⇒Run Module. When the window opens, move the player around with the w, a, s and d keys. Move the player off the top of the window; they should reappear at the bottom. Now try moving the player off the left, right and bottom of the screen and see what happens. Figure 6-5 shows screenshots before the player has moved offscreen and after they have reappeared.
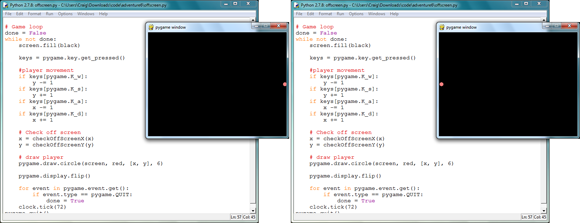
FIGURE 6-5 The player is now able to move off the edge of the screen and reappear on the other side.
Adding the Ball
Now that you have a player that can move around the game, it would be great to have something they can interact with. In this part of the adventure, you’ll add a ball to the game for the player to kick around. You’ll later add a goal for the player to kick the ball into.
Your first task is to set the ball at a random position in the game and draw it:
- In your
movementGame.pyprogram, add this line of code to the first line of the program. This will let your program use random numbers:import random - Next, find the code in your program that sets the player’s position. It should look like this:
# player position
x = size[0] / 2
y = size[1] / 2 - Below it add the following code to set the position of the ball to a random location:
# ball position
ballX = random.randrange(0, size[0])
ballY = random.randrange(0, size[1]) - Finally, you need to draw the ball in the game loop. Find the lines of code that set the player’s position:
    # draw player
pygame.draw.circle(screen, red, [x, y], 6) - Below it add this code to draw the ball:
    # draw ball
pygame.draw.circle(screen, blue, [ballX, ballY], 6) - Save the program and run it using Run⇒Run Module. You should see a blue dot appear in the window. (Trying moving the red player over it. You'll find that nothing happens—yet!) Close the game window and run it again. The ball should now be in a new random position (see Figure 6-6).
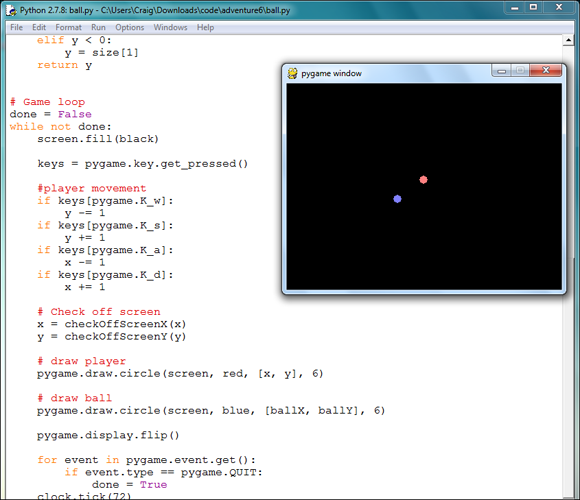
FIGURE 6-6 A blue ball is now generated at a random position in the game.
Creating Collisions
At the moment, when your player kicks the ball it doesn’t do anything. To fix this you’re going to add some code that checks whether the player is near the ball and causes a small explosion if they are:
- In the
movementGame.pyprogram find thecheckOffScreenY()function. Below that function add this function that will check if the player is touching the ball:def checkTouching():
"""Causes a mini explosion if the players are touching"""
global x
global ballX
global y
global ballY
# Check if player and ball are touching
if -10 < y - ballY < 10 and -10 < x - ballX < 10:
#draw an explosion
pygame.draw.circle(screen, white, [x, y], 15)
xDiff = x - ballX
yDiff = y - ballY
# check if ball is on edge of screen
if ballX == 0:
xDiff -= 5
elif ballX == size[0]:
xDiff += 5
if ballY == 0:
yDiff -= 5
elif ballY == size[1]:
yDiff += 5
# move the ball and player
x += xDiff * 3
ballX -= xDiff * 3
y += yDiff * 3
ballY -= yDiff * 3 - Next, find this code in the program:
    # draw player
pygame.draw.circle(screen, red, [x, y], 6) - Above it add this code to check if the player is touching the ball:
    # Check if player is touching the ball
checkTouching() - Save the program and test it. Brilliant! Whenever the player kicks the ball there’s a small explosion and the player and ball move in opposite directions (see Figure 6-7).
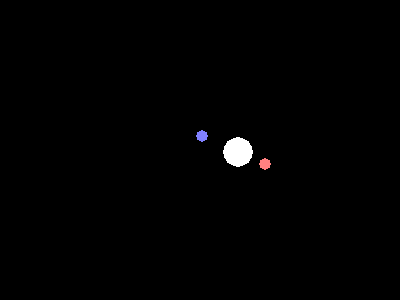
FIGURE 6-7 When the player collides with the ball there is a small explosion.
You may notice that if you kick the ball to the side of the screen gets stuck. To fix this, you can use the functions on the ball’s position variables to check whether the player is offscreen. Let’s do this now:
- Find this code in your program:
    # Check off screen
    x = checkOffScreenX(x)
y = checkOffScreenY(y) - Directly beneath it add this code to check whether the ball is offscreen:
    ballX = checkOffScreenX(ballX)
ballY = checkOffScreenY(ballY) - Save the program and run it. Now your player can kick the ball off the side of the screen and it will reappear on the opposite side.
Goal!
Now that the player can kick the ball around the screen, you’re going to add a goal to the game so that the player has something to kick it at and score points. The program will draw a goal at the center of the screen and check whether the player has kicked the ball into the goal. Figure 6-8 shows what the goal will look like.
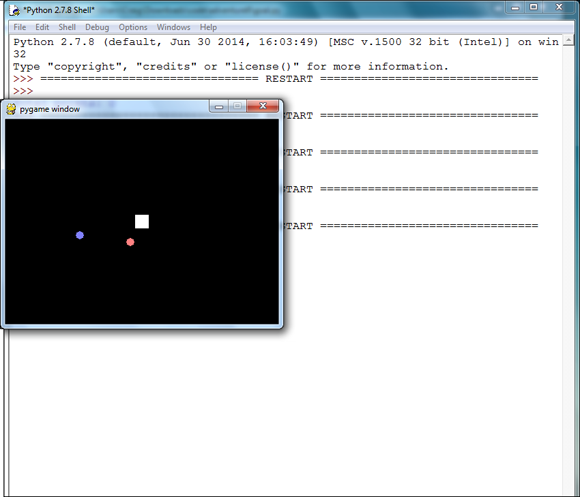
FIGURE 6-8 The goal
- In the program, find the ball position lines of code that look like this:
# ball position
ballX = random.randrange(0, size[0])
ballY = random.randrange(0, size[1]) - Below that, add this code to set the position and size of the goal and set the points to 0:
# Goal position
goalX = size[0] / 2 - 10
goalY = size[1] / 2 - 10
goalW = 20
goalH = 20

# points
points = 0 - Next, find this line in the game loop:
screen.fill(black) - Below that, add this code to draw the goal:
    #Draw the goal
    pygame.draw.rect(screen, white, (goalX, goalY, goalW,
goalH)) - Below that, add this code to check the ball is in the goal:
    # Check ball is in goal
    if goalX <= ballX <= goalX + goalH and goalY <= ballY
  <= goalY + goalH:
        points += 1
        ballX = random.randrange(0, size[0])
ballY = random.randrange(0, size[0]) - Now save the program and run it. You should be able to make your player kick the ball into the goal. The ball resets and teleports to a new random position every time you do this.
Fantastic! You’ve created a program in which a player can score goals and score points. But how do you know how many points they’ve scored? Here’s how to create a display for the points:
- Below the code that checks the player is touching the ball, add the following code:
    # Draw points
    for point in range(points):
        pointX = 0 + point * 5
pygame.draw.rect(screen, white, (pointX, 3, 4, 7)) - You also want your program to print the total points when the game ends. After the final line of the program, which should be
pygame.quit(), add the following line of code:print "Total points: " + str(points)
Save the program and run it. What happens? Whenever you score a goal, a small white line, one for each point, should appear in the top-left of the screen (see Figure 6-9). Finally, when you exit the window, your total points will be printed to the Python shell (see Figure 6-10).
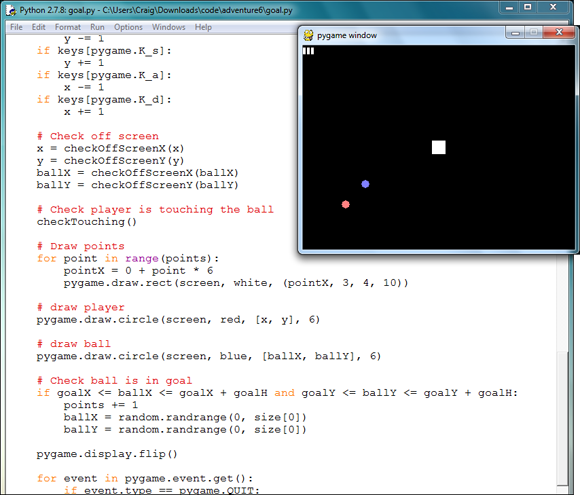
FIGURE 6-9 The points are displayed in the top-left corner of the screen.
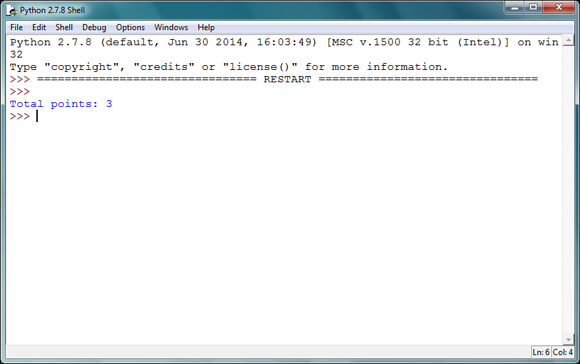
FIGURE 6-10 The program closes after 60 seconds, and the points are displayed in the Python shell.
Adding a Time Limit
At the moment the game does everything it needs to. Not very challenging though, is it? And it goes on forever! Why not add excitement by adding a time limit?
- In your program find this code:
# Game loop
done = False - Below the code add this code to get the time that your program starts:
# get current time
timeStart = pygame.time.get_ticks() - Next, find this code:
clock.tick(72) - Below it, add this code to check if the game has lasted 60 seconds. If it has, it will exit the loop:
    # Check elapsed time
    timeNow = pygame.time.get_ticks()
    if timeNow - timeStart >= 60000:
        done = True
Python Command Quick Reference Table |
|
Command |
Description |
|
This function in |
|
The keypresses in the |
|
Global variables are used in functions so that a function can change the value of a variable that was created outside of the function. |
|
Range checks check whether one value is between two other values. If the value is between the other two numbers, it evaluates to |
Achievement Unlocked: Skilled creator of a game using PyGame and the keyboard.