THE MOUSE IS an extremely versatile tool. Mice are simple to use and make interaction with the computer via GUIs very straightforward.
In this adventure, you’ll learn how to use the mouse with Python and PyGame. You’ll learn how to check for mouse clicks and find the position of the mouse pointer. By building on these basic things, you’ll create some cool programs including a moving target game, a mesh drawer and a trail that follows the mouse around the window.
The mouse position uses coordinates to determine its position like other PyGame programs. Values for the coordinates are most frequently represented by x and y variables. The top-left corner has the coordinates 0, 0, with these x and y values increasing as the mouse moves farther to the right and downwards.
Getting the Mouse Position
Let’s dive into using the mouse with Python and PyGame.
This first program will get the current position of the mouse and display it. The program is meant to show you how to get the mouse position; it doesn’t do much else.
In this program, you press the left button on the mouse in order to display the value of the mouse position. As you move the mouse around the PyGame window the value of the mouse position will change. When you click again in the window, the new value will be displayed.
To keep things simple, the program will print the mouse’s position in the Python shell when the mouse is clicked.
- First up, open IDLE and create a new file with File⇒New Window.
- Now in the new window, save the program as
mousePos.pyin a new folder calledAdventure 7. - Click in the file editor and enter these lines of code to set up the
PyGamewindow:import pygame
pygame.init()
windowSize = [400, 300]
screen = pygame.display.set_mode(windowSize)
clock = pygame.time.Clock() - To check if any of the mouse buttons have been pressed and to display the position of the click, add this code:
done = False
while not done:
for event in pygame.event.get():
if event.type == pygame.MOUSEBUTTONDOWN:
pos = pygame.mouse.get_pos()
print pos - Finally, so that the window can be closed, add this code:
if event.type == pygame.QUIT:
done = True
pygame.quit() - Save the program and run it with Run⇒Run Module.
- When the window appears move your mouse into the window and click the left button on the mouse. The position of the mouse will be printed in the Python shell (see Figure 7-1).
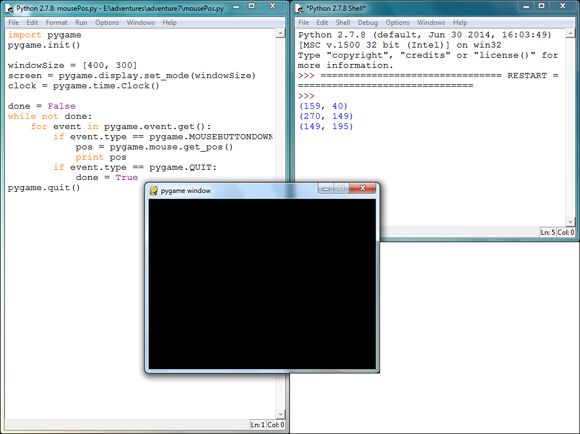
FIGURE 7-1 Looking at the Python shell, you can see where the mouse button has been clicked.
Making a Button
In Adventure 3, you learned how to make buttons with Tkinter. Unlike Tkinter, PyGame doesn’t have an inbuilt way to create buttons easily because it is made to create games and other multimedia. However, with a small amount of code you can create an area in the PyGame window that works like a button.
You’re going to create a program that will create a rectangle in the middle of the window. When you click on the rectangle it will change the colour of the window, but when you click elsewhere in the window it will do nothing.
You’ll then build upon this code to create a game where you have to click on a moving target.
You can see the finished program in Figure 7-2.
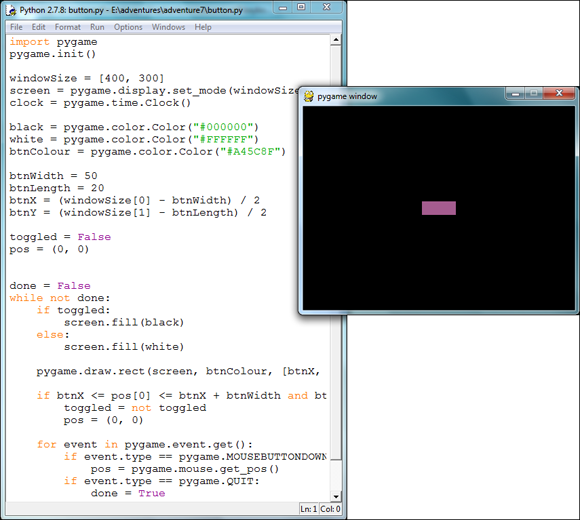
FIGURE 7-2 When the button in the middle of the screen is pressed, the background will change to black.
Time to get going.
- Open IDLE and create a new window with File⇒New Window.
- Save the program as
button.pyin theAdventure 7folder. - Add these lines of code to the top of your program to set up the
PyGamewindow:import pygame
pygame.init()
windowSize = [400, 300]
screen = pygame.display.set_mode(windowSize)
clock = pygame.time.Clock() - Next, add these lines to create three colours. The black and white colours are for the background and the
btnColourcolour variable is the colour for the button:black = pygame.color.Color("#000000")
white = pygame.color.Color("#FFFFFF")
btnColour = pygame.color.Color("#A45C8F") - The next bit of the code sets the size and position of the rectangle for the button. It also sets the button toggled to
Falseand the default position of the mouse. Add this code now:btnWidth = 50
btnLength = 20
btnX = (windowSize[0] - btnWidth) / 2
btnY = (windowSize[1] - btnLength) / 2
toggled = False
pos = (0, 0) - The next bit of code starts the game loop. If the toggled variable is
True, it will make the background colour of the window black, otherwise it will be white.done = False
while not done:
if toggled:
screen.fill(black)
else:
screen.fill(white) - This code will draw the rectangle for the button and check if the button has been clicked. If it has been clicked, it will change the
toggledvariable, thereby changing the colour of the background:pygame.draw.rect(screen, btnColour, [btnX, btnY,
btnWidth, btnLength])
if btnX <= pos[0] <= btnX + btnWidth and btnY <=
pos[1] <= btnY + btnLength:
toggled = not toggled
pos = [0, 0] - The final bit of code checks if the mouse button has been pressed and stores its position when it was clicked. It also checks if the window has been closed and updates the display:
for event in pygame.event.get():
if event.type == pygame.MOUSEBUTTONDOWN:
pos = pygame.mouse.get_pos()
if event.type == pygame.QUIT:
done = True
pygame.display.flip()
clock.tick(10)
pygame.quit() - Save the program and run it using Run⇒Run Module.
- When the window opens, click on the button and the background colour will change. Clicking elsewhere on the window will not do anything.
Moving Target
Now that you can create a clickable area in the PyGame window, let’s modify the code to turn it into a game.
In the game, the clickable area will move around the window randomly. When the player clicks the area they will get points, but the difficulty of the game will also increase, making the random movements of the button more erratic and therefore harder to click.
In Figure 7-3 you can see that the button you created in the last program will now move around the window.
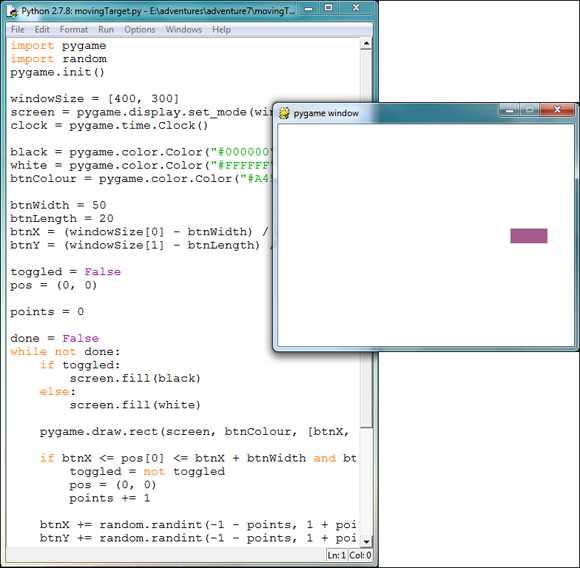
FIGURE 7-3 The more you click the target, the more erratically it will move.
- This code builds upon the previous program, so open the previous program called
button.pyin theAdventure 7folder. - Save the program as
movingTarget.pyin theAdventure 7folder. - On the first line of the program, add this line to import the random module:
import random - Find these lines of code:
toggled = False
pos = (0, 0) - Below this, add this line of code to record the number of times the player has clicked the button:
points = 0 - Now find these lines of code:
if btnX <= pos[0] <= btnX + btnWidth and
btnY <= pos[1] <= btnY + btnLength:
toggled = not toggled
pos = (0, 0) - Directly below that, add this code to increase the points awarded when the target is clicked and randomly move the position of the target:
points += 1
btnX += random.randint(-1 - points, 1 + points)
btnY += random.randint(-1 - points, 1 + points) - Finally, on the last line of the program add this statement so that the points are displayed in the Python shell after the window has been closed:
print points - Now save the program and run it using Run⇒Run Module.
- When the window opens you can click on the target. It should start moving around. The more you click, the farther it will move.
Exploding Clicks
With some minor modifications to the program you can make quite a drastic change to its effects. In this program, you’ll create an explosion effect that will appear every time you click in the window.
The colour of the explosions will be randomised every time you click the mouse.
- Open IDLE and create a new file with File⇒New Window.
- Save the program as
explosions.pyin theAdventure 7folder. - First add the following lines to the program:
import pygame
import random
pygame.init() - The next bit of code is a function that will generate a random colour, and it will be used later in the program. Add it below the code you’ve already written:
def randColour():
r = random.randint(0, 255)
g = random.randint(0, 255)
b = random.randint(0, 255)
return (r, g, b) - The next bit of code will set up the window and create the colours for the background and default value of the explosion. The other variables record the number of frames that the explosion animation will use and the maximum number of frames in the animation:
windowSize = [400, 300]
screen = pygame.display.set_mode(windowSize)
clock = pygame.time.Clock()
black = pygame.color.Color("#000000")
colour = randColour()
count = 0
click = False
limit = 30
pos = (0, 0) - The next bit creates the game loop and draws the explosion to the screen:
done = False
while not done:
screen.fill(black)
if click and count < limit:
pygame.draw.circle(screen, colour, pos, count)
count += 1
if count >= limit:
click = False - The final bit of the program gets the position of mouse clicks and allows the window to be closed:
for event in pygame.event.get():
if event.type == pygame.MOUSEBUTTONDOWN:
pos = pygame.mouse.get_pos()
click = True
count = 0
colour = randColour()
if event.type == pygame.QUIT:
done = True
pygame.display.flip()
clock.tick(60)
pygame.quit() - Save the program and run it using Run⇒Run Module.
- When the window opens, click anywhere in the window. See what happens? A randomly coloured explosion appears where you clicked the mouse. You can see an example of this in Figure 7-4.
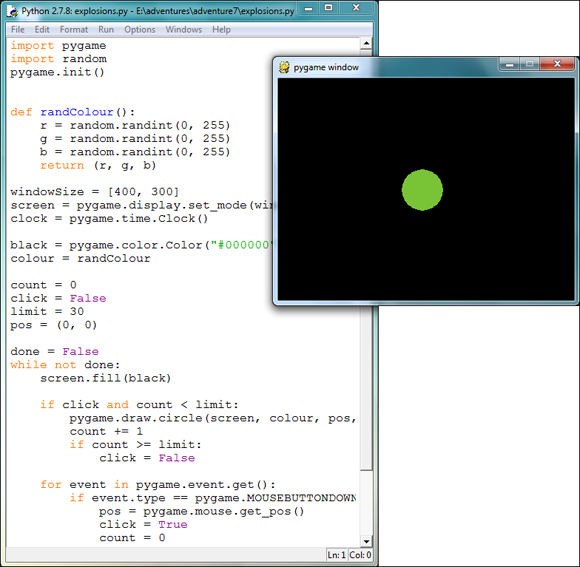
FIGURE 7-4 Every time you click on the window there is a new explosion.
Making a Mesh
Flexibility is one of benefits of using PyGame with Python. So far in this adventure, you’ve seen several variations on programs that use the mouse position and mouse clicks.
The next program will show you how flexible PyGame and Python can be. The program will allow you to draw lines that look like a 3D mesh. A 3D mesh is a collection of joined lines that are used to make 3D models. This program will create something that looks like a 3D mesh but doesn’t work like one—it just looks similar.
You can see an example of this program in Figure 7-5.
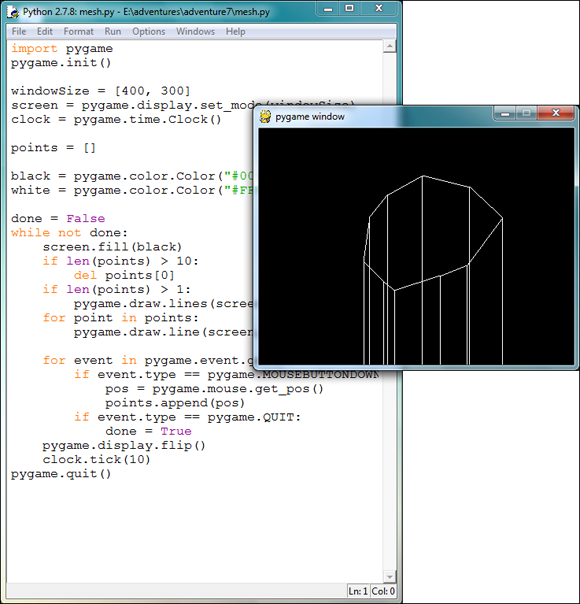
FIGURE 7-5 Clicking anywhere on the window adds a new point to the mesh.
When you click on the window the program will create a new point in the mesh. Every following click will create a new point in the mesh. The program will limit the number of points in the mesh to 10 points, after which it will delete the oldest point and update the mesh.
- Open IDLE and create a new file with File⇒New Window.
- Save the program as
mesh.pyin theAdventure 7folder. - In the new file add these lines of code:
import pygame
pygame.init()

windowSize = [400, 300]
screen = pygame.display.set_mode(windowSize)
clock = pygame.time.Clock() - The next bit of the code is a list that will record every position that has been clicked with the mouse. It will be used later in the program to draw the lines for the mesh:
points = [] - Add this code, which creates the colours and starts the game loop:
black = pygame.color.Color("#000000")
white = pygame.color.Color("#FFFFFF")

done = False
while not done:
screen.fill(black) - Next, the program will check if there are 10 points in the mesh. If there are it will remove the first point in the mesh. The second bit will draw all of the points in the mesh:
    if len(points) > 10:
        del points[0]
    if len(points) > 1:
pygame.draw.lines(screen, white, True, points) - The next bit of the code will link each point in the mesh with the bottom of the window by creating straight lines. Add this code to the program:
    for point in points:
pygame.draw.line(screen, white, point, [point[0], windowSize[1]]) - The last bit of code checks for mouse clicks and allows the window to be closed:
    for event in pygame.event.get():
        if event.type == pygame.MOUSEBUTTONDOWN:
            pos = pygame.mouse.get_pos()
            points.append(pos)
        if event.type == pygame.QUIT:
            done = True
    pygame.display.flip()
    clock.tick(10)
pygame.quit() - Save the program and run it with Run⇒Run Module.
- Now when the window opens you can click anywhere in the window and a line will appear that joins the point where you clicked to the bottom of the window. Clicking again will create a second point that joins to the first. The more you click, the more lines will appear. You can create 10 lines in total.
Creating Mouse Trails
This final program in this adventure creates a trail of lines behind the mouse. The difference between this program and the others in the adventure is that it doesn’t use mouse clicks, just the position of the mouse. The mouse trails program not only looks cool, it also shows you how you can follow the mouse’s position without needing to click any buttons.
Look at Figure 7-6 to see the trails following the mouse.
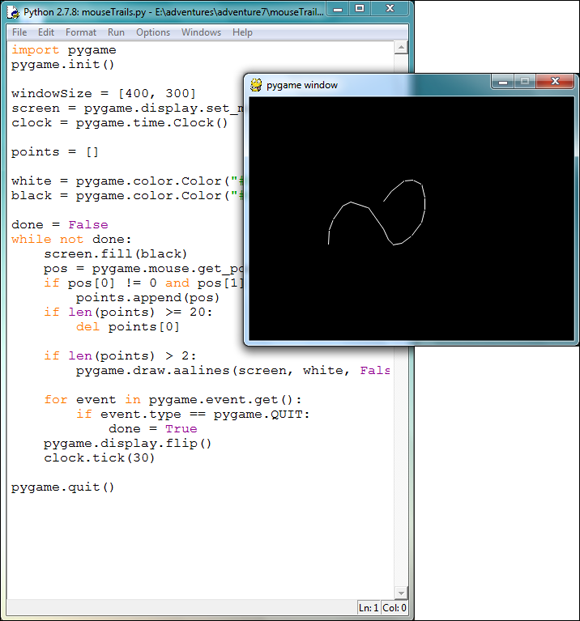
FIGURE 7-6 The trails follow the mouse all over the window.
- Open IDLE and create a new file with File⇒New Window.
- Save the new file as
mouseTrails.pyin theAdventure 7folder. - The next part of the program sets up the
PyGamewindow, creates a list for the points of the trail that will be stored and also creates two variables that store colours:import pygame
pygame.init()
windowSize = [400, 300]
screen = pygame.display.set_mode(windowSize)
clock = pygame.time.Clock()
points = []
white = pygame.color.Color("#FFFFFF")
black = pygame.color.Color("#000000") - The next bit of the code starts the game loop and gets the position of the mouse at the start of the loop. Add it to your program now:
done = False
while not done:
    screen.fill(black)
pos = pygame.mouse.get_pos() - When the window opens, the mouse will have a position of (0, 0). This code stops the program drawing a line from this position. It also limits the number of points to 20:
    if pos[0] != 0 and pos[1] != 0:
        points.append(pos)
    if len(points) >= 20:
del points[0] - In order for lines to be drawn properly, there need to be at least two points in the list. This code checks for this and then draws all of the points to create a trail behind the mouse:
    if len(points) >= 2:
pygame.draw.aalines(screen, white, False, points) - The final bit of the code allows the window of the program to be closed:
    for event in pygame.event.get():
        if event.type == pygame.QUIT:
            done = True
    pygame.display.flip()
    clock.tick(30)

pygame.quit() - Now run the program with Run⇒Run Module.
- When the window opens, move the mouse around. It will magically be followed by a trail of lines.
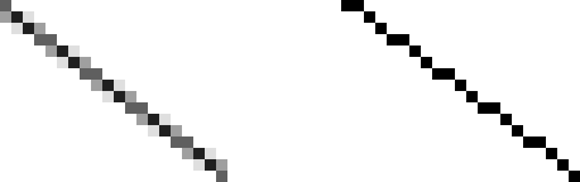
FIGURE 7-7 Lines with and without anti-aliasing. Notice the extra pixels on the line with anti-aliasing.
Python Command Quick Reference Table |
|
Command |
Description |
|
When any mouse button is pressed, a |
|
This function finds the position of the mouse and returns the x and y values as a tuple. |
|
A range check is used to check if one value is between two others. If it is, it will evaluate to |
|
To check the number of items in a list (and any other collections, such as tuples), the |
|
To add an item to the end of a list, the |
|
To delete an item from a list, the |
|
The |
|
The |
Achievement Unlocked: Skilled manipulator of the mouse to create superb programs with PyGame.