In this adventure, you’ll learn how to use images with Python and PyGame. During previous adventures you’ve used PyGame’s drawing functions to draw shapes. You’ve discovered how flexible this is and how much it allows you to do, but it can’t do everything! Sometimes you will want to use images from other programs instead of drawing them with code.
During this adventure, you’ll create programs to load and layer images. You’ll create a program that lets you add a moustache to any image and another program to move a sprite around the window, which forms the basis of a game.
Loading an Image
The first thing you’ll do in this adventure is learn how to load and display an image. Before you can start, you’ll need to save your chosen images into the folder that the program will be saved in. In this adventure I’ve chosen the images for you. To download these images, follow the steps given in the Appendix.
Finished? Once you have the images, copy all of them into the Adventure 8 folder.
The first images you will be using are catSmall.png, catLarge.png, hat.png and space.png. Make sure they are in the Adventure 8 folder; if they aren’t then make sure you follow the steps in the Appendix. If they are in the correct place then you may begin.
This program will display a picture of a cat. The program loads an image into Python using PyGame and displays it in a new window.
- Open IDLE and create a new file with File⇒New Window.
- Save the program as
loadImage.pyin theAdventure 8folder. - In the file editor, add the following code to set up the
PyGamewindow:import pygame
pygame.init()
windowSize = [400, 300]
screen = pygame.display.set_mode(windowSize) - Next, the image is loaded into the program using the
load()function and placed onto the window using theblit()function. Add this code to your program now:image = pygame.image.load('catLarge.png')
screen.blit(image, (0, 0)) - Finally add this code so that the window can be closed:
done = False
while not done:
for event in pygame.event.get():
if event.type == pygame.QUIT:
done = True
pygame.display.flip()
pygame.quit() - Save the program and run it using Run⇒Run Module.
- When the window opens you should see a picture of a cat in the top-left corner of the window, as in Figure 8-1.

FIGURE 8-1 The image loads into the window. You can see the black background due to transparency around the image of the cat.
Cat © Jagodka/Shutterstock.com
Layering Images
You’re now going to give your cat a hat. To do this, you need a program that uses two images, one of a cat and the other of a hat, which are loaded from files. The cat’s face is placed on the background of the window, and the hat is placed on top of it. The position of the hat is set in the program. This program shows you how to layer images on top of each other.
Time to get started:
- Make sure that IDLE is open and create a new file with File⇒New Window.
- Save the program as
layeredImage.pyin theAdventure 8folder. - In the file editor add this code to set up the
PyGamewindow:import pygame
pygame.init()
windowSize = [400, 300]
screen = pygame.display.set_mode(windowSize) - Next, the two images are loaded. Add this code now:
cat = pygame.image.load('catLarge.png')
hat = pygame.image.load('hat.png') - The next bit of code places the images onto the screen surface. As the hat image is blitted second, it will appear on top:
x = 0
y = 0
screen.blit(cat, (x + 10, y + 50))
screen.blit(hat, (x + 7, y)) - The last part of the code allows the window to be closed:
done = False
while not done:
for event in pygame.event.get():
if event.type == pygame.QUIT:
done = True
pygame.display.flip()
pygame.quit() - Save the program and run it using Run⇒Run Module.
- Load the program. The cat should now be sporting a smart bowler hat (see Figure 8-2).
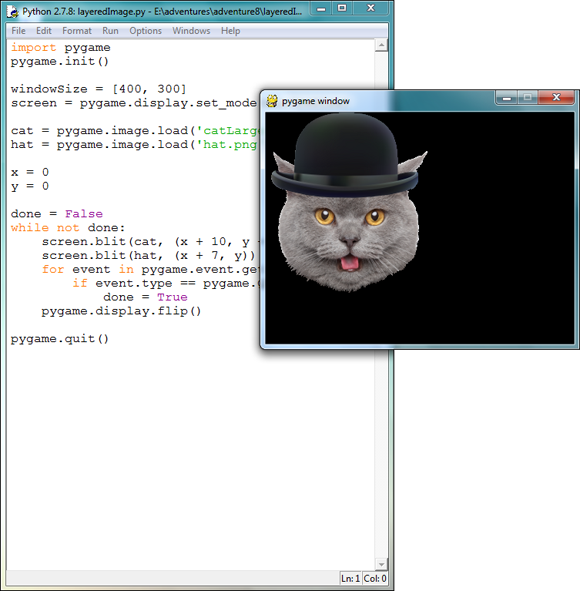
FIGURE 8-2 The cat is now wearing a hat. The image has a transparent background so that you can see the cat’s face.
Cat © Jagodka/Shutterstock.com
Hat © Mayboroda/Shutterstock.com
Randomly Layering Images
There is no limit to the number of images you can blit to the PyGame window surface. Images will stay on the surface, meaning that you can blit images on top of each other.
The images will stay on the surface until you fill the surface with a colour or place another image over the top of it—you’ll cover that later in this adventure.
Next, you’re going to layer images randomly all over the window surface. The end result should look something like Figure 8-3. The images layer on top of each other because you never refresh the background and, just to maximize the randomness, you’re going to rotate each image by a random angle.
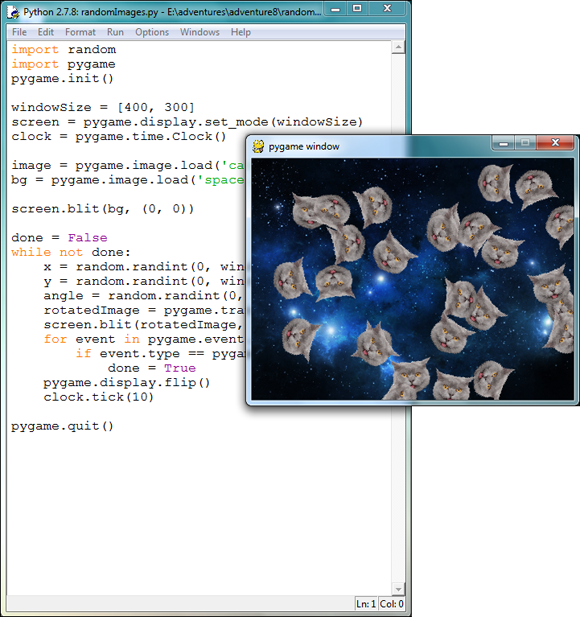
FIGURE 8-3 The image of the cat appears randomly all over the window.
Cat © Jagodka/Shutterstock.com
- Open IDLE and create a new file with File⇒New Window.
- Save the program as
randomImages.pyin theAdventure 8folder. - In the file, add the following code to set up the
PyGamewindow:import random
import pygame
pygame.init()

windowSize = [400, 300]
screen = pygame.display.set_mode(windowSize)
clock = pygame.time.Clock() - Next, the program loads the image you’ve chosen for the background and the image you’ve chosen to be repeated on top of it. The background is then blitted onto the background. Add this code:
image = pygame.image.load('catSmall.png')
bg = pygame.image.load('space.png')

screen.blit(bg, (0, 0)) - Now the program starts the game loop. In the loop, it generates a random location for the image and rotates it by a random angle:
done = False
while not done:
    x = random.randint(0, windowSize[0])
    y = random.randint(0, windowSize[1])
    angle = random.randint(0, 360)
    rotatedImage = pygame.transform.rotate(image, angle)
screen.blit(rotatedImage, (x, y)) - Finally, the program uses this code so that the window can be closed:
    for event in pygame.event.get():
        if event.type == pygame.QUIT:
            done = True
    pygame.display.flip()
    clock.tick(10)

pygame.quit() - Save the program and run it using Run⇒Run Module.
- When the window opens, pictures of cats should appear randomly appear all over the window on top of a background picture of space.
Adding a Moustache to a Photograph
You can create some really cool programs by using images and the mouse. You’re now going to use the mouse to put a moustache on the cat’s face, as in Figure 8-4. This program combines code from the programs you’ve already created in this adventure and in Adventure 7 when you learned how to use a mouse with PyGame. Why not try using a picture of your own instead of the cat image?
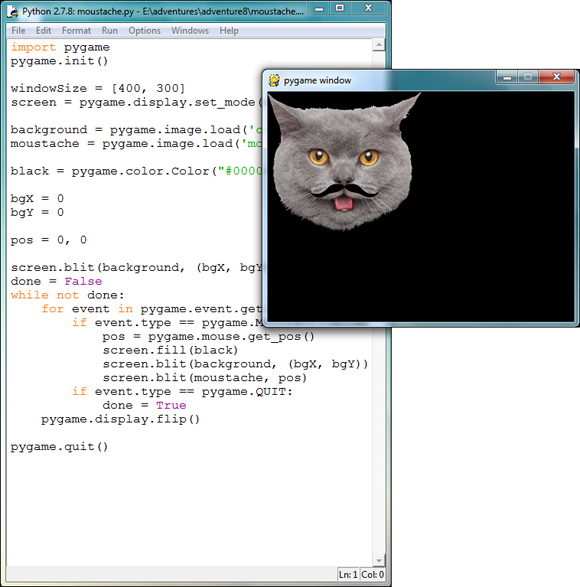
FIGURE 8-4 The cat now has a moustache.
Cat © Jagodka/Shutterstock.com
Time to get started:
- Open IDLE and create a new window with File⇒New Window.
- Save the program as
moustache.pyin theAdventure 8folder. - Add this code to set up the
PyGamewindow:import pygame
pygame.init()
windowSize = [400, 300]
screen = pygame.display.set_mode(windowSize) - Next, you’re going to load the face and moustache images. Alongside this, the colour black is created and the background image placed onto the window:
background = pygame.image.load('catLarge.png')
moustache = pygame.image.load('moustache.png')

black = pygame.color.Color("#000000")

bgPos = (0, 0)
pos = (0, 0)
screen.blit(background, bgPos) - Next, the game loop is started:
done = False
while not done: - The
event forloop checks if the mouse has been clicked. If it has, it will refresh the window’s background and place the moustache image where the mouse was clicked. Add this code now:for event in pygame.event.get():
if event.type == pygame.MOUSEBUTTONDOWN:
pos = pygame.mouse.get_pos()
screen.fill(black)
screen.blit(background, bgPos)
screen.blit(moustache, pos) - Finally, add this code so that the window can be closed:
        if event.type == pygame.QUIT:
            done = True
    pygame.display.flip()
pygame.quit() - Save the program and run it using Run⇒Run Module.
- When the window opens, the picture of the cat will be in the background. Here’s where the fun starts: you can now click the mouse anywhere in the window and a moustache will miraculously appear at that point.
Making Sprites
In 2D computer games, the player and other characters in the game often have collections of images for all their movement and actions. These are called sprites. When combined in animations, the collection of images make the sprite look like it’s moving. In this part of the adventure, you’ll learn how to make basic sprite animations using images in PyGame.
In these programs, you will use the image functions that you’ve already learned in this adventure to make animations for sprite movement.
The first program will allow the sprite to move in one direction. You’ll then build on top of that to allow it to move in all directions. Finally, you’ll add an awesome teleportation animation.
Creating a Walking Animation
Let’s get going on the first part of the program, in which you create a sprite that can walk down the window when the s key is pressed (see Figure 8-5). Animations are a necessary part of games. They help the players understand what is going on in the game and make the game more interactive than just using single images. For example, walking animations help make player movement look more relatable to players.
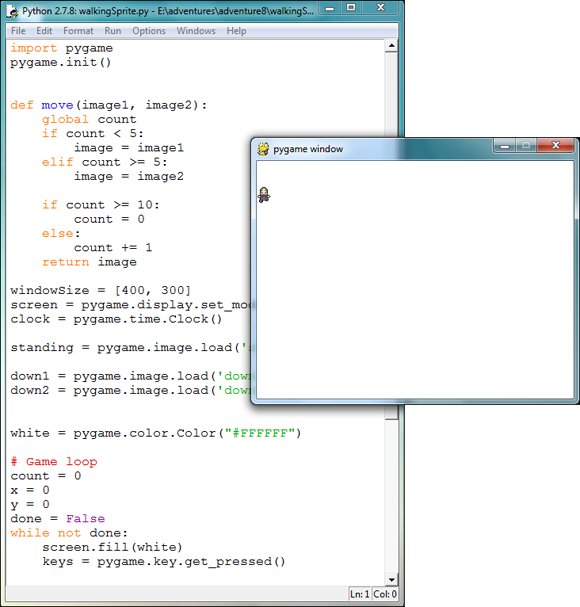
FIGURE 8-5 You can make the sprite walk down the window by using the s key.
The sprite you will be using in this program is an adventurer with a hat and a beard. The sprite is similar in size to some classic modern adventure games. With the knowledge you gain in this chapter and later chapters, you could develop this program or even further to turn it into a full game.
- Open IDLE and create a new file with File⇒New Window.
- Save the program as
walkingSprite.pyin theAdventure 8folder. - In the file editor, copy these lines of code so that your program can use
PyGame:import pygame
pygame.init() - The next bit of code is a function that chooses which picture to use for the current frame of the walking animation. Two images are used here for the walking animation so that the program makes it look like the player is walking when they move. To do this, it uses the
countvariable and, depending on its value, it returns one of the two images in the animation:def move(image1, image2):
global count
if count < 5:
image = image1
elif count >= 5:
image = image2
if count >= 10:
count = 0
else:
count += 1
return image - The next bit of code sets up the
PyGamewindow. Add it to the file editor:windowSize = [400, 300]
screen = pygame.display.set_mode(windowSize)
clock = pygame.time.Clock() - The next part of the code loads the images for the standing and downward movement animation. It also creates the colour for the background. Add it to your program now:
standing = pygame.image.load('standing.png')

down1 = pygame.image.load('down1.png')
down2 = pygame.image.load('down2.png')

white = pygame.color.Color("#FFFFFF") - The next part of the program adds the
count,xandyvariables. Thecountvariable is used in the animations for timing the changes between images. As usual, thexandyvariables are used to record the position of the sprite:count = 0
x = 0
y = 0 - The next part of the program starts the game loop and checks if any keys have been pressed:
done = False
while not done:
screen.fill(white)
keys = pygame.key.get_pressed() - The program then checks if the s key has been pressed and chooses the image to use for the animation with the
move()function:#player movement
if keys[pygame.K_s]:
image = move(down1, down2)
y += 1 - If the key isn’t pressed, the character will use the standing still image:
else:
image = standing - Next, the program blits the image onto the screen surface at the x and y positions and allows the window to be closed:
screen.blit(image, (x, y))
for event in pygame.event.get():
if event.type == pygame.QUIT:
done = True
pygame.display.flip()
clock.tick(32)
pygame.quit() - Save the program and run it using Run⇒Run Module.
- When the window opens, press the s key. Et voila! The sprite will start walking down the window.
Walking in All Directions
Next it’s time to expand your program. In the previous part, you made it so that the sprite could walk downwards. In this part you’ll add code so that the sprite can walk in all directions (see Figure 8-6).
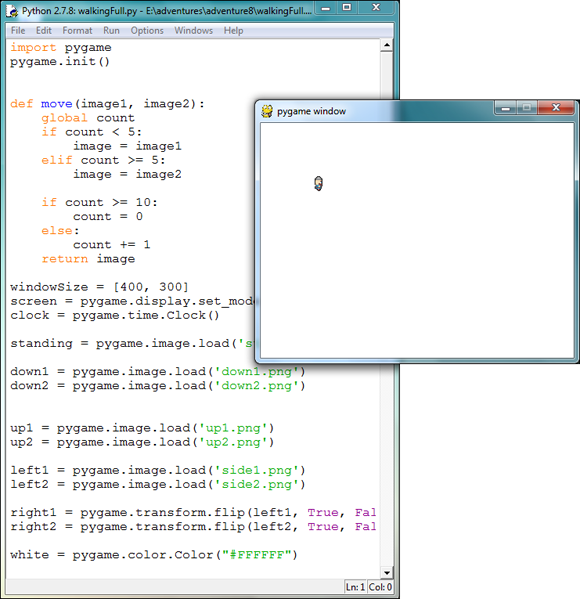
FIGURE 8-6 The sprite can now walk in all four directions.
- Open the previous exercise in IDLE. You should have saved it as
walkingSprite.py. - In the program, find these lines of code:
down1 = pygame.image.load('down1.png')
down2 = pygame.image.load('down2.png') - Underneath the code, add these lines to load the images for the other movement directions:
up1 = pygame.image.load('up1.png')
up2 = pygame.image.load('up2.png')
left1 = pygame.image.load('side1.png')
left2 = pygame.image.load('side2.png')
right1 = pygame.transform.flip(left1, True, False)
right2 = pygame.transform.flip(left2, True, False) - Next, find the
ifstatement that looks like this:if keys[pygame.K_s]:
image = move(down1, down2)
y += 1
else:
image = standing - Change it to look like this, by adding the
elifstatements shown in bold here:if keys[pygame.K_s]:
image = move(down1, down2)
y += 1
elif keys[pygame.K_w]:
image = move(up1, up2)
y -= 1
elif keys[pygame.K_a]:
image = move(left1, left2)
x -= 1
elif keys[pygame.K_d]:
image = move(right1, right2)
x += 1
else:
image = standing - Save the program and run it using Run⇒Run Module.
- You can now move the sprite up, down, left and right by pressing the w, a, s and d keys.
Teleportation
To finish off this program, you’re now going to add a final animation that teleports your sprite to a new location when you press the space bar, as in Figure 8-7. You might use this in a game when your player needs to quickly move from one location to another or steps on a portal.

FIGURE 8-7 Pressing the space bar will now teleport the sprite to a random location.
To get this to work, the program will add an animation for the teleportation and set the coordinates of the sprite to a new random location. While this happens, movement with the keyboard will be locked so that no unexpected bugs can occur.
- Make sure you have the
walkingSprite.pyfile open in IDLE. - On the first line, add this code so that the program can use the random module:
import random - In the program, find these lines of code:
right1 = pygame.transform.flip(right1, True, False)
right2 = pygame.transform.flip(right2, True, False) - Below it, add these statements to load the teleport images:
teleport1 = pygame.image.load('teleport1.png')
teleport2 = pygame.image.load('teleport2.png')
teleport3 = pygame.image.load('teleport3.png') - Next, you need to add a variable to lock the movement when the sprite is teleporting. Find these lines of code:
count = 0
x = 0
y = 0 - Add this variable below them:
locked = False - To add the space bar as the key that will teleport the player, find this code:
if keys[pygame.K_s]:
image = move(down1, down2)
y += 1
elif keys[pygame.K_w]:
image = move(up1, up2)
y -= 1
elif keys[pygame.K_a]:
image = move(left1, left2)
x -= 1
elif keys[pygame.K_d]:
image = move(right1, right2)
x += 1
else:
image = standing
count = 0 - Add the bold code to enable the program to teleport the player when the space key is pressed:
if keys[pygame.K_s]:
image = move(down1, down2)
y += 1
elif keys[pygame.K_w]:
image = move(up1, up2)
y -= 1
elif keys[pygame.K_a]:
image = move(left1, left2)
x -= 1
elif keys[pygame.K_d]:
image = move(right1, right2)
x += 1
elif keys[pygame.K_SPACE]:
locked = True
else:
image = standing
count = 0 - Add an
ifstatement to the code and indent it so that it won’t run if the lockedifstatement isTrue. This will stop the players from moving with the direction keys while they are teleporting:if not locked:
    #player movement
    if keys[pygame.K_s]:
        image = move(down1, down2)
        y += 1
elif keys[pygame.K_w]:
image = move(up1, up2)
y -= 1
elif keys[pygame.K_a]:
image = move(left1, left2)
x -= 1
elif keys[pygame.K_d]:
image = move(right1, right2)
x += 1
elif keys[pygame.K_SPACE]:
locked = True
    else:
        image = standing
count = 0 - Below this, add an
elsestatement that runs the teleport animation and teleports the player to a random location:else:
if count < 5:
image = teleport1
elif count < 10:
image = teleport2
elif count < 15:
image = teleport3
else:
x = random.randrange(0, windowSize[0])
y = random.randrange(0, windowSize[1])
count = 0
locked = False
count += 1 - Save the program and run it using Run⇒Run Module.
- When the program opens, press the space bar and watch the sprite teleport to a random position. If you press the w, a, s or d key during the teleport animation, the player should not move as the controls will be locked. The green flash that appears over the player is part of the animation that looks like the player is teleporting.
Python Command Quick Reference Table |
|
Command |
Description |
|
This function is used by |
|
Blit is used to place images onto a |
|
The |
|
Like the |
Achievement Unlocked: Rising star of images in PyGame.