
Chapter 12
Tab Formatting
In This Chapter
![]() Revealing tab stops and characters
Revealing tab stops and characters
![]() Viewing the ruler
Viewing the ruler
![]() Working in the Tabs dialog box
Working in the Tabs dialog box
![]() Setting left tab stops
Setting left tab stops
![]() Using right, center, and decimal tabs
Using right, center, and decimal tabs
![]() Decorating with the bar tab
Decorating with the bar tab
![]() Setting leader tabs
Setting leader tabs
![]() Removing tabs and tab stops
Removing tabs and tab stops
On my ancient Underwood typewriter, the Tab key is located on the right side of the keyboard. It’s named Tabular Key. On other old typewriters, I've seen it named Tabulator. The root for these words is the same as the root for table, which is the Latin word tabula, meaning list.
In Word, tabs are used to make lists or indent text. That sounds simple, but for some reason tabs remain one of the most complex formatting topics.
Once Upon a Tab
Like other keys on the keyboard, pressing the Tab key inserts a tab character into your document. The tab character works like the spacebar, although the character inserted has a variable width. The width is set at a predefined location marked across a page. That location is called the tab stop.
It's the tab stop that makes the tab character work: Press the Tab key, and the insertion pointer hops over to the next tab stop. That way, you can precisely line up text on multiple lines. Using a tab is definitely neater than whacking the spacebar multiple times to line up columns of text.
- Word presets tab stops at every half-inch position across the page. And, of course, you can create your own.
 Anytime you press the spacebar more than once, you need a tab. Believe me, your documents will look prettier and you'll be happier once you understand and use tabs instead of spaces to line up your text.
- The tab character’s behavior is determined by the type of tab stop. In Word, multiple tab stop types help you format a line of text in many ways.
- As with any other characters, you use the Backspace or Delete keys to remove a tab character.
- Tabs work best for a single line of text or for only the first line of a paragraph. For more complex lists, use Word's Table command. See Chapter 19.
 The diet beverage Tab was named for people who like to keep a tab on how much they consume.
Seeing tab characters
Tab characters are normally hidden; they look like blank spaces, which is probably why too many Word users use spaces to create those blanks.
It’s not necessary to see tab characters to use them, although if you’re having trouble setting tab stops and using tabs, viewing the tab characters is helpful.
![]() Use the Show/Hide command to quickly view tabs in a document. When Show/Hide is active, tab characters appear in your text as a left-pointing arrow, similar to what’s shown in the margin.
Use the Show/Hide command to quickly view tabs in a document. When Show/Hide is active, tab characters appear in your text as a left-pointing arrow, similar to what’s shown in the margin.
To activate the Show/Hide command, click the Home tab and in the Paragraph group, click the Show/Hide command button, which looks like the paragraph symbol (¶). Click the button again to deactivate the command.
To direct Word to show tab characters at all times, whether or not the Show/Hide command is active, follow these steps:
- Click the File tab.
-
Choose Options.
The Word Options window appears.
- Click the Display item on the left side of the window.
- Put a check mark by the Tab Characters option.
- Click OK.
With the Tab Characters option set, tabs always appear in a document. They don’t print that way, but viewing them in your text may help you solve some formatting puzzles.
Seeing tab stops
Tab stops are invisible; you can’t see them in your document, but they exist. The best way to view the tab stops, as well as to set new ones, is to summon the ruler. Follow these steps:
- Click the View tab.
-
In the Show area, ensure that the check box by the Ruler item has a check in it.
If not, click to set the check mark.
The ruler appears just above the document. Figure 12-1 illustrates how the ruler might look when various tab stops are set. It also shows the location of the Tab gizmo, which is a handy tool you can use to access different tab stop types.

Figure 12-1: Tab stops on the ruler.
If tab stops are not visible on the ruler, Word is using its default setting of one tab stop every half inch. Those tab stops don’t appear on the ruler.
- When several paragraphs are selected, you may spot a light gray, or phantom, tab stop on the ruler. The ghostly appearance indicates that a tab stop is set in one paragraph but not in all. To apply the tab stop to all selected paragraphs, click the phantom tab stop once.
- See the later section, “Tab Stop, Be Gone!” for information on using the ruler to remove, or unset, a tab stop.
Using the ruler to set tab stops
The visual and quick way to set a tab stop is to use the ruler. Assuming that the ruler is visible (see the preceding section), the process involves two steps:
-
Click the Tab gizmo until the desired tab stop type appears.
Later sections in this chapter discuss when and how to set each of the five types of tab stops.
The Tab gizmo also shows paragraph indent controls. These items are covered in Chapter 11 and don’t relate to setting tabs.
-
Click the ruler at the exact spot where you want the tab stop set.
For example, click the number 2 to set a tab stop at the 2-inch mark, which is 2 inches in from the page’s left margin.
The tab stop icon appears on the ruler, marking the tab stop position. You can further adjust the tab by dragging left or right with the mouse. If a tab character already sits in the current paragraph, its format updates as you drag the top stop hither and thither.
Tab stops are a paragraph-level format. The tab stop you set applies to the current paragraph or any selected paragraphs. Refer to Chapter 6 for information on selected text.
Using the Tabs dialog box to set tabs
For precisely setting tabs, bring up the Tabs dialog box. It’s also the only way to get at certain types of tabs, such as dot leader tabs, which are covered elsewhere in this chapter.
Keep in mind that the Tabs dialog box doesn’t work like a typical Word dialog box: You must set the tab position and type first and then click the Set button. Click the OK button only when you’re done setting tabs. Generally speaking, the process works like this:
- Click the Home tab.
-
In the lower-right corner of the Paragraph group, click the dialog box launcher.
The Paragraph dialog box appears. Tabs are, after all, a paragraph-level format.
-
Click the Tabs button.
The Tabs dialog box appears, as shown in Figure 12-2.

Figure 12-2: The Tabs (tab stop) dialog box.
-
Enter the tab stop position in the Tab Stop Position box.
You can be precise, if you like.
-
Choose the type of tab stop from the Alignment area.
Word’s five tab stop types are covered elsewhere in this chapter.
-
Click the Set button.
The tab stop is added to the Tab Stop Position list.
-
Continue setting tab stops.
Repeat Steps 2 through 6 for as many tab stops as you need to set.
- Click OK.
You must click the Set button to set a tab stop! I don’t know how many times I click OK instead, thinking that the tab stop is set when it isn't.
The tab stops you set affect the current paragraph or a selected group of paragraphs.
 If the ruler is visible, you can quickly summon the Tabs dialog box: Double-click any existing tab stop.
The Standard Left Tab Stop
The left tab stop is the traditional type of tab stop. When you press the Tab key, the insertion pointer advances to the left tab stop position, where you can continue to type text. This type of tab stop works best for typing lists, organizing information in single-line paragraphs, or indenting the first line of a multiline paragraph.
Creating a basic tabbed list
A common use for the left tab stop is to create a simple two-column list, as shown in Figure 12-3.

Figure 12-3: Two-column list.
Follow these steps to create this type of list:
- On a new line, press Tab.
-
Type the item for the first column.
This item should be short — two or three words, max.
- Press Tab.
-
Type the item for the second column.
Again, make it short.
-
Press Enter to end that line and start a new line.
Yes, your list looks horrible! Don't worry. Type first, then format.
-
Repeat Steps 2 through 5 for each line in the list.
After the list is finished, use the ruler to visually set the tab stops.
Refer to the previous section “Using the ruler to set tab stops” for information on summoning the ruler, if it’s not currently visible.
-
Select all lines of text that you want to organize in a two-column tabbed list.
-
 Choose a left tab stop from the Tab gizmo on the ruler.
If necessary, click the Tab gizmo until the Left Tab Stop icon shows up, as shown in the margin.
-
Click the ruler to set the first tab stop.
If the text doesn’t line up right, drag the tab stop left or right.
-
Click to set the second tab stop.
Drag the tab stop left or right, if necessary, to help line up text.
Although you could add a third column to the list, things start to get crowded. In fact, any time you need more than a single word or two in a tabbed list, consider cobbling a table instead. See Chapter 19.
You need only one tab between items in a column list. That's because the tab stop lines up your text, not the tab character.
Creating a two-tab paragraph thing
You can create a descriptive list by using the power of tabs coupled with a paragraph’s hanging indent format. Such a thing is difficult to describe, so refer to Figure 12-4 to see what’s up.

Figure 12-4: A tab-tab-paragraph format for text.
Follow these steps to create a list similar to the one shown in Figure 12-4:
-
On a new line, type the first item.
The shorter, the better. This item sits at the left margin, so don’t type a tab to start the line.
- Press Tab.
-
Type the second item and press Tab.
This step is optional; you can create a simpler tab-paragraph list, which looks just like the one shown in Figure 12-4, but without the Dish column (and spaced accordingly).
-
Type the paragraph text.
Unlike with the first two items, you're free to type more text here. That's because this final paragraph column wraps, as shown in Figure 12-4.
-
Press Enter to end the line.
Don't let the ugly look of your text deceive you at this point. The text beautifies itself when you add the tab stops.
-
Repeat Steps 1 through 5 for each item in the tab-tab-paragraph list thing.
When you're done, you can set the tab stops.
- Select all the lines of text you want to organize into a tab-tab-paragraph list.
-
Bid the ruler appear, if need be.
Directions for beckoning forth the ruler are found earlier in this chapter.
-
Ensure that the left tab stop is chosen on the Tab gizmo.
The margin shows the Left Tab Stop symbol.
-
Set a left tab stop to mark the first item in the list.
The second column snaps into place.
-
 Slide the paragraph’s left margin to the start of the text item.
The Left Indent triangle is shown in the margin. It sets the left margin for all text in a paragraph, save the first line. (See Chapter 11 for details.) Slide the triangle to the right until it’s past items in the second column, as shown in Figure 12-4.
-
Adjust the tab stop and left margin as necessary.
Make the adjustments while text is selected, which provides visual feedback for the paragraphs.
As with formatting any complex list, it’s perfectly okay to give up. See Chapter 19 for information on adding a table to your document. You might find a table better to work with than all this paragraph-formatting nonsense.
The Center Tab Stop
The center tab is a unique critter with a special purpose: Text placed at a center tab is centered on a line. Unlike centering a paragraph, only text placed at the center tab stop is centered. This feature is ideal for centering text in a header or footer, which is about the only time you need the center tab stop.
Figure 12-5 shows an example of a center tab. The text on the left is at the start of the paragraph, which is left-justified. But the text typed after the tab is centered on the line.
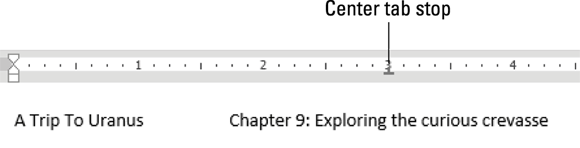
Figure 12-5: Center tab in action.
Here's how to make that happen:
-
Start a new paragraph, one containing text that you want to center.
Center tabs inhabit one-line paragraphs.
-
 Click the Tab gizmo on the ruler until the center tab stop shows up.
The Center Tab Stop icon is shown in the margin.
Refer to the section, “Using the ruler to set tab stops,” earlier in this chapter, for information on displaying the ruler and using the Tab gizmo.
-
Click the ruler to set the center tab stop’s position.
Generally speaking, the center tab stop dwells in the middle of the page. That location could be the 3-inch mark or the 3¼-inch mark.
-
Type any text to start the line.
In Figure 12-5, the text A Trip to Uranus appears at the start of the line. Typing such text is optional, depending on what you’re formatting.
-
Press the Tab key.
The insertion pointer hops over to the center tab stop.
-
Type the text you want to center.
As you type, the text is centered on the line. Don't type too much; the center tab is a single-line thing.
- Press Enter to end the line of text.
Center tab stops are used primarily in a document header or footer, or when typing a title. See Chapter 14 for information on headers and footers.
When you need only centered text on a line, use the center paragraph format instead of a center tab stop. See Chapter 11.
The Right Tab Stop
A right tab stop isn’t the opposite of the left tab stop. Instead, it’s a special creature that right-justifies text on a single line. You've probably seen such a thing in action many times, but never thought you could easily create such formatted text.
As with the other unusual tab stop types, the right tab stop works best on a single line of text. It’s also commonly used in a document header or footer, as described in Chapter 14.
Making a right-stop, left-stop list
A clever way to format a two-column list is to employ both a right tab stop and a left tab stop. The list lines up on a centerline, as shown in Figure 12-6.
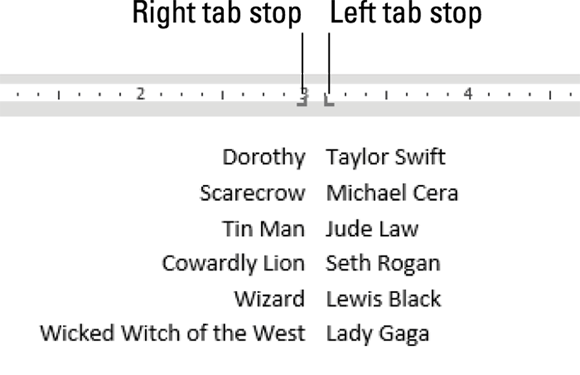
Figure 12-6: Right tab stops are used to center-align this list.
To build such a list, follow these steps:
- Start out on a blank line, the line you want to format.
-
 Click the Tab gizmo until the right tab stop shows up.
The Right Tab Stop icon appears in the margin.
See the section, “Using the ruler to set tab stops” for information on displaying the ruler.
-
Click near the center of the ruler to place the right tab stop.
-
Click the Tab gizmo until the left tab stop appears.
Click, click, click until you see the Left Tab Stop icon, as shown in the margin.
-
Click to place the left tab stop just to the right side of the right tab stop on the ruler.
Use Figure 12-6 as your guide.
Now it’s time to type the text. Don’t worry about getting the tab stops correct at this point in the process; you can adjust them later.
-
Press the Tab key.
The insertion pointer hops over to the right tab stop’s position.
- Type text for the first, right-justified column.
- Press the Tab key.
- Type your text for the second, left-justified column.
- Press Enter to end the line of text.
- Repeat Steps 6 through 10 for each line in the list.
If further adjustments are necessary after you’re finished, select all the lines and use the mouse to adjust the tab stops’ positions on the ruler as necessary.
Building a two-column right-stop list
The right tab stop can be used on the second column of a two-column list. The presentation appears commonly in programs, similar to what’s shown in Figure 12-7.

Figure 12-7: Right tab stops right-align the second column of this list.
Here's how to concoct such a thing:
-
Start on a blank line of text.
-
Click the Tab gizmo until the right tab stop appears.
The Right Tab Stop icon is shown in the margin.
Refer to the earlier section, “Using the ruler to set tab stops,” for information on displaying the ruler and finding the Tab gizmo.
-
Place the right tab stop on the far right side of the ruler.
The position is just a guess at this point. Later, you can adjust the right tab stop position to something more visually appealing.
-
Type the first column text.
The text is left-justified, as it is normally.
-
Press the Tab key.
The insertion pointer hops to the right tab stop.
-
Type the second column text.
The text you type is right-justified, pushing to the left as you type.
- Press Enter to end the line of text.
- Repeat Steps 4 through 7 for every line in the list.
Afterward, you can adjust the list’s appearance: Select all the text as a block and then drag the right tab stop back and forth on the ruler.
The Decimal Tab
Use the decimal tab to line up columns of numbers. Although you can use a right tab for this job, the decimal tab is a better choice. Rather than right-align text, as the right tab does (see the preceding section), the decimal tab aligns numbers by their decimal — the period in the number, as shown in Figure 12-8.

Figure 12-8: Using the decimal tab to line up numbers.
Here's how to work with such a beast:
-
Start a blank line of text.
-
 On the ruler, click the Tab gizmo until the decimal tab stop appears.
The Decimal Tab Stop icon is shown in the margin.
-
Click the ruler to set the decimal tab stop.
You can adjust the position later.
-
Type the first column text.
This step is optional, although in Figure 12-8 you see the first column as a list of items.
- Press the Tab key.
-
Type the number.
The number is right-justified until you press the period key. After that, the rest of the number is left-justified.
- End that line of text by pressing Enter.
- Repeat Steps 4 through 7 for each line in the list.
You can make adjustments after the list is complete: Select all the lines in the list and then drag the decimal tab stop left or right.
- When a line doesn’t feature a period, text typed at a decimal tab stop is right-justified, as shown by the word Free in Figure 12-8.
- This tab stop is used inside a table cell or column to align values. See Chapter 19 for information on Word’s table commands.
The Bar Tab
Aside from being a most excellent pun, the bar tab isn’t a true tab stop in Word. Instead, consider it a text decoration. Setting a bar tab merely inserts a vertical bar in a line of text, as shown in Figure 12-9. Using a bar tab is much better than using the pipe (|) character on the keyboard to create a vertical line in a multicolumn list.

Figure 12-9: The mysterious bar tab.
To set a bar tab stop, follow these steps:
-
 Click the Tab gizmo until the bar tab stop appears.
The Bar Tab Stop icon is shown in the margin.
-
Click the ruler to place the bar tab stop.
At each position, a vertical bar appears in the text. The bar appears whether or not the current line contains any tab characters.
To best use the bar tab stop, mix in a few other tab stops. For example, in Figure 12-9, left tab stops are set to the side of each bar tab stop. The effect is that text is organized into columns, but the bar tab serves only to decorate the text. It has no effect otherwise.
Fearless Leader Tabs
Press the Tab key and the insertion pointer hops over to the next tab stop. The space added is empty, but it doesn’t have to be. Word lets you apply different styles to the empty space, which help create something called a leader tab.
A leader tab shows a series of dots or other characters where the tab appears on the page. Three styles are available: dot, dash, and underline, as illustrated in Figure 12-10.

Figure 12-10: Leader tab styles.
You can apply a leader to any tab stop in Word other than the bar tab. To do so, follow these steps:
-
Create the tab-formatted list.
Refer to sections elsewhere in this chapter for information on creating a list of items.
- Select the text as a block.
-
Bring forth the Tabs dialog box.
The quick shortcut is to double-click a tab on the ruler. Also see the section, “Using the Tabs dialog box to set tabs.”
- Select the tab stop from the Tab Stop Position list.
- In the Leader area, choose the leader style.
-
Click the Set button.
Don't click OK before you set the tab stop to add the leader. This step is the one you'll screw up most often. -
Click OK.
The leader is applied.
Use the underline leader tab to create fill-in-the-blank forms. In the Tabs dialog box, set a left tab stop at the far right margin (usually, 6.0 inches). Choose the underline leader style (number 4). Click Set and then click OK. Back in your document, type a tab to create a fill-in-the-blank line, such a:
Your name: _______________________________________________________
This format is far better than typing a zillion underlines.
Tab Stop, Be Gone!
To unset or clear a tab stop, follow these steps:
- Select the paragraph(s) with the offending tab stop.
-
Drag the tab stop from the ruler.
Drag downward. The tab stop is removed from the paragraph(s).
Even though you’ve removed the tab stop, the tab character may still lurk in the paragraph. Remember that Word places automatic tab stops on every line of text.
For complex tab stop removal, such as when tab stops are close to each other or to the paragraph indent controls on the ruler, use the Tabs dialog box: Click to select the tab in the Tab Stop Position list, and then click the Clear button. Click OK to exit the Tabs dialog box.
- Clicking the Clear All button in the Tabs dialog box removes all tab stops from the current paragraph or selected paragraphs in one drastic sweep.
- To delete a tab character, use the Backspace key.