
Chapter 10
Character Formatting
In This Chapter
![]() Applying a text format
Applying a text format
![]() Selecting a font
Selecting a font
![]() Setting basic text formats
Setting basic text formats
![]() Changing text size
Changing text size
![]() Adding color to your words
Adding color to your words
![]() Changing text case
Changing text case
![]() Removing text formatting
Removing text formatting
![]() Exploring the Font dialog box
Exploring the Font dialog box
At the atomic level, the most basic element you can format in a document is text — the letters, numbers, and characters you type. You can format text to be bold, underlined, italicized, small or large, in different fonts or colors, and all sorts of pretty and distracting attributes. Word gives you a magnificent amount of control over the appearance of your text.
Text-Formatting Techniques
You can format text in a document in two ways:
- Use text-formatting commands as you type, turning them on or off.
- Type the text first. Go back and select the text to format. Apply the format.
Either method works, although I recommend you concentrate on your writing first and return to format later.
As an example, suppose you wanted to write and format the following sentence:
His toe was really swollen.
The first way to format is to type the sentence until the word really. Press Ctrl+I to apply the italic format. Type the word. Press Ctrl+I again to turn off the format. Continue typing.
The way I formatted the sentence was to type the entire thing first. Once done, I double-clicked the word really to select it, and then pressed Ctrl+I to apply the italic format.
See Chapter 6 for more information on marking blocks of text.
Basic Text Formats
Word stores the most common text-formatting commands on the Home tab, in the Font group, as shown in Figure 10-1.

Figure 10-1: Text-formatting commands in the Font group.
The Font group’s gizmos not only control the text format but also describe the format for currently selected text. So in Figure 10-1, the text format uses the font Calibri, the text size is 11 points, and the Bold attribute is set.
In addition to the Home tab’s Font group, text-formatting commands are available on the mini toolbar. It appears whenever text is selected, as described in Chapter 6.
Choosing a font
The base attribute of text is its typeface, or font. The font sets the way your text looks and its overall style. Although choosing the best font can be agonizing (and, indeed, many graphic artists are paid well to choose just the right font), the process isn’t too difficult. It generally goes like this:
- Click the Home tab.
-
In the Font group, click the down arrow by the Font item.
A list of fonts appears, similar to what’s shown on the right in Figure 10-1.
-
Select a font.
As you point the mouse pointer at a font, text in the document changes to preview the font. Click to choose the font and change the text format.
The Font menu is organized to help you locate the font you need. The top part of the menu lists fonts associated with the document theme. The next section contains fonts you've chosen recently, which is handy for reusing fonts. The rest of the list, which can be quite long, shows all fonts available to Word. The fonts appear in alphabetical order and are displayed as they would appear in the document.
 To quickly scroll to a specific part of the Font menu, type the first letter of the font you need. For example, type T to find Times New Roman.
- If you know the exact font name, you can type it in the Font text box, which seems like a horrifically nerdy thing to do.
- When a font name doesn’t appear the Font group (the text box is blank), it means that more than one font is selected in the document.
- Refer to Chapter 16 for more information on document themes.
- Fonts are the responsibility of Windows, not Word. Thousands of fonts are available for Windows, and they work in all Windows applications.
 Graphic designers prefer to use two fonts in a document — one for the text and one for titles. Word is configured this way as well. The Body font is set for text. The Heading font is set for titles. These two fonts are set as part of the document theme.
Applying character formats
On the lower left side of the Font group you find some of the most common character formats. These formats enhance the selected font or typeface.
![]() To make text bold, press Ctrl+B or click the Bold command button.
To make text bold, press Ctrl+B or click the Bold command button.
Use bold to make text stand out on a page — for titles and captions or when you're uncontrollably angry.
![]() To make text italic, press Ctrl+I or click the Italic command button.
To make text italic, press Ctrl+I or click the Italic command button.
Italic has replaced underlining as the preferred text-emphasis format. Italicized text is light and wispy, poetic, and free.
![]() Underline text by pressing Ctrl+U or clicking the Underline command button. You can click the down arrow next to the Underline command button to choose from a variety of underline styles or set an underline color.
Underline text by pressing Ctrl+U or clicking the Underline command button. You can click the down arrow next to the Underline command button to choose from a variety of underline styles or set an underline color.
The double-underline format is available from the Underline command button’s menu, but it does have a keyboard shortcut: Ctrl+Shift+D.
Also available is word-underlining format. Word underlining looks like this. The keyboard shortcut is Ctrl+Shift+W.
![]() Strike through text by clicking the Strikethrough command button. (A keyboard shortcut is unavailable.)
Strike through text by clicking the Strikethrough command button. (A keyboard shortcut is unavailable.)
I don't know why strikethrough text made it to the Font group. If I were king of Microsoft, I would have put small caps up there instead. But who am I? Strikethrough is commonly used in legal documents, when you mean to say something but then change your mind think of something better to say.
![]() Click the Subscript command button to make text subscript. The keyboard shortcut is Ctrl+= (equal sign).
Click the Subscript command button to make text subscript. The keyboard shortcut is Ctrl+= (equal sign).
Subscript text appears below the baseline, such as the 2 in H2O.
![]() To make text superscript, click the Superscript command button. The keyboard shortcut is Ctrl+Shift+= (equal sign), which is the shifted version of the subscript keyboard shortcut.
To make text superscript, click the Superscript command button. The keyboard shortcut is Ctrl+Shift+= (equal sign), which is the shifted version of the subscript keyboard shortcut.
Superscript text appears above the line, such as the 10 in 210.
Another popular format, but apparently not popular enough to sport a command button in the Fonts group, is small caps. The small caps keyboard shortcut is Ctrl+Shift+K.
Small caps formatting is ideal for headings. I use it for character names when I write a script or play:
BILL. That’s a clever way to smuggle a live grenade into prison.
The All Caps text format sets the text to uppercase letters only. As with small caps, this format doesn’t feature a command button, although it has a shortcut key: Ctrl+Shift+A.
To find all these text formats and more, open the Font dialog box. Refer to the section “Behold the Font Dialog Box,” later in this chapter.
 All character formats work like a toggle switch. Use the command to apply a text format. Use the same command again to remove that format.
- Text-formatting commands affect text as you type. They can also be applied to a block of text.
- More than one character format can be applied at a time to any text. For example, use Ctrl+B and then Ctrl+I to apply bold and italic formats.
- The best way to use superscript or subscript is to write text first and then apply the superscript or subscript format to selected text. So 42 becomes 42 and CnH2n+1OH becomes CnH2n+1OH. If you apply superscript or subscript as you type, the text tends to be difficult to edit.
- When will the Underline text attribute die? I'm baffled. Honestly, I think we're waiting for the last typewriter-clutching librarian from the 1950s to pass on before underlining is officially gone as a text attribute. And please don't fall prey to the old rule about underlining book titles. It's Crime and Punishment, not Crime and Punishment.
Text Transcending Teensy to Titanic
Text size is set in your document based on the ancient typesetter measurement known as points. One point is equal to inch. Although that value is mysterious and fun, don’t bother committing it to memory. Instead, here are some point pointers:
- The bigger the point size, the larger the text.
- Most printed text is either 10 or 12 points tall.
- Headings are typically 14 to 24 points tall.
- In Word, fonts can be sized from 1 point to 1,638 points. Point sizes smaller than 6 are generally too small for a human to read.
- A 1-inch-high letter is roughly 72 points.
- The point size of text is a measure from the bottom of the descender to the top of the ascender, such as from the bottom of the lowercase p to the top of the capital E. So the typical letter in a font is smaller than its given point size. In fact, depending on the font design, text formatted at the same size but with different fonts (typefaces) doesn't appear to be the same size. It's just one of those typesetting oddities that causes regular computer users to start binge drinking.
Setting the text size
To set the size of text you’re about to type, or text in a selected block, heed these steps:
- Click the Home tab.
-
In the Font group, click the down arrow next to the Font Size box.
A menu of font sizes appears, as shown in the center in Figure 10-1.
-
Choose a font size.
As you point the mouse pointer at various values, text in the document (an individual word or a selected block) changes to reflect the size. Click to set the size.
The Size menu lists only common text sizes. To set the text size to a specific value, type the value in the box. For example, to set the font size to 11.5, click in the Size box and type 11.5.
Nudging text size
Rare is the student who hasn't fudged the length of a term paper by inching up the text size a notch or two. To accommodate those students, or anyone else trying to set text size visually, Word offers two command buttons in the Home tab’s Font group.
![]() To increase the font size, click the Increase Font Size command button. The keyboard shortcut is Ctrl+Shift+>.
To increase the font size, click the Increase Font Size command button. The keyboard shortcut is Ctrl+Shift+>.
The Increase Font Size command nudges the font size up to the next value as listed on the Size menu (refer to Figure 10-1). So if the text is 12 points, the command increases its size to 14 points.
![]() To decrease the font size, click the Decrease Font Size command button. Its keyboard shortcut is Ctrl+Shift+<.
To decrease the font size, click the Decrease Font Size command button. Its keyboard shortcut is Ctrl+Shift+<.
The Decrease Font Size command works in the opposite direction of the Increase Font Size command: It reduces text size to the next-lower value displayed on the Size menu (refer to Figure 10-1).
To remember the text size keyboard shortcuts, think of the less-than and greater-than symbols. To make the text size greater than the current size, use the Ctrl+Shift+> shortcut. To make the text size less than its current size, use Ctrl+Shift+<.
To increase or decrease the font size by smaller increments, use these shortcut keys:
|
Ctrl+] |
Makes text one point size larger |
|
Ctrl+[ |
Makes text one point size smaller |
More Colorful Text
Adding color to your text doesn’t make your writing more colorful. All it does is make you wish that you had more color ink when it’s time to print your document. Regardless, you can splash color on your text, without the need to place a drop cloth below the computer.
Coloring the text
To change the color of text in a document, follow these steps:
- Click the Home tab.
-
 In the Font group, click the Font Color command button.
The current word, any selected text, or any new text you type is assigned the button’s color.
The Font Color button shows which color it assigns to text. To change the color, click the menu triangle to the button’s left and choose a color from the menu displayed.
- To restore the font color, choose Automatic from the Font Color menu. The Automatic color is set by the text style. See Chapter 15 for details on styles.
- Theme colors are associated with the document theme. Refer to Chapter 16.
- To craft your own, custom colors, select the More Colors item from the Font Color menu to display the Colors dialog box.
- The printer companies would love it if you’d use more colored text in your documents. Remember: Colored text works only on a color printer, so buy more ink!
- Avoid using faint colors for a font, which can make text extremely difficult to read.
 Don’t confuse the Font Color command button with the Text Highlight Color command button, to its left. Text highlighting is used for document markup, as described in Chapter 26.
Shading the background
To set the text background color, use the Shading command. Follow these steps:
- Click the Home tab.
-
 In the Paragraph group, click the Shading command button.
The color shown on the button shades the current word or selected block, or sets the background color for new text typed.
To switch colors, click the menu button to the right of the Shading command button. Select a color from the list, or choose More Colors to create a custom color.
- If you want to remove the background color, choose No Color from the Shading command’s menu.
- The Shading command is used also to shade other objects on the page, such as cells in a table. That’s why it dwells in the Paragraph group and not the Font group.
- To create white-on-black text, first select the text. Change the text color to white, and then change the background (shading) to black.
- If you need to apply a background color to an entire page, use the Page Color command. See Chapter 13.
Change Text Case
Text case isn’t really a font format, but it’s historically related to fonts: Back in the days of mechanical type, a font came in a case, like a briefcase. The upper part of the case held the capital letters. The lower part held the noncapital letters. That’s where the terms uppercase and lowercase originated.
To change the case of text in Word, well, you could just type it the proper way in the first place. Even I forget to do that. Although Word’s AutoCorrect and AutoFormat features can automatically capitalize text for you, another command is available. Follow these steps:
- Click the Home tab.
 In the Font group, click the Change Case command button.
-
Choose the proper case from the menu.
The list of menu items reflects how the case is changed, as shown in Figure 10-2.
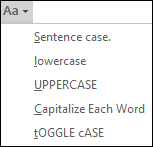
Figure 10-2: Options for changing text case.
The Change Case command is not really a formatting command; its effect doesn’t stick with the text you type.
The keyboard shortcut for the Change Case command is Shift+F3. Press this key combination to cycle between three case options: ALL CAPS, lowercase, and Capitalize Each Word.
Clear Character Formatting
So many Word formatting commands are available that it's possible for your text to look more like a pile of runes than modern text. Word understands this problem, so it offers the Clear Formatting command. Use this command to peel away all formats from your text, just like you peel the skin from a banana.
To remove text formatting, follow these steps:
- Click the Home tab.
-
 In the Font group, click the Clear Formatting command button.
Text formats are removed from selected text or from all new text typed.
The formatting isn’t removed as much as it’s restored: After issuing the Clear Formatting command, text is altered to represent the defined style. That style includes font, size, and other attributes.
- The keyboard shortcut for the Clear Formatting command is Ctrl+spacebar.
- The Clear Formatting command removes the ALL CAPS text format but doesn’t otherwise change the text case.
- You cannot use the Clear Formatting command to remove text highlighting. See Chapter 26.
- Although you can use the Clear Formatting command to change text color, it doesn’t reset the background color. See the section, “Shading the background,” earlier in this chapter.
Behold the Font Dialog Box
Word features a single location where all your font-formatting dreams can come true. It’s the Font dialog box, shown in Figure 10-3.

Figure 10-3: The neatly organized Font dialog box.
To summon the Font dialog box, obey these steps:
- Click the Home tab.
-
In the Fonts group, click the dialog box launcher button.
The button is found in the lower-right corner of the Font group (refer to Figure 10-1).
The Font dialog box contains all the commands for formatting text, including quite a few that didn't find their way into the Font group on the Ribbon. As with all text formatting, the commands you choose in the Font dialog box affect any new text you type or any selected text in your document.
When you've finished setting up your font stuff, click the OK button. Or click Cancel if you’re just visiting.
- Use the Ctrl+D keyboard shortcut to quickly summon the Font dialog box.
- The best benefit of the Font dialog box is its Preview window, at the bottom. This window shows you exactly how your choices affect text in your document.
- The Font names +Body and +Heading refer to the fonts selected by the current document theme. This is done so that you can use Word's theme commands to quickly change body and heading fonts for an entire document all at one time.
- Click the Font dialog box’s Text Effects button to access interesting text attributes such as Shadow, Outline, Emboss, and Engrave. See Chapter 17 for information on this button.
- The Font dialog box’s Advanced tab hosts options for changing the size and position of text on a line.
- The Set as Default button in the Font dialog box is used to change the font that Word uses for a new document. If you prefer to use a specific font for all your documents, choose the font (plus other text attributes) in the Font dialog box, and then click the Set as Default button. In the dialog box that appears, choose the option All Documents Based on the Normal Template, and then click the OK button. Afterward, all documents start with the font options you selected.