
Chapter 29
A More Custom Word
In This Chapter
![]() Configuring the status bar
Configuring the status bar
![]() Customizing the Quick Access toolbar
Customizing the Quick Access toolbar
![]() Finding special commands for the toolbar
Finding special commands for the toolbar
![]() Adding tabs and groups to the Ribbon
Adding tabs and groups to the Ribbon
I’m not one to customize things. Despite available options, I survive with the stock Windows desktop and background. I don’t modify my phone’s appearance. And I’ve only ever put only one bumper sticker on my car. Still, I’m all in favor of having the ability to modify things if I so choose. Customization seems to be a part of everything, and Word is no exception.
A Better Status Bar
Lurking at the bottom of the Word window is an extremely useful gizmo, the status bar. Chapter 1 introduces the status bar but only hints at its potential. Now it's time to reveal all: Right-clicking the status bar produces the helpful Customize Status Bar menu, shown in Figure 29-1.
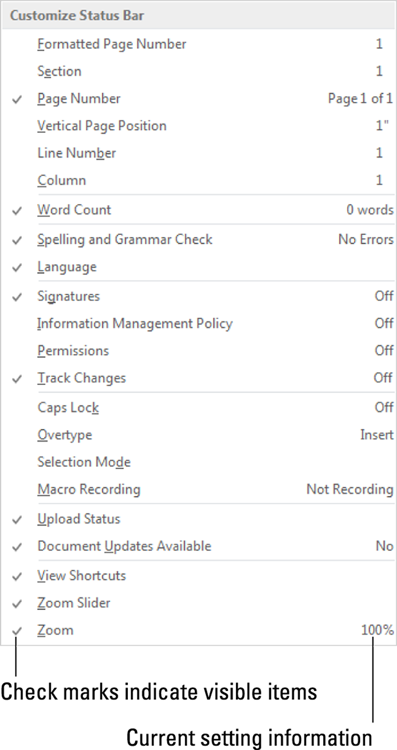
Figure 29-1: The Customize Status Bar menu.
The Customize Status Bar menu does two things: First, it controls what you see on the status bar (informational tidbits as well as certain controls). Second, it lets you turn on or off certain Word features.
From Figure 29-1, as well as on your screen, you can see the current status for many optional settings. A check mark indicates that an item is either visible or appears when necessary. To add an item, choose it. To remove a check marked item, choose it.
Here are my thoughts:
- Choosing an item from the menu doesn't cause the menu to disappear, which is handy. To make the menu go away, click the mouse elsewhere in the Word window.
- The topmost items on the menu display information about your document. To have that information displayed on the status bar, chose one or more of those items.
- The Selection Mode option directs Word to display the text Extend Selection on the status bar when you press the F8 key to select text. See Chapter 6 for more information on selecting text.
- The Overtype item places the Insert/Overtype button on the status bar. You can click this button to easily switch between Insert and Overtype modes. However, most Word users prefer to use Insert mode all the time.
- The last three items on the menu control whether the View buttons or Zoom shortcuts appear on the status bar.
The Quick Access Toolbar
Back in the old days, you could seriously mess with how the Word window looked. You could add toolbars, remove toolbars, modify toolbars, create your own toolbars, and generally use the word toolbars over and over again until it lost its meaning. Today, Word isn’t quite as flexible as it once was, but you’re still allowed to customize a toolbar.
The Quick Access toolbar is illustrated in Figure 29-2. It’s found at the top-left corner of the window.

Figure 29-2: The Quick Access toolbar.
Click a wee icon on the Quick Access toolbar to activate a feature. You can customize the toolbar by removing icons you don’t use and adding icons you need.
 When the Quick Access toolbar grows too many custom buttons and begins to crowd into the document’s title, place it below the Ribbon: Choose the command Show Below the Ribbon from the toolbar menu (refer to Figure 29-2). To move the Quick Access toolbar back atop the Ribbon, choose the command Show Above the Ribbon.
- Word is configured to show three buttons on the Quick Access toolbar: Save, Undo, and Redo. If you have a touchscreen PC, a fourth button appears, Touch/Mouse Mode.
Adding buttons to the Quick Access toolbar
When you enjoy using a Word command, and find yourself using it so much that the mouse is wearing a track in the program window, consider adding the command to the Quick Access toolbar.
Common commands are kept on the toolbar’s menu. Refer to Figure 29-2 for the lot. To add one of those common commands, such as the Quick Print command, choose it from the menu.
To add any Word command to the Quick Access toolbar, locate its command button on the Ribbon. Right-click the command and choose Add to Quick Access toolbar from the shortcut menu that pops up.
- Word remembers the Quick Action toolbar’s commands. They show up again the next time you start Word, in every document window.
- Some commands place buttons on the toolbar, and others place drop-down menus or text boxes.
Editing the Quick Access toolbar
To keep the Quick Access toolbar from getting out of hand, you can make adjustments beyond adding commands already on the menu. To do so, choose More Commands from the Quick Access toolbar’s menu. You see the Word Options dialog box with the Quick Access Toolbar area shown, as illustrated in Figure 29-3.

Figure 29-3: Adjusting the Quick Access toolbar.
Use the list on the left to choose a new command to add to the Quick Access toolbar.
The list on the right shows items currently on the toolbar. You can use that list to rearrange or remove Quick Access toolbar items.
Click the OK button when you’re finished editing.
- Choose the All Commands item from the Choose Commands From menu (refer to Figure 29-3) to view every possible command in Word. Sometimes, a missing command that you think could be elsewhere ends up being available in the All Commands list — for example, the popular Save All command or the Tabs command, which quickly displays the Tabs dialog box.
- When your command list grows long, consider organizing it. Group similar commands by using the <Separator> item, which will appear as a vertical bar on the Quick Access toolbar.
- Yes, some commands lack specific graphics on their buttons; they show up as green dots on the toolbar.
- To return the Quick Access toolbar to the way Word originally had it, choose Reset ⇒ Reset Only Quick Access toolbar from the Word Options window (refer to the bottom right in Figure 29-3).
Removing items from the Quick Access toolbar
To remove a command from the Quick Access toolbar, right-click its command button and choose Remove from Quick Access toolbar.
Likewise, you can choose a command with a check mark from the Customize Quick Access Toolbar menu. Or you can use the Word Options dialog box, as described in the preceding section, to remove items.
Customize the Ribbon
Word doesn’t let you alter the basic tabs and groups on the Ribbon, which is probably a good thing for the sake of consistency. What Word will let you do, however, is create your own tab on the Ribbon or a new group on an existing tab.
 Although this type of customization is popular and can be fun, I consider it an advanced topic. The task is not difficult to perform, but it can potentially mess things up. Proceed with caution.
Here’s how that operation works:
- Click the File tab.
- Choose Options.
-
In the Word Options window, choose Customize Ribbon.
The Word Options window changes its appearance. Tabs on the Ribbon are listed on the right, and Word commands are shown on the left. The Ribbon is your oyster.
To add a new group to an existing tab, click the tab on the right side of the window, and then click the New Group button. Click the Rename button to assign the group a name other than New Group and to add a symbol (if Word lets you).
To add commands to a custom group, click to select the group you created. Locate the command on the left side of the window, and then click the Add button to stick it into the new group.
If you want to go whole hog and add your own tab to the Ribbon, click the New Tab button. The new tab is created along with a new group; right-click both items to rename them. Then add commands to the custom tab’s custom group as described earlier.
In Figure 29-4, you see the Dan Tab that I added to the Ribbon, along with two groups, A commands and Z commands.

Figure 29-4: A custom tab and groups on the Ribbon.
The changes you make to the Ribbon hold for every Word document you open. They aren’t tied to a specific template.
- The tabs and groups on the Ribbon are shown on the right side of the Word Options window, using a hierarchical menu system: Click [+] to expand a tab or group; click [-] to collapse it.
- Use the Up and Down arrows to the right side of the Tabs list (in the Word Options dialog box) to shuffle the tabs, groups, and commands. You can rearrange the Ribbon any way you like, but keep in mind that in this book I assume that you haven’t messed with anything.
- If you’d rather not see your custom tab or group, summon the Word Options dialog box (follow the steps in this section) and remove the check mark by your new tab or group. That action doesn’t delete the item; it just prevents it from showing up.
- To restore the Ribbon to normal, click the Reset button found in the lower-right corner of the Customize window. Choose the command Reset All Customizations.