
Chapter 26
Let’s Work This Out
In This Chapter
![]() Sticking comments in a document
Sticking comments in a document
![]() Highlighting text
Highlighting text
![]() Finding changes in a document
Finding changes in a document
![]() Tracking changes in a document
Tracking changes in a document
![]() Reviewing document changes
Reviewing document changes
![]() Sharing by using online collaboration
Sharing by using online collaboration
Writing isn’t a team sport, but it can be. Eventually, writers encounter collaboration, welcome or not. Often it comes in the form of an editor, but occasionally others chime in. To assist in that task, Word gives you some work-it-out-together tools. They help you share ideas, point out issues that need attention, and even see who has done exactly what to your precious text.
Comments on Your Text
You can write a note to yourself, or those reading your document can jot a note. They can do so right in the text, which is très gauche, coloring the text in another font, or using ALL CAPS, or surrounding it with triple curly brackets or some other such nonsense.
The better way to insert comments in a document is to use Word’s Comment feature, found on the Review tab.
Adding a comment
To adroitly thrust a comment into your document, follow these steps:
-
Select the chunk of text on which you want to comment.
Be specific. Although you may be tempted to select the entire document, only the first few words of a longer chunk are necessary.
-
Click the Review tab.
-
 In the Comments group, click the New Comment button.
The New Comment button is shown in the margin. Click it to see a Comments box to the right of the current page, similar to the one shown in Figure 26-1. The side of the page where the comment appears is called the markup area.
-
Type your comment.
Jot down your thoughts. I’m not sure how long a comment can be, although you probably don’t want to write more than a few lines. If you desire, you can apply text formats to the comment.
- Press the Esc key when you’ve finished typing the comment.
Or you can click in the document’s text.
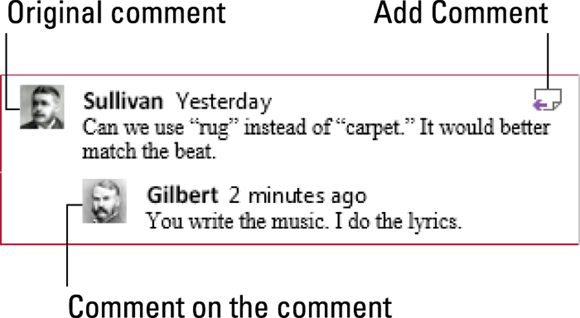
Figure 26-1: Comments on a text passage.
To comment on a comment, click the Add Comment button, shown in Figure 26-1. Type your reply to the earlier comment in the box. Click in the text when you’re done.
Displaying or hiding comments
Add a comment to your document and the markup area appears on the right side of the page. The markup area appears whenever a document features comments, but its appearance is controlled by settings on the Review tab.
 To hide the markup area, click the Review tab. In the Tracking group, click the Display for Review button, shown in the margin. The four available options set how comments, as well as other document revisions (covered elsewhere in this chapter), are displayed:
- Simple Markup: Chose this item to display the markup area and view comments and revisions.
- All Markup: Choose this item to display the markup area. Any comments or revisions are shown, along with lines referencing their locations in the text.
- No Markup: Choose this item to hide the markup area. Comments don’t appear, and any revisions are hidden in the text.
- Original: Choose this item to hide the markup area as well as any revisions made to the document. With regards to comments, this item is identical to No Markup.
The markup area appears best when viewing the document in Print Layout view. Web Layout view (not my favorite) also shows the markup area on the right side of the window.
If you choose Draft view, the comments appear as bracketed initials highlighted with a specific background color. For example, my comments look like [DG1], where DG are my initials and the 1 represents comment one. Position the mouse pointer at that text to view the comment in a pop-up bubble.
 When Word is in Read Mode view, comments appear as cartoon bubbles to the right of the text. Click a bubble, similar to what’s shown in the margin, to view the comment.
- See Chapter 1 for more information on Word’s different document views.
 To view all comments, no matter which document view is chosen, summon the Reviewing pane: Click the Review tab, and in the Tracking group, click the Reviewing Pane button. Choose either the horizontal or vertical display to summon the Reviewing pane and peruse comments as well as text revisions.
- See the later section, “Tracking changes as they're made,” for information on revisions.
Reviewing comments one at a time
Rather than randomly scroll through your document to hunt down a comment, use the Next Comment and Previous Comment buttons. These buttons are found on the Review tab, in the Comments group.
 Click the Next Comment button to jump to the next comment in the document.
 Click the Previous Comment button to jump to the previous comment in the document.
Clicking either the Next Comment or Previous Comment button activates All Markup view, as covered in the preceding section.
Printing comments (or not)
I’ll bet you were surprised! You went to print your document and, lo, there on the page along with all your wonderful formatted text were those silly comments. That’s probably not what you intended.
To control whether a document’s comments appear when printed, follow these steps:
-
Press Ctrl+P.
The Print screen appears.
-
Click the Print All Pages button.
A menu pops up, which I call the “print what” menu.
At the bottom of the menu, you see a set of options, the first of which is Print Markup. This setting controls whether comments, as well as other text markup covered in this chapter, print with the rest of the document.
-
Choose the Print Markup command.
When this command has a check mark by it, the comments print. When no check mark appears, you’re directing Word not to print comments (and other types of text markup).
Use the Print Preview window to confirm whether comments will print. - Make any other settings in the Print window as needed.
- Click the big Print button to print the document.
 The change made by completing these steps isn’t permanent. You must follow these steps every time you print the document or else the comments print as well.
See Chapter 9 for more information on printing documents in Word.
Deleting comments
To delete a comment, work these steps:
- Click the Review tab.
-
Click the Next Comment button to locate the offending comment.
Or you can click the Previous Comment button, depending on where the insertion pointer blinks inside the document.
Upon success, the comment is highlighted in the markup area.
-
In the Comments area, choose Delete ⇒ Delete.
 The Delete button is shown in the margin. It’s one of those menu button icon things that you must click to access the commands.
 -
Repeat Steps 2 and 3 to remove additional comments.
Or just keep repeating Step 2 until you find a comment worthy of obliteration.
To delete all comments from a document in one single act of massive retaliation, use the Delete Comment button's menu: Choose Delete ⇒ Delete All Comments in Document.
The Yellow Highlighter
Word comes with a digital highlighter pen that lets you mark up and colorize the text in your document without damaging the computer’s monitor. To highlight text, abide by these steps:
-
Click the Home tab.
-
 In the Font group, click the Text Highlight button.
The mouse pointer changes to a — well, I don't know what it is, but the point is that Word is now in Highlighting mode.
-
Drag the mouse over the text you want to highlight.
The text becomes highlighted — just as if you used a highlighter on regular paper but far neater.
-
Click the Text Highlight button again to return the mouse to normal operation.
Or press the Esc key to exit Highlighting mode.
The highlight doesn’t necessarily need to be yellow. Click the menu button to the right of the Text Highlight button, and choose a different highlighter color from the palette displayed.
To remove highlighting from your text, highlight it again in the same color. If that doesn’t work, choose None as the highlight color and then drag the mouse over any color of highlighted text to remove the highlight.
- To highlight multiple chunks of text, double-click the Text Highlight button. The mouse pointer stays in highlighting mode until you click the Text Highlight button again or press the Esc key.
- To highlight a block of text, mark the block and then click the Highlight button that appears on the mini toolbar.
- Highlighting isn’t the background color. See Chapter 10 for information on setting the text background color.
 The highlighted text prints, so be careful with it. If you don’t have a color printer, highlighted text prints in black or gray on hard copy.
Look What They've Done to My Text, Ma
I enjoy feedback. All good writers do. Still, I’d like to know what’s been done to my text, not only to see the effect but sometimes to learn something. Word’s revision-tracking tools make such a review possible.
Comparing two versions of a document
You have the original copy of your document — the stuff you wrote. You also have the copy that Brianne, the vixen from the legal department, has worked over. Your job is to compare them to see exactly what’s been changed from the original. Here’s what to do:
- Click the Review tab.
-
In the Compare group, choose Compare ⇒ Compare.
The Compare Documents dialog box shows up.
-
Choose the original document from the Original Document drop-down list.
The list shows recently opened or saved documents. Choose one, or use the Browse item to summon the Open dialog box and hunt down the document.
-
Choose the edited document from the Revised Document drop-down list.
Choose the document from the list, or use the Browse item to locate the changed, altered, or mangled document.
- Click OK.
Word compares the two documents. The changes are displayed in a quadruple-split window, as shown in Figure 26-2. This presentation is actually a third document titled Compare Result.
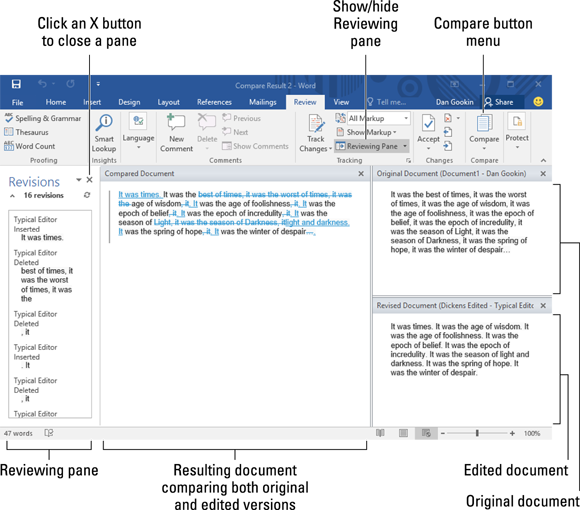
Figure 26-2: The shameful changes show up here.
Look it over! Peruse the changes made to your pristine prose by the barbarian interlopers: Scrolling is synchronized between all three documents: original, edited, and compared. Click a change in the Reviewing pane (shown on the left in Figure 26-2) to quickly see which part of your document was folded, spindled, or mutilated.
- Changed text is highlighted in two ways: Added text is underlined. Removed text is shown in strikethrough style.
- You can confirm or reject the changes in the Compare Result document just as you would when tracking changes manually. See the upcoming section, “Reviewing changes.”
Tracking changes as they’re made
 To be a kind and gentle collaborator, activate Word’s Tracking feature before you being making changes to someone else’s text: Click the Review tab, and in the Tracking group, click the Track Changes button, shown in the margin. From that point on, any changes made to the document are color-coded based on who is making the changes and what level of markup is displayed:
- For Simple Markup, a color-coded bar appears to the left of a paragraph, indicating that some change was made.
- For All Markup, new text appears in a specific color, depending on who made the changes. Added text appears with a color-coded underline and deleted text appears with color-coded strikethrough. These text highlights are called revision marks.
- For No Markup, the changes are tracked but not displayed in the document. This is a great setting to choose for the least amount of distraction. (The revision marks can be seen by choosing All Markup instead of No Markup.)
Refer to the earlier section, “Displaying or hiding comments,” for information on the Simple Markup, All Markup, and No Markup settings.
Word continues to track changes and edits in your document until you turn off Track Changes. To do so, click the Track Changes button again.
Although the Track Changes button appears highlighted while the feature is active, a better way to check — and use — this feature is to activate the Track Settings option on the status bar. To set this option, right-click the status bar and choose Track Changes. As a bonus, you can click this item on the status bar to activate or deactivate revision marks in your document.
Reviewing changes
After your poor, limp document is returned to you, the best way to review the damage inflicted is to use the commands on the Review tab, located in the Changes group. These commands are illustrated in Figure 26-3; depending on the window size, you may or may not see text explaining what each one does.
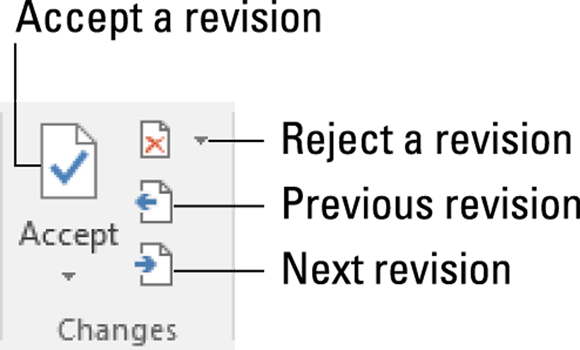
Figure 26-3: Buttons for reviewing changes.
To review changes throughout your document, click the Next or Previous buttons. Click a button to hop from one change in the text to the next change.
Click the Accept button if you can tolerate the change. To reject a change, click the Reject button. After clicking either button, you instantly see the next change in the document, until all the changes are dealt with.
- The Accept and Reject buttons are actually menus. They sport commands that accept or reject all the changes in your document in one fell swoop. The only thing missing is the “swoop!” sound when you use those commands.
- You can view a summary of changes by summoning the Revisions pane: On the Review tab, in the Tracking group, click the Reviewing Pane button. The Revisions pane doesn’t show the changes in context, but it lists each one. Click an item in the Revisions pane to hop to each change in your document.
- To see the changes in your text, ensure that you chose the All Markup command from the Display for Review menu button.
- When you goof while approving or rejecting a change, press Ctrl+Z to undo.
- You can also right-click any revision mark to accept or reject it.
Collaborate on the Internet
Most document changes are made sequentially: You write something, save, and then someone else works on the document. If that chaos isn’t enough for you, Word allows you to invite people to edit a document while you’re working on it. This collaboration feature is called Sharing, probably because a better name wasn’t available or Microsoft was pressed for time.
To make document sharing work, save your document to the cloud, or Internet storage. Specifically, the document must be saved to Microsoft’s One Drive storage. See Chapter 8 for more information.
Sharing a document
After saving your document to OneDrive online storage, follow these steps to make it available for collaboration:
-
Click the Share button.
This button is found above the Ribbon, near the top-right part of the document’s window.
Upon success, the Share pane appears.
-
Fill in information about your collaborator(s).
Type in the Invite People box the email address of the person or people with whom you want to share the document. If you use Outlook as your computer’s address book, click the Address icon to the right of the Invite People box to automatically add people.
-
Choose whether or not the collaborators can edit.
Choose Can View from the menu and the people you invite can read the document. Choose Can Edit and they can make changes.
- Type a message in the Include a Message box.
-
Click the Share button.
The invites are sent.
Eventually, the recipients receive the email invite. To access the shared document, they click the link in the email address. Their web browser program opens and displays the document. If they want to edit the document, they click the link Edit in Browser button. At that point, their web browser displays the document as it appears in Word, complete with a customized version of the Ribbon. Hack away.
Checking updates
To determine whether someone has edited your shared document, or even if he's editing it right now, open the shared document and click the Share button found near the upper-right corner of the document window. The Share pane lists all collaborators and whether or not they’re currently editing.
If any collaborators have changed the document, save your copy to view the updates: Click the Save icon on the Quick Access toolbar, or press Ctrl+S. Any changed content appears in the document with a colored overlay, similar to how revision marks are displayed, as covered earlier in this chapter.
To check to see whether updates are pending, click the File tab, and on the Info screen look for and click the button titled Document Updates Available.