
Chapter 3
Android Application Development With Android Studio
WHAT'S IN THIS CHAPTER?
- Android projects
- Android activities
- Android services
- Assets of Android projects
- XML files in Android projects
- Android manifest file
- Creating and working with modules
- Building modules for Android Projects
Android Studio is your best friend when it comes to Android application development and distribution. Android Studio doesn't only help you writing code but it also provides tools and templates to fasten your development process. Android Studio is increasingly more capable than a traditional Android development environment in Eclipse with the Android Developer Tools (ADK) plugin.
This chapter guides you through Android application development in Android Studio. We cover the basic building blocks of Android applications and the capabilities of Android Studio.
We start by creating an Android application project for phones and tablets and continue with additional development modules for your application.
ANDROID PROJECTS
Software applications with many source files and resources are organized under a project structure or a folder structure to better classify files and define source code compiling and binary generation order with a hierarchy. We call these predefined folder and file structures a project, which is an organizational unit that represents a complete software solution.
Android applications also have a file and folder hierarchy structure, referred to as an Android application project. Android application projects include Java source code, XML configuration files, images, videos, sounds, and other resources within an organizational structure. For each unique application you develop, you need to create a new project. Android Studio helps from the first step when creating the initial project structure.
The build process uses the configuration files and folder hierarchy to identify Java source and resource file relations in the Android Project to create the final application package to run on an Android device. If you don't follow the correct structure, you won't be able to create the final application package and your application simply won't build.
In Chapter 2, you saw how to import an example project. In this chapter, you create a new empty project with auto-generated files for Android Studio's application build process.
Creating a New Android Project
Creating a new Android project is pretty straightforward with Android Studio. If you have just launched the Android Studio, it will display the screen shown in Figure 3.1 and list the Quick Start options.
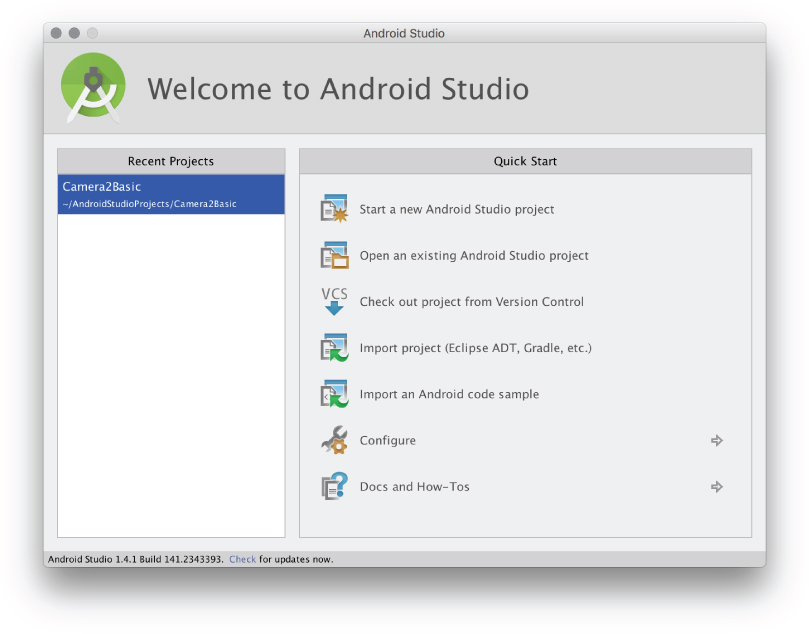
Figure 3.1 Android Studio Welcome window
- To begin, click Start a new Android Studio project.
- Name your application. Your application's name will be shown in the list of applications on the Android menu to launch the application. It's conventional to start an application name with a capital letter. As you can see in Figure 3.2, we named this example application ChapterThree.
- Configure your domain name for packaging application source files. Reserved domain name syntax is used by Android Studio to create a package name and store Java source files.
Sun, later acquired by Oracle, recommends that developers use a company domain written in reverse for the package name to prevent name collisions for the Java classes. By default, Android Studio shows com.example, which is overwritten after you enter the domain name. You don't need to buy a domain name for your personal project but you need to make sure the domain name you are about to choose is unique.
We named our first example's company domain with our book's title expertandroid.com (refer to Figure 3.2). You may choose your company's name as the domain name or just write any name.
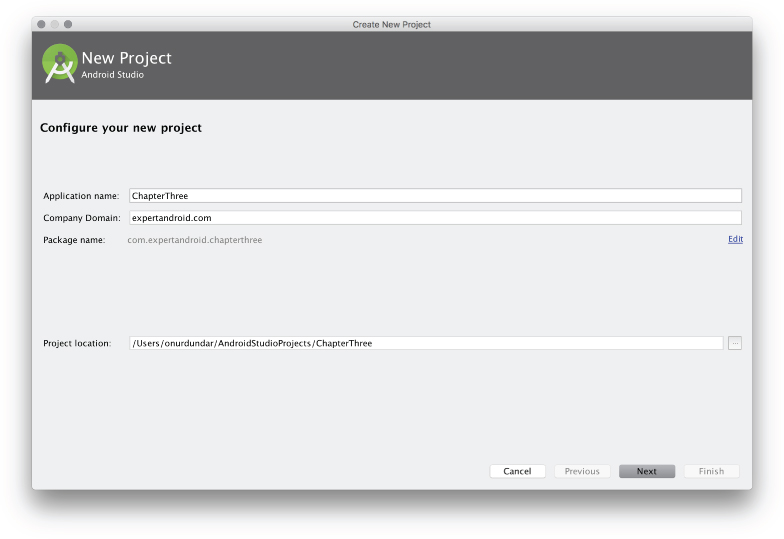
Figure 3.2 Create New Project window
- Accept the default project location and click Next to select the device type and SDK version you want to deploy your application to. Deployment targets can be phones, tablets, wearables, TVs, or Android Auto applications. Throughout the book, Android SDK 6.0 (Marshmallow) is used, so for this example we selected Android SDK 6.0 for Phone and Tablet, as shown in Figure 3.3.
You can select previous versions of Android SDK according to your application's requirements. It is not always the best option to select the latest version for Android applications because not all the devices on the market are updated for the latest version. Earlier SDK versions are compatible with the latest releases so if you select an earlier version, your application will work on the latest devices.
Android Studio can help you select the best SDK version for your application. Click the Help me choose link shown in Figure 3.3 to see the Android Platform/API Distribution. The window shown in Figure 3.4 will appear.
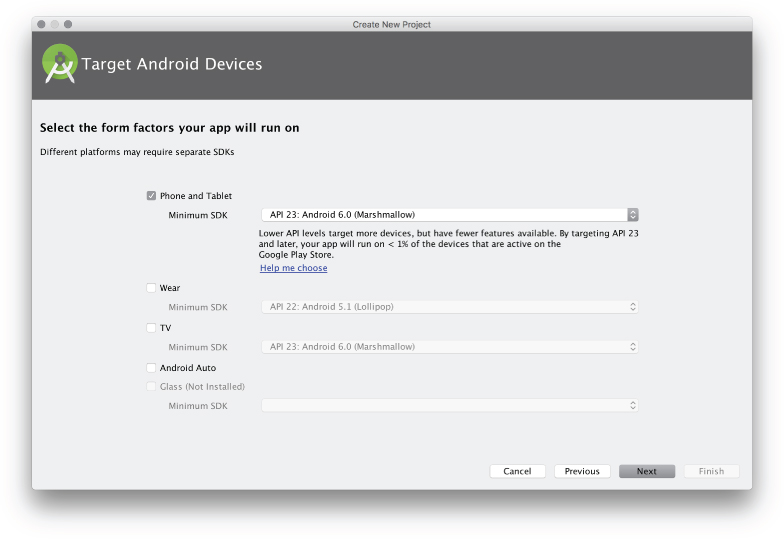
Figure 3.3 Target device selection window
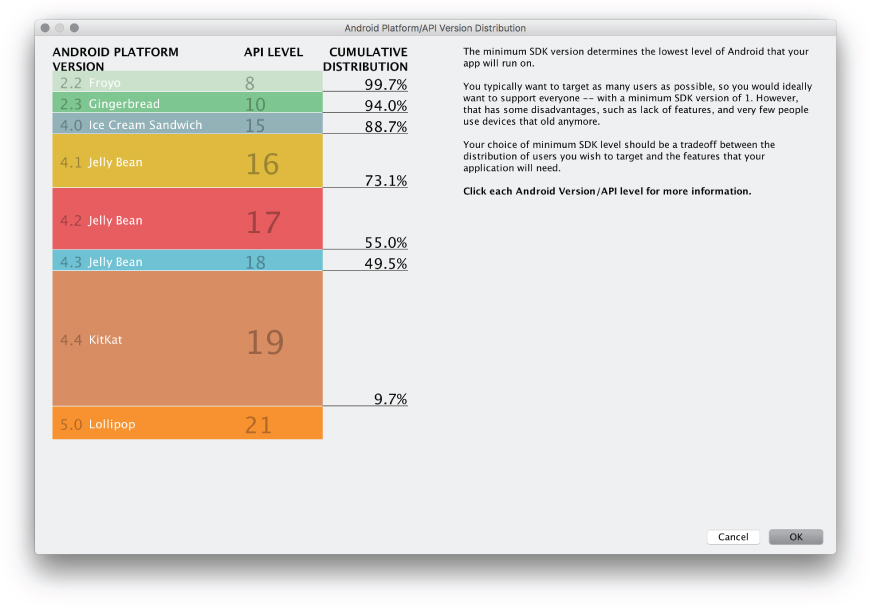
Figure 3.4 Android Platform/API Version Distribution window
The distribution list might help you to decide about your application's target audience, but remember that the latest devices from Google always have the most recent Android distribution and get updated regularly.
Also, be aware of device proliferation. There are thousands of different Android devices and most have different specifications, so you need to test your application for several of them.
- After selecting the device and SDK version, click OK to display the window shown in Figure 3.5. Here you select the initial activity for the application.

Figure 3.5 Add activity window
- Select the Empty Activity template, which doesn't include a user interface. The Empty Activity just creates the initial related source and XML layout files. It simply creates the Hello World project for the Android Studio.
- After you select the Empty Activity option, click Next to open the window shown in Figure 3.6. This is where you name your activity. Each activity selection requires different naming and configuration options. The Empty Activity only needs naming and layout generation selection. We selected to generate the main activity layout, which is the user interface configuration file, so we named our first activity MainActivity.
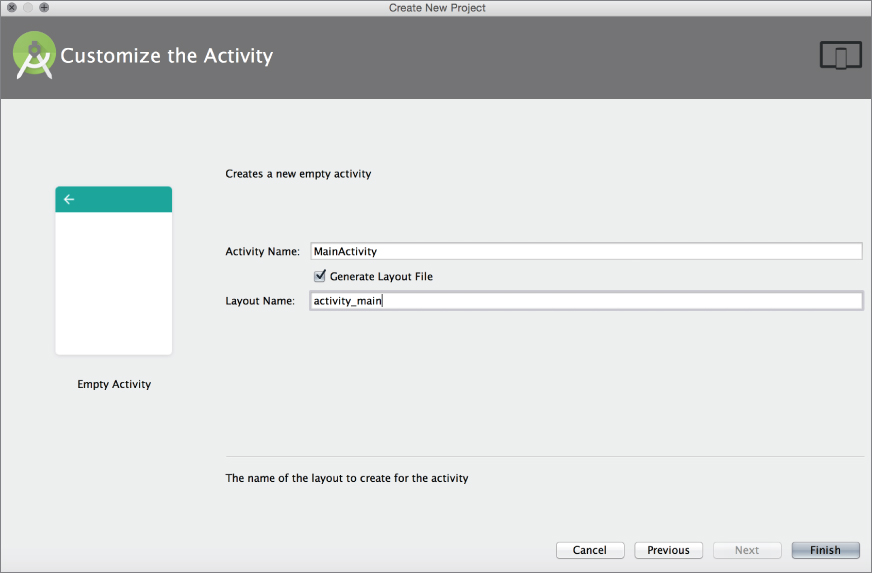
Figure 3.6 Activity customization window
All related resources will use the activity's name so, for example, the layout xml file and other configuration files will include “Main” in their names.
After you click Finish, Android Studio generates files and folders for the application and configures the application build environment. When the project is complete, it is displayed in Android Studio, as shown in Figure 3.7.
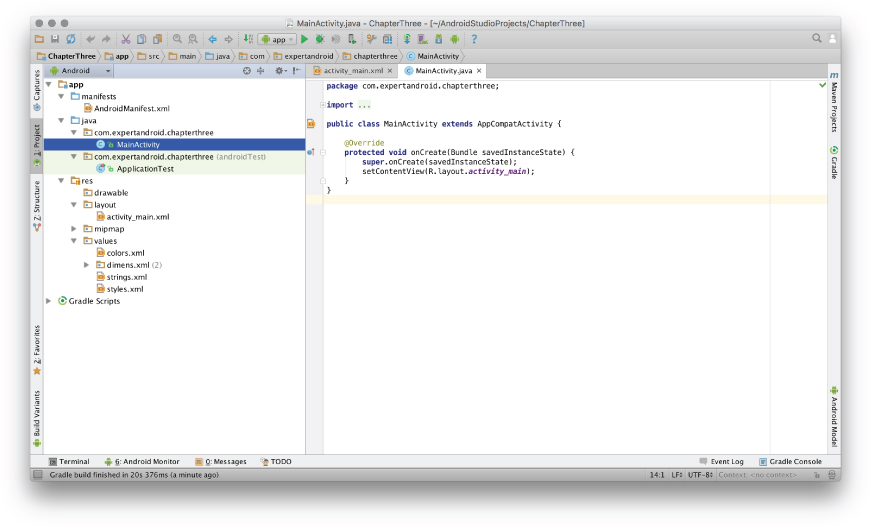
Figure 3.7 First Project View in Android Studio
Creating a Project with Multiple Target Devices
In the past few years, the Android operating system has expanded to devices such as set top boxes, TVs, wearable devices such as watches and glasses, and even automobiles. Android Studio helps you create multiple modules for each device while you are creating the Android application project.
In the previous section, we selected only Phone and Tablet. As shown in Figure 3.8, the list of Target Android Devices includes Wear for wearable devices such as watches, TV for Android TV–enabled devices, and Auto for cars with Android-enabled infotainment systems.
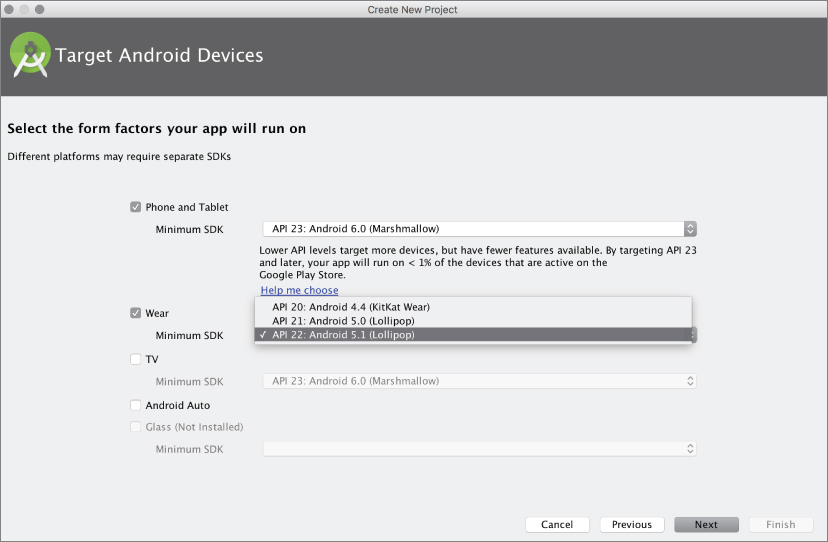
Figure 3.8 Multiple target device selection
- For this example, select both Wear and Phone and Tablet.
- Just like applications for Phone and Tablet, applications for other devices should have an activity. The setup wizard for wearable devices offers a variety of activities for you to choose from, as shown in Figure 3.9.
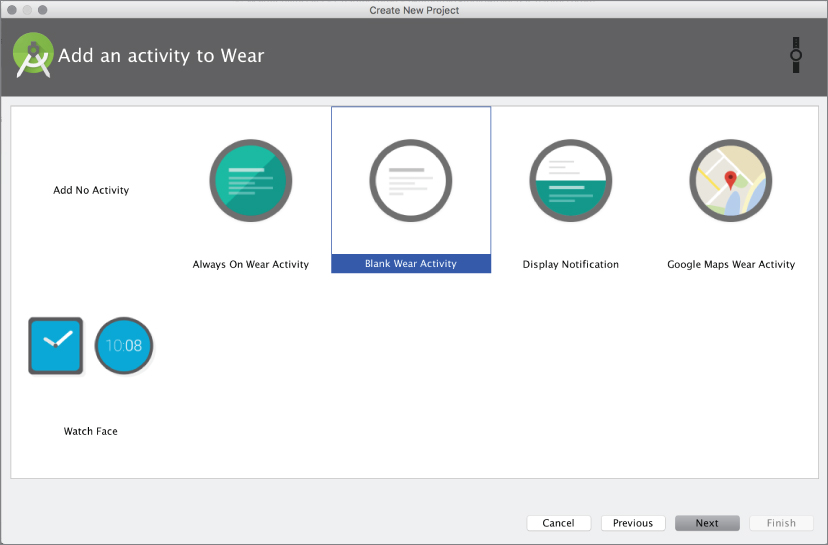
Figure 3.9 Adding a Wear Activity
- The setup wizard prompts you to name the activity and populate the rest of the fields for the project. Note that Wear Activity has more fields to initialize. Name the activity MainActivity, as shown in Figure 3.10.
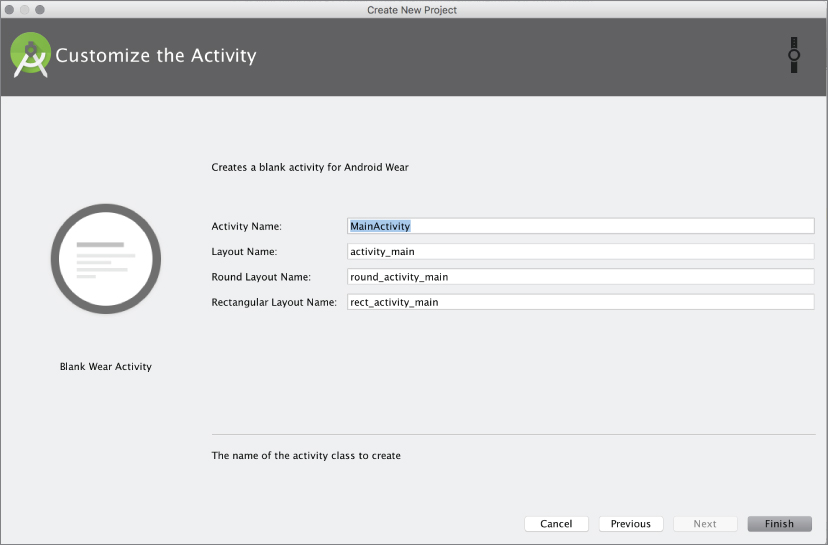
Figure 3.10 Wear Activity configuration window
- Click Finish and after the project is initialized, you will see two modules in Android Studio, as shown in Figure 3.11.
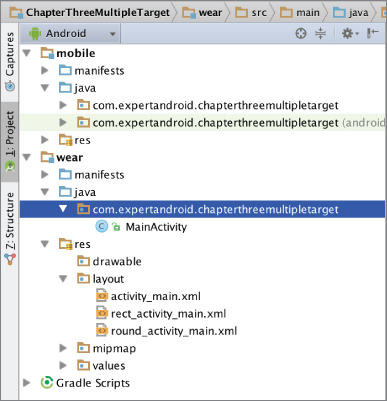
Figure 3.11 Two modules shown in Project View
Having two target platforms in one project is suggested when you are creating an application designed to run on both platforms. Health and fitness applications are a good example of these kinds of projects: A fitness application on a phone or tablet receives a user's running and walking data from the Android watch device and displays the details.
To accomplish this cooperation between devices, both target platforms' source and resource files must be in the same project, but they will be divided into different modules. Android application architecture requires Wear application binaries to be distributed inside the phone/tablet binary package, which is facilitated when you have both apps in a single project. This structure will make you design better communication between devices, use common Java libraries on both applications, and maintain consistency between user interface designs.
Launching Android Applications
After you have created the application project, you need to build the application and launch it on a device. (You learn about configuring it in the following sections of this chapter.) The build process is covered in Chapter 2; here we cover launching your first application with Android Studio. This example shows Hello World on the Android phone's screen.
If you already have a device attached to your development machine with a compatible Android SDK version, select that directly or, as shown in the previous section, you can create a virtual Android device to run your application.
- To run an Android application from the initial project, click the Run ‘app’ arrow shown in Figure 3.12. Alternatively, you can type Shift+F10 (Control+R on Mac) on your keyboard.

Figure 3.12 Android Studio toolbar Run ‘app’ button
- Android Studio will prompt you to select a device from the list of available running devices, as shown in Figure 3.13. If a virtual device is already running, it will be listed as well.
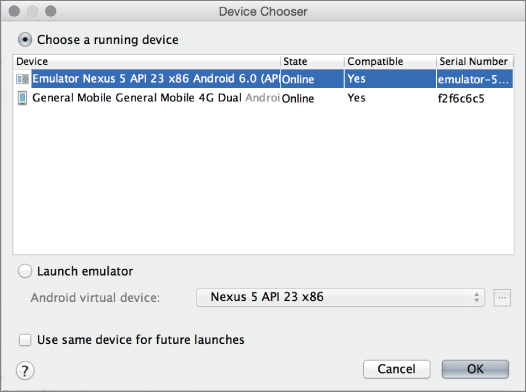
Figure 3.13 Device selection window
If an emulator is not running, you can select the Launch emulator option and click OK to launch the virtual device and run the application, as shown in Figure 3.14. If you intend to use the same device again for running or debugging your project, you can check the Use same device for future launches box.
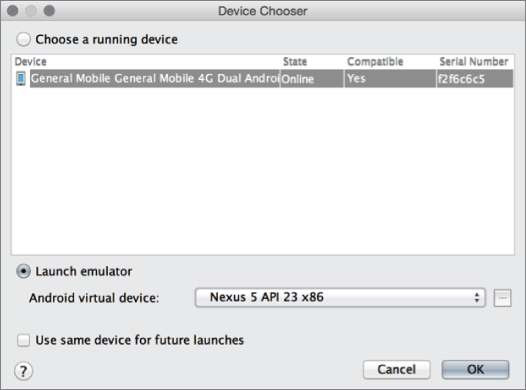
Figure 3.14 Launch emulator option in the Device selection window
The application will automatically launch and you will see the activity you created running on the device.
If you followed this example, you will see an empty application printing “Hello World!” to the screen, as shown in Figure 3.15.
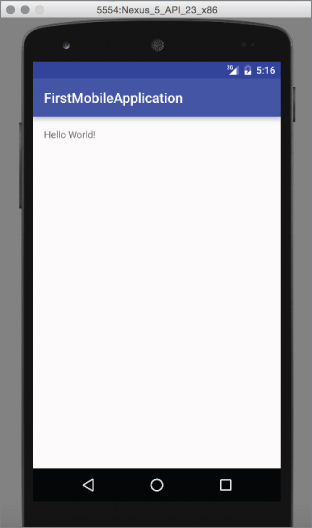
Figure 3.15 Hello World application running on the emulator
The following section covers the details of other activity templates that can be added to Android projects.
ANDROID ACTIVITIES
Android is a Linux-based operating system; all applications running on the Android devices are Linux processes and each application's lifecycle is predetermined from start to finish.
Activities are the most fundamental building blocks of an Android application. There is no main function defined for Android applications so the Android system launches applications with the defined launcher activity, which serves as the entry point for the application.
When the application is launched, the Android operating system application manager uses the Main Activity to start the application. The Main Activity is the first activity users see.
Android activities have a defined lifecycle to manage application runtime from launch to the end of application life. Figure 3.16 shows the simple states of an activity's lifecycle.
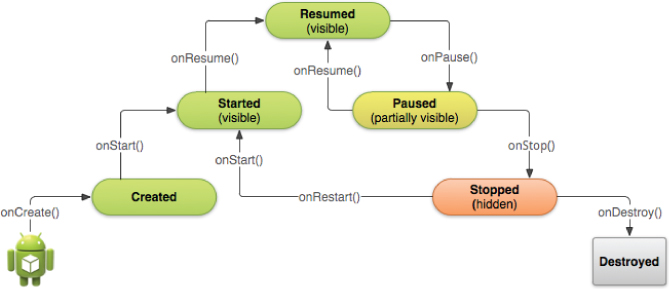
Figure 3.16 Android Activity lifecycle
Source: Figure 3.16 is reproduced from work created and shared by the Android Open Source Project and used according to terms described in the Creative Commons 2.5 Attribution License. (https://developer.android.com/training/basics/activity-lifecycle/starting.html)
To understand Android applications. you must understand the Activity lifecycle. Understanding the lifecycle is crucial to designing a better application while complying with the standards of Android applications.
The following list describes the Activity lifecycle states with Activity methods.
onCreate—In the creation state, activities load the static user interface elements and allocate system resources such as the display device, network device, and other resources required for the application.onStart—After creation by theonCreatemethod, an activity enters the started state. It becomes visible and ready to handle user interaction.onResume—In the resumed state, all actions are performed, such as user input, drawing new user interface elements according to user input, and so on.onPause—In the paused state, the application is taken to the background, or another application is started and brought to the front.onStop—In the stopped state, the application is totally invisible and in a sleeping state.onDestroy—The destroyed state means that all processes are killed and all device resources released.
Activities handle drawing the user interface, user inputs, and response to user input. For example, when you launch an application, it launches the main activity to draw to the device's screen the first user interface defined in the layout XML file. It also handles touch inputs and responds to user interaction.
User-defined activities derive from the Android API's super class Activity in the android.app package. There are also other derived classes, which you can inherit to develop an Activity module for your application. ListActivity and AppCompatActivity are two Java classes derived from Activity. They provide extensions to configure your Activity class without requiring reimplementation of features you require.
The Activity super class inherits the activity lifecycle methods and application context fields that you can override to customize your own Activity for the application.
Listing 3.1 is from Android Studio's Empty Activity template. It overrides the onCreate method of the Activity super class to initialize the activity's activity_main user interface and displays “Hello World!”
The Intent Event Handler
Starting an application activity requires you to create an event handler called Intent. The Intent object is accessible through the android.content package. You can create a new Intent handler as follows:
Intent intent = new Intent();Intent is a data structure that holds the description of the action to be performed, such as starting a new activity, application, service, and so on. The following code snippet creates a new Intent to start the NextActivityClass activity.
Intent intent = new Intent(this, NextActivityClass.class);When a new application starts, the main activity becomes the first screen you see. The Intent abstract class is used by the Android system to launch the main activity. Intent is also used to start another activity within an activity.
Adding Template Activities to Android Projects
Android Studio provides several template activities for developers to seamlessly start development. In addition to providing a starting point for developing your application, they help ensure compliance with the Android application development guidelines.
In this section, you add two template activities: the Blank Activity and the Tabbed Activity. (You added the Empty Activity during project creation.)
Adding a Blank Activity
Let's add a Blank Activity template to your project. The Blank Activity template consists of two components in addition to the Empty Activity template.
Adding an activity template is an easy process in Android Studio. You can add a Blank Activity by performing the following steps.
- Right-click on the project and select New ⇨ Activity ⇨ Blank Activity from the list of available activities, as shown in Figure 3.17. Alternatively, from the Android Studio menu, select New ⇨ Activity ⇨ Blank Activity. Both methods list the same activity templates from which to choose.
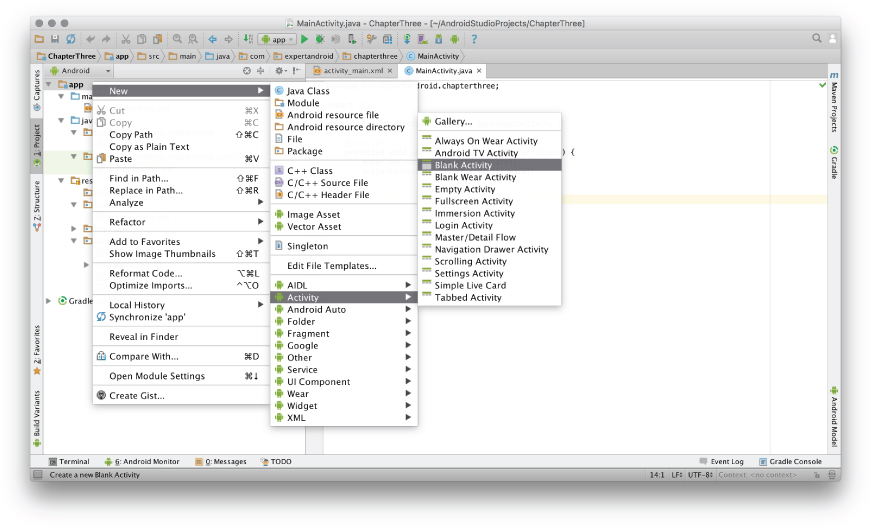
Figure 3.17 Adding a new activity template
- Customize the new activity in the Customize the Activity window that displays (see Figure 3.18). Enter the name, title, UI layout name, and the Java package name you want to add to your new Activity class.
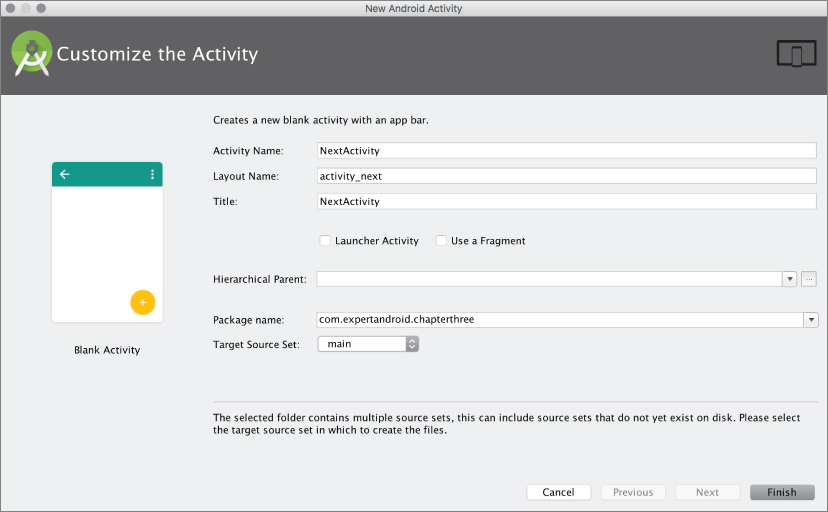
Figure 3.18 Activity template customization
After clicking Finish (without making the additional configurations mentioned in the previous note), the new activity's Java class, named NextActivity.java, is created in the com.expertandroid .chapterthree package. Listing 3.2 shows the auto-generated code from this example.
As you can see in this source code, unlike the Empty Activity, the blank template includes a toolbar object and loads a layout to initialize its view on the phone or tablet.
In addition to the toolbar object, a FloatingActionButton object is defined for the Blank Activity and an action method to show a notification with Android API's Snackbar object has been defined by default with the template.
You cannot directly launch the Empty Activity you added earlier in the chapter. However, as the first activity you added, it is still the main launcher activity. As a result, you can either set an intent object inside the launcher activity to start the NextActivity class you just created, or you can set the NextActivity as the launcher activity when you add it. The second option makes it easier to display the Blank Activity onscreen immediately, as shown in Figure 3.19.

Figure 3.19 Empty Activity template on an Android device
Together with the Java class, the template generates two XML files. Because we named the activity NextActivity, one class is named activity_next.xml and the other is content _next.xml.
The activity_next.xml file defines the main layout user interface elements, including a toolbar widget (AppBarLayout) and a button widget (FloatingActionButton). content_next.xml is the layout defined to include user interface elements in the blank area. It has been defined as a RelativeLayout to configure and design the main user interface for the activity.
Listing 3.3 shows the activity_next.xml file for this example, without any modification.
All elements (the toolbar, the content_next.xml layout, and the FloatingActionButton) are defined in the XML file inside another UI component named CoordinatorLayout. content_next .xml. That file includes just a RelativeLayout with the required configurations but no other elements. RelativeLayout is shown in Listing 3.4.
Further development can be done inside the NextActivity.java file. You can override onStart(), onResume(), and other Activity class functions to determine what this activity performs when it is running. UI design and customization can be made in the activity_next and content_next XML files, together with the Java class file.
In the next two sections, we briefly discuss fragments. Then, in the “Tabbed Activity” section, we demonstrate an activity that includes a fragment.
Android Fragments
Fragments are like subactivities; they handle partial UI operations for a better user experience. Using fragments decreases the number of activities used inside the application and provides a smooth transition between user interface elements.
Using fragments simply divides the UI tasks defined for activities into subcomponents. Fragments allow developers to design a more compact application without the need to launch a large number of activities, which decreases the application stack.
Fragments are even more useful in large screen applications because you must make use of each part of the application without blocking the activity thread that handles the user interface.
Fragments are bound to a root activity to handle their jobs. For example, a typical mail application lists e-mail messages. When a user selects an e-mail to read, a fragment can be used to load only the e-mail content to the screen. If you use an activity instead of a fragment, you need to switch to the new activity and load the e-mail content to the activity; if you want to read another e-mail, you need to go back to the previous activity again, and so on. Fragments prevent this overload.
Fragments make an application respond faster and provide a more continuous user experience. Fragments can be reused within other activities, which helps reduce the number of fragment objects to be used.
Understanding the Fragment Lifecycle
Android fragments are like activities within an activity, so they have a similar lifecycle with additional bindings to the root activity they run in. Figure 3.20 shows the fragment lifecycle.
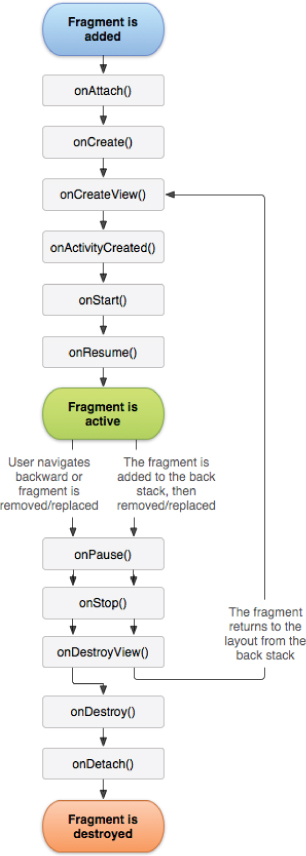
Figure 3.20 Fragment lifecycle
Source: Figure 3.20 is reproduced from work created and shared by the AndroidOpen Source Project and used according to terms described in the CreativeCommons 2.5 Attribution License. (https://developer.android.com/guide/components/fragments.html)
As described in detail in the previous section, fragments are like activities. A fragment has all the lifecycle states of an activity. In addition to the activity's lifecycle states, fragments have additional states to identify the activity they will be running in since a fragment's lifecycle is dependent on its parent activity. These additional lifecycle states are described in the following list.
onAttach—The fragment's association with the root activityonCreateView—Creates and returns the view hierarchy associated with the fragmentonActivityCreated—Method called when the activity is ready after theonCreatestateonDestroyView—Method called when the fragment frees resources and viewsonDetach—Method called when the fragment is no longer associated with the activity
The activity template presented in the following section is the Tabbed Activity, which has fragment definitions included.
Adding a Tabbed Activity
The Tabbed Activity template is a complex activity template with fragments. The Tabbed Activity is also a very popular activity type that is used in many productive applications to switch between states of the application.
To add a Tabbed Activity, you can repeat the steps you followed to add a new Blank Activity earlier in this chapter, but the Tabbed Activity has a different configuration window, as shown in Figure 3.21.
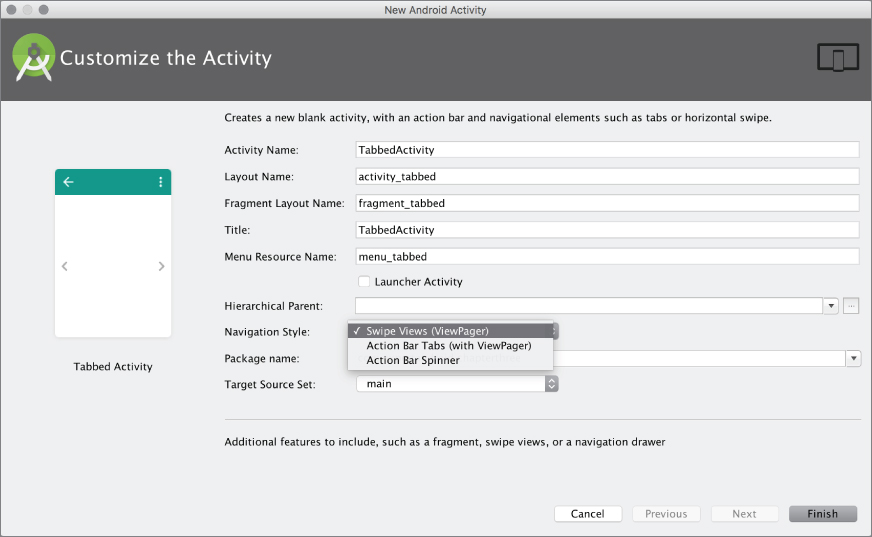
Figure 3.21 Tabbed Activity customization window
Figure 3.21 shows more fields to configure than the Blank Activity.
- Named this activity as TabbedActivity, which auto configures the other fields, adding
_tabbedto the Layout Name, Fragment Layout Name, and Menu Resource Name. The Title becomes TabbedActivity, as shown in Figure 3.21. - Enter our project's default,
com.expertandroid.chapterthree, as the package name.
The Navigation Style list offers three options; Swiping Views, Action Bar Tabs, and Spinner. These determine the style for switching between contents of the activity, such as changing between videos by clicking on a tab or using a swiping movement. By selecting the navigation style you can customize the UI.
When you change from one style option to another, you can see a preview at the left of the window shown in Figure 3.21. In this example, we do not recommend selecting a particular style because we want to show the results for each of them.
Changing the navigation style affects the UI widgets and views styles as well as the template's Java code. Swipe Views and Action Bar Tabs navigation styles generate similar code and XML files but the Action Bar Spinner is little different than the others because the method for navigation between fragments changes. The following list explains these three navigation styles:
- Swipe Views—Swipe screen to change between fragments.
- Action Bar tabs—Touch the tabs on the menu to switch between fragments.
- Action Bar Spinner—Use a drop-down menu on the toolbar to switch between fragments.
The Tabbed Activity is created from the super class AppCompatActivity: public class TabbedActivity extends AppCompatActivity.
The generated TabbedActivity.java template's code is longer and has additional methods to the Blank Activity because it has to account for swipes between fragment pages.
The Tabbed Activity template has two private fields for pager activity. The pagers, shown in the following code, handle switching between fragments.
private SectionsPagerAdapter mSectionsPagerAdapter;
private ViewPager mViewPager;The onCreate function is similar to the same function in the Blank Activity template except there are initializations for paging operations. The onCreate function for the Tabbed Activity is shown in Listing 3.4.
mSectionsPagerAdapter is set to FragmentManager, which interacts with the fragments associated with the activity. mViewPager is set to the container that includes the fragment's XML layout.
Dealing with fragments requires defining additional classes and functions for the activity. One class with its members is required to handle paging the activity and navigation between fragments: public classSectionsPagerAdapter extends FragmentPagerAdapter. (The constructor for this class is public SectionsPagerAdapter(FragmentManager fm) { super(fm); }.) The following functions help FragmentManager to get the page and to set the page title in the activity:
public Fragment getItem(int position)public int getCount()public CharSequence getPageTitle(int position)
Then there is the Fragment class need to handle the views and states of the fragment. Listing 3.5 shows the Fragment class, which is auto-generated inside the TabbedActivity.java class and overrides the onCreateView() function to initialize the fragment's layout XML file.
When you launch the Tabbed Activity template, you see the UI on the device screen, as shown in Figure 3.22, if the Swipe Views navigation style is selected.
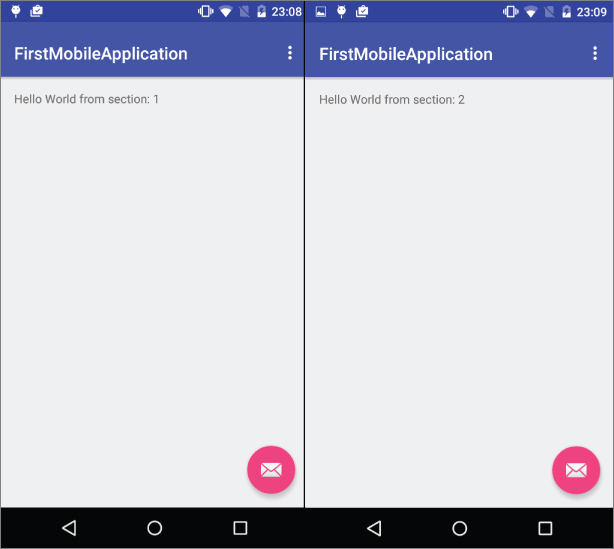
Figure 3.22 Tabbed Activity template screenshot with Swipe Views navigation style
Figure 3.23 shows the screenshots taken for the other navigation styles: Action Bar Tabs and Action Bar Spinner.
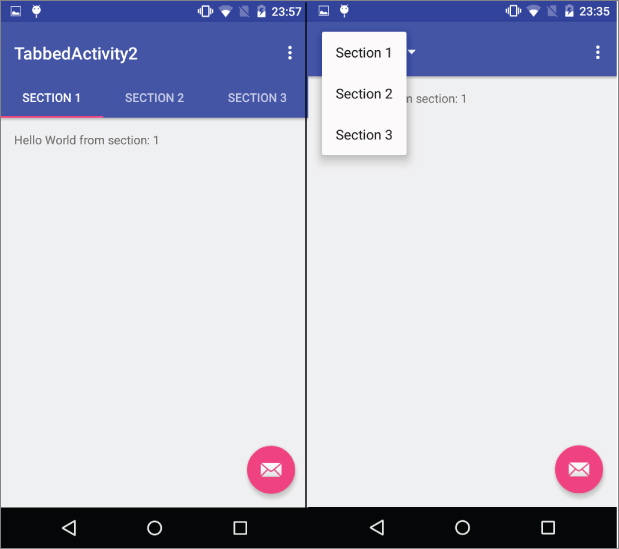
Figure 3.23 Action Bar Tabbed and Spinner UI screenshots for the Tabbed Activity template
Adding activity templates is easy with some practice, but the real work starts after you select the template that's suited to your application design. If your application will load content on the UI at each change, using a fragment is a good choice. If one screen on your application will be tasked to do a specific job, and you would not require a dynamic update on the UI content, you can add an activity without any fragments.
Selecting templates for your application takes some effort and makes you focus on the design and development process. After your template and activity creation, you can work on the detailed implementation of features you want to add.
Activity templates save you from having to initialize your activity in the AndroidManifes.xml file because you create layout files in the right directory and perform initialization directly in the code. You save time with these great features of Android Studio.
In addition to Activity templates, Android Studio has templates for services, which are another main building block of Android applications. In the next section, you learn how to add service templates for your application.
ANDROID SERVICES
Services can be defined as activities without a user interface that run in the background to perform long-running tasks. Android applications can bind to services to perform file IO or retrieve sensor data.
A music player application is a good example to demonstrate services. When you open a music player application, start playback, and then switch to another application, the music player continues to play music in the background by using a service component that can stay active without a UI.
Android Studio provides two basic service templates for developers to add to their application. One is the standard Android Service class and the other one is the Intent Service.
Services usually handle tasks within the application's main thread; they are designed to be short running. However, IntentService handles long running tasks; they need to be designed as a separate thread than the main application thread.
Adding a Service Template with Android Studio
To add a service template to your application, follow the steps for adding an activity template, but click New ⇨ Service ⇨ Service or Service (IntentService).
Because services don't have a user interface, the new service wizard just asks for the service name and additional check buttons to configure service.
Figure 3.24 shows the window when you add a service.
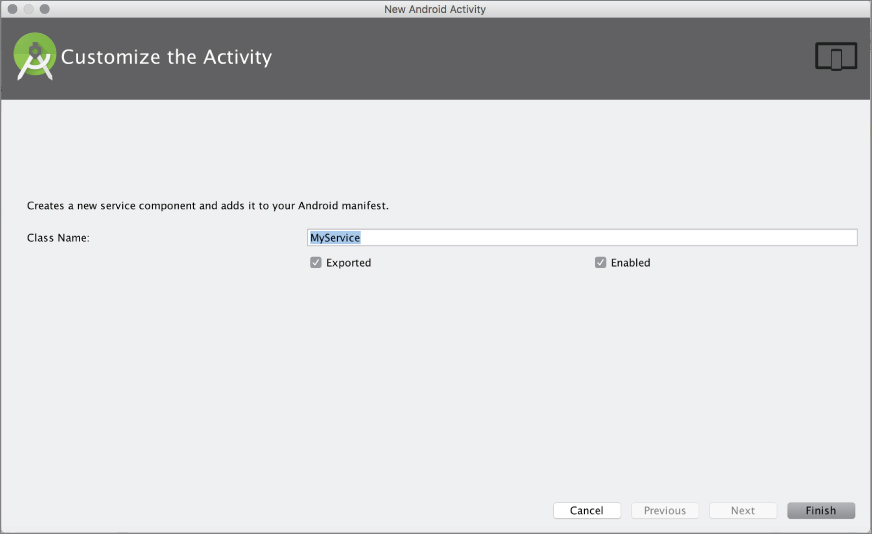
Figure 3.24 Customizing the service class name
There are two check buttons to configure Android Manifest initialization:
- Exported—When checked, other applications can invoke or interact with the service.
- Enabled—When checked, the system service can be instantiated by the system.
The template source code overrides only the onBind method, which is used when another component wants to bind to the service (see Listing 3.6).
If you selected IntentService when you added the service template, you will see the window shown in Figure 3.25. Here you name the service and can check the option to add a static start method for the IntentService.

Figure 3.25 IntentService customization window
IntentService handles asynchronous tasks such as incoming requests from other components. For this reason, the IntentService class differs from the Service class. The template includes components related to asynchronous tasks you can customize as needed (see Listing 3.7).
ADD ASSETS FOR ANDROID PROJECT
While developing an application, you need to include resource files such as the logo art for your application, photos, figures, custom sounds, music, videos or animations. These files are the assets the application loads while running.
Each asset type should be added to its own directory to comply with the Android development standards. All assets are stored in the res folder. Initially, Android Studio creates only the drawable and mipmap-xdpi folders to store resources other than XML files.
Switch to the traditional Project View to better see the res folder content, as shown in Figure 3.26.
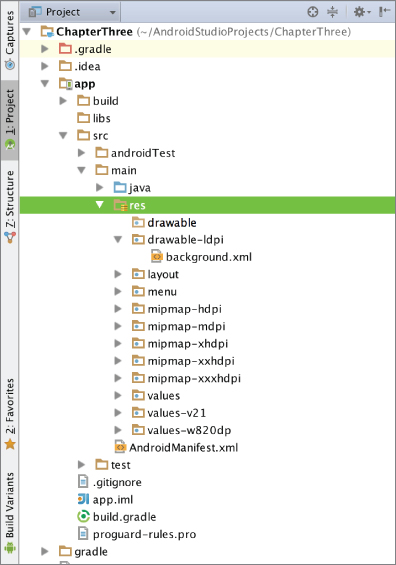
Figure 3.26 res folder content
Adding Images Assets
Images that you plan to use as a background on your project, or as a background for your buttons and so on, can be in many formats, such as PNG or JPEG. Image resources should be stored in the mipmap-xx folders (see Figure 3.26).
If your application will be running on multiple devices with different screen resolutions, you should add images to the corresponding resolution folder in your project directory and store the same image at different resolutions in the appropriate folder from the following list:
- mipmap-hdpi—High density images
- mipmap-mdpi—Medium density images
- mipmap-xhdpi—Extra high density images
- mipmap-xxhdpi—Extra extra high density images
- mipmap-xxxhdpi—Extra extra extra high density images
To add image resources to your project, follow these steps:
- Either drag-and-drop the file onto your project or right-click on the project and select Image Asset from the menu, as shown in Figure 3.27.
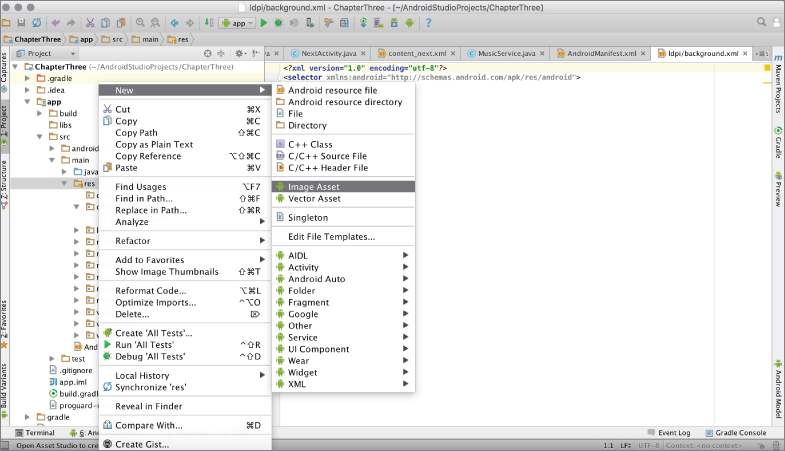
Figure 3.27 New Image Asset menu
- Click Image Asset to open a new window where you can select the image size, type, and other properties to let Android Studio to customize the image, and load the image into all related folders easily as shown in Figure 3.28.
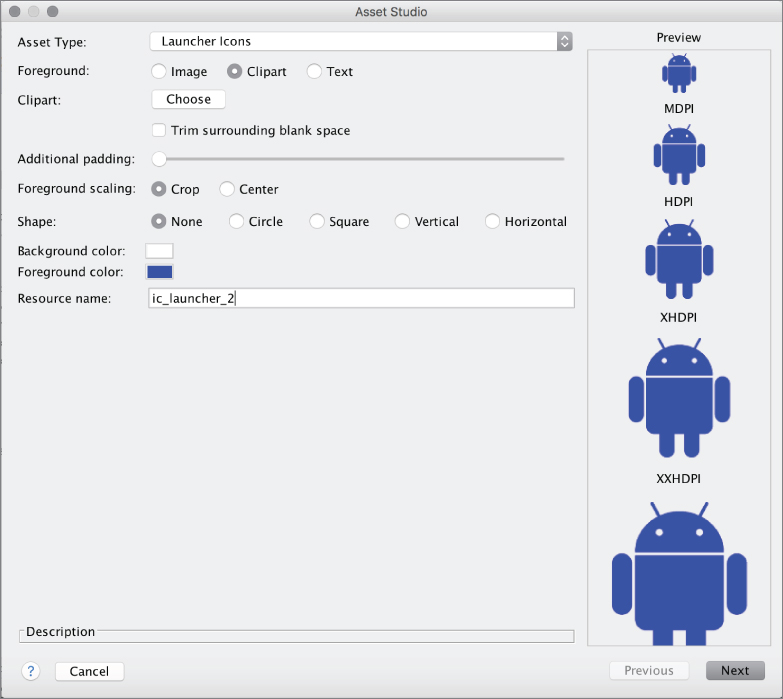
Figure 3.28 Image Asset Studio window
- After completing the Asset Studio options, click Next. The Image Asset Wizard will show a summary of where the new resource will be placed (see Figure 3.29).
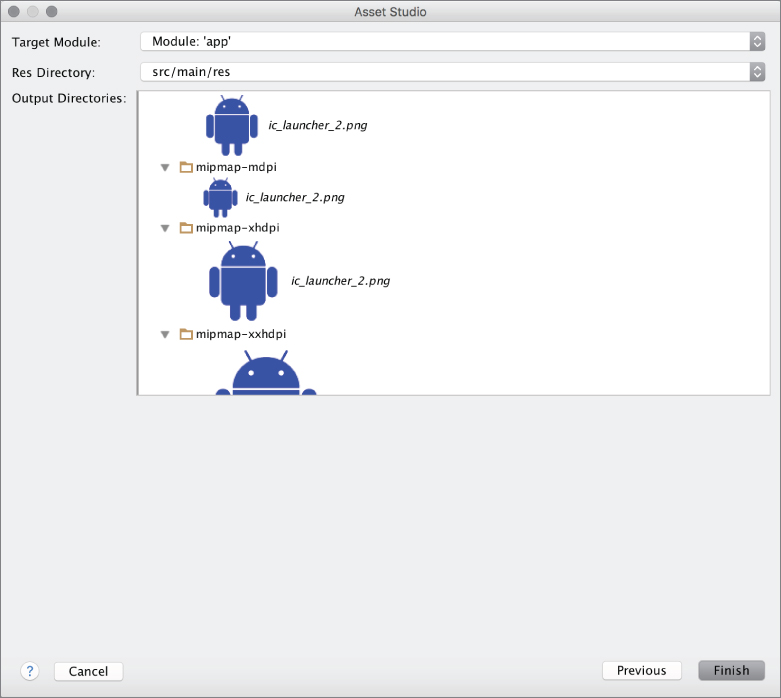
Figure 3.29 Image Asset Studio summary
Adding Sound Assets
Sound assets are placed in subfolders in the raw directory. The raw directory is not auto-generated by Android Studio. If you would like to add a sound asset, create a subdirectory in the res folder by right-clicking on the res folder in Project View, and then select New ⇨ Folder. That opens a new window where you can name the new folder. Type raw and you are done adding the sound asset folder.
Later you can add sounds by either dragging and dropping or copying and pasting to the Project View.
Adding Video Assets
Videos are also stored in the raw folder. Create subfolders for videos as you do for audio files (see the preceding section). Videos are not reliable because they are large files that can be expensive to load and play on a mobile device, so including videos is not preferred practice, although you may want to add a short animation of 2–5 seconds. That may create a better experience for your users.
ADDING XML FILES TO AN ANDROID PROJECT
You define static strings in XML files; these files contain static information to be encoded by an application at runtime. You sometimes need to define a list of strings in an XML file instead of declaring them in the Java source code. In fact, it is a very bad practice to define static strings in the Java source code, and Android advises developers to define static strings in the XML files. Figure 3.30 shows where strings are defined for the ChapterThree application.
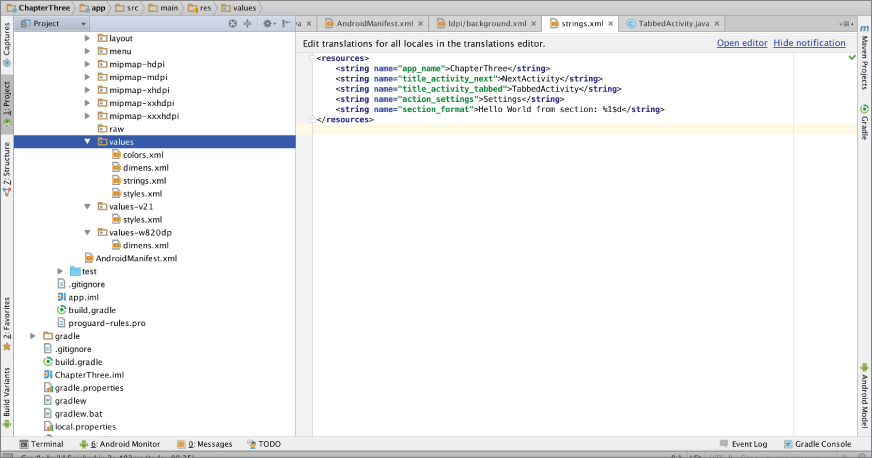
Figure 3.30 string.xml and the values folder content
XML files also define user interface modules, UI layouts, and styles to be reused in UI development. In order to add a new XML values file (not a layout file), right-click the values folder and select New ⇨ XML ⇨ Values XML File.
Since we will work on layouts in Chapter 5, we skip adding layout XMLs for this section. XML files also helps you to make an application more configurable, improve the UI, and implement more reusable code for your Android application.
ANDROID MANIFEST FILE
The Android manifest file is like an Android application's signature for the Android operating system. It defines the starting activity and other activities the application includes in the package, such as services, the application's name, the Android SDK version, and required permissions needed to access data and sensors on the device.
The Android manifest informs the Android operating system of possible processes and threads that can be generated for the application along with activity and service descriptions. The manifest informs the system that the application will get access to certain sensor devices and networks, will gather location information, and so on.
You might have noticed that some installed applications on your Android device ask for permission to access the Internet, your location, contacts, camera, and so on. These permissions are defined in the Android Manifest file.
The Android manifest file can be accessed from the Android manifest folder. Each time you define an activity or service manually, you should enter the required info into the AndroidManifest.xml file as well.
Listing 3.8 is the Android Manifest file of our application with the two activities and one service added in this chapter. You may notice that we also have requested Internet access with the permission tag. It can be found under the ‘manifests’ directory in the Android Project View.
If you were using the Eclipse IDE previously, you were able to add tags with the help of UI components. You may struggle to find that capability in Android Studio; you should instead enter the new entry manually. Android Studio's IntelliSense feature will help you to auto-complete the entry in the Android Manifest file.
ANDROID MODULES
Modules are additional software components for the projects being developed. If you have created a project only for Phone and Tablet devices, initial application is the first module. Modules you can add include Android Library, Wear, TV, Glass, Phone and Tablet, and so on. Figure 3.31 shows all modules available to add on to your project.
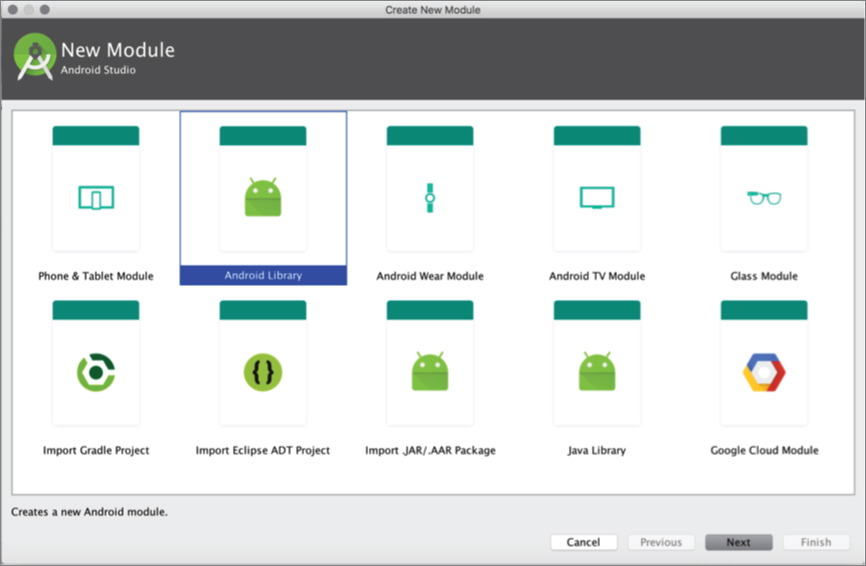
Figure 3.31 New Module selection window
Let's add an Android Library to our project. In the window shown in Figure 3.32, Android Studio helps you configure your module by first asking for the module name.

Figure 3.32 Creating a new module
After you add the module, you will see a second directory in the Android Project View (see Figure 3.33).
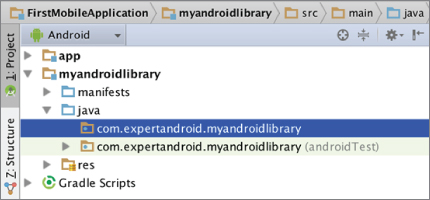
Figure 3.33 Project View after a new module iscreated
You can add a new Java class to develop your own library to ease development of and reuse on other applications.
Modules have independent build configurations, and after the build process they also produce their own binaries.
SUMMARY
In this chapter, we worked on creating the main building blocks of Android application projects using Android Studio. The main building blocks of Android applications are activities, services, assets, XML files, the Android Manifest file, and modules.
Brief information about building blocks has been provided to help you better understand what you are dealing with so you can follow the best practices of Android Studio application development.