
Chapter 1
Getting Started
WHAT'S IN THIS CHAPTER?
- System requirements for Android Studio
- Java installation instructions for Microsoft Windows, Mac OSX, and Linux
- Android Studio installation instructions for Microsoft Windows, Mac OSX, and Linux
In this chapter you get started with setting up your development environment so you can start Android development with Android Studio. To that end, this chapter covers the basic installation instructions for Android Studio and its system requirements.
Although the Android operating system is based on Linux, the Android SDK and tools are available for all major operating systems, so you can set up your development environment for the operating system you are working with. Throughout this book we use Mac OS as the main environment; however, we cover Linux and Windows setup as well.
SYSTEM REQUIREMENTS FOR WINDOWS, MAC OS X, AND LINUX
To use Android Studio, your development system must meet the minimum system requirements. This section lists the minimum requirements for Windows, Mac OS X, and Linux.
Microsoft Windows
- Microsoft Windows 10/8/7/Vista/2003 (32 or 64 bit)
- 2GB RAM minimum, 4GB RAM recommended
- 400MB hard disk space
- At least 1GB for Android SDK, emulator system images, and caches
- 1280 × 800 minimum screen resolution
- Java Runtime Environment (JRE) 6 or higher
- Java Development Kit (JDK) 7
- Optional for accelerated emulator: Intel processor with support for Intel VT-x, Intel EM64T (Intel 64), and Execute Disable (XD) Bit functionality
Mac OS X
- Mac OS X 10.8.5 or higher, up to 10.9 (Maverick)
- 2GB RAM minimum, 4GB RAM recommended
- 400MB hard disk space
- At least 1GB for Android SDK, emulator system images, and caches
- 1280 × 800 minimum screen resolution
- Java Runtime Environment (JRE) 6
- Java Development Kit (JDK) 7
- Optional for accelerated emulator: Intel processor with support for Intel VT-x, Intel EM64T (Intel 64), and Execute Disable (XD) Bit functionality
Linux
- GNOME or KDE desktop
- GNU C Library (glibc) 2.15 or later
- 2GB RAM minimum, 4GB RAM recommended
- 400MB hard disk space
- At least 1GB for Android SDK, emulator system images, and caches
- 1280 × 800 minimum screen resolution
- Java Runtime Environment (JRE) 6 or higher
- Oracle Java Development Kit (JDK) 7
More details about system requirements can be found at https://developer.android.com/sdk/index.html#Requirements.
Keep in mind that based on the size of the project, number of your dependencies, and emulator usage, you will likely need more resources. Typically, you will need at least 8GB of RAM and GPU support to run an emulator and work smoothly with better compilation times.
In most cases, developers need to test applications on multiple devices. Because they usually don't have enough devices to test adequately, they rely on emulators. Emulators require a high amount of storage and memory to run faster.
INSTALLING JAVA
Java is essential for all operating systems. You must install Java SE (Standard Edition) Development Kit (JDK) for your operating system.
The JDK 7 download page can be accessed directly at http://www.oracle.com/technetwork/java/javase/downloads/jdk7-downloads-1880260.html. When you navigate there, the page shown in Figure 1.1 appears.

Figure 1.1 JDK download page
To download the required installation binary or packages, select the Accept License Agreement option and then click the download link of the binary or package for your operating system.
The following sections provide installation instructions for Oracle Java version 7 on 64 bit Windows, Mac OS X, and Linux.
Installing Java for Windows OS
Java installation on Windows is pretty straightforward. As mentioned in the previous section, installing JDK provides JRE as well.
Download the jdk-7u79-windows-x64.exe file and run it to start the installation.
Install Java
Start the Java installation by clicking the jdk-7u79-windows-x64.exe file after downloading it; you will see the dialog box shown in Figure 1.2.

Figure 1.2 Java installation setup wizard
- Click the Next button to continue.
- In the window that opens, all items are selected by default to be installed on your local hard drive. You can change the installation path and which installation modules to install. For Android application development, the Public JRE and Development Tools options must be selected if they are not already installed on your machine. (If they are already installed, they will not be listed inside the window.) You may deselect Source Code, which is used to install public Java API classes. It is not mandatory to install the source code. Make your selections in the dialog shown in Figure 1.3.
- We suggest that you continue with the default selections and use the default installation path, then click Next to finish the installation.

Figure 1.3 Java installation setup window
Setting Paths for Java on Windows 10
After the installation finishes, you need to set the Windows 10 environment paths for Java to configure the system environment. You need to set a path for the JAVA_HOME system variable.
- Right-click the Start menu icon and click File Explorer. In the window that opens, right-click This PC and select Properties to open the System window.
- From the options at the left of the System window, select Advanced system settings. This will open the dialog box shown in Figure 1.4 with the Advanced tab enabled.
- Click the Environment Variables… button shown in Figure 1.4.
- From the Environment Variables window that opens, click the New button and set the Java path with your installation directory. As shown in Figure 1.5, the path is
C:Program FilesJavajdk1.7.0_79for our 64 bit installation. If you installed the x86 version, your path would be different, such asC:Program Files (x86)Javajdk1.7.0_79.

Figure 1.4 Java path setup for Windows 10
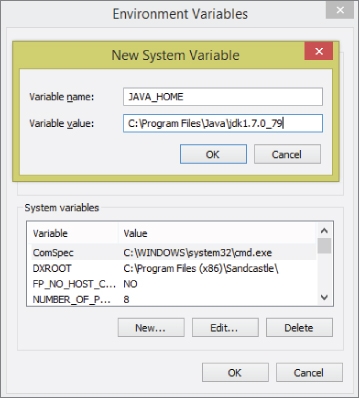
Figure 1.5 Java Environment Variables setup for Windows 10 64-bit
Installing Java for MacOS X
Java used to be a part of Mac OS X and was shipped by Apple. This changed several years ago. Apple also decided to remove Java from Mac OS so JDK, which is provided by Oracle, needs to be installed separately.
- Start by downloading the
jdk-7u79-macosx-x64.dmgfile from the page shown in Figure 1.1. - Launch the dmg file to display the window shown in Figure 1.6.
- Double click the JDK 7 Update 79.pkg file link to start the installation.
- Select the installation directory you want and complete the installation in the window shown in Figure 1.7.

Figure 1.6 Mac OS X Java installation

Figure 1.7 Java installation Max OS X
Now JDK is ready to use on Mac OS X. You can check the installed JDK version from System Preferences of Mac OS X or type 'java –version' in the terminal window to see whether Java installed properly.
Installing Java for Linux
Two types of installation packages are available for Linux. If you use a distribution with an rpm package manager like Fedora, you can download the rpm package and install Java via rpm. In this section you install JDK with the tar.gz package on Ubuntu 14.04.
- Download
jdk-7u79-x64.tar.gzfrom the download page shown in Figure 1.1 and extract it to the directory where you downloaded thetar.gzfile using the following command:user@ubuntu$ tar xzvf jdk-7uXX-x64.tar.gzThat command will extract JDK into the
jdk1.7.0_79folder where you ran the command. - Move that folder to
/usr/local/javawith the following command:user@ubuntu$ mv jdk1.7.0_79 /usr/local/java - Edit the
/etc/profilefile to set Java paths for your session. You can copy and paste the following lines to the end of the/etc/profilefile.##Java Path JAVA_HOME=/usr/local/java/jdk1.7.0_79 JRE_HOME=$JAVA_HOME/jre PATH=$PATH:$JAVA_HOME/bin:$JRE_HOME/bin export JAVA_HOME export JRE_HOME export PATH - Install Java binaries for system-wide use with the following commands:
- Install the Java binary:
user@ubuntu$ sudo update-alternatives --install "/usr/bin/java" "java" "/usr/local/java/jdk1.7.0_79/bin/java" 1 - Install the Java Compiler binary
javac:user@ubuntu$ sudo update-alternatives --install "/usr/bin/javac" "javac" "/usr/local/java/jdk1.7.0_79/bin/javac" 1 - Install the Java Web Start binary
javaws:user@ubuntu$ sudo update-alternatives --install "/usr/bin/javaws" "javaws" "/usr/local/java/jdk1.7.0_79/bin/javaws" 1
- Install the Java binary:
- Set Oracle Java as the default Java for your system with the following commands:
user@ubuntu$ sudo update-alternatives --set java
/usr/local/java/jdk1.7.0_79/bin/java
user@ubuntu$ sudo update-alternatives --set javac
/usr/local/java/jdk1.7.0_79/bin/javac
user@ubuntu$ sudo update-alternatives --set javaws
/usr/local/java/jdk1.7.0_79/bin/javaws
When you are done with the previous instructions, JDK and JRE will be ready to use when you restart Ubuntu. You can test whether Java installed correctly with version control. The command and output for that will look like this:
user@ubuntu~$ java -version
java version "1.7.0_79"
Java(TM) SE Runtime Environment (build 1.7.0_79-b15)
Java HotSpot(TM) 64-Bit Server VM (build 24.79-b02, mixed mode)
INSTALLING ANDROID STUDIO
Android Studio installation, like Java installation, differs by operating system. The following sections provide installation instructions for Windows, Mac OS X, and Linux platforms.
The direct link for the installation binaries is https://developer.android.com/sdk/index.html.
The download link that's available when you go to this site will be correct for the operating system you are running, as shown in Figure 1.8.

Figure 1.8 Android Studio download page
Installing Android Studio for Microsoft Windows 10
This section covers the installation instructions for Android Studio on Microsoft Windows 10.
- Click the Download Android Studio for Windows link to download the latest Android Studio installer exe file.
- Run the exe file after the download completes. You will see the window shown in Figure 1.9.
- Click the Next button to select installation components. The Android Studio option can't be changed, but you can deselect the Android SDK, Emulator, and Intel HAXM installations, as shown in Figure 1.10.
- The next window prompts you for installation paths for Android Studio and Android SDK separately.
- As shown in Figure 1.11, the installation asks about Intel HAXM memory configuration, and lets you choose a custom memory configuration.

Figure 1.9 Android Studio Setup window

Figure 1.10 Android Studio Setup configuration for Windows

Figure 1.11 Intel HAXM configuration dialog for Windows
You are now ready to launch Android Studio on Windows. The first time you launch Android Studio, it asks you to select the theme for the IDE, as shown in Figure 1.12.

Figure 1.12 Android Studio theme selection on Windows
Finally, the installation completes and Android Studio is ready to work on Android application projects.
Installing Android Studio for Mac OS X
This section covers the basic steps to install Android Studio on Mac OS X.
- From the page shown in Figure 1.8, click the Download Android Studio for MAC link.
Download the
android-studio-ide-141.2178183-mac.dmgfile, which includes the Android Studio IDE installer for Mac OS. - Launch the file you just downloaded.
- Drag and drop the Android Studio.app icon into Applications folder, as shown in Figure 1.13.

Figure 1.13 Android Studio installer for Mac OS X
After copying Android Studio to the Applications folder, Android Studio is ready to launch. You can then remove the .dmg file from your system.
When you first launch Android Studio, it asks if you want to install Android SDK, the Android emulator, and Intel HAXM. It will also ask for the setup path for them, as shown in Figure 1.14.

Figure 1.14 Android Studio Setup Wizard for Max OS X
If you selected Intel HAXM installation, you are asked for the amount of RAM memory you want to make available for the virtual devices, as shown in Figure 1.15.
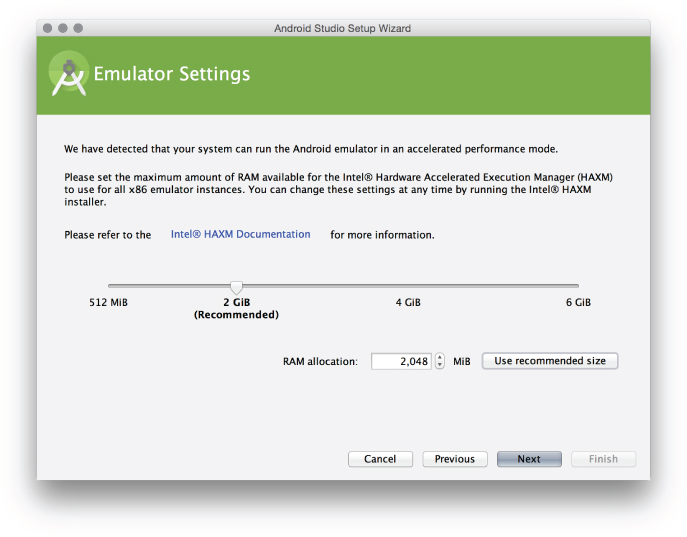
Figure 1.15 Intel HAXM configuration for Mac OS X
After you click Finish from the Emulator Settings dialog box, a window with an installation summary will display as shown in Figure 1.16.

Figure 1.16 Summary window for Max OS X installation
Installing Android Studio for Linux
Navigate to the download page shown in Figure 1.9 to download Android Studio for Linux (android-studio-ide-141.2178183-linux.zip). After you've downloaded the file, follow these steps:
- Enter the following command to extract the setup file to the android-studio folder where you executed the command:
user@ubuntu$ unzip android-studio-ide-141.2178183-linux.zipIn this example you move the android-studio folder to the
/optdirectory. You can select your own home directory as well, to make it available only to you.user@ubuntu$ sudo mv android-studio /opt - Start Android Studio with the
./opt/android-studio/bin/studio.shcommand.When you first launch Android Studio on Linux, it will display the screen shown in Figure 1.17.
Then the setup wizard will ask for Standard or Custom installation.
- Select Custom installation to see the installation packages.
The wizard moves to the window shown in Figure 1.18 where you can select an Android Studio UI theme.
Figure 1.18 shows that the IntelliJ theme has been selected for this installation.
- Select the Android Studio, Android SDK, and Emulator as shown in Figure 1.19.
- Indicate the installation path for Android SDK in the Android SDK Location field at the bottom of the dialog box, as shown in Figure 1.19. Click Finish to complete the Android SDK installation.

Figure 1.17 Android Studio Setup Wizard for Linux

Figure 1.18 Theme selection window for Linux
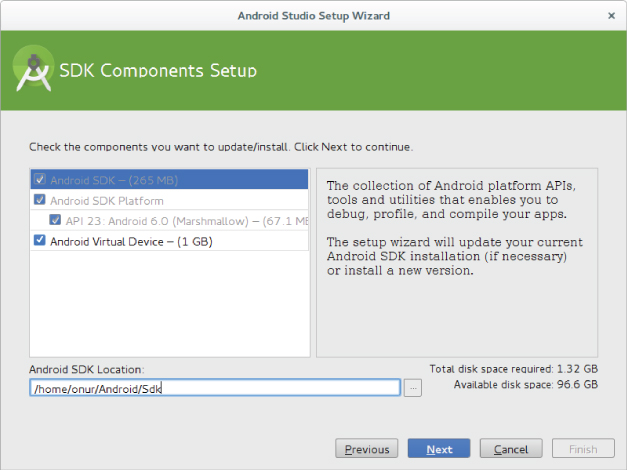
Figure 1.19 Android SDK configuration on Linux
LAUNCHING ANDROID STUDIO FOR THE FIRST TIME
When you first launch Android Studio, you will see the Complete Installation dialog box shown in Figure 1.20, which enables you to import settings from a previous installation. Because we made a clean installation for this example, we selected the last option in the dialog box. If you have a previous installation with customization you'd like to import, you can specify your previous installation path (see the first two options in Figure 1.20).

Figure 1.20 First launch of Android Studio
Welcome to Android Studio
Welcome to the world of Android development! When you finish installing Android Studio, you will finally reach the screen shown in Figure 1.21. Android Studio is ready to work with Android projects.

Figure 1.21 Welcome to Android Studio
STANDALONE SDK INSTALLATION
In this book, the main focus is on using Android Studio for development at an advanced level. Therefore, the book covers Android SDK and tools installations together with Android Studio. If you would like to explore Android SDK and tools separately, you can get the standalone installation binaries for your choice of operating system.
Standalone installation will help you either work with an IDE other than Android Studio, or to use the tools alone. The binaries are available at http://developer.android.com/sdk/index.html at the bottom of the page.
As you did in this chapter, you can download the compatible binary for your operating system and follow similar installation steps to continue. After you download and extract the SDK, you can add its location to Android Studio using Settings⇨Appearance & Behavior⇨System Settings⇨Android SDK⇨Android SDK Location.
SUMMARY
In this chapter, we wanted to make sure you have all the necessary tools to work on the examples in the following chapters. We started by providing the requirements for the basic computer system needed to install the required software.
We then covered the installation of Android Studio for Windows, Mac OS, and Linux. We continue with what is required to begin Android application development in Android Studio in Chapter 2.