
CHAPTER 1
Getting Started with Your iPhone
In this chapter, you set up your iPhone to work with your computer or iCloud. You choose items to sync and learn to use the iPhone interface.
Identify and Compare the iPhone Models
Understanding iPhone 11 Controls
Install and Set Up iTunes on Windows
Set Up and Activate Your iPhone
Set Up Your iPhone Using Finder or iTunes
Choose Which Items to Sync from Your Computer
Explore the Interface and Launch Apps
Identify and Compare the iPhone Models
The iPhone is a series of hugely popular smartphones designed by Apple. As of this writing, Apple sells six iPhone models that differ in size, power, features, and price. This section explains the six models, their common features, and their differences to enable you to distinguish them and choose among them.
Understanding the Six iPhone Models
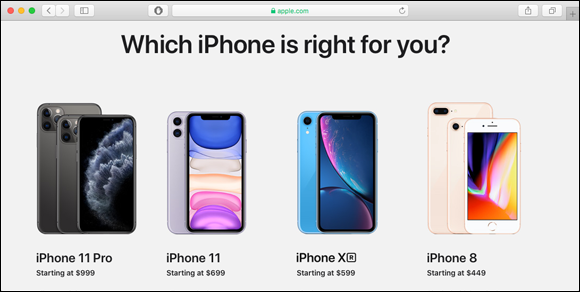
As of this writing, Apple sells six iPhone models. Three models are in the iPhone 11 family, which Apple introduced in 2019. The base model in this family is called simply iPhone 11. The other two models are in the Pro line, and have different sizes. The iPhone 11 Pro is the smaller of the two, and the iPhone 11 Pro Max is the larger.
- iPhone 11 Pro Max. The Pro Max has the largest screen of the iPhone models — a 6.5-inch OLED screen with 2688×1242-pixel resolution. OLED is the acronym for organic light-emitting diode; these screens are considered top of the range and have a wide viewing angle.
- iPhone 11 Pro. The Pro has a 5.8-inch OLED screen with 2436×1125-pixel resolution.
- iPhone 11. The iPhone 11 has a 6.1-inch screen with 1792×828-pixel resolution.
These models have a design featuring thin bezels, rounded screen corners, and a “notch” cutout at the middle of the top edge of the screen. The notch contains the front camera and various sensors for features such as Face ID face recognition.
Apple currently continues to sell three iPhones from its previous two generations. The following list explains the models available:
- iPhone XR. Introduced in 2018, the iPhone XR has a 6.1-inch screen with 1792×828-pixel resolution. The iPhone XR is similar in size and design to the iPhone 11 — including the thin bezels, round corners, and notch — but contains slightly less powerful hardware and less memory.
- iPhone 8 and iPhone 8 Plus. Introduced in 2017, these two models are similar, but the iPhone 8 Plus is physically larger than the iPhone 8. These two iPhones have an older design. There are two primary visual differences between this design and the newer models listed previously. First, these models have thicker bezels and no notch at the top of the screen. Second, below the screen is the Home button, a round button used for navigation and for the Touch ID fingerprint-recognition authentication system.
Understanding the Common Features of the iPhone Models
Each iPhone comes with the Apple EarPods headset, which incorporates a remote control and a microphone, and connects via the Lightning connector at the bottom of the iPhone. None of these iPhone models has a headphone jack; you can connect headphones either wirelessly via Bluetooth or by using an adapter dongle such as Apple’s Lightning to 3.5mm Headphone Jack Adapter. Using Apple’s headphone adapter prevents you from charging the iPhone via the Lightning port, although you can still charge it wirelessly; you may prefer a third-party adapter that includes a power pass-through.
Each iPhone includes a USB power adapter and a Lightning-to-USB cable. Each iPhone also features wireless charging, which you may find easier and more convenient than using a cable. You will need to get a wireless charger separately.
Each iPhone uses a nano-SIM card to connect to cellular networks but can also use one or more eSIMs, virtual SIM cards that you add electronically.
Each iPhone runs iOS 13, the latest operating system from Apple, which comes with a suite of built-in apps, such as the Safari web browser and the Mail e-mail app. If you buy an older iPhone model, you may need to upgrade it to iOS 13, but this is easy to do.
The iPhone 11 Pro models come in four colors: silver, space gray, gold, and midnight green.
The iPhone 11 models come in six colors: black, white, purple, green, yellow, and (PRODUCT)RED.
The iPhone XR comes in six colors: black, white, blue, coral, yellow, and (PRODUCT)RED.
The iPhone 8 models come in three colors: silver, space gray, and gold.
The iPhone 11 Pro models have triple 12-megapixel cameras on the back and a front-facing 12-megapixel camera with depth-sensing features that enable the Face ID authentication and unlocking system.
The iPhone 11 has dual 12-megapixel cameras on the back. On the front, the iPhone 11 also has a 12-megapixel camera with depth-sensing features for Face ID.
The iPhone XR has a single 12-megapixel camera on the back and a 7-megapixel camera with depth-sensing features on the front.
The iPhone 8 models have a 12-megapixel main camera on the back and a 7-megapixel camera on the front. The iPhone 8 Plus also includes a second camera unit to enable optical zoom and other features. Each iPhone 8 model has a Touch ID fingerprint reader integrated in the Home button.
Apart from physical size and key features, you should consider the storage capacity of the iPhone model you are thinking of buying. Having more storage enables you to install more apps and carry more music, movies, and other files with you. Having plenty of storage is especially important for shooting videos with your iPhone.
Compare the iPhone 11 Models with the Earlier iPhone Models
The iPhone 11 models offer a substantial upgrade over the iPhone XR, the iPhone 8, and the iPhone 8 Plus. The three biggest differences are that the iPhone 11 models have faster processors, better screens, and improved cameras.
On the processor front, the iPhone 11 models have the A13 Bionic chip with third-generation Neural Engine, the iPhone XR has the A12 Bionic chip with second-generation Neural Engine, and the iPhone 8 models have the A11 Bionic chip with Neural Engine. The nomenclature is fair gibberish, but the newer chips and engines are faster and so deliver better performance.
As for screens, the iPhone 11 Pro models have the Super Retina XDR display with HDR and True Tone, the iPhone 11 and iPhone XR have the Liquid Retina HD display with True Tone, and the iPhone 8 models have the Retina HD display with True Tone. Briefly, Super Retina is better than Liquid Retina, which in turn is better than Retina. XDR stands for Extreme Dynamic Range, which gives greater brightness and more natural-looking colors than HDR, which stands for High Dynamic Range. The True Tone feature enables the iPhone to adjust its display colors to match the ambient lighting it detects, making colors appear more consistent in different lighting conditions.
On rear cameras, the iPhone Pro models have triple 12-megapixel cameras: one camera has an ultra–wide-angle lens, the second has a wide-angle lens, and the third has a telephoto lens. The iPhone 11 has dual 12-megapixel cameras, one ultra–wide-angle and the other wide-angle. The iPhone 8 Plus has dual 12-megapixel cameras, one wide-angle and the other telephoto. The iPhone XR and iPhone 8 each have a single 12-megapixel camera.
On front cameras, there is less variation: the iPhone 11 models have a 12-megapixel camera that can shoot video at 4K resolution and 60 frames per second, whereas the iPhone XR and the iPhone 8 models have a 7-megapixel camera that can shoot video at the lower 1080p resolution, also at 60 frames per second.
The iPhone 11 models also have somewhat increased water resistance, but while any improvement is welcome, it may not be relevant to you. In practical terms, the improvements mean the iPhone 8 models should survive 30 minutes in the shallow end of a swimming pool, the iPhone 11 should manage 30-minute immersion in the deep end, and the iPhone 11 Pro models should have no trouble with half an hour in the diving section.
Evaluate iPhone Storage Capacity
The iPhone models are available with different amounts of storage capacity. The following table shows the capacities with sample amounts of contents to give you some idea of what the amounts mean in real terms.
The iPhone 11 Pro models come in 64GB, 256GB, and 512GB capacities.
The iPhone 11 comes in 64GB, 128GB, and 256GB capacities.
The iPhone XR and the iPhone 8 models come in 64GB and 128GB capacities.
Higher capacities command substantially higher prices, so you must decide how much you are prepared to spend. Generally speaking, higher-capacity devices get more use in the long run and are worth the extra cost.
Capacity |
Songs |
Photos |
Video |
64GB |
5,000 |
4,000 |
10 hours |
128GB |
10,000 |
8,000 |
20 hours |
256GB |
20,000 |
16,000 |
40 hours |
512GB |
40,000 |
32,000 |
80 hours |
Understanding the Reachability Feature

iOS includes a feature called Reachability to help you use your iPhone with one hand when necessary. With the Reachability feature enabled, swipe down on the bottom edge of the screen to slide the screen down so that you can easily reach the top of it. On the iPhone 8 models, you double-tap Home — double-tap rather than double-press — to slide the screen down. After you give a command, the screen slides back up again; if you decide not to give a command, tap Restore (![]() ) to slide the screen back up; on an iPhone 8 model, double-tap Home again.
) to slide the screen back up; on an iPhone 8 model, double-tap Home again.
To enable Reachability, first tap Settings (![]() ), tap Accessibility (
), tap Accessibility (![]() ), and then tap Touch (
), and then tap Touch (![]() ). Near the top of the Touch screen, set the Reachability switch to On (
). Near the top of the Touch screen, set the Reachability switch to On (![]() ).
).
Understanding the Live Photos Feature
All of the current iPhone models include a feature called Live Photos that enables you to capture short sections of video before and after a still photo. After capturing the Live Photo, you can make the video segments play by tapping and holding the photo.
You can view your Live Photos on other Apple devices, such as your iPad or your Mac. You can also use a Live Photo as the wallpaper for your iPhone’s lock screen.
Understanding iPhone 11 Controls
With the touchscreen used for most actions, the iPhone 11 has only four other hardware controls: the Side button in the middle of the right side; the Ringer On/Off switch at the top of the left side; and the Volume Up button and Volume Down button, below the Ringer On/Off switch. This section illustrates and explains these controls, plus the methods for unlocking the iPhone and locking it again.
Identify the Hardware Controls

The right side of the iPhone has only one control, a button called the Side button. The Side button has multiple functions on its own and in combination with the Volume Up button and the Volume Down button. The remainder of this section explains how to use the Side button.
The left side of the iPhone has three controls:
- The Ringer On/Off switch turns the ringer on and off. Move the switch toward the rear of the iPhone, exposing an orange background, to turn the ringer off. Move the switch to the front again to turn the ringer back on.
- The Volume Up button and Volume Down button enable you to control the volume quickly without having to use the touchscreen. These buttons also work in combination with the Side button for other actions.
Turn Your iPhone On and Off
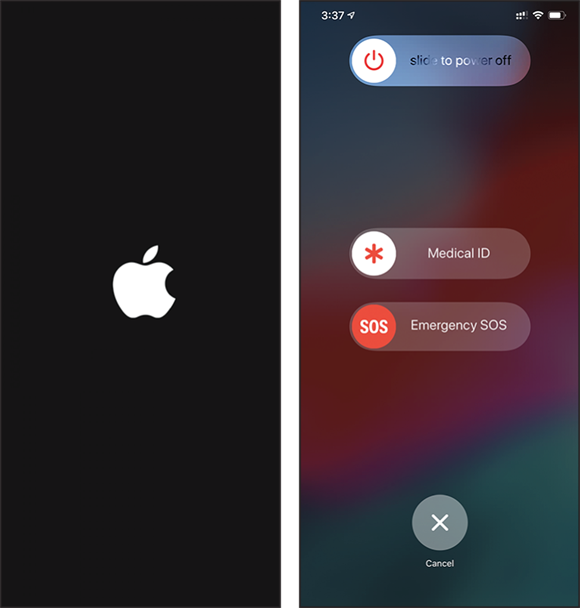
To turn on your iPhone when it is powered off, press and hold Side until the Apple logo appears on-screen, then release the Side button. Your iPhone continues to start, and then the lock screen appears.
To turn off your iPhone, press and hold Side and either Volume Up or Volume Down until the Power Off screen appears, then swipe slide to power off (![]() ) to the right.
) to the right.
Unlock and Lock Your iPhone

To unlock your iPhone, hold it so the front cameras can scan your face. The iPhone unlocks (![]() changes to
changes to ![]() ) and the Swipe up to open prompt appears at the bottom of the screen. Swipe up from the bottom of the screen. The iPhone unlocks, and you can start using it.
) and the Swipe up to open prompt appears at the bottom of the screen. Swipe up from the bottom of the screen. The iPhone unlocks, and you can start using it.
To lock your iPhone and put it to sleep, press Side once. Depending on how the iPhone is configured, the iPhone may also go to sleep automatically after a period of inactivity.
Use Sleep and Wake, Siri, App Store, and Apple Pay

When the iPhone is awake, press Side once to put it to sleep. When the iPhone is asleep, press Side once to wake it.
At any time, press and hold Side to activate Siri, which plays a tone and displays a text prompt asking what you want.
When installing an app from the App Store, double-click Side to authenticate yourself via Face ID and continue installing the app.
When making a purchase via Apple Pay, double-click Side to authenticate yourself via Face ID and confirm the purchase.
Force the iPhone to Restart
If the iPhone becomes unresponsive, a software problem may have occurred. Wait for a minute or two to see if iOS can resolve the problem.
If the iPhone remains unresponsive, you will need to restart it. Press and hold Side and Volume Down for several seconds. When the screen turns off, release the buttons. The iPhone then restarts, and the Apple logo appears on-screen.
Install and Set Up iTunes on Windows
To sync your iPhone with your Windows PC, you use the iTunes app, which Apple makes available for free. For Windows 10, the current version of Windows, you download iTunes from the Microsoft Store and install it on your PC.
If you do not have a computer, or you do not want to sync your iPhone with your computer, you can set up and sync your iPhone using Apple’s iCloud service. See the section “Set Up and Activate Your iPhone,” later in this chapter.
Install and Set Up iTunes on Windows
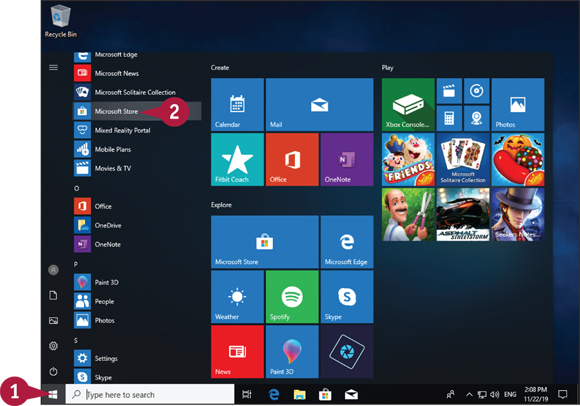
![]() Click Start (
Click Start (![]() ).
).
The Start menu opens.
![]() Click Microsoft Store (
Click Microsoft Store (![]() ).
).
Note: You can also download iTunes from the Apple website, https://www.apple.com/itunes/.
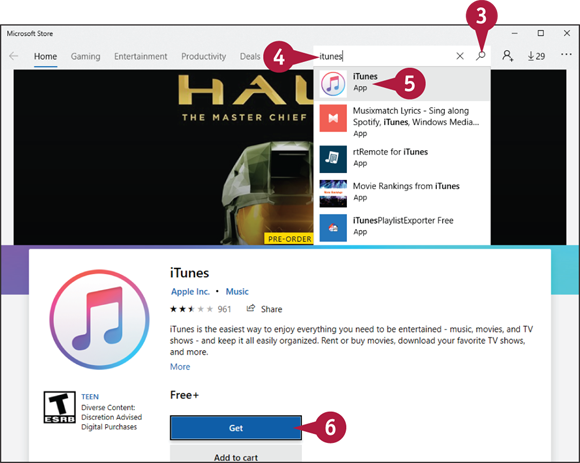
The Microsoft Store app opens.
![]() Click Search (
Click Search (![]() ).
).
The Search pane opens.
![]() Type itunes.
Type itunes.
A list of matching results appears.
![]() Click iTunes (
Click iTunes (![]() ).
).
The iTunes screen appears.
![]() Click Get.
Click Get.
Note: If the Use Across Your Devices dialog box opens, prompting you to sign in with Microsoft and be able to use iTunes on any compatible device, click Sign In if you want to do so. Otherwise, click No Thanks.
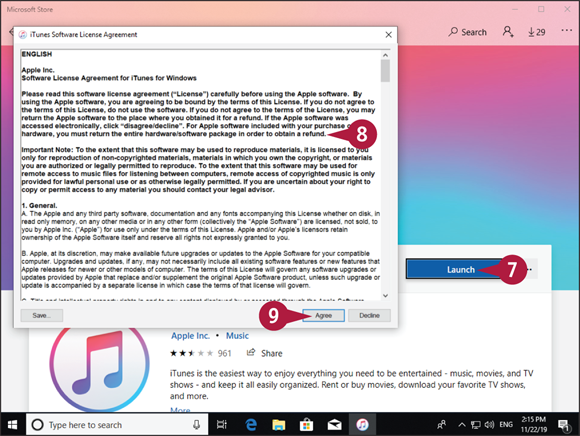
The Microsoft Store app downloads and installs iTunes.
![]() Click Launch.
Click Launch.
Windows launches iTunes.
On first run, the iTunes Software License Agreement dialog box opens.
![]() Read the license agreement, or as much as you can bear.
Read the license agreement, or as much as you can bear.
![]() Click Agree if you want to proceed.
Click Agree if you want to proceed.
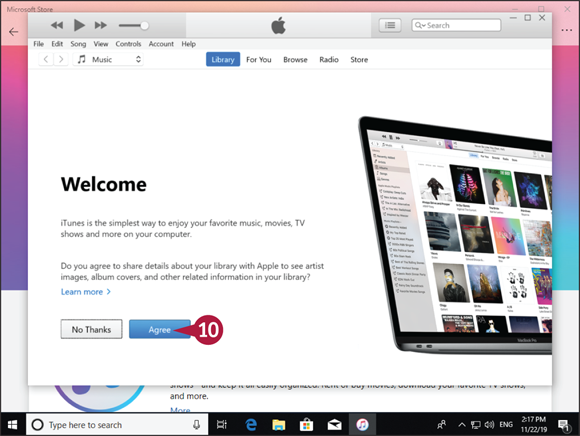
iTunes opens.
Also on first run, the Welcome screen appears, asking if you agree to share details about your library with Apple in order to get artist images, album covers, and other information.
![]() Click Agree or No Thanks, as appropriate.
Click Agree or No Thanks, as appropriate.
iTunes opens.
Set Up and Activate Your iPhone
Before you can use your iPhone, you must set it up and activate it. First, you choose your language and specify your country or region. You can then either use the Quick Start feature, if you have an iPhone or iPad running iOS 11 or a later version, or continue setup manually. Assuming you continue manually, you connect the iPhone to the Internet through either a Wi-Fi network or the cellular network, choose whether to use Touch ID fingerprint unlocking, and choose a passcode.
Power On Your iPhone
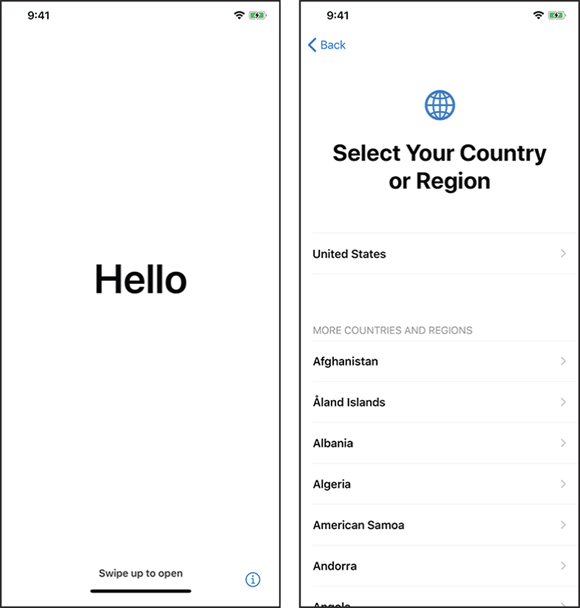
First, power on your iPhone by pressing and holding Side — the button on the right side of the iPhone — until the Apple logo appears on-screen. The Hello screen then appears.
Swipe up from the bottom of the screen to start setup. The Language screen appears. Tap the language you want to use, such as English.
On the Select Your Country or Region screen that appears, tap your country or region.
Chose Quick Start or Manual Setup, and Connect to Wi-Fi
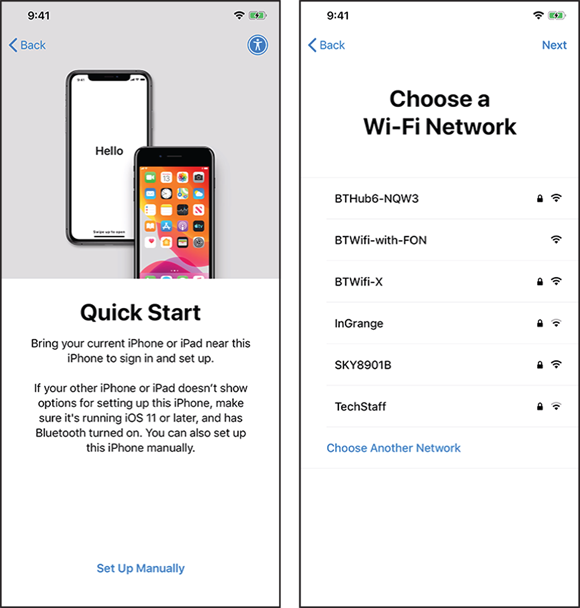
The Quick Start feature lets you set up your iPhone more quickly by sharing settings from an existing iPhone, iPad, or iPod touch running iOS 11 or a later version. If you have such a device, bring it close to the new iPhone and follow the prompts. If not, tap Set Up Manually.
On the Choose a Wi-Fi Network screen, tap the wireless network you want to use; if the Wi-Fi network’s name does not appear because the network does not broadcast its name, tap Choose Another Network, and then type the network’s details. Enter the network password when prompted, and then tap Join.
Set Up Face ID
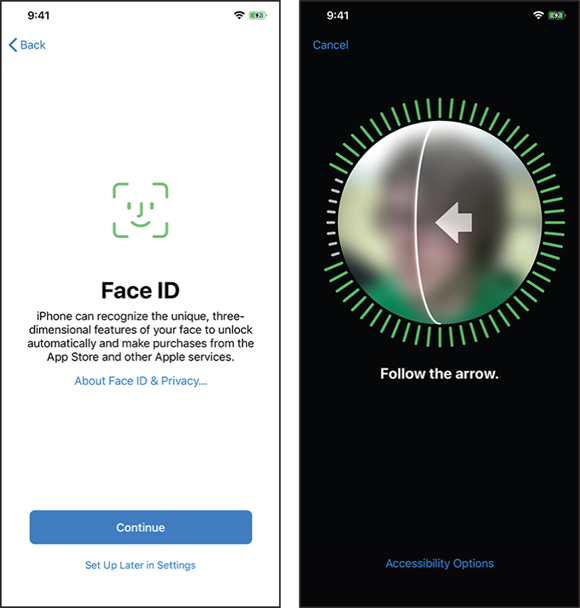
On the Face ID screen, tap Continue if you want to set up Face ID now, which is usually the most convenient unlock method; if not, tap Set Up Later in Settings. Assuming you proceed, Face ID then walks you through the process of scanning your face twice, either by rotating your head or by moving the iPhone around. If you have difficulty completing Face ID, you can tap Accessibility Options at the bottom of the screen, and then tap Use Partial Circle.
When Face ID is set up, tap Continue.
Create a Passcode
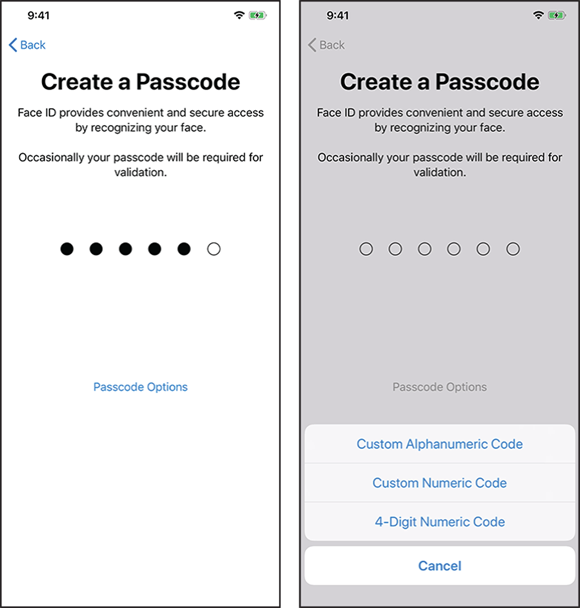
After setting up Face ID, you create a passcode for unlocking your iPhone when Face ID does not work or when iOS requires extra security, such as when the iPhone has restarted. On the Create a Passcode screen, tap the keypad to enter a six-digit numeric passcode, and then re-enter the same passcode when prompted.
If you want to create a different type of passcode, tap Passcode Options. In the Passcode Options dialog box, tap Custom Alphanumeric Code, Custom Numeric Code, or 4-Digit Numeric Code, as needed. A long custom alphanumeric code is most secure; a long custom numeric code can be highly secure; and a four-digit numeric code is inadvisable.
If you enter an easily guessed passcode, such as 111111 or abcdef, iOS warns you and suggests you enter a stronger passcode. Tap Use Anyway or Change Passcode, as needed.
After setting up Face ID and choosing a passcode, you choose how to complete setting up the iPhone. If you have not used an iOS device before, you can set up the iPhone as a new iPhone. If you have used an iOS device, you can restore an iCloud backup or an iTunes backup of that device to the iPhone. If you have been using an Android device, you can use the Move to iOS app to move data to the iPhone.
Choose How to Set Up Your iPhone

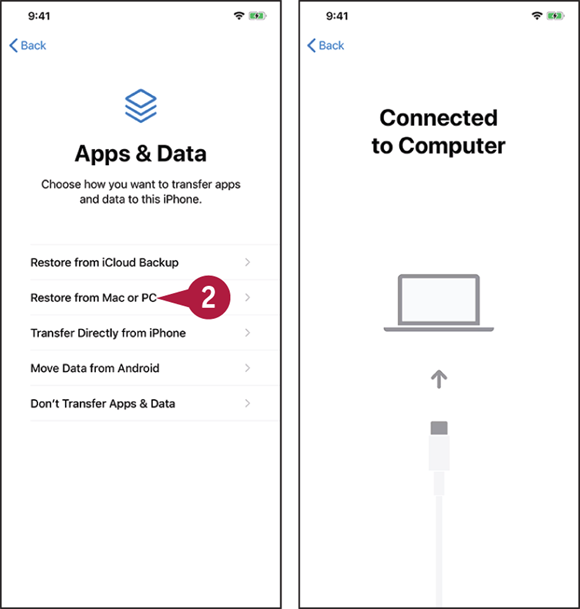
On the Apps & Data screen, you choose between five ways of setting up your iPhone:
- Tap Restore from iCloud Backup if you have a backup of your previous iPhone or another iOS device stored in iCloud. Sign in on the iCloud screen that appears, and then continue with the instructions in the next subsection on this page.
- Tap Restore from Mac or PC if you have a backup of your previous iPhone or other iOS device on your computer. See the section “Set Up Your iPhone Using Finder or iTunes,” later in this chapter, for further details.
- Tap Transfer Directly from iPhone if you are upgrading iPhones and have your old iPhone at hand. The Quick Start screen appears, and you can connect the iPhones wirelessly by bringing them close together.
- Tap Move Data from Android if you are switching from an Android phone or tablet to the iPhone and you want to transfer data from your old device. You will need to install the Move to iOS app on your Android device. You then run the app, connect the iPhone and Android device by using a pairing code, and choose which data to transfer.
- Tap Don’t Transfer Apps & Data if you want to set up your iPhone from scratch. Follow the prompts to set up the iPhone manually; see the later subsection, “Set Up Your iPhone Manually,” for highlights.
Set Up Your iPhone from an iCloud Backup

Follow the prompts to sign in to iCloud; if you have two-factor authentication enabled, iCloud sends a verification code to your registered device to enable you to authenticate yourself to your new iPhone. On the Terms and Conditions screen, tap Agree if you want to proceed.
On the Choose Backup screen, tap the backup you want to use. Then, on the Settings from Your Backup screen, review the settings that you can restore or customize, and tap Continue or Customize Settings, as appropriate.
Set Up Your iPhone Manually
When you choose to set up your iPhone manually, iOS walks you through a long sequence of configuration screens that enable you to customize how the operating system looks and behaves. The following list explains the key items you configure:
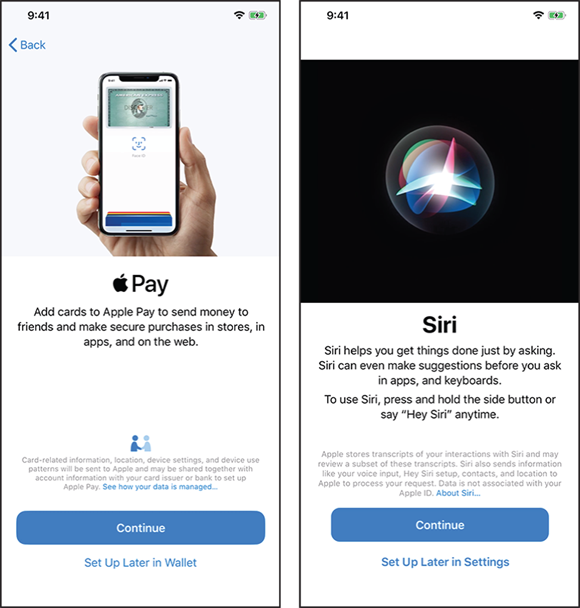
- Apple Pay. You can set up Apple’s payment system on your iPhone, enabling yourself to make electronic transactions easily, including sending payments to your contacts via the Messages app. If you prefer to set up Apple Pay later, tap Set Up Later in Wallet.
- Siri. You can set up Apple’s voice-driven virtual assistant on your iPhone. Siri enables you to give various commands, such as sending an e-mail message or a text message, and asking for a wide variety of information — for example, getting directions in the Maps app or looking up information on WolframAlpha or on the web. If you prefer not to set up Siri now, tap Set Up Later in Settings.
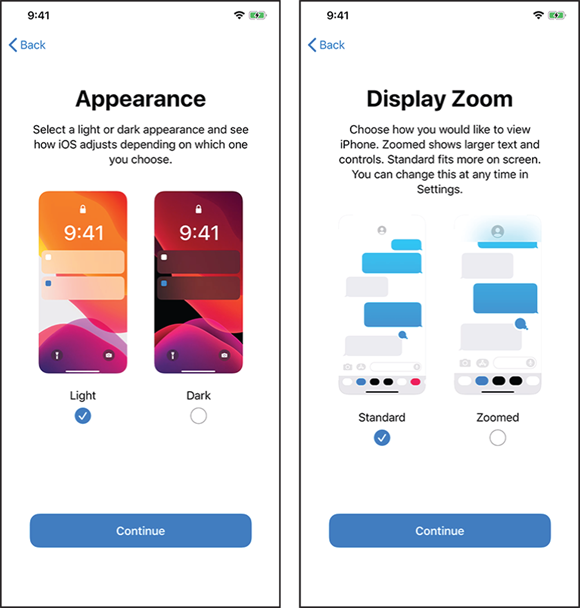
- Appearance. iOS gives you the choice between a Light appearance and a Dark appearance. During setup, you choose an appearance on the Appearance screen. The appearance you choose controls how much of the iOS interface appears. Tap Light (
 changes to
  ) or Dark ( changes to ) to see which you prefer, and then tap Continue. You can subsequently change appearance by tapping Settings (
 ) on the Home screen, tapping Display & Brightness (
 ), and then working on the Display & Brightness screen. Here, you can also set the Automatic switch to On (
 ) and specify the schedule — either Sunset to Sunrise or Custom Schedule — on which you want iOS to switch appearances automatically.
 - Display Zoom. iOS offers two views, Standard View and Zoomed View. During setup, you choose a view on the Display Zoom screen. Tap Standard ( changes to ) or Zoomed ( changes to ) to compare the two views, and tap Continue once you have made your choice. You can subsequently change views by tapping Settings () on the Home screen, tapping Display & Brightness (), tapping View on the Display & Brightness screen, and using the controls on the Display Zoom screen.
Set Up Your iPhone Using Finder or iTunes
If you want to manage your iPhone from your Mac, you can set it up using Finder on macOS Catalina or iTunes on an earlier version of macOS. If you want to manage your iPhone from your Windows PC, you can set it up using iTunes. You can either restore a backup to the device or set up the iPhone from scratch using Finder or iTunes. This example shows macOS Catalina.
When setting up your iPhone for the first time, you can restore it from a backup of another iPhone — for example, your previous iPhone. If you have already set up this iPhone, you can restore it from its own backup.
Set Up Your iPhone Using Finder or iTunes
![]() Begin setup as explained in the section “Set Up and Activate Your iPhone,” earlier in this chapter.
Begin setup as explained in the section “Set Up and Activate Your iPhone,” earlier in this chapter.
![]() On the Apps & Data screen, tap Restore from Mac or PC.
On the Apps & Data screen, tap Restore from Mac or PC.
The Connect to Computer screen appears.
![]() Connect your iPhone to your computer via the USB cable.
Connect your iPhone to your computer via the USB cable.
The Connected to Computer screen appears on your iPhone.
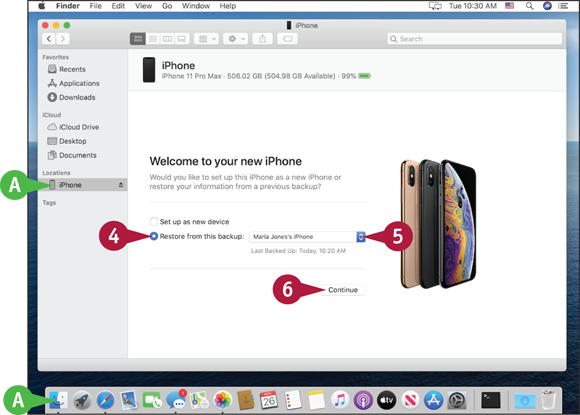
![]() On macOS Catalina, click Finder (
On macOS Catalina, click Finder (![]() ) on the Dock to open a Finder window if one does not open automatically showing the iPhone’s management screens, then click the iPhone.
) on the Dock to open a Finder window if one does not open automatically showing the iPhone’s management screens, then click the iPhone.
On your computer, a Finder window opens or iTunes opens or becomes active.
The Welcome to Your New iPhone screen appears.
![]() Make sure the Restore from this backup radio button is selected (
Make sure the Restore from this backup radio button is selected (![]() ).
).
![]() Click the pop-up menu button (
Click the pop-up menu button (![]() ) and select the appropriate iPhone from the menu.
) and select the appropriate iPhone from the menu.
![]() Click Continue.
Click Continue.
iTunes restores your iPhone from the backup.
When the restore is complete, your iPhone restarts.
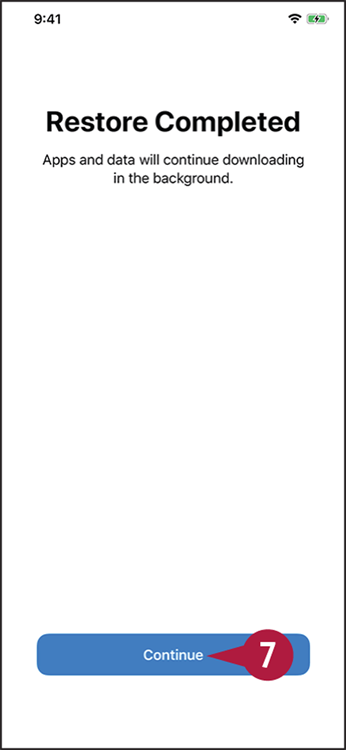
The Restore Completed screen appears on the iPhone.
![]() Tap Continue.
Tap Continue.
Your iPhone’s control screens appear in the Finder window or iTunes window.
You can now choose sync settings for the iPhone as explained in the next section, “Choose Which Items to Sync from Your Computer.”
Choose Which Items to Sync from Your Computer
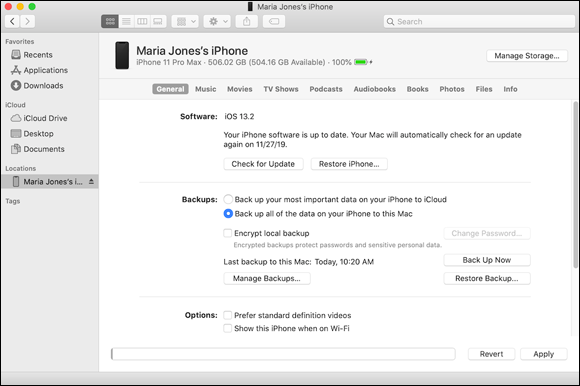
After specifying that you will use Finder or iTunes to sync your iPhone, as explained in the previous section, “Set Up Your iPhone Using Finder or iTunes,” you use the iPhone’s control screens in Finder or iTunes to choose which items to sync. On the General tab in Finder or the Summary tab in iTunes, you can change your iPhone’s name, specify the backup location, and set general options for controlling syncing.
Choose Which Items to Sync from Your Computer
Connect Your iPhone and Choose Options on the General Tab or Summary Tab
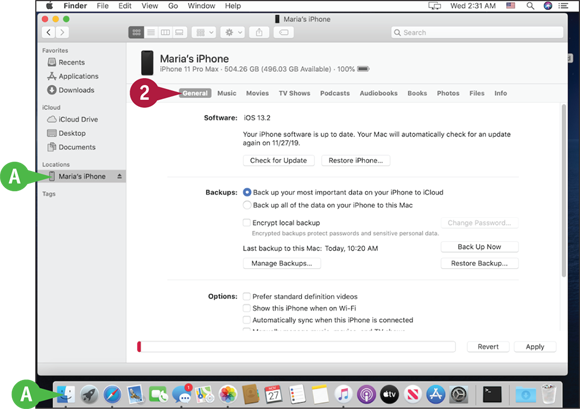
![]() Connect your iPhone to your computer via the USB cable.
Connect your iPhone to your computer via the USB cable.
![]() On macOS Catalina, click Finder (
On macOS Catalina, click Finder (![]() ) on the Dock to open a Finder window if one does not open automatically showing the iPhone’s management screens, then click the iPhone.
) on the Dock to open a Finder window if one does not open automatically showing the iPhone’s management screens, then click the iPhone.
On macOS Catalina, a Finder window opens. On earlier macOS versions or on Windows, the iTunes window appears.
Note: If your iPhone’s control screens do not automatically appear in iTunes, click iPhone (![]() ) on the navigation bar at the top of the screen.
) on the navigation bar at the top of the screen.
![]() On macOS Catalina, click General; on earlier macOS or Windows, click Summary in the sidebar on the left.
On macOS Catalina, click General; on earlier macOS or Windows, click Summary in the sidebar on the left.
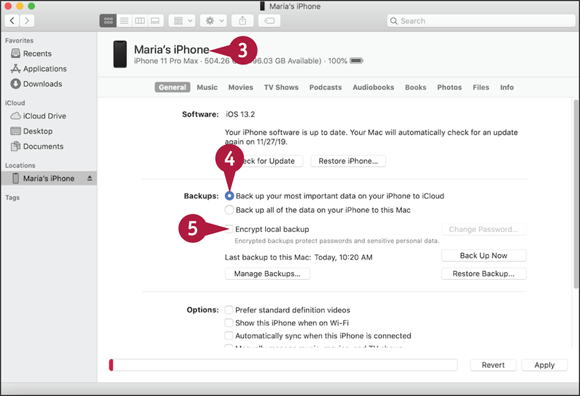
![]() To change the iPhone’s name, click the existing name, type the new name, and press
To change the iPhone’s name, click the existing name, type the new name, and press ![]() or
or ![]() .
.
![]() Click a radio button (
Click a radio button (![]() changes to
changes to ![]() ) to specify where to back up your iPhone.
) to specify where to back up your iPhone.
![]() If you choose to back up to this computer, click Encrypt local backup or Encrypt iPhone backup (
If you choose to back up to this computer, click Encrypt local backup or Encrypt iPhone backup (![]() changes to
changes to ![]() ).
).

A dialog opens for setting a password.
![]() Type a password in the Password box and again in the Verify Password box.
Type a password in the Password box and again in the Verify Password box.
![]() On a Mac, click Remember this password in my keychain (
On a Mac, click Remember this password in my keychain (![]() changes to
changes to ![]() ) if you want to save the password in your keychain.
) if you want to save the password in your keychain.
![]() Click Set Password to close the dialog.
Click Set Password to close the dialog.
![]() Click Automatically sync when this iPhone is connected (
Click Automatically sync when this iPhone is connected (![]() changes to
changes to ![]() ) if you want to sync your iPhone automatically when you connect it.
) if you want to sync your iPhone automatically when you connect it.
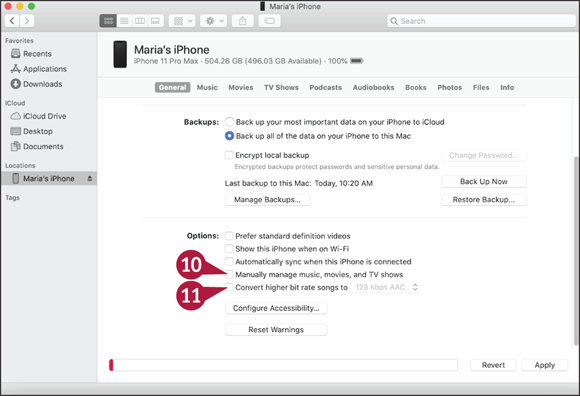
![]() Click Manually manage music, movies, and TV shows (
Click Manually manage music, movies, and TV shows (![]() changes to
changes to ![]() ) if you want to load these items on your iPhone manually rather than using the automated features in Finder or iTunes.
) if you want to load these items on your iPhone manually rather than using the automated features in Finder or iTunes.
![]() Click Convert higher bit rate songs to AAC (
Click Convert higher bit rate songs to AAC (![]() changes to
changes to ![]() ) if you want to compress larger songs to fit more on your iPhone. In the pop-up menu, choose the bit rate and encoding type, such as 128 Kbps AAC.
) if you want to compress larger songs to fit more on your iPhone. In the pop-up menu, choose the bit rate and encoding type, such as 128 Kbps AAC.
Backing up your iPhone to your computer is convenient but takes up space. You may want to delete old backups manually to reclaim space.
You can easily choose which items to sync to your iPhone. By selecting the iPhone in the sidebar in Finder on macOS Catalina and clicking the appropriate tab, or by selecting the iPhone on the navigation bar in iTunes and then clicking the appropriate item in the Settings area of the Source list, you can specify which music, movies, books, and other items to sync from your computer.

Manage Your iPhone Backups
![]() Click General on macOS Catalina or Summary on earlier macOS versions or Windows.
Click General on macOS Catalina or Summary on earlier macOS versions or Windows.
![]() Click Manage Backups.
Click Manage Backups.
A dialog opens, showing a list of backups.
![]() Click the backup you want to delete.
Click the backup you want to delete.
![]() Click Delete Backup.
Click Delete Backup.
![]() Click OK.
Click OK.
The dialog closes.
Choose Which Content to Sync
Note: This section uses the Music category to illustrate choosing content to sync. The controls in most of the other categories — such as Movies, TV Shows, and Podcasts — work in the same way, although the specific controls vary.
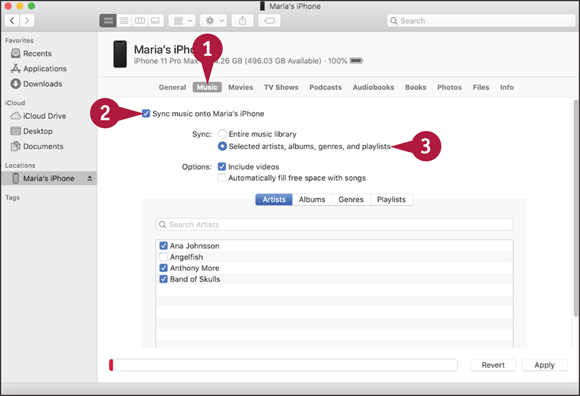
![]() Click the category or tab, such as Music.
Click the category or tab, such as Music.
The contents of the category or tab appear.
![]() Click Sync Music (
Click Sync Music (![]() changes to
changes to ![]() ).
).
The remaining controls become enabled.
![]() To load a selection of music, click Selected artists, albums, genres, and playlists (
To load a selection of music, click Selected artists, albums, genres, and playlists (![]() changes to
changes to ![]() ) instead of Entire music library.
) instead of Entire music library.
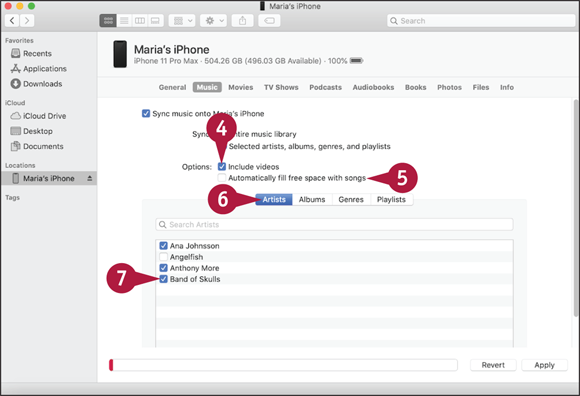
![]() Click Include videos (
Click Include videos (![]() changes to
changes to ![]() ) if you want to include music videos.
) if you want to include music videos.
![]() Click Automatically fill free space with songs (
Click Automatically fill free space with songs (![]() changes to
changes to ![]() ) only if you want to put as much music as possible on your iPhone.
) only if you want to put as much music as possible on your iPhone.
Note: Filling free space with songs may limit your ability to shoot photos or videos.
![]() Click Artists, Albums, Genres, or Playlists.
Click Artists, Albums, Genres, or Playlists.
That type of content appears.
![]() Click the check box (
Click the check box (![]() changes to
changes to ![]() ) for each artist, album, genre, or playlist to include.
) for each artist, album, genre, or playlist to include.
Apply Your Changes and Sync
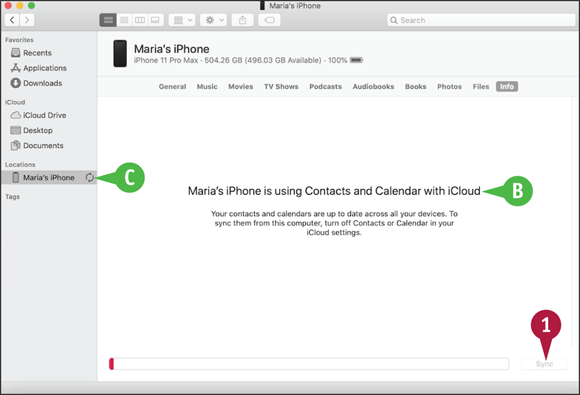
![]() If a content category is being synced via iCloud, you cannot sync it via Finder or iTunes. To turn off iCloud sync, tap Settings (
If a content category is being synced via iCloud, you cannot sync it via Finder or iTunes. To turn off iCloud sync, tap Settings (![]() ) on the iPhone’s Home screen; tap Apple ID, the button bearing your name; tap iCloud (
) on the iPhone’s Home screen; tap Apple ID, the button bearing your name; tap iCloud (![]() ); and then use the controls in the Apps Using iCloud list.
); and then use the controls in the Apps Using iCloud list.
![]() Click Apply or Sync, depending on which button appears.
Click Apply or Sync, depending on which button appears.
iTunes syncs the items to your iPhone.
![]() The readout shows you the sync progress.
The readout shows you the sync progress.
![]() When the sync finishes, disconnect your iPhone.
When the sync finishes, disconnect your iPhone.
Explore the Interface and Launch Apps
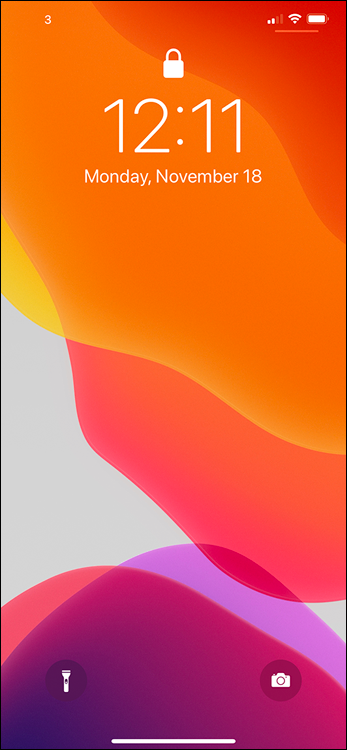
After you set up your iPhone with iCloud or iTunes, you are ready to start using the device. When you wake the iPhone from sleep, it displays the lock screen. You then unlock the iPhone to reach the Home screen, which contains icons for running the apps installed on the iPhone.
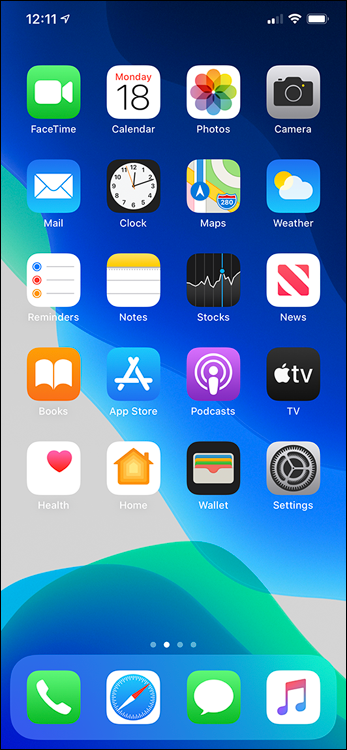
You can quickly launch an app by tapping its icon on the Home screen. From the app, you can return to the Home screen by swiping up from the bottom of the screen. You can then launch another app as needed.
Explore the Interface and Launch Apps
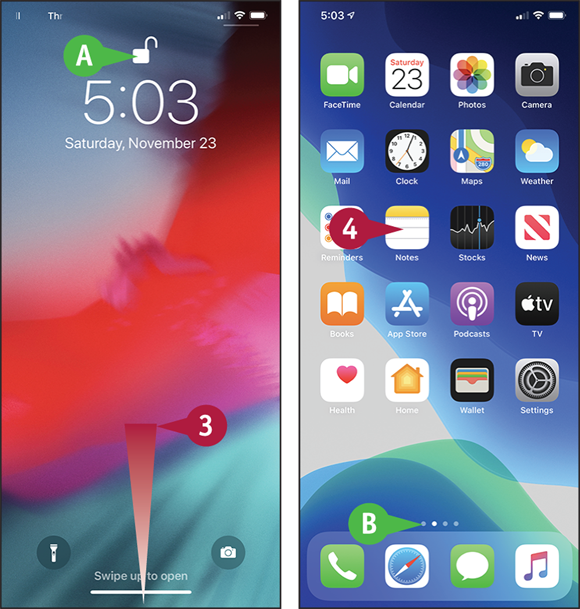
![]() Tap the screen.
Tap the screen.
Note: You can also press Side to wake the iPhone.
The iPhone’s screen lights up.
The lock screen appears.
![]() Raise the iPhone, pointing the screen at your face.
Raise the iPhone, pointing the screen at your face.
Face ID scans your face and attempts to match it to the stored data. If it succeeds, the iPhone unlocks; if it fails, the iPhone prompts you to enter your passcode.
Note: If the iPhone prompts you to enter your passcode, do so.
![]() The iPhone unlocks.
The iPhone unlocks.
![]() Swipe up from the bottom of the screen with one finger.
Swipe up from the bottom of the screen with one finger.
The Home screen appears.
![]() The iPhone has two or more Home screen pages. The gray dots at the bottom of the Home screen show how many Home screen pages you have. The white dot indicates the current Home screen page.
The iPhone has two or more Home screen pages. The gray dots at the bottom of the Home screen show how many Home screen pages you have. The white dot indicates the current Home screen page.
![]() Tap Notes (
Tap Notes (![]() ).
).

The Notes app opens.
Note: If you chose to sync notes with your iPhone, the synced notes appear in the Notes app. Otherwise, the list is empty until you create a note.
![]() Tap New (
Tap New (![]() ).
).
A new note opens, and the on-screen keyboard appears.

![]() Type a short note by tapping the keys.
Type a short note by tapping the keys.
![]() If the middle button in the suggestion bar shows the word you want, tap
If the middle button in the suggestion bar shows the word you want, tap ![]() to accept it. If one of the other buttons shows the right word, tap that button.
to accept it. If one of the other buttons shows the right word, tap that button.
![]() Tap Done.
Tap Done.
The on-screen keyboard closes.
![]() Tap Back (
Tap Back (![]() ). This button shows the name of the folder, such as All iCloud.
). This button shows the name of the folder, such as All iCloud.
![]() The Notes list appears, with your note in it.
The Notes list appears, with your note in it.
![]() Swipe up from the bottom of the screen.
Swipe up from the bottom of the screen.
The Home screen appears again.
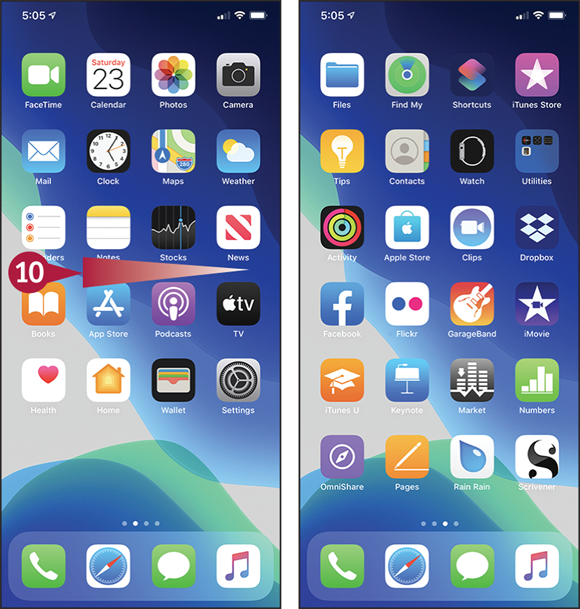
![]() Swipe left to display the second Home screen page.
Swipe left to display the second Home screen page.
Note: You can also tap at the right end of the row of dots on the Home screen to move one screen to the right. Tap at the left end to move one screen to the left.
You can now launch another app by tapping its icon.
![]() Press the Side button.
Press the Side button.
Your iPhone goes to sleep.
Using Cover Sheet and Today View
Your iPhone handles many different types of alerts, such as missed phone calls, text messages, and invitations to events such as meetings. Your iPhone integrates these alerts into Cover Sheet so that you can review them easily.
The iPhone’s Today View enables you to view snippets of important and helpful information, such as weather, calendar appointments, and stock updates. You can access Today View either via Cover Sheet or directly from the Home screen.
Using Cover Sheet and Today View

Open Cover Sheet and Deal with Notifications
![]() Swipe down from the top of the screen.
Swipe down from the top of the screen.
Cover Sheet appears.
Note: See the section “Choose Which Apps Can Give Notifications” in Chapter 2 for instructions on customizing the notifications that appear on Cover Sheet.
![]() You can tap Clear (
You can tap Clear (![]() ) to clear all notifications in a category such as Notification Center.
) to clear all notifications in a category such as Notification Center.
![]() To remove a single notification, swipe it left.
To remove a single notification, swipe it left.
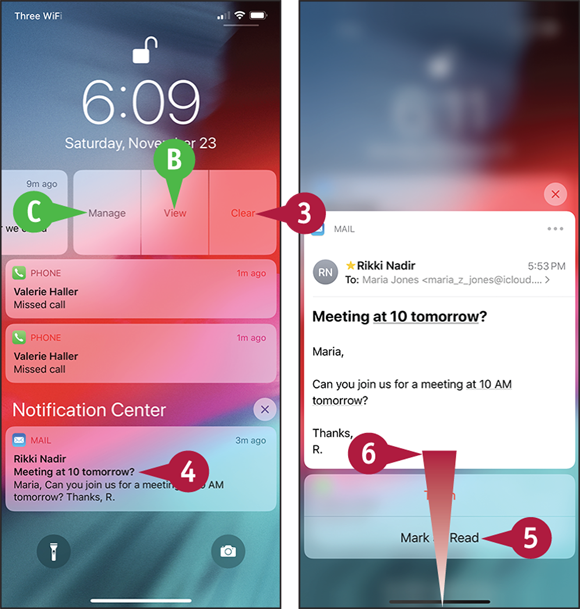
Action buttons for the notification appear.
![]() You can tap View to view the notification in its app.
You can tap View to view the notification in its app.
![]() You can tap Manage to take other actions with the app that gave the notification.
You can tap Manage to take other actions with the app that gave the notification.
![]() Tap Clear.
Tap Clear.
The notification disappears from Cover Sheet.
![]() Tap and hold a notification.
Tap and hold a notification.
The pop-up panel opens, together with action buttons.
![]() Tap the action you want to take. For example, for an e-mail message, tap Mark as Read to mark the message as read.
Tap the action you want to take. For example, for an e-mail message, tap Mark as Read to mark the message as read.
Note: To go to the app that raised a notification, tap the notification.
![]() When you finish working on Cover Sheet, swipe up from the bottom of the screen.
When you finish working on Cover Sheet, swipe up from the bottom of the screen.
The Home screen appears.
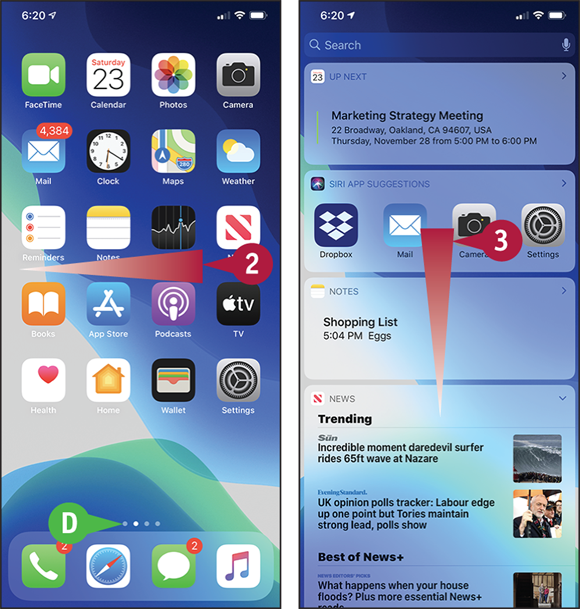
Open Today View
![]() Swipe up from the bottom of the screen.
Swipe up from the bottom of the screen.
The Home screen appears.
Note: If the Home screen page that appears is not the first page, press Home again or swipe up again to display the first page.
![]() Swipe right.
Swipe right.
![]() You can also tap the gray dot at the bottom of the screen.
You can also tap the gray dot at the bottom of the screen.
Today View appears.
Note: You can customize the selection of widgets in Today View. See the section “Customize Today View” in Chapter 2 for details.
![]() Swipe up.
Swipe up.

Other items appear.
![]() You can tap a widget to go straight to the related app.
You can tap a widget to go straight to the related app.
![]() You can tap an item such as a reminder to mark it as done.
You can tap an item such as a reminder to mark it as done.
![]() Swipe left.
Swipe left.
The Home screen appears.
Using Control Center
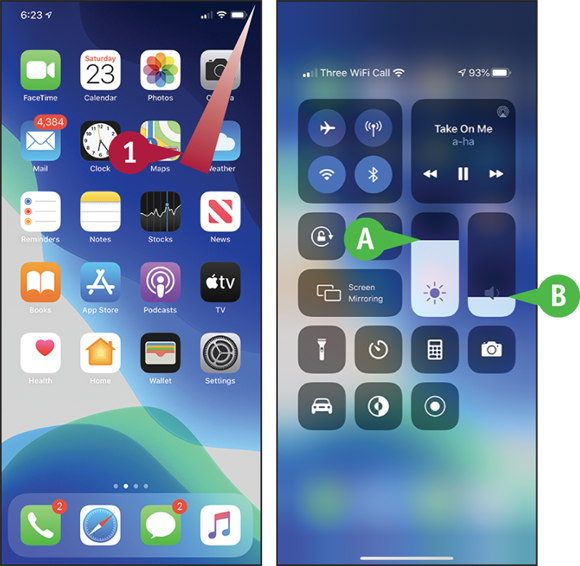
Control Center puts your iPhone’s most essential controls at your fingertips. From Control Center, you can turn Airplane Mode, Wi-Fi, Bluetooth, Do Not Disturb Mode, and Orientation Lock on or off; control music playback and volume and direct your iPhone’s audio and video output to AirPlay devices; change the setting for the AirDrop sharing feature; and quickly access the Flashlight, Clock, Calculator, and Camera apps. Control Center appears as a pane that you open by swiping upward from the bottom of the screen on the Home screen or in most apps.
Using Control Center
Open Control Center
![]() Swipe down from the upper-right corner of the screen.
Swipe down from the upper-right corner of the screen.
Control Center opens.
![]() You can drag the Brightness slider to control screen brightness. Press the Brightness slider to display a larger slider and the Night Shift icon (
You can drag the Brightness slider to control screen brightness. Press the Brightness slider to display a larger slider and the Night Shift icon (![]() ), which you can tap to turn Night Shift on or off. See the section “Configure Night Shift and Display Zoom” in Chapter 2 for information on Night Shift.
), which you can tap to turn Night Shift on or off. See the section “Configure Night Shift and Display Zoom” in Chapter 2 for information on Night Shift.
![]() You can drag the Volume slider to control audio volume.
You can drag the Volume slider to control audio volume.
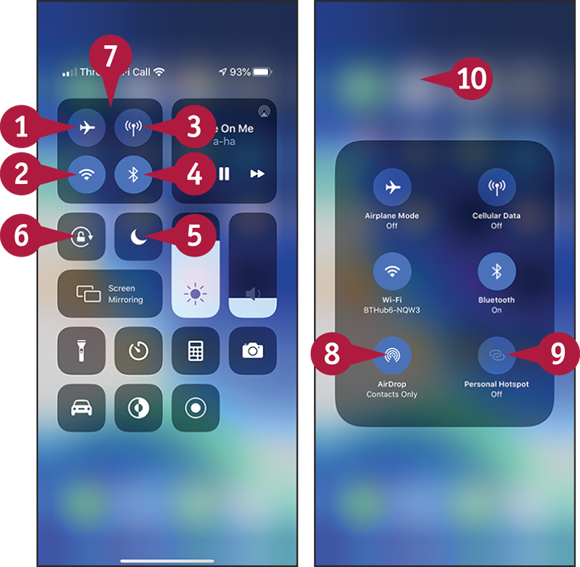
Control Essential Settings
![]() Tap Airplane Mode (
Tap Airplane Mode (![]() or
or ![]() ) to turn Airplane Mode on (
) to turn Airplane Mode on (![]() ) or off (
) or off (![]() ).
).
![]() Tap Wi-Fi (
Tap Wi-Fi (![]() or
or ![]() ) to turn Wi-Fi on (
) to turn Wi-Fi on (![]() ) or off (
) or off (![]() ).
).
![]() Tap Cellular Data (
Tap Cellular Data (![]() or
or ![]() ) to turn Cellular Data on (
) to turn Cellular Data on (![]() ) or off (
) or off (![]() ).
).
![]() Tap Bluetooth (
Tap Bluetooth (![]() or
or ![]() ) to turn Bluetooth on (
) to turn Bluetooth on (![]() ) or off (
) or off (![]() ).
).
![]() Tap Do Not Disturb (
Tap Do Not Disturb (![]() or
or ![]() ) to turn Do Not Disturb Mode on (
) to turn Do Not Disturb Mode on (![]() ) or off (
) or off (![]() ).
).
![]() Tap Orientation Lock (
Tap Orientation Lock (![]() or
or ![]() ) to turn Orientation Lock on (
) to turn Orientation Lock on (![]() ) or off (
) or off (![]() ).
).
![]() Tap and hold the Communications box.
Tap and hold the Communications box.
The Communications panel opens.
![]() Tap AirDrop (
Tap AirDrop (![]() ) to change the AirDrop setting.
) to change the AirDrop setting.
![]() Tap Personal Hotspot (
Tap Personal Hotspot (![]() or
or ![]() ) to turn Personal Hotspot on (
) to turn Personal Hotspot on (![]() ) or off (
) or off (![]() ).
).
![]() Tap outside the Communications panel.
Tap outside the Communications panel.
The Communications panel closes.

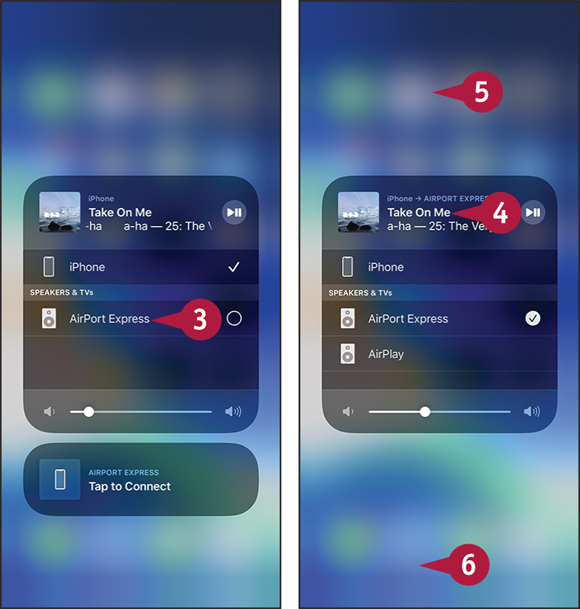
Choose an AirPlay Device for Audio
![]() Tap the song information to go to the song in the Music app.
Tap the song information to go to the song in the Music app.
![]() Tap Previous (
Tap Previous (![]() ) to go back to the start of the song. Tap again to play the previous song.
) to go back to the start of the song. Tap again to play the previous song.
![]() Tap Next (
Tap Next (![]() ) to play the next song.
) to play the next song.
![]() Tap Pause (
Tap Pause (![]() ) to pause playback.
) to pause playback.
![]() Press the Audio box firmly.
Press the Audio box firmly.
The Audio panel opens.
![]() You can drag the playhead to move through the song.
You can drag the playhead to move through the song.
![]() Tap AirPlay (
Tap AirPlay (![]() ).
).
The list of AirPlay devices appears.
![]() Tap the audio device to use for output.
Tap the audio device to use for output.
The iPhone starts playing audio on that device.
![]() Tap the song name.
Tap the song name.
The Now Playing On panel closes.
![]() Tap the screen outside the Audio panel.
Tap the screen outside the Audio panel.
The Audio panel closes.
![]() Tap at the bottom of the screen.
Tap at the bottom of the screen.
Control Center closes.