
8
Hardware Devices Integration With IoT
Sushant Kumar1* and Saurabh Mukherjee2
1Banasthali Vidyapith, Rajasthan, India
2Dept. of Computer Science and Engineering, Banasthali Vidyapith, Rajasthan, India
Abstract
Sensing any environmental conditions and acting on behalf of it is the basis of IoT Technology. One might wonder how physical parameters can be changed on the basis of only sensing, but that’s the most attractive part of IoT technology. Imagine the milk jug in our refrigerator telling us through an application notification that the milk is about to run out and we should refill it, or even the milk jug sending signals to the milk vendor to come to the house to refill it. It sounds unrealistic, but that’s what Internet of Things (IoT) technology can create. Imaginations are the wisdom that encompass human satisfaction level. There are many hardware devices which are compatible with IoT. Their working part is discussed here regarding the Arduino and Raspberry Pi hardware which have equal capability of inventing new unimaginable horizons in IoT. These devices can be used for numerous applications within IoT. The whole architecture consists of sensor data, clouds, processing, notification.
Keywords: BLE, LPDDR, REST, HTTP, WiMAX, GPIO
8.1 Introduction
Integrating with IoT is possible with a few hardware devices such as Arduino and Raspberry Pi hardware which are equally capable of inventing new unimaginable horizons in IoT. Arduino is an actuator or a small microcontroller sort of device whereas Raspberry Pi is a mini computer. The basic difference between the two lies in the computational power and different work capacities involved. Moreover, Raspberry Pi is a bigger subset which engulfs Arduino too. Discussing both, a methodology should be devised to gain maximum insights into their computational abilities and how they can transform the IoT industry.
The whole architecture of IoT involves sensors, actuators, cloud, data processing, gathering analytical data, sending automatic updates and notifying users of any aberration. For example, opening a garage door, the sensors can sense the environmental changes (Proximity sensor) and then send data to the actuator which are mechanical in nature (motor) and they act on those changes as instructed. This small work structure can be completed using an Arduino device.
As in the case, for example, of weather monitoring, when there is a lot of data and complexity involved or bulk data processing and filtering, then the Raspberry Pi hardware device is used. The sensors can send all of the data to the cloud as the data is heavy (regular monitoring) and needs a lot of filtering and analysis to be done before any useful data can be fetched out. This scenario needs a full IoT infrastructure to thrive including clouds, processing center, analytical center, etc.
Currently, in market, there are many applications where IoT finds a suitable use. These applications include the Medical field, Health domain, Agriculture production, Weather Monitoring, Surveillance, Machine learning models, Smart cities, Satellite communications, etc. There is vast usage of IoT devices for increasing the efficiency and accuracy of gadgets and therefore helping humanity in many ways. This was my motivation in compiling this chapter.
IoT has proved itself capable of shaping the future of the digital world. In the sections below, IoT-compatible hardware devices, case studies with real-life application scenarios, drawbacks of IoT technology and challenges in IoT infrastructure are discussed.
8.2 Literature Review
Below are some of the research papers that had done work similar to what I am proposing in this chapter.
In [1], Air quality measurement is discussed. Increasing population levels have led to a decrease in air quality, which leads to detrimental effects on our body. Poor air quality is the main propellant for chronic diseases. The main substance is carbon monoxide, which can be measured by sensors and then remotely monitored by devices at home and also at public places. The updates can be pushed to the subscriber.
In the paper, Arduino and Raspberry Pi are used to measure the soil moisture content of plants with the help of HTU 211D sensor element. The sensors are used for measuring the temperatures from the surroundings and storing displayed information. In this ESP8266 Wi-Fi module has been used for data storing purpose [2].
An IoT-based patient health monitoring system enables the doctor to get regular health-centric updates about the patient with the help of Raspberry Pi connected to the server with internet. A patient’s health status can be monitored by device/sensor deployed with the patient and all health parameters are sent to the doctor’s mobile application or to a central server with proper authentication. This is IoT-based remote technology for medical treatment for patient [3].
In this paper, Raspberry Pi acts as a sensor node and a centrally controlled controller. Hardware devices integration IoT has become the most versatile platform for various application services. Here, the Raspberry Pi is used to develop this, because it works as a sensor node and as a controller. In this paper, a health monitoring system has been proposed [4].
In the present work, an IoT-based real-time energy monitoring system is created to monitor and control a switch gear industry need. Daily energy needs of an industry are monitored and a summative assessment is sent to the server for analysis to be done for future supply [5].
In the paper, an affordable IoT-based solution is discussed that will increase COVID-19 indoor safety. The aspects which it will cover are contactless temperature sensing, mask detection and minimum distance maintained between individuals. The temperature sensing will be done automatically by infra-red sensors, and the other two activities will be performed by Raspberry Pi–enabled computer vision techniques [6].
Continuous monitoring of crops is indispensable for the cultivation of agriculture. A new AGRO IoT system is developed where an automatic mirroring and reconfiguration of remote monitoring system is deployed. The functionalities it will support is lessening the downtime and efficient utilization of computational resources availability [7].
In the paper, an automatic weather monitoring system is discussed which will regularly note the weather-related data values of a location along with all the parameters like temperature, humidity, pressure, and breeze velocity, and then relay these values to a centralized server or database to help monitor analytic data over a period of time. The system also includes wireless technology, electronic devices and sensors [12].
This below paper provides IoT-oriented comparison of various boards with suitable selection of the hardware development platforms that are capable enough to improve the understanding of technology, and methodology to facilitate the developer’s requirements. This paper also summarizes various capabilities of available hardware development platforms for IoT and provides a method to solve real-life problems by building and deployment of powerful Internet of Things notions [13].
The above literature review discusses the application concerning deployment of different IoT hardware modules and integrating them within IoT architecture to regularly fetch all the desired updates on our local (app) and centralized server.
8.3 Component Description
The hardware devices which can be integrated with the IoT infrastructure are found in abundance. The most prominent ones in the market are Arduino and Raspberry Pi. While Arduino is used for completion of smaller and repetitive tasks, Raspberry Pi is used for bigger and more complicated, difficult work. It’s also called a mini computer and is a credit card– sized device. Below, both devices are discussed in more detail.
8.3.1 Arduino Board UNO
In Figure 8.1, an Arduino Board UNO has been shown with nos. depicting its PCB layout [1]. In the points mentioned in the picture, 1 is the USB port; it loads the code into the Arduino board, 2 is the barrel jack, 3 is ground point, 4 and 5 are input voltage pins of 5V and 3.3V, respectively.
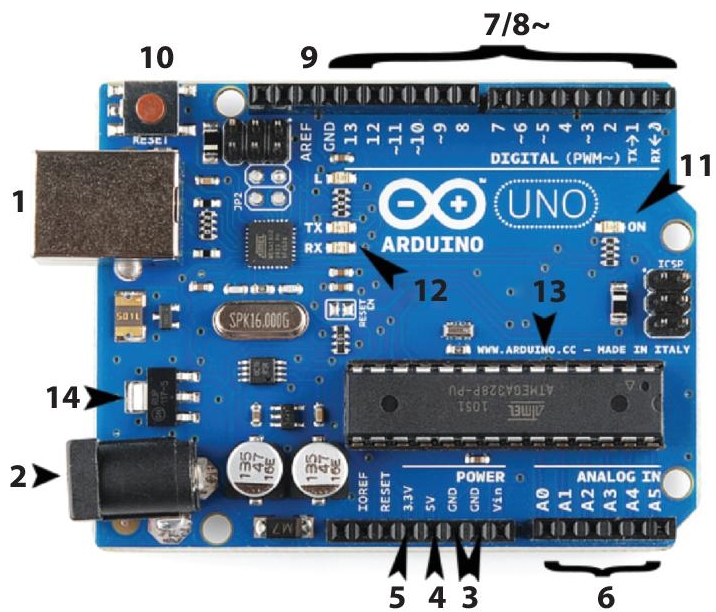
Figure 8.1 Arduino UNO board.
6 stands for six analog inputs (A0-A5), for example in case of input from temperature sensor. 7-8 stands for pins numbered from 0-13, that is 14 digital pins used for both input and output. 9 is for analog reference point. 10 is for reset button, which erases all code on the device and is available for new code again. 11 shows LED ON, if Arduino is powered by a source. 12 indicates TX and RX, which shows when our device is transmitting data and receiving data, respectively.
13 shows IC (horizontal black with many legs) which stands for Integrated Circuit. 14 controls the amount of voltage to be let in the Arduino board. There are many other small parts in the Arduino board but those are beyond the scope of our domain.
8.3.2 Raspberry Pi
Another hardware device, which is depicted in the figure below, is Raspberry Pi. It is a small mini computer with a 4GB processor. It has a conventional Wi-Fi, Micro SD card, USB port [9] and GPIO with camera ports too. It is also used for connecting sensors data with cloud technology.
In Figure 8.2, the Raspberry Pi 4 components description is provided [2]. The Broadcom CPU handles all computations and GPU handles all graphical output. The LPDDR is Low Power Double Data Rate, specially for mobile computers. The frequency is 1.5 GHz and RAM is 4 GB. The USB ports are used to connect it to laptop or other source. An Ethernet port is used for internet. A video port is also available at the bottom side next to a camera port. Next to that are HDMI ports for high-definition networking. A 5V power input is also provided.
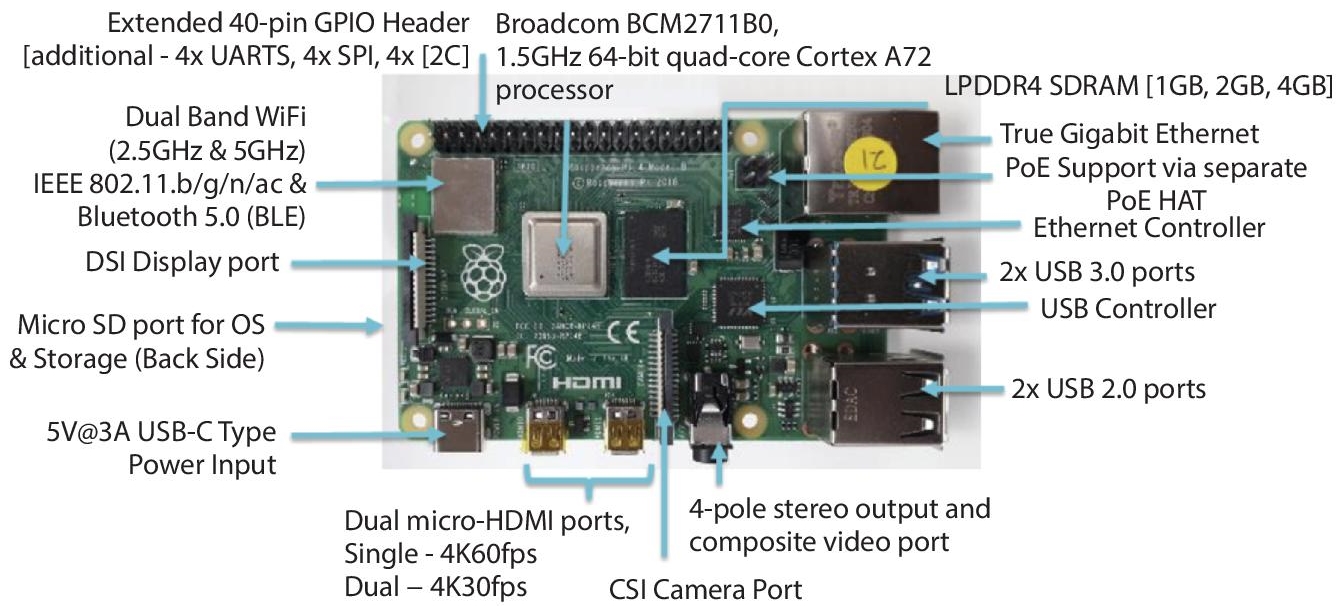
Figure 8.2 Raspberry Pi 4 board.
A micro-SD port for OS and also storage is shown. Two bands Wi-Fi at 2.5 Ghz and 5 Ghz, along with BLE (Bluetooth Low Energy) technology port is shown. GPIO stands for General Purpose Input Output port. The processor is 64-bit quad core Cortex A72 processor. The kind of experimental setup that can be achieved using these two components will be discussed herewith.
8.4 Case Studies
The different sensors data are used in many applications as explained in the sections below. Some of the few sensors, their working, connections, code and output are briefly described.
8.4.1 Ultrasonic Sensor
There are many varieties of sensors used to measure physical attributes. One such sensor is ultrasonic sensor. It sends ultrasonic sound waves and they touch any hard surface and reflect back in forms of an electrical signal which is gathered by the sensor. Their range is 40-70 KHz.
Here, in this experiment, distance is being measured between two points using ultrasonic sensor. The logic behind this is that the sound waves (high frequency) will be emitted from the source/emitter and then they will touch the nearest straight obstacle and then return. The time taken by the rays can be noted and also the speed of rays (330ms) is known beforehand. So, by observing both things and putting in formula, Distance = Speed X Time.
One thing to note is that the distance here travelled is double as the rays are hitting the obstacle and then coming back too. So, finally it should be divided by two to get actual distance. So, this can be worked out by downloading and installing Arduino IDE on our personal system. Open and run it. The hardware needed are Arduino uno, breadboard, jumper wires, USB connector, personal system, and ultrasonic sensor.
In breadboard connect ultrasonic sensor with jumper wires. The back side pins of sensor: (in breadboard vertical connections (in between) are there). VCC should be connected to 5V in Arduino board, trig to pin 13 of digital in of Arduino. Also, Echo to pin 12 of digital pin of Arduino. Gnd to Gnd of Arduino board. Connect USB from laptop to Arduino as shown in Figure 8.3.
Once it is connected, the code should be run in Arduino sketch (code writing area) [1]. To verify our code in Arduino IDE that is sketch. Upload our code in sketch. After connecting all things, press Ctrl + shift + M, can see output window.
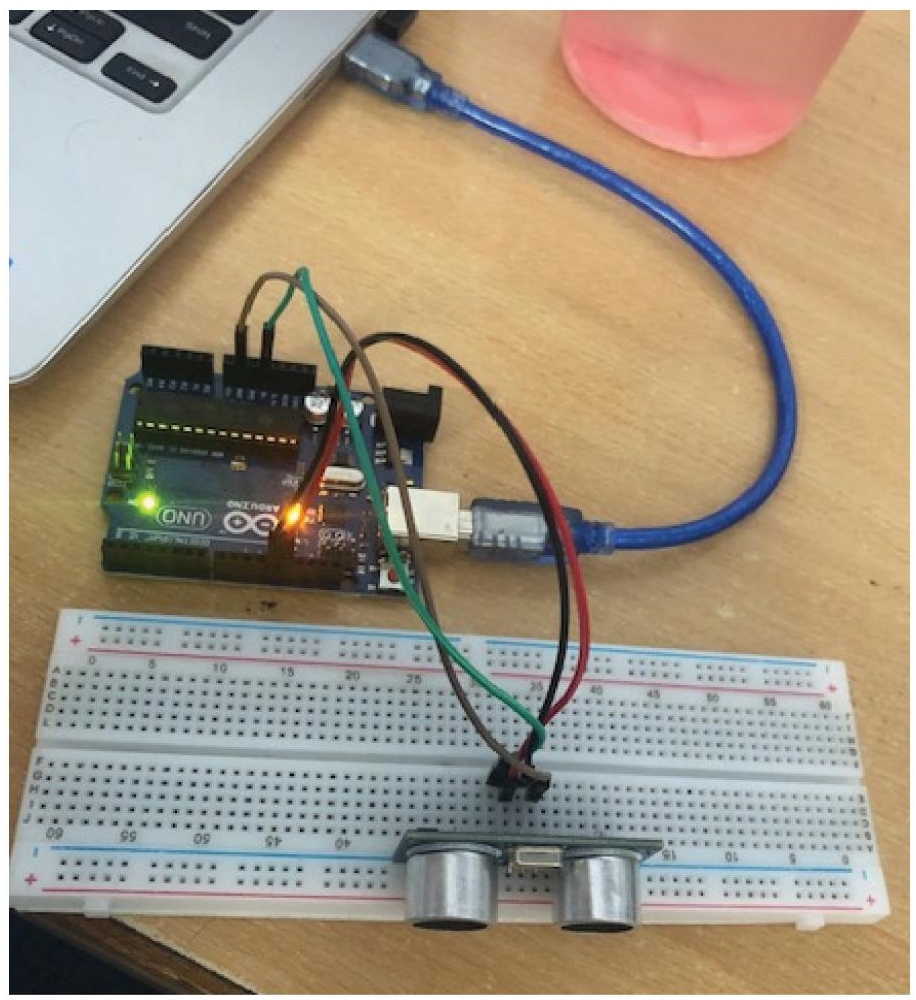
Figure 8.3 Connections of ultrasonic sensor for measuring distance.
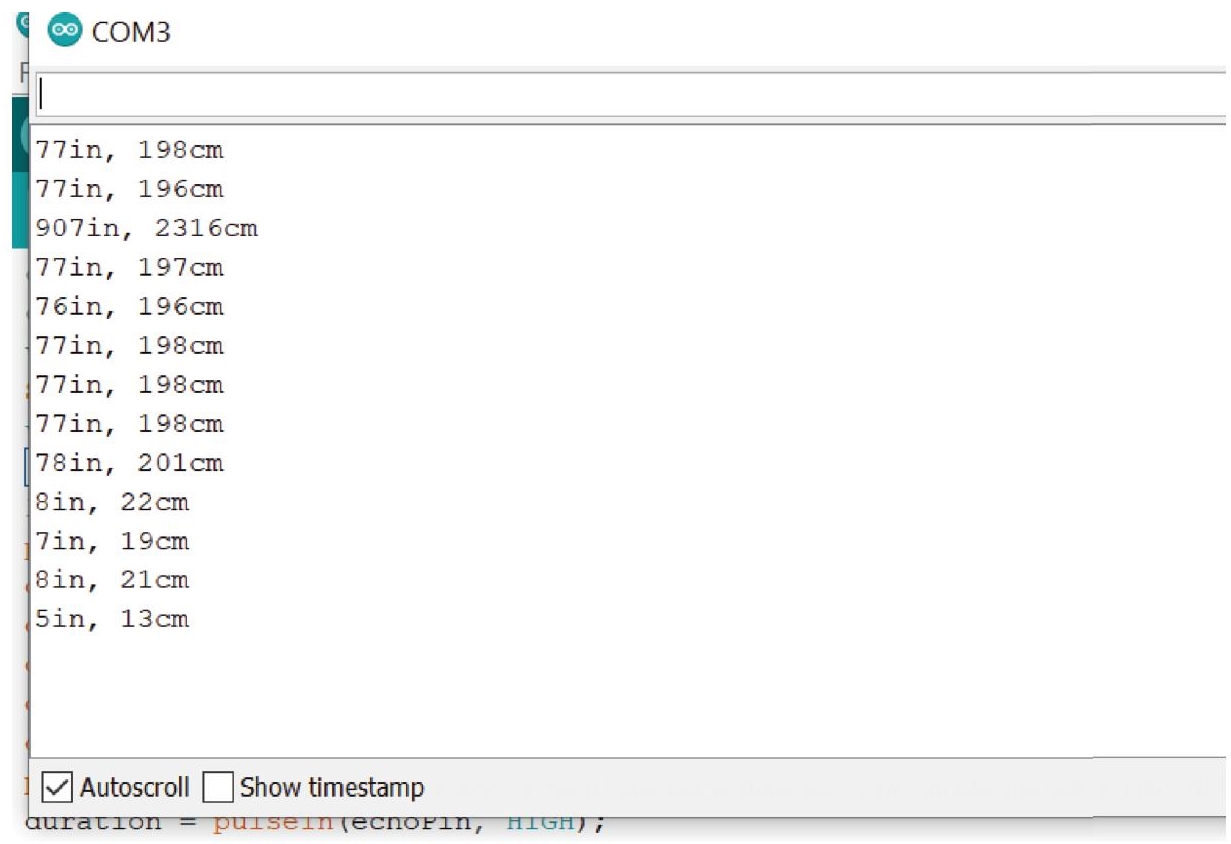
Figure 8.4 Distance readings.
So, here from Figure 8.4, it can be inferred that, in the output, the first distance is in inches and the second one is the equivalent cm; it shows the nearest straight obstacle’s distance from the sensor on the Arduino board.
8.4.2 Temperature and Humidity Sensor
Applications where weather monitoring is done using IoT devices, different sensors are required. The sensors like DHT11, which measures temperature and humidity, are deployed at nodes and they capture the environmental conditions remotely and send data to the cloud or server regularly. Here, in this experiment, the measurements of environment parameters are measured, namely Temperature and Humidity. Following the same procedure that was followed for measuring distance in Arduino IDE, it can be set up and the code below measures temperature and humidity values.
Please note that it is a safe process to explicitly download the DHT library in IDE. DHT is the sensor name for measuring the environment parameters.
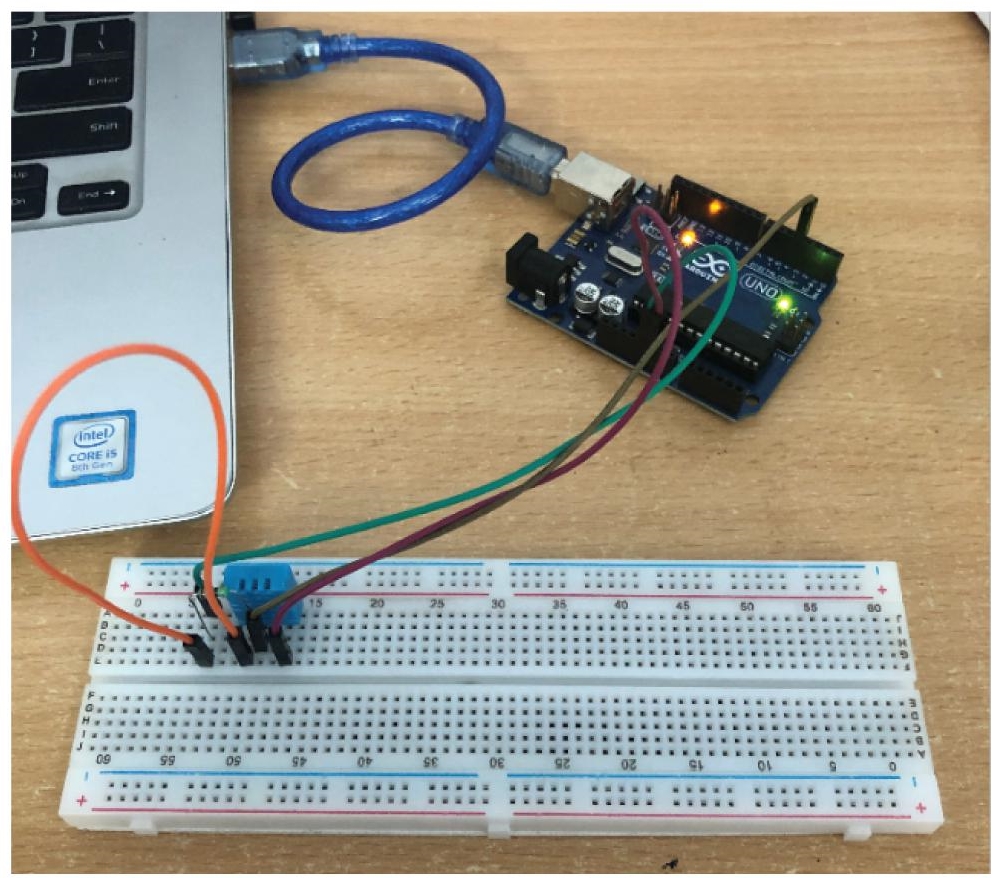
Figure 8.5 Connections for measuring temperature and humidity.
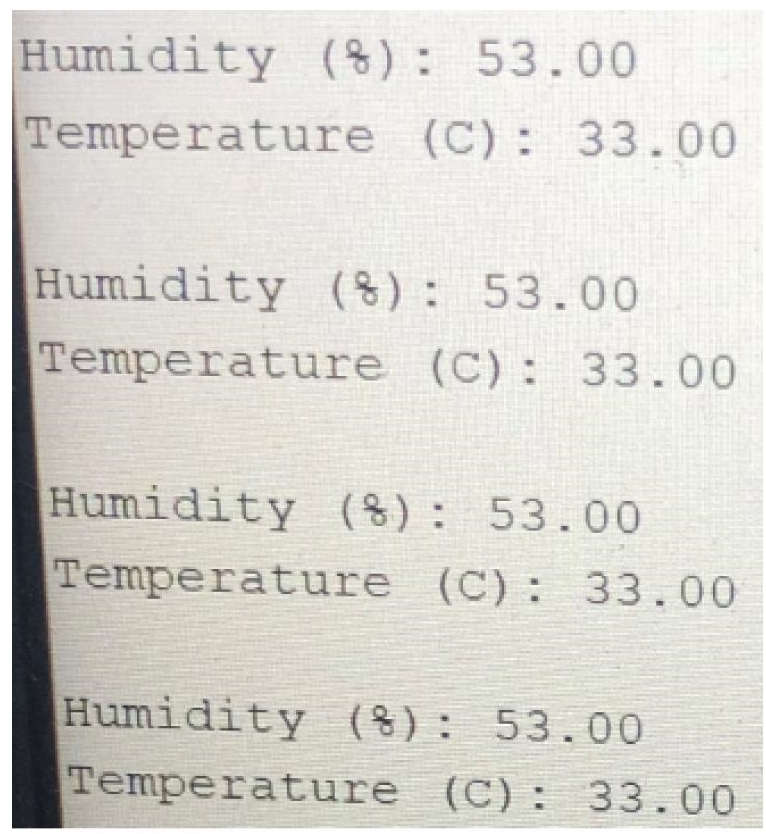
Figure 8.6 Output measurements in Arduino IDE.
The connections are mentioned in Figure 8.5. Code [2] is mentioned in annexures. In [2] code, delay of 2000 is in microsecond; it can be modified to set the frequency of measurement. 9600 is the baud frequency (default).
Here, in Figure 8.6, temperature and humidity are being measured, both of which values are shown. For example, 53 is humidity (%) and 33 is deg C.
Similarly, many projects can be done using Arduino board, for example, soil moisture measurements of a plant, opening and closing the door of our garage or LED glowing in case of intrusion detection in our home/office. But generally repetitive tasks are preferred in Arduino and also much less computational task is performed. It is notable that internet connectivity is not used in the above tasks. On the other hand, let us see what work our Raspberry Pi can perform as compared to Arduino.
8.4.3 Weather Monitoring System Using Raspberry Pi
Weather nowadays has become most unpredictable as there have been a myriad of ecological imbalances in nature. From deforestation to pollution to soil erosion, humans have changed the environment according to their material needs.
This in turn has resulted in the sporadic increase of natural calamities over the years. So, in planning to monitor the environmental imbalances which are about to occur, it is hoped that human lives can be saved by predicting potential disasters beforehand.
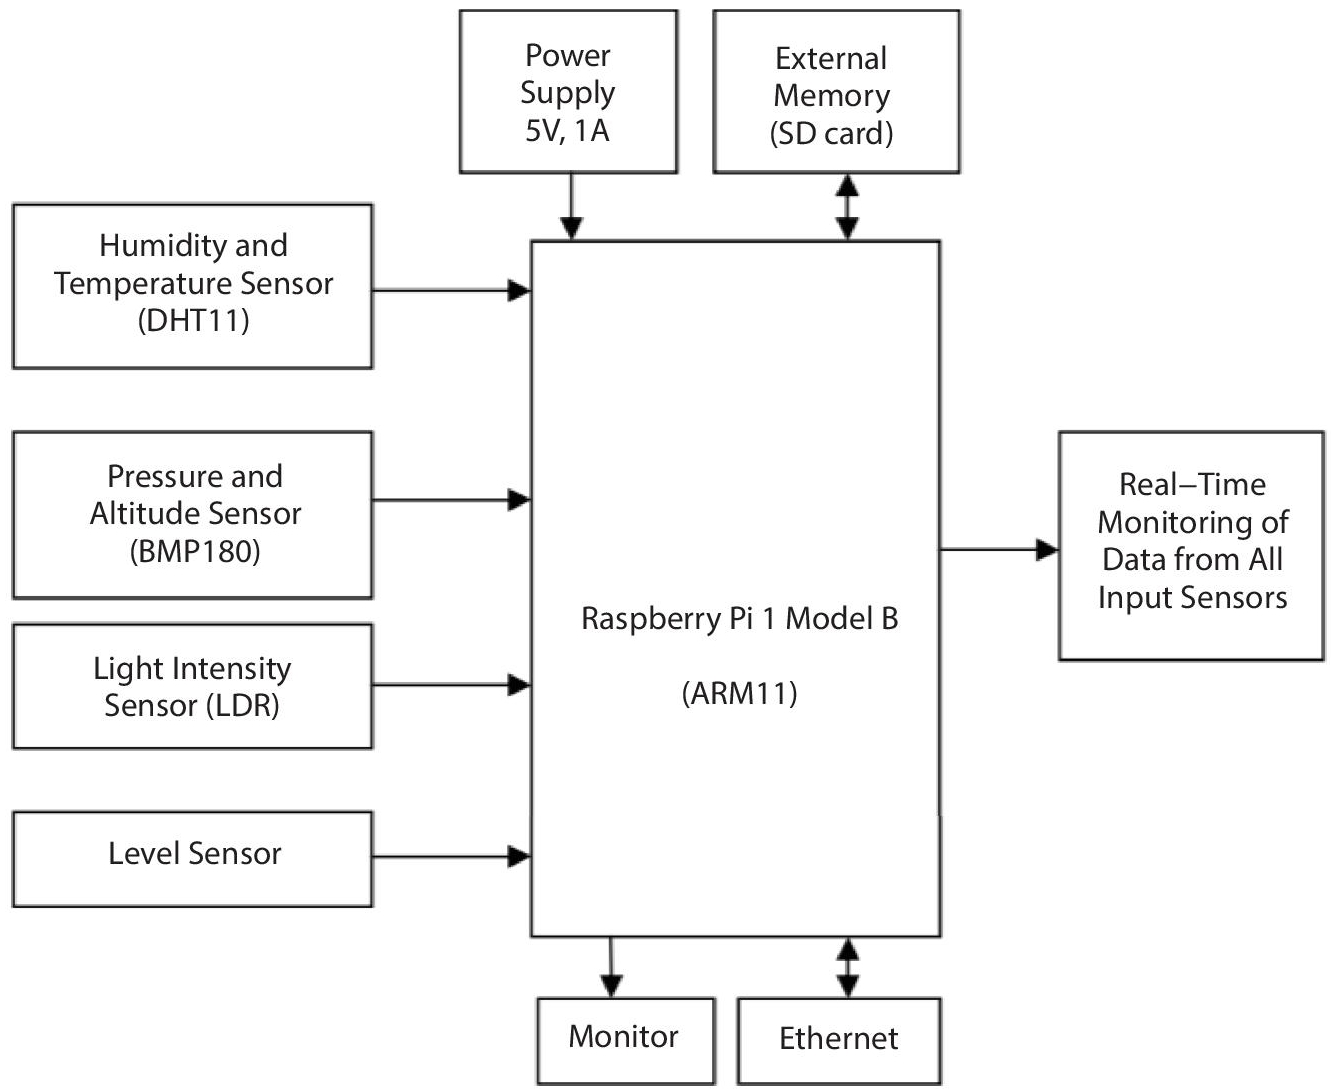
Figure 8.7 Working diagram of weather monitoring.
In Figure 8.7, [8], a Raspbian OS is used with Linux OS. A SD card can install the Raspbian OS on the Raspberry Pi. Python will be used to code on the device. Temperature, humidity, pressure, light intensity, level sensors are connected and these parameters are used to monitor the environment and the measurements are sent to the cloud via internet (Wi-Fi) and then any server can be uploaded with the data as desired. Also, apps used by disaster management teams can be notified herewith. The GPS location of the place is also notified.
In Figure 8.8 below, a flow chart is depicted where, on top, all the data is collected from the sensors, then it is sent to Raspberry Pi processor and that particular data is stored in CSV file at server. Now for analytics, this data can be sent to either apps, website, govt disaster relief team, etc. REST (Representational State Transfer) architectural principles are used to communicate with HTTP (Hypertext transfer protocol).
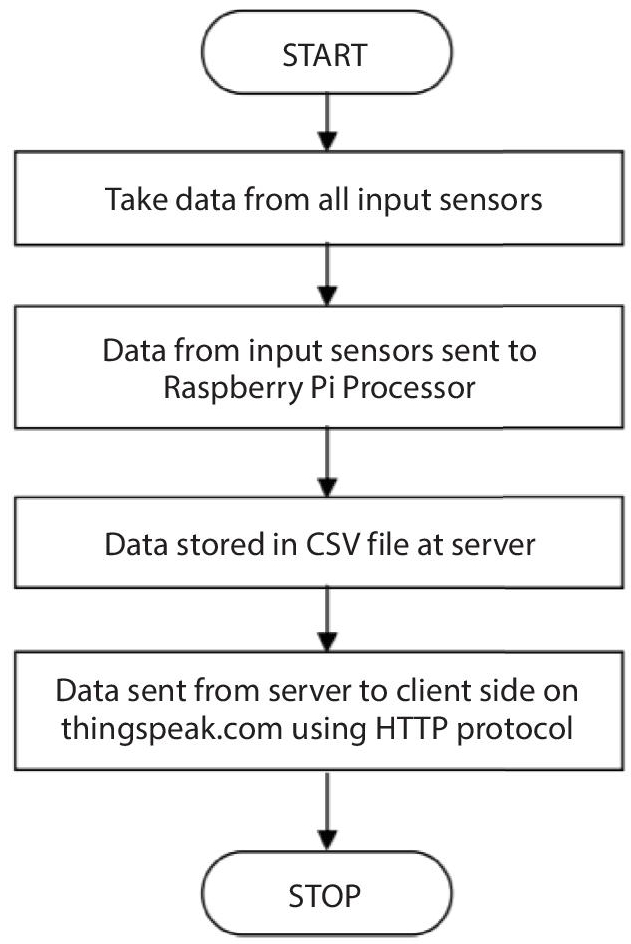
Figure 8.8 Flow chart.
8.5 Drawbacks of Arduino and Raspberry Pi
Both Arduino and Raspberry Pi have several advantages compared to other conventional methods. Some interesting comparisons can be made between them.
Arduino is a small microcontroller, the size of an atm card. It can do many small tasks without the need of an OS. It simply writes the code and executes it as its firmware interprets it. It is generally preferred for hardware projects and used where monitoring the readings without much execution part or a very small, less computational task is to be followed. Generally, an Arduino board is used for simple loopy tasks such as opening and closing a house door, gathering the outside temperature data or driving a simple motor, etc.
While Arduino can be turned ON and OFF at any point of time without any risk or damage, when the power resumes, the code is run again. A battery pack will suffice Arduino. It is cheaper than Raspberry Pi, as Arduino costs around $10-20 depending on the version [5]. For example, if a bulb needs to be ON, then Arduino is best suited, otherwise let us suppose tens of bulbs be ON with some condition, then Raspberry Pi will hold aces. Arduino cannot be connected to internet but still if we want to use it, then its little tacky work as external Boards called “Shields” needs to be plugged in, to make Arduino as functional as Pi, with a proper coding to handle them.
Raspberry Pi, on the other hand, is bigger in size compared to its former counterpart. Also, there is Raspbian OS on SD card inside it. It has CPU and a GPU too. Computationally, it is more intensive. It has a Wi-Fi/ BLE port also. Raspberry Pi is best used for cumbersome tasks such as driving a robot, performing multiple tasks, or doing encryption calculations. Pi is hard to run on batteries. The price of Raspberry is around $35-40 [4].
Pi can do parallel tasks like a computer does multi-tasking. For building a complex project, Raspberry Pi is the best choice. It runs on an OS and must be properly shut down before turning OFF the power, otherwise OS and applications may get corrupt and can be damaged. Raspberry Pi is almost 40 times faster than Arduino. Pi has an Ethernet port, for connection to the networks. Also, internet can easily be run on Pi using USB Wi-Fi dongles.
8.6 Challenges in IoT
Owing to the vastness of the IoT domain, there ought to be many challenges involved like Design challenges, Security challenges and Development challenges. These challenges can become a bottleneck for future work capabilities in this domain. Some of the prominent challenges occurring in IoT are listed below.
8.6.1 Design Challenges
The challenges [11] generally involve the deploying of IoT products in unstable network areas. For example, with poor GSM/GPRS signals. Also, sometimes, the environment adds to the woes. As the power consumption of the sensor nodes in the architecture should be minimal owing to the size of the service area and unavailability of charging areas, so devices should be made with minimal power consumption or maybe charged with solar power. A proper strategy of choosing NVM (Non-Volatile Memory) should be made as during network failure, internal NVM, stores the critical data. A secondary partition for failover handling can be made in those critical times.
8.6.2 Security Challenges
Are the most important challenges of all [10]. Insufficient testing and non-modification of IoT products before they are launched in the market is the main grave concern affecting security. In the mad race for making fast money, many big companies ignore these security loopholes.
Brute force attack, Default passwords, IoT malware and ransomware are a few other security challenges [10]. Due to so many different layers of authorization and authentication involved, the privacy of the users is jeopardized.
8.6.3 Development Challenges
Some newbie enterprises don’t have an exact idea of IoT infrastructure and thus try to get into this domain before getting any design or test, creating implementation issues [10]. Data miners, experts and analysts are also required at the end IoT level 6 and 7 where a final report has to be created out of the raw data from sensors. So knowledge of specialized technologies and manpower is a big requirement in this IoT technology.
8.7 Conclusion
As a result of the enormous growth of IoT, it has become a highly capable technology that can cause gigantic developments in the technology field. Moreover, it’s a high probability that IoT will be the go-to technology in the near future. Edge computing technology has also been looked upon. As all the sensors don’t send all data to the cloud, as it would be too much to handle, thus edge computing comes into the picture. The technology computes important computations at the sensor nodes only and only sends required data further to the cloud, thus reducing the load on the cloud. However, it too has limitations and so, in future a mixture of edge computing and blockchain would be inevitable for the growth of IoT.
IoT technology has been the most upcoming and talked about of the promising technologies for the future. There has been lots of research in the ongoing domain. Communication has become indispensable for the prosperity of human beings, so this technology enhances it. Imagine our car talking to us or communicating with other vehicles in the vicinity, or our jug in the refrigerator alerting us that milk is about to run out soon. These are a few examples of areas where IoT can do wonders. As more and more things are getting involved with IoT, obviously the security, privacy, and availability of data remains an issue. The applications of IoT range from smart homes, future agriculture farming, smart city, healthcare, industrial automation and much more. When many technologies or architectures meet to benefit a common cause, accountability is always a point to ponder. Likewise, future insights can be provided by Blockchain regarding the accountability issues, and maybe these two can provide a better and more robust system for future generations. Blockchain can settle the privacy and reliability concerns in IoT.
8.8 Annexures
1
const int trigPin = 13;
const int echoPin = 12;
void setup() {
Serial.begin(9600);}
void loop()
{
long duration, inches, cm;
pinMode(trigPin, OUTPUT);
digitalWrite(trigPin, LOW);
delayMicroseconds(2);
digitalWrite(trigPin, HIGH);
delayMicroseconds(10); |
digitalWrite(trigPin, LOW);
pinMode(echoPin, INPUT);
duration = pulseIn(echoPin, HIGH);
inches = microsecondsToInches(duration);
cm = microsecondsToCentimeters(duration);
Serial.print(inches);
Serial.print("in, ");
Serial.print(cm);
Serial.print("cm");
Serial.println();
delay(1000);
}
long microsecondsToInches(long microseconds)
{return microseconds / 74 / 2;
}
long microsecondsToCentimeters(long microseconds)
{return microseconds / 29 / 2;}
2
#include <dht11.h>
#define DHT11PIN 4
dht11 DHT11;
void setup()
{
Serial.begin(9600);
}
void loop()
{
Serial.println();
int chk = DHT11.read(DHT11PIN);
Serial.print("Humidity (%): ");
Serial.println((float)DHT11.humidity, 2);
Serial.print("Temperature (C): ");
Serial.println((float)DHT11.temperature, 2);
delay(2000);
}
References
- 1. Kumar, S., & Jasuja, A. (2017, May). Air quality monitoring system based on IoT using Raspberry Pi. In 2017 International Conference on Computing, Communication and Automation (ICCCA) (pp. 1341-1346). IEEE.
- 2. Barik, L. (2019). IOT based Temperature and Humidity Controlling using Arduino and Raspberry pi. (IJACSA) International Journal of Advanced Computer Science and Applications.
- 3. Rohit, S. L., & Tank, B. V. (2018, April). Iot based health monitoring system using raspberry PI-review. In 2018 Second International Conference on Inventive Communication and Computational Technologies (ICICCT) (pp. 997-1002). IEEE.
- 4. Naik, S., & Sudarshan, E. (2019). Smart healthcare monitoring system using raspberry Pi on IoT platform. ARPN Journal of Engineering and Applied Sciences, 14(4), 872-876.
- 5. Mudaliar, M. D., & Sivakumar, N. (2020). IoT based real time energy monitoring system using Raspberry Pi. Internet of Things, 12, 100292.
- 6. Petrović, N., & Kocić, Đ. (2020). IoT-based System for COVID-19 Indoor Safety Monitoring. preprint), IcETRAN, 2020, 1-6.
- 7. Arunachalam, A., & Andreasson, H. (2021). RaspberryPi‐Arduino (RPA) powered smart mirrored and reconfigurable IoT facility for plant science research. Internet Technology Letters, e272.
- 8. Shewale, S. D., and S. N. Gaikwad. “An IoT based real-time weather monitoring system using Raspberry Pi.” International Journal of Advanced Research in Electrical, Electronics and Instrumentation Engineering 6.6 (2017): 4242-4249.
- 9. VivekBabu, K., et al. “Weather forecasting using raspberry pi with internetof things (IoT).” ARPN Journal of Engineering and Applied Sciences 12.17(2017): 5129-5134.
- 10. Basu, Subho Shankar, Somanath Tripathy, and Atanu Roy Chowdhury. “Design challenges and security issues in the Internet of Things.” 2015 IEEE Region 10 Symposium. IEEE, 2015.
- 11. Xu, Teng, James B. Wendt, and Miodrag Potkonjak. “Security of IoT systems: Design challenges and opportunities.” 2014 IEEE/ACM International Conference on Computer-Aided Design (ICCAD). IEEE, 2014.
- 12. Mabrouki, J., Azrour, M., Dhiba, D., Farhaoui, Y., & El Hajjaji, S. (2021). IoT-based data logger for weather monitoring using arduino-based wireless sensor networks with remote graphical application and alerts. Big Data Mining and Analytics, 4(1), 25-32.
- 13. Patnaik Patnaikuni, D. R. (2017). A Comparative Study of Arduino, Raspberry Pi and ESP8266 as IoT Development Board. International Journal of Advanced Research in Computer Science, 8(5).
Additional Resources
- https://learn.sparkfun.com/tutorials/what-is-an-arduino/whats-on-the-board
- https://www.electronics-lab.com/project/raspberry-pi-4-look-hood-make/
- https://create.arduino.cc/projecthub/knackminds/how-to-measure-distance-using-ultrasonic-sensor-hc-sr04-a-b9f7f8
- https://www.raspberrypi.org/documentation/faqs/
- https://www.arduino.cc/en/Main/software
- https://www.slideshare.net/EmertxeSlides/design-challenges-iotemertxev20
- https://www.peerbits.com/blog/biggest-iot-security-challenges.html
- https://www.slideshare.net/professorbanafa/iot-implementation-and-challenges
Note
- *Corresponding author: [email protected]