Chapter 4
File, Object, and Data Lake Storage
The previous chapter examined nonrelational data that is stored in a NoSQL database. This chapter focuses on nonrelational data that is stored in object storage. Object storage services in Azure are used to store data as files. These services can be used to store binary data such as videos and images, to store files that are used in data processing systems, and as replacements for existing on-premises file servers. Knowing how these services work will not only help you understand object storage services in Azure but will also prepare you for the enterprise data lake aspect of modern analytical solutions covered in Chapter 5, “Modern Data Warehouse in Azure.”
File and Object Storage Features
File storage organizes and stores data as flat files in folders under a hierarchy of directories and subdirectories. Data is stored on a local hard drive or a network-attached storage (NAS) device. Shared folders that use a NAS device allow multiple users to share data with each other. While file storage is a good storage solution for small amounts of organized files, it is not ideal for large volumes of files that contain different types of data. Hierarchical folder structures can become bottlenecks when working with large files or unstructured data. Object storage can overcome many of these limitations.
Object storage is used to store large volumes of data in binary and text format. Data stored in object storage can be structured, semi-structured, or unstructured. These data stores are like shared folders on a local network except that they bundle data with custom metadata. APIs can use an object's metadata to retrieve its contents. Cloud-based object data stores are highly scalable, allowing organizations to store exabytes worth of files. Furthermore, these systems are designed to be highly redundant to protect against hardware failures.
Object data stores are useful in the following scenarios:
- Storing images, videos, and audio that are analyzed by deep learning models or served to a website
- Storing raw and processed data in file formats such as Parquet, ORC, or Avro that are optimized for distributed computing solutions
- Serving as the backend storage layer for modern data warehouse scenarios that separate compute and storage with a scale-out architecture
- Capturing IoT data for long-term storage and analysis
- Storing data backups for high availability
- Archiving data for regulatory compliance
Azure offers options for both file and object storage with the Azure Storage platform of services. Let's examine the Azure Storage platform and the core storage options it offers in the following sections.
Azure Storage
Azure Storage is a multi-purpose PaaS storage platform that allows users to create object, file, key-value, and queue data stores. While the ability to host different types of data stores is like Azure Cosmos DB's multi-modal implementation, it differs from Azure Cosmos DB in that a single Azure Storage instance can manage multiple types of data stores.
The highest level of management for Azure Storage is the storage account. Storage accounts serve as a container that group the core Azure Storage data services together. It is at this level of management that hardware performance, business continuity, network isolation, and data encryption are managed. Users can create one or more of the following services in the storage account to host their data:
- Azure Files can be used to create a fully managed file share in Azure. File shares created using Azure Files are accessible via Server Message Block (SMB) and Network File System (NFS) protocols.
- Azure Blob Storage is an object data store that can be used to store exabytes worth of data, including unstructured data, backups, or files used for distributed processing solutions.
- Azure Data Lake Storage Gen2 is an object data store that is optimized for distributed analytics solutions. It adds a hierarchical namespace on top of the Azure Blob storage service for quick and efficient data access. This service can be enabled when creating a storage account.
- Azure Table storage is a NoSQL database that stores data as key-value pairs. Azure Table storage was covered in Chapter Chapter 3, “Nonrelational Databases in Azure,” and is being moved to the Azure Cosmos DB Table API.
- Azure Queue storage is used to store millions of messages and transfer them between different applications. The specifics of Azure Queue storage are outside of the scope for this book and the DP-900 exam. However, feel free to use the following link if you would like to learn more about Azure Queue storage:
https://docs.microsoft.com/en-us/azure/storage/queues/storage-dotnet-how-to-use-queues?tabs=dotnet.
Each of the previously mentioned storage services uses different URL endpoints for connectivity. Table 4.1 lists the URL endpoint patterns used for each service.
TABLE 4.1 Storage service URL endpoint patterns
| Storage Service | URL Pattern |
|---|---|
| Azure Files | https://<storage-account-name>.file.core.windows.net/ |
| Azure Blob storage | https://<storage-account-name>.blob.core.windows.net/ |
| Azure Data Lake Storage Gen2 | https://<storage-account-name>.dfs.core.windows.net/ |
| Azure Table storage | https://<storage-account-name>.table.core.windows.net/ |
| Azure Queue storage | https://<storage-account-name>.queue.core.windows.net / |
Performance Tiers
Storage accounts can be created using one of following two performance tiers depending on the type of storage and hard drive speed required:
- Standard tier storage accounts support all the Azure Storage suite of services and is recommended for most scenarios. This tier uses standard hard disk drives (HDDs) for storage. Azure Files created on a standard storage account only support SMB file shares.
- Premium tier storage accounts support Azure Files, Azure Blob storage, and Azure Data Lake Storage Gen2 (ADLS). This tier uses solid-state drives (SSDs) for storage. Storage accounts using this tier are typically used in scenarios with high data transaction rates or that require consistently low latency. Azure Files created on a premium storage account support both SMB and NFS file shares.
Data Redundancy
Azure Storage maintains HADR by storing multiple copies of the data in the same region, and optionally across different regions. This ensures that data is protected from planned and unplanned downtime. Azure Storage offers the following four options for replicating data:
- Locally redundant storage (LRS) creates three copies of the data in a single datacenter. LRS protects data from server rack and driver failures but does not protect against datacenter-wide failures such as a natural disaster.
Write operations are performed synchronously and will only return successfully once the data is replicated to all three copies.
- Zone-redundant storage (ZRS) replicates the data to three different availability zones in the same region. ZRS is recommended for solutions that require high availability, as each availability zone is a separate physical location. For example, ZRS protects against datacenter-wide power outages since data is replicated to other datacenters in the same region.
As with LRS, write operations are performed synchronously and will only return successfully once the changes have finished replicating to all three availability zones.
- Geo-redundant storage (GRS) creates three copies of the data in a single datacenter using LRS. It then creates an additional three copies of data in a secondary region to protect against regionwide failures such as natural disasters.
Write operations are first committed synchronously in the primary region. Once that is completed, the changes are replicated asynchronously to the secondary region. These changes are then copied synchronously between the three copies in the secondary location using LRS.
- Geo-zone-redundant storage (GZRS) replicates the data to three different availability zones in the same region using ZRS. It then creates an additional three copies of data in a secondary region using LRS. GZRS is recommended for solutions requiring maximum HADR.
Storage accounts using GRS or GZRS can also be configured to offload read-only workloads to the secondary region. This is known as read-access geo-redundant storage (RA-GRS) and read-access geo-zone-redundant storage (RA-GZRS). Applications can take advantage of read access to the secondary region by using the secondary URL endpoint. This endpoint simply appends the suffix -secondary to the storage account name in the primary URL endpoint (for example, https://myaccount-secondary.blob.core.windows.net).
There are some limitations to the level of redundancy that is supported by different storage account types. Table 4.2 lists the redundancy options that are supported by each type of storage account.
TABLE 4.2 Storage account redundancy options
| Storage Account Type | Supported Storage Services | Redundancy Options |
|---|---|---|
| Standard | Blob storage, ADLS, queue storage, table storage, and Azure Files | LRS, ZRS, GRS, GZRS, RA-GRS, and RA-GZRS |
| Premium block blobs | Blob storage and ADLS | LRS and ZRS |
| Premium file shares | Azure Files | LRS and ZRS |
| Premium page blobs | Page blobs | LRS |
The different types of blobs mentioned in Table 4.2 will be detailed later in this chapter in the section “Azure Blob Storage.” For now, it is important to understand that replicating data to secondary regions using GRS, RA-GRS, GZRS, and RA-GZRS is only supported by standard storage accounts.
Deploying through the Azure Portal
Storage accounts can be easily deployed through the Azure Portal. Once an account is deployed, users will be able to use it to create the storage service needed for their solution. Use the following steps to create an Azure storage account through the Azure Portal:
- Log into
portal.azure.comand search for Storage accounts in the search bar at the top of the page. Click Storage Accounts to go to the storage accounts page in the Azure Portal. - Click Create to start choosing the configuration options for your storage account.
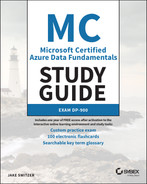
- The Create a Storage Account page includes six tabs with different configuration options to tailor the storage account to fit your needs. Let's start by exploring the options available in the Basics tab. Along with the following list that describes each option, you can view a completed example of this tab in Figure 4.1.
- Choose the subscription and resource group that will contain the storage account. You can create a new resource group on this page if you have not already created one.
- Enter a name for the storage account.
- Choose the primary Azure region for the storage account.
- Choose the performance tier for the storage account. If you choose premium, you will be asked to choose from the following three account types: block blobs, file shares, and page blobs. This example will continue with the standard tier.
- Choose the type of redundancy you want the storage account to have. If you choose GRS or GZRS, you will be given the option to enable read access.
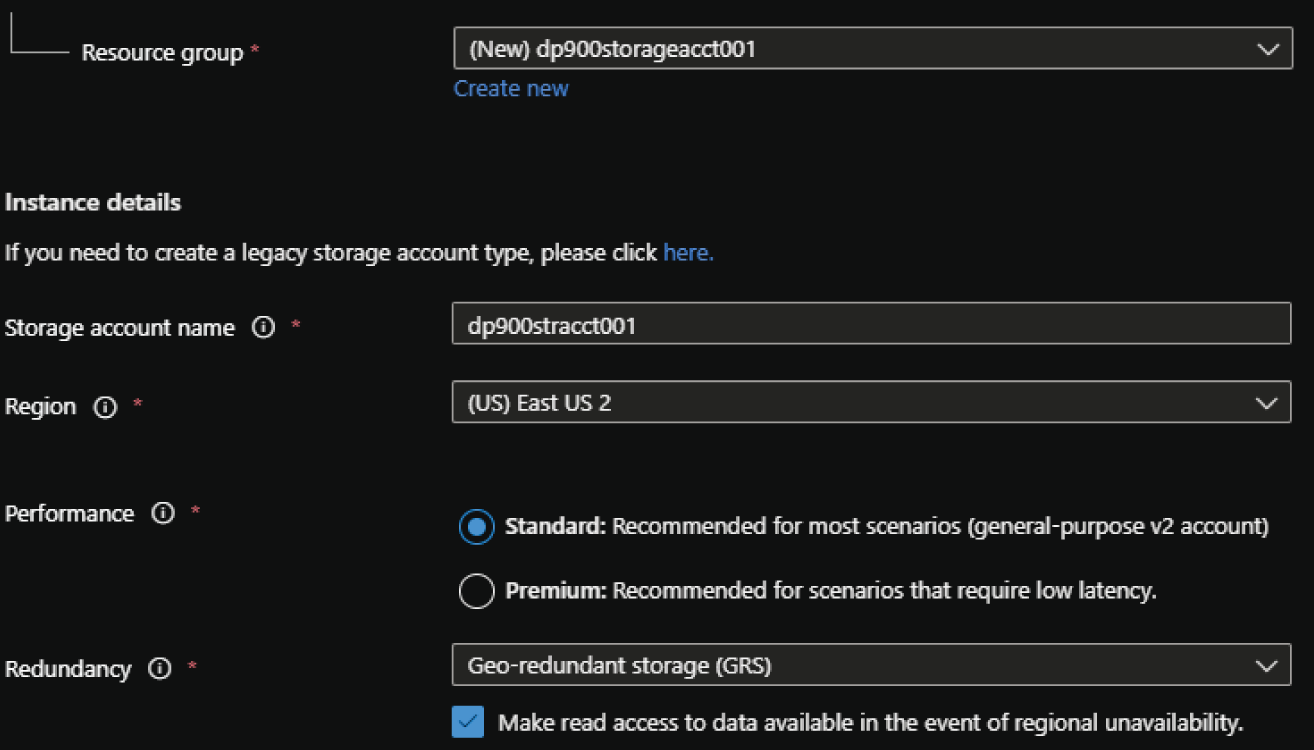
FIGURE 4.1 Create a Storage Account: Basics tab.
- The Advanced tab allows you to enable specific security and storage settings. The following describes the configurable settings in this tab.
- The first set of configuration options relate to security. They include enabling or disabling secure transfer for REST API operations, infrastructure encryption, anonymous public access for blob storage, access via account keys, Azure Active Directory authorization, and the minimum TLS version. We will use the default configuration settings for this example, as shown in Figure 4.2.
- The next setting will allow you to enable the hierarchical namespace for ADLS. We will cover when to enable this setting later in this chapter in the section “Azure Data Lake Storage Gen2,” but for now understand that this option should be enabled if the storage account will be used to store data used by distributed analytics workloads. It's important to note that this setting cannot be changed once the storage account is deployed.
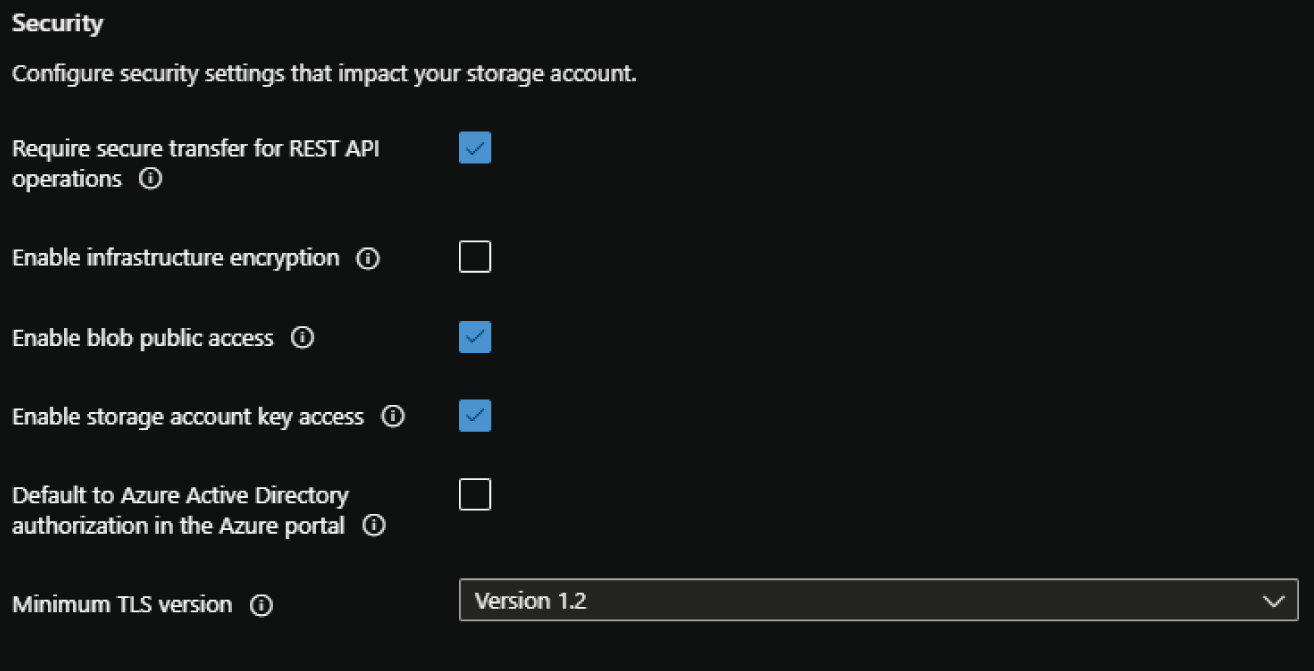
FIGURE 4.2 Create a Storage Account: Advanced tab security configurations.
- The next set of configuration options are specific to the storage services that will be available in the storage account. An important setting to consider here is the access tier you would like to configure for the storage account. This will depend on whether the account will be accessed frequently (Hot) or infrequently (Cool).
- The last setting to consider on this page is related to Azure Files. If you will be creating an Azure file share in the account, you will need to consider how large the file share will be. While the standard storage limit is 5 TB, enabling the large files setting will increase the limit to 100 TB. Figure 4.3 illustrates an example of the advanced storage settings with the default options.
- The Networking tab allows you to configure network access and connectivity for your storage account. There are three options to choose from for network configuration: Public endpoint (all networks), Public endpoint (selected networks), and Private endpoint.
- Public endpoint (all networks) opens access to the account to applications from any network. This option removes network isolation as a data security component to the storage account configuration. Figure 4.4 illustrates an example of the Networking tab with this option enabled.
- Public endpoint (select networks) allows access to specific subnets in a selected VNet.
- Private endpoint allows you to attach a private IP address from a VNet to the storage account, limiting access to applications that can communicate with the VNet.
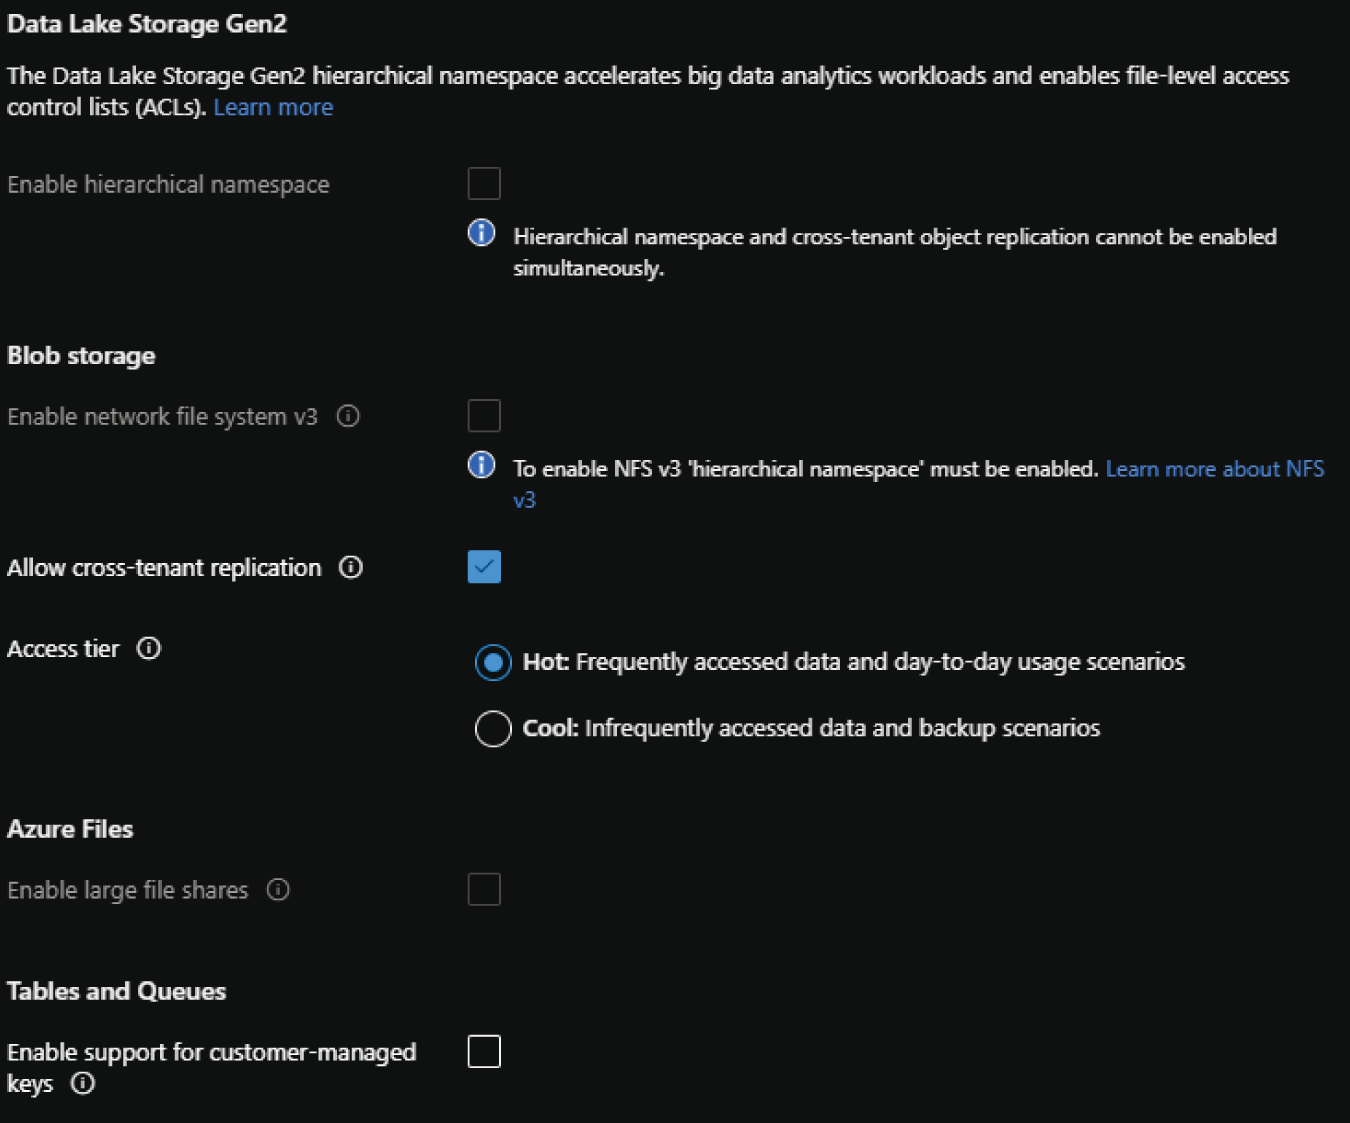
FIGURE 4.3 Create a Storage Account: Advanced tab storage configurations.

FIGURE 4.4 Create a Storage Account: Networking tab.
- The Data Protection tab allows you to protect data from accidental deletes or modifications, enable version management, and set time-based retention policies for blob versions. Figure 4.5 illustrates an example of the data protection settings with the default options.
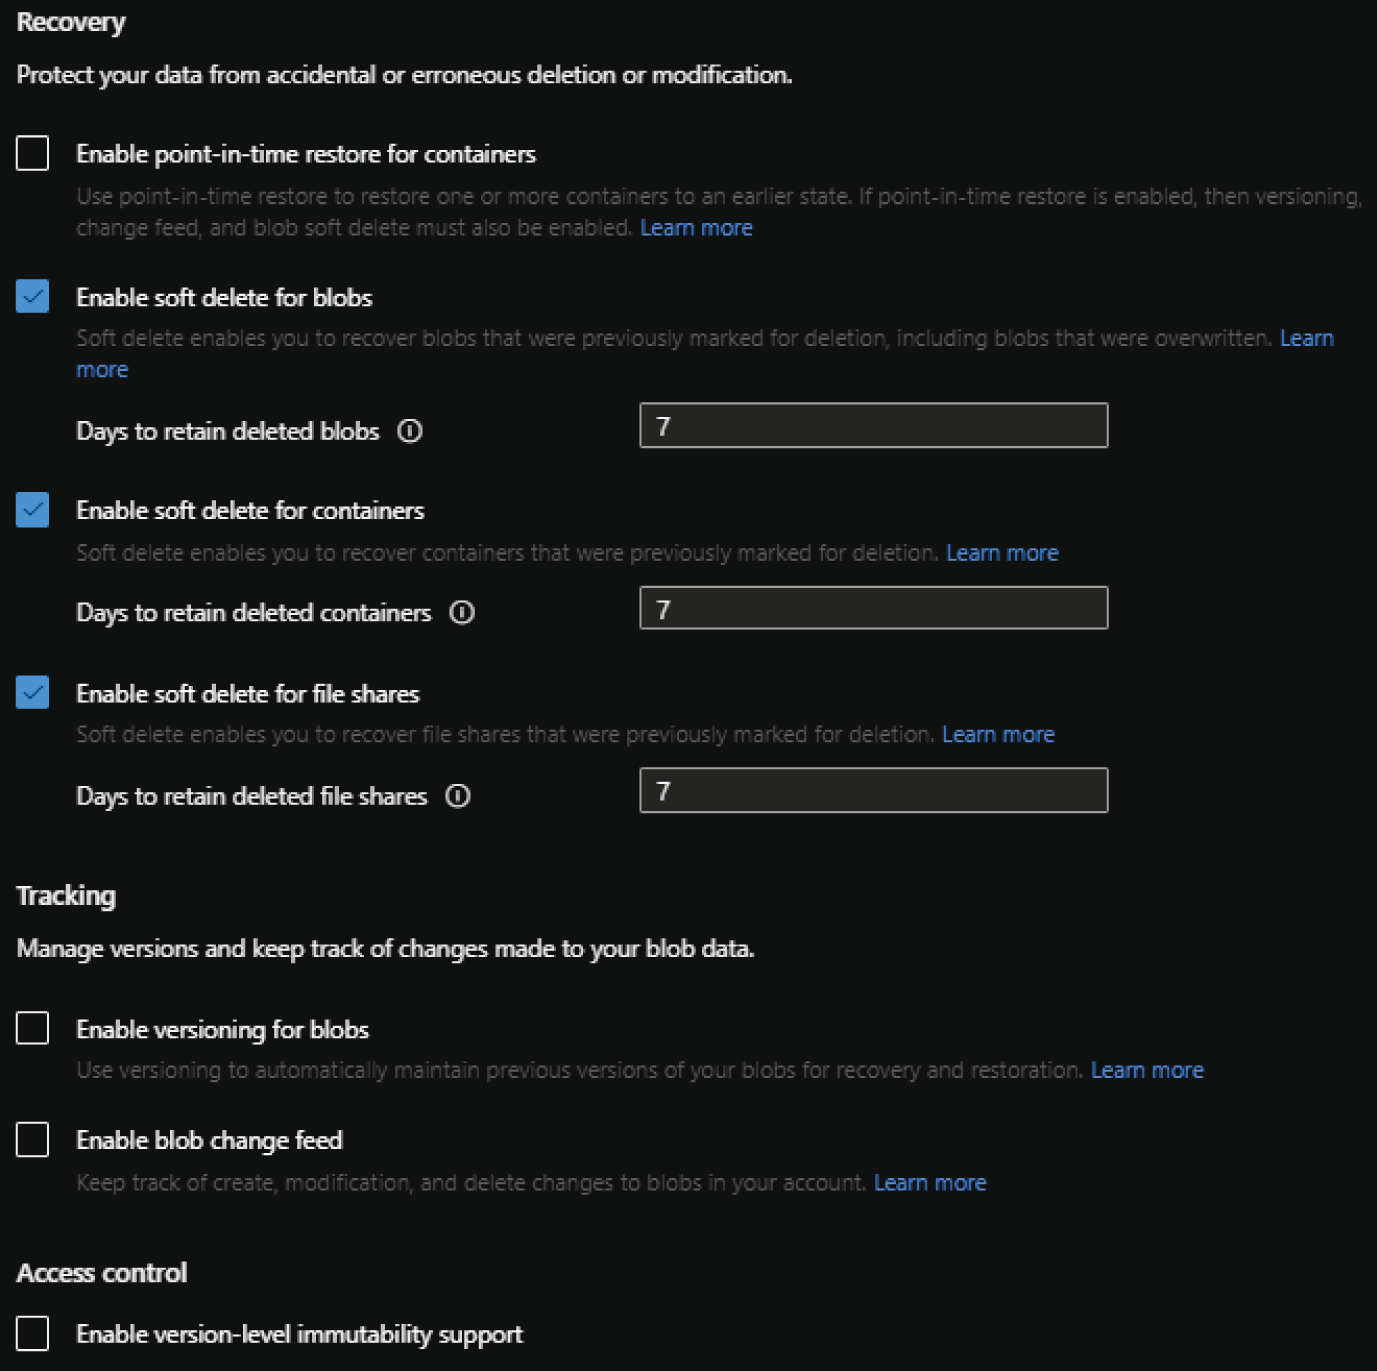
FIGURE 4.5 Create a Storage Account: Data Protection tab.
- The Tags tab allows you to place a tag on the storage account for cost management.
- Finally, the Review + Create tab allows you to review the configuration choices made during the design process. If you are satisfied with the choices made for the instance, click the Create button to begin provisioning the storage account.
Azure Storage Services
The DP-900 exam covers Azure Files, Azure Blob storage, ADLS, and Azure Table storage. Because Azure Table storage was covered in Chapter 3, the following sections will focus on Azure Files, Azure Blob storage, and ADLS.
Azure Files
Azure Files is a storage service that allows organizations to build fully managed file shares in Azure. File shares deployed through Azure Files can be accessed using the SMB protocol on standard and premium storage accounts or the NFS protocol on premium storage accounts. The service organizes data in a hierarchical folder structure and is typically used to replace or complement on-premises file shares. Along with the benefits that are native to Azure storage accounts such as offloading hardware management and global redundancy, data stored in an Azure file share can be accessed from anywhere in the world.
File shares created in Azure Files can be mounted concurrently to a VM in the cloud or on a user's local machine for access. SMB file shares can be mounted to Windows, Linux, or macOS devices. NFS file shares are limited to Linux and macOS devices. In addition to being accessible as a mounted drive, SMB file shares can be synchronized between Azure Files and a local share on a Windows Server device using Azure File Sync. This service allows organizations to cache frequently accessed data on the local file share while leaving the least accessed data in Azure.
Access Tiers
Azure Files offers four storage tiers to meet the performance and price requirements of different workloads:
- Premium file shares use SSDs for storage, providing high performance and low latency for IO-intensive workloads. This tier is only available in premium storage accounts.
- Transaction optimized file shares use standard HDDs for storage, enabling transaction-heavy workloads that do not need the low latency that premium file shares provide. This tier is available in standard storage accounts.
- Hot file shares use standard HDDs for storage and are optimized for general-purpose file-sharing scenarios. This tier is available in standard storage accounts.
- Cool file shares use standard HDDs for storage and offer cost-efficient storage that is optimized for archive storage scenarios. This tier is available in standard storage accounts.
The premium storage tier is the only tier that users can access via SMB and NFS protocols. Transaction optimized, hot, and cool tiers are only offered in standard storage accounts and do not support the NFS protocol as of this writing.
File shares created on a standard storage account switch between the transaction optimized, hot, and cool tiers without needing to move to a different storage account. Moving from one of the standard storage account tiers to the premium tier will require you to create a new premium storage account and copy the data from the old file share to the new one. The data can be copied from the old share to the new one using the AzCopy utility that is described later in this chapter.
More information about the different storage tiers available for Azure Files can be found at https://docs.microsoft.com/en-us/azure/storage/files/storage-files-planning#storage-tiers.
Creating a File Share
File shares in Azure can be created through the Azure Portal, a REST API call, an Azure PowerShell or Azure CLI script, or as a part of an Infrastructure as Code template. The Azure Files client library can be used in custom .NET, Java, C++, or Python applications to manipulate file shares. The following steps describe how to create a file share in the Azure Portal.
- Navigate to the storage accounts page in the Azure Portal and click on the storage account that was previously created.
- In the left-side panel of the storage account blade, click File shares. Figure 4.6 shows where this button is located.
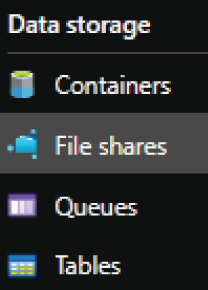
FIGURE 4.6 File shares button
- Click the + File Share button at the top of the file shares blade to configure a new file share. Figure 4.7 shows what this button looks like and where at the top of the page it is located.

FIGURE 4.7 Create a New File Share button.
- Enter a name and select an access tier for the new file share. Figure 4.8 illustrates a completed example of this page.

FIGURE 4.8 New file share
- Click Create to create the file share.
Mounting a File Share
One of the biggest advantages of using an Azure file share is that they can be mounted to any computer in the world. However, there are some considerations that need to be made:
- If you are connecting via SMB, then the OS of the computer that the file share is being mounted to must support SMB 3.0 and higher.
- Ensure that TCP port 445 is open if you are connecting via SMB and using the file share's public endpoint. This is the port that the SMB protocol uses for communication.
- As of this writing, mounting an NFS file share using its public endpoint is restricted to VMs inside of Azure.
Many organizations do not allow public endpoint access and block TCP port 445 for security reasons. In these scenarios, organizations can establish a secure network tunnel between an Azure VNet and their on-premises network using a VPN or ExpressRoute connection. This allows them to attach a private IP address, or private endpoint, from the VNet to the storage account hosting the file share. Using the private endpoint allows users to access the file share using a secure network connection without needing to open TCP port 445. More information about securely accessing an Azure file share can be found at https://docs.microsoft.com/en-us/azure/storage/files/storage-files-networking-overview#accessing-your-azure-file-shares.
The Azure Portal provides scripts that will mount a file share to a machine using a compatible OS. The following steps describe how to access these scripts:
- Navigate to the storage accounts page in the Azure Portal and click on the storage account that was previously created.
- In the left-side panel of the storage account blade, click File Shares.
- Click on the file share that was previously created.
- Click the Connect button at the top of the page. Figure 4.9 shows what this button looks like and where at the top of the page it is located.

FIGURE 4.9 Connect button
- In the Connect pop-up page, choose the OS you will be mounting the file share to. This example will use the Windows option.
- Choose the drive letter that the mounted file share will use and the authentication method. The example will use Z as the drive letter and Storage account key for the authentication method.
- Copy the script provided in the pop-up window. Paste the script into a command prompt or PowerShell window on the host you want to mount the file share to and run it. If all dependencies are configured properly, then the script will mount the file share to the host machine. Figure 4.10 illustrates a completed example of the Connect page.
Azure File Sync
Azure File Sync allows users to use Azure Files as a highly resilient central file repository for their local file shares. It does this by creating a local cache of an Azure file share on one or more local Windows file servers. Content is synchronized between Azure Files and each of the local file servers, thus maintaining a consistent view of data. By enabling the cloud tiering feature, Azure File Sync can control how much local storage is needed for caching by allowing users to only cache frequently accessed files.
To maintain synchronous copies of data between Azure Files and a local file share using Azure File Sync, you will first need to download and install the Azure File Sync agent to the local server. You will be able to map the Azure file share to folders on the local server with sync groups once the agent is installed. Instructions for downloading and installing the Azure File Sync agent, as well as setting up sync groups, can be found at https://docs.microsoft.com/en-us/azure/storage/file-sync/file-sync-extend-servers#install-the-agent.
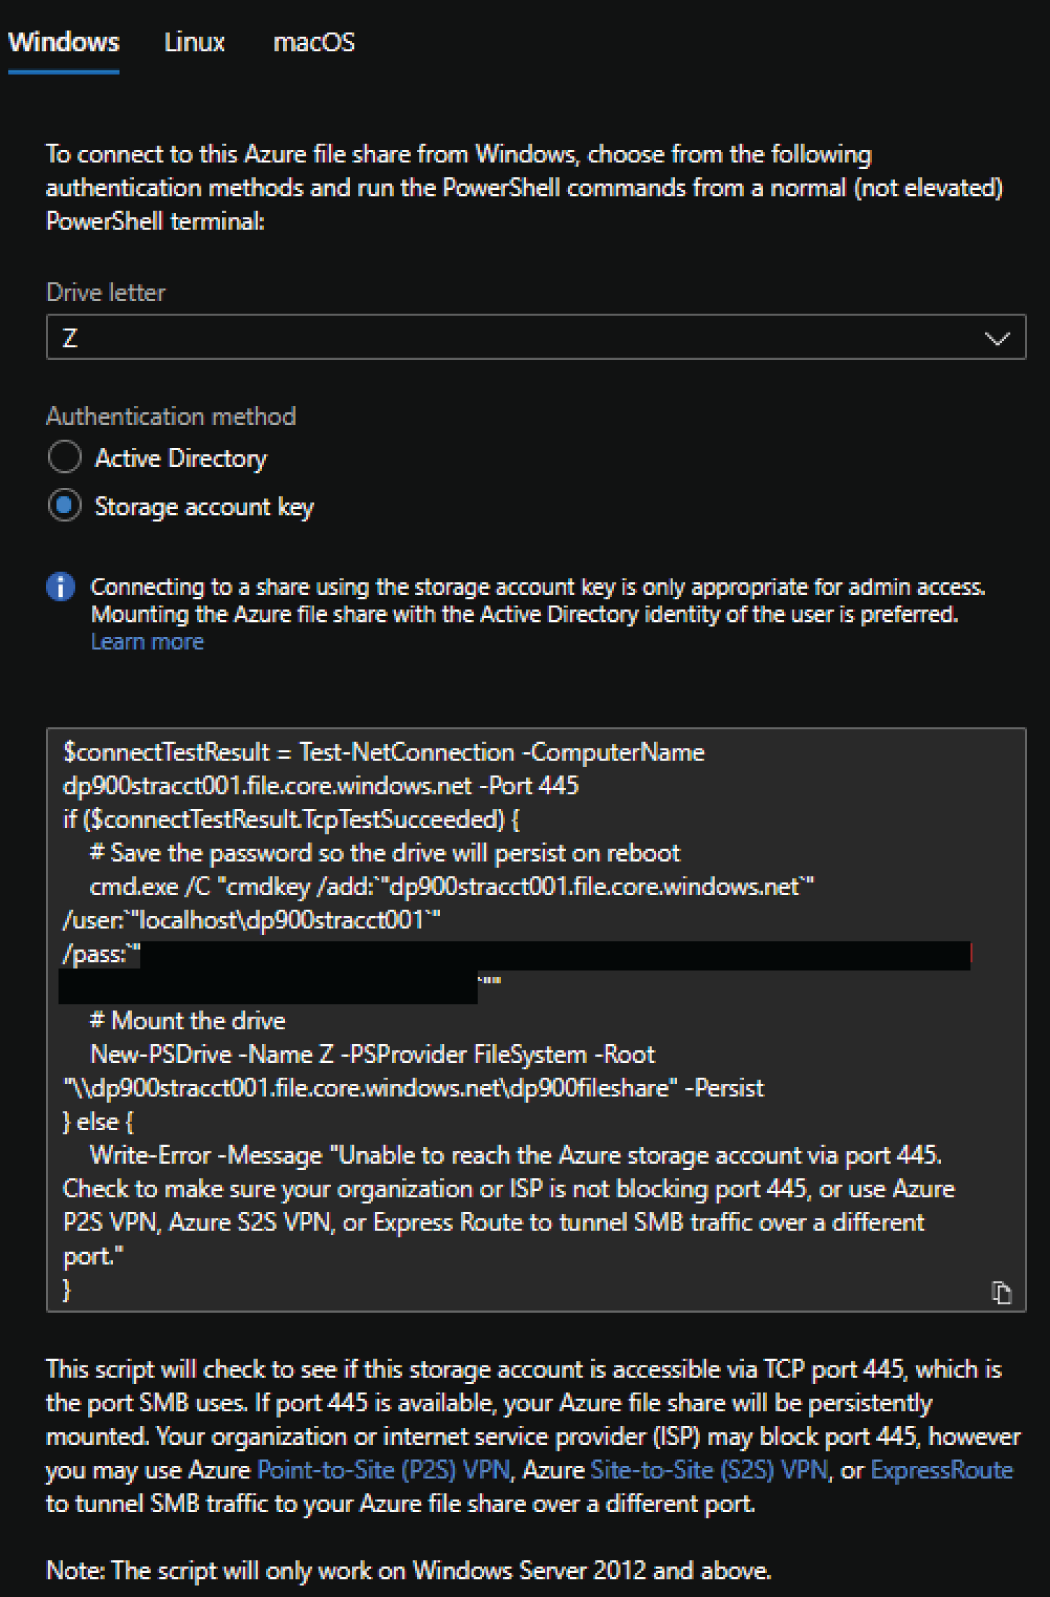
FIGURE 4.10 Connect page
Azure Blob Storage
Azure Blob Storage is a highly flexible object data storage solution in the cloud. It is designed to store massive amounts of data that are used in several different scenarios. The following list includes some common use cases for blob storage:
- Storing unstructured data such as videos, images, and audio
- Storing large amounts of data files that are used in big data solutions
- Storing application log files
- Storing data backups
- Serving as an archive for historical data
Users can manage their Azure Blob Storage data in container objects. A container is like a directory in a file system and can store an unlimited amount of data. Users can create as many containers as they want in a single storage account, allowing them to organize data however they want. Containers can be accessed from anywhere in the world by appending the container name to the end of the Blob storage URI (for example, https://<storage-account-name>.blob.core.windows.net/<container_name>).
Containers store individual pieces of data as blob objects. New pieces of data can be categorized as one of the following blob types when they are uploaded to Azure Blob Storage:
- Block blobs are optimized for storing large amounts of text and binary data. Data that is uploaded as a block blob is composed of block segments. A single block blob can contain up to 50,000 blocks, each one identified by a unique block ID. Existing block blobs can be modified by inserting, replacing, or deleting blocks. A single block blob can be approximately 190.7 TB.
- Append blobs consist of blocks like block blobs but are optimized for append operations. When an append blob is modified, the additional data is appended to the end of the blob. Updating or deleting existing blocks is not supported. Append blobs are commonly used to store log files from virtual machines.
- Page blobs store data as a collection of 512-byte pages, with a maximum blob size of 8 TB. They are optimized for random read and write operations. Writes to a page blob can overwrite up to 4 MB of pages in the blob. Random ranges of bytes can be read from or written to a page blob, making them ideal for storing OS and data disks for VMs and databases. For this reason, virtual data disks that serve Azure VMs are persisted as page blobs. Azure SQL Database also uses page blobs as the underlying storage for its databases. More information about page blobs and their uses cases can be found at
https://docs.microsoft.com/en-us/azure/storage/blobs/storage-blob-pageblob-overview?tabs=dotnet.
Access Tiers
Azure Blob Storage is regularly used to store data that is frequently and rarely accessed in the same storage account. In these scenarios it is critical to distinguish data that is actively used and data that is archived. For this reason, Azure Blob Storage offers three access tiers that allow users to store blob data in the most cost-effective manner based on how it is used:
- Hot tier is an online tier for storing data that is frequently accessed. Data that is configured to use this tier is expected to be read from or written to often. This tier has the highest storage costs but the lowest access latency.
- Cool tier is an online tier for storing data that is infrequently accessed and should be stored for a minimum of 30 days. Typical use cases for the cool access tier include storing short-term data backups and older datasets that are not frequently accessed but need to be available at a moment's notice.
- Archive tier is an offline tier for storing data that is almost never accessed and should be stored for a minimum of 180 days. This tier has the lowest storage costs but the highest access costs. Data stored with this access tier should have flexible latency requirements as retrieval can take several hours. Typical use cases for the archive tier include storing long-term backups, compliance data that needs to be retained for regulatory reasons, and raw datasets that must be retained but are never used once they are processed.
Creating a Blob Container
Just like any other Azure Storage service, blob containers can be easily created through the Azure Portal, a REST API call, an Azure PowerShell or Azure CLI script, an Infrastructure as Code template, or a custom application using the Azure Blob Storage client library. The following steps describe how to create a new container in the Azure Portal:
- Navigate to the storage accounts page in the Azure Portal and click on the storage account that was previously created.
- In the left-side panel of the storage account blade, click Containers. Figure 4.11 shows where this button is located.
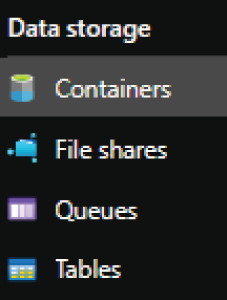
FIGURE 4.11 Containers button
- Click the + Container button at the top of the containers blade to configure a new container. Figure 4.12 shows what this button looks like and where at the top of the page it is located.

FIGURE 4.12 Create a New Container button.
- Enter a name and choose one of the following three public access level options: Private (no anonymous access), Blob (anonymous read access for blobs only), or Container (anonymous read access for containers and blobs).
- Private (no anonymous access) denies all anonymous requests and only allows authorized requests to access the container and its blobs. This is the default setting for new containers. Figure 4.13 illustrates a completed new container example using this option.
- Blob (anonymous read access for blobs only) allows anonymous requests to access blobs in the container but denies anonymous requests trying to read container data.
- Container (anonymous read access for containers and blobs) allows anonymous requests to access container and blob data, except for container permission settings and metadata.
- The Advanced drop-down list in the New Container page allows you to alter the encryption scope and version-level immutability for container blobs. We will use the default options for this example.
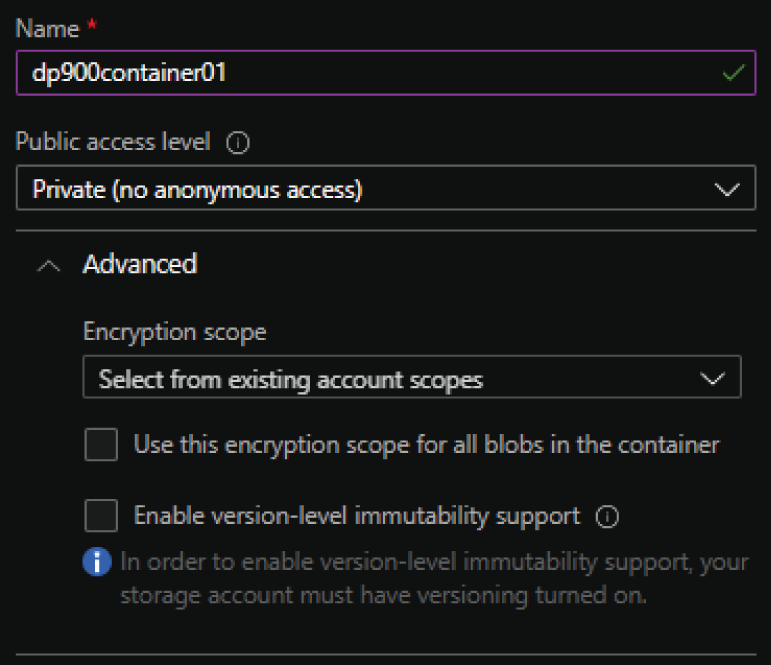
FIGURE 4.13 New Container
- Click Create to create the container.
Uploading a Blob
Uploading blobs to a container can be performed using a variety of different methods. Administrators can write scripts that create and manage blobs using Azure PowerShell and Azure CLI. Developers can implement custom logic in their applications that will upload and manipulate several blobs at a time via the REST API or the Azure Blob Storage client library. Management tools such as Azure Storage Explorer, AzCopy, Azure Data Factory, and Azure Data Box can be used to migrate massive amounts of data to Azure Blob Storage. These tools will be described later in this chapter in the subsections under “Management Tools.”
The following steps explore how to upload a blob through the Azure Portal:
- Go to the container that was previously created.
- Click the Upload button at the top of the containers blade to upload a new blob. Figure 4.14 shows what this button looks like and where at the top of the page it is located.

FIGURE 4.14 Upload button
- The Upload Blob pop-up page provides a way to browse your local computer for data to upload. It also provides a setting to overwrite the blob if it already exists.
- The Advanced drop-down list allows you to define the authentication method used to upload the data as well as configure the blob type, access tier, retention policy, and other optional blob settings. Figure 4.15 illustrates an example of how this page can be used to upload a CSV file using the default options.
Blob Service REST API
The Blob service REST API can be used to upload, manage, organize, and delete containers and blobs. It allows users to manage Azure Blob Storage content using HTTP operations. For example, you can compile a list of all blobs in a specific container by issuing the following GET operation:
https://<storage-account-name>.blob.core.windows.net/<container_name>?resttype=container&comp=list
For more information about the different operations that are available through the Blob service REST API, see the following link: https://docs.microsoft.com/en-us/rest/api/storageservices/blob-service-rest-api.
Azure Blob Storage Client Library
The Azure Blob Storage client library is a part of the Azure SDK that users can use to build custom application logic for managing Azure Blob Storage. Users can take advantage of this SDK when building applications using different languages, including .NET, Java, Python, JavaScript, and C++. The library contains several classes that can be used to create, replace, list, and delete containers or blobs.
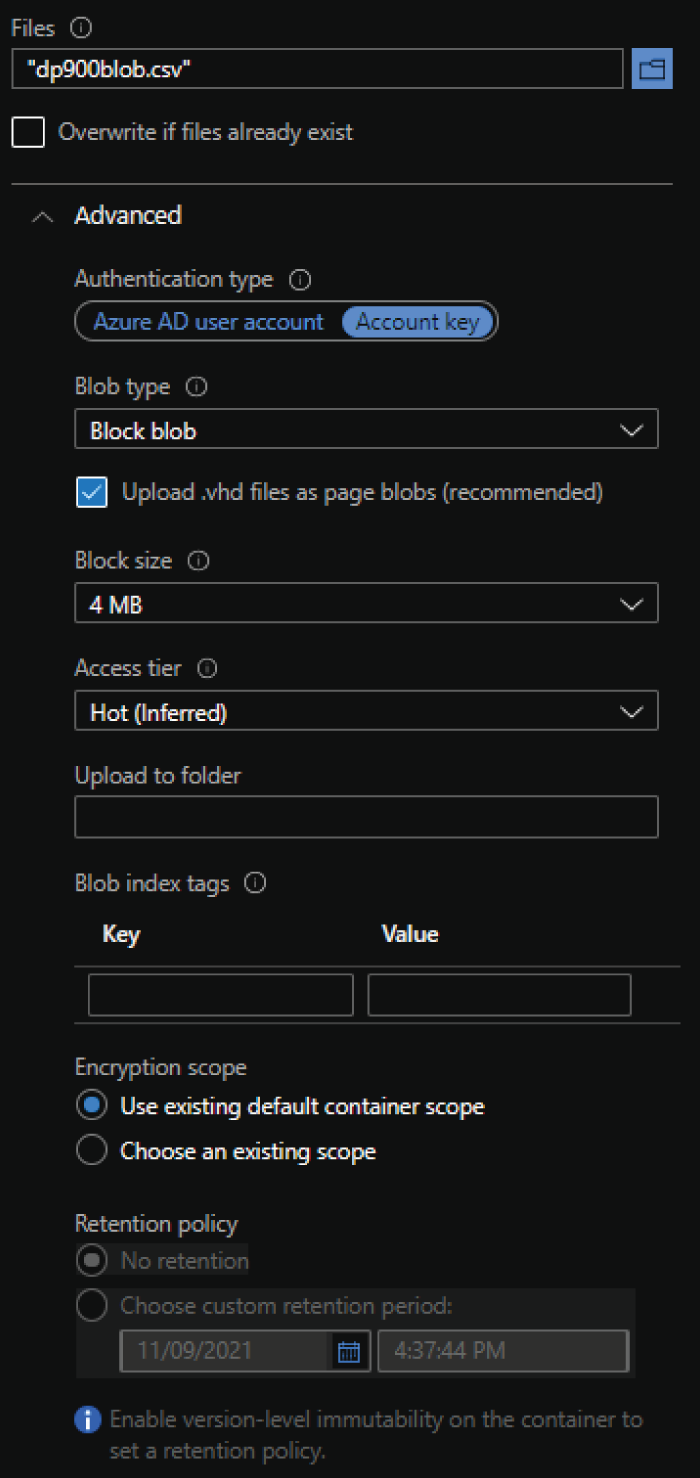
FIGURE 4.15 Upload blob
The following are the most useful classes for interacting with Azure Blob Storage content:
- BlobServiceClient allows users to manipulate storage account resources such as blob containers.
- BlobContainerClient allows users to manipulate containers and their blobs. This class goes by ContainerClient in the Python and JavaScript versions of the Azure Blob Storage client library.
- BlobClient allows users to manipulate blobs.
Check out the following tutorial if you would like to learn more about how to get started building custom application logic that manipulates Azure Blob storage: https://docs.microsoft.com/en-us/azure/storage/blobs/storage-quickstart-blobs-dotnet. While this specific tutorial uses .NET, there are several other tutorials available for the other languages that support the Azure Blob storage client library.
Azure Data Lake Storage Gen2
Azure Data Lake Storage Gen2, or ADLS for short, is an object storage solution that is built on top of Azure Blob Storage. It can be enabled when creating a storage account in the Azure Portal by selecting the Enable hierarchical namespace setting in the Advanced tab. The hierarchical namespace allows users to easily organize data objects into a hierarchy of directories and subdirectories for efficient data access.
The addition of the hierarchical namespace to Azure Blob storage's existing capabilities makes ADLS an ideal storage solution for big data and distributed analytics solutions. Users can easily organize data into different directories that are specific to where it is in the data processing life cycle. For example, there could be a raw directory that acts as a landing zone for new datasets, a cleansed directory that stores the data once it has been scrubbed of any errors or inconsistencies, and a report-ready directory that stores the data once aggregations and business logic have been applied to it. Furthermore, each of these directories can host several subdirectories that partition data by certain features such as year, month, and date.
ADLS is easily scalable and very cost-effective because it is built on top of Azure Blob Storage. This allows organizations to store data in multiple stages without having to worry about high costs or running out of storage. This allows users to leverage data at different life cycles for several different use cases. For example, data scientists can use raw and processed data to build their models, and analysts can use the report-ready directory to build reports or share aggregated datasets with other business units.
In addition to its performance enhancements, ADLS provides more granular access security to what is available with Azure Blob Storage. Administrators can use POSIX-like access control lists (ACLs) to set user permissions at the directory and file level. Using ACLs to manage access for data stored in ADLS is described further later in this chapter in the section “Access Management.”
Azure Blob File System Driver
Perhaps the biggest benefit to using ADLS is its ability to allow users to manage and access data like they would with a Hadoop Distributed File System (HDFS). The Azure Blob File System (ABFS) driver is native to ADLS and is used by Apache Hadoop environments to create and interact with data in ADLS. Typical environments in Azure that access ADLS with the ABFS driver include Azure HDInsight, Azure Databricks, and Azure Synapse Analytics.
The ABFS driver enables access to ADLS resources using a URI-based connection. Applications constructing the URI can use the following format to navigate to specific directories or files in ADLS:
abfs://<container-name>@<storage-account-name>.dfs.core.windows.net/<path>/<file-name>
As you can see, the parent directory is a container object. This object can contain several levels of subdirectories depending on how the data is organized. For example, the directory hierarchy for storing product data by date could look like <product>/<year>/<month>/<day>, where product is the parent directory and year, month, and day represent different subdirectories. Using this directory structure, let's look at how you would format the ABFS URI to access product data from November 11, 2021:
abfs://[email protected]/2021/November/11/
This URI will access all the data in the 11 subdirectory. Adding a specific filename at the end of the URI, such as bicycles.csv, will redirect access to that one file. There is also support for accessing all files of a specific format by adding the * wildcard and the file extension to the end of the URI. The following extends the previous example by accessing all the CSV data produced on November 11, 2021.
abfs://[email protected]/2021/November/11/*.csv
Management Tasks for Azure Storage
There are several management activities that administrators and developers must consider when working with Azure Storage. For one, users will need to decide how they will design their Azure Storage deployments to be reusable across multiple environments. Administrators will also need to decide how to secure their storage accounts, as well as how they will provide/restrict access to the different storage services that are created in the account. The following sections will discuss common methods used to perform these tasks as well as the tools users can utilize to manage their storage accounts.
Deployment Scripting and Automation
Automated resource deployments are standard for any multi-environment workload that uses cloud resources. As with any Azure resource, Azure Storage deployments can be scripted using a variety of methods including Azure PowerShell, Azure CLI, and Infrastructure as Code templates. Azure PowerShell and Azure CLI are also common tools that can be used to manage data stored in Azure Storage. The following sections examine how to use Azure PowerShell, Azure CLI, and ARM templates to deploy Azure Storage resources.
Azure PowerShell
Users can easily write Azure PowerShell scripts that will deploy and manage Azure Storage resources. The following is an example of a script that will create a standard general-purpose v2 storage account:
<# Sign into your Azure environment. Not requiredif running this script in the Azure Cloud Shell #>Connect-AzAccount$resourceGroupName = "dp900storageacct001"$storageAccountName = "dp900stracct001"$location = "East US"New-AzStorageAccount -ResourceGroupName $resourceGroup `-Name $storageAccountName `-Location $location `-SkuName Standard_RAGRS `-Kind StorageV2
The next step after creating the storage account and setting security postures is to begin creating file shares and/or blob containers. The following script creates a new blob container in the previously created storage account:
$resourceGroupName = "dp900storageacct001"$storageAccountName = "dp900stracct001"$containerName = "dp900container01"# Retrieve an existing Storage Account reference$storageContext = Get-AzStorageAccount -ResourceGroupName $resourceGroupName `-Name $storageAccountName# Create the containerNew-AzStorageContainer -Name $containerName `-Context $storageContext `
Once the container is created, you can start uploading data to it using the Set-AzStorageBlobContent Azure PowerShell command. The following script demonstrates how to use this command to upload an image stored on a local directory to the container. It also configures the blob to use the hot access tier for quick access.
$resourceGroupName = "dp900storageacct001"$storageAccountName = "dp900stracct001"$containerName = "dp900container01"# Retrieve an existing Storage Account reference$storageAccount = Get-AzStorageAccount -ResourceGroupName $resourceGroupName `-Name $storageAccountName# Get the Storage Account context$storageContext = $storageAccount.Context# Upload a file to the Hot access tierSet-AzStorageBlobContent -File "D:ImagesImage001.jpg" `-Container $containerName `-Blob "Image001.jpg" `-Context $storageContext `-StandardBlobTier Hot
The script can be modified to upload several files by looping through the local directory. More information about creating and managing Azure Blob storage resources with Azure PowerShell can be found at https://docs.microsoft.com/en-us/azure/storage/blobs/storage-quickstart-blobs-powershell.
Azure CLI
Azure CLI is another scripting environment that administrators can use to create and manage Azure Storage resources. The following Azure CLI script uses the same parameters as the Azure PowerShell script in the previous section to create a storage account and a blob container:
resourceGroupName='dp900storageacct001'storageAccountName='dp900stracct001'containerName='dp900container01'location='eastus'az storage account create--name $storageAccountName--resource-group $resourceGroupName--location $location--sku Standard_RAGRS--kind StorageV2az storage container create--account-name $storageAccountName--name $containerName
More information about creating and managing Azure Blob storage resources with Azure CLI can be found at https://docs.microsoft.com/en-us/azure/storage/blobs/storage-quickstart-blobs-cli.
ARM Template
Like other Azure services, Infrastructure as Code templates such as Azure Resource Manager (ARM) templates are the most optimal way to define resources for Azure Storage deployments. These templates can be used to quickly build Azure Storage services in multiple development environments, allowing developers to easily build and test new functionality.
One example of an ARM template that creates a standard storage account can be found at https://github.com/Azure/azure-quickstart-templates/tree/master/quickstarts/microsoft.storage/storage-account-create. The template can be deployed using the following Azure PowerShell:
Connect-AzAccount$resourceGroupName = "dp900storageacct001"$location = "East US"New-AzResourceGroup-Name $resourceGroupName-Location $locationNew-AzResourceGroupDeployment-ResourceGroupName $resourceGroupName `-TemplateUri https://raw.githubusercontent.com/Azure/azure-quickstart-templates/master/quickstarts/microsoft.storage/storage-account-create/azuredeploy.json
Azure Storage Security
Microsoft provides several layers of security to ensure that data stored in one of the Azure Storage services is protected from unauthorized access. As with any other data service in Azure, there are several network isolation and identity management options that can be used to limit who can access data in a storage account. The following sections examine the methods available for securing data in Azure Storage as well as some of the default security standards such as data encryption and protection from accidental deletes.
Network Isolation
Storage accounts have a public endpoint that provides access over the Internet. Azure allows users to isolate this endpoint by limiting access to certain IP addresses through a firewall, trusted Azure services, or specific Azure subnets. Azure also allows users to attach a private IP address from a VNet to a storage account, restricting communication to traffic that can access the VNet. This is the Microsoft recommended approach for securing storage accounts that store sensitive data such as personally identifiable information (PII).
All these options can be configured through the Azure Portal, or an Azure PowerShell or Azure CLI script after a storage account is created. Let's walk through how to configure one of the network isolation options in the Azure Portal:
- Navigate to the storage accounts page in the Azure Portal and click on the storage account that was previously created.
- In the left-side panel of the storage account blade, click Networking. Figure 4.16 shows where this button is located.

FIGURE 4.16 Networking button
- There are three tabs listed at the top of the networking page: Firewalls And Virtual Networks, Private Endpoint Connections, and Custom Domain. We will cover the Firewalls And Virtual Networks and Private Endpoint Connections tabs for the purpose of configuring network isolation on a storage account. Just know that the Custom Domain tab allows you to map a custom domain to a blob or static website endpoint.
- The Firewalls And Virtual Networks tab enables users to allow access from specific VNets and subnets as well as specific IP addresses. Figure 4.17 illustrates these settings.
This tab also allows you to configure access from trusted Azure services and read access to storage logging and metrics from any network. There is also an option to determine whether traffic is routed over the Microsoft network or the Internet as it travels from the source application to the storage account's public endpoint. These settings are illustrated in Figure 4.18.
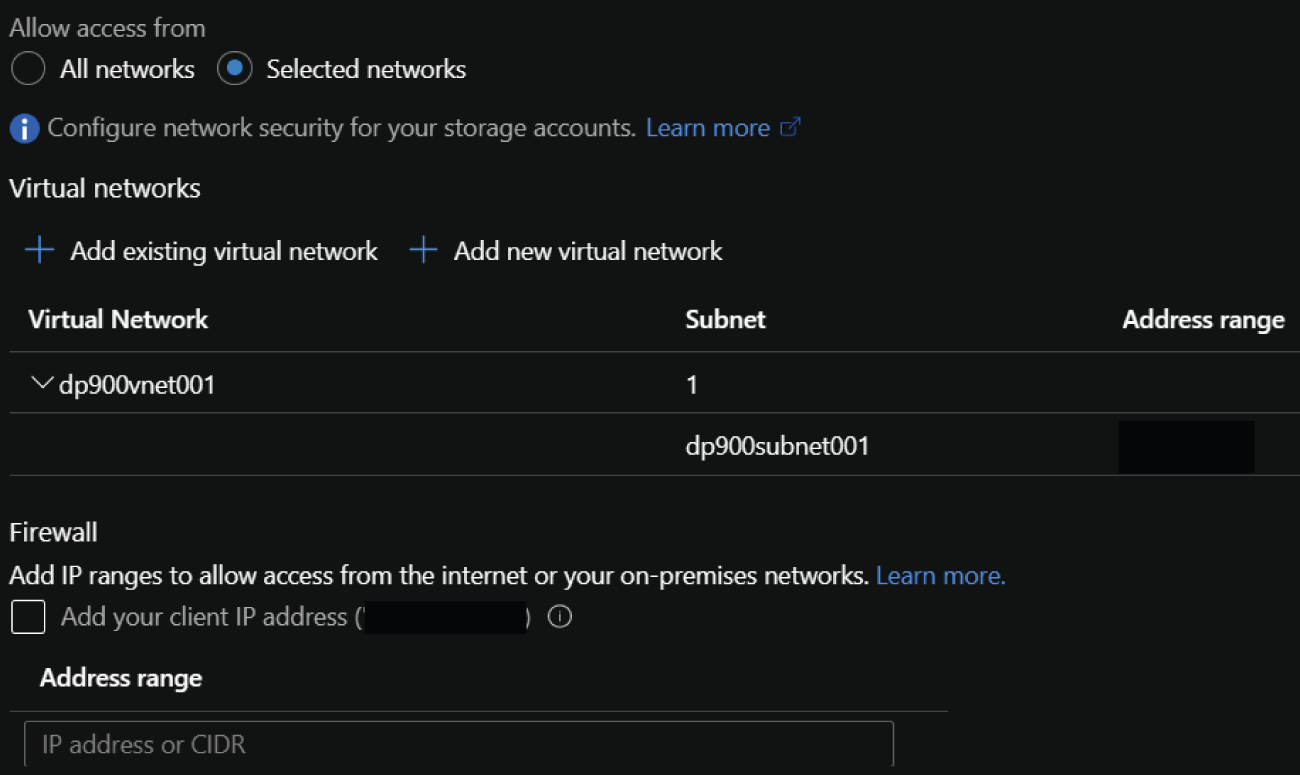
FIGURE 4.17 Virtual Network and Firewall Access
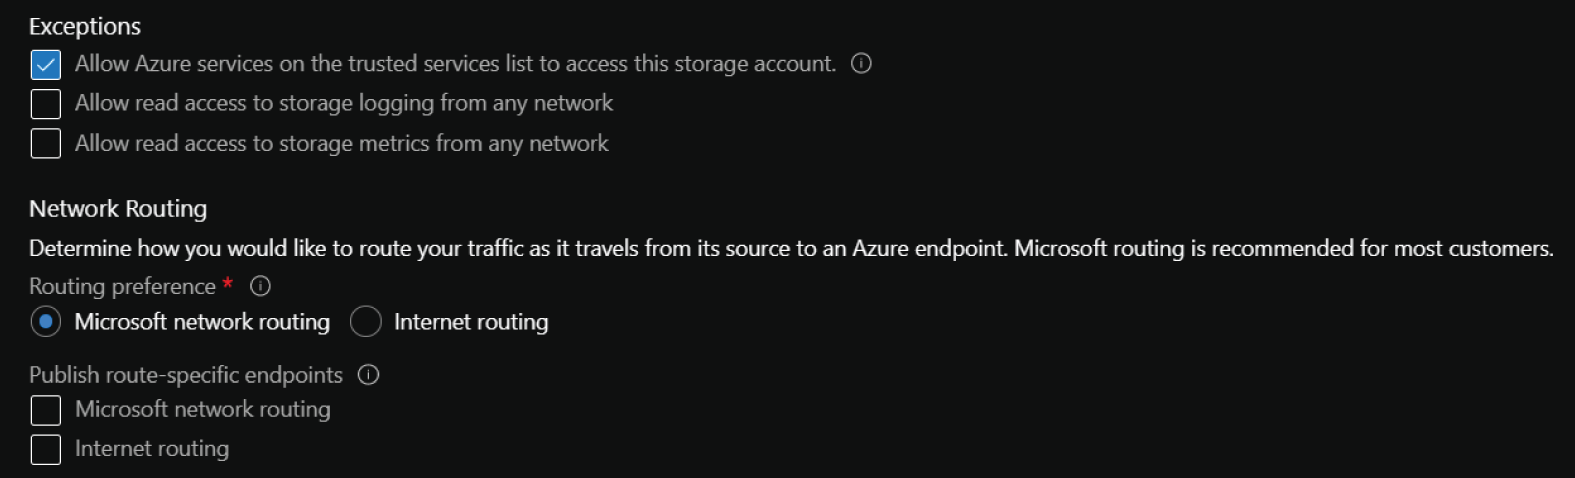
FIGURE 4.18 Exceptions and Networking Routing
- If you click the Private Endpoint Connections tab, you will be able create a new private endpoint that will have its very own private IP address from a VNet. This will restrict storage account access to traffic that can communicate with that VNet.
Access Management
Azure Storage requires that every application interacting with a storage account has the appropriate authorization permissions. The only exception to this rule is when anonymous read access for containers or blobs is configured. Azure allows organizations to use either one of or a combination of the following authorization methods to provide storage account access:
- Storage account access keys
- Shared access signatures (SAS)
- Azure AD Integration
- AD Domain Services (AD DS) for Azure Files
- Access control lists (ACLs) for ADLS
The following sections examine each of these options in further detail.
Storage Account Access Keys
Storage accounts natively include two access keys that can be used to authorize access to blob, file, queue, and table storage services. These keys can be regenerated at any point in time and can be kept in a secure location like Azure Key Vault. They can be found by clicking on the Access keys button on the left side of the storage account blade for a storage account.
Access keys can be used in the authorization header for any REST API call to provide storage access. Instead of assigning an access key to an authorization header, users can choose to use one of the predefined connection strings that are available in the access keys page to authorize their application requests.
While access keys are an available authorization option for storage accounts, it is recommended to use Azure AD credentials instead. Access keys provide shared authorization to multiple storage services, which can provide more access than what is needed. Azure AD can be used to provide more granular permissions to specific storage services such as blob containers and file shares. For this reason, Azure provides administrators with the option to block storage account requests that use an access key. This can be done by clicking the Configuration button (under Settings) on the left side of the storage account blade for your storage account and clicking Disabled under the Allow Storage Account Key Access setting.
Shared Access Signature (SAS)
A shared access signature (SAS) delegates access permissions to specific storage account resources over a predetermined period of time. A SAS provides more granular access than an account key, as they allow administrators to restrict what resources a client application can access and what permissions it has on those resources.
Administrators can create a SAS using the Azure Portal, Azure PowerShell, Azure CLI, or the Azure Storage client library for .NET. Creating a SAS results in one or more signed URLs that point to each storage service that the SAS was provided access to. The URL includes a token that indicates what permissions client applications are authorized to use with the SAS.
To create a SAS in the Azure Portal, click on the Shared Access Signature button on the left side of the storage account blade for your storage account. Figure 4.19 illustrates the configuration options on the shared access signature page.
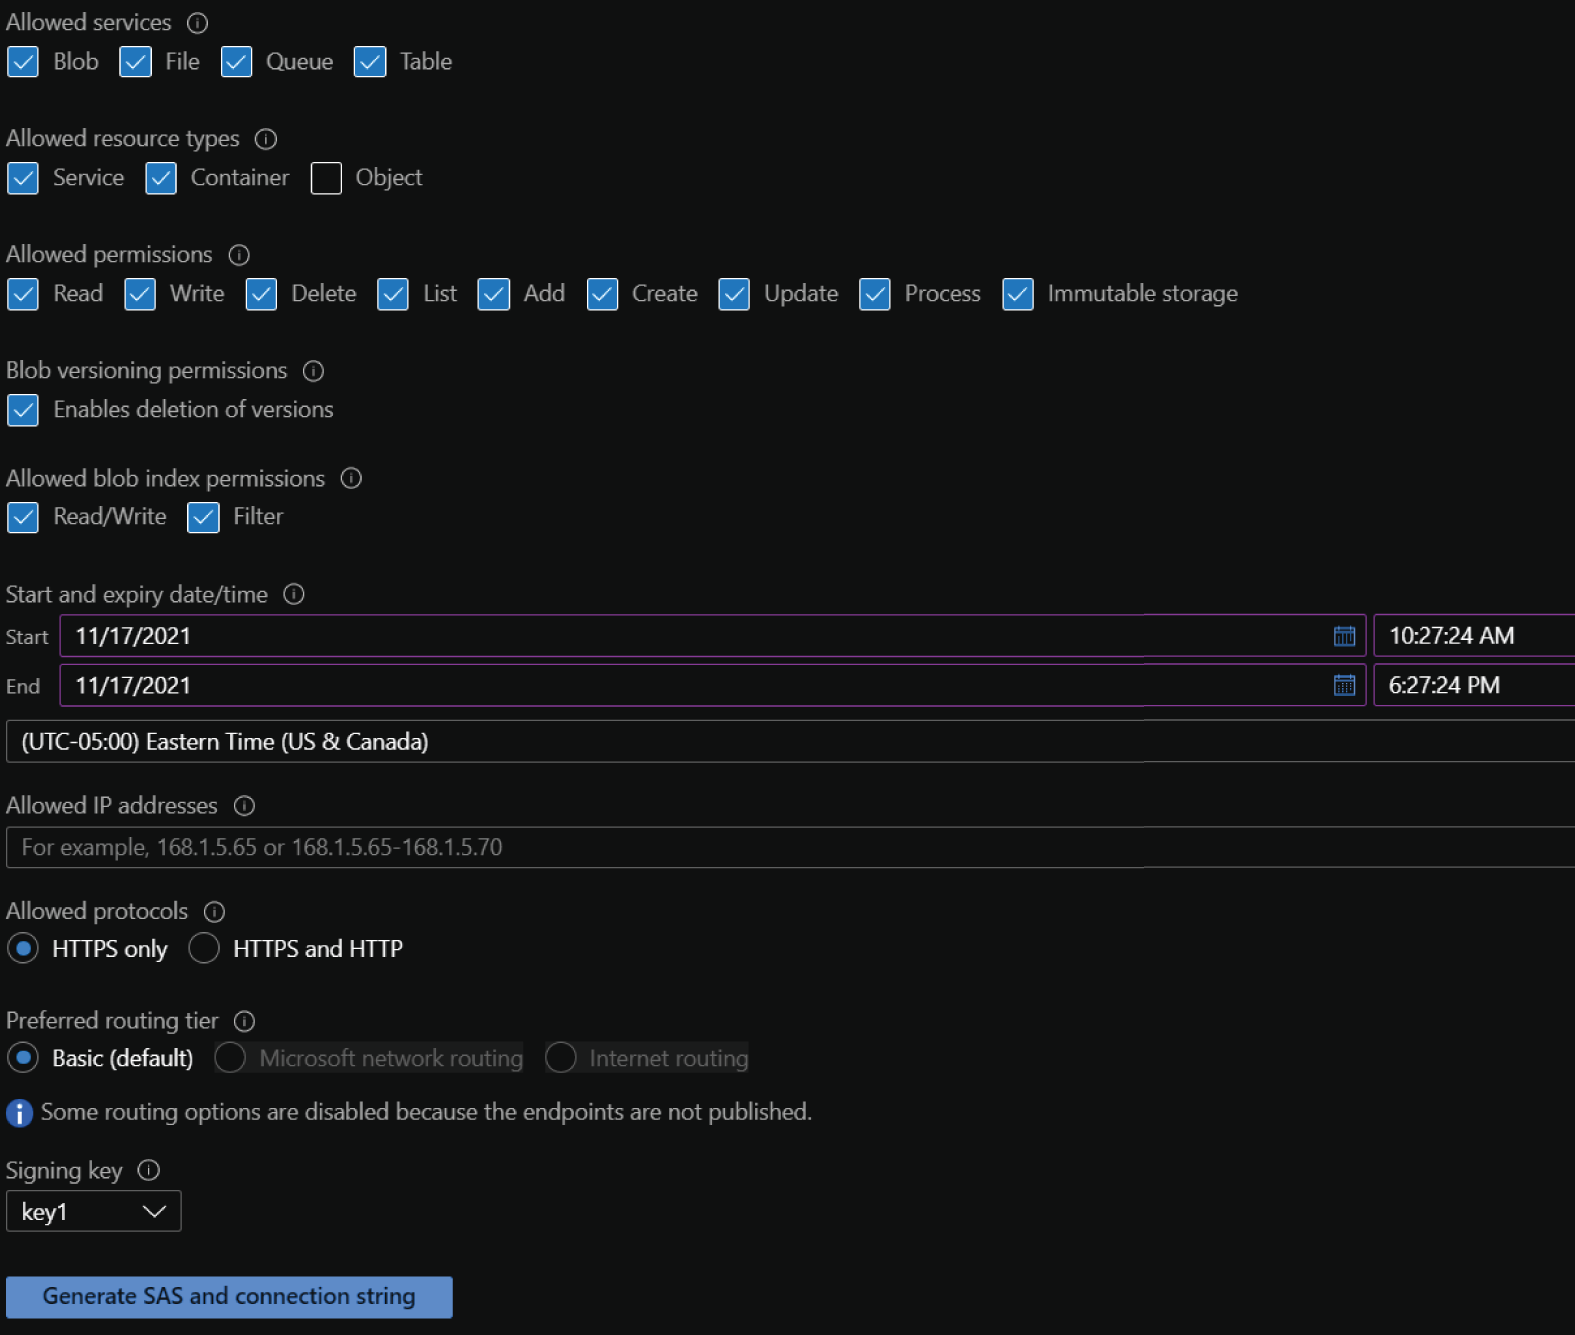
FIGURE 4.19 Shared access signature configuration options
The following list describes each configuration option on this page:
- Allowed services defines which storage services the SAS can access. Options include blob, file, queue, and table storage.
- Allowed resource types sets the access granularity for the SAS. For example, setting the allowed resource type scope to Service will enable access to the entire blob, file, queue, or table service. Setting the Object resource type scope will limit access to data objects stored in a storage service. Options include service, container, and object types.
- Allowed permissions defines what permissions the SAS is authorized to perform. Options include read, write, delete, list, add, create, update, process, and immutable storage.
- Blob versioning permissions sets whether the SAS can delete blob versions if versioning is enabled.
- Allowed blob index permissions defines what permissions the SAS is authorized to perform on blob indexes. Options include read/write and filter.
- Start and expiry date/time defines how long the SAS is valid.
- Allowed IP addresses restricts access to one IP address or a range of IP address. Leaving this option empty will allow any IP address to communicate with the storage account via the SAS.
- Allowed protocols sets the protocols permitted for a request using the SAS. By default, this option is set to HTTPS only, but it can be changed to allow HTTPS and HTTP connections. It is recommended to only allow HTTPS connections.
Click the Generate SAS And Connection String button at the bottom of the page to generate the SAS token as well as the connection strings and SAS URLs for each of the selected storage services.
As with access keys, it is recommended to use Azure AD credentials instead of a SAS. The same process that blocks requests made with an access key also blocks requests that use a SAS.
Azure AD Integration
Azure AD is a supported identity management service for Azure Storage services. Administrators can assign storage access permissions to Azure AD users, groups, and applications with Azure RBAC roles. These roles can be used to grant access permissions to Azure AD identities at the following storage levels:
- The storage account level—Azure AD identities that are scoped to a storage account are propagated with their delegated permissions to all resource objects hosted in the storage account.
- The resource level—This includes any resource that may be hosted by a storage account, such as a blob container or a file share. An Azure AD identity scoped to a resource can interact with that resource's data, granted the action the identity is trying to perform is allowed by the permissions assigned to it.
Identities can be set using a variety of methods such as through the Azure Portal, Azure PowerShell, and Azure CLI. To add identities through the Azure Portal, click the Access Control (IAM) button in the left-side panel of the resource you want to add the identity to. Click the Add button on the Access Control (IAM) page and start adding role assignments to identities. Along with generic RBAC roles such as Owner, Contributor, and Reader that will grant administrative access to the object, Azure Storage services have built-in roles that grant resource-specific permissions. The following is a list of roles specific to Azure Storage that are relevant to the DP-900 exam:
- Storage Blob Data Owner—Identities assigned this role have full access to blob containers and data. It can also be used to assign ACLs to ADLS folders. This role applies to Azure Blob Storage and ADLS.
- Storage Blob Data Contributor—Identities assigned this role have read, write, and delete access to blob containers and data. This role applies to Azure Blob storage and ADLS.
- Storage Blob Data Reader—Identities assigned this role have read access to blob containers and data. This role applies to Azure Blob Storage and ADLS.
- Storage File Data SMB Share Elevated Contributor—Identities assigned this role have read, write, delete, and modify NTFS permission access to file shares over SMB. This role applies to Azure Files.
- Storage File Data SMB Share Contributor—Identities assigned this role have read, write, and delete access to files shares over SMB. This role applies to Azure Files.
- Storage File Data SMB Share Reader—Identities assigned this role have read access to files shares over SMB. This role applies to Azure Files.
There are also several built-in roles specific to Azure Queue and Azure Table storage, including contributor and reader roles. These roles assign similar permissions to the contributor and reader roles for Azure Blob Storage and Azure Files.
AD Domain Services (AD DS) for Azure Files
Azure Files uses on-premises AD Domain Services (AD DS) and Azure AD Domain Services (Azure AD DS) to manage authentication and authorization through SMB. This is useful in hybrid scenarios where on-premises file servers are migrated to Azure Files but still have to support on-premises AD identities. Azure AD DS enables administrators to assign file share access permissions with one of the built-in RBAC roles for Azure Files to identities hosted in Azure AD.
To enable either on-premises AD DS or Azure AD DS for Azure Files, click on the File Shares button in the left-side panel of your storage account. Check to see if AD is configured at the top of the file shares page. Click Not Configured if AD is not configured. This setting will look like Figure 4.20 if AD is not configured.

FIGURE 4.20 Configure Active Directory for Azure Files.
The Active Directory page will allow you to set an on-premises Active Directory domain controller or Azure AD DS as an identity provider for the Azure Files instance. Identities can be scoped to file shares and assigned RBAC roles once this step is complete.
Azure Files use Kerberos for authenticating application requests with either on-premises AD DS or Azure AD DS. When an application attempts to access an Azure file share, the access request is routed to AD DS or Azure AD DS for authentication. If the identity the application is using is found and authentication is successful, the on-premises AD DS or Azure AD instance will return a Kerberos token to the application. The application then sends a request to the Azure file share with the Kerberos token, and the file share uses the token to authorize the request.
More information about using on-premises AD DS, Azure AD DS, and Kerberos for authentication and authorization with Azure Files can be found at https://docs.microsoft.com/en-us/azure/storage/files/storage-files-active-directory-overview#how-it-works.
ADLS Access Control Lists (ACLs)
While RBAC roles will generally grant the appropriate level of access to a user, they can sometimes grant too much privilege. Identities can be granted access to a storage account or a blob container with an assigned RBAC role such as Storage Blob Data Contributor or Storage Blob Data Reader to limit what that identity can do with data. However, this provides identities access to all of the data in a container. RBAC cannot be used to grant specific permissions to individual blobs in a container. ADLS enables administrators to grant blob-level access with the use of ACLs.
ACLs provide administrators with the ability to grant Azure AD identities read, write, or execute permissions to directories and blobs in ADLS. Table 4.3 details how these permissions can be used.
TABLE 4.3 Blob and Directory ACL Permissions
| Permission | Blob | Directory |
|---|---|---|
| Read (R) | Read the contents of a blob | Requires read and execute to list the directory's contents |
| Write (W) | Write and append content to a blob | Requires write and execute to create child items in the directory |
| Execute (X) | Does not provide any permissions to blobs | Required to traverse the child items (such as additional subdirectories and blobs) in the directory |
The key concept to remember about providing blob-level read or write permissions via ACLs to a specific identity is that the identity will need execute permission to each of the directories that lead to the blob. If we use our previous example of product data that is organized in a date hierarchy, then granting read access to an individual blob will require execute access on the product, year, month, and day directories that precede the blob.
ACLs can be set through the Azure Portal, Azure PowerShell, Azure CLI, the REST API, or the Azure Storage client library. To manage ACLs through the Azure Portal, go to an ADLS-enabled storage account and click on a container. Click on the Manage ACL button in the left-side panel of the container blade. The Manage ACL page will allow you to add identities and assign them read, write, or execute permissions. Figure 4.21 illustrates an example of this page.
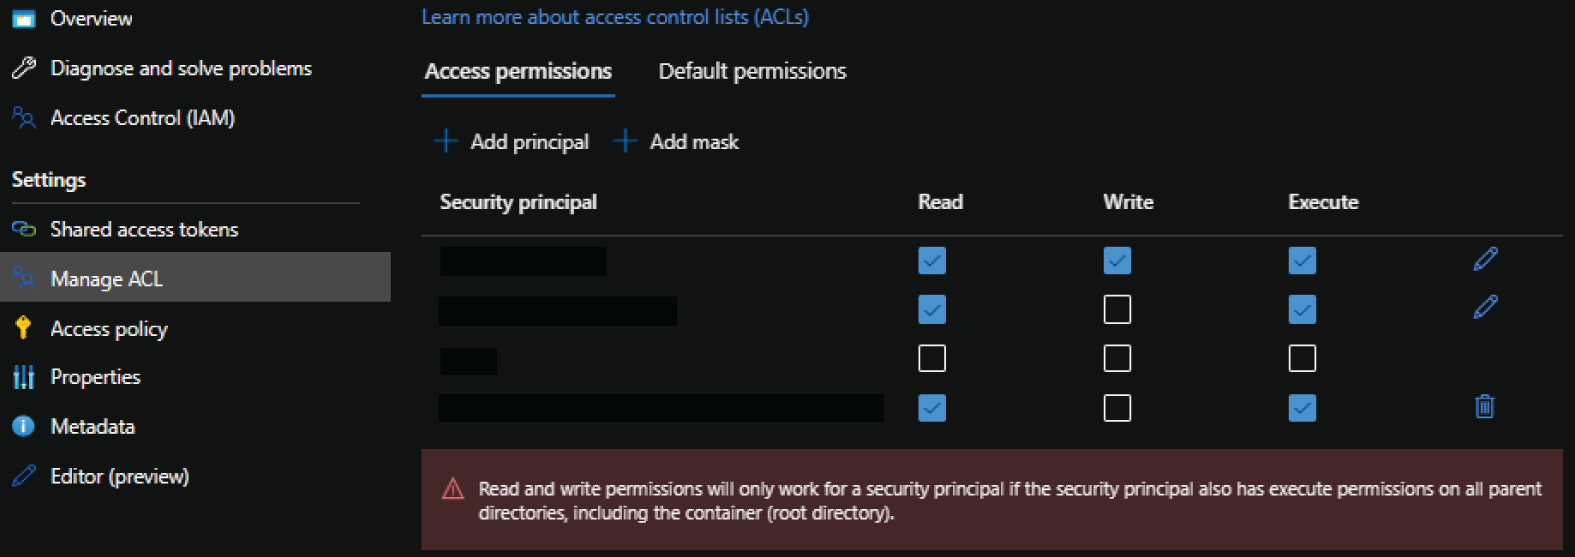
FIGURE 4.21 Manage ACLs in the Azure Portal.
Because ADLS is an add-on to Azure Blob Storage, it has the ability to leverage both Azure RBAC and ACLs to control user access. ADLS uses the following rules when evaluating an identity's RBAC and ACL permissions:
- Azure RBAC role assignments are evaluated first and take priority over ACL assignments.
- If the operation is fully authorized based on the identity's RBAC assignment, then any ACL it may be assigned is not evaluated.
- If the operation is not authorized via RBAC, then the identity's ACLs are evaluated.
Figure 4.22 illustrates the permission flow ADLS uses to evaluate a read request.
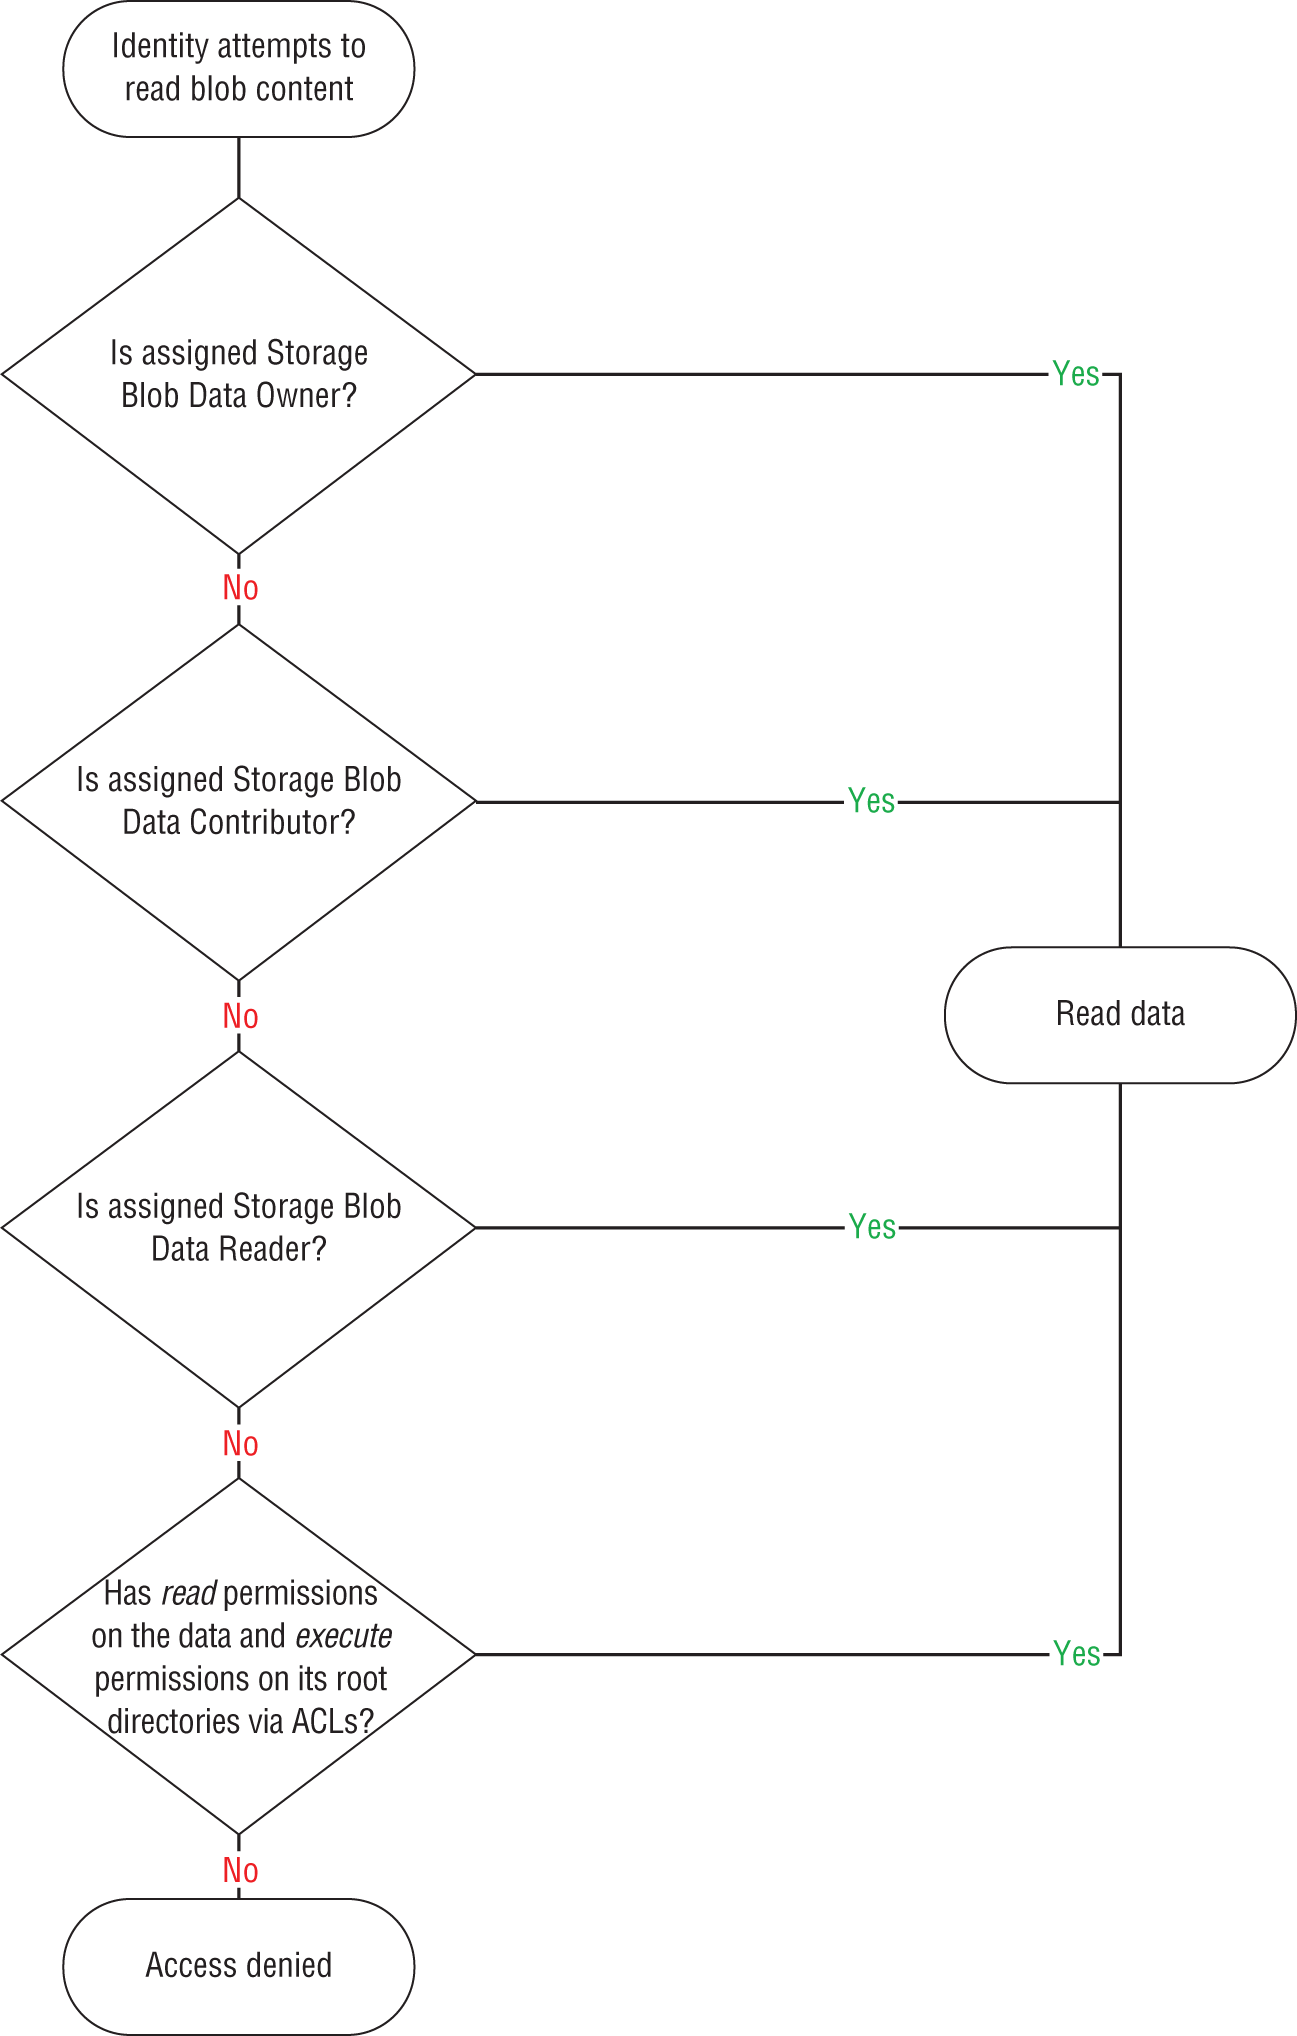
FIGURE 4.22 How ADLS evaluates identity access
Data Encryption
All data that is stored in an Azure storage account is encrypted at rest by default. Azure Storage also encrypts data in transit using TLS and allows organizations to enforce a minimum required version of TLS for requests made to the storage account.
Data stored in a storage account is encrypted with Microsoft-managed keys by default. This abstracts encryption key management from storage account administrators. While this can be a benefit to some organizations, others require more control of the encryption keys. For this reason, Azure Storage allows organizations to use their own keys to encrypt storage account data. Customer-managed keys must be stored in Azure Key Vault.
A storage account can be configured to use customer-managed keys by changing its encryption type. To do this, click the Encryption button on the left side of the storage account blade for your storage account and change the encryption type to Customer Managed Keys. This will prompt you to select an Azure Key Vault and an encryption key.
Data Protection
In addition to providing data redundancy for business continuity, Azure Storage protects data from being deleted or modified with the following features:
- Soft delete protects data from being accidentally deleted. Storage resources can be recovered when this feature is enabled, within a specified retention period. During the retention period, deleted storage resources can be restored to their state at the time they were deleted. Soft delete can be configured for file shares, containers, and blobs.
- Blob versioning captures the state of a blob at a given point in time. When this is enabled, Azure Blob Storage will create a new version of the blob when it is created and every time it is modified. This feature is not available for ADLS or Azure Files.
- Immutability policies enable users to restrict data from being modified or deleted once it is written to Azure Blob Storage. With this feature, data can be read as many times as needed but never modified or deleted for a user-specified interval.
Azure Blob storage supports two types of immutability policies: time-based and legal hold. Time-based retention policies allow users to define the number of days the data is immutable, anywhere between 1 and 146,000 days. Legal hold policies restrict data from being modified or deleted until the legal hold is explicitly removed.
Azure Storage Common Connectivity Issues
Applications interacting with Azure Storage will have to traverse multiple levels of security to establish successful connections. While this is paramount for storing data securely in Azure, it can potentially lead to some connectivity interruptions. These can be expected or unexpected and are typically related to authorization issues, resources not being available, or network failure. The following sections describe some common Azure Storage connectivity issues and how to fix them.
Forbidden Exceptions
Forbidden exceptions typically occur when an application is attempting to authenticate with an access key, SAS, or Azure AD identity that does not have the appropriate access permissions to the storage account. Client applications that experience this issue will throw a 403 exception to indicate that the request was unauthorized.
If the client application is authenticating with an access key, verify that the access key is still valid. There is a chance that the key had been regenerated without it being changed in the application. If the application is using an Azure AD identity to access the storage account, verify that the identity has the correct permissions to perform the action the application is attempting.
While authentication issues with an access key or Azure AD can occur, 403 forbidden exceptions are typically the result of an invalid or expired SAS. Use the following rules to minimize the chances of this issue occurring:
- Do not set a future start time when initially setting up the SAS. It is possible that the SAS will not be valid if there are any clock differences between the time that the client application is sending a request to the storage account and the SAS's start time.
- Do not set a short expiry time on the SAS.
- Make sure that the version parameter in the SAS matches the Azure Storage client library version that the client application is using. Always use the latest version of the Azure Storage client library to mitigate this issue.
Resource Not Found
Resource not found errors imply that the resource the client application was trying to connect to does not exist. Client applications that experience this issue will throw a 404 exception. There are several possible reasons for this error:
- The object the application is trying to access was deleted by a previous operation.
- The application is using a SAS that does not include all of the necessary permissions to perform the attempted operation.
- Unexpected network failures.
Management Tools
Microsoft provides several tools for uploading and managing data stored in Azure Storage. These also include tools that can be used to migrate data from legacy storage solutions to Azure Storage. The following sections describe some of the most popular tools for interacting with Azure Storage.
AzCopy
AzCopy is a command-line tool that can be used to migrate data into and out of Azure Storage. It includes a set of commands that users can leverage to move data to an Azure storage account from a local file share, Amazon S3, Google Cloud Storage, or another Azure storage account.
Download the most current version of AzCopy from the following link to get started: https://docs.microsoft.com/en-us/azure/storage/common/storage-use-azcopy-v10#download-azcopy. Once it's installed, you will be able to run AzCopy commands through a local command prompt.
Moving data to or from a storage account with AzCopy requires an authorized connection. Table 4.4 lists the authorization methods that AzCopy can use when connecting to Azure Storage:
TABLE 4.4 Supported AzCopy authorization methods
| Storage Service | Supported Authorization Method |
|---|---|
| Azure Blob Storage | Azure AD and SAS |
| ADLS | Azure AD and SAS |
| Azure Files | SAS |
All AzCopy statements begin with the azcopy keyword to indicate that the statement is using the AzCopy executable. Most AzCopy statements use the following format to perform an action:
azcopy [command] [source-file-path] [destination-storage-account]--[optional-flag]
For example, the following statement uses this format to upload a local directory of data to Azure Blob Storage:
azcopy copy 'C:myDirectory' 'https://dp900stracct001.blob.core.windows.net/dp900container01'--recursive=true
This example assumes that the statement is being run with an Azure AD identity that is authorized to create data in the storage account. To use a SAS instead of Azure AD to authenticate to the storage account, simply add the SAS token to the end of the blob URL (for example, https://dp900stracct001.blob.core.windows.net/dp900container01<SAS-Token>).
Azure Storage Explorer
Azure Storage Explorer is a free desktop application that can be used to manage Azure Storage resources across Azure subscriptions. The application uses AzCopy to perform resource management and data movement operations, allowing users to leverage the performance benefits of AzCopy with an easy-to-use GUI.
You can get started with Azure Storage Explorer by downloading the most current version from https://azure.microsoft.com/en-us/features/storage-explorer. Here you will find download options for Windows, macOS, and Linux devices. Once it's installed, users can leverage Azure Storage Explorer to perform the following tasks:
- Connect to and manage Azure storage accounts across multiple Azure subscriptions.
- Create, manage, and delete blob containers, ADLS directories, and file shares.
- Upload, manage, download, and delete data and virtual hard disks.
Use the following steps to log into your Azure account and list the subscriptions and storage accounts you have access to:
- Open Azure Storage Explorer and click the Connect to Azure Storage button. Figure 4.23 illustrates where you can find this button.
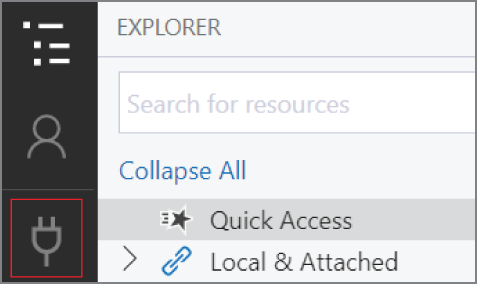
FIGURE 4.23 Connect to Azure Storage button
- The Connect to Azure Storage pop-up window provides connection options at the Azure subscription, storage account, and storage service levels. Click the Subscription button and follow the prompts to sign into your Azure account.
- After you successfully log into your Azure account, the account and its associated subscriptions will appear under the Account Management page. Select the subscription that hosts the storage accounts you want to manage and click Open Explorer.
- The Explorer page will list all of the storage accounts and storage resources in the selected subscription(s). Figure 4.24 illustrates how the previously created blob container and file share is listed in Azure Storage Explorer.

FIGURE 4.24 Storage account display
When you click on a blob container or a file share, the main pane will display all of its contents as well as options to upload new items and create a new subfolder. Click on the previously created blob container and click the Upload button in the top ribbon. Click Upload Files to upload one or more data files. The Upload Files pop-up page allows you to select the files you want to upload, the blob type, and the access tier for the blob. Figure 4.25 shows an example of this page uploading a block blob with the hot access tier.
Once it's uploaded, you will be able to manipulate the data with several options in the top ribbon and by right-clicking the blob.
Azure Data Factory
Azure Data Factory is a PaaS ETL technology that can be used to orchestrate data movement and data transformation activities. With the Azure Data Factory's native data store connectors, users can quickly build connections to on-premises and cloud data stores. Developers can then use those established connections, called Linked Services, to build datasets that are used in Azure Data Factory pipelines. Pipelines consist of activities that process datasets, storing them in formats that can be used by data science and reporting applications.
One of the core components of Azure Data Factory is its Copy Data activity. Developers can use this activity to move large amounts of data from on-premises and cloud data stores to a central data repository in Azure Storage. The Copy activity is typically the first step used in an Azure Data Factory ETL pipeline, consolidating raw, source data in a single ADLS account. This activity is also used to migrate binary objects such as videos, images, and audio files to Azure Blob Storage.
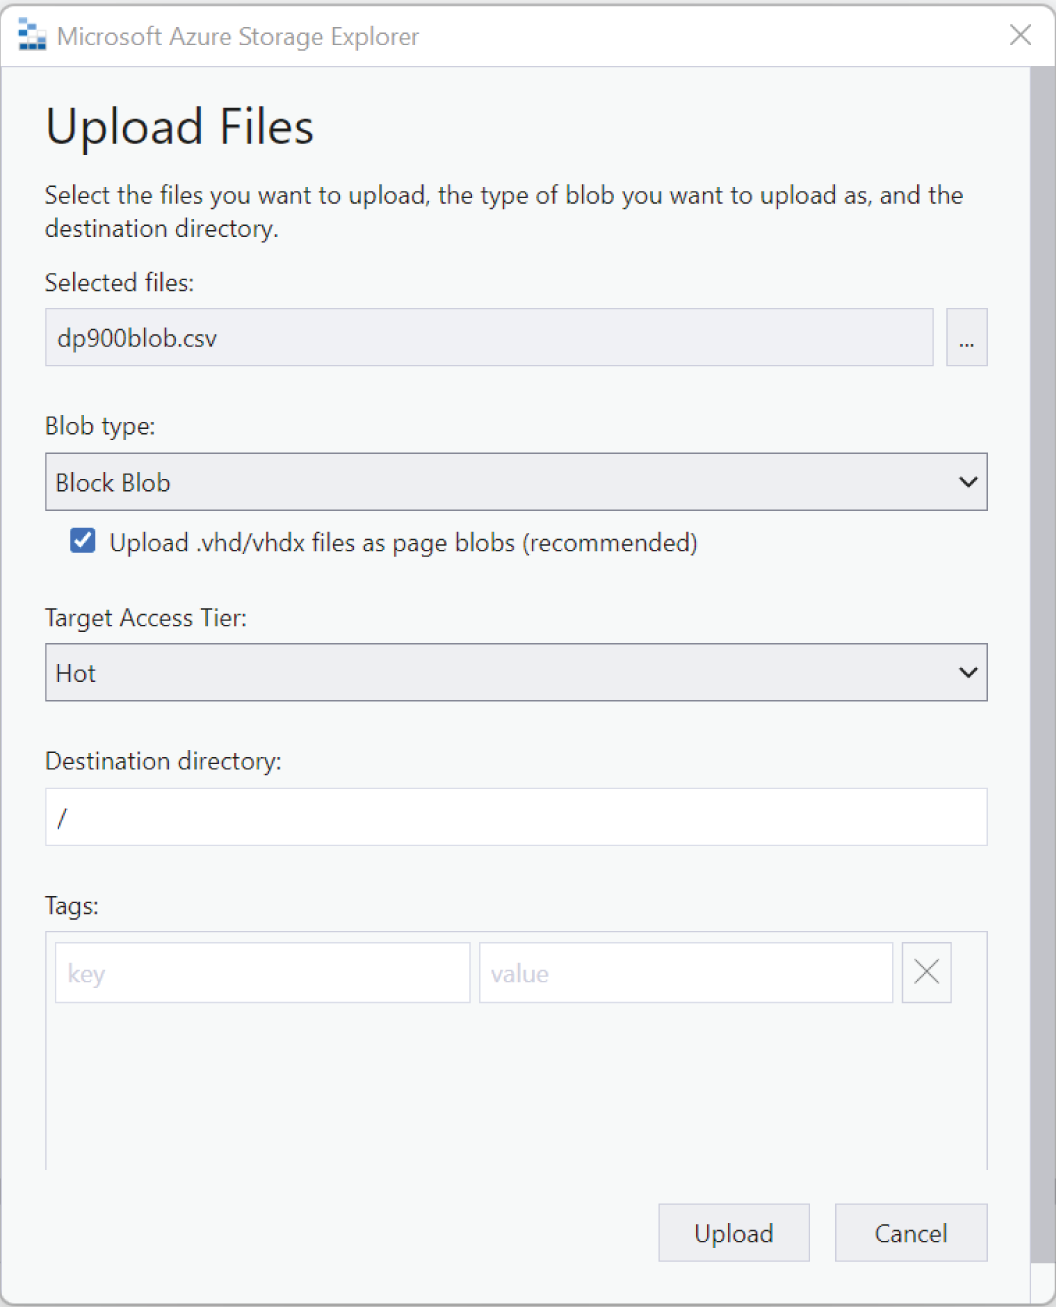
FIGURE 4.25 Upload Files pop-up page
Creating Azure Data Factory resources such as linked services, datasets, pipelines, and pipeline activities is covered in further detail in Chapter 5, “Modern Data Warehouses in Azure.”
Azure Data Box
For some organizations, using a programmatic approach to migrating data from an on-premises appliance to Azure can take longer than what is acceptable. Microsoft can support organizations facing this issue with Azure Data Box. Azure Data Box is a physical device that lets organizations send large amounts of data to Azure very quickly. It is typically used to migrate datasets that are larger than 40 TBs in scenarios with limited or no network connectivity. Azure Data Box is used in the following scenarios:
- Moving large amounts of media data such as videos, images, and audio files to Azure
- Migrating several VMs to Azure at once
- Migrating large amounts of historical data that is used by distributed analytics solutions
Azure Data Box can also be used to export data from Azure Storage to an on-premises datacenter.
The following steps describe the workflow used to migrate data to Azure with Azure Data Box:
- Order the device through the Azure Portal. Provide shipping information and the destination Azure storage account for the data.
- Once the device is delivered, connect the device to your network using a wired connection. Make sure the computer from which you will be copying the data has access to the data.
- Copy the data to the device.
- Once the data has finished copying, turn off the device and ship it back to the Azure datacenter that you are migrating the data to.
- The data is moved to the designated Azure storage account once the device is returned.
More information about procuring and managing an Azure Data Box device can be found at https://docs.microsoft.com/en-us/azure/databox/data-box-overview.
Summary
This chapter covered file and object storage concepts and when to use one over the other. In a nutshell, file storage is used to organize data on a file share and is typically used for network-wide collaboration. File storage is optimized for small amounts of data that can be organized using a hierarchy of directories and subdirectories. Object storage is used to store large volumes of data in binary and text format. This includes images, videos, audio, and data used in distributed analytics solutions.
Azure Storage is a multi-purpose PaaS storage platform that allows users to create object, file, key-value, and queue data stores. A storage account is the highest level of management for Azure Storage and can host one or more storage services. The storage services include Azure Blob storage, Azure Data Lake Storage Gen2, Azure Files, Azure Table storage, and Azure Queue storage.
Depending on the performance requirements for the use case, storage accounts can be configured to one of two account types: standard or premium. Both standard and premium storage accounts replicate their data three times locally for high availability. Standard storage accounts also allow users to configure a secondary region that will replicate the data three more times in a different Azure region for disaster recovery benefits.
Azure Files is a fully managed file share solution in Azure with support for SMB and NFS access protocols. File shares can be easily mounted to network drives or synchronized to a local machine using Azure File Sync. Azure offers the following four storage tiers for file shares to meet the performance and price requirements of different workloads: premium, transaction optimized, hot, and cool.
Azure Blob Storage is Azure's object storage solution. Typical Azure Blob Storage use cases include storing binary data such as images and videos and storing large amounts of textual data for big data processing solutions and as a data archive. Data in Azure Blob Storage is represented as blob objects. Blobs can be stored in one of three access tiers that allow users to store blob data in the most cost-effective manner depending on latency requirements and how frequently they are accessed.
Azure Data Lake Storage Gen2 (ADLS) is an object storage solution that is built on top of Azure Blob Storage. With its hierarchical namespace implementation and native HDFS support, ADLS is an ideal storage solution for big data analytics solutions.
As with any service in Azure, Azure Storage services can be deployed manually in the Azure Portal or automated with a script or an Infrastructure as Code template. Azure Storage provides multiple methods to secure data, including several network isolation and access management techniques. Data is natively encrypted at rest and in transit and is protected from being accidentally deleted or modified.
This chapter ends by describing some of the tools that can be used to manage and move data to Azure Storage. Data movement can be managed through a command line with AzCopy, graphically with Azure Storage Explorer, or as a part of an ETL pipeline with Azure Data Factory. Microsoft also offers Azure Data Box, a physical device that organizations can procure to migrate large amounts of data. Once it's ordered and received, organizations can connect an Azure Data Box device to their local network and upload data to it. The Azure Data Box device can then be shipped back to an Azure datacenter where Microsoft will upload the data to a storage account of the organization's choosing.
Exam Essentials
- Describe the characteristics of object storage. Understand what constitutes object storage. This can range from unstructured data such as videos, images, and audio to semi-structured or structured data files that are used in distributed compute solutions. These data stores are also used to store static content, data backups, and archive data.
- Describe Azure Storage. For the exam, remember that Azure Storage is a multi-purpose storage platform that allows users to create Azure Blob Storage, Azure Data Lake Storage Gen2, Azure Files, Azure Queue storage, and Azure Table storage services. Storage accounts offer two performance tiers, standard and premium, depending on the type of storage and hardware speed needed. There are four redundancy options that storage accounts can use for business continuity, including locally redundant storage (LRS), zone-redundant storage (ZRS), geo-redundant storage (GRS), and geo-zone-redundant storage (GZRS). The secondary GRS and GZRS regions can be configured to be readable.
- Describe Azure Files. Azure Files is a storage service that allows organizations to build fully managed file shares in Azure. File shares deployed through Azure Files can be accessed using SMB on standard and premium storage accounts or NFS on premium storage accounts. Remember that it has four access tiers: premium (only available on premium storage accounts), transaction optimized, hot, and cool. Azure file shares can be mounted to any computer in the world that is running a Windows, Linux, or macOS operating system. Users can also access files by using Azure File Sync to create a local cache of the Azure file share on a machine running Windows Server 2012 R2 or higher. Users can connect to an Azure file share from their local network by either opening TCP port 445 or by attaching a private endpoint to the host storage account and establishing a VPN or ExpressRoute connection between the private endpoint's VNet and the local network.
- Describe Azure Blob Storage. Azure Blob Storage is Microsoft's object storage solution in Azure. It can store any type of file and is optimized for storing videos, images, audio, text formatted files used for big data processing, backups, and archival data. For the exam, remember that a single storage account can have an unlimited number of containers, and a single container can have an unlimited number of blobs. Remember that there are three types of blobs: block blobs, append blobs, and page blobs.
Blobs can be set to use one of three different access tiers, including hot, cool, and archive. The appropriate setting for a given blob depends on how frequently it is accessed and what its latency requirements are.
- Describe Azure Data Lake Storage Gen2. Azure Data Lake Storage Gen2, or ADLS for short, is an object storage solution that is built on top of Azure Blob Storage. It uses a hierarchical namespace to organize data in a structure of directories and subdirectories for efficient data access. This makes it the ideal storage solution for big data and distributed analytics solutions, such as those built with Azure HDInsight, Azure Databricks, or Azure Synapse Analytics. Remember that the Azure Blob File System (ABFS) driver allows Apache Hadoop environments to easily interact with data stored in ADLS.
- Describe automated Azure Storage deployments. As with other Azure data services, the DP-900 exam will include some questions about best practices for Azure Storage deployments. Azure PowerShell, Azure CLI, and Infrastructure as Code templates are commonly used to automate Azure Storage deployments across multiple development environments.
- Describe network isolation for Azure Storage. Like other data services in Azure, storage accounts use a public endpoint that can be secured using an IP firewall or by allowing access to specific Azure VNets or Azure services. Users can also attach private endpoints to a storage account, restricting access to only applications that can communicate with the VNet the IP address is in.
- Describe access management for Azure Storage. Remember that there are three methods that can be used to manage authentication and authorization for storage accounts: access keys, shared access signatures (SAS), and Azure AD identities. Microsoft recommends that access management is done with Azure AD identities as these are easier to manage and they provide more granular levels of permissions than access keys or SAS. Know that there are several Azure RBAC roles that are specific to accessing different types of Azure storage. Also remember that ADLS allows a combination of Azure RBAC and POSIX-like access control lists (ACLs) to provide access at the storage account, container, directory, and blob levels.
- Describe data encryption and data protection for Azure Storage. Azure encrypts data stored in Azure Storage at rest by default. Azure Storage also encrypts data in transit using TLS and allows organizations to enforce a minimum required version of TLS for requests made to the storage account. Azure Storage also protects data from being deleted or modified with the following features: soft delete, blob versioning, and immutability policies.
- Describe management tools for Azure Storage. The DP-900 exam covers several tools that can be used to manage data in Azure Storage. AzCopy is a command-line tool that is used to migrate data from on-premises or cloud storage to an Azure storage account. Azure Storage Explorer is a desktop tool that can be used to manage storage account resources. Remember that Azure Storage Explorer uses AzCopy to upload data. Azure Data Factory is an orchestration tool that can be used to move data to Azure Storage as a part of an ETL pipeline. Finally, Azure Data Box is a physical device that organizations can use to move large amounts of data (more than 40 TB) to Azure Storage.
Review Questions
- Which of the following types of data can be stored in Azure Storage?
- Unstructured
- Structured
- Semi-structured
- All of the above
- Which of the following redundancy options is not available for premium tier storage accounts?
- Local redundant storage.
- Geo-redundant storage.
- Zone-redundant storage.
- All of these are available redundancy options for premium storage accounts.
- As the Azure administrator for your company, you are responsible for creating a storage system that replaces the existing SMB file share that is used by developers. The solution must be able to provide quick access to files that are frequently used and offload the storage of files that are not frequently used to the cloud. Which of the following solutions meets this requirement?
- Create an Azure file share and set up Azure File Sync on a Windows Server device.
- Create an Azure file share and mount the share to an on-premises network drive.
- Create an Azure Blob Storage container and mount the container to an on-premises network drive.
- Create an Azure file share and set up Azure File Sync on a Linux device.
- What port needs to be opened to allow SMB communication to an Azure file share if there is not an established Azure VPN or ExpressRoute to tunnel SMB traffic to the share?
- 445
- 443
- 1433
- 2049
- Which blob type is used by Azure VMs for disk storage?
- Block blob
- Append blob
- Page blob
- Disk blob
- You are designing an Azure Blob Storage solution to serve as the backend for a big data processing solution. Initially, the data must be available to be processed and analyzed with minimal latency. Once the raw data is processed and is no longer useful, it must be maintained for compliance reasons. Which of the following options should you implement to create the most cost-effective storage solution?
- Initially store the raw data using the hot access tier and then use a life cycle management policy to move the raw data to the cool access tier once it is processed.
- Initially store the raw data using the hot access tier and then use a life cycle management policy to move the data to the archive access tier once it is processed.
- Initially store the data using the transaction optimized access tier and then use a life cycle management policy to move the raw data to the cool access tier once it is processed.
- Initially store the data using the transaction optimized access tier and then use a life cycle management policy to move the raw data to the archive access tier once it is processed.
- When selected, which of the following features will enable ADLS for Azure Blob Storage?
- Hierarchical namespace
- File share
- Directory namespace
- Premium
- What is the recommended Azure PowerShell command to use when creating a reference to an existing storage account?
Get-AzureRmStorageAccountGet-AzStorageAccountGet-AzureStorageAccountGet-AzRmStorageAccount
- You are designing a storage account that will be used to store personally identifiable information. What network isolation solution should you use to ensure that the storage account is properly secured?
- Use the public endpoint with the IP firewall to restrict access to specific IP addresses.
- Use the public endpoint and restrict access to specific Azure subnets.
- Use a private endpoint to attach a private IP address from a VNet to the storage account. This will restrict storage account access to applications that can communicate with the VNet.
- Use a private endpoint with the IP firewall to restrict access to specific IP addresses.
- You are an Azure administrator for a sports team and are working with the team's data engineering department to design an Azure Blob Storage repository for all of the team's historical statistics. Analysts must be able to read data from the blob containers but must not be able to write new data or delete existing data. Which of the following access management solutions should you implement?
- Storage Blob Data Contributor
- Reader
- Contributor
- Storage Blob Data Reader
- Your organization is preparing to move its existing data estate to Azure Storage. The scope of the migration will include 50 TBs of historical data and media files. All the data needs to be migrated at once without taking a lot of time. Which of the following solutions should you use to perform this migration?
- AzCopy
- Azure Data Box
- Azure Data Factory
- Azure Storage Explorer
- Which of the following Azure resources can you connect to in Azure Storage Explorer?
- Subscriptions
- Storage accounts
- Blob containers
- All of the above