CHAPTER 1
Getting Ready to Work with Python
In this chapter, you learn what Python is and get ready to work with it. You choose the version of Python that suits your needs and then install that version if your computer does not already have it. You also install and configure your main tool for working with Python, a powerful code editor/integrated development environment called Visual Studio Code.
Understanding What Python Is and Does
Choose the Right Version of Python
Install Python on Linux If Necessary
Learn About Development Tools for Python
Download and Install Visual Studio Code
Get Started with Visual Studio Code and Apply a Theme
Understanding What Python Is and Does
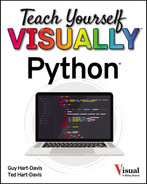
Python is a programming language that is used both widely and for many different purposes. Python enables you to write applications that work on many different computing platforms, including Microsoft Windows, Apple’s macOS, and Linux. Python is especially useful for automating routine tasks, thus enabling yourself and your colleagues to get more work done in less time.
A Dutch programmer named Guido van Rossum began work on Python in the late 1980s, eventually releasing the first version as Python 0.9.0 in 1991. Since 2001, Python has been run by a U.S.-based nonprofit organization called the Python Software Foundation.
Understanding What Python Is
A programming language is a type of computer language that is used to implement algorithms, which are instructions for performing particular actions — in other words, to make the computer do what the programmer wants it to do.
Python is a general-purpose programming language rather than a domain-specific programming language. As you might guess, a general-purpose programming language is a programming language designed for general programming use rather than for use in a specific area of computing. By contrast, a domain-specific programming language is a programming language designed for use in a specific area of computing. For example, Wolfram Mathematica is a programming language designed for symbolic mathematics; it is not designed for, and is not suitable for, general programming use, so it is domain specific.
Understanding Cross-Platform Programming
Python enables you to write applications that work on many different computing platforms. A computing platform means the hardware and operating system that together constitute a functional computer.
This book covers three widely used computing platforms:
- PC hardware running Microsoft’s Windows operating system. This book uses Windows 10 and Windows 11 for examples.
- Apple Macintosh hardware running Apple’s macOS operating system. This book uses macOS version 12, also known as macOS Monterey, for examples.
- PC hardware running the Linux operating system. Linux comes in many different versions, called distributions. This book uses the popular Ubuntu distribution for Linux examples.
Python fully supports the Windows, Mac, and Linux platforms, but it also supports many other platforms. These platforms range from those for personal devices, such as Apple’s iOS operating system and iPhones, all the way up to “big-iron” platforms for minicomputers and mainframes, such as IBM’s AIX and HP’s HP-UX. Python versions for some platforms come from third-party vendors.
Understanding Who Uses Python
Many different types of programmers use Python. Here are two examples:
- Web developers use Python to create web services that provide custom information in response to requests they receive. For example, when you visit a web forum, Python may be generating some or all parts of the page that the server sends to your browser.
- Scientists, mathematicians, and engineers across many fields use Python to perform data analysis, because Python provides powerful and convenient tools for processing and applying complex equations to statistical data.
Know Where You Can Get Python
You can download Python for free from the Python Software Foundation’s website, www.python.org. However, you may not need to download Python, because it may already be installed on your computer.
Windows typically does not include Python; see the section “Install Python on Windows,” later in this chapter, for instructions on installing Python.
macOS includes Python 2. See the section “Install Python on the Mac,” later in this chapter, for instructions on seeing which version a Mac contains and updating Python if necessary.
Many Linux distributions include one or more versions of Python. As of this writing, more distributions include Python 2 than include Python 3, but some distributions include both versions; see the following section, “Choose the Right Version of Python.” See the section “Install Python on Linux If Necessary,” later in this chapter, for instructions on checking the version and updating if necessary.
To find versions of Python for iOS or iPadOS, open the App Store app on the iPhone or iPad and search for python. Pythonista is a popular app, but there are plenty of other choices. Similarly, to find versions of Python for Android, open the Play Store app on your Android device and search for python.
Choose the Right Version of Python
As of this writing, two major versions of Python are in use: Python 2 and Python 3. Before you download and install Python on your computer, you should determine which version of Python will be best for your needs. This will most likely be Python 3, because Python 2 is out of date and the Python Software Foundation no longer supports it.
This section explains what you need to know about Python 2 and Python 3. It also explains the two types of Python builds that are available — stable builds and development builds — and advises you which build type to get.
Understanding Python 2 and Python 3
Two major versions of Python are currently in wide use: Python 2, released in 2000, and Python 3, released in 2008.
Each version uses a sequence-based numbering scheme for intermediate releases. For example, “Python 2.7.1” means Python 2, the seventh minor version, and the first update to that minor version. Similarly, “Python 3.10.0” means Python 3, the tenth minor version, and the initial release of that minor version.
The Python Software Foundation officially discontinued, or “sunset,” Python 2 on January 1, 2020. Sunsetting means that the Python Software Foundation will not develop Python 2 any further, even if researchers discover serious security issues in it. Because Python 2 has been sunset, the Python Software Foundation recommends that all users upgrade to Python 3 as soon as possible. The final version of Python 2 was 2.7.18.
With most software, such as business productivity apps or multimedia apps, upgrading to a newer version is a straightforward and painless procedure: You upgrade to the new version, and everything still works, even if the user interface has changed and the new version of the app provides extra features.
Python 3 offers compelling new features that Python 2 does not have; even better, Python 3 typically runs faster than Python 2. However, Python 3 is not fully compatible with Python 2, and some Python 2 code may not run successfully in Python 3. This is why many companies and organizations still have not upgraded from Python 2 to Python 3. The more Python 2 code a company or organization has built up, the more time, effort, and expense it will take to upgrade to Python 3.
Which Version of Python Do You Need?
You almost certainly need Python 3 unless your workplace uses Python 2 and is not migrating to Python 3. For example, your employer may have developed substantial amounts of Python 2 code that is not fully compatible with Python 3 and may therefore be sticking with Python 2.
If you are planning to start developing code from scratch, you should definitely choose Python 3 rather than Python 2.
You can install both Python 2 and Python 3 alongside each other and use each version when you need it.
macOS and many Linux distributions include Python 2 because they require Python 2 to run some software packages included with the operating system or distribution. Because of this requirement, you should not uninstall Python 2, even if you do not need it. Instead, simply leave Python 2 alone, install Python 3, and use Python 3 for development.
Windows does not need Python 2, so normally, you should install Python 2 on Windows only if you need it.
What Are the Two Build Types of Python?
Python.org makes available two types of builds of Python, stable builds and development builds:
Stable build. A stable build is a build that has been fully tested and approved for distribution.
Development build. A development build is an experimental build used for testing and compatibility. Development testers provide feedback on changes and new features before they are finalized and added to stable builds.
You may also see Python builds described as “release candidates.” A release candidate is a near-final development build made available — usually to a wide audience — for final testing. A release candidate is stable in theory but not always so in practice.
Which Build Type Should You Get?
You will almost always want to get a stable build of Python rather than a development build. Normally, you will want to get the latest stable build of Python so that you have access to the latest features. However, if your company, organization, or school is using an older stable build of Python, it will likely want you to use that build for compatibility.
When Will Python 4 Be Released?
The Python Software Foundation has not announced a release date for Python 4. In fact, Guido van Rossum has cast doubt on whether there will ever be Python 4, given how difficult and protracted the move from Python 2 to Python 3 turned out to be. Instead, the Python Software Foundation is continuing to develop Python 3.
As of this writing, the current stable version of Python is 3.10.4. Future versions of Python 3 are likely to use numbering such as 3.11.x, 3.12.x, and so on.
Install Python on Windows
Windows has no version of Python installed by default, so you will need to install Python unless you have already installed it or an administrator has installed it for you.
You can install Python either by using the Microsoft Store app or by downloading and running the Python installer from the Python Software Foundation. Microsoft recommends using the Microsoft Store app, but we recommend downloading the Python installer, because this enables you to make the latest version of Python available to the Visual Studio Code editor app, which you will meet later in this chapter.
Install Python on Windows
Download and Install Python on Windows
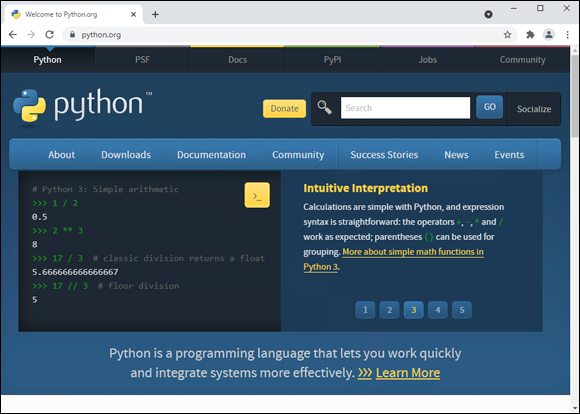
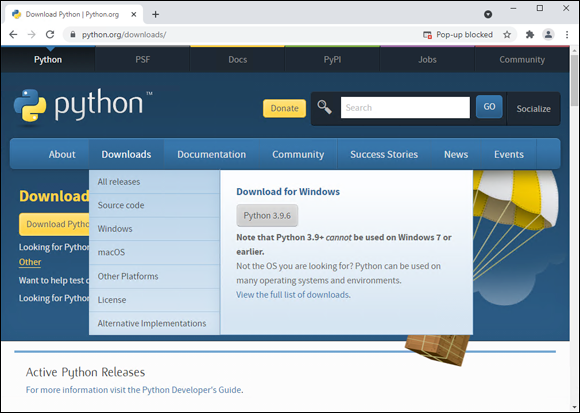
![]() Open a browser window and go to the Python Software Foundation website, www.python.org.
Open a browser window and go to the Python Software Foundation website, www.python.org.
![]() Hold the pointer over Downloads.
Hold the pointer over Downloads.
![]() A pop-up window appears.
A pop-up window appears.
![]() The web page selects the Windows tab, because it detects your computer is running Windows.
The web page selects the Windows tab, because it detects your computer is running Windows.
![]() Click the Python button under the Download for Windows heading.
Click the Python button under the Download for Windows heading.
This button shows the Python version, such as Python 3.10.0 in the example.
The browser downloads the file.

![]() Open the downloaded file from the browser. For example, in Chrome, click Actions (
Open the downloaded file from the browser. For example, in Chrome, click Actions (![]() changes to
changes to ![]() ) to open the pop-up menu, and then click Open to open the file.
) to open the pop-up menu, and then click Open to open the file.
Note: In Microsoft Edge, click Downloads (![]() ) to display the Downloads panel, locate the Python file you downloaded, and then click Open file beneath its name.
) to display the Downloads panel, locate the Python file you downloaded, and then click Open file beneath its name.

The Python Setup Wizard opens and displays the Install Python screen.
![]() Select Install launcher for all users (
Select Install launcher for all users (![]() ) to install the Python launcher for all users of this computer. This is usually helpful.
) to install the Python launcher for all users of this computer. This is usually helpful.
Note: If an earlier version of Python is installed on the PC, the Upgrade Now button appears. See the subsection “Upgrade Python on Windows,” later in this section.
![]() Select Add Python to PATH (
Select Add Python to PATH (![]() ) to add the location of the Python executable file to your Windows PATH statement. Doing so enables Windows to find Python and is usually helpful.
) to add the location of the Python executable file to your Windows PATH statement. Doing so enables Windows to find Python and is usually helpful.
![]() You can click Install Now to install Python and all its components for yourself, not for other users.
You can click Install Now to install Python and all its components for yourself, not for other users.
![]() Click Customize installation.
Click Customize installation.
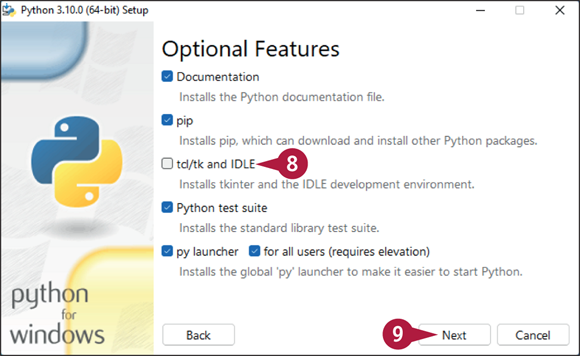
The Optional Features screen appears.
![]() Deselect the check box for any feature you do not want to install. For example, deselect tcl/tk and IDLE (
Deselect the check box for any feature you do not want to install. For example, deselect tcl/tk and IDLE (![]() ) if you do not want to install the IDLE development environment.
) if you do not want to install the IDLE development environment.
![]() Click Next.
Click Next.
When installing Python, you can choose to install the Python launcher component for just yourself or for all users. Separately, you can choose to install the main Python app and other components either for just yourself or for all users of your computer. You can also add the Python program location to your Windows PATH, which enables Windows to find Python without you having to specify the path explicitly.
After installing Python, you can update it to the latest version by downloading the latest installer from the Python Software Foundation website, running the installer, and clicking Upgrade.
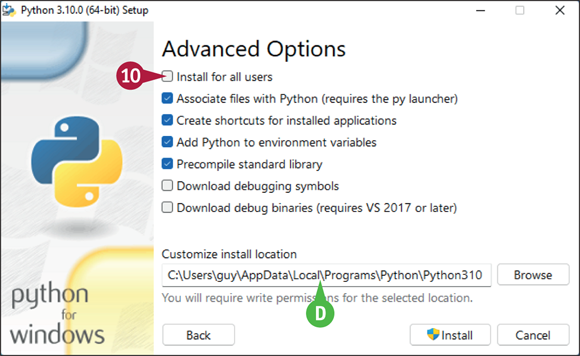
The Advanced Options screen appears.
Note: By default, the Python Setup Wizard installs Python and the components you choose only for you, not for all users of your computer.
![]() The default install location is within the AppData folder in your user account. This location is available only to you.
The default install location is within the AppData folder in your user account. This location is available only to you.
![]() Click Install for all users (
Click Install for all users (![]() changes to
changes to ![]() ).
).

![]() The install location changes to a Python folder within your computer’s Program Files folder. This location is available to all users.
The install location changes to a Python folder within your computer’s Program Files folder. This location is available to all users.
![]() You can click Browse and select a different install location if necessary. Normally, the default location works well.
You can click Browse and select a different install location if necessary. Normally, the default location works well.
![]() Click Install.
Click Install.
Note: If the User Account Control dialog box opens, prompting you to decide whether to allow the Python Setup Wizard to make changes to your computer, click Yes.
The Python Setup Wizard installs the components you chose.
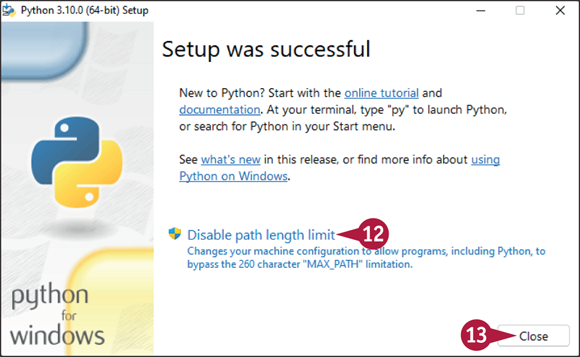
The Setup Was Successful screen appears.
![]() If you want to disable the path length limit, click Disable path length limit, and then click Yes in the User Account Control dialog box that appears.
If you want to disable the path length limit, click Disable path length limit, and then click Yes in the User Account Control dialog box that appears.
![]() Click Close.
Click Close.
The Python Setup Wizard closes.
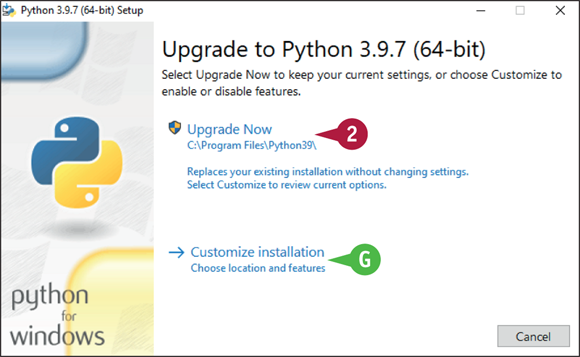
Upgrade Python on Windows
![]() Follow steps 1 to 4 in the previous subsection to download the Windows installer for the latest version of Python from the Python Software Foundation website, www.python.org, and open the installer file.
Follow steps 1 to 4 in the previous subsection to download the Windows installer for the latest version of Python from the Python Software Foundation website, www.python.org, and open the installer file.
The Python Setup Wizard screen appears.
![]() Click Upgrade Now to upgrade Python but retain all your settings.
Click Upgrade Now to upgrade Python but retain all your settings.
![]() If you want to change your settings, click Customize installation, and then make your choices on the Options screen and the Advanced Options screen.
If you want to change your settings, click Customize installation, and then make your choices on the Options screen and the Advanced Options screen.
Install Python on the Mac
Whether it has an Intel CPU or an Apple Silicon CPU, your Mac almost certainly has a version of Python installed — but it is most likely to have only Python 2. If so, you will want to install Python 3, probably the latest stable version of it.
In this section, you use the Terminal app in macOS to check whether Python is installed and, if so, which version. Then, if needed, you can download and install a newer version of Python.
Install Python on the Mac

Check Which Version of Python Is Installed on Your Mac
![]() Click Launchpad (
Click Launchpad (![]() ).
).
Launchpad opens.
![]() Start typing terminal.
Start typing terminal.
Launchpad narrows the selection to the apps that include what you have typed.
![]() Click Terminal (
Click Terminal (![]() ).
).
A Terminal window opens.
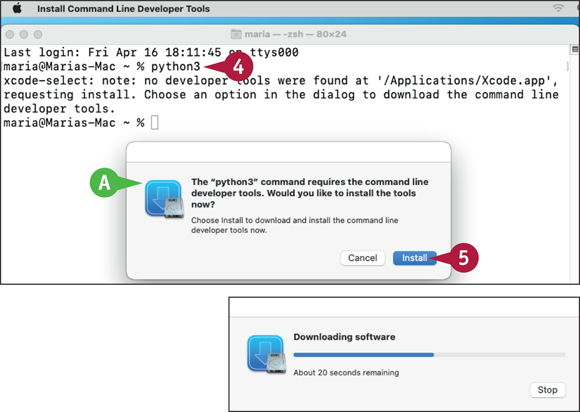
![]() Type python3 and press
Type python3 and press ![]() .
.
Note: If Terminal displays the version of Python, as shown in the final screen of this section, go to step 8. Python 3 is already installed on your Mac.
![]() A dialog box opens, prompting you to install the command-line developer tools.
A dialog box opens, prompting you to install the command-line developer tools.
![]() Click Install.
Click Install.
The Downloading Software dialog box opens, showing a progress readout.
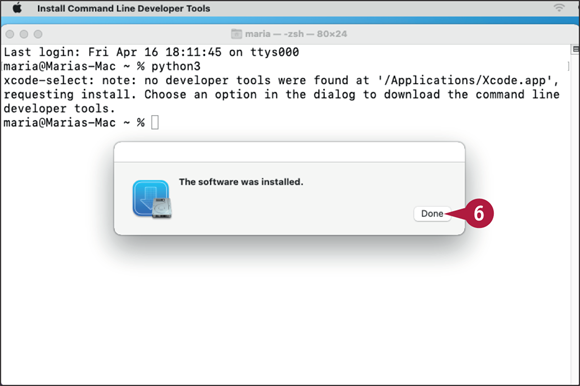
When the installation completes, a The Software Was Installed dialog box opens.
![]() Click Done.
Click Done.

The dialog box closes.
The Terminal window becomes active again.
![]() Type python3 and press
Type python3 and press ![]() .
.
![]() The version of Python appears.
The version of Python appears.
![]() Type quit() or press
Type quit() or press ![]() +
+ ![]() .
.
The Python app quits.
![]() Press
Press ![]() +
+ ![]() .
.
The Terminal app quits, and the Terminal window closes.
Install Python on Linux If Necessary
Many Linux distributions include a version of Python, so you may not need to install Python on Linux. In this section, you check whether Python is already installed on your Linux box and install it if it is not. If Python is already installed but is out of date, you update it to the latest version available for your Linux distribution.
This section uses Ubuntu Linux as the example and provides brief notes on other widely used Linux distributions. You need to have the permission to run commands as superuser — as the root user — using the sudo command.
Install Python on Linux If Necessary
Verify That Python Is Installed on Linux
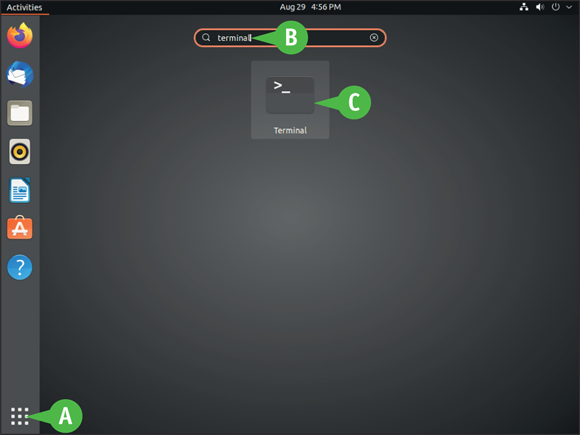
![]() Open a Terminal window. For example, on Ubuntu:
Open a Terminal window. For example, on Ubuntu:
![]() Click Show Applications (
Click Show Applications (![]() ).
).
The Activities screen appears.
![]() Type terminal.
Type terminal.
Matching search results appear.
![]() Click Terminal (
Click Terminal (![]() or similar).
or similar).

A Terminal window opens.
![]() Type python3 and press
Type python3 and press ![]() .
.
![]() If Terminal displays details of the Python version, such as Python 3.9.5, Python is installed.
If Terminal displays details of the Python version, such as Python 3.9.5, Python is installed.
![]() You can quit Python by typing quit() and pressing
You can quit Python by typing quit() and pressing ![]() . Alternatively, press
. Alternatively, press ![]() +
+ ![]() .
.
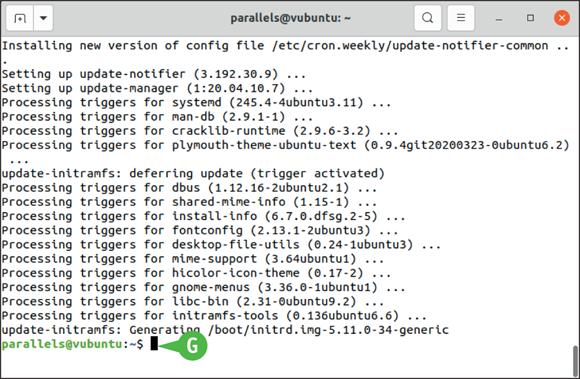
Note: If you see a message saying that Python was not found, you need to install Python. In the Terminal window, type sudo apt install python3 and press ![]() . If Terminal prompts you for your password, type it and press
. If Terminal prompts you for your password, type it and press ![]() . Linux then downloads and installs Python.
. Linux then downloads and installs Python.
Update Python on Linux
![]() Open a Terminal window. For example, on Ubuntu, click Show Applications (
Open a Terminal window. For example, on Ubuntu, click Show Applications (![]() ), type terminal, and then click Terminal (
), type terminal, and then click Terminal (![]() ).
).
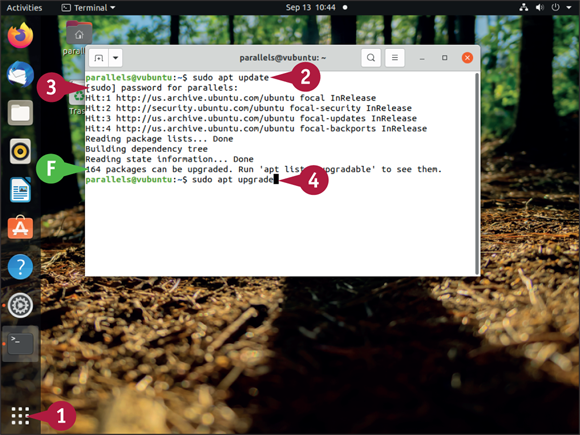
![]() Type the
Type the sudo apt update command and press ![]() .
.
Linux prompts you for your password.
![]() Type your password and press
Type your password and press ![]() .
.
Linux downloads the latest list of software packages available.
![]() Terminal displays information about available upgrades.
Terminal displays information about available upgrades.
![]() Type the
Type the sudo apt upgrade command and press ![]() .
.
Note: If Terminal displays information about the amount of additional disk space that will be used and prompts you to decide whether to continue, type y and press ![]() .
.
Linux downloads and installs the updates.
![]() When the upgrade finishes, the prompt reappears.
When the upgrade finishes, the prompt reappears.
You can then type python3 and press ![]() to see the Python version that has been installed.
to see the Python version that has been installed.
Learn About Development Tools for Python
Python code consists of plain text with structured layout, so you can create the code in any app that can output plain text. For example, you can create Python code in the Notepad text editor on Windows or in the TextEdit text editor on macOS.
But unless you like doing things the hard way, you will be better off using an app that is designed for creating code and that provides features to help you create code that is both correct and correctly formatted. This app can be either a code editor or an integrated development environment, IDE for short.
What Is a Code Editor?
A code editor is an app that is designed and built to make the writing of programming code easier, faster, and more efficient. While you can write code using any text editor or word processor, these apps do not provide the programming-specific features that a code editor gives you.
A code editor typically includes features such as the following:
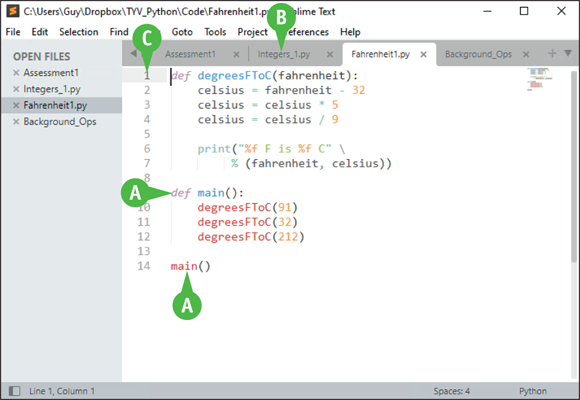
- Syntax evaluation and highlighting. As you program, the editor determines the code’s different elements and highlights them in different colors and font styles (A) to help you identify them visually.
- Automatic completion of code. When you start typing a keyword or another known element, the code editor displays suggestions for completing it. By accepting these suggestions, you can work faster.
- Multifile interface. Whereas most word processors keep each document in a separate window, many code editors use a tabbed interface (B) that enables you to open multiple files in the same window and switch quickly from one file to another by clicking the appropriate tab. Many text editors likewise use a tabbed interface.
- Line numbers. The code editor automatically displays line numbers (C) so that you can easily navigate through your code.
What Is an Integrated Development Environment?
An integrated development environment, or IDE, is an application designed for developing code. The development environment is integrated because you can both write the code in the environment and run the code to make sure it works correctly.
An IDE typically provides similar features to those in a code editor, such as syntax evaluation and highlighting, automatic code completion, and the ability to switch easily among multiple files. To these features the IDE adds tools for testing and debugging your code.
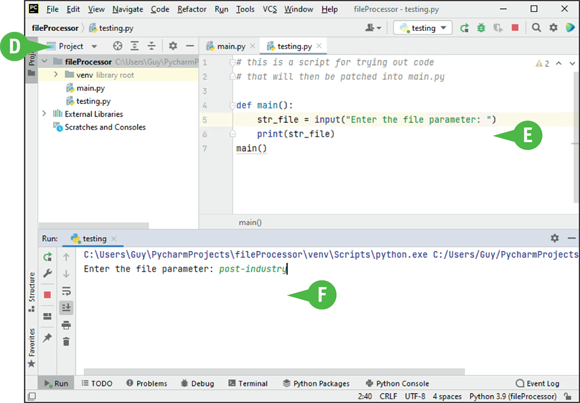
For example, the figure shows the PyCharm IDE. In the upper-left corner is the Project pane (D), which enables you to navigate among the files in your current project; gives you access to external libraries, repositories containing code you can add; and provides a scratch window for quick work and notes, and consoles for running code outside the IDE. In the upper-right corner is the Code pane (E), where you write your code. And across the bottom is the Run window (F), in which the output from your running code appears.
Should I Use a Code Editor, an IDE, or Both?
Which coding tools you use for Python is very much a personal preference. That said, you will almost certainly want to use an IDE for debugging your Python code. The question then becomes whether you want to use a code editor as well as an IDE.
You may want to use both a code editor and an IDE for different aspects of your work developing code in Python. Experiment with different tools to discover which tool or combination of tools works best for you.
When it comes to development tools for Python, there are a lot of choices. Many Python-capable code editors and IDEs are available, offering various combinations of features likely to appeal to different developers. Most of these code editors and IDEs work for multiple — or many — programming languages, but you can find IDEs built to work only with Python.
This section introduces you to some of the code editors and IDEs you may want to explore, including Visual Studio Code, the coding tool we recommend you use for working with Python.
Which IDEs Can I Use for Creating Python Code?
You can use a bewildering variety of IDEs for creating Python code. Some IDEs are designed for use only with Python, whereas other IDEs are designed for use with various programming languages. Some IDEs are much fuller featured than others and provide more help as you work. Extra help may be welcome while you are starting to use Python but may become annoying as you gain more experience.
Here are three examples of IDEs for Python:
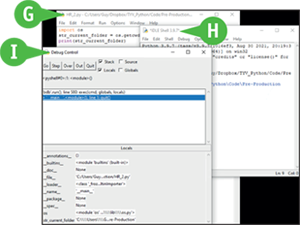
- IDLE. IDLE is a minimalist IDE that is included in the Python packages you can download from the Python Software Foundation website, www.python.org. IDLE, shown in the figure, uses multiple separate windows for the Editor (G), the Shell (H), and features such as Debug Control (I) rather than displaying multiple panes inside a single window.
- PyCharm. PyCharm (www.jetbrains.com/pycharm) is a full-featured IDE that comes in two editions. Normally, you would want the Community Edition, which is free and works only with Python. The other edition, Professional, is a paid version that has a free trial and works with HTML, JavaScript, and SQL, as well as Python.

- Thonny. Thonny (https://thonny.org) is a lightweight IDE designed to help beginners come to grips with Python coding. Thonny offers three modes for different levels of experience: Simple Mode for beginners, Regular Mode for those who need greater control, and Expert Mode for advanced users. The accompanying figure shows Regular Mode.
Which Code Editors Can I Use for Python?
You have a wide choice of code editors suitable for programming Python. Here are three examples of code editors well worth your consideration:
- Sublime Text. Sublime Text, shown in the “What Is a Code Editor?” subsection earlier in this section, is a powerful text editor with a minimalist interface that provides as much space as possible for displaying your code files. Sublime Text supports more than 40 other programming languages as well as Python. You can download an evaluation version of the app from the Sublime Text website, www.sublimetext.com; the app then costs $99 for a 3-year subscription.
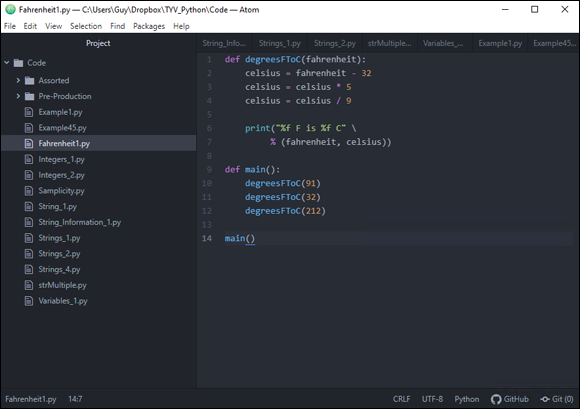
- Atom. Atom, shown on this page, is a highly customizable code editor that makes working with multiple files easy. As of this writing, Atom seems to place greater demands on the computer running it than the other code editors listed here; as a result, Atom tends to run more slowly. Atom is free to download from the Atom website, https://atom.io.
- Visual Studio Code. Visual Studio Code is a powerful code editor developed by Microsoft. It is separate from Microsoft’s Visual Studio IDE and runs on Windows, macOS, and Linux. See the following section for more information.
Which Code Editor or IDE Does This Book Recommend for Python?
This book recommends that you use Visual Studio Code as your main coding tool for working with Python, at least while using this book. Visual Studio Code is free, provides powerful coding features, and is widely used for various programming languages from C + + and C# to PHP and PowerShell.
While Visual Studio Code is generally described as a code editor, it also provides full-scale debugging features, so it is effectively also an IDE.
The following section, “Download and Install Visual Studio Code,” shows you how to get the app on your Windows PC, Mac, or Linux box. Subsequent sections show you how to set Visual Studio Code’s look by applying a theme, install Python-related extensions to provide extra functionality, and configure some essential settings.
Download and Install Visual Studio Code
In this section, you download and install the Visual Studio Code app. Visual Studio Code is the code editor and IDE we recommend you use for creating Python code. Visual Studio Code runs on Windows, macOS, and Linux; this section shows Windows and provides notes and tips on the differences in macOS and Linux.
On Windows, you can add an Open with Code command to the context menus for files and for directories. This command enables you to easily open a file or a folder in Visual Studio Code from File Explorer, which is usually helpful.
Download and Install Visual Studio Code
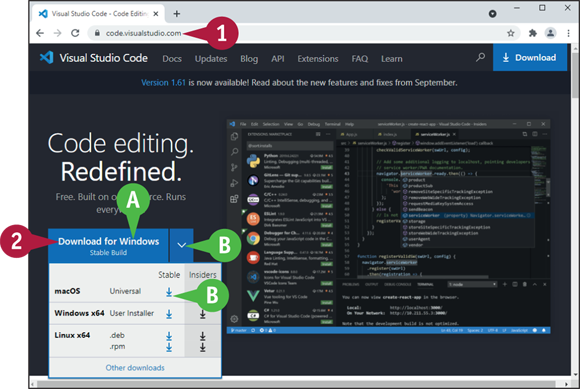
![]() Open your web browser and go to https://code.visualstudio.com.
Open your web browser and go to https://code.visualstudio.com.
The home page of the Visual Studio Code website appears.
![]() Click the Download link for your computer’s operating system.
Click the Download link for your computer’s operating system.
![]() The Download button shows the operating system your computer is using.
The Download button shows the operating system your computer is using.
![]() To download Visual Studio Code for another operating system, click the drop-down arrow (
To download Visual Studio Code for another operating system, click the drop-down arrow (![]() ), and then click Download (
), and then click Download (![]() ) in the Stable column for the operating system.
) in the Stable column for the operating system.
The Documentation for Visual Studio Code screen appears, and the download starts.
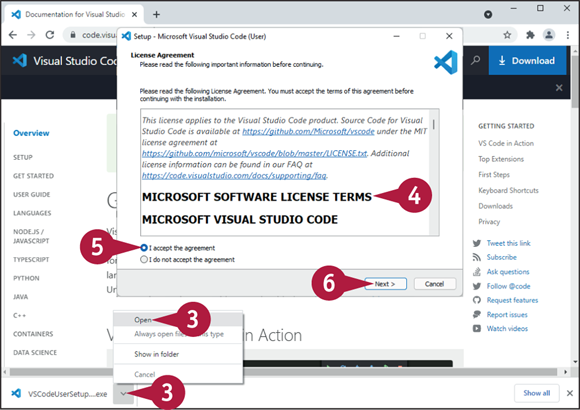
![]() Launch the Setup Wizard. For example, in the Chrome browser, click
Launch the Setup Wizard. For example, in the Chrome browser, click ![]() (
(![]() changes to
changes to ![]() ), and then click Open on the pop-up menu.
), and then click Open on the pop-up menu.
The Setup Wizard’s License Agreement screen appears.
![]() Read the license agreement.
Read the license agreement.
![]() If you want to continue, click I accept the agreement (
If you want to continue, click I accept the agreement (![]() changes to
changes to ![]() ).
).
![]() Click Next.
Click Next.
![]() Click Next on the Select Destination Location screen.
Click Next on the Select Destination Location screen.
![]() Click Next on the Select Start Menu Folder screen.
Click Next on the Select Start Menu Folder screen.
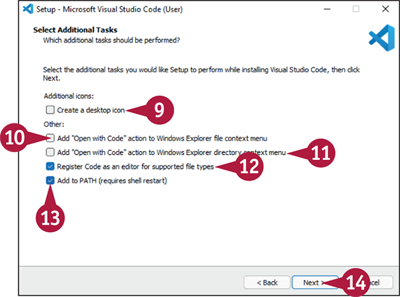
The Select Additional Tasks screen appears.
![]() Select Create a desktop icon (
Select Create a desktop icon (![]() ) if you want a Visual Studio Code icon on your desktop.
) if you want a Visual Studio Code icon on your desktop.
![]() Select Add “Open with Code” action to Windows Explorer file context menu (
Select Add “Open with Code” action to Windows Explorer file context menu (![]() ), as needed.
), as needed.
![]() Select Add “Open with Code” action to Windows Explorer directory context menu (
Select Add “Open with Code” action to Windows Explorer directory context menu (![]() ), as needed.
), as needed.
![]() Select Register Code as an editor for supported file types (
Select Register Code as an editor for supported file types (![]() ) to associate Visual Studio Code with the file types it supports.
) to associate Visual Studio Code with the file types it supports.
![]() Select Add to PATH (
Select Add to PATH (![]() ) to add Visual Studio Code to your Windows path. This helps Windows locate Visual Studio Code.
) to add Visual Studio Code to your Windows path. This helps Windows locate Visual Studio Code.
![]() Click Next.
Click Next.
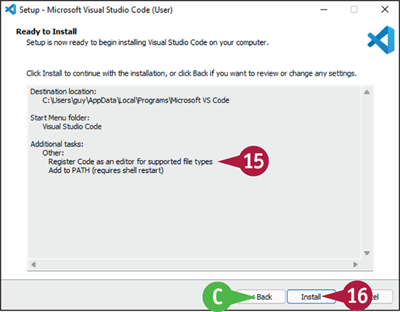
The Ready to Install screen appears.
![]() Verify that the summary shows the choices you intended to make.
Verify that the summary shows the choices you intended to make.
![]() If you need to make changes, click Back until you reach the appropriate screen.
If you need to make changes, click Back until you reach the appropriate screen.
![]() Click Install.
Click Install.
The Setup Wizard installs Visual Studio Code.
The Completing the Visual Studio Code Setup Wizard screen appears.
Note: If you want to use Visual Studio Code immediately, select Launch Visual Studio Code (![]() ) on the Completing the Visual Studio Code Setup Wizard screen.
) on the Completing the Visual Studio Code Setup Wizard screen.
![]() Click Finish.
Click Finish.
The Setup Wizard closes.
Visual Studio Code opens.
You can now configure Visual Studio Code, as explained in the section “Configure Visual Studio Code for Working with Python,” later in this chapter.
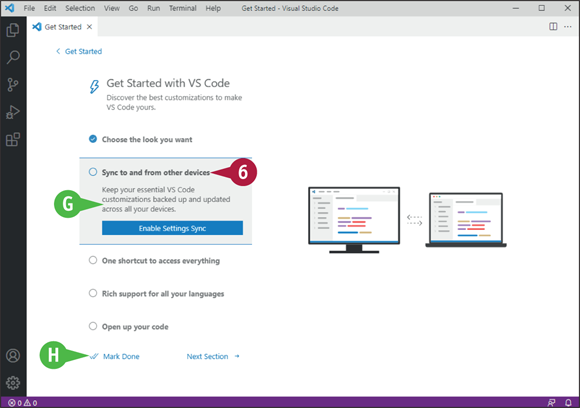
Get Started with Visual Studio Code and Apply a Theme
The first time you run Visual Studio Code, the app displays the Get Started with Visual Studio Code screen, which walks you through some initial configuration steps. You can return to the Get Started with Visual Studio Code screen later if you like; alternatively, you can use the app’s other means of accessing its settings to configure the app to work the way you prefer.
The first change you will likely want to make is to the theme, which controls the overall look of Visual Studio Code. The app includes various dark themes and various light themes; third-party themes are also available.
Get Started with Visual Studio Code and Apply a Theme
Launch Visual Studio Code
![]() Launch Visual Studio Code in one of the standard ways for your computer’s operating system.
Launch Visual Studio Code in one of the standard ways for your computer’s operating system.
For example, on Windows, click Start (![]() ) to open the Start menu, and then click Visual Studio Code (
) to open the Start menu, and then click Visual Studio Code (![]() ).
).
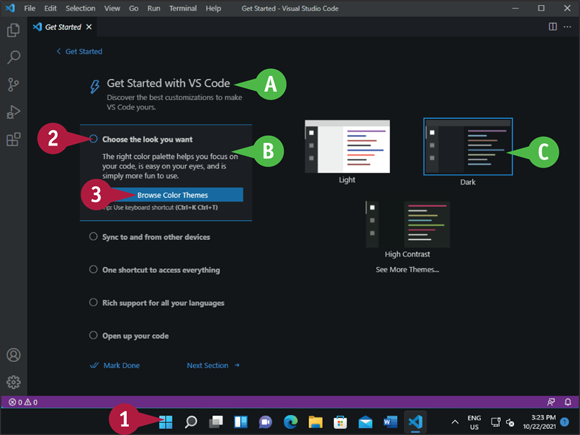
![]() The Get Started with Visual Studio Code screen appears.
The Get Started with Visual Studio Code screen appears.
The list on the left contains headings for several initial configuration steps.
![]() Click Choose the look you want.
Click Choose the look you want.
![]() Controls under the heading section appear.
Controls under the heading section appear.
![]() A preview appears.
A preview appears.
![]() Click Browse Color Themes.
Click Browse Color Themes.
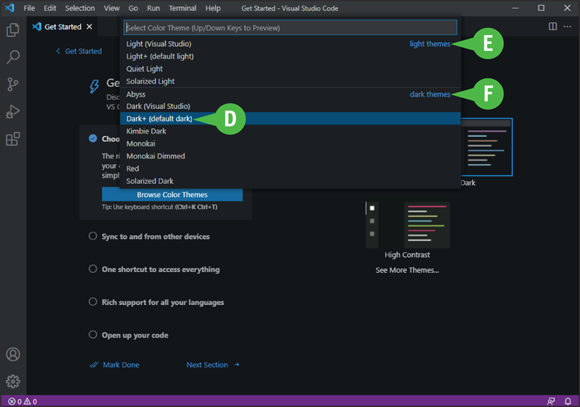
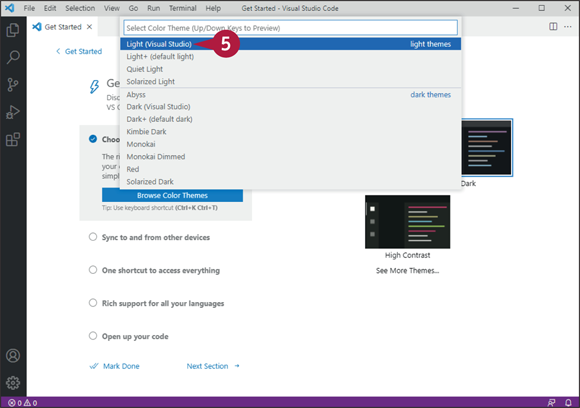
The Theme drop-down list opens.
![]() The highlight shows the current theme.
The highlight shows the current theme.
![]() The Light Themes section at the top contains themes based on light colors.
The Light Themes section at the top contains themes based on light colors.
![]() The Dark Themes section contains themes based on dark colors.
The Dark Themes section contains themes based on dark colors.
![]() Press
Press ![]() or
or ![]() to move the highlight to the theme you want to preview.
to move the highlight to the theme you want to preview.
Visual Studio Code displays a preview of the theme.
![]() Click the theme you want to apply.
Click the theme you want to apply.
Note: You can also press ![]() to apply the currently selected theme.
to apply the currently selected theme.
The Get Started screen appears fully again.
![]() Click the next heading whose settings you want to explore.
Click the next heading whose settings you want to explore.
![]() The settings for the heading appear, and you can work with them.
The settings for the heading appear, and you can work with them.
![]() When you finish working through the list, you can click Mark Done (
When you finish working through the list, you can click Mark Done (![]() ) to tell Visual Studio Code you finish using this list.
) to tell Visual Studio Code you finish using this list.
Install Visual Studio Code Extensions for Python
Visual Studio Code comes with powerful built-in features, but it also enables you to add further functionality by installing extensions. An extension is an add-on unit of code that you can install or uninstall separately. Many extensions are available from third-party developers, providing a wide range of supplementary functionality for Visual Studio Code.
For working with Python, you should install the Python extension, as explained in this section. The Python extension includes the Pylance server language extension and the Jupiter Notebook Renderers extension, so you effectively install three extensions in a single move.
Install Visual Studio Code Extensions for Python
![]() Launch Visual Studio Code in one of the ways your computer’s operating system offers.
Launch Visual Studio Code in one of the ways your computer’s operating system offers.
For example, on macOS, click Launchpad (![]() ) to display the Launchpad screen, and then click Visual Studio Code (
) to display the Launchpad screen, and then click Visual Studio Code (![]() ).
).
Visual Studio Code opens.
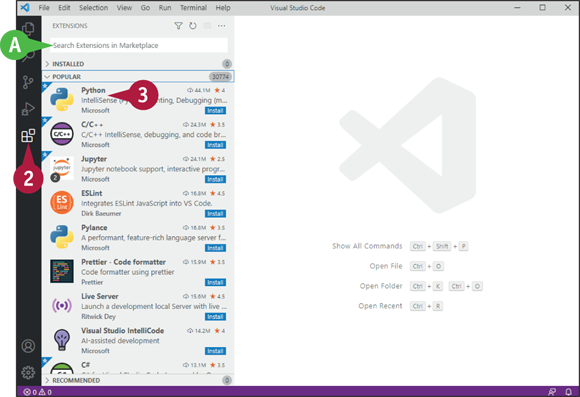
![]() Click Extensions (
Click Extensions (![]() ).
).
The Extensions screen appears.
![]() You can click Search Extensions in Marketplace and type a search term to search by name.
You can click Search Extensions in Marketplace and type a search term to search by name.
However, the Python extension often appears toward the top of the Popular list, which is sorted by number of downloads, so you may not need to search.
![]() Click Python.
Click Python.
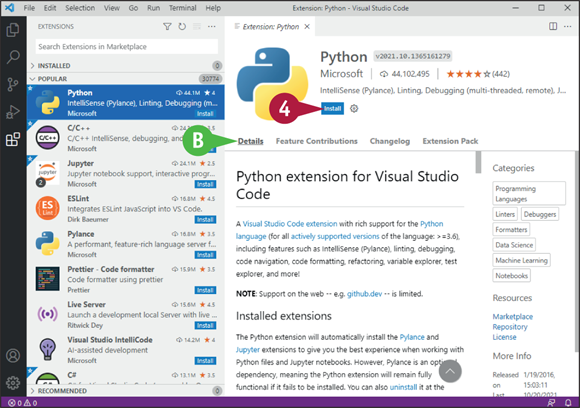
The information screen for the Python extension appears.
![]() You can read detailed information about the extension.
You can read detailed information about the extension.
![]() Click Install.
Click Install.
Visual Studio Code downloads the Python extension and installs it.
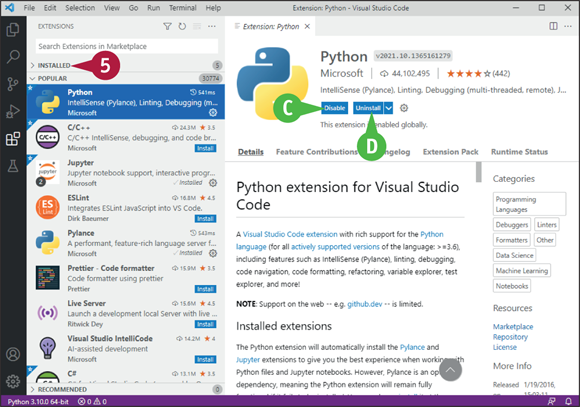
![]() You can click Disable if you need to disable the extension temporarily without uninstalling it.
You can click Disable if you need to disable the extension temporarily without uninstalling it.
![]() You can click Uninstall if you decide you want to uninstall the extension.
You can click Uninstall if you decide you want to uninstall the extension.
![]() Click Installed.
Click Installed.
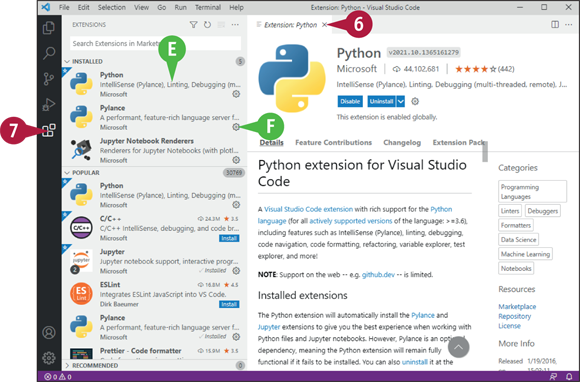
The Installed list expands.
![]() You can see all the extensions you have installed.
You can see all the extensions you have installed.
![]() You can click Settings (
You can click Settings (![]() ) to configure settings for an extension.
) to configure settings for an extension.
![]() Click Close (
Click Close (![]() ).
).
The pane showing information about the Python extension closes.
![]() Click Extensions (
Click Extensions (![]() ).
).
The Extensions pane closes.
Configure Visual Studio Code for Working with Python
Visual Studio Code is highly customizable, so you should spend a few minutes configuring the code editor suitably for your work in Python. This section shows you how to access Visual Studio Code’s configuration preferences and explains the preferences you are most likely to benefit from setting. These preferences include the “Files: Auto Save” setting, which controls whether Visual Studio Code automatically saves unsaved changes as you work; the font size and font family in which Visual Studio Code displays your code; and whether Visual Studio Code automatically inserts a closing bracket to match each opening bracket you type.
Configure Visual Studio Code for Working with Python
![]() Launch Visual Studio Code.
Launch Visual Studio Code.
For example, on Windows, click Start (![]() ) to open the Start menu, and then click Visual Studio Code (
) to open the Start menu, and then click Visual Studio Code (![]() ).
).
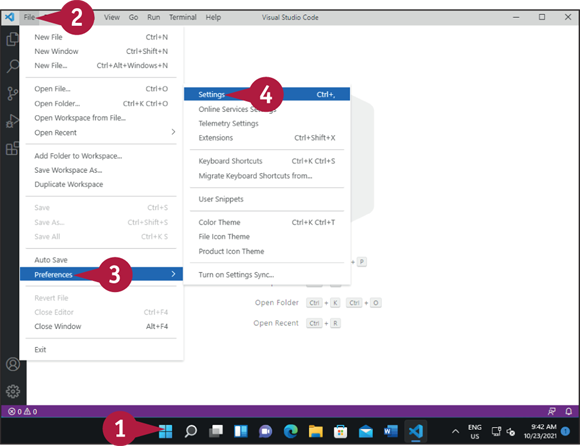
![]() Click File.
Click File.
The File menu opens.
![]() Click or highlight Preferences.
Click or highlight Preferences.
The Preferences submenu opens.
![]() Click Settings.
Click Settings.
Note: On Windows and Linux, you can press ![]() +
+ ![]() to display the Settings screen. On macOS, press
to display the Settings screen. On macOS, press ![]() +
+ ![]() . Alternatively, click Manage (
. Alternatively, click Manage (![]() ) in the lower-left corner, and then click Settings on the menu that opens.
) in the lower-left corner, and then click Settings on the menu that opens.

The Settings screen appears.
![]() The Commonly Used settings category appears at first.
The Commonly Used settings category appears at first.
Note: If the Commonly Used category does not appear, click Commonly Used.
![]() Click Files: Auto Save (
Click Files: Auto Save (![]() ), and then click the Auto Save option you want. See the first tip for advice.
), and then click the Auto Save option you want. See the first tip for advice.
![]() Click Editor: Font Size and type the font size you want to use in the editor.
Click Editor: Font Size and type the font size you want to use in the editor.
![]() You can click Editor: Font Family and type the font family you want to use in the editor.
You can click Editor: Font Family and type the font family you want to use in the editor.
![]() Click Text Editor.
Click Text Editor.

The Text Editor settings category appears.
![]() Click Auto Closing Brackets (
Click Auto Closing Brackets (![]() ), and then click always, languageDefined, beforeWhitespace, or never, as needed.
), and then click always, languageDefined, beforeWhitespace, or never, as needed.
Note: Auto Closing Brackets controls whether Visual Studio Code automatically enters a closing bracket when you type an opening bracket. Auto Closing Delete controls whether Visual Studio Code automatically deletes adjacent closing quotes or brackets during deletion.
![]() Click Auto Closing Delete (
Click Auto Closing Delete (![]() ), and then click always, auto, or never, as needed.
), and then click always, auto, or never, as needed.
![]() Click Features.
Click Features.
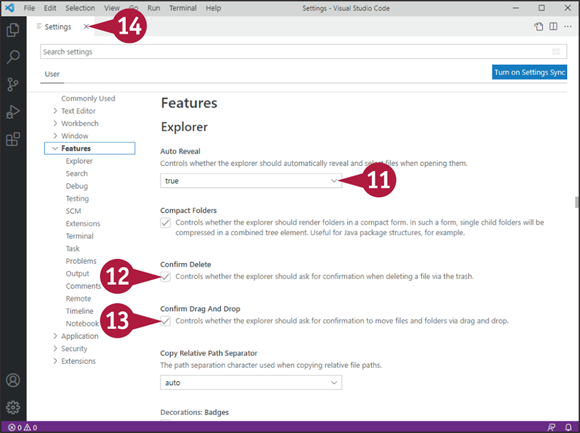
The Features settings category appears.
![]() Click Auto Reveal (
Click Auto Reveal (![]() ), and then click true, false, or focusNoScroll, as needed.
), and then click true, false, or focusNoScroll, as needed.
![]() Select Confirm Delete (
Select Confirm Delete (![]() ) to make the explorer confirm your file deletions.
) to make the explorer confirm your file deletions.
![]() Select Confirm Drag And Drop (
Select Confirm Drag And Drop (![]() ) to make the explorer confirm your file drag-and-drop actions.
) to make the explorer confirm your file drag-and-drop actions.
![]() When you finish configuring settings, click Close (
When you finish configuring settings, click Close (![]() ).
).
The Settings tab closes.