
CHAPTER 4
Working with Files and Directories
In this chapter, you learn to use Python to work with files and directories. You start by learning the essentials and then move on to navigating between directories and working with them. You learn how to return information about the user and system and how to split a file path into its components. And you gain expertise in opening and closing text files, writing data to them, and reading their contents.

Understanding Working with Files and Directories
Load the os Module and List Files and Directories
Rename, Move, and Copy Files and Directories
Get Information About the User and System
Split a File Path into Its Components
Understanding Python’s open() Function
Understanding Python’s Ways of Closing Files
Open a File If It Exists; If Not, Create It
Check an Open File’s Status and Close It
Understanding Working with Files and Directories
This section gives you an overview of how you work with files and directories in Python. To make sure you are clear on the essentials, we first cover what files and directories are and what directory paths and file paths consist of. We then introduce you to three key modules you will need to load at different points during this chapter, briefly discuss the basic structure of a file, and give you an executive overview of the process of working with text files.
Understanding What Files and Directories Are
A file is a named storage unit on a computer. For example, you might create a text file named cats.txt that contains textual information about different types of cats. The file has a base name, cats, and a file extension, .txt. The file extension typically identifies the type of file; .txt normally indicates a text-only file, as in this example.
A directory, also called a folder, is a special type of file that acts as a container for other files. Python commands refer to “directory” rather than “folder,” and this discussion follows suit. If a directory contains other directories, that directory is a parent directory, and the directories it contains are subdirectories or child directories.
Most computer operating systems provide each user account with a “home” directory that is kept separate from each other user account’s directories, such as a C:UsersAl directory on Windows or a /Users/Ann directory on macOS. A user’s home directory typically contains various subdirectories, such as a Desktop subdirectory and a Pictures subdirectory.
Understanding Directory Paths and File Paths
A directory path or folder path gives the location of a directory. For example, if you are the user Ann and your home directory on macOS contains a subdirectory called Text, the directory path is /Users/Ann/Text.
A file path consists of the directory path to a file plus the filename and file extension. For example, if you are still Ann and you store the file cats.txt in the Text subdirectory in your home directory, the file path is /Users/Ann/Text/cats.txt.
Understanding Three Key Modules for Working with Files and Directories
For working with files and directories, you will typically need to import one or more of the following Python modules:
os. The Operating System module,os, includes commands for working with individual files and directories. For example, later in this chapter, you useosto create and delete individual directories and to return, slice, and dice file paths.glob. The Global module,glob, includes commands for searching for file paths that match the pattern you specify. For example, in this chapter, you importglobso that you can search using wildcards.shutil. The Shell Utility module,shutil, includes commands for taking broad-based actions with files and directories. For example, later in this chapter, you useshutilto create multiple directories in a single operation — and to remove a whole directory tree, likewise in a single operation.
To import these modules, you use the import command:
import os
import glob
import shutil
Understanding a File’s Basic Structure
A file typically consists of three sections:
- Header section. This section contains metadata about the file, such as the filename and the file type.
- Data section. This section contains the file’s actual contents, such as text for a text file or image data for a picture.
- End-of-file marker. The end-of-file marker, or EOF marker, is a special character that denotes the end of the file.
Understanding the Essentials of Working with Files
To access a file via Python, you open the file by using the open() function. Opening the file does not open it in the conventional sense, as you do not see the file’s contents, if there are any; instead, opening the file returns a file object that enables you to manipulate the file.
Once the file is open, you can read its contents; write new data to the file, either preserving or overwriting its existing contents; or append new data to the file while preserving its existing contents.
When you finish working with a file, you use Python’s close() command to close the file.
Load the os Module and List Files and Directories
In this section, you load the os module, which provides methods for working with the file system. You use the getcwd() method of the os module to return the current working directory. You then use the listdir() method of the os module to return a list of the files and directories in a specified directory.
You also import the glob module and use its glob() method to return a list of files and directories using wildcards. This way enables you to return a targeted list of files and directories.
Load the os Module and List Files and Directories

![]() Open a terminal window and launch Python.
Open a terminal window and launch Python.
![]() The Python prompt appears.
The Python prompt appears.
![]() Type the following statement, which imports the
Type the following statement, which imports the os module, and then press ![]() .
.
import os
Python loads the os module.
The Python prompt appears, but there is no other acknowledgment that Python has loaded the module.
List Files and Directories
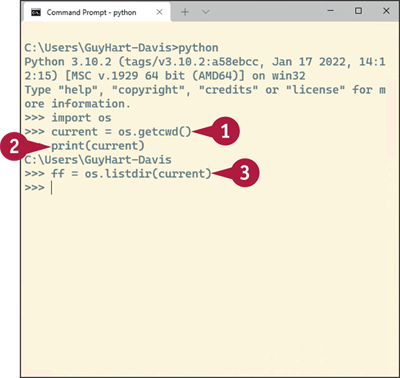
![]() Type the following statement, which creates a variable named
Type the following statement, which creates a variable named current and assigns to it the result of using the getcwd() method of the os module. Press ![]() .
.
current = os.getcwd()
![]() Type the following statement, which uses the
Type the following statement, which uses the print() command to display the contents of current, and then press ![]() :
:
print(current)
Python returns the directory, such as 'C:UsersGuy' on Windows or '/Users/guy' on macOS.
![]() Type the following statement, which creates a variable named
Type the following statement, which creates a variable named ff and assigns to it the result of using the listdir() method of the os module to list the files in current. Press ![]() .
.
ff = os.listdir(current)
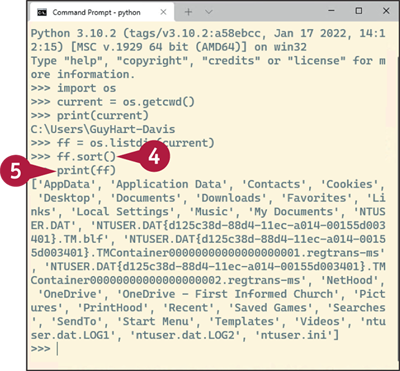
![]() Type the following statement, which uses the
Type the following statement, which uses the sort() method to sort the contents of ff in ascending order. Press ![]() .
.
ff.sort()
![]() Type the following statement, which uses the
Type the following statement, which uses the print() function to display the contents of ff, and then press ![]() :
:
print(ff)
Python displays a list of the directory's contents. The following example shows an abbreviated version of the list from a Windows PC.
['AppData', 'Application Data', 'Contacts', 'Cookies', 'Desktop', 'Documents', 'Downloads', 'Favorites',
…
'ntuser.dat.LOG1', 'ntuser.dat.LOG2', 'ntuser.ini']

![]() Type the following statement, which imports the
Type the following statement, which imports the glob module, and then press ![]() .
.
import glob
![]() Type the following statement, which creates the variable
Type the following statement, which creates the variable fg and assigns to it the result of using the glob() method in the glob module to search for files and directories whose names begin with D.
fg = glob.glob("D*")
![]() Type the following
Type the following print() statement to display the contents of fg. Press ![]() .
.
print(fg)
Python displays the list of items beginning with D, such as ['Desktop', 'Documents', 'Downloads'].
Navigate Among Directories
Python’s os module provides the tools you need to navigate among the directories in the computer’s file system. You can use the expanduser() method of the path object in the os module to return the path to the user’s home directory and then use the chdir() method of the os module to switch to that directory. You can use the isfile() method of the os module to determine whether a particular directory is present; if it is, you can navigate to the directory and then navigate back up from it.
Navigate Among Directories
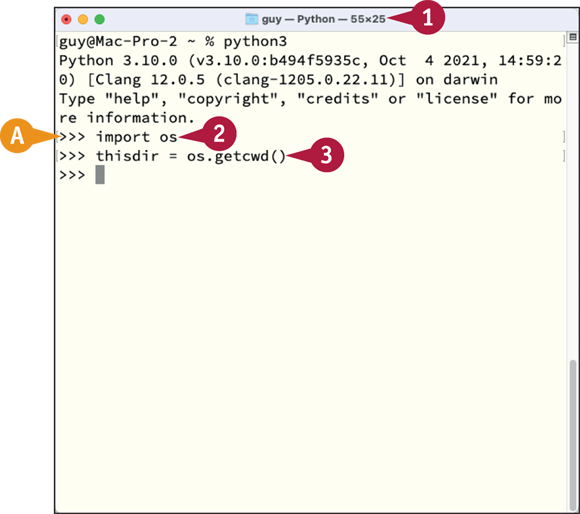
![]() Open a terminal window and launch Python.
Open a terminal window and launch Python.
![]() The Python prompt appears.
The Python prompt appears.
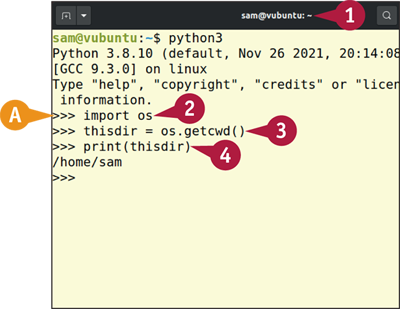
![]() Type the following statement, which imports the
Type the following statement, which imports the os module, and then press ![]() .
.
import os
![]() Type the following statement, which creates a variable named
Type the following statement, which creates a variable named thisdir and assigns to it the result of using the getcwd() method of the os module. Press ![]() .
.
thisdir = os.getcwd()

![]() Type the following statement, which uses the
Type the following statement, which uses the print() function to display the contents of thisdir. Press ![]() .
.
print(thisdir)
Python displays the current directory.
![]() Type the following statement, which creates a variable named
Type the following statement, which creates a variable named homedir and assigns to it the result of using the expanduser() method of the path object in the os module. Press ![]() .
.
homedir = os.path.expanduser("~")
Note: The expanduser() method here takes the argument ~, which represents the current user’s home directory.
![]() Type the following statement, which uses the
Type the following statement, which uses the chdir() method of the os module to change directory to homedir. Press ![]() .
.
os.chdir(homedir)

![]() Type the following statement, which uses the
Type the following statement, which uses the getcwd() method of the os module, and then press ![]() :
:
os.getcwd()
Python displays the current working directory, such as 'C:\Users\Ted' on Windows or '/Users/guy' on macOS. See the tip for an explanation of the use of \.
![]() Type the following two-line
Type the following two-line if statement, which uses the isdir()method of the path object in the os module to determine whether the Pictures directory exists in the current directory and changes directory to it if it does. Press ![]() at the end of each line, and then press
at the end of each line, and then press ![]() again to end the statement.
again to end the statement.
if os.path.isdir("Pictures"):
os.chdir("Pictures")
Note: Indent the second line of the if statement by four spaces.

![]() Type the following statement, which uses the
Type the following statement, which uses the dirname() method of the path object in the os module to return the parent directory of the current working directory, and the chdir() method of the os module to switch to it. Press ![]() .
.
os.chdir(os.path.dirname(os.getcwd()))
![]() Type the following statement to change to the original directory, and then press
Type the following statement to change to the original directory, and then press ![]() :
:
os.chdir(thisdir)
![]() Press
Press ![]() five times to repeat the
five times to repeat the os.getcwd() statement, and then press ![]() .
.
os.getcwd()
Python displays the directory from which you started.
Create and Delete Directories
In your code, you will likely need to create directories in which to store files. You may also need to delete directories that you no longer require.
Python’s os module includes the mkdir() function for creating a single directory. The os module also provides the makedirs() method, which enables you to create multiple directories at once. For example, if you give the command os.makedirs("/home/sam/Pictures/2022/Dec") from the /home/sam directory, which already contains the Pictures directory, Python creates the 2022 subdirectory and the Dec subdirectory.
Create and Delete Directories
Create Directories
![]() Open a terminal window and launch Python.
Open a terminal window and launch Python.
![]() The Python prompt appears.
The Python prompt appears.
![]() Type the following statement, which imports the
Type the following statement, which imports the os module, and then press ![]() .
.
import os
![]() Type the following statement, which creates a variable named
Type the following statement, which creates a variable named thisdir and assigns to it the result of using the getcwd() method of the os module. Press ![]() .
.
thisdir = os.getcwd()
![]() Type the following statement, which uses the
Type the following statement, which uses the print() function to display the contents of thisdir. Press ![]() .
.
print(thisdir)
Python displays the current directory.
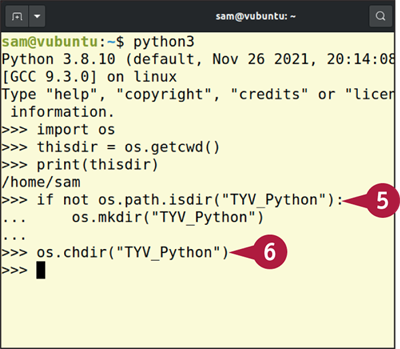
![]() Type the following two-line
Type the following two-line if statement, which uses the isdir() method of the path object in the os module to check whether the TYV_Python directory exists and then uses the mkdir() method of the os module to create it if it does not. Press ![]() at the end of each line, and press
at the end of each line, and press ![]() once more to end the
once more to end the if statement.
if not os.path.isdir("TYV_Python"):
os.mkdir("TYV_Python")
Note: Indent the second line of the if statement by four spaces.
![]() Type the following statement, which uses the
Type the following statement, which uses the chdir() method of the os module to change to the TYV_Python directory. Press ![]() .
.
os.chdir("TYV_Python")
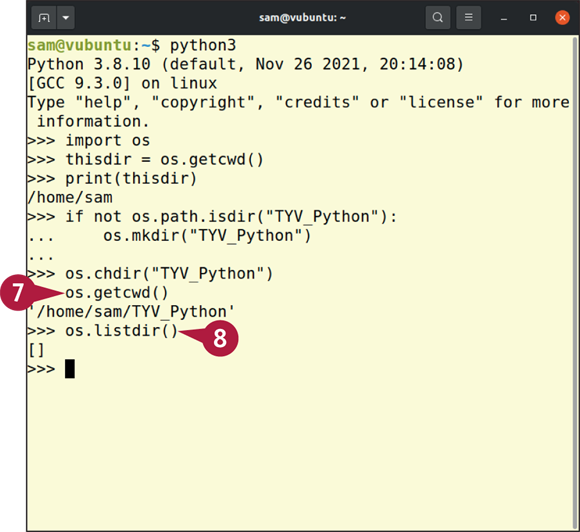
![]() Type the following statement, which uses the
Type the following statement, which uses the getcwd() method of the os module to return the current working directory, and then press ![]() :
:
os.getcwd()
Python displays the directory path, such as '/home/sam/TYV_Python'.
![]() Type the following statement, which uses the
Type the following statement, which uses the listdir() method of the os module to display a list of the files and directories in the current working directory. Press ![]() .
.
os.listdir()
Python displays a list of files and directories in brackets. If the directory is empty, as it will be if you just created it, Python displays [], indicating an empty list.
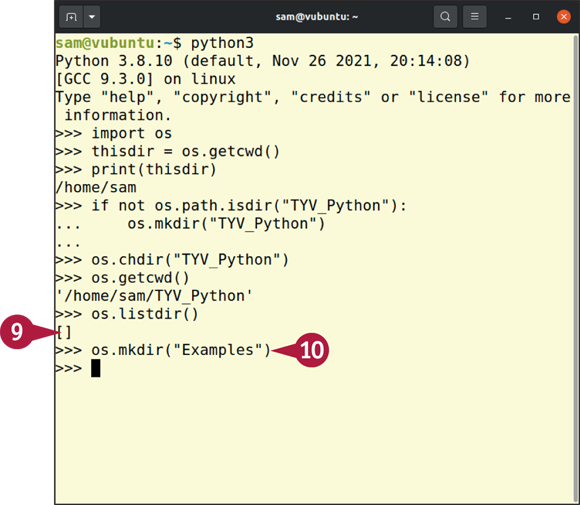
![]() Verify visually that the list of files and directories does not contain a file or directory called
Verify visually that the list of files and directories does not contain a file or directory called Examples.
![]() Type the following statement, which uses the
Type the following statement, which uses the mkdir() method of the os module to create a directory named Examples. Press ![]() .
.
os.mkdir("Examples")
Python creates the Examples directory but gives no confirmation that it has done so.
Python’s os module includes the rmdir() method for removing a single file or directory. When you need to remove multiple files or directories, you can use the rmdir() method in a loop.
Sometimes you may need to remove an entire directory tree — a directory and all its subdirectories — in a single move. To remove a directory tree, you can import the Shell Utility module, shutil, and then use its rmtree() method.

![]() Type the following statement, which uses the
Type the following statement, which uses the makedirs() method of the os module to create a directory and its subdirectories, and then press ![]() .
.
os.makedirs("Files/Final")
Python creates the directories but gives no confirmation.
![]() Type the following statement, which uses the
Type the following statement, which uses the listdir() method of the os module to display the directory’s contents, and then press ![]() .
.
os.listdir()
Python returns the list of files and directories, such as ['Examples', 'Files'].
![]() Type the following statement, which uses the
Type the following statement, which uses the chdir() method of the os module to change to the Files directory. Press ![]() .
.
os.chdir("Files")

![]() Press
Press ![]() twice to repeat the
twice to repeat the os.listdir() command, and then press ![]() :
:
os.listdir()
Python displays the list of contents of the Files directory: ['Final'].
![]() Type the following statement to change to the
Type the following statement to change to the Final directory, again pressing ![]() .
.
os.chdir("Final")
![]() Press
Press ![]() twice to repeat the
twice to repeat the os.listdir() command, and then press ![]() :
:
os.listdir()
Python displays the list of contents of the Files directory: [] — in other words, nothing.
Note: Use os.chdir("..") to move up one directory. Add /.. for each additional directory level — for example, use os.chdir("../../..") to move up three levels.

![]() Type the following statement, which uses the
Type the following statement, which uses the chdir() method with the argument ../.. to move up two directories. Press ![]() .
.
os.chdir("../..")
![]() Type the
Type the os.getcwd() command again, and then press ![]() , to display the current directory:
, to display the current directory:
os.getcwd()
Python displays the directory path.
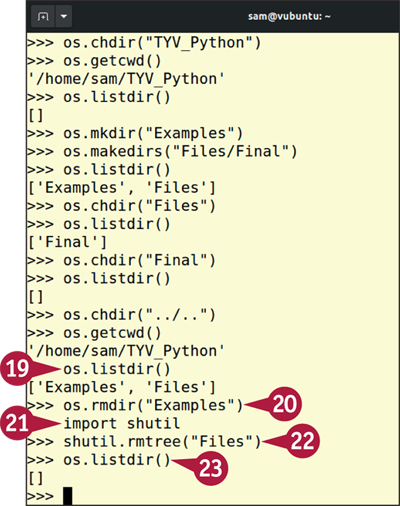
![]() Type the following statement, which displays the contents of the current directory, and then press
Type the following statement, which displays the contents of the current directory, and then press ![]() :
:
os.listdir()
Python displays the contents of the TYV_Python directory, ['Examples', 'Files'].
![]() Type the following statement, which uses the
Type the following statement, which uses the rmdir() method to remove the Examples directory. Press ![]() .
.
os.rmdir("Examples")
![]() Type the following statement, which imports the
Type the following statement, which imports the shutil module, and then press ![]() :
:
import shutil
![]() Type the following statement, which uses the
Type the following statement, which uses the rmtree() method of shutil to remove the Files directory tree. Press ![]() .
.
shutil.rmtree("Files")
![]() Press
Press ![]() four times to repeat the
four times to repeat the os.listdir() command, and then press ![]() :
:
os.listdir()
Python displays the directory’s contents: [] — in other words, nothing.
Rename, Move, and Copy Files and Directories
Python’s os module and shutil module provide the commands you need to copy, move, and rename files and directories. The rename() method of the os module enables you not only to change the name of a file or directory, but also move it to different location by specifying the appropriate directory. The remove() method of the os module lets you delete a file, whereas the rmdir() method lets you delete a directory that has no contents.
Rename, Move, and Copy Files and Directories

![]() Open a terminal window and launch Python.
Open a terminal window and launch Python.
![]() The Python prompt appears.
The Python prompt appears.
![]() Type the following statement, which imports the
Type the following statement, which imports the os module, and then press ![]() .
.
import os
![]() Type the following statement, which creates the variable
Type the following statement, which creates the variable tdir and assigns to it the path to the user’s home directory plus temp1. Press ![]() .
.
tdir = os.path.expanduser("~") + "/temp1"
Note: See the following section, “Get Information About the User and System,” for information about the expanduser() method.
![]() Type the following two-line
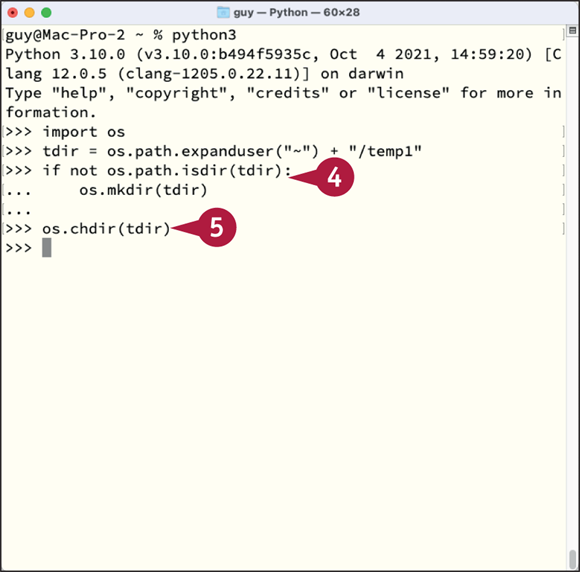
Type the following two-line if statement, which uses the isdir() method of the path object in the os module to check whether the tdir directory exists and then uses the mkdir() method of the os module to create it if it does not. Press ![]() at the end of each line, and press
at the end of each line, and press ![]() once more to end the
once more to end the if statement.
if not os.path.isdir(tdir):
os.mkdir(tdir)
Note: Indent the second line of the if statement by four spaces.
![]() Type the following statement, which uses the
Type the following statement, which uses the chdir() method of the os module to change to the tdir directory. Press ![]() .
.
os.chdir(tdir)
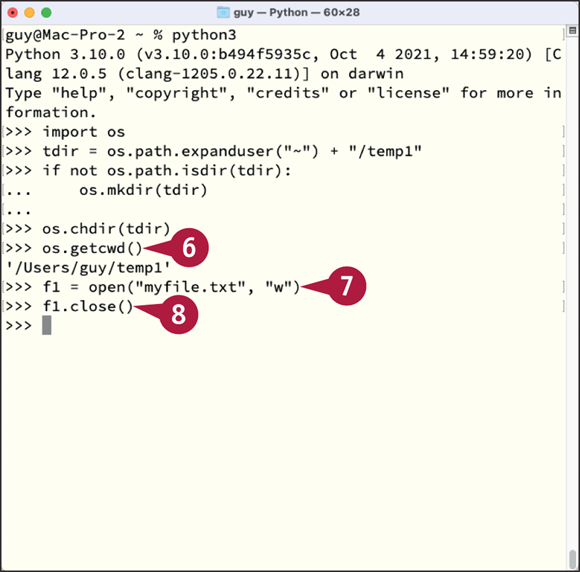
![]() Type the following statement, which uses the
Type the following statement, which uses the getcwd() method of the os module to return the current directory, and then press ![]() .
.
os.getcwd()
Python returns the path, such as '/Users/guy/temp1'.
![]() Type the following statement, which creates the variable
Type the following statement, which creates the variable f1 and assigns to it a text file created in the current directory using the open() function. Press ![]() .
.
f1 = open("myfile.txt", "w")
![]() Type the following statement, which uses the
Type the following statement, which uses the close() method to close the f1 file object. Press ![]() .
.
f1.close()

![]() Type the following statement, which uses the
Type the following statement, which uses the os.listdir() method to list the directory’s contents, and then press ![]() :
:
os.listdir()
Python displays the list, such as ['myfile.txt'].
![]() Type the following statement, which imports the
Type the following statement, which imports the shutil module, and then press ![]() :
:
import shutil
![]() Type the following statement, which uses the
Type the following statement, which uses the copy() method of the shutil module to copy myfile.txt to a file named copy.txt in the same directory. Press ![]() .
.
shutil.copy("myfile.txt", "copy.txt")
Python returns 'copy.txt', indicating that shutil has copied the file.
There is some overlap between the file- and directory-management capabilities of the os module and those of the shutil module, but generally speaking, the shutil module’s commands are wider ranging than those of the os module.
The copy() method of the shutil module lets you create a copy of a file, whereas the copytree() method of shutil enables you to copy a directory and all its contents. Similarly, the move() method of the shutil module enables you to move an entire directory tree from one directory to another.

![]() Press
Press ![]() three times to repeat the
three times to repeat the os.listdir() command, and then press ![]() :
:
os.listdir()
Python displays the list, such as ['copy.txt', 'myfile.txt'].
![]() Type the following statement, which uses the
Type the following statement, which uses the rename() method of the os module to rename the copy.txt file to spare.txt. Press ![]() .
.
os.rename("copy.txt", "spare.txt")
![]() Type the following statement, which uses the
Type the following statement, which uses the remove() method of the os module to remove spare.txt, and then press ![]() .
.
os.remove("spare.txt")
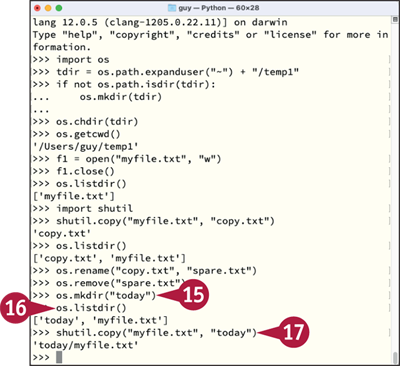
![]() Type the following statement, which uses the
Type the following statement, which uses the mkdir() method of the os module to create a subdirectory called today in the temp1 directory. Press ![]() .
.
os.mkdir("today")
![]() Press
Press ![]() four times to repeat the
four times to repeat the os.listdir() command, and then press ![]() :
:
os.listdir()
Python returns ['today', 'myfile.txt'].
![]() Type the following statement, which uses the
Type the following statement, which uses the copy() method of the shutil module to copy myfile.txt to the today directory, and then press ![]() :
:
shutil.copy("myfile.txt", "today")
Python returns 'today/myfile.txt', indicating that shutil has copied the file.
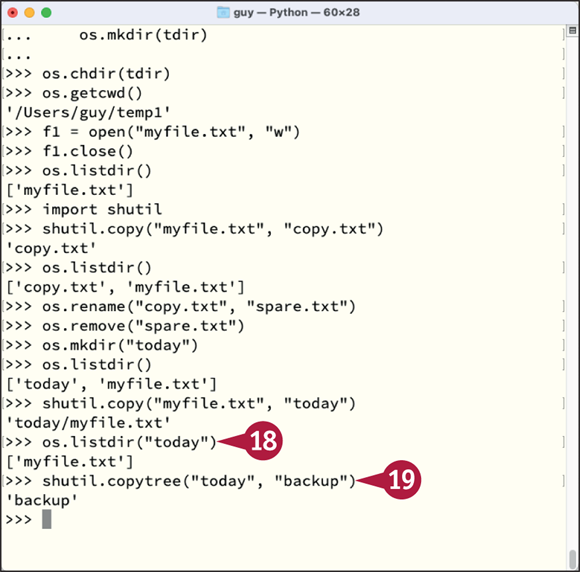
![]() Type the following statement, which uses
Type the following statement, which uses os.listdir() to list the contents of the today directory. Press ![]() .
.
os.listdir("today")
Python returns ['myfile.txt'].
![]() Type the following statement, which uses the
Type the following statement, which uses the copytree() method of the shutil module to copy the today directory and its contents to a directory named backup. Press ![]() .
.
shutil.copytree("today", "backup")
Python returns 'backup', indicating that shutil has created the directory.

![]() Press
Press ![]() twice to reenter the
twice to reenter the os.listdir() statement, but change the directory to "backup" before you press ![]() :
:
os.listdir("backup")
Python returns ['myfile.txt'], enabling you to see that the copied directory’s contents are present.
Get Information About the User and System
Your code may need to return information about the user running or system running a script. For example, you might want to determine where a user’s home directory is so that your code can use it, return the working directory, or learn the computer’s operating system.
You use different tools to access different types of information. For example, the os module gives access to the user’s home directory, while the sys module lets you determine the operating system. Environment variables offer detailed information about the user and the computing environment on Linux and macOS but provide little information on Windows.
The following subsections explain how to return the user’s name from the getpass module, return the user’s home directory from the os module, return the computer’s operating system via the sys module, and use environment variables to access a wider range of information on Linux and macOS.
Return the User’s Username
To return the user’s username, first import the getpass module, and then use the getuser() method:
import getpass
username = getpass.getuser()
print(username)
Return the User’s Home Directory
To return the user’s home directory, first import the os module, and then use the expanduser() method of the path object in the os module, with the argument ~, as in the second of the following statements. The third statement uses the chdir() method to change directory to the homedir directory.
import os
homedir = os.path.expanduser("~")
os.chdir(homedir)
Determine the Computer’s Operating System
To determine the computer’s operating system, first import the sys module:
import sys
You can then return the platform attribute to get the operating system — for example:
print(sys.platform)
The value win32 indicates Windows, darwin indicates macOS, and either linux or linux2 indicates Linux.
Return Information Using Environment Variables
Python’s environment variables enable you to return a wide range of information about the user and the environment on Linux and macOS, but not on Windows.
Table 4-1 explains the most widely useful environment variables.
Table 4-1: Python’s Environment Variables
|
Variable Name |
Returns the |
Example |
|---|---|---|
|
|
User’s username |
|
|
|
User’s login name |
|
|
|
User’s home directory on macOS or Linux |
|
|
|
Current language encoding |
|
|
|
Old working directory |
|
|
|
Current working directory |
|
|
|
The shell, the command language interpreter |
|
To access the environment variables, you import the os module and then use the environ object. Here are quick examples of returning information from environment variables:
- Import the
osmodule:import os - Return the username:
os.environ.get("USER") - Return the user’s home directory and change directory to it on macOS or Linux:
homedir = os.environ.get("HOME")os.chdir(homedir) - Return the language encoding:
os.environ.get("LANG") - Return the present working directory:
os.environ.get("PWD") - Return the current shell:
os.environ.get("SHELL")
Split a File Path into Its Components
Python’s os module enables you to split a file path into its components. By using the split() method of the path object in the os module, you can split the path and the filename. And by using the splitext() method of the path object, you can split the base filename from the extension. For example, starting from the file path Users/Ted/Python/Division1.txt, you can return the path, /Users/Ted/Python; the base filename, Division1; and the file extension, .txt. Using the components, you can then build a different file path — for example, creating the name for an output file for a script.
Split a File Path into Its Components

![]() Open a terminal window and launch Python.
Open a terminal window and launch Python.
![]() The Python prompt appears.
The Python prompt appears.
![]() Type the following statement, which imports the
Type the following statement, which imports the os module, and then press ![]() :
:
import os
![]() Type the following statement, which creates a variable named
Type the following statement, which creates a variable named fp and assigns to it a file path in macOS format. Press ![]() .
.
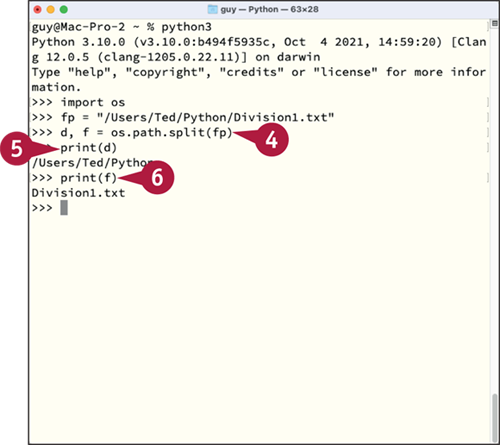
fp = "/Users/Ted/Python/Division1.txt"
![]() Type the following statement, which creates the variables
Type the following statement, which creates the variables d and f and uses the split() method of the path object in the os module to assign to them the directory path and the full filename, respectively, from fp. Press ![]() .
.
d, f = os.path.split(fp)
![]() Type the following statement, which uses the
Type the following statement, which uses the print() function to display the contents of d, and then press ![]() :
:
print(d)
Python displays /Users/Ted/Python.
![]() Type the following statement to display the contents of
Type the following statement to display the contents of f, and then press ![]() :
:
print(f)
Python displays Division1.txt.
![]() Type the following statement, which creates the variables
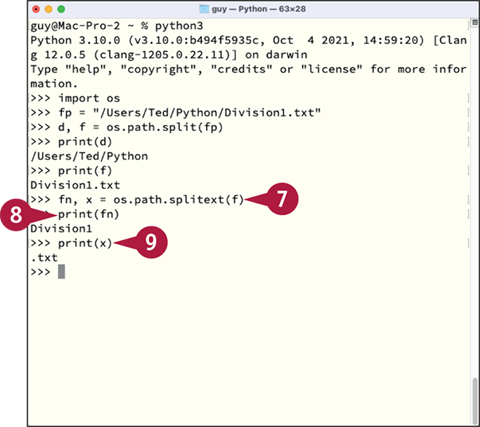
Type the following statement, which creates the variables fn and x and assigns to them the results of using the splitext() method of the path object in the os module to split the filename and extension in f. Press ![]() .
.
fn, x = os.path.splitext(f)
![]() Type the following statement to display the contents of
Type the following statement to display the contents of fn, and then press ![]() :
:
print(fn)
Python displays Division1.
![]() Type the following statement to display the contents of
Type the following statement to display the contents of x, and then press ![]() :
:
print(x)
Python displays .txt.

![]() Type the following statement, which creates a variable named
Type the following statement, which creates a variable named output and assigns to it a string formed from d, f, /, and the extension .rtf. Press ![]() .
.
output = d + "/" + fn + ".rtf"
![]() Type the following statement to display the contents of
Type the following statement to display the contents of output, and then press ![]() :
:
print(output)
Python displays /Users/Ted/Python/Division1.rtf.
Understanding Python’s open() Function
Python’s open() function enables you to open a file if it exists and to create the file if it does not exist. The open() function has various modes that you specify by including the appropriate argument when you call the function. For example, you can use open() with the w parameter to open a file in Write Mode, which enables you to make changes to the file. Or you can use open() with the a parameter to open the file in Append Mode, which lets you append data at the end of the file’s existing contents.
The open() function enables you to open a file in one of six main modes:
- Write Mode. You use Write Mode to write text to the file. Write Mode deletes the current contents of the file and inserts the text at the beginning of the file. Subsequent writes occur at the end of the file unless you specify a different position using the
seek()method. - Read Mode. You use Read Mode to read the contents of a file. In Read Mode, you cannot make changes to the file’s contents.
- Append Mode. You use Append Mode to append text to a file without deleting its existing contents. By default, Python inserts the new text at the end of the file unless you specify a different position.
- Write and Read Mode. You use Write and Read Mode to open a file, deleting any existing contents, so you can write to the file and then read its contents.
- Read and Write Mode. You use Read and Write Mode when you need to open a file both for reading text from it and for writing text to it.
- Append and Read Mode. You use Append and Read Mode when you want to append data to a file and be able to read the file’s contents.
Table 4-2 explains the modes of the open() function.
Table 4-2: Modes of Python’s open() Function
|
Mode |
Explanation |
|---|---|
|
|
Create the file if it does not exist; delete its contents if it does exist. Open the file in Write Mode with the pointer at the beginning. |
|
|
Open the file in Read Mode with the pointer at the beginning. If the file does not exist, an error occurs. |
|
|
Create the file if it does not exist. Open the file in Append Mode with the pointer at the end. |
|
|
Create the specified file and then open it with the pointer at the beginning. If the file already exists, an error occurs. |
|
|
Create the file if it does not exist; delete its contents if it does exist. Open the file in Write and Read Mode with the pointer at the beginning. |
|
|
Open the file in Read and Write Mode with the pointer at the beginning. If the file does not exist, an error occurs. |
|
|
Create the file if it does not exist. Open the file in Append and Read Mode with the pointer at the end. |
Understanding Python’s Ways of Closing Files
After opening or creating a file using the open() function and either reading the file’s contents or changing them, your scripts will likely need to close that file. You can either close the file explicitly by using the close() method of the file object or have Python close the file automatically for you. Python can close a file automatically either at the end of a script or when it runs a command that implicitly requires the file to be closed. Generally, it is better to close files explicitly, but you should understand how both approaches work.
The first subsection tells you how to close a file manually using the close() method of the file object that references the file. The second subsection explains how you can let Python close files implicitly in your code.
Close a File Manually Using the close() Method
To close a file explicitly, use the close() method at the appropriate point in your code. For example, the first of the following statements creates the variable f6 and uses the open() function to assign to it the file new.txt, creating the file if it does not exist. The second statement closes the f6 file object.
f6 = open("new.txt", "w + ")
f6.close()
Python does not raise an error if you call the close() method on a file object that you or Python have already closed. The file object must exist, but it does not have to be open. This flexibility means that you can safely use the close() method to ensure that a file has been closed, even if it turns out to have been closed earlier.
Let Python Close a File Implicitly
Instead of closing a file explicitly using the close() method, you can let Python close the file for you. Python closes a file automatically if you assign the file object currently assigned to the open file to a different file, as in the following example for macOS or Linux:
# open h.txt and assign it to the variable f
f = open("/Users/fi/h.txt", "w")
# write text to f
f.write("Unblock the writer!")
# open j.txt and assign it to the variable f
f = open("/Users/fi/j.txt", "r")
# Python closes h.txt to free up f
Python also closes a file automatically if you use the open() function to reopen the file using a different mode. You do not need to close the file explicitly.
Open a File If It Exists; If Not, Create It
Python’s open() function enables you to open a file in Write Mode, Write and Read Mode, Append Mode, or Append and Read Mode if the file exists, and create the file if it does not exist. Automatically creating a file is especially useful because you need neither write code to check that the file exists before you try to open it nor handle an error if the file does not exist.
Open a File If It Exists; If Not, Create It

![]() Open a terminal window and launch Python.
Open a terminal window and launch Python.
![]() The Python prompt appears.
The Python prompt appears.
![]() Type the following statement, which imports the
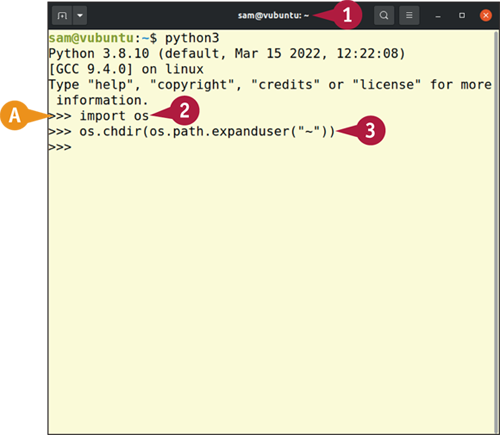
Type the following statement, which imports the os module, and then press ![]() .
.
import os
![]() Use the
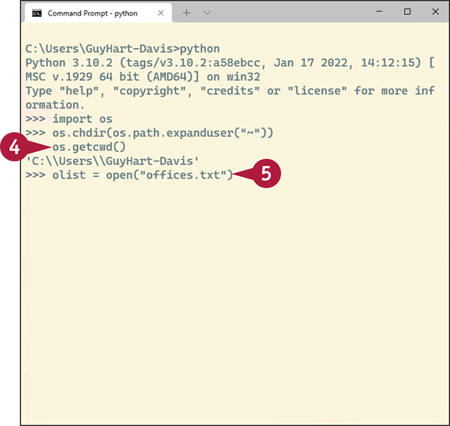
Use the os.chdir() method to change to a directory in which you can create a sample file. For example, type the following statement, and then press ![]() , to change to your home directory:
, to change to your home directory:
os.chdir(os.path.expanduser("~"))
![]() Type the following statement, which uses the
Type the following statement, which uses the getcwd() method of the os module, to display the current directory, confirming you have navigated to where you intended. Press ![]() .
.
os.getcwd()
Python returns the directory, such as 'C:\Users\AJ' on Windows.
Note: In Windows paths, Python’s escaped backslash, \, represents a single “real” backslash, .
![]() Type the following statement, which uses the
Type the following statement, which uses the open() function with no mode specified to try to open the file offices.txt in the current directory and assign it to the variable olist, and then press ![]() .
.
olist = open("offices.txt")

![]() Python returns a
Python returns a FileNotFoundError, because the file does not exist.
![]() Press
Press ![]() once to repeat the command, but edit the end to add the appropriate argument before you press
once to repeat the command, but edit the end to add the appropriate argument before you press ![]() . In this case, use the
. In this case, use the w argument.
olist = open("offices.txt", "w")
Note: Use the w argument for Write Mode, the w + argument for Write and Read Mode, the a argument for Append Mode, and the a + argument for Append and Read Mode.
Python creates the file but gives no indication it has done so.
The file is now open in Write Mode.

![]() Type the following statement, which uses the
Type the following statement, which uses the write() method to write text to the file, and then press ![]() :
:
olist.write("Anchorage, Boston")
![]() Type the following statement, which uses the
Type the following statement, which uses the close() method to close the file, and then press ![]() :
:
olist.close()
Check an Open File’s Status and Close It
After opening a file using the open() function, you can use the resulting file object to manipulate the file. The following sections show you how to read a file’s data, replace a file’s existing data, and append new data to the existing data.
In this section, you check the properties of a file object to determine information about it. You use the name property to return the filename and then use the closed property to determine whether the file object is open or has been closed. You then use the close() method to close the file.
Check an Open File’s Status and Close It
![]() Open a terminal window and launch Python.
Open a terminal window and launch Python.
![]() The Python prompt appears.
The Python prompt appears.
![]() Type the following statement, which imports the os module, and then press
Type the following statement, which imports the os module, and then press ![]() :
:
import os
![]() Use the
Use the os.chdir() method to change to a directory in which you can create a sample file. For example, type the following statement, and then press ![]() , to change to your home directory:
, to change to your home directory:
os.chdir(os.path.expanduser(“~”))

![]() Type the following statement, which uses the
Type the following statement, which uses the open() function with the w+ mode specified to open the existing file new.txt, or create it if it does not exist, in the current directory and assign it to the variable f1. Press ![]() .
.
f1 = open(“new.txt”, “w+”)
![]() Type the following statement, which returns the name property of f1. Press
Type the following statement, which returns the name property of f1. Press ![]() .
.
f1.name
![]() Python displays
Python displays ‘new.txt’.

![]() Type the following statement, which returns the closed property of
Type the following statement, which returns the closed property of f1. Press ![]() .
.
f1.closed
![]() Python returns False.
Python returns False.
![]() Type the following statement, which uses the
Type the following statement, which uses the close() method to close f1, and then press ![]() :
:
f1.close()
Python closes the file without confirmation or comment.
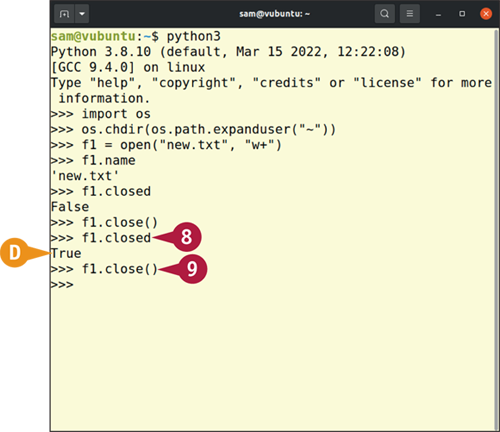
![]() Press
Press ![]() twice to repeat the second-to-last statement, and then press
twice to repeat the second-to-last statement, and then press ![]() :
:
f1.closed
![]() Python returns True.
Python returns True.
![]() Press
Press ![]() twice to repeat the now second-to-last statement, and then press
twice to repeat the now second-to-last statement, and then press ![]() :
:
f1.close()
Even though the file was already closed, no error occurs.
Write Data to a File
To write data to a text file, you open that file in Write Mode by using the open() function with the w argument. To write data and subsequently read it, you use the open() function with the w + argument to open the file in Write and Read Mode.
Both modes create the specified file if it does not exist; if it does exist, both modes “truncate” the file, deleting all its contents. Both modes position the pointer at the start of the file, so text you add using the write() method lands there.
Write Data to a File
![]() Open a terminal window and launch Python.
Open a terminal window and launch Python.
![]() The Python prompt appears.
The Python prompt appears.
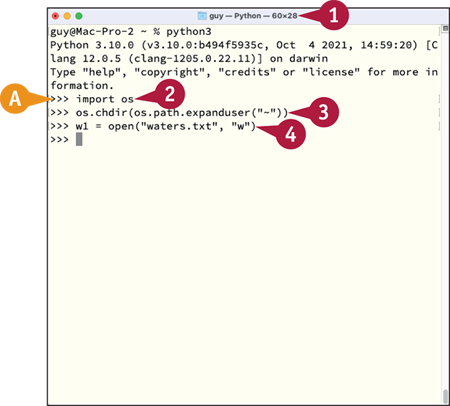
![]() Type the following statement, which imports the
Type the following statement, which imports the os module, and then press ![]() .
.
import os
![]() Use the
Use the os.chdir() method to change to a directory in which you can create a file. For example, type the following statement, and then press ![]() , to change to your home directory:
, to change to your home directory:
os.chdir(os.path.expanduser("~"))
![]() Type the following statement, which creates a variable named
Type the following statement, which creates a variable named w1 and assigns to it the file waters.txt, which it opens in Write Mode. Press ![]() .
.
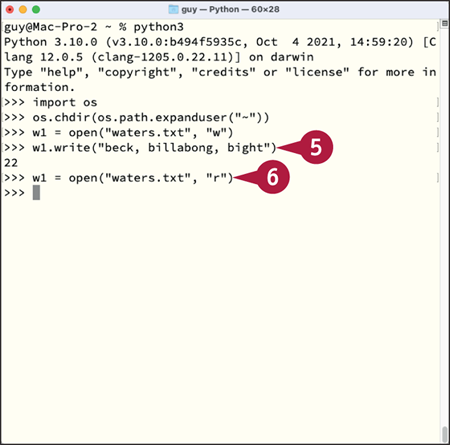
w1 = open("waters.txt", "w")
Note: If the file exists, Python “truncates” it, deleting its contents; if not, Python creates it. Either way, the file is empty once opened.
![]() Type the following statement, which uses the
Type the following statement, which uses the write() method to write text to the w1 file object. Press ![]() .
.
w1.write("beck, billabong, bight")
![]() Type the following statement, which uses the
Type the following statement, which uses the open() function with the r argument to reopen the text file in Read Mode, reassigning it to w1. Press ![]() .
.
w1 = open("waters.txt", "r")
Note: Python automatically closes the file before reopening it.
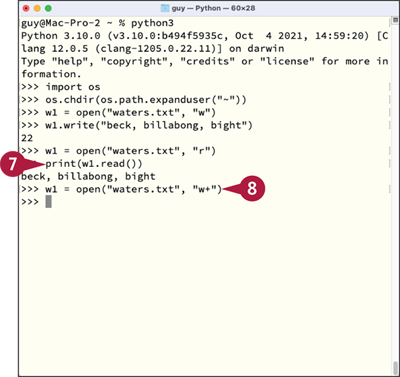
![]() Type the following statement, which uses the
Type the following statement, which uses the print() function to display the output from using the read()method on w1. Press ![]() .
.
print(w1.read())
Python displays beck, billabong, bight.
![]() Type the following statement, which uses the
Type the following statement, which uses the open() function with the w + argument to reopen the text file in Write and Read Mode, again assigning it to w1. Press ![]() .
.
w1 = open("waters.txt", "w + ")
Note: Again, Python automatically closes the file before reopening it. Python truncates the file, deleting its contents.
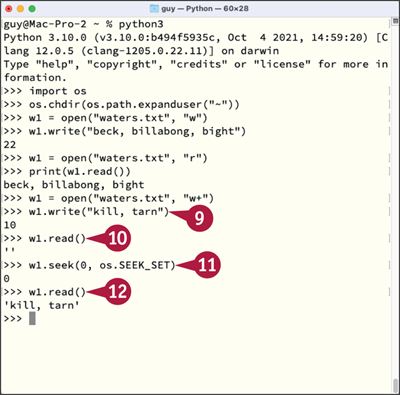
![]() Type the following statement, which writes two fresh waters to the file, and then press
Type the following statement, which writes two fresh waters to the file, and then press ![]() .
.
w1.write("kill, tarn")
![]() Type the following statement, which reads the file from the pointer position. Press
Type the following statement, which reads the file from the pointer position. Press ![]() .
.
w1.read()
Python displays '', an empty string, because the pointer is at the end of the file.
![]() Type the following statement, which uses the
Type the following statement, which uses the seek() method to move the pointer to the file’s beginning, and then press ![]() :
:
w1.seek(0, os.SEEK_SET)
![]() Press
Press ![]() twice to repeat the
twice to repeat the w1.read() statement, and then press ![]() :
:
w1.read()
Python displays 'kill, tarn', the contents you wrote.
Open a File for Both Reading and Writing
To open a file for both reading and writing, use the open() function with the r + argument. Because the file is open for writing as well as reading, you will need to be careful to avoid overwriting the existing contents of the file. For example, you can use the seek() method to move the pointer to the end of the file before writing new data to the file using the write() method. After writing, you can move the pointer back to the beginning of the file to read all its contents using the read() method.
Open a File for Both Reading and Writing

![]() Open a terminal window and launch Python.
Open a terminal window and launch Python.
![]() The Python prompt appears.
The Python prompt appears.
![]() Type the following statement, which imports the
Type the following statement, which imports the os module, and then press ![]() .
.
import os
![]() Use the
Use the os.chdir() method to change to a directory in which you can create a file. For example, type the following statement, and then press ![]() , to change to your home directory:
, to change to your home directory:
os.chdir(os.path.expanduser("~"))
![]() Type the following statement, which creates a variable named
Type the following statement, which creates a variable named rwf and assigns to it the file metals.txt, which it opens or creates in Write Mode. Press ![]() .
.
rwf = open("metals.txt", "w")

![]() Type the following statement, which uses the
Type the following statement, which uses the write() method to write text to the rwf file object, and then press ![]() .
.
rwf.write("Calcium
Gallium
")
Python returns 16, the character position at the end of the file.
![]() Type the following statement, which opens the same file in Read/Write Mode and assigns it to
Type the following statement, which opens the same file in Read/Write Mode and assigns it to rwf again. Press ![]() .
.
rwf = open("metals.txt", "r + ")
Note: Opening the file with the r + argument causes Python to close the file and then reopen it.
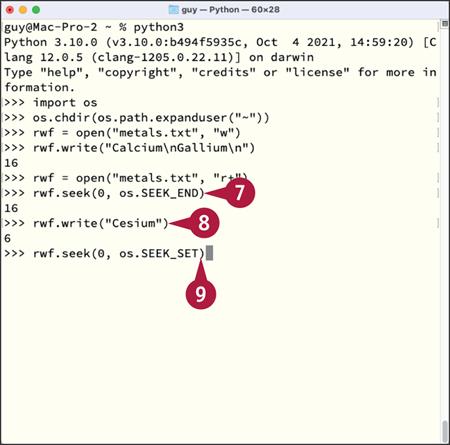
![]() Type the following statement, which uses the
Type the following statement, which uses the seek() method to move the pointer to the end of the file, and then press ![]() :
:
rwf.seek(0, os.SEEK_END)
Python returns 16, the character position at the end of the file.
![]() Type the following statement, which uses the
Type the following statement, which uses the write() method to add text to the file, and then press ![]() :
:
rwf.write("Cesium")
Python returns 6, the number of characters added.
![]() Type the following statement, which uses the
Type the following statement, which uses the seek() method to move the pointer to the start of the file, and then press ![]() :
:
rwf.seek(0, os.SEEK_SET)

Python returns 0, the character position at the start of the file.
![]() Type the following statement, which uses the
Type the following statement, which uses the print() function to display the result of reading the file’s contents. Press ![]() .
.
print(rwf.read())
Python displays this:
Calcium
Gallium
Cesium
![]() Type the following statement, which uses the
Type the following statement, which uses the close() method to close rwf, and then press ![]() :
:
rwf.close()
Append Data to a File
Python provides two modes for appending data to the existing contents of a file without affecting the existing contents. Append Mode, which you invoke by using the a argument with the open() function, lets you add text after the file’s existing contents. Append and Read Mode, which you invoke by using the a + argument, likewise lets you append text but also lets you read the existing contents.
Both Append Mode and Append and Read Mode automatically create the specified file if it does not exist. Both modes prevent you from modifying the file’s existing contents.
Append Data to a File

![]() Open a terminal window and launch Python.
Open a terminal window and launch Python.
![]() The Python prompt appears.
The Python prompt appears.
![]() Type the following statement, which imports the
Type the following statement, which imports the os module, and then press ![]() .
.
import os
![]() Use the
Use the os.chdir() method to change to a directory in which you can create a file. For example, type the following statement, and then press ![]() , to change to your home directory:
, to change to your home directory:
os.chdir(os.path.expanduser("~"))
![]() Type the following statement, which creates a variable named
Type the following statement, which creates a variable named s and assigns to it the file staples.txt, which it opens or creates in Append Mode. Press ![]() .
.
s = open("staples.txt", "a")
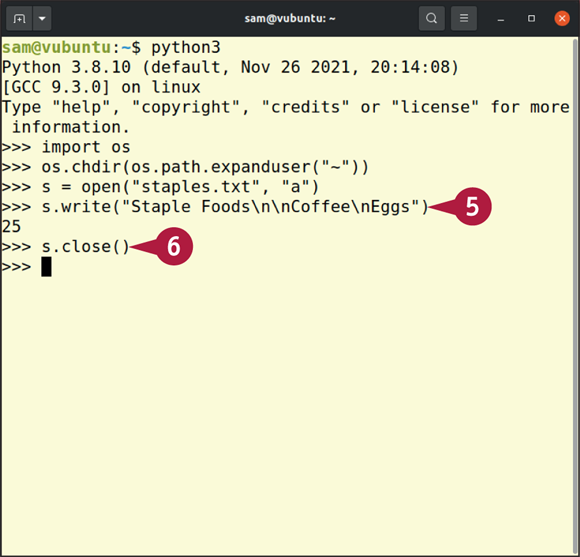
![]() Type the following statement, which uses the
Type the following statement, which uses the write() method to append some text to the s file object. Press ![]() .
.
s.write("Staple Foods

Coffee
Eggs")
Python returns 25, the number of characters added.
![]() Type the following statement, which uses the
Type the following statement, which uses the close() method to close the s file object explicitly, and then press ![]() :
:
s.close()
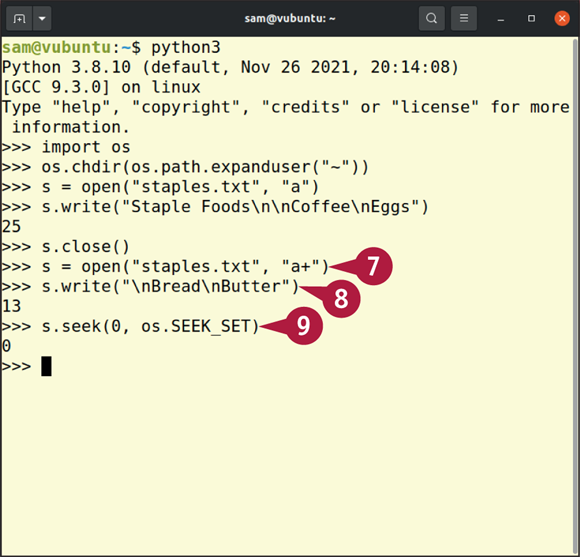
![]() Type the following statement, which opens the same file in Append and Read Mode, again assigning it to the variable
Type the following statement, which opens the same file in Append and Read Mode, again assigning it to the variable s. Press ![]() .
.
s = open("staples.txt", "a + ")
![]() Type the following statement, which uses the
Type the following statement, which uses the write() method to append text to the end of the file. Press ![]() .
.
s.write("
Bread
Butter")
![]() Type the following statement, which uses the
Type the following statement, which uses the seek() method to move the pointer to the start of the file. Press ![]() .
.
s.seek(0, os.SEEK_SET)

![]() Type the following statement, which uses the
Type the following statement, which uses the print() function to display the result of using the read() method to read the file’s contents. Press ![]() .
.
print(s.read())
Python displays the file’s text:
Staple Foods
Coffee
Eggs
Bread
Butter
![]() Type the following statement, which uses the
Type the following statement, which uses the close() method to close the file, and then press ![]() .
.
s.close()
Read a Text File
Python’s open() function enables you to open a text file in Read Mode by using the r + argument or in Read and Write Mode by using the r + argument. Usually, the choice between Read Mode and Read and Write Mode is straightforward: Use Read Mode when you need only to read the file’s contents, but use Read and Write Mode when you also need to change the contents.
Both modes place the pointer at the start of the file, ready to read from there on. Both modes return a FileNotFoundError if the specified file does not exist.
Read a Text File

![]() Open a terminal window and launch Python.
Open a terminal window and launch Python.
![]() The Python prompt appears.
The Python prompt appears.
![]() Type the following statement, which imports the
Type the following statement, which imports the os module, and then press ![]() .
.
import os
![]() Use the
Use the os.chdir() method to change to a directory in which you can create a file. For example, type the following statement, and then press ![]() , to change to your home directory:
, to change to your home directory:
os.chdir(os.path.expanduser("~"))
![]() Type the following statement, which creates a variable named
Type the following statement, which creates a variable named xr and assigns to it the file waters.txt, which it opens or creates in Write Mode. Press ![]() .
.
xr = open("waters.txt", "w")

![]() Type the following statement, which uses the
Type the following statement, which uses the write() method to add text to xr, and then press ![]() :
:
xr.write("sound, swamp, wadi")
![]() Type the following statement, which reopens the same file in Read Mode. Press
Type the following statement, which reopens the same file in Read Mode. Press ![]() .
.
xr = open("waters.txt", "r")
Note: Python automatically closes the text file before reopening it.
![]() Type the following statement, which uses the
Type the following statement, which uses the print() function to display the result of using the read() method to read the contents of xr. Press ![]() .
.
print(xr.read())
Python displays sound, swamp, wadi.
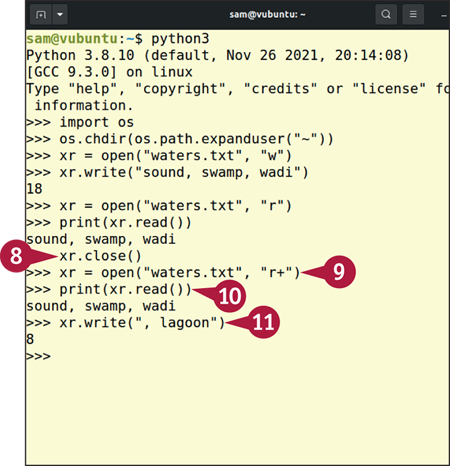
![]() Type the following statement, which uses the
Type the following statement, which uses the close() method to close xr explicitly. Press ![]() .
.
xr.close()
![]() Type the following statement, which opens the file in Read and Write Mode, again assigning it to
Type the following statement, which opens the file in Read and Write Mode, again assigning it to xr. Press ![]() .
.
xr = open("waters.txt", "r + ")
![]() Press
Press ![]() three times to repeat the
three times to repeat the print() statement, and then press ![]() :
:
print(xr.read())
Python displays sound, swamp, wadi again.
![]() Type the following statement, which writes another term to the file, and then press
Type the following statement, which writes another term to the file, and then press ![]() :
:
xr.write(", lagoon")

![]() Press
Press ![]() twice to repeat the
twice to repeat the print() statement, and then press ![]() :
:
print(xr.read())
![]() Python returns a blank paragraph, because the Write operation has moved the pointer to the end of the file.
Python returns a blank paragraph, because the Write operation has moved the pointer to the end of the file.
![]() Type the following statement, which uses the
Type the following statement, which uses the seek() method to move the pointer to the start of the file. Press ![]() .
.
xr.seek(0, os.SEEK_SET)
![]() Press
Press ![]() twice to repeat the
twice to repeat the print() command, and then press ![]() :
:
print(xr.read())
Python displays sound, swamp, wadi, lagoon, the file’s entire contents.