Chapter 9
Working with Documents and Folders
IN THIS CHAPTER
![]() Gaining a general understanding of creating a document
Gaining a general understanding of creating a document
![]() Exploring how to use File Explorer
Exploring how to use File Explorer
![]() Getting familiar with how to do backups
Getting familiar with how to do backups
![]() Seeing how to move files between your physical computer and your cloud PC
Seeing how to move files between your physical computer and your cloud PC
If you are like us, then you remember the days when the world ran using paper. Big file cabinets contained all sorts of documents in the form of pieces of paper. Each piece of paper represented information of some type, and they were grouped together in folders. Some of those pieces of paper were drawings or photographs, some were typewritten text, and others were a combination of both. And then the digital age swept the world.
If you are an experienced computer user, then you are already familiar with documents and folders in the digital age. Documents became digital, and working with them involved using specific software applications such as the popular Office applications Word, Excel, and PowerPoint. We like to think of the migration from paper to digital documents as the first great wave of transition. We are now well into the second great wave of transition, which involves software developed in a hyperconnected world using the Internet (aka the cloud).
As computing has moved into a cloud-first world, the concept of a document has morphed from a piece of paper into something that is not so easy to understand. Yes, a document still represents a type of information, such as a Word document, an Excel spreadsheet, or a PowerPoint presentation. However, with cloud-first software, the file can be synchronized automatically between cloud locations and physical devices. In other words, a shift has happened so that a document can magically be many places at the same time. This requires a mental shift, the familiar reference of a digital document representing a physical document no longer works. Microsoft undertook this shift nearly a decade ago when they introduced Office 365. With Office 365, your documents are often available on all your devices without you having to think of where you left them. For example, in order to work on a file in the days before Office 365, you would first have to remember whether your file was on your laptop or maybe on your computer at the office. If you wanted to move a file between devices, then you could put it on a disk or email it to yourself or a colleague. Office 365 removed this burden with the result being that your files were always available on every device.
Now Microsoft is doing the same with the Windows operating system in the form of Windows 365. Windows 365 makes your entire operating system available just as Office 365 did with your documents. Which brings us to the current chapter. Microsoft provided a gradual on-ramp to the cloud-first world with the move from Office to Office 365. Microsoft is doing the same in the move from Windows to Windows 365. When thinking about your documents and folders on your cloud PC, you’ll have to make mental adjustments to some things, although for now, most of your current knowledge will directly translate.
In this chapter, you learn how to create new files on your cloud PC. You learn how the new Office application is a one-stop shop for creating Office documents. You then learn how to open a particular Office application, such as Word, directly and how to create a document. Next, you explore how to work with files using File Explorer, how backups work in Windows 365, and finally, how to move files between your cloud PC and your physical computer.
Finding Microsoft Office
The traditional Office apps, such as Word, Excel, and PowerPoint, are a major part of Windows in your cloud PC. Microsoft has created a unified Office experience in the form of a single Office app (although you can still launch each Office app individually). From the single Office app, you can find all your Office formats and create and open files.
 We expect that in the future, Windows 365 will continue to integrate with Office and other popular Microsoft products such as Teams and SharePoint. At some point, it might be hard to tell where the operating system of your cloud PC ends and the apps it runs begin. Your cloud PC will become your productivity portal in the metaverse and any device with an Internet connection will work. We feel that Microsoft is laying the groundwork for a new era of computing in the metaverse. Perhaps an augmented reality device, such as HoloLens, or a virtual reality device, such as Oculus, will be your primary cloud PC interface at some point in the future. Some people are even working on direct brain-computer implant interfaces, like Elon Musk and his company Neuralink, so perhaps the future of computing will see our brains integrating completely with the cloud! Seems a scary thought — although probably no more radical than the concept of the Internet would have been 100 years ago.
The Office apps are integrated and available in a single app that feels like part of your cloud PC. Microsoft has named this new app simply Office. You can still find the stand-alone apps and open them individually, too. We walk you through both methods of accessing your favorite Office apps next and cover the SharePoint and OneDrive apps (which are part of Office 365) further in Chapter 11.
Creating a new Excel spreadsheet from the Office app
Microsoft has evolved Office into much more than the traditional apps such as Word, Excel, and PowerPoint. As Office transitioned to a cloud-first strategy with Office 365, a significant number of apps were added to the product. To help you wrangle all these new apps, Microsoft created a super-app called simply Office. The Office app has the same name as the Office suite of products from yesteryear, although it is so much more. All these new Office apps might boggle your brain, but if you are just trying to open Excel to create a spreadsheet, you should know that it is as easy as ever.
To open Microsoft Excel from the Office app on your cloud PC, follow these steps:
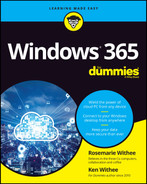
- Make sure you are logged into your cloud PC and then click the Start button.
-
Type office and then click the Office app, as shown in Figure 9-1.
The main Office app opens, and you can see all the individual apps along the left side of the screen, as shown in Figure 9-2.
-
Click the icon to load the Excel app. Alternatively, you can click the plus sign at the top of the list and then select the type of file you want to create, as shown in Figure 9-3.
The Excel app then launches, and you can create a new blank spreadsheet, open an existing spreadsheet, or create a new spreadsheet from a template.
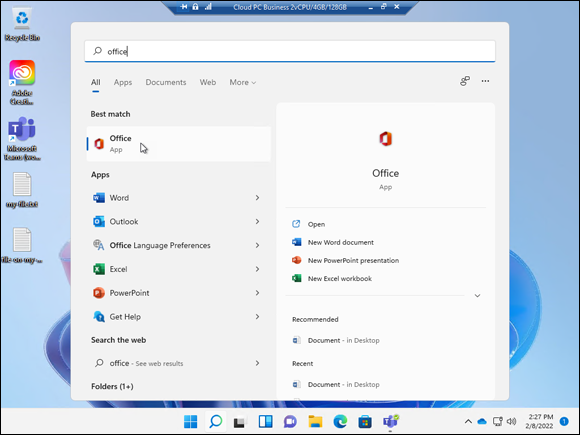
FIGURE 9-1: Opening the Office app from the Start menu.
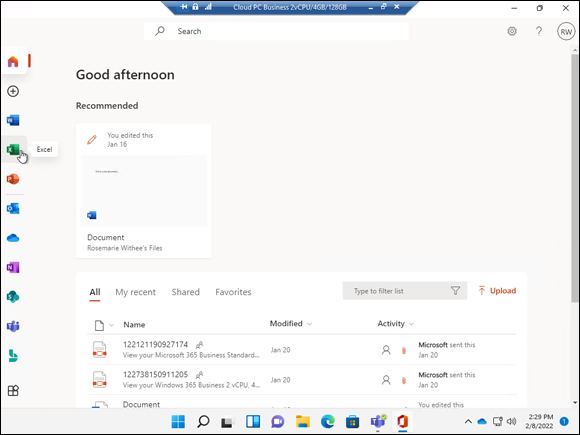
FIGURE 9-2: The main screen of the Office app.
FIGURE 9-3: Creating a new file by launching one of the Office apps.
Working in full-screen mode when creating a new document
 When you open an app such as Microsoft Word, you must make sure you are opening it in your cloud PC, not your physical PC. It can be easy to make a mistake if your cloud PC and your physical computer have the same apps running. If your physical computer is running MacOS, on the other hand, then it is easier to avoid the mistake. If your physical computer is running Windows 11 and your theme and background are identical on both systems, then it is easy to make the mistake. As we mentioned earlier, we like to change the look and feel of our cloud PC so that we never make the mistake of working on physical computer when we thought we were working on our cloud computer.
To open Microsoft Word on your cloud PC, follow these steps:
-
Be sure you are in the window you are using to connect to your cloud PC.
We covered connecting to your cloud PC using the Windows 365 Remote Desktop client or a web browser in Chapter 4.
-
Click the Start button (on your cloud PC).
The Start menu appears.
-
Click the Word app (or type word in the search bar and press Enter).
The Word app opens on your cloud PC.
A good habit to get into is making the look and feel of your cloud PC different from any look and feel of your physical computers. Another good habit is always making the window you are using to connect to your cloud PC full screen. To illustrate the point, we opened Word on our cloud PC and made the window smaller so that you can see the Start menu and the desktop of our physical computer as well as the cloud PC, as shown in Figure 9-4. When we put the window that shows our cloud PC (which is the Windows 365 Remote Desktop client running on our physical computer) into full-screen mode, then our entire physical display is filled with our cloud PC desktop. This concept can take some time to get used to, but after you are familiar with it, using your cloud PC from any physical device is a piece of cake.

FIGURE 9-4: Microsoft Word running on our cloud PC.
Saving a document
When you sign into your cloud PC, you are using your Microsoft 365 credentials as we outlined in Chapter 1. This means that when you sign into your cloud PC you get all the Office 365 cloud-enabled features by default. A perfect example is saving a document. You won’t see the Save menu item if the AutoSave toggle is on. This is because your document is automatically saved for you by default. In other words, when you stop working, move to another computer, or throw your computer in the ocean, and then come back to work on the document again, using whatever physical device you decide you want to use, your cloud PC and the document you were working on will be exactly as you left them.
 The AutoSave toggle is turned on automatically when you are logged in to your Microsoft 365 account. When you are using your cloud PC, you sign in using your Microsoft 365 account. If you are using a traditional version of Windows on a physical computer, however, then you need to keep in mind the document might not be saved automatically. We experienced this when we got used to working on our cloud PC and then had to work on a document on a traditional version of Windows. We forgot to constantly save the document and lost a significant amount of work. To avoid making the same mistake, you should always remember to save your document when not working in your cloud PC.
The AutoSave feature can be tricky when you are used to the traditional method of saving a file as you work. We have run into issues where we were used to saving a file with a new name as we made changes, and this doesn’t work with AutoSave. Microsoft is trying to be helpful and automatically save your work; however, it can be a struggle to get used to the feature.
Copying and pasting
When you first begin to use your cloud PC, you will likely have information on your physical computer that you will want to get into your cloud PC. Later in this chapter, we tell you how to move files. However, you might want to move only a paragraph of text, or an image, or some financial data. To move information to your cloud PC, you can copy from a document on your physical computer and then paste into a document on your cloud PC. Copy-and-paste works because of a shared clipboard between your physical device and your cloud PC.
The way you add information to your clipboard on your physical device depends on the operating system the device is using. For example, in Windows you can right-click and select the Copy icon. You can also use the keyboard shortcut by pressing and holding the Ctrl key and then pressing the C key. On a Mac, the keyboard shortcut is to press and hold the Command key and then press the C key to copy. On a tablet or smartphone, you tap and hold and then select Copy. After you’ve successfully copied the information, you can paste it in your Windows 365 cloud PC by right-clicking and selecting the Paste icon or by using the keyboard shortcut (Ctrl-V).
Copying and pasting from your physical computer to your cloud PC can also be done when using your web browser. When you connect to your cloud PC using a web browser, make sure that the selection for Clipboard is selected, as shown in Figure 9-5.
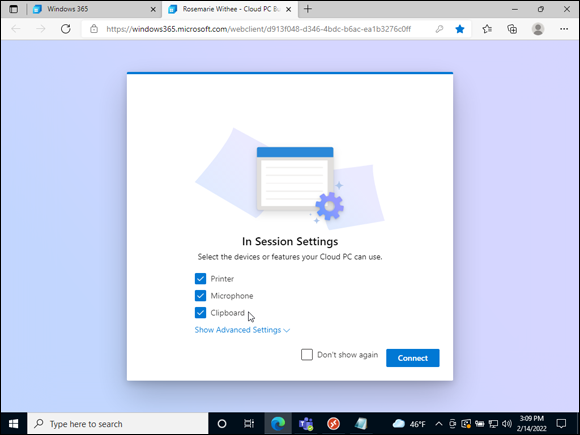
FIGURE 9-5: Allowing copy and paste from your physical computer to your cloud PC when using a web browser.
Closing a document
Because your cloud PC is always on and always available you don’t necessarily need to close a document. When we first started using Windows 365, we were in the habit of closing documents when we shut down our computer. Over time, we adjusted to the fact that our cloud PC is always on and always available and exactly how we left it. Now we keep documents open and when we close them, we think of it as archiving it or moving our thinking about it to a closed state. If you want to close a document, click the X in the upper-right corner of the document. Alternatively, you can click on the File menu in the upper-left of a document and then select Close.
Getting Familiar with Windows in Windows 365
Microsoft tends to use the same words for various meanings. It is especially the case with software like Teams where your team can work together. Teams is relatively new, and we cover it further in Chapter 9. Windows, on the other hand, has been around for ages. An eternity, in Internet time. Windows refers to the operating system that runs all the hardware on a computer. A window is also a box that is displayed on your computer that represents the user interface for an application. So, it makes some sense that Windows, the operating system, is focused around using windows to get things done. If you are already familiar with Windows, then this concept is all too familiar. What makes Windows 365 different is that the entire Windows operating system is also running within a window on your physical computer. It doesn’t matter what physical computer you are using or what operating system that physical computer is running. When you connect to your cloud PC, you are viewing it through a window on your physical computer. This can take some getting used to. As we mentioned previously, we like to make the window we are using work with our cloud PC full screen, so we have the illusion that our cloud PC is running on our physical computer.
One of the most important concepts to keep in mind when using your cloud PC is that it is separate from whatever physical computer you happen to be using to connect to it. The best way we have found to get our minds around it is to think of your cloud PC as an actual computer that Microsoft has set up for you and that you log into and use remotely over the Internet. Using this way of thinking makes it easier to think about apps and files and where they live and run. The apps either live and run on your cloud PC or they live and run on whatever physical computer you are using to connect to your cloud PC.
Looking at Files and Folders
There is a special app in Windows called File Explorer. When you open this app, you are presented with the files and folders on your computer. Be sure you are in the correct window and looking at the desktop of your cloud PC and then click the Start button, type file explorer, and press Enter. The File Explorer app opens, and you can see all your files and folders, as shown in Figure 9-6. By default, it opens and shows you quick access areas that you might want to look at, but you can also click on the left side of the app to explore the files and folders in other places on your computer.
If the File Explorer application is pinned to the tray, which it is by default, then you can click the icon to open it. In Figure 9-6, you can see the icon, which looks like a file folder, on the tray. In general, there are multiple ways to perform the same task in Windows 365.
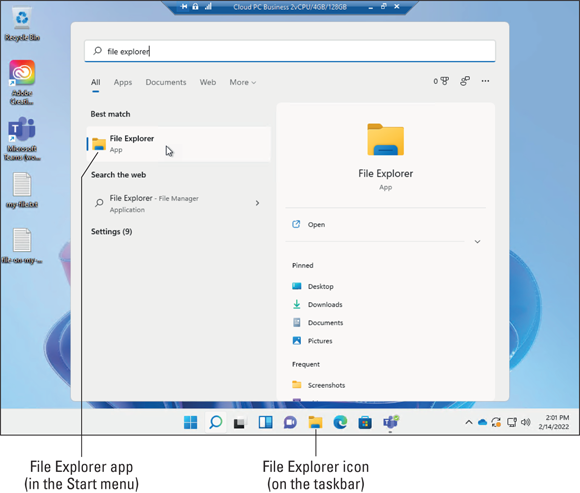
FIGURE 9-6: Opening the File Explorer application.
Moving and copying files
You can move files between folders by clicking on them, holding the mouse button down, and then dragging them to another folder. You can make copies by right-clicking on a file and choosing the Copy icon, as shown in Figure 9-7. You can then go to another folder, right-click, and choose the Paste icon, which makes an exact copy of the file in the new location.
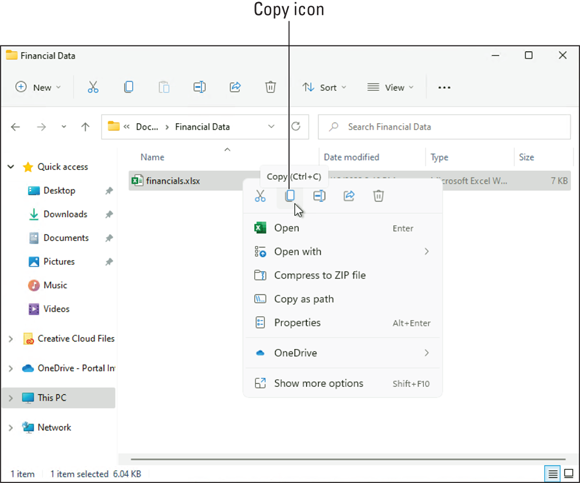
FIGURE 9-7: Right-clicking a file and copying it to the clipboard.
Creating folders
You can create new folders and name them so that you can organize your documents. A folder can be created within another folder. To create a new folder, navigate to the location you want to create the folder, then right-click in File Explorer and select New from the menu and then choose Folder, as shown in Figure 9-8.
Figure 9-8 shows you how to right-click and create a new folder. Notice that you can also choose to create a new document using the same process. It is often the case in Microsoft products that you can achieve the same result in multiple ways.
After you create a folder, you can move it just like you move files: Click on it and hold down the mouse button and then drag it to the new location and release the mouse button.
Organizing files
Keeping files, as well as our homes, organized can be a challenge for us all. On the surface, it can feel overwhelming to start using a new cloud PC. It seems like it is just one more place you might have to look for your digital files. If you are dreading this aspect of Windows 365, then you are not alone. We felt the same way when we started using our cloud PC. We already used Dropbox, Box, OneDrive, Teams, SharePoint, and folders on various devices and external drives. Over time, we shifted to keeping all our work documents on our cloud PC and slowly stopped using other locations. It took time, but after a while we found our work lives to become more organized because we know our cloud PC is always on and always available. We like to think of it as being like the mental shift we went through when banking shifted to the cloud (yes, we remember it like it was yesterday). Prior to online banking, we had to correspond through the mail, waited for a statement every month, and reconciled our checkbook. Now we don’t even receive a paper statement, and we know exactly the details of our checking account in real-time on our phone. We have found the same holds true with our cloud PC. After shifting to using our cloud PC, we don’t think much about our work documents. We know we can connect to our cloud PC from any device and from anywhere in the world. Our work progress is exactly how we left it the last time we connected, even if that was from a computer in another time zone.
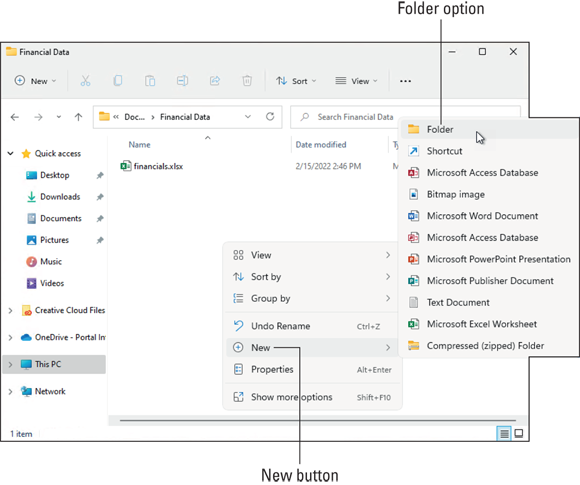
FIGURE 9-8: Right-clicking and creating a new folder.
When you get your mind around your cloud PC being always on and always available, the next step is organizing your files. If you are already familiar with folders, then you will feel right at home in Windows 365. You can create new folders (described in the previous section) and you can put documents inside those folders. You can also put folders within other folders in a hierarchy of folders. To move a folder into another folder, click on it, hold down the mouse button, drag the folder over the top of another folder, and then release the mouse button. The folder will be moved inside of the other folder. You can continue this process in a way that makes the most sense for you.
Sharing documents with others
Sharing folders with other people in your organization is a concept that has been around for a long time. Windows 365 provides the same functionality through Teams, SharePoint, and OneDrive. The Teams application has a place where you can store and share files with others. When you put documents in Teams, they are shared with others on the team, and you can work on them and collaborate in real time. We cover using Teams in detail in Chapter 10, but if you want to dive even further check out Teams For Dummies by Rosemarie Withee (Wiley). You can think of OneDrive and SharePoint as almost the same thing. SharePoint includes a web interface and OneDrive is used to sync files with SharePoint sites and colleagues. In fact, SharePoint uses OneDrive to sync files. We cover OneDrive in more detail in Chapter 11.
If you are using Teams to store your files, then you are already using SharePoint. Teams uses SharePoint behind the scenes for document storage.
Deleting and recovering documents and folders
You can delete a document or folder by selecting it and pressing the Delete key on your keyboard. Alternatively, you can right-click and select the Delete icon (it looks like a trashcan, which you can see by referring back to Figure 9-7). When you delete a document or folder, you move it to a special folder called the Recycle Bin. The Recycle Bin in your cloud PC is like the recycle bin at the food court in a mall. When you throw something like an empty soda can into the recycle bin, it remains there for a while, but eventually it is removed and recycled and used to make a new can. In the same way, when you delete a file, it is moved to the Recycle Bin, and you are letting your cloud PC know that it can recycle the digital space that it took up and make it available to create new documents.
By default, the Recycle Bin keeps your deleted files until the space reserved for recycled items runs out. The default size of the Recycle Bin on our cloud PC is 1638 megabytes. When we have deleted more than 1638 megabytes, the Recycle Bin folder will start permanently deleting older Recycle Bin files to make room for files we recently deleted. You can change these settings by right-clicking the Recycle Bin icon on your desktop and selecting Properties.
If you accidentally delete something, you can still retrieve it for some time by looking for it in the Recycle Bin. To restore an item you deleted, double-click the Recycle Bin folder on your desktop to open it, right-click the item, and select Restore.
Getting files from your physical computer to your cloud PC
One of the first tasks most people want to achieve with a cloud PC is to get the files on their physical computer into their cloud PC. The good news is that when you are using the Windows 365 Remote Desktop client, the storage on your physical computer shows up in the File Explorer app on your cloud PC. You can find that storage by selecting “This PC” on the left side of File Explorer. You will see the storage on your cloud PC, and at the bottom you will see the Redirected Drives and Folders section, as shown in Figure 9-9.
Using the Windows 365 Remote Desktop client on MacOS is slightly different than on Windows. On MacOS you will find the Folders options on the Folders tab where you can redirect folders.
Keep in mind that the contents you see in the Redirected Drives and Folders section are specific to whatever physical computer you happen to be using to connect to your cloud PC. If you connect from your laptop in the morning, then you will see the files and folders on your laptop. If you connect from your desktop computer, then you will see the files and folders in your desktop. When using the Windows 365 Remote Desktop client, you can even see the storage on your phone, if that is the device you happen to be connecting from.
To move files from your physical computer to your cloud PC, use File Explorer. The process is similar to moving a file between folders within the same computer. On your cloud PC, open File Explorer twice so you have two windows open. In one window, open the files on your physical computer, found in the Redirected Files and Folders section. In the second window, open the location on your cloud PC to where you want to move the files. Then, click on a file in one window and drag and drop it in the other window, as shown in Figure 9-10.
By default, dragging and dropping files between computers creates a copy. If you want to move the file instead of copying it, then use the right mouse button to drag and drop. When you use the right mouse button and drop a file, you are presented with a menu with options other than copy.
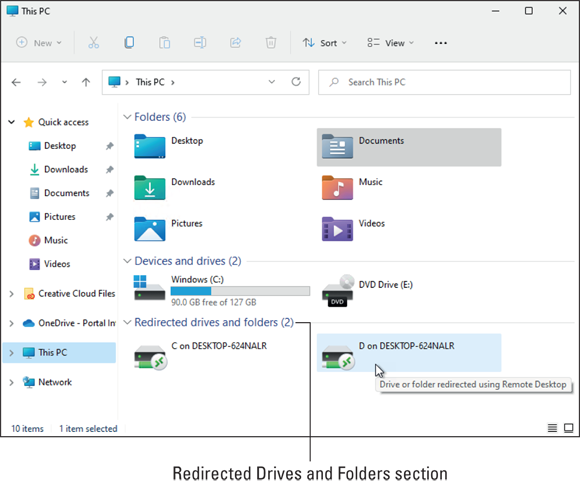
FIGURE 9-9: Viewing the storage on your physical computer from your cloud PC.
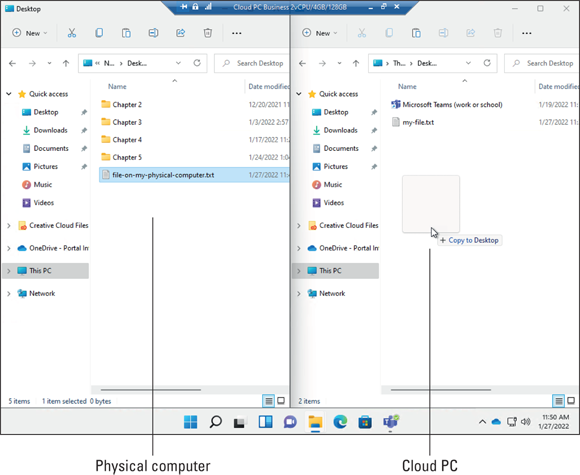
FIGURE 9-10: Copying a file from our physical computer to our cloud PC.
If you are using a web browser to connect to your cloud PC, then you won’t see the Redirected Files and Folders section in File Explorer. This is another reason we recommend using the client whenever possible. Using a web browser is fine in a pinch but for everyday work we always use the client.
With files in so many places it can be easy to get confused. For this reason, we recommend using a content management system like SharePoint to keep your files organized and share and collaborate with others in your organization. If your organization uses Teams and you have files in Teams, then you are using SharePoint. Teams uses SharePoint as a content management system and provides a simpler interface to work with files than going directly into SharePoint. We cover using Teams in Chapter 10 and SharePoint in Chapter 11.
Getting Comfortable with Backups in the Metaverse
If you have used a computer connected to the Internet to interact with others, then you are a bona fide member of the metaverse. Congratulations! We love the “metaverse” buzzword because it sounds like we are in a sci-fi movie such as The Matrix. Cue the movie voice, “in a world known as the metaverse, a young heroine fights evil …”. Using the previous buzzword, the cloud, was cool for a long time, but it is time to move into the future. Both terms mean essentially the same thing. You are using resources “out there” that are being hosted and run by someone else. Since “out there” isn’t very catchy most people prefer to call it the cloud or the metaverse. In the case of Windows 365, the group out there hosting the software is Microsoft. And this is a good thing because it means they are on the hook for making sure our digital infrastructure is backed up and secure. Even though we are offloading most things to Microsoft, there are still some backup considerations we need to keep in mind.
The term cloud derives from the early days of drawing diagrams of networks. Networks consist of pieces of equipment such as routers, switches, cables, and plugs. Drawing a network can be time consuming so engineers, being inventive, decided to just draw a cloud shape for a complex network diagram. The Internet became the network of all networks and thus became the cloud shape in diagrams. This tidbit is a great conversation piece at cocktail parties.
You can think of backups in two primary ways. The first way is to think of the personal work you are doing on your cloud PC in the form of your documents and files. The second way is to think of your cloud PC and the settings and applications you have installed.
Making sure you don’t lose work
Modern computing is very forgiving to the mistakes we humans make. Lately, we are more surprised when we can’t recover from a mistake with the few clicks of a button. With that said, you still need to be aware of the content on your cloud PC and take the proper precautions so that you never lose your work. For example, if you accidentally delete data in a spreadsheet and don’t realize it, then the data is likely lost unless you have a previous version backed up.
If you keep your documents in SharePoint and have versioning on, then you can easily go back and see all the different versions from when you saved and worked on a document.
To keep your hard work safe, we recommend keeping your documents in a content management system such as Teams or SharePoint (hint, Teams uses SharePoint behind the scenes). When your files are in a content management system they are automatically backed up. You can turn on automatic versioning and avail of all sorts of great features. We cover Teams in Chapter 10 and SharePoint in Chapter 11. We have even written entire books on Teams and SharePoint. If you want to dive deep in these areas, check out Teams For Dummies and SharePoint For Dummies (Wiley).
Keeping your cloud PC safe and backed up
The cost of a cloud PC is not insignificant. One of the benefits of having Microsoft take on the ownership of managing the infrastructure is that they are on the hook for backing up your cloud PC. Going into the details of what this entails would require several books. If you are interested in learning more about this, open your favorite search engine and type in “how does a Microsoft data center work.” We think understanding all the pieces of a data center is on par with understanding all the pieces of the U.S. Government. In other words, a lot of people have careers focused on various aspects of the process. With all this in mind it is important to know that you or your administrator can cause problems for yourself by performing actions such as resetting a cloud PC from the Microsoft 365 administrative interface.
If you have followed along with the book, then you personalized your cloud PC in Chapter 5. Making your cloud PC your own can consume a lot of time, and you don’t want to lose the work. If you are an administrator, then keep in mind that you can reset a cloud PC back to a fresh state. However, when you do this, you are removing all the changes that have happened to the cloud PC since it was first created. If you are not the administrator for your cloud PC, then make sure to tell the administrator not to reset things without checking with you first.
An administrator can reset your cloud PC, which removes all apps and local documents you have created on it. We cover administration further in Chapter 18.