
CHAPTER 6
Networking in the AWS Cloud
In this chapter, you will
• Learn about basic AWS networking concepts
• Learn about virtual networking with Amazon Virtual Private Cloud (VPC)
• Learn how AWS Direct Connect lets you bypass the public Internet to access your resources in the AWS cloud
• Learn how Elastic Load Balancing (ELB) helps you balance your workloads among multiple EC2 instances in an AWS region
• Understand how to use Amazon Route 53 to manage your network domains and connect to AWS
• Learn how Amazon CloudFront helps deliver web content faster to your users
AWS networking is a crucial component of AWS, as networking underlies everything you do in AWS. You’re likely to be quite familiar with several of the networking features that I’ll be discussing in this chapter, while some are specific to AWS, such as virtual private clouds and Amazon’s Route 53, its Domain Name System (DNS) service.
The certification exam expects you to know the basics of networking, such as IP addresses, subnets, and so on. I introduce the basics first, and following that, explain the key AWS networking features.
Basic AWS Networking Concepts
Before we jump into AWS networking concepts such as Amazon VPC, you need to understand the definitions of several common networking terms and concepts.
Virtual Private Cloud
A VPC is an isolated virtual network dedicated to your account. This logically isolated network is inside the AWS cloud, where you can launch your AWS resources such as EC2 instances within your VPC and run AWS services safely. You manage the VPC entirely.
You must specify a range of IPv4 addresses when you create the VPC in a Classless Inter-Domain Routing (CIDR) block (such as 10.0.0.0/16). The first block you create will be the primary CIDR block, and you can associate secondary CIDR blocks later to the VPC if required.
Subnets
A subnet is a range of IP addresses in your Amazon VPC. After you launch services such as EC2 into specific subnets in your VPC, you place them into a public subnet if you want those services to be connected to the Internet. Otherwise, you use a private subnet to launch the services.
A VPC is divided into public subnets and private subnets, and further segmented into availability zones (AZs), as shown in Table 6-1. Remember that when you create a subnet, it’s mapped to an AZ, and you can attach only a single AZ to a subnet.
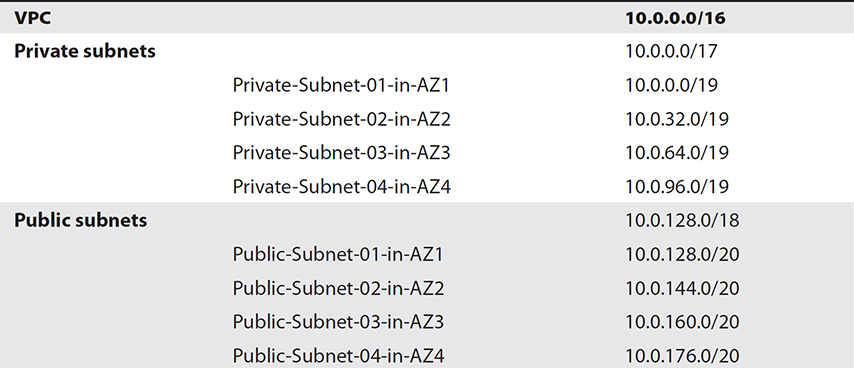
Table 6-1 VPC Divisions

NOTE If your VPC supports only IPv4, you can configure IPv6 support for the VPC and the resources in your subnets. The default VPC and EC2 IP addressing system is IPv4, and you can’t disable it. However, you can enable your VPC and the subnets in it to use IPv5 by configuring the VPC to operate in a dual stack mode.
Subnets of a PC must be in the same address space as the VPC. Thus, if you create a VPC with the CIDR of 10.0.0.0/16, you can create a pair of subnets (one public, the other private) such as 10.0.1.0/24 and 10.0.2.0/24, but not a pair such as 10.1.0.0/24 and 10.2.0.0/24.
Route Tables
A route table is associated with each subnet and specifies the permissible routes for outbound traffic from that subnet. A route table includes a set of rules, or routes, that you configure, which are used to determine where network traffic is directed. Every subnet in a VPC must be associated with a route table. Your VPC has a main route table, and by default, every subnet you create is associated with your VPC’s main route table.
Security Groups
A security group controls inbound and outbound traffic for your EC2 instances. It is a virtual firewall that controls traffic to an instance. If you don’t specify a security group when you create an instance, AWS uses the default security group. Here are the default rules for a default security group:
• Allow all inbound traffic from all other instances associated with the default security group
• Allow all outbound IPV4 traffic from the instance
A custom security group enables you to control the type of role an instance plays, such as a web server or a database server. Here are the default rules for a custom security group:
• Allow no inbound (ingress) traffic
• Allow all outbound (egress) traffic
NOTE AWS security groups are stateful—that is, you do not need the same rules for both outbound traffic and inbound.
You can add rules in a security group that control traffic flow to or from the instances you associate with that security group. By default, a security group allows all outbound traffic. AWS evaluates all the rules from all the security groups you associate with an instance before determining whether it should allow traffic to reach the instance. You can also assign multiple security groups to an instance. AWS aggregates the rules in all the security groups you assign to an instance to determine whether it should grant access.
Network Access Control Lists
Network access control lists (NACLs) control both inbound and outbound traffic for your subnets. Each subnet that you create in your VPC must be associated with an NACL, and by default, all subnets are associated with your VPC’s default NACL.
Security groups and ACLs offer additional layers of security for AWS resources in each subnet in a VPC. Unlike a security group, an NACL is stateless. That means that any changes applied to an incoming rule will not be applied to the outgoing rule. So, for example, if you allow an incoming request on port 80, you would also need to apply the rule for port 80 for outgoing traffic. Network ACLs are tied to the subnet, so the rule applies to all instances within the subnet group.
Domain Name System
DNS uses a distributed directory that resolves human-readable hostnames, such as example.com, into machine-readable IP addresses, such as 192.161.1.132.
Amazon Virtual Private Cloud
An Amazon VPC is a virtual network dedicated to your AWS account. A VPC is isolated from other networks in the AWS cloud. Amazon VPC enables you to launch your AWS resources such as EC2 instances into your own virtual private network (VPN), and it thus acts as the network layer for EC2. The virtual network, as its name says, is private to you and is quite similar to traditional networks that you work with in your data centers, which means that it includes entities such as routing, ACLs, and firewalls.
NOTE A private subnet doesn’t have a route to the Internet gateway.
You can specify an IP address type (IPv4 and/or IPv6) and range for the VPC that you create and add subnets to the VPC. You can also associate security groups with the VPC as well as configure route tables.
NOTE You can use multiple VPCs; your AWS account entitles you to five VPCs, which is a soft limit that you can have raised by contacting AWS. Because a VPC can’t span AWS regions, if you’re running AWS services in multiple regions, you must create multiple VPCs—at least one per region.
IP Address Types and IP Ranges
You can use either or both IPv4 and IPv6 address types for a VPC; the IPv4 type is the default and mandatory, and IPv6 is optional. It’s important to understand that all IPv6 address types are reachable from the Internet. By default, your VPC and subnets must have IPv4 CIDR blocks, but you can optionally associate an IPv6 CIDR block with the VPC. You must specify a range of IP addresses (CIDR block) for your VPC when you create the VPC. If you’re creating multiple VPCs, each one must have a separate address range.
NOTE Make sure the CIDR block IP ranges are not in conflict with your on-premise IP ranges if you want to connect both networks.
The size of the CIDR block for your VPC depends on the address range that you choose, and it can range from a /16 (65,536 IP addresses) to a /28 (16 IP addresses) netmask. You can associate one or more secondary CIDR blocks, with a maximum of four secondary IPv4 blocks, with the VPC after you create it, enabling you to increase the size of the VPC.
Here are some key factors about CIDR blocks and a VPC:
• You can’t change the size of a VPC’s CIDR block after creating it—that is, you can’t increase or decrease the size of an existing CIDR block.
• A subnet’s CIDR block is a subset of the VPC’s CIDR block if you create multiple subnets.
• CIDR blocks of different subnets can’t overlap.
• If you have a single subnet in your VPC, the CIDR block of the subnet and the VPC can be identical.
Each subnet in a VPC must have its own distinct CIDR block. Let’s say, for example, that you create a VPC with the CIDR block 10.0.0.0/24. You want to create two subnets within this VPC. The /24 netmask allows 256 IP addresses, meaning that each of your subnets can have a maximum of 128 IP addresses (if you decide to assign each subnet the same number of IP addresses). One of the subnets uses the CIDR block 10.0.0.0/25, with the IP address range 10.0.0.0–10.0.0.127. The other subnet uses the remaining portion of the VPC’s CIDR block, which will be 10.0.0.0/25, with the IP address range 10.0.0.128–10.0.0.0.255.
AWS recommends that you specify a CIDR block of /16 or smaller and dedicate that network to your VPCs to allow for future needs. AWS further recommends that you specify the CIDR block (/16 or smaller) from the following set of private IPv4 address ranges:
• 10.0.0.0–10.255.255.255.255 (10/8 prefix)
• 172.16.0.0–172.31.255.255 (172.16/12 prefix)
• 192.168.0.0–192.168.255.255 (192.168/16 prefix)
NOTE AWS refers to private IP addresses as the IPv4 addresses that are within the CIDR range of a customer’s VPC.
One you create a VPC with a CIDR block such as 20.0.0.0/24, you can create both public and private subnets in the VPC. In this case, you can create, for example, two subnets: one public subnet with the CIDR block 20.0.0.0/25 (128 IP addresses, in the range 20.0.0.00–20.0.0.0.127) and a private subnet with the CIDR block 20.0.0.0/25 (128 IP addresses, with the IP range 20.0.0.128–20.0.0.0-255).
AWS reserves certain IP addresses in the network for its own use, as shown in the following list. If, for example, you create a subnet with the CIDR block 10.0.0.0/24, AWS reserves the first four IP addresses, as well as the last address.
• 10.0.0.0 The network address.
• 10.0.0.1 Reserved for the Amazon VPC router.
• 10.0.0.2 Reserved for the IP address of the DNS server, which is always the base of the VPC network range, plus two. However, AWS also reserves the base of each subnet’s range plus two. If you have multiple CIDR blocks, the DNS server’s IP address is located in the primary CIDR.
• 10.0.0.3 Reserved for future use by AWS.
• 10.0.0.255 Reserved as the network broadcast address, because AWS doesn’t support broadcast in a VPC.

TIP If you happen to create a subnet with the CIDR 20.0.0.0/16 and the VPC has the same CIDR, you can’t create another subnet in this VPC with another CIDR such as 20.0.0.0/24, because you can’t have overlapping CIDRs. You can’t modify a subnet, however, so you must therefore delete and re-create the first subnet with a different CIDR block (that’s smaller than the VPC’s CIDR block), before creating the second subnet.
The reservation of these IP addresses means that you can’t assign any of them to an instance running in either a private or a public subnet inside your VPC. So, in the earlier example of a VPC with the CIDR 20.0.0.0/24 (256 IP addresses), you can assign any of the following IP addresses (private IP address) for an EC2 instance, but not 20.0.0.0/255, since it’s the network broadcast addresses reserved for AWS use:
• 20.0.0.132
• 20.0.0.55
• 20.0.0.122
Accessing the Internet from a VPC
Each default subnet in a VPC is a public subnet. The EC2 instances you launch into the default VPC have both private and public IPv4 addresses. You communicate with the Internet from your VPC through an Internet gateway, which helps your EC2 instances connect to the Internet via the EC2 network edge. You need the Internet gateway to connect to services that are outside your VPC. Some AWS services such as Amazon S3 have endpoints that eliminate the need for an Internet gateway, but not every service has such an endpoint. A default VPC comes with an Internet gateway, and for a non-default VPC, you must create a gateway to communicate with the Internet.
Figure 6-1 shows how EC2 instances in a VPC communicate through an Internet gateway.
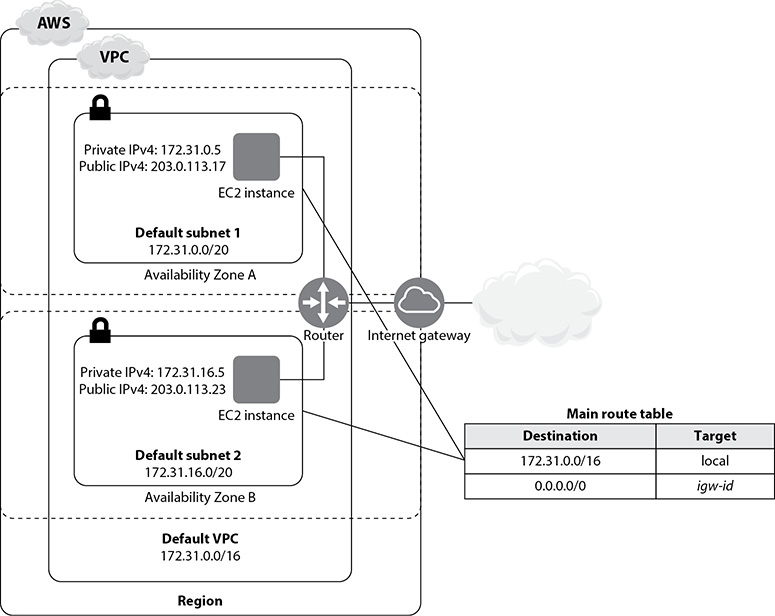
Figure 6-1 Accessing the Internet from inside a VPC
Amazon Virtual Private Cloud Components
To work with a VPC, you must understand various networking components that play a key role, such as subnets and route tables. I’ve been using several of these terms out of necessity, but I’ll provide clear definitions and explanations for all the VPC network-related terms and concepts here.
Figure 6-2 shows a VPC with a CIDR block of IP addresses and a main route table.
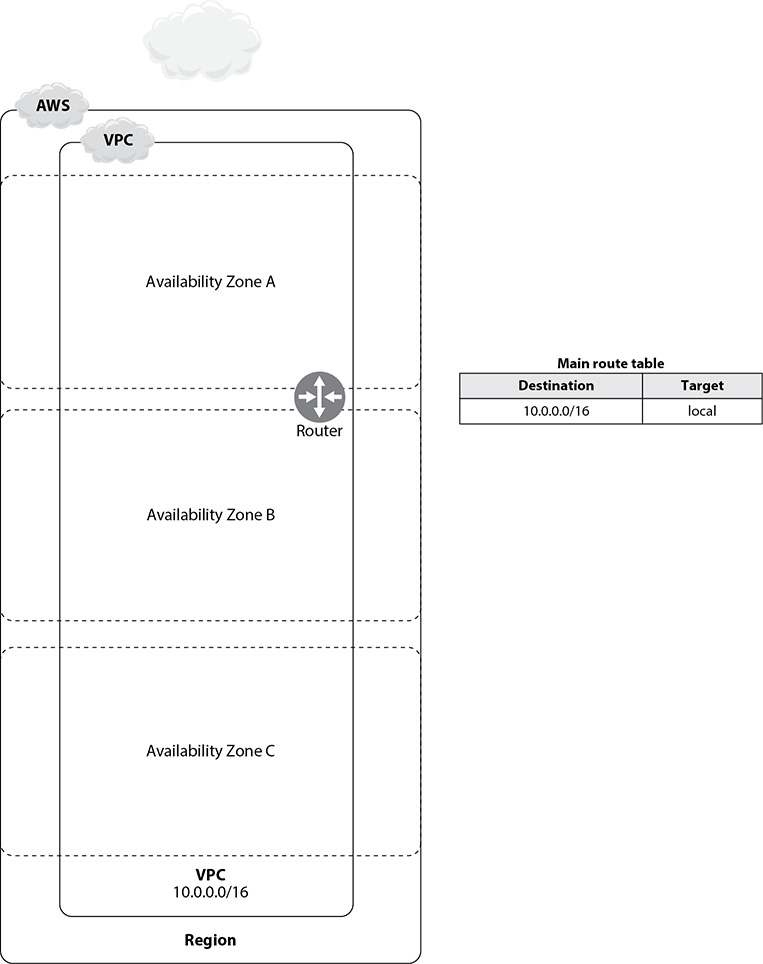
Figure 6-2 A simple VPC
A VPC comes with several components that work together to enable networking. Figure 6-3 shows the VPC dashboard, listing all the VPC resources you can use in your VPC.
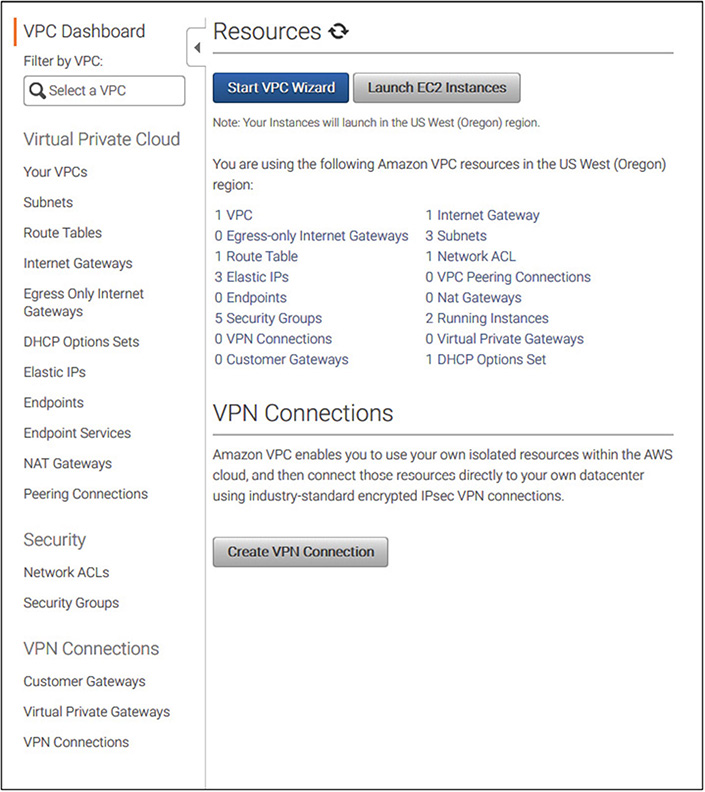
Figure 6-3 The VPC dashboard lists all the VPC components.
In the following sections, I explain each of the key VPC resources.
Subnets and a VPC
When you create a VPC, you can launch AWS resources such as instances into that VPC. As part of the VPC creation process, you must specify a range of IP addresses (IPv4) for the VPC. The VPC further subdivides that into one or more ranges of IP addresses, called a subnet. You specify the IP addresses in the form of a CIDR block, such as 10.0.0.0/16, which is the primary CIDR block for the VPC.
NOTE Exercise 6-4 walks you through the steps for creating a subnet in your VPC.
Subnet Types There are two main types of subnets: private and public. A private subnet is used for resources such as databases that don’t need to connect to the Internet. A public subnet is used for resources such as web servers that must connect to the Internet.
Default and Nondefault Subnets and Access to the Internet When you create a VPC, you create a default subnet as well, which is a public subnet. The EC2 instances you launch into these subnets have private IPv4 addresses as well as public IPv4 addresses. These instances can communicate among themselves and are able to access the Internet through an Internet gateway.
When you launch an EC2 instance into a nondefault subnet, the instance has only a private IPv5 address. Thus, these instances can communicate only among themselves, with no Internet access. You can, however, assign a public IPv4 address at instance launch time or modify the subnet’s public IP address attribute.
You can enable Internet access for the EC2 instances that you launch into a custom nondefault subnet in one of the following ways:
• Attach an Internet gateway to the VPC (if it isn’t a default VPC) and associate an elastic IP (EIP) address with the instance.
• For IPV4 traffic, to enable EC2 instances in a VPC to initiate outbound connections to the Internet but disallow random, unsolicited connections from the Internet, you can use a network address translation (NAT) device, or a NAT gateway. The NAT device uses an EIP and communicates with the Internet via an Internet gateway. You can connect EC2 instances in a private subnet to the Internet through the NAT device, which routes traffic from the EC2 instance to the Internet gateway and routes the responses to the EC2 instance.

EXAM TIP Look out for questions that probe your understanding of how a NAT instance works. Remember that you can make your EC2 instances very secure by placing them in a private subnet with no EIP and routing all traffic through a NAT instance that lives in a public subnet. Amazon offers Linux-based Amazon Machine Images (AMIs) that are configured to run as NAT instances. You launch these instances into your public subnet.
When you create subnets, they inherit the VPC’s route table, security groups, and network ACLs. You must therefore modify the route table, security groups, and network ACLs to change the routing of Internet traffic to the subnet you created.
AWS recommends that you create a public subnet and private subnet for every AZ. The public subnet (used for the web layer) includes a route to the Internet. It has either a public IP or an EIP assigned to it. The private subnet (used for the database and application layer) has no route to the Internet and is assigned only a private IP address for internal communications inside the VPC.
If you want to set up the private subnet to send and receive Internet traffic, you must configure it to do so. If you want the private subnet to send network packets to the Internet, you must create a route in the subnet’s route table, specifying that the IP packets must be routed through either a NAT gateway or a NAT instance. For the private subnet to receive traffic from the Internet, the network packets must go through a load balancer of some type, such as the Classic Load Balancer or the Application Load Balancer (both described later in the section “Elastic Load Balancing”). A private subnet with a NAT gateway attached has a route table with the NAT gateway specified in a route, as shown here:

Accessing Your Corporate Network from Your VPC
You can connect your corporate data center with your Amazon VPC through an AWS-managed VPN connection. This in effect makes the AWS cloud an extension of your corporate data center. A VPN connection uses two gateways: a virtual private gateway on the AWS side and a customer gateway in your data center. The virtual private gateway is attached to your VPC and the customer gateway is a physical device or software appliance located in your data center.
NOTE If your AWS VPC doesn’t have an Internet gateway attached to any of its subnets, the only way to SSH into your EC2 instances is by creating a VPN connection.
Accessing AWS Services Through AWS PrivateLink AWS PrivateLink helps you privately connect your Amazon VPC to supported AWS services and to services that are hosted by other AWS account (VPC endpoint services). The traffic between your VPC and these services remains within the Amazon network. You don’t need an Internet gateway, a NAT device, an AWS Direct Connect connection, or a VPN connection to communicate with the services. When you create a VPC endpoint for a service in your VPC, you create an elastic network interface with a private IP address that the traffic sent to the service uses as an entry point.
Launching an EC2 Instance Inside Your VPC Follow these steps, in this order, to launch EC2 instances in a VPC:
1. Create an empty VPC, either with the AWS CLI command create_vpc or from the Amazon VPC console. (See Exercise 6-2 to create a VPC.)
2. Next, you can create subnets. To add a new subnet to a VPC, you need to specify an IPv4 CIDR block for the subnet from the IP range of a VPC. You can create a subnet with the create-subnet command or from the Amazon VPC console, as shown in Exercise 6-3.
3. After you create a subnet, you must configure routing. By default, a subnet you create is a private subnet. To make the subnet a public subnet, you must attach an Internet gateway to your VPC. So, you need to do the following:
• Create and attach an Internet gateway to the VPC.
• Create a custom route table and add a route to the Internet gateway.
4. Also, you can do the following to enhance the instance’s security in your VPC.
• Create a security group.
• Create network ACLs.
5. After you’ve created your subnet, configured routing, and secured the VPC, you can launch an EC2 instance into your subnet (from the EC2 console or via the command line with the create-instance command).
For the EC2 instance to communicate with services outside your VPC, you must associate a public IP address with the instance by assigning one when you create the instance. Alternatively, NAT can assign the IP address with the NAT service being provided by a NAT gateway.
NOTE The exercises at the end of this chapter help you perform each of the steps listed here to launch an EC2 instance in a VPC that you create after creating a subnet and configuring routing, followed by a configuration of a security group and network ACLs.
The Default VPC
Your account comes with a default VPC with a default subnet in each AZ. If you don’t create your own VPC, your EC2 instances will launch in the default VPC. The VPC you create is called a nondefault VPC. Subnets that you create in this VPC are called nondefault subnets.
The default VPC has the following components:
• A default subnet in each AZ
• A size /16 CIDR block (172.31.0.0/16), which provides up to 65,536 private IP addresses
• A default subnet /20, which provides up to 4096 addresses
• An Internet gateway
• A main route table, which routes all IPv4 traffic destined for the Internet to the Internet gateway
• A default security group and a default ACL that allow all traffic
• A default DHCP option set
Elastic Network Interfaces
An elastic network interface (ENI) is a virtual network interface that includes attributes such as these:
• A primary and one or more secondary private IPv4 addresses
• An EIP for each private IPv4 address
• A public IPv4 address that can be assigned to the eth0 network interface
• One or more IPv6 addresses
• One or more security groups
• A MAC address
• A description
Every instance in a VPC has a default network interface, which is the primary network interface (eth0). This interface has a private IPv4 address. Though you can’t detach an instance’s primary network interface, you can configure and attach multiple network interfaces to instances in your VPC. Among other things, multiple network interfaces offer an inexpensive high availability solution for instances in your VPC.
Let’s say, for example, that you have an application inside your VPC with hard-coded IP addresses. You can enable the application to fail over to new instances without having to reconfigure the application by assigning a secondary private IP address to the primary ENI that can be moved to a failover instance. You can also achieve the failover capability by creating a secondary ENI that can be moved to a failover instance. You can do both of these when launching an instance (cold attach), when you are allowed to specify up to two network interfaces. You can also add network interfaces to a running instance (hot attach) or when the instance is stopped (warm attach). If you specify more than one network interface for an instance, you can’t auto-assign a public IPv4 address to that instance.
The maximum number of network interfaces depends on the instance type. For example, the c4.8xlarge instance type can have a maximum of eight network interfaces and up to thirty IPv4 addresses per interface.
An elastic network interface is a static public IPv4 address associated with your account. The interfaces are associated with your AWS account, not to the instances. You can thus associate an ENI with any instance or network interface in your VPC. When you turn off an instance, the ENI that you’ve associated with that instance remains. If you delete the instance, the ENI continues to be associated with your account, because you created it.
When you create a network interface, it inherits the public IPV4 address from the subnet. After you create a network interface (same as an ENI in our context), you can attach it to an instance, detach it from that instance, and attach it to another instance. The network interface carries over the attributes that you’ve defined, and network traffic is sent to the new instance to which you attached the network interface. If you want, you can modify the network interface’s attributes—say, by changing its security groups and managing its IP addresses.
NOTE The network interface determines the public IPv4 addressing attribute of an instance when you launch an instance and specify an existing network interface as its primary network interface (eth0).
You can monitor IP traffic going to and from a network interface by enabling a VPC flow log on the network interface. Once you create the flow log, you can view its data in CloudWatch Logs.
Attaching Multiple Network Interfaces to an Instance
You can attach multiple network interfaces to an instance in the following use cases.
Create a Low Budget High Availability Solution You can keep a hot-standby instance running and preconfigure it for the same role as the primary network interface. When the primary instance fails, you attach the primary network interface to the hot-standby instance. When you attach the network interface to the secondary instance, the interface maintains its private IP addresses, EIPs, and MAC address, which helps network traffic to start going to the standby instance.
Create a Management Network Multiple network interfaces help support a management network. You set up the primary network interface (eth0) to handle public traffic and a secondary network interface (eth1) to take care of management traffic.
You configure different access controls for the primary network (public traffic) and the secondary network (management traffic) interfaces. Typically, the access to the public network is less restrictive, and the security group that you associate with this interface permits access to the server from the Internet.
The security group associated with the secondary network interface doesn’t face the Internet. It’s a private-facing interface for management purposes. The security group associated with the secondary interface allows SSH access for a small set of IP addresses (in the Internet or in your own VPC, or a virtual private gateway).
Create Dual-Home Instances Multiple network interfaces help you manage workloads (and roles) on separate subnets. Suppose you have two web servers that connect to a middle tier where an application server runs. In this scenario, you can also configure the application server as dual-homed to a backend network (subnet) such as the database server’s network. Each of the dual-homed instances can receive requests on the front end and send their requests to the servers running in the backend network.
NOTE Several network and security appliances such as load balancers, proxy servers, and NAT servers require that you configure them with multiple network interfaces.
Creating, Attaching, and Detaching a Network Interface
You can create a network interface from the command line with the ec2 create-network-interface AWS CLI command or create it from the Amazon EC2 console. You can create a network interface in a subnet, but you can’t move it to a different subnet.
You can attach a network interface to an instance while the instance is running or while it is stopped. You can also attach the network interface (both primary and secondary) when you’re launching an instance. And you can attach the interface to instances running in the same AZ.
You can’t detach the primary interface (eth0). However, you can detach a secondary (ethN) network interface while the instance is running or is stopped.
NOTE Exercise 6-4 shows how to create a network interface using the Amazon EC2 console.
Elastic IP Addresses
An EIP is a static public IPv4 address reachable from the Internet that you can associate with an instance or network interface in a VPC. An EIP is associated with an account while a public IP is assigned to a specific instance. If you reboot an instance, neither a public IP nor an EIP that is associated with the instance is removed. If you stop an instance, while a public IP is removed from the instance, the EIP stays with the instance. If an instance fails, the IP address can be quickly remapped to another EC2 instance in your VPC.
Here’s what you need to remember about an EIP:
• You can associate an EIP address to an EC2 instance or a network interface.
• You can move an EIP from one EC2 instance to another.
• If you associate the EIP with a network interface, you can move all the attributes for the interface from one EC2 instance to another.
• When you associate an EIP with an instance that has a public IPv4 address, the public DNS name of the instance changes and becomes the same as that for the EIP.
• An EIP is a regional entity.
• An EIP is accessed through a VPC’s Internet gateway.
• You must first allocate an EIP for use in your VPC, before you can associate it with an instance or a network interface. (Exercise 6-1 shows how to perform both tasks.)
• If you associate an EIP to an instance or its primary network interface, the instance’s public IP address, if you’ve assigned one, goes back to Amazon’s pool of public IPv4 addresses.
• You can assign an EIP only to one instance at a time.
• You associate an EIP with an EC2 instance by configuring the network interface that you’ve attached to that interface.
• When you move an EIP from an instance, the new instance can be in the same or in a different VPC.
• You can disassociate an EIP from an instance or network interface and re-associate it to a different instance or interface. An EIP you’ve disassociated from a resource remains allocated to you until you release it.
• You can have a maximum of five EIP addresses, which is a soft limit that can be increased by submitting a request to AWS. Use a NAT device to conserve your limited EIPs. AWS won’t charge you for one EIP associated with a running instance but will charge you for any additional EIPs you’ve associated with that instance.
Route Tables
A VPC that you create will have one or more subnets. Each of those subnets must be associated with a route table, which contains a set of rules (routes) that determine where network traffic is directed in a subnet.
NOTE A subnet can have only one route table at a given time. However, multiple subnets can use the same route table.
Main and Custom Route Tables
Each VPC comes with a default route table called the main route table. If you don’t associate a subnet explicitly with any custom route table of your own, the subnet is implicitly associated with the main route table.
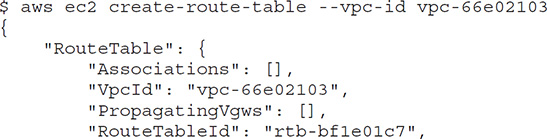
The default route table for a VPC with the CIDR range of 10.3.0.0/16 looks like the following, with a single route:
![]()
This route table specifies that all IP packets with the destination address in the 10.3.0.0/16 network (addresses between 10.3.0.0 and 10.3.255.255) are delivered within this VPC. Suppose you create a private subnet with CIDR range 10.3.55.0/24 in this VPC. The default route table for this subnet will be 10.3.0.0/16, since a subnet inherits its default route table from the VPC.
By default, the main route table doesn’t contain a route to an Internet gateway. You can modify the main route table, and add other addresses, as shown here with two routes, the second one added by you:

As with the first example, the first route delivers all network traffic bound for the 10.155.0.0/16 network within this VPC. The second route ensures that all other network traffic bound for this network is routed to the Internet gateway.
You can make a private subnet a public one by adding a route to an Internet gateway. You must first create an Internet gateway and then add a route with a destination of 0.0.0.0/0 for IPv4 traffic or ::/0 for IPv6 traffic, along with a target of the Internet gateway ID (igw-xxxxxxxxx).
You may explicitly associate a subnet with the main route table, although it’s not common. You do this temporarily when replacing the main route table. Custom route tables that you create help you explicitly control how a subnet routes outbound traffic.
Creating a Route Table
You can create a route table with the aws ec2 create-route-table command. You must specify the VPC. Here’s an example:
Connecting to the Internet or Other External Networks from a VPC
You can create a VPC that has no connectivity to the Internet or to your other AWS services or networks, but that wouldn’t be of much use to you. Instead, you can set up external connectivity from a VPC through various means:
• Internet gateway This VPC component enables communications between the EC2 instances in a VPC and the Internet. It is a redundant and highly available component that provides a target in the route tables for traffic to or from the Internet, and it performs NAT for instances with public IPv4 addresses.
• NAT gateway This gateway enables EC2 instances in a private subnet to connect to the Internet and to other AWS services. The big difference between the NAT and Internet gateways is that the NAT gateway prevents the Internet from initiating connections to your EC2 instances.
• VPN gateway This gateway enables VPN connections through the Internet to your on-premise data centers.
• VPC endpoints VPC endpoints enable a VPC to connect to services such as Amazon Simple Storage Service (S3) that don’t live inside your VPC (remember that EC2 instances live inside the VPC).
• VPC peering connections These enables connectivity between a VPC and another VPC, both owned by you as well as those outside your AWS account.
NOTE AWS doesn’t charge you for using a VPC, and you continue to pay the standard rates for instances and other EC2 features. You must pay a charge for using the AWS-managed VPN connection and for using a NAT gateway.
Enabling Internet Access for an EC2 Instance Inside a Subnet
For an instance inside a VPC subnet to access the Internet, you must first attach an Internet gateway to the VPC. Then you must ensure that the subnet’s route table points to the Internet gateway. The scope of the route can be all destinations not explicitly known to the route table, such as 0.0.0.0/0 for IPv4 addresses or ::/0 for IPv6 IP addresses. You can also narrow the route to a specific range of IP addresses, such as the EIP of EC2 instances outside the VPC.
Each instance in the subnet must have a globally unique IP address, such as a public IPv4 address, an EIP that’s associated with a private IPv4 address on the instance, or an IPv6 address. The Internet gateway provides the NAT on behalf of the instance. The reply address field of the traffic going to the Internet is thus set to the public IPv4 instead of the private IP address of the instance. Similarly, the destination address of traffic sent to the public IPv4 or the EIP of the instance is translated by NAT to the instance’s private IPv4 address to deliver the inbound Internet traffic to the VPC.
NOTE The network ACLs and security groups rules must allow the Internet traffic to flow to and from the instances.
Creating a VPC
Although AWS does offer you a default VPC, it’s a good practice to create your own VPC. You can create a VPC through the VPC Wizard in the Amazon VPC console. When you use the VPC Wizard to create your VPC (follow the steps in Exercise 6-3), the wizard does the following for you:
• It creates a VPC with a /16 IPv4 CIDR block.
• It associates a /56 IPv6 CIDR block with the VPC.
• It attaches an Internet gateway to the VPC.
• It creates a subnet with a /24 IPv4 CIDR block and a /64 IPv6 CIDR block in your VPC.
• It creates a route table and associates it with the subnet it creates, to facilitate network traffic between that subnet and the Internet gateway.
EXAM TIP The exam probes deeply into your understanding of a VPC, including things such as private and public subnets. Remember that a subnet that you associate with a route table that has a route to an Internet gateway is a public subnet. Also, a VPC’s default settings will only assign a private UP address for the instances in a subnet (the Auto-assign Public IP property is by default set to no). You must also configure any EIPs and the Internet gateway, since these aren’t configured by default when you create a subnet.
From the AWS CLI, you can execute the create-vpc command to create a VPC:
$ aws ec2 create-vpc –cidr-block 10.0.0.0/16
To create a VPC manually with a single public subnet that supports Internet access through an Internet gateway, follow these steps:
1. Create the subnet. (Exercise 6-3 shows how to do this.)
2. Create and attach an Internet gateway (or a NAT gateway) to the VPC. (Exercise 6-7 shows how to create a NAT gateway.)
3. Create a custom route table and associate that with the subnet, since, by default, the main route table doesn’t contain a route to an Internet gateway. (Exercise 6-8 shows how to create a route for a NAT gateway.)
4. Update the security group rules.
Common VPC Scenarios
I described the generic process for creating a VPC, but you can create a VPC under various scenarios, with different configurations for your subnets, route table, and other VPC components. Let’s run through two basic VPC configuration scenarios.
A Simple Single Public Subnet Scenario
This simple VPC has a single public subnet and an Internet gateway that allows Internet communications. AWS recommends this type of configuration for a simple public-facing web applications, such as a small web site or a blog.
In this simple scenario, the VPC’s configuration can have the following components:
• A VPC with a size /16 IPv4 CIDR block (remember, this is the maximum size you choose for a VPC’s CIDR block and supports 65,536 private IPv4 addresses).
• A single subnet, which can be as large as /16, but is usually something like size /24 IPv4 CIDR block (for example, 10.0.0.0/24), providing 256 private IPv4 addresses.
• An Internet gateway to connect this VPC to the Internet as well as other AWS services. An Internet gateway isn’t automatically attached to a VPC by default; you must attach the gateway to your VPC and ensure that the subnet’s route table points to the gateway.
• Assigned instances running in this subnet private IPv4 addresses in the subnet’s range, which is 10.0.0.0–10.0.0.0.255. You can assign an instance the private IP address of 10.0.0.8, enabling the instance to communicate with other instances in this VPC. You also assign an EIP such as 198.51.100.4, which is a public IPv4 address that enables these instances to be reached from the Internet.
• The custom route table associated with the subnet, which enables instances in this subnet to communicate with other instances running in your VPC, and to communicate directly over the Internet.
EXAM TIP The certification exam quizzes you on your knowledge of an Internet gateway. Remember that an Internet gateway does two things: it provides a target in the route tables for Internet routable traffic, and it performs network address translation (NAT) for instances to which you’ve assigned public IPv4 addresses. You must explicitly create the gateway and attach an EIP to an instance so you can connect to the Internet from the instance.
A VPC with a Public and a Private Subnet
Another common scenario is a VPC with both public and private subnets. AWS recommends this configuration when you want to run public-facing web applications while also running backend servers (such as those that host database servers) without any public access.
In this scenario, instances that run in the public subnet can directly send outbound traffic to the Internet, and instances in the private subnet can access the Internet only via a NAT gateway. The NAT gateway is located in the public subnet.
Although the database servers can access the Internet (for things such as software and security updates) via the NAT gateway, the Internet won’t be able to initiate inbound connections to the database servers.
A typical configuration of two subnets, one private and the other public, includes the following entities:
• A VPC with a size /16 IPv4 CIDR block such as 10.0.0.0/16
• A public subnet, such as 10.0.0.24, associated with a route table with a route to an Internet gateway
• A private subnet, such as 10.0.1.24
• An Internet gateway to connect the VPC to the Internet as well as to other AWS services
• Instances in this VPC may have difference connectivity capabilities:
• Instances with private IPv4 addresses in the subnet range, such as 10.0.04 and 10.0.1.5, are allowed to communicate with each other within the VPC.
• Instances in the public subnets can have an EIP address, such as 198.51.100.1, that enables them to be reached from the Internet. You can also assign a public IP address for these instances when you launch them, instead of assigning them an EIP.
• Instances in the private subnet that run in the backend won’t have any public IP addresses since they don’t need to accept traffic from the Internet. However, these instances can send requests to the Internet via the NAT gateway (located in the public subnet).
• A NAT gateway in the public subnet with an EIP, which allows instances in the private subnet to send requests to the Internet.
The public subnet has a custom route table associated with it. This route table contains two entries: The first entry enables instances in this subnet to communicate with other instances in the VPC. The second entry enables the instances to communicate directly with the Internet (over IPv4). The route table looks like this:

EXAM TIP Be sure to understand the difference between the main route table and a custom route table. In a VPC, the main route table is associated with the private subnet and the custom route table with the public subnet.
The private subnet has the main route table associated with it. This route table also contains two entries. The first entry enables instances in this subnet to communicate with the other instances in the VPC, and the second entry enables the instances to communicate with the Internet via the NAT gateway.
![]()
If a subnet doesn’t have a route to the Internet gateway, but instead has its traffic routed to a virtual private gateway (this is called a site-to-site, or S2S, connection), the subnet is a VPN-only subnet. Only IPv4 traffic is currently supported over a S2S VPN connection.
NOTE If you have a running NAT instance in your VPC, you can’t delete the VPC. If you have other EC2 instances in a subnet, you also can’t delete that subnet.
Securing Your VPC
Let’s say, for example, that one of the instances in a subnet is running a database and another instance in another subnet is running a web application that needs to talk to the database. To ensure that the database and the web application can talk to each other, you must ensure that you configure the VPC’s security groups so that they allow the application host to talk to the database on the correct protocol. You must also configure a NACL that allows communication between the two subnets.
Amazon VPC offers three main features or capabilities to secure your VPC: security groups, NACLs, and VPC flow logs, which monitor network traffic going to and coming from VPC, rather than a full-fledged security feature. Both security groups and network ACLs can enhance your VPC’s security.
Security Groups
A security group serves as a virtual firewall to control the traffic for one or more EC2 instances. You can specify one or more security groups when you launch an instance or use the default security group of the VPC.
Security groups provide strong security for the instances, but NACLs (discussed next) offer an additional layer of security at the subnet level. The EC2 instances in your VPC don’t have to belong to the same security group; they can each belong to a separate security group.
Security Group Rules You add rules to each of your security groups to control traffic into the instances. One set of rules controls inbound traffic, and another set controls outbound traffic from the instances:
• Inbound rule Consists of the traffic source and the source port (or port range). The source may be another security group, a single IP address, or an IPv4 or IPv6 CIDR block.
• Outbound rule Contains the traffic destination and the destination port (or port range). The destination may be another security group, a single IP address, or an IPv4 or IPv6 CIDR block.
NOTE Security groups are stateful, which means that the return traffic is automatically allowed, regardless of any rules that you may configure.
A security group rule contains the following entities:
• Any protocol with a standard protocol number
• An optional description of the rule
NOTE Security groups let you filter only on destination ports, not source ports.
You can specify allow rules that allow traffic, and deny rules that keep traffic from flowing into or out of an entity. You can specify allow rules only for a security group, not deny rules. The type of security group rules that you add depend on the role that the EC2 instance plays. A database server would need a security rule that allows inbound MySQL access, for example.
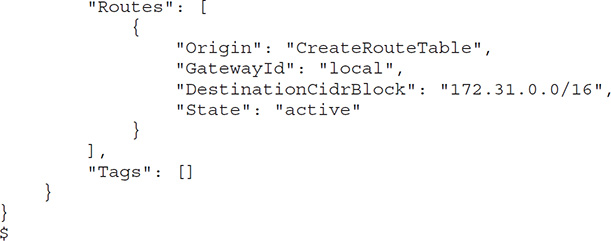
A rule for a security group for a web server looks different from that of a database server. A web server usually needs to receive HTTP/HTTPS traffic from all IPv4/IPv6 addresses. So its inbound rules would be something like that shown in Table 6-2.
Table 6-2 A Security Group’s Inbound Rules
NOTE Remember that if you want anyone to be able to access an application running in one of your instances, the source IP range must be 0.0.0.0/0. If, on the other hand, you want to, say, SSH into an instance from a specific IP address, then the source IP is that of the address from which you want to allow the SSH connectivity.
The same set of web servers also needs to send Microsoft SQL Server and MySQL traffic to a database server, so the outbound rules for the security group could look like this:

Default Security Group Behavior The default security group has an initial set of rules that enables all instances associated with the security group to communicate with each other. However, instances from other security groups by default can’t communicate with each other, unless you add security rules explicitly allowing those instances to communicate.
Here are a few summary points about a default security group:
• A security group has an outbound rule, and the rule allows all outbound traffic. You can remove the outbound rule entirely or add outbound rules that allow only specific outbound traffic.
• There are no inbound rules by default. Therefore, all traffic from other hosts is denied, until you add appropriate inbound rules to the security group.
• All traffic between instances in a default security group is allowed.
• You can’t delete a default security group, but you may change its rules, just as you can with any other security group.
Security Group Statefulness A security group is stateful. In other words, all responses to requests that an instance sends out are allowed in, irrespective of the inbound security group rules. Similarly, responses to all permitted inbound requests are also allowed to flow out, irrespective of the security group’s outbound rules.
Creating Security Groups Every VPC comes with a default security group, but you need to create your own custom security groups to control the traffic into and out the various instances that you run in your VPC. You can create a security group from the AWS CLI by executing the create-security-group command:
$ aws ec2 create-security-group --group-name MySecurityGroup --description "My security group" --vpc-id vpc-1a2b3c4d
Run the describe-security-groups command to describe one or more security groups, as shown in this example:
$ aws ec2 describe-security-groups --group-ids sg-123008a4
This command displays information about the security group with the ID sg-123008a4.
NOTE Exercise 6-5 shows how to create a security group from Amazon VPC console.
Network Access Control Lists
NACLs help you control inbound and outbound traffic to a subnet. While a security group controls traffic going to and from an instance, ACLs offer an additional layer of protection at the subnet level. Each subnet must be associated with a NACL, and the rules that you configure for the ACL apply to the entire subnet. Every VPC comes with a default NACL that allows all inbound traffic. Each subnet must be associated with a NCL, and if you don’t associate a subnet with a network ACL, the subnet is associated with the default NACL. You can add or remove rules from the default network ACL and associate a subnet with a different custom ACL that you create. You can also change the default ACL if you want. A custom network ACL that you create and associate with a subnet by default denies all inbound and outbound traffic. You can associate a network ACL with multiple subnets, but the opposite isn’t true. In other words, you can associate a subnet with only one network ACL.
You can divide your VPC into logical areas by configuring a NACL that restricts which subnets in your VPC can talk to each other—for example, if you don’t want development team members working in a development subnet to impact production instances that you’re running in a separate production subnet.
Security groups and NACLs work in tandem. If an instance running Subnet A can’t ping another instance running in Subnet B, there are two possible reasons:
• The NACL in Subnet B doesn’t allow outbound ICMP traffic (ping uses ICMP).
• The security group that you attached to Subnet B doesn’t allow inbound ICMP traffic.
NACL Rules As with security group rules, NACLs have separate inbound and outbound rules that can either allow or deny traffic:
• Inbound rule Consists of the traffic source and the destination port (or port range). The source may be another security group, a single IP address, or an IPv4 or IPv6 CIDR block.
• Outbound rule Contains the traffic destination and the destination port (or port range). The destination may be another security group, a single IP address, or an IPv4 or IPv6 CIDR block.
Unlike security groups, NACLs are stateless, meaning that responses to any allowed inbound external traffic depend on the NACL rules for outbound traffic. The same principle applies to requests sent via outbound traffic.
A NACL rule has the following components:
• Rule number Each rule has a number, and the rules are evaluated starting with the lowest numbered rule. As soon as a numbered rule matches the traffic (network packet), the rule is applied.
• Protocol Any protocol with a standard protocol number can be used.
• A choice of ALLOW or DENY for the specified traffic Suppose you configure an ACL for Subnet A that specifies two rules: Rule #100 explicitly denies TCP traffic on port 21 from 0.0.0.0/0 and Rule #110 explicitly allows TCP traffic on the same port from 0.0.0.0/0. Since rules are evaluated starting from the lowest numbered rule, Rule #100 is evaluated first. Rule #110 is ignored, since there’s already a match with a lower numbered rule (#100). The explicit deny in Rule #100 overrides the explicit allow in Rule #110, and traffic is disallowed.
If you need to block access for specific IP addresses to your VPC, you can modify the NACLs associated with the public subnets in the VPC to prevent requests from the IP addresses to access your VPC. You must create an inbound rule for the NACL that denies traffic coming from one or more IP addresses so that the inbound request is stopped at the subnet level. So, if you suspect that a web server is under a phishing or a Denial of Service (DoS) attack and you identify a specific IP address or a set of IP addresses as the source of the attack, you can configure an ACL rule to block all traffic coming from this IP address. You place a DENY rule in the NAL to deny access to the IP addresses.
NOTE Both the default NACL and all custom NACLs include a rule whose number is an asterisk (*). This rule’s purpose is to ensure that all packets that don’t match any of the numbered rules are denied. You cannot remove or alter this rule.
VPC Flow Logs
VPC Flow Logs enable you to capture information about the IP traffic passing to and from your VPC’s network interfaces. You can choose to publish the flow log data to Amazon S3 and CloudWatch Logs, from where you can view the flow log data.
VPC Flow Logs help you secure your instances by monitoring your network traffic. They also help in troubleshooting certain issues, such as when network traffic fails to reach an instance because of security group rules with overly restrictive filtering rules.
NOTE When you use flow logs, CloudWatch charges apply, regardless of whether you configure the storage of the flow logs in CloudWatch Logs or Amazon S3.
You can create a flow log for a VPC, a subnet, or a network interface. AWS monitors all network interfaces in a VPC or subnet when you create a flow log at the subnet or VPC level. Each network interface traced by flow logs has a separate log stream, which consists of log records that store the log events pertaining to the network traffic for a specific network interface.
When you create a flow log, you specify the following key entities:
• Resource VPC, subnet, or network interface
• Traffic type Accepted, rejected, or all traffic
• Destination at which to publish the records Amazon S3 or to the CloudWatch Logs service.
Although you can create flow logs for network interfaces created by AWS services such as Amazon RDS, Elastic Load Balancing (ELB), and Amazon ElastiCache, you cannot do so from the consoles or APIs that belong to these services. You must create the flow logs for these network interfaces from the Amazon EC2 console or the Amazon EC2 API. In addition, you cannot create the log streams from the CloudWatch Logs console or API.
The capture window for a flow log record is the duration of time for which the flow logs service aggregates data before it publishes the flow log records via S3 or CloudWatch Logs. The capture window is around 10 minutes but can be extended to 15 minutes. This means that you can’t expect flow logs to capture the real-time log events for the network interfaces.
You cannot enable flow logs for VPCs that are peers of your VPC unless the other VPCs are also in your AWS account. Flow logs don’t capture all IP traffic. For example, they don’t log DHCP traffic and traffic generated by EC2 instances when they contact the Amazon DNS service.
Amazon VPC Optional Components
Amazon VPC offers several optional components that you can use for various purposes:
• NAT gateways NAT gateways enable instances in private subnets to connect to the Internet and other services but prevent the Internet from initiating connections with the instances in the subnet.
• DHCP options sets The Dynamic Host Configuration Protocol is a standard for passing configuration parameters to hosts on a TCP/IP network. The parameters include the domain name, domain name server, and the netbios-node-type.
• VPN connections These are private connections you establish between the Amazon VPC and remote networks or an on-premise network.
• VPC peering VPC peering is a networking connection between two VPCs that helps you transmit traffic between the VPCs with private IPv4 or IPv6 addresses. The two VPCs communicate as if they were in the same network.
We’ll review these optional VPC components in the following sections.
NAT Instances and NAT Gateways
You use a NAT device when you want to let instances in a private subnet connect to the Internet or to other AWS services, but block the Internet from initiating connections to those instances. You also use the NAT device to forward traffic from instances that live in a private subnet. NAT forwards the traffic from the instances to the Internet and returns the response back to the instances. When the NAT device forwards the traffic from the instances to the Internet, it replaces the instance’s IP address with the NAT device’s address. Similarly, when the NAT device sends response traffic to these instances, it translates the address back to the instance’s private IP address.
NOTE Because NAT devices aren’t supported for IPv6 traffic, you must use an egress-only Internet gateway for IPv6. AWS offers two types of NAT devices: NAT gateways and NAT instances. Though you must manage a NAT instance yourself from a NAT AMI, AWS manages the NAT gateway service. NAT instances are meant for use in special cases where you want more control. There is a charge for creating and using a NAT gateway.
How a NAT Gateway Works You must specify a public subnet and an EIP to create a NAT gateway. The NAT gateway lives in this public subnet. You can associate only one EIP to a NAT gateway. After you create the NAT gateway, you must update the route table of the private subnet (could be multiple) to direct all Internet-bound traffic to the NAT gateway, allowing the instances in that private subnet to talk to the Internet.
For availability purposes, AWS creates a NAT gateway in an AZ and implements redundancy in that zone. If the AZ goes down, the resources from other AZs that use this gateway lose their Internet access. To keep your operations running despite an AZ failure, you must create a NAT gateway in each AZ.
Any ACLs that you create in a subnet in which you locate the NAT gateway apply to the NAT gateway’s traffic. You can thus use network ACLs to control traffic to and from this subnet.
Let’s say you’re running a set of EC2 instances in a private subnet such as 10.0.1.0/24. You’ve also set up a NAT instance in your public subnet. The EC2 instances running in the private subnet need to download their updates from the Internet via HTTPS. You must add an incoming rule to the security group for the NAT instance that allows incoming requests from Source 10.0.1.0/24 on port 443.
VPC Endpoints, VPC Peering, VPN, AWS Direct Connect, and NAT Gateways You won’t able to use a NAT gateway to send traffic over VPC endpoints, VPN, Direct Connect, or a VPC peering connection. The instances in the private subnet must use the subnet’s route table to route traffic directly to these devices. Similarly, resources on the other side of the VPC peering connection, a VPN connection, or Direct Connect can’t route traffic to a NAT gateway.
Here’s an example of a private’s subnet’s route table’s routes:
• Internet-bound traffic (0.0.0.0.0) is routed to a NAT gateway.
• The traffic for 10.25.0.0/16, which is more specific than 0.0.0.0/0, is routed to a VPC peering connection.
• The instance’s Amazon S3-bound traffic uses (pl-xxxxxxxx), a specific IP address range for Amazon S3, and is routed to a VPC endpoint.
Creating a NAT Gateway You can use the Amazon VPC console to create a NAT gateway. To create the gateway, you must specify a public subnet and an EIP.
NOTE Exercise 6-7 walks you through the steps for creating a NAT gateway.
After you create the NAT gateway, you must update the route table of the private subnet (or subnets) so it can direct Internet traffic to the NAT gateway. Figure 6-4 shows the architecture of a VPC with a NAT gateway.
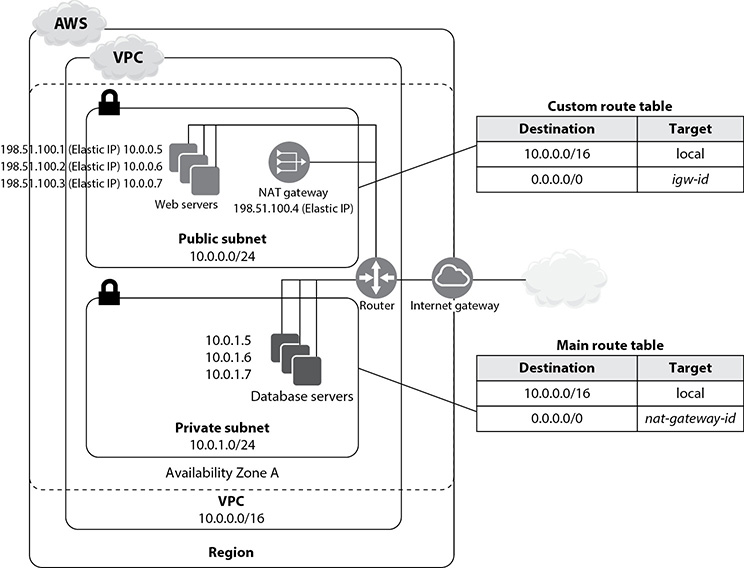
Figure 6-4 Architecture of a VPC with a NAT gateway
DHCP Option Sets
DHCP is a standard for passing configuration information to hosts running on a TCP/IP network. You can configure what are known as DHCP options sets for a VPC. When you launch an EC2 instance into your VPC (custom, not the default VPC), by default, the instance has only a private IP address, and not a public IPv4 address. You can change this default behavior by specifying a public IP for the instance when you launch it, or by modifying the subnet’s public IPv4 address attribute.
AWS assigns all instances in a non-default VPC that you create an unresolvable host-name, such as ip-10-0-0-204. AWS automatically creates a set of DHCP options for a VPC when you create the VPC. The default DHCP options set contains two DHCP options:
• domain-name-servers The AmazonProvidedDNS points to an Amazon DNS server that provides DNS for EC2 instances that want to connect to the Internet over the VPC’s Internet gateway.
• domain-name Domain name for your region.
AWS provides an EC2 instance that you launch into a nondefault VPC with a private DNS hostname. It might also provide a public DNS hostname, if your instance has a public IPv4 address and you’ve also configured the required DNS attributes for your VPC. The two VPC attributes that you must set are
• enableDnsHostnames If you set this attribute to true, the instances in your VPC get public DNS hostnames, but only if you’ve also set the enableDnsSupport attribute to true.
• enableDnsSupport If you set this attribute to true, DNS resolution is supported for your VPC.
When you set both attributes to true, this is what happens:
• The instances in this VPC receive public hostnames.
• The Amazon-provided DNS server resolves Amazon-provided private DNS hostnames.
If you haven’t set both attributes to true, your instance gets a custom private DNS hostname, if you’ve specified a custom domain name in your DHCP options set.
The default public DNS hostnames for the instances have the following form:
• ec2-public-ipv4-address.compute-1.amazonaws.com (for the us-east-1 region)
• ec2-public-ipv4-address.region.compute.amazonaws.com (for all other regions)
The private hostnames take the following forms:
• ip-private-ipv4-address.ec2.internal (for the us-east-1 region)
• ip-private-ipv4-address.region.compute.internal (for all other regions)
You can configure the supported options for a DHCP options set for use with your VPC, to do things like assigning your own domain name to your instances. Here are the five DHCP options you can set:
• domain-name-servers You can provide the IP addresses of up to four domain name servers if you don’t want to use the default Amazon DNS server, AmazonProvidedDNS. Suppose, for example, your corporate policies dictate that the DNS name for your internal applications must be resolved internally and not publicly over the Internet. You can create a DHCP option set that includes both options for the domain name servers—AmazonProvidedDNS and your internal DNS server name.
• domain-name If you’re using AmazonProvidedDNS in the us-east-1 region, specify ec2.itnernal land region.compute.internal for all other regions. If you’re not using AmazonProvidedDNS, you must specify a domain name such as mycompany.com.
• ntp-servers You can specify up to four Network Transfer Protocol (NTP) servers by providing their IP addresses.
• netbios-name-servers You can specify up to four NetBios name servers by suppling their IP addresses.
• netbios-node-type You can specify a NetBios node type, such as point-to-point, broadcast, and multicast. AWS recommends specifying node type 2 (point-to-point, or P-node). The broadcast and multicast types aren’t supported at this time.
VPN Connections
A VPN connection is a connection between your AWS VPC and your own network. You can also connect your VPC to a remote network through a Virtual Private network (VPN) connection. You can choose to use AWS Managed VPN (hardware VPN) to set up the connection to your remote networks. Alternatively, you can do the same thing by configuring an EC2 instance in your VPC that runs a third-party software VPN appliance that is provided by the AWS Partner Network and the open source community. A software VPN offers you more control, but you also become responsible for managing it and ensuring that the software is working as designed. AWS doesn’t provide support or maintain a third-party VPN appliance.
When using an AWS Managed VPN, you can enable connectivity between your VPC and your own remote networks by attaching a virtual private gateway to the VPC and creating an AWS-managed VPN connection.
A VPN connection contains several components, such as a virtual private gateway and a customer gateway. You must ensure that a customer gateway is in place, attach a virtual private gateway to your VPC, and create the VPN connection.
NOTE Most organizations use either, or both, AWS Direct Connect and VPN connections to connect their WANs (wide area networks) to AWS.
VPN Gateway A VPN gateway (also called a Virtual Private Gateway or VGW ) works on the Amazon side of the VPN connection. You create the VPN and attach it to your VPC from where you want to create the VPN connection to your remote network. You can use a VPN gateway to provide either a VPN connection through the Internet to your on-premise location or an AWS Direct Connect connection to your location. Remember the following:
• If you’re setting the VPN gateway to provide a VPN connection, two connections are configured for availability purposes, and the gateway supports both static routing and Border Gateway Protocol (BGP).
• When you set up a VPN gateway for an AWS Direct Connect connection, it supports only BGP.
By enabling route propagation, you allow a virtual private gateway to automatically propagate routes to the route tables, removing the need for you to manually enter the VPN routes to the route tables. So, if don’t see any network traffic on the AWS side of your VPN connection to your VPC, ensure that route propagation is turned on in your VPC’s main route table, after you attach the virtual private gateway to your VPC.
Customer Gateway The customer gateway is a physical device (or virtual software application) that you configure on your remote network. You create the customer gateway resource in AWS to provide information about the device, such as the IP address of its external interface and the type of routing (static/dynamic) used. After creating the resource in AWS, you must configure the device (or software application) in the remote network to enable the VPN connection. You must set up routing so that any traffic from your VPC to your remote external network is routed to the Virtual Private Gateway.
Route Tables You must add a route to your remote network in your route table, with the virtual private gateway as the target. This ensures that the VPC’s traffic going to your remote network passes through the Virtual Private Gateway and over a VPN tunnel.
Configuring VPN Tunnels and High Availability When traffic is generated from the remote network side of the VPN connection, the customer gateway initiates VPN tunnels. A VPN gateway comes with two publicly reachable IP addresses routed through a pair of IPsec tunnels, each using a separate Virtual Private Gateway public IP address. Both tunnels must be working for redundancy purposes. Figure 6-5 shows the two tunnels of a VPN connection.
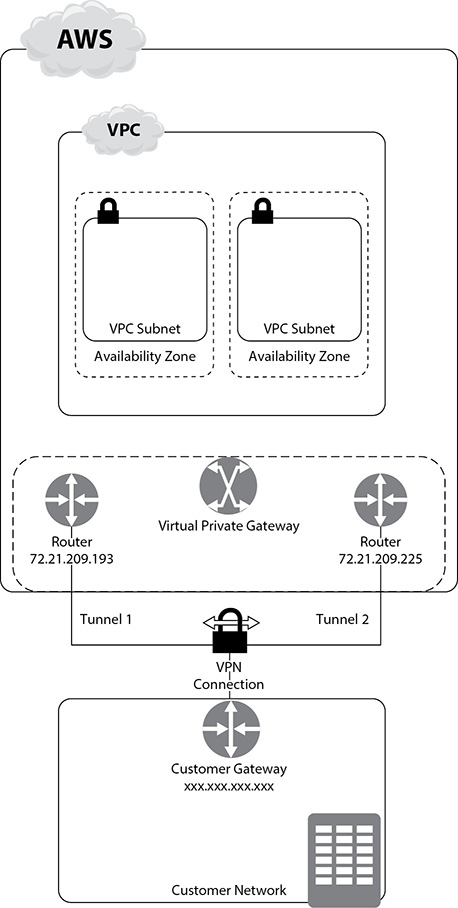
Figure 6-5 Configuring both tunnels for redundancy of a VPN connection
To protect against the unavailability of one customer gateway, it’s a good idea to configure a second customer gateway to set up a redundant, secondary VPN connection to your VPC and Virtual Private Gateway. The two public IP addresses that you need to provision for the tunnels can be on a single customer gateway or on two customer gateways in the same or a different location. More than one customer gateway can connect to a VPN gateway.
A software VPN supports two tunnels. To make a hardware VPN redundant, download the router configuration from the AWS Management Console and configure two customer gateways, each with endpoints for the hardware VPN’s virtual private gateway.
If you are deploying Direct Connect to replace your VPN connection to your VPC, failover to the new Direct Connect connection is automatic, using the BGP. Once established, the Direct Connect connection path will always be the preferred path.
AWS VPN CloudHub If you have several VPN connections, you can enable the multiple remote sites to communicate with one another and not just with the VPC, by setting up the AWS VPN CloudHub. VPN CloudHub uses a VPN gateway and a hub-and-spoke architecture to connect multiple customer gateways. VPN CloudHub uses BGP, with each customer location assigned a different autonomous system number (ASN).
To configure the AWS VPN CloudHub, you must first create multiple customer gateways. Then you create a VPN connection between each of the customer gateways to the same virtual private gateway.
Using VPN as a Backup for AWS Direct Connect You can use a VPN connection as a backup to AWS Direct Connect. Let’s assume, for example, that you’ve configured both a VPN connection and AWS Direct Connect. Should the Direct Connect connection fail for any reason, your VPN can act as a backup for transmitting your data. This is provided by the AWS route preference algorithm, when it has multiple routes to choose from. The route preference is in the following order:
• A VPC’s local routes
• Longest prefix first from the route tables
• Static routes
• AWS Direct Connect BGP
• VPN static routes that you’ve configured in your VPN connection
• VPN BGP
You can use a Direct Connect connection as your main means of connectivity to your VPC, but configure a VPN backup as a lower-cost backup connection.
VPC Peering
A VPC peering connection enables two VPCs to communicate as though they are part of the same network. These connections enable a VPC to access resources in one of your other VPCs. You can create a peering connection between VPCs in your own AWS account, VPCs in a different AWS customer’s account, or VPCs in a different AWS region. Creating a peering connection provides the other VPC(s) an entry in the VPC’s route table.
NOTE A VPC peering connection is different from a VPN connection or a gateway because there’s no physical hardware involved.
A VPC peering connection makes it easy to transfer data between multiple AWS accounts you own by creating a file sharing network to transfer the data easily.
You can set up VPC peering connections that provide access (routes) to parts of a CIDR block, an entire CIDR block, or a specific instance within the peer VPC. The CIDR blocks of the VPCs that you want to set up a peering connection for can’t match or overlap with each other.
Your VPC peering configurations can include the following:
• Two VPC peered to two subnets in one VPC
• Two VPCs peered to a specific CIDR block in one VPC
• One VPC peered to specific subnets in two VPCs
• Instances in one VPC peered to instances in two VPCs
The VPCs in a peering connection must belong to the same region and should not have overlapping IP ranges. The VPCs must use security groups to control access, and they should not have overlapping IP ranges. If you need to connect VPCs in different regions, you must use a VPN connections between all the VPCs.
Setting Up VPC Peering Here are the steps to create a VPC peering connection:
1. The owner of the VPC that requests the peering connection (requester VPC) sends a request to the owner of the target VPC (accepter VPC) to create the connection.
2. The owner of the accepting VPC accepts the connection request.
3. The owners of both VPCs in the peering connection add a route to at least one of their VPC route tables that point to the IP address range of the other VPC—the peer VPC in this context.
4. The owners of the two VPCs may also need to update the security group rules to ensure that traffic from the peer VPC is allowed.
You must enable DNS hostname resolution for the VPC connection. Then, when instances in the VPC peering connection address each other using a public DNS hostname, that hostname resolves to the private and not the public IP address of the instance.
After you configure VPC peering, you must ensure that you update all the route tables in each VPC with the appropriate peering configuration. Let’s say, for example, that you have set up a VPC peering connection between VPC A (10.0.0.0/16) and VPC B (20.0.0.0/16). The peering connection ID is pcx-1a2b1a2b. Following this, you need to add the following route entries to the route tables of the two VPCs so that traffic can flow between them:
• For VPC A: Destination 20.0.0.0/16 and Target pcx-1a2b1a2b
• For VPC B: Destination 10.0.0.0/16 and Target pcx-1a2b1a2b
Multiple VPC Peering Connections You can create more than one peering connection for one of your VPCs. However, you must create a unique VPC peering connection between different VPCs, because AWS doesn’t support a transitive peering relationship, even if the VPCs belong to the same AWS account.
For example, if you have set up a peering connection between VPC A and VPC B and also between VPC A and VPV C, there’s no automatic transitive peering relationship between VPC B and VPC C. You must explicitly set up a peering relationship between any pair of VPCs. In this case, you must set up a peering relationship between VPC B and VPC C as well, if you want those VPCs to have a peering relationship.
NOTE A VPC peering relationship is always a 1:1 relationship between two VPCs.
VPC Endpoints
A VPC endpoint is a virtual device that enables communications between VPC-based EC2 instances and AWS services, without affecting your network traffic bandwidth. A VPC endpoint helps you privately connect your VPC to supported AWS services and VPC endpoint services powered by AWS PrivateLink. For example, to connect to a service outside a VPC, such as Amazon S3, you can use a VPC endpoint, which makes an Amazon S3 bucket an entry in the VPC’s route table.
VPC endpoints enable connections without the use of an Internet gateway, an NAT device, or a VPN/AWS Direct Connect connection. The VPC instances don’t need public IP addresses to communicate with AWS resources.
NOTE IAM users don’t have permission to work with endpoints until you create user policies that grant the users the permissions to create, modify, describe, and delete endpoints.
The following example shows a route table with a VPC endpoint.

There are two VPC endpoint types: interface endpoints and gateway endpoints.
Interface Endpoints
An interface endpoint is an elastic network interface with a private IP address. It acts as the entry point for traffic sent to supported AWS services such as AWS CloudFormation, AWS CloudWatch, AWS Config, Amazon Simple Notification Service (SNS), endpoint services hosted by other AWS customers and partners in their own VPCs, and supported AWS marketplace partner services.
A service provider is the owner of the service, and you, as the service consumer, are the principal that creates the interface endpoints and provides the name of the AWS service or endpoint services to which you want to connect. After you create an interface endpoint, it’s available for use only after it’s accepted by the service provider, which must configure either automatic or manual acceptance of requests by the service.
An endpoint retunes responses to traffic sent to resources in your VPC. Services won’t be able to initiate requests to your resources inside your VPC through the endpoint.
Gateway Endpoints
A gateway endpoint serves as a target for a specified route in your route table, for traffic going to a supported AWS service. As of this writing, the supported services are Amazon S3 and DynamoDB.
You specify one or more route tables to control the routing of the traffic between your VPC and the other services. Subnets using the route tables can access the endpoints. You must change the route table for a private subnet to route traffic through an endpoint. Traffic from instances within the subnets to other services is sent through the endpoint.
Troubleshooting AWS Network Connectivity Problems
You might occasionally run into an issue related to AWS networks. Troubleshooting network connectivity issues in the cloud is similar to how you do so on premises. There are several network tools that you can use to troubleshoot connectivity issues. You may also need to check your security group rules to ensure that they allow the connectivity you’re looking for.
The ping,nslookup, and traceroute Utilities
A quick tool for testing AWS network connectivity is the ping utility, which sends an ICMP package from a server to another server. Here’s an example:

If ping doesn’t respond with an IP address, the server name may be incorrect. A ping test may fail when an AWS target is offline or inaccessible. You can view the AWS Service Health Dashboard (https://status.aws.amazon.com/), which reports up-to-the-minute information on AWS service availability, to see if the service you’re trying to connect to, such as EC2 in a specific region, is unavailable.
If you are unable to ping your instance, ensure that the security group’s inbound rules allow ICMP traffic for the Echo Request message for all sources or from the server where you’re issuing the ping command. If you are unable to issue the ping command from an instance, check the security group’s outbound rules and make sure they allow ICMP traffic for the Echo Request message to all destinations or to the destination you are trying to ping.
You can use the nslookup command on a Linux system to resolve the target hostname from the IP address. If there’s an error when you run this command or if the name that’s returned isn’t associated with the right node or server, there may be either a DNS failure or a configuration error. Here’s an example:

The Linux traceroute command (or the Windows tracert command) helps trace the path and checks delays between a data center and the AWS-based instances. The utility shows details about each router hop and helps find potential network bottlenecks across the public Internet. Pay attention to hops with persistenly high packet losses or packet losses that accumulate to a sizable number over multiple hops.
Errors Connecting to an Instance
You may receive error messages such as Network error: Connection timed out, or Error connecting to [instance], reason: -> Connection timed out: connect. When you see these types of errors when connecting to an instance with an IPv4 address, follow these steps:
• Check the security group’s inbound rules to ensure it has a rule that allows inbound traffic from your public IP address on the correct port. For SSH connectivity errors from a Linux server, ensure that there is a rule that allows traffic from your server to port 22. For the same errors from a Windows server, the port is 3389 (RDP).
• Check the route table for the subnet to ensure that there’s a route that sends all traffic destined outside your VPC to the VPC’s Internet gateway.
• Ensure that there’s an Internet gateway attached to your VPC. If there is not, create the gateway and attach it to the VPC.
• Ensure that the route table has a route with 0.0.0.0/0 as the destination and the Internet gateway for your VPC as the target.
• Check the NACL for the subnet and ensure that it allows inbound and outbound traffic to and from your local IP address on the proper port. The default NACL allows all inbound and outbound traffic.
• If your server is on a corporate network, make sure that the internal firewall allows inbound and outbound traffic from your server on port 22 for Linux servers and port 3389 for Windows servers. If you have a firewall on your computer make sure it allows the same traffic as the internal corporate firewall.
• Check your instance’s CPU load to make sure it is not overloaded. You can do this with CloudWatch metrics and by checking the instance status in the EC2 console. If your workloads are variable, try using Auto Scaling and ELB to manage the workload. If your workload is growing steadily over time, move to a larger EC2 instance type.
AWS Direct Connect
In some use cases, you won’t want to use the Internet to access your AWS resources. That’s where AWS Direct Connect comes in; it enables you to bypass the public Internet to access your resources in the AWS cloud. Direct Connect links the internal networks in your data centers to an AWS Direct Connect location. This helps you create direct virtual interfaces to public AWS services such as Amazon S3, bypassing Internet service providers. So, in a scenario where you are performing a daily backup of, say, 10GB of data from your on-premise data center to Amazon S3, you can drastically reduce the time it takes to move this data by moving it via Direct Connect between your data center and your AWS VPC. (As you’ll learn in Chapter 7, doing a multipart upload to S3 can also speed up the upload process.)
A Direct Connect connection provides access to AWS in the region in which the direct connection is associated. You can use this connection to access public AWS services in any public region. Figure 6-6 shows the AWS Direct Connect architecture and how it works with your internal networks.
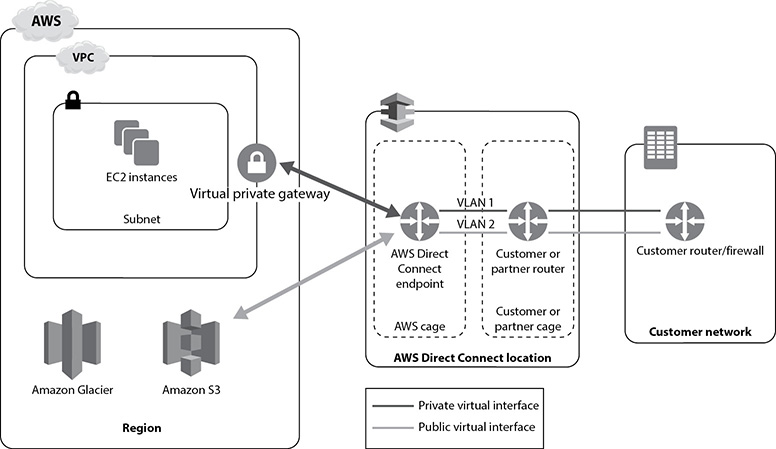
Figure 6-6 How AWS Direct Connect interfaces with your internal networks
NOTE You connect to Direct Connect via a virtual private gateway attached to the VPC. Therefore, you must configure and associate the virtual private gateway with your VPC.
Direct Connect offers several benefits for transferring data between your own network and your VPC:
• Lowers your network bandwidth costs Because AWS charges reduced rates for data transfers via your dedicated connection, compared to Internet data transfer rates, you end up lowering your bandwidth costs. Costs can be further reduced by reducing your bandwidth commitment to your Internet service provider.
• Provides consistent network performance Because you can choose how data is routed through Direct Connect, you gain more consistent network performance, without the variable and inconsistent network latency that’s common in public Internet–based network connections.
• Facilitates large data transfers A VPN connection requires specialized VPN hardware and has problems handling large data transfers (over 4 Gbps). With Direct Connect, you can select a 10 Gbps Direct Connect connection and set up multiple connections to enhance your data transfer capacity.
• Provides a private connection to AWS Direct Connect helps you set up a private, secure, and fast network connection between your own network and your VPC.
Setting Up Direct Connect
You don’t necessarily have to set up your Direct Connect connection at an AWS Direct connection location offered by AWS. You can also set up the connectivity through a network carrier or a member of the AWS Partner Network (APN). Instead of setting up your own Direct Connect connection, you can opt for a hosted connection that’s provided by an APN member.
Direct Connect Components
The two key components of Direct Connect are connections and virtual interfaces. Because Direct Connect supports only the BGP routing protocol, you need a router that supports BGP. To use Direct Connect, your network must be collocated with an existing AWS Direct Connect location, or you must work with an independent service provider to connect to Direct Connect.
Connections
To create a dedicated connection between your network and a Direct Connect location, you must work with a partner in the APN. This enables you to set up a network circuit between your data center (or colocation environment) and an AWS Direct Connect location. When you request a connection, AWS authorizes the connection via a Letter of Authorization and Connecting Facility Assignment (LOA-CFA). Your network provider or the colocation provider requires this to order a cross-connect (a cross-network connection) for you. AWS recommends that you request two dedicated connections to AWS to provide failover of the Direct Connect connection.
TIP You can aggregate multiple connections as a single Direct Connect endpoint via a link aggregation group (LAG). This logical interface enables you to treat the multiple connections as a single connection.
Virtual Interfaces
After you create a connection, you must create a virtual interface (VIF) to use a Direct Connect connection. For each Direct Connect connection that you configure, you can configure multiple virtual interfaces. There are two types of virtual interfaces:
• A private virtual interface A private VIF is a logical interface that enables you to connect to an EC2 instance within your VPC. Each VPC needs a separate private VIF to connect to Direct Connect (or you can use a Direct Connect gateway). The private virtual interface handles traffic originating from your onsite network, destined for resources in your VPC that may not have either a public IP address or an EIP.
• A public virtual interface This connects to AWS services that don’t live in your VPC, such as Amazon S3 or Glacier. The public interface is meant for handling traffic to other AWS services or to the Internet.
If your traffic is coming both from your onsite network and from other AWS services and the Internet, you need both a private and public virtual interface. After creating a virtual interface, you download the router configuration for the Direct Connect connection. To implement Direct Connect, you also need a public Autonomous System Number for the public VIF and a private Autonomous System Number for the private VIF.
NOTE Remember that a virtual interface supports only the BGP network routing protocol.
For high availability, you must create multiple Direct Connect connections, and the best practice is to create these in different regions. When you set up a redundant Direct Connect connection, in case of a failure, traffic fails over to the second link automatically. The best practice is to enable Bidirectional Forwarding Detection (BFD) to enable fast failure detection and failover.
Direct Connect Gateways
A Direct Connect gateway connects your Direct Connect connection to VPCs in your account over a private virtual interface. You can link this gateway to the virtual private gateway for a VPC. Following this, you create a private virtual interface for the Direct Connect connection to the Direct Connection gateway. You can attach a single or multiple public virtual interfaces to a Direct Connect gateway.
You can use a Direct Connect gateway that you create in a public region in all other public regions. Figure 6-7 shows you how a Direct Connect gateway enables you to use a Direct Connect connection in one region to access VPCs in two regions.
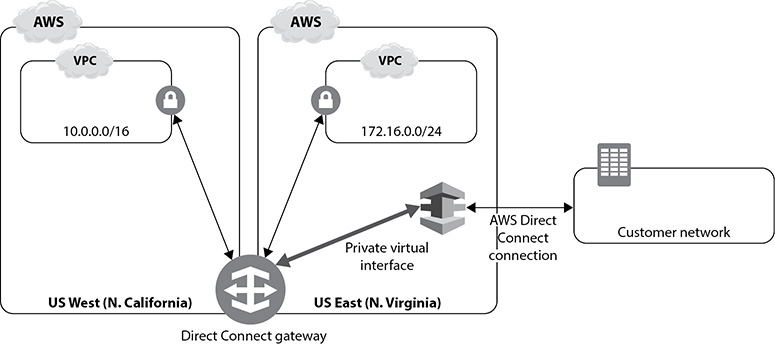
Figure 6-7 A Direct Connect gateway that enables Direct Connect connection to access VPCs in multiple regions
Direct Connect Costs
Direct Connect costs much less than it costs to transfer data via the Internet, and it includes the following components:
• Port costs (billed on hourly basis)
• Data transfer costs
• Direct Connect partner circuit charges
• Cross-connect charges, if you’re in a colocation facility
NOTE You must pay Direct Connect transfer charges for the virtual interfaces. You must also pay the cross-connect or network circuit charges.
Elastic Load Balancing
AWS offers the Elastic Load Balancing (ELB) capability to distribute your applications and their network traffic automatically across multiple targets. For example, if the incoming traffic’s target is a web server, ELB can spread the traffic among multiple web servers.
In addition to ELB, which is an Internet-facing load balancer, you can also configure an internal load balancer to distribute your internal traffic. An architecture with both types of load balancers enables you to register your web servers with ELB and your backend database servers with the internal load balancer. The instances in an internet-facing load balancer have public IP addresses. Hence, the DNS name of an internet-facing load balancer is publicly resolvable to the public IP addresses of the instances, and the load balancer can route requests over the Internet. Because the nodes of an internal load balancer have private IP addresses, the DNS name of this load balancer is publicly resolvable to the private IP addresses of the nodes. Hence, the load balancer can only route internal requests.
ELB supports three types of load balancers:
• Application Load Balancers
• Network Load Balancers
• Classic Load Balancers
A Network Load Balancer can handle all your volatile workloads and scale to millions of requests per second.
NOTE AWS classifies both Application Load Balancers and Network Load Balancers as ELB – Version 2. It places classic load balancing under ELB – Version 1.
ELB can scale itself as traffic to your application changes over time. Besides helping share the workload among multiple compute resources such as EC2 instances, a load balancer enhances the availability of your applications and makes them more robust when they encounter error conditions.
How Load Balancing Works
Clients send their connection requests to the load balancer. The load balancer, in turn, distributes the requests among targets such as EC2 instances that live in one or more AZs.
How Client Requests Are Routed
A client first receives the load balancer’s domain name from the DNS server. The Amazon DNS servers return one or more IP addresses to the client. These IP addresses point to the load balancer nodes of the load balancer that you’ve set up. The client then chooses one of the IP addresses to send requests to the load balancer. The load balancer picks a healthy target and sends the request to the target.
By default, when you use TCP for both front-end and back-end connections, the load balancer forwards requests without any changes to the request headers. If you look in the web server’s access logs, you’ll find the load balancer’s IP address instead of the IP address of the client that originated the request. If you enable Proxy Protocol, a header with the connection information (source and destination IP addresses and port numbers) is added to the request header and the header is sent to the web server as part of the request. The X-Forwarded-For request header reveals the IP address of a client when you use an HTTP or HTTPS load balancer.
Routing Algorithms
The Application Load Balancer uses listener rules to select a target from the target group, using the round-robin routing algorithm. Listener rules forward requests to target groups that you specify. A Network Load Balancer selects targets from the target group using a flow hash algorithm. It uses the source IP address, protocol, port destination IP address/port, and TCP sequence number to route to different targets. It may use one of two different routing algorithms: the round-robin algorithm for TCP listeners and the least outstanding requests algorithm for HTTP/HTTPS listeners.
In connection multiplexing, the requests from multiple clients can be routed to a target through a single backend connection. This helps lower latency and reduce application load. Both the Classic and Application Load Balancers support connection multiplexing.
Availability Zones and ELB
You must enable one or more AZs for the load balancer when you create it; you cannot do so later. Enabling multiple AZs, which AWS recommends, offers fault tolerance for your applications. ELB can route traffic to healthy targets in a different AZ if one AZ becomes unavailable or if there are no healthy targets in the AZ.
NOTE An Application Load Balancer requires you to enable multiple AZs (at least two). This is recommended for the other two types of load balancers.
When you create a load balancer, you must specify one public subnet from at least two AZs. You specify the subnet from the AZ when you enable the zone. ELB creates a load balancer node in that zone and a network interface for the subnet. The load balancer node(s) in the zone use this network interface to get static IP addresses. If you create an Internet-facing load balancer, you can associate an EIP per node.
If you want a web application to accept traffic only from specific IP addresses, you can do so by configuring the following:
• Configure ELB security groups to allow traffic only from the IP address that you want.
• Configure the web servers to filter their traffic based on the ELB’s X-Forwarded-For header.
Cross-Zone Load Balancing
A load balancer node distributes traffic evenly among the registered targets in the AZ where you created the load balancer. This is the default behavior. By enabling cross-zone load balancing, you can make the load balancer node distribute traffic among registered targets in all enabled AZs.
NOTE Cross-zone load balancing is always enabled for an Application Load Balancer.
Cross-zone load balancing is enabled by default for Application Load Balancers and disabled for Network Load Balancers. If you create a Classic Load Balancer with the API or CLI, cross-zone load balancing is disabled by default, and it is enabled if you create the load balancer from the AWS Management Console.
EXAM TIP You may see questions about the Classic Load Balancer on the certification exam. Make sure you understand how connecting draining and stick sessions work, and be familiar with the Server Order Preference option.
Here are key things that you need to know about the Classic Load Balancer:
• You can set up connection draining to allow inflight requests to proceed while an instance is being deregistered via Auto Scaling. By default, ELB allows inflight request traffic to continue for 300 seconds, and the maximum time limit is 3600 seconds. You can disable connection draining.
• You can ensure that user requests always go the instance where the user created the session by enabling sticky sessions. The sticky session ELB algorithm uses cookies to track sessions and inserts a cookie in the response, whether it finds the cookie in the request or not. Sticky sessions help an application manage user sessions.
• The Server Order Preference option in the ELB’s security policy specifies which ciphers and protocols are supported during SSL negotiations between the client and ELB. You can choose a Predefined Security Policy or a custom policy. This option helps match the ciphers (encryption algorithms that use encryption keys to create a coded message) on the client side in the order (which indicates the order of preference) they are specified in the ELB cipher list (or table), when the client requests ELB DNS over an SSL connection. If you don’t enable this option, ELB uses the ciphers in the order the client presents them. If you haven’t configured a specific security policy, ELB chooses the latest version of the policy.
Creating a Load Balancer
You can create a Network Load Balancer, an Application Load Balancer, and a Classic Load Balancer in a similar fashion, with appropriate differences.
To configure load balancers after you create them, you must create a target group. You register your targets, such as EC2 instances, with the target groups that you create. A best practice is to ensure that each AZ has at least one registered target.
A Network Load Balancer requires that you create a listener, which listens for connection request at a port (such as 80 that accepts HTTP requests, and 443 that accepts HTTPS requests) and a protocol (such as TCP) that you specify. You define rules for the listener that dictate how the load balancer sends requests to multiple targets in a target group.
The following example shows how to create a Network Load Balancer from the command line:
1. Execute the create-load-balancer command to create the load balancer:
$ aws elbv2 create-load-balancer --name my-load-balancer --type network --subnets subnet-12345678
2. Specify a public subnet for each AZ in which you’ve launched EC2 instances.
3. Create a target group by executing the create-target-group command:
$ aws elbv2 create-target-group --name my-targets --protocol TCP --port 80 --vpc-id vpc-12345678
4. Register your instances with the target group you created in the previous step by running the register-targets command:
$ aws elbv2 register-targets --target-group-arn targetgroup-arn --targets Id=i-12345678 Id=i-23456789
2. Specify an EIP for your load balancer:
$ aws elbv2 create-load-balancer --name my-load-balancer --type network --subnet-mappings SubnetId=subnet-12345678,AllocationId=eipalloc-12345678
You can specify one EIP per subnet via subnet mapping.
EXAM TIP Review the different types of ELB-related errors captured by CloudWatch metrics. For example, the HTTPCode_Backend_5XX error is caused by issues with the backend servers. The HTTPCode_Backend_4XX error is due to a client error response (such as “A malformed or canceled request from the client”) from the registered instances. The HTTPCode_3XX error indicates a redirect response from the instances. Finally, a HTTPCode_Backend_2XX error message indicates a normal, successful response from the instances. Other possible errors are HTTP 502: Bad Gateway, HTTP 503: Service Unavailable, and HTTP 504: Gateway Timeout. You can bypass the load balancer temporarily and send requests directly to an instance to view the responses in the access logs or the error logs of the instances.
You can enable ELB access logging to trace requests sent to the ELB. The logs contain information about the time of the request, the server responses, latency, and the client’s IPA address. Once you enable access logging, ELB captures the logs and stores them in an Amazon S3 bucket.
NOTE If you happen to accidentally delete an ELB, instances registered with it continue running.
Amazon Route 53
Amazon Route 53 is AWS’s DNS web service. It helps route users to web sites by translating domain names such as www.example.com into numeric IP addresses that computers can use to connect to each other. You use Route 53 to do the following:
• Register domain names (such as example.com).
• Route Internet traffic to your web sites or web applications.
• Check the health of your resources, such as web servers.
You don’t have to use Route 53 for all three functions listed here, although you can. When you use Route 53 to perform all three of these functions, you register your domain name with Route 53, configure Route 53 to route your Internet traffic to your domain, and finally use the service for checking the health of your AWS services such as the web servers that you run in the AWS cloud. Alternatively, you may decide to use a separate domain registrar to register your domains and use Route 53 to route your traffic and check the health of the AWS services.
Implementing Route 53 involves two main steps:
1. Create a hosted zone or zones.
2. Create your resource record sets.
You configure the routing for traffic to your domain and subdomains via a hosted zone. Route 53 assigns a set of unique nameservers for each hosted zone that you create. Because Route 53 can manage both public and private hosted zones, you can use it for distributing traffic both within an AWS region as well as between AWS regions.
If you choose Route 53 as the domain registrar, Route 53 automatically creates a hosted zone for you. If you’re using a different organization as the domain registrar, you must create the hosted zone. Route 53 also automatically creates a hosted zone for you when you transfer an existing domain over to Route 53.
The next step after you create the hosted zones for your domain (for example, mycompany.com) is to create resource record sets. A resource record set consists of a record type and routing policy. Routing polices tell Route 53 how to respond to queries directed to your domain. You configure different routing polices for each of the record types.
Because Route 53 is a DNS, it’s important to learn the basics of DNS.
Basics of the Domain Name System
Every host (server) has at least one numerical IP address, a number assigned to devices such as laptops or web servers that enables the devices to communicate with other devices on the Internet—just as every home in a city has a unique address to enable folks to find the house. However, since it’s cumbersome for us to use a numerical IP address, we use the friendlier concept of hostnames to refer to the host. For example, it’s much easier to search for www.google.com rather than 74.125.224.147, which happens to be the main Google numerical IP address.
When a client talks to your web site, the DNS is the very first contact point. Clients reaching out to your web services or web sites must first find your server’s IP address before they can connect to it. DNS maps hostnames to IP addresses and vice versa (reverse DNS ). It translates simple names such as example.com into IP addresses. The DNS is a distributed database that contains a hierarchy of DNS servers.
NOTE In practice, a DNS server and a name server are interchangeable terms.
DNS Domains
The structure of the DNS is like that of an inverted tree, with the roots and the branches known as domains. At the very top is the aptly named root domain. The root domain consists of a blank area, and it is expressed by a period, or dot (.). In browsers today, it’s not necessary to enter this dot, since the browser will add it itself. There are 13 geographically separated root servers. Root servers really don’t hold much information, although they sit on top of the inverted root tree—they simply point to a set of domains called top-level domains, which are named .com, and .net, for example.
A fully qualified domain name (FQDN) for a site includes the following: [hostname].[domain].[tld ]. In practice, it looks like this: www.mydomain.com. The FQDN contains information about all the domains that are part of the hostname. Even though we don’t write it out, there’s an implicit dot (.) after every FQDN for a site: so www.mydomain.com is www.mydomain.com. (note that the dot at the end is not a period here but represents the root domain).
After the root domain is the top-level domain (TLD). The TLD names are well known to us: they include the generic domains (.org, .com, .net), country-code domains (.us, .uk, .nz), and branded domains (.linux, .microsoft).
A second-level domain name is the domain name that’s typically allocated to an organization or even an individual. So in our example, mydomain.com is the second-level domain.
The third-level domain names are not mandatory unless the user has a specific requirement. A third-level domain can add clarity to a domain name, however. For example, third-level domains can show the hostnames within an organization or can be assigned to subdomains within that organization. So, for example, if mydomain.com has a file transfer protocol (FTP) server to let users download files, its third-level domain name would be ftp and the full domain name would be ftp.mydomain.com. A domain name like support.mydomain.com or membership.mydomain.com indicates that the company has a support department or a membership department, respectively, and each of these subdomains would get its own zone
Types of Name Servers
A name server in the DNS helps translate domain names into IP addresses. DNS employs a distributed architecture with a large number of name servers located throughout the world, so it can scale. There are three classes of name servers: root DNS servers, top-level domain (TLD) DNS servers, and authoritative DNS servers—that are organized in a hierarchy, with the root DNS server at the very top of the inverted root structure. The root name servers are special, and there are only 24 of them, managed by various providers. Root name server names look something like this: a.root-server.net, b.root-server.net, c.root-server.net, and so on.
Root DNS servers really don’t do much; basically, they publish a root zone file to other DNS servers. The root zone file tells requesters where the authoritative servers for the top-level domains such as .com and .org are to be found.
There are three main types of name servers:
• Authoritative servers These are the primary DNS servers and are aware of all the hosts and subdomains under them. They also store the domain’s configuration files. Any updates to the domain’s DNS tables are performed on the authoritative servers. The authoritative name server has definite information about a part of the DNS and responds to requests from DNS resolvers.
• Secondary servers Like the primary servers, secondary servers store the configuration files for domains. Because secondary servers need to download the latest information from the authoritative servers, they are occasionally behind the primary servers, but they are mostly trustworthy. Secondary servers act as both backups for the primary servers and also help to lessen the load on those servers.
• Recursive servers or DNS resolvers Also referred to as caching servers, these servers don’t carry any configuration files at all. In general, they answer name resolution requests in a non-authoritative fashion.
When you enter a domain name in a browser, the DNS query goes to a DNS resolver first. If the IP addresses aren’t present in their local cache, the servers ask the DNS name server for the names and cache that information. A DNS resolver is often called a recursive name server because it requests a sequence of authoritative DNS name servers for the IP addresses, which it then returns to the request’s service, such as a web browser that runs on your laptop.
How a DNS Request Works
Let’s say, for example, that you open your browser and type a domain name in the address bar—say www.google.com. Your browser then submits a DNS query to obtain the IP address associated with the web server. The DNS query first contacts one of the root servers, which returns the IP addresses for the TLD servers for the top-level domain named .com. The request then hops to one of the TLD servers, which returns the IP address of an authoritative server, for google.com. Finally, the DNS request contacts the authoritative server, which returns the IP address for www.google.com.
Working with Records
Each name server stores resource records (RRs), including those that provide the hostname-to-IP mappings. A DNS record defines how Route 53 (DNS) will route traffic for a domain. You select the type of DNS record based on how you want Route 53 to respond to DNS queries. For example, you may create a record specifying that for your domain, traffic should be routed to the web server running on the server with the IP address 192.0.3.234.
Each DNS reply sent by a DNS server carries one or more DNS records. A DNS record has the following fields (name and value fields depend on the type of resource records in use):
• Name The name of the domain, or a subdomain.
• Value Depends on the record type.
• Type The record type, such as MX for routing e-mail. Each record type has a unique set of information. For example, an MX type record contains the hostname of the mail server and a priority for each mail server.
• TTL The time to live, which specifies how long a resource record is stored in the DNS cache.
DNS Record Types Following are the main DNS resource record types:
• SOA (start of authority) These records start the description of the site’s DNS entries. An SOA record contains information about a domain and its hosted zone. Here’s an example:
ns-2048.awsdns-64.net hostmaster.awsdns.com 1 1 1 1 60
• NS (name server) These records specify which name server stores the records for a hosted zone. Thus, if Type=NS, the Value field shows the authoritative DNS server that knows how to obtain the IP addresses for all hosts in a domain (or zone). In other words, the NS record’s value is the domain name of the domain server. Here’s an example:
ns-1.example.com
• A (address record) This resource record provides the standard hostname-to-IP mapping. The A record maps the hostnames to the IP addresses. Here’s an example for the Route 53 console:
192.0.2.2351 (IPv4 address format)
• PTR (pointer record) This is the opposite of the A record—it performs reverse name resolution and is in the same format as a domain name, as shown here:
hostname.example.com
• MX (mail exchanger) This record tells a host where the site’s mail server is. The values in an MX record show the domain name and the priority of the mail server (if you have multiple mail servers). The priority indicates the order or priority—that is, which mail server is sent e-mails first, second, third, and so on. The mail server with the lowest priority value has precedence. Here’s an example MX record, showing the priority and the domain name to specify a mail server:
10 mailserver.example.com
• CNAME (canonical name) This element has the same format as a domain name. The canonical name doesn’t provide an IP address; it points to another hostname. CNAME records enable you to create aliases for hostnames. Route 53 uses alias records, which belong to a non-standard DNS record type, to route traffic to AWS resources such as CloudFront distributions, an Application Load Balancer, an Elastic Beanstalk environment, and an S3 bucket that you’ve configured as a static website (see Chapter 7). Instead of pointing to an IP address or a domain name like an A record does, an alias record type points to the AWS resources. You can also configure alias records to route traffic from one record to another in a hosted zone, since an alias record enables you to point to another Route 53 record set
You can’t create a CNAME record for the zone apex, which is the top node of the DNS namespace. So if your domain name in DNS is example.com, the zone apex is example.com, and you can’t create a CNAME for example.com (but you can create a CNAME for sales.example.com).
• Alias A virtual record type that provides CNAME-like behavior on apex domains. Aliases are similar to CNAME record types, but unlike CNAME records, you can create an alias for the zone apex. That is, you can create an alias record that is named the same as the hosted zone which is the zone apex. Suppose your domain is mycompany.com and you want to point it to a name such as myapp.herokuapp.com. You can use an alias record, which will automatically resolve your domain to one or more A records, and the name resolvers see your domain just as if it had A records.
Routing Policies
A DNS query is a request to the DNS for a resource that’s associated with a domain name. DNS uses a routing policy to determine how it should respond to a DNS query. There are several types of routing policies, as explained in the following sections.
Simple Routing Policy The simple routing policy routes traffic to a single resource that performs a specific function for a domain, such as a web server for one of your domains. You can only configure standard DNS records, with no special routing such as weighted or latency routing. Route 53 responds to DNS queries based on the values you specify in the resource record set, such as the IP address in an A record.
You can’t create multiple records with the same name and type. However, you can specify multiple values (say, IP addresses) within the same record.
Failover Routing Policy The failover routing policy helps you configure active-passive failover by designating primary and secondary resources. You can route traffic to the primary resource (such as a web server) so long as it’s healthy (as determined by a health of the resource’s record set), and when the resource’s health status turns to unhealthy, traffic can be automatically routed to an alternate resource, such as a different web server. Route 53 returns the primary record set when both primary and secondary resources’ record sets are healthy.
You can use failover routing polices to send users to a primary ELB load balancer within a region if the load balancer is healthy, or to a secondary load balancer when the primary load balancer is unhealthy or unavailable due to maintenance or another reason.
Geolocation Routing Policy The geolocation routing policy, which maps IP addresses to locations, enables you to route traffic based on the location of your users—that is, where the DNS requests originate from. You can use geolocation routing policies to route all users for a country to a single endpoint. For example, you can configure all DNS queries from Asia to be routed to a load balancer (ELB) in Tokyo. If some IP addresses aren’t mapped to specific locations, you can create a default record to handle the queries from those IP addresses that aren’t mapped to locations to avoid a “no answer” response from Route 53.
Geoproximity Routing Policy Geoproximity routing policies consider the geographic location of your resources as well as your users. To use this policy, you must use Route 53 Traffic Flow, described later in the section “Using Traffic Flow to Route DNS Traffic.”
You can specify a value, called a bias, that grows or shrinks a geographic region’s size to route more or less traffic, respectively, to a resource. You can configure a negative bias with a range between –1 and –99, and a positive bias in the range of 1 and 99. With a positive bias setting, Route 53 treats the DNS query’s source as being closer to a resource (such as an EC2 instance) than the reality. If the geoproximity record for a web server has a positive bias value of 50, Route 53 acts as if the distance (biased distance) between the source of the query and the web server is half of the actual distance.
Not every IP address is mapped to a geographic location, and thus, Route 53 can receive DNS queries from geographic locations that it can’t identify. You create a default resource record set to handle these types of queries, to avoid Route 53 having to send a “no answer” response to these queries.
Latency-based Routing Policy You use latency-based routing policies to route traffic to the resource in a location that offers the lowest latency. You can, for example, use latency routing policies to route users to AWS regions based on the latency between those users and the AWS regions. Route 53 uses the latency record that you create to determine the region with the lowest latency and selects the latency record for that region to route a request. Route 53 sends the DNS query the IP address of a web server, or a similar value, from the latency record that it selects.
TIP Remember that AWS determines latency on the basis of the AWS region.
Latency routing policy is helpful when you run AWS services such as web servers in multiple EC2 data centers, and you want Route 53 always to pick the web servers in the data center with the best latency at that time.
Here’s a good scenario for creating a latency-based routing record: Suppose you have ten EC2 instances in five AWS regions, with two instances in each region. To enhance availability in case one of the regions loses its network connectivity, you can do the following:
• Create a latency-based routing record set that resolves to an ELB in each of the five regions,
• Set the corresponding Route 53 health check for each ELB.
Latency between Internet hosts can change over time, and, therefore, the same request may be routed to different regions at different times.
Multivalue Answer Routing Policy A multivalue answer routing policy enables Route 53 to return multiple values for a resource (such as web server IP addresses). Although it’s not meant for load balancing per se, this routing policy enhances availability and offers load balancing of resources such as web servers.
If you associate health checks with each record, Route 53 responds to DNS queries with all the healthy records (up to eight healthy records), providing different answers to different DNS resolvers. If you don’t associate a health check with a multivalued answer routing record, Route 53 considers the record healthy.
Weighted Routing Policy The weighted routing policy routes traffic to multiple resources (within the same domain, such as example.com) in a weighted fashion, based on weights that you specify. Since you can configure how much traffic goes to each resource, such as to each web server, you can use this policy for load balancing of web requests to your domain. It’s also a helpful policy when rolling out software changes, since you can limit the traffic that uses the new releases, thereby limiting potential adverse effects of the changes.
Under the weighted routing policy, you assign each record a weight to select the percentage of traffic you want to send to that resource. Thus, if you want to send just 10 percent of your Internet traffic to a web server, and 90 percent to a second web server, you can do so by assigning the two web servers weights of 10 and 90, respectively. If you set a resource record’s weight to 0, it means that no traffic is to be routed to that resource. You would create two resource records in this case.
Creating Resource Records
You can create resource records through the Amazon Route 53 console or by importing a zone file. Exercise 6-9 at the end of this chapter shows how to create a resource record through the Route 53 console.
For complex routing configuration, you may want to check out the Traffic Flow Visual Editor. You can associate the traffic policies that you create with this editor to a domain name in any hosted zone.
To create a bunch of records for a Route 53–hosted zone, you can import a zone file. This is useful if you’re migrating from another DNS service provider to Route 53; simply export your current DNS settings as a zone file and import that file into a Route 53–hosted zone. Zone files use a standard format called BIND to represent resource records in a text format. It’s simple to import a zone file:
1. In the Route 53 Management Console, under Hosted Zones, click Import Zone File.
2. Paste the contents of the zone file you want to import in the text box.
3. Click Import.
Configuring Amazon Route 53 to Route Traffic for a Domain
Using Amazon Route 53 as your DNS is optional, and you can choose to use any DNS you like. However, Route 53 offers several built-in advantages and works well with AWS resources. When you use Route 53 as your DNS, a key function it can perform is to route Internet traffic to your domain. To configure this routing, you must do three things:
• Register your domain.
• Use the public hosted zone that Route 53 automatically creates.
• Create resource record sets in your hosted zone, specifying how you want traffic to be routed for your domain.
Registering a Domain To register a new domain via the Route 53 console, you choose a name for the new domain, provide the requested contact details, and register your domain by paying the annual charge for the domain registration.
Once you register your domain, Route 53 returns the domain name status code (also called an EPP status code) and the Route 53 name servers that will handle the DNS queries for your new domain. You can add, change, or delete the name servers.
Using Hosted Zones A hosted zone is a container for records that specify how you want to route Internet traffic for a specific domain and its subdomains. It’s a set of DNS records that make up a single domain’s configuration. You must create a hosted zone for each domain that you configure in Route 53. A hosted zone has the same name as its corresponding domain, such as example.com. There are two types of hosted zones:
• Records in a public hosted zone specify how to route traffic for your domain on the Internet.
• Records in a private hosted zone specify how to route traffic in an Amazon VPC.
When you register with Route 53, it automatically creates a public hosted zone for the domain, for which there’s a small monthly fee. If you create records in a hosted zone other than the one Route 53 creates for you, you must update the name servers for the domain by selecting name servers for the new hosted zone.
The other way to get a public hosted zone is by creating it when you transfer DNS service for a domain to Route 53. Regardless of how you get the public hosted zone, your next step is to create records in it to specify how you want to route traffic for the domain. For example, you might create a record that specifies that Internet traffic be routed to a web server in your own data center.
You create private hosted zones yourself and specify the Amazon VPCs you’d like to associate with the zone. Services such as databases and web servers that run on an EC2 instance in one of the VPCs that you associate with a private hosted zone can submit DNS queries for the domain to Route 53. If you want to ensure that the instances in your VPC only respond to the DNS queries via your domain, you can do by setting up a private hosted zone.
Creating Resource Record Sets Following your registration of a domain name, Route 53 automatically creates a public hosted zone for you. To route traffic to your AWS resources such as RDS databases and web servers, you create records (also called resource record sets, or just record sets) in your hosted zone. You add records such as the CNAME record to Route 53 as record sets.
For example, you can create records that specify how Internet traffic for your domain (such as example.com) is routed to the IP address of a web server in your data center. There are no charges for the records you add to a hosted zone.
A resource record contains details about how you want to direct traffic to your domain, such as the following:
• Name of the record The record name is the same as the domain name (example.com) or the subdomain name (retail.exmple.com) to which you want to route traffic.
• Record type This refers to the type of resource to which you want to route traffic. For an e-mail server, the record type is MX, and for a web server (IPv4 IP address), it is the record type A.
• Value The value is dependent on the record type. For example, for a web server it could be something like 192.0.2.136.
NOTE A record includes the domain (or subdomain name), the record type, and information applicable to that record type.
An alias record is a special Route 53 record that routes Internet traffic to AWS resources such as S3 buckets that you’ve configured as a static web site, CloudFront distributions, Elastic Beanstalk environments, Application Load Balancers, and another Route 53 resource record set in the same hosted zone.
Using Traffic Flow to Route DNS Traffic
It’s difficult to manage numerous resource records that use multiple Route 53 routing policies (failover, weighted, geolocation, and so on). You’re likely to have problems keeping track of the relationships among the many resource records that you create.
Route 53 Traffic Flow offers a visual editor to make it easy for you to create and manage complex DNS configurations. You create and save the configuration as traffic policies. You can then associate the traffic policies with a domain (mycompany.com) or a subdomain (www.mycompany.com) name.
NOTE Traffic Flow lets you route traffic to both AWS and non-AWS resources.
You can use Traffic Flow only for configurations for public hosted zones. You can associate a traffic policy in the same or in multiple public hosted zones. Traffic Flow makes it easy to apply updates to DNS names or to roll back updates if the configuration doesn’t show good performance.
In a nutshell, this is how Traffic Flow works:
1. You create a traffic policy via the visual editor. The traffic policy contains the routing configuration you want to create, such as the resources (IP address of EC2 instances or the domain name of an ELB load balancer) you want to send DNS traffic to, and the routing policies that you want to use. You have the option of ensuring that Route 53 sends traffic only to healthy endpoints by associating health checks with the endpoints.
2. Create a policy record, where you specify the hosted zone in which you want to create the configuration laid out in the traffic policy you created in step 1. You also specify the DNS name (such as www.mycompany.com) that you want to associate the configuration with. You can use the same traffic policy to create multiple policy records, in the same or a different hosted zone. Route 53 creates a tree of records when you create a policy record, with the root record having the DNS name that you specified.
3. When users go to the DNS name you’ve specified (www.mycompany.com in our example), Route 53 routes the request based on the traffic policy you used as the basis for the policy record that you created in step 2.
Handling Service Failovers (Enhancing Resiliency) with Health Checks
Route 53 helps greatly in making your systems resilient. Using Route 53, you can survive Elastic Load Balancing and application outages.
Route 53 monitors the health and performance of web applications, web servers, and other resources by performing periodic health checks (for example, by requesting web pages from various URLs that you specify). Therefore, it’s important that you understand Route 53 health checks, so that you can understand how Route 53 manages service failovers to healthy resources.
Route 53 Health Checks
If you’re running multiple resources such as web servers or mail servers, Route 53 can monitor the health of the resources and ensure that the DNS queries are always sent to the currently healthy resources. You can monitor the status of the health checks on the Route 53 console. You can also set CloudWatch alarms from the console to get automatic notifications when a resource’s health status changes. When you update the port for a health check (such as for an Application Load Balancer), you won’t see the health check in the Amazon CloudWatch console unless you also update the security group rules to allow traffic into and out of the new port.
A Route 53 health check monitors the health and performance of various resources such as web servers. For all failed health checks, except calculated health checks, you can see the reasons for failure in the Route 53 console. A specific health check can monitor one of the following: health of a resource, status of a health check, and status of a CloudWatch alarm.
Health of a Specific AWS Resource These health checks monitor an endpoint for a resource, such as an IP address or a domain name. Once you create a health check that monitors an endpoint, the health checks send requests to the endpoint to determine its health. For example, for an HTTP and HTTPS health check, the individual health checker must be able to establish a TCP connection within four seconds.
You specify the interval between the health checks, which could be 10 or 30 seconds. The endpoint health checkers determine the endpoint health based on response time and the failure threshold, which is the number of consecutive health checks the endpoint must respond to. You specify the failure threshold.
Route 53 will gather data from its health checks, and if more than 18 percent of health checks report that an endpoint is healthy, Route 53 deems it to be in a healthy state of operation, and unhealthy otherwise. The 18 percent value ensures that health checkers in multiple regions consider the endpoint healthy, and may change in the future, based on the number of AWS regions.
Status of a Health Check Some health checks monitor other health checks; these are called calculated health checks. For example, a health check can monitor the status of web server health checks, and it can notify you when the number of available web servers drops below a threshold you specify. The monitoring health check is called the parent health check, and the monitored health checks are called child health checks. A parent health check can monitor up to 255 child health checks
Status of a CloudWatch Alarm A CloudWatch alarm monitors the status of various metrics, such as the number of throttled read events for a DynamoDB database. You can create health checks to monitor the same metric stream that CloudWatch monitors for an alarm to get advanced notice of adverse conditions. In a healthy metric, the alarm’s data stream indicates that the state of the alarm is “OK”; the state changes to “Alarm” if the check is deemed unhealthy. Even before the state of a CloudWatch alarm changes to “Alarm,” the status of a Route 53 health check can become unhealthy.
Configuring DNS Failover
When you have multiple AWS resources that can perform the same function, such as multiple web servers in a domain, you can ask Route 53 to check the resources’ health and direct DNS queries to the healthy resources, thus enhancing availability. This feature is called DNS failover, since Route 53 transparently directs (or fails over) the requests from an unhealthy web server to a healthy server. You can configure Route 53 to perform health checks through both simple and complex configurations.
In a simple configuration, you create a set of resource records that are all the same record type and name, such as a set of weighted records of record type A. You create a record and a health check for a resource such as a web server and associate the health checks with the resource. The health checks will keep periodically probing the resource’s health, and Route 53 directs traffic to the healthy resources. You can’t use alias records, however, because the alias records can route traffic directly to a resource such as an ELB; they can’t direct traffic to another Route 53 record.
Complex configurations require you to create a tree of resource records to route traffic based on multiple criteria instead of a single criterion, as is the case in a simple configuration. For example, you can combine latency- and weight-based records to route traffic to EC2 instances. Complex configurations can include a combination of alias and non-alias records in a multilevel tree. Once you create the records for complex routing configurations, you must associate the records with health checks. When you configure health checking for a set of records with the same type (for example, A) and the same routing policy (such as weighted), Route 53 chooses a healthy record and returns the values in that record as its response to a DNS query. Route 53 selects from a set of health records based on the routing policy you’ve configured; for example, if you’ve specified the weighted routing policy, it selects a record based on the weights you’ve configured for each record.
Configuring Active-Active and Active-Passive Failover
You can configure two types of DNS failover: active-active and active-passive. In both cases, you use Route 53 health checking.
Configure active-active failover if you want all the resources such as web servers to be available most of the time. In this configuration, all records with the same name, type, and routing policy are active, so long as the underlying resources are deemed healthy by Route 53. Route 53 will respond to DNS queries by routing traffic to any healthy resource. You can configure active-active failover with any routing policy or policies other than the failover routing policy. So, if you want to ensure that a website loads pages in the shortest time and is also always available, you can place the web site in two regions and use latency-based routing together with DNS failover.
In active-passive failover, you distinguish between primary and secondary resources (or groups of resources). You configure this when you want the primary resource to be available most of the time, and you want a secondary resource to be on standby for the times when the primary resource is unavailable. When the primary resources are all unhealthy, Route 53 starts routing traffic to healthy secondary resources. You must use the failover routing policy to configure an active-passive failover.
Monitoring Route 53
The Amazon Route 53 dashboard is your best friend for monitoring Route 53. The dashboard shows new domain registrations and domains that are nearing expiration.
You use health checks along with CloudWatch and CloudTrail to monitor Route 53. CloudWatch tracks the number of health checks with a healthy status and related metrics, such as the time it took for a health check to receive the first byte. CloudTrail records all Route 53–related API requests.
CloudFront: Amazon’s Content Delivery Network
CloudFront is AWS’s content delivery network (CDN) service. CloudFront lets you speed up the delivery of both static and dynamic web content, such as HTML, CSS, image, and media files, as well as streaming media, to users. CloudFront serves content faster via a network of data centers called edge locations. Edge servers are located in an edge location. CloudFront routes user requests through the AWS network to the edge location that can assure the fastest delivery of content to users. Typically, this is the edge location that’s closest to the user who makes a request for content.
NOTE Latency is the time it takes to load the first byte of a file. The lower the latency, the higher the data transfer rate.
When clients request content, such as an image file, if the files are already in an edge location with the lowest latency, CloudFront delivers it from that location. Otherwise, CloudFront retrieves the images from an origin that you specify, such as an Amazon S3 bucket or a HTTP server.
The key thing here is that the users aren’t aware of what CloudFront does behind the scenes—routing requests from among networks to obtain the resource that was requested.
CloudFront Use Cases
You can use CloudFront wherever faster delivery content is critical. Here are some common use cases:
• Faster static web content delivery CloudFront can help you deliver static content such as images and JavaScript faster to your users spread across the globe.
• On-demand or live streaming video CloudFront can stream data in common formats such as MPEG DASH to any device. For live streaming, you can cache media fragments on the edge servers to reduce the origin server’s load.
• Encrypt specific fields By setting up field-level encryption through the addition of a public key to CloudFront, you can protect specific data, so that only specific applications at your origin can view the data.
• Customize the edge server You can use the edge servers to customize the web content and web experience for your users, such as returning custom instead of generic HTTP error messages. You can also use Lambda@Edge with CloudFront to customize the CloudFront content by creating and deploying functions with CloudFront.
Configuring CloudFront to Deliver Content
When you want CloudFront to distribute web content, you store the objects in an origin server (S3 buckets, or custom origins such as an HTTP server or a directory in the specified domain) and expose a CloudFront link to the files to your users. Origin servers are locations where you store your web content’s original versions. When it receives a request for files, CloudFront gets the files from the origin and distributes them at the edge locations. You can use both S3 buckets and HTTP servers as your origin servers.
Configuring CloudFront to deliver web content faster to users involves the following steps:
1. Specify the source of the web content that CloudFront distributes from edge locations. Content sources, or origin servers, can be an AWS resource—such as an S3 bucket (mybucket.s3.amazonaws.com) or a custom origin server completely outside of AWS. An origin server can also be another AWS resource, such as EC2, or the ELB service. When serving content over HTTP, the origin server is either an S3 bucket or an HTTP (web) server. The web servers can be run on EC2 instances or your own servers. Web servers that you maintain on your own servers are called custom origins. An Amazon S3 bucket is always the origin for distributing media files on demand.
2. You can specify the directory path as the origin name, which means that when configuring the origin server, you specify the directory path as well as the domain name. This enables you to deliver multiple types of content through CloudFront, without making major changes to the origin infrastructure.
3. Upload the web content, or objects, such as web pages, images, and media files, to the origin servers. If the content is originating from Amazon S3, you must make the objects in the S3 bucket publicly readable.
4. Create a CloudFront distribution—a set of origin servers where CloudFront can get your files to satisfy requests for those files made by users through your applications or web sites. You can create distributions to serve content such as static and dynamic content (.html, .js, and image files), video on demand, and live streaming.
5. Your users can then access the objects that you stored in Amazon S3 buckets either directly from S3 or have CloudFront get the objects from S3 and distribute them to the users. If the users access your S3 objects frequently, it’s smarter to use CloudFront, since the data transfer costs for CloudFront are lower than those from transferring data from S3. Since CloudFront restores the objects in edge servers that are nearer to the users, the data is sent faster to the users as well.
6. You can optionally configure the origin server to add headers to the content files. The headers help control the length of time the files can remain in the cache on CloudFront edge locations.
CloudFront assigns a domain name to the distribution you created in step 4. You can choose to specify a custom domain name to use for URLs for your objects. For example, CloudFront may assign an URL such as the following to an object named image.jpg that you have stored in your Amazon S3 bucket.: http://d111111abcdef8.cloudfront.net/image.jpg. Alternatively, you can configure your CloudFront distribution to use your domain name, in which case, the URL for the object image.jpg will be:
http://www.example.com/image.jpg
You can do this by creating or updating a CNAME record in Route 53 (or another DNS) to route requests for www.example.com to d111111abcdef8cloudfront.net.
7. CloudFront transmits the distribution’s configuration to all its edge locations, which are located all over the globe. CloudFront caches copies of the objects at the edge locations.
How CloudFront Delivers Content
CloudFront stores the data that it retrieves from origin servers in edge server caches and regional edge caches. Here’s how CloudFront delivers content to your users:
1. A user requests an object, such as an image file or an HTTP file, by accessing a web application or one of your web sites.
2. Route 53 (or another DNS) routes the user request to the CloudFront edge location nearest to the user, in terms of latency.
3. If the requested files are in the CloudFront cache at this edge location, the files are returned to the user.
4. Or, if the requested files aren’t in the cache at this edge location, CloudFront forwards the request to an origin server, such as an S3 bucket (for image files) or an HTTP server (for HTML files).
5. The origin server sends the requested files to the CloudFront edge location. For faster content delivery, CloudFront maintains persistent connections with the origin servers.
6. CloudFront starts forwarding the files to the user as soon as the first byte arrives from the origin server.
7. CloudFront stores the files to its cache at the edge location and serves all subsequent requests for this content directly from this cache.
Restricting Access to Amazon S3 Content via Origin Access Identities
When you set up an S3 bucket as the origin for a CloudFront distribution, you can restrict access to the bucket by using CloudFront signed URLs or signed cookies. You can restrict access to the content by ending the access after a specific date and time, and also control which IP addresses can be used to access the content. However, you also might want to prevent your users from accessing the S3 files by directly using the S3 URLs, bypassing the control provided by the CloudFront signed URLs or signed cookies.
To ensure that your users access the S3 files only via CloudFront URLs (signed or not), you must do the following:
• Create an origin access identity (a special CloudFront user) and associate it with your distribution.
• Change the permissions on the S3 bucket or the objects in the bucket (files) so that only the origin access identity has read permissions (you can also grant the download permission). The origin access identity will get the S3 files on behalf of the users when they access the files, but if the users request the files directly, the requests are denied.
Regional Edge Caches
A regional edge cache helps with faster delivery of popular content such as user-generated videos and photos, e-commerce objects such as product photos and videos, and new and event-related content. As objects become less popular, individual edge locations may remove those objects to make room for more popular content.
Regional edge caches are located closer to the viewers of content and are situated in between your origin servers and the global edge locations. Their caches are larger than the caches of individual edge locations, thus enabling these locations to retain objects longer in their cache.
Edge servers contact the nearest regional edge cache to retrieve objects, instead of going to the origin server. When CloudFront requests objects from origin servers (when it can’t find the object in its cache), it adds the files to the caches in both the regional edge cache location and the edge location. All edge locations within an AWS region share a local cache.
There are some similarities and differences between regional edge caches and edge locations:
• A cache invalidation removes objects from both edge caches and regional edge caches.
• Proxy methods such as PUT/POST/DELETE don’t proxy through regional edge caches; instead, they go directly to the origin servers from the edge locations.
• Amazon S3 origins don’t use regional edge caches.
• Dynamic content doesn’t go through regional edge caches; instead, it goes straight to the origin.
Configuring an Amazon CloudFront Distribution
As explained earlier, the CloudFront distribution instructs CloudFront about the origin servers from which it should retrieve the content, following a user request for the content made through a web application or a web site.
Configuring a CloudFront distribution involves setting the following values:
• Delivery method
• Origin settings
• Cache behavior
• Custom error pages and error caching
You can specify these values during the creation of or while updating a distribution. The following section describes each of these confirmation elements.
TIP You can use the optional private content feature to limit who can access your CloudFront-distributed content. You do this by requiring users to use either a signed URL or have a signed HTTP cookie when requesting content from your web site or through an application.
Configuring the Delivery Method
The two types of delivery methods are Web or RTMP. If you’re using Adobe Flash media Server, the delivery method is Real Time Messaging Protocol (RMTP). For everything else, choose Web. You can specify the delivery method when creating or updating a distribution through the CloudFront console or programmatically. In the console, you choose Create Distribution=>Get started, and then configure values for the distribution, including delivery method, origin settings, and so on.
Origin Setting Values
There are three basic origin values you can configure: origin domain name, origin path, and origin ID:
• Origin domain name This is the DNS domain name of the Amazon S3 bucket or the HTTP server from where CloudFront gets the objects for this origin. Here are some examples:
• Amazon S3 bucket: myawsbucket.s3.amazon.com (this is theS3 bucket name)
• An Amazon S3 bucket configured as a web site: http://bucket-name.s3-website-us-west-2.amazonaws.com (this is the S3 static web site hosting endpoint for your S3 bucket)
• An Amazon EC2 instance: ec2-1111-0-222-33.compute-1.amazonaws.com
• Your local web server: http://mycompany.com
• Origin path Specify a directory path to make CloudFront request content from a directory in your custom origin or an AWS resource.
• Origin ID Set the origin ID to help uniquely identify the origin or origin group in a CloudFront distribution.
You can configure several other origin-related parameters, such as origin keep-alive timeout, which specifies how long CloudFront tries to maintain a connection to a custom origin after it receives the last packet of a response.
Configuring Cache Behavior
You can also configure cache behaviors, which are sets of rules for a specific URL pattern for files on your web site, based on file extension (such as .jpg), filename, and any part of a URL path on your side. You can configure one or more cache behaviors for a web distribution. CloudFront matches user requests with the URL pattern that you provide and enforces the cache behavior that you’ve configured for the URL pattern.
A cache behavior lets you configure settings for the following types of CloudFront functionality:
• The path pattern
• The origin from which you want CloudFront to forward requests (if you’ve configured multiple origins)
• Whether to forward query strings to the origin
• Whether to force users to use HTTPS to access files on the origin (you can also configure the redirecting of HTTP requests to HTTPS protocols)
• The minimum and maximum lengths of time files can stay in the CloudFront cache (overriding the value of any cache-control headers that the origin adds to the files).
TIP Each origin requires a different cache behavior. If you have four origins, for example, you must configure four cache behaviors (including the default cache behavior).
Following are some of the many cache behavior parameters you can configure.
Configuring the Viewer Protocol Policy By default, when using an Amazon S3 origin, CloudFront accepts requests using HTTP or HTTPS. It also forwards the requests to the S3 bucket, using the same protocol that was used by the requests. CloudFront handles HTTP and HTTPS requests differently for a custom origin. You can specify whether CloudFront accesses the origin using only HTTP or HTTPS, or both HTTP and HTTPS.
Caching Content Based on Request Headers By default, CloudFront ignores headers when caching objects in edge locations. Even if the origin returns two objects, if the request headers are the only difference between the two objects, CloudFront caches only one version of the object.
For most web distributions, you can configure CloudFront to forward headers (none, all, or a whitelisted set of request headers) to the origin and to cache multiple versions of an object based on the header values in the requests. This makes it possible for you to serve custom content based on a viewer’s location, device, language, or other criteria.
Let’s say, for example, that a user request for logo.jpg has Amazon or Walmart as the value for a custom Company header. If you configure CloudFront to cache objects based on the value of the Company header, it includes the Company header and the two possible values (Amazon and Walmart) when it forwards requests from logo.jpg to the origin. CloudFront also caches logo.jpg twice: once for requests with the value Walmart for the Company header, and the other for requests with the value Amazon for the Company header.
You can configure cache behavior based on request headers in one of the following ways:
• Forward all headers to your region. When you configure this, CloudFront sends every request to the origin, and doesn’t cache the objects that match this cache behavior.
• Forward a whitelist of headers that you specify. CloudFront caches objects based on the values in all the headers that you specify.
• Forward only default headers. CloudFront won’t cache objects based on the request header values.
Caching Duration and Minimum TTL This behavior is the same for both S3 origins and custom origins. You set the Caching Duration and Minimum TTL to control how long web objects remain in the CloudFront cache before CloudFront forwards new requests on to your origin. You can set the caching duration and Minimum TTL by doing one of the following:
• Adding a Cache-Control or an Expires header to each object.
• Specify a value for a Minimum TTL in CloudFront cache behaviors.
• Use the default value, which is 24 hours.
By default, all objects are cached in an edge location for 24 hours, after which the object expires. You can configure the duration of caching, with there being no maximum expiration time limit.
NOTE Not all content is good to cache! By setting Cache-Control header directives such as a private and no-store, you can direct CloudFront not to cache that content.
Using Query String Parameters to Determine Caching Content Some web applications send information to the origin via query strings. A query string is the portion of a web request that comes after a ? character and can contain one or more parameters. The following example shows two parameters: color=red and size=large:
http://d111111abcdef8.cloudfront.net/images/image.jpg?color=red&size=large
Query strings help customize web content that’s generated by a script that runs on the origin server. By default, CloudFront doesn’t forward query string parameters to the origin, and it also ignores the query string portion of the URL, thus treating multiple objects with different query parameters as not being unique.
Because query strings enable the customization of user web pages, you can configure CloudFront not to forward the query strings to the origin. You can alternatively configure it to forward query strings to the origin and cache the content based on all or some of the parameters in the query string.
Handling Cookies HTTP cookies help deliver a customized or personal dynamic content. By default, CloudFront doesn’t consider cookies when caching objects in edge locations. You can configure CloudFront to forward cookies to an origin, which makes CloudFront cache the objects, using the forwarded cookie values to identify the unique objects in its cache.
You can configure a cache behavior in a web distribution to do one of the following:
• Don’t forward cookies to your origin. CloudFront won’t cache objects on cookie values. It also removes the Cookie header from requests that it forwards to the origin and removes the Set-Cookie header from responses it sends back to the users.
• Forward all cookies to your origin. CloudFront includes all cookies in the user request that it forwards to the origin.
• Forward a whitelist of cookies that you specify. CloudFront forwards requests to the origin after stripping out the cookies that aren’t on the whitelist of cookies that you specify.
Cross-Origin Resource Sharing (CORS) Client web applications loaded on one domain interact with resources in another domain via Cross-Origin Resource Sharing (CORS). For both S3 origins and your custom origin servers, you can configure CloudFront to forward the request Origin header to your origin, thus ensuring that CloudFront adheres to the CORS settings.
Serving Compressed Files CloudFront can compress certain file types and serve them to your users. For compression to occur, the user request must include Accept-Encoding: gzip in the request header. In addition, you must ensure that you’ve specified automatic CloudFront file compression in your cache behavior settings.
Downloading compressed content is faster, because the files are much smaller after compression. Faster downloads mean quicker rendering of web pages to you users. On top of this, it cuts your CloudFront costs to transfer data since it’s cheaper to serve the smaller compressed file.
Because CloudFront doesn’t compress all file types, you can configure your origin (custom or S3 origin) to compress those file types. You can set this up with or without CloudFront’s automatic compression. CloudFront knows when it receives a compressed file from the origin and doesn’t compress the file further.
Adding, Updating, and Removing Content that CloudFront Distributes
You, as an administrator, must know the basics of how to add, update, and delete content from the origins.
Adding Content
To add content that you want CloudFront to distribute, add the content (objects in the form of files) to an origin that you’ve listed in your CloudFront distribution. In addition, expose a CloudFront link that enables access to the files. The CloudFront edge location retrieves the files you’ve added to the origin when it receives a new user request for that content.
If you’re using a custom origin, you must add the file you want CloudFront to distribute to a directory in the domain you’ve specified. If Amazon S3 is the origin, ensure that you add the files to an Amazon S3 bucket that you’ve specified in the distribution.
TIP Make sure that path pattern in the cache behavior that applies to the content sends the requests to the appropriate origin. If the only applicable cache behavior for the content is .html, CloudFront forwards only .html files, and nothing else.
Updating Content
You can update existing content that you’ve configured CloudFront to distribute by updating the files using the same name, or by updating them using a version identifier in the filename. AWS recommends that you use a version identifier in your file or directory names to control your content better. You can use identifiers such as sequential numbers or a date-time stamp. So, for example, instead of updating the file image_1.jpg with the same name, you could call the updated file named image_2.jpg, and update the web application’s or web site’s links to point to this new version of the file.
If you choose to update an existing file in an origin with a new version of the same name, you must be aware that the edge location can’t immediately access the new file version. Indeed, the new version may not be served for up to 23 hours. When the new version is sent to the edge location of the origin, both of the following must be true:
• The previous file version in the cache must expire. By default, CloudFront caches the files in edge locations for 24 hours.
• A user must request the file at that specific edge location.
TIP Since you can’t control how CloudFront starts serving new files, it’s preferable to use different filenames when updating content.
Removing Content
If you want to remove content from a CloudFront distribution, you can remove the files from the origin. However, CloudFront will continue retrieving and sending the content to your users by serving it from edge location’s cache until the files expire. This is not good, of course, so you can remove the files immediately either by invalidating them or by using file versioning.
Invalidating Files You can invalidate the files in an edge cache to override the expiration period you’ve configured for that object on the origin server. When there’s a subsequent request for this content, CloudFront is forced to contact the origin server to retrieve the latest file version.
NOTE You’ll use file invalidation only in unusual circumstances, such as to invalidate changes made in error to a web site’s CSS file.
You can invalidate a CSS file, for example, to ensure that your changes propagate almost immediately. Suppose you update your application’s UI, and its CSS file takes 16 hours to propagate into the cache, whereas the layout changes take only 4 hours. You have a situation where it’ll take 12 hours for the new layout that you pushed out to be styled properly. Invalidating objects in CloudFront’s cache helps in situations like this. You can invalidate only files that are associated with a web distribution. You can invalidate an entire S3 bucket.
You can remove a large number of objects in a single move by sending a list of up to 3000 invalidation paths in an XML document. You can also request up to 15 invalidation paths with a wildcard (*) character. You can specify either an individual file’s path or a path with the * wildcard to invalidate files, as shown here:
• /images/image1.jpg
• /images/image*
• /images/
When you invalidate a file, it removes all copies of an object—that is, it removes the object from all CloudFront edge locations.
NOTE AWS doesn’t charge you for a specific number of invalidation paths per month. If you go over the specified number of paths, you pay a fee for each additional invalidation path.
File Versioning File versioning is another option to update your cached files living on the CloudFront edge locations. By creating a unique name for each version of a file and specifying the most recent filename in your web applications and web pages, you ensure that CloudFront caches the latest version of the object. Then CloudFront doesn’t have to wait for the older object to expire in the cache before it can serve the newer version of the object.
If you frequently update your files, AWS recommends that you use file versioning for the following reasons:
• You can serve different file versions to different sets of users.
• Versioning makes it easy to roll back file revisions.
• Versioning has no charges, except the cost to transfer the new file version to edge locations; invalidation incurs costs above a specific threshold of files.
• If you invalidate files instead of using file versioning, some users may still see old versions of a file since they have cached it locally or behind a corporate caching proxy. Thus, file versioning helps you more tightly control when your changes go into effect.
How CloudFront Handles HTTP Status Codes from an Origin
When CloudFront requests objects from an origin (S3 bucket or custom origin server), the origin sometimes doesn’t return the object, instead returning an HTTP 3xx , 4xx, or 5xx status code, indicating the error that prevented the origin from returning the object.
NOTE Some of the caching strategies for requests and responses are similar to both Amazon S3 origins and to custom origins, while others are different.
HTTP 3xx Status Codes
HTTP 3xx codes include the following:
• 301, URL has changed (Moved Permanently)
• 307, URL has changed (Temporary Redirect)
• 304, Not Modified: Object hasn’t change the last time CloudFront requested it.
NOTE CloudFront doesn’t follow the redirect to the new location if the origin returns a 301 or 307 status code.
CloudFront caches all 3xx response for the duration you’ve specified in your CloudFront distribution, and the header files that the origin returns with an object.
HTTP 4xx and 5xx Status Codes
HTTP 4xx and 5xx codes indicate errors. CloudFront caches the following HTTP 4xx and 5xx status codes returned by an origin:
• 400: Bad Request
• 403: Forbidden
• 404: Not Found
• 405: Method Not Allowed
• 414: Request-URI Too Large
• 500: Internal Server Error
• 501: Not Implemented
• 502: Bad Gateway
• 503: Service Unavailable
• 504: Gateway Time-out
When an origin returns the HTTP 4xx or 5xx status code, CloudFront can behave in different ways, depending on whether you’ve configured custom error pages, the duration you want CloudFront to cache the origin’s error responses, and whether the requested object is present in the CloudFront edge cache.
Error Processing When You’ve Configured Custom Error Pages The CloudFront behavior depends on whether the requested object is in the edge cache. CloudFront continues to try to get the requested object from your origin when all of the following are true:
• A viewer requests an object.
• The object isn’t in the edge cache.
• Your origin returns an HTTP 4xx or 5xx status code instead of returning a 304 status code (Not Modified) or an updated version of the object.
CloudFront then does the following:
1. In the CloudFront edge cache that received the viewer request, CloudFront checks your distribution configuration and gets the path of the custom error page that corresponds with the status code that your origin returned.
2. CloudFront finds the first cache behavior in your distribution that has a path pattern that matches the path of the custom error page.
3. The CloudFront edge location sends a request for the custom error page to the origin that is specified in the cache behavior.
4. The origin returns the custom error page to the edge location.
5. CloudFront returns the custom error page to the viewer that made the request and caches the custom error page for the amount of time specified by the error caching minimum TTL (five minutes by default).
6. After the error caching minimum TTL has elapsed, CloudFront tries again to get the requested object by forwarding another request to your origin. CloudFront continues to retry at intervals specified by the error caching minimum TTL.
Error Processing When You Haven’t Configured Custom Error Pages CloudFront behavior depends on whether the requested object is in the edge cache. CloudFront continues to try to get the requested object from your origin when all of the following are true:
• A viewer requests an object.
• The object isn't in the edge cache.
• Your origin returns an HTTP 4xx or 5xx status code instead of returning a 304 status code (Not Modified) or an updated version of the object.
CloudFront then returns the 4xx or 5xx status code to the viewer. It also caches the status code in the edge cache that received the request. For the duration of the error caching minimum TTL, CloudFront responds to subsequent viewer requests for the same object with the cached 4xx or 5xx status code. After the error caching minimum TTL has elapsed, CloudFront tries again to get the requested object by forwarding another request to your origin.
Chapter Review
AWS networking is a vast topic, and in this chapter, I’ve reviewed the essentials of all the major networking capabilities offered by AWS. You learned how Amazon VPC enables you to set your own logically separate and secure network in the AWS cloud. You learned about key VPC components such as subnets and routes, and how to secure your AWS resources with security groups and network ACLs.
The chapter also reviewed ways to establish secure direct connections to Amazon VPC, such as Amazon Direct Connect. You learned about several optional VPC features, such as VPC peering, VPN connections, and configuring DHCP option sets.
Networking also includes understanding how to configure and work with various load options offered by Elastic Load Balancing.
Amazon’s Route 53 service is a DNS service you can use. You learned the basics of DNS, as well as how to work with Route 53 to register domains, route traffic to your domains, and perform health checks.
Finally, the chapter described AWS’s content delivery service, Amazon CloudFront, and how to secure it.
Exercises
The exercises are designed to teach you how to network. There are no answers to any of the exercises; if you make a mistake, retrace your steps and ensure that you’ve correctly performed the steps. You’ll know that you’ve correctly completed the exercise if you achieve the goal set for you in each exercise, such as creating an Amazon VPC.
Exercise 6-1: Create an Elastic IP (EIP) address.
To create an EIP, you must first allocate an EIP, and then associate it with an EC2 instance. Here are the steps:
1. Open the VPC console: https://consile.aws.amazon.com/vpc/.
2. In the navigation pane, select Elastic IPs.
3. Select Allocate New Address.
4. Select Allocate.
5. Select the EIP that you’ve allocated for use with a VPC in the previous step and choose Actions | Associate Address.
6. Select Instance or Network interface. Then, depending on your choice, select the instance or network interface ID.
7. Select the private IP address you want to associate the EIP with. Then click Associate.
Exercise 6-2: Create an Amazon Virtual Private Cloud (VPC).
1. Go to the Amazon VPC console at https://console.aws.amazon.com/vpc.
2. In the navigation pane, select Your VPCs, VPC, and then Click Create VPC. Create VPC.
3. Specify the VPC name tag, CIDR Block, and Tenancy:
• Name Tag: This is an optional VPC name.
• IPv4 CIDR Block: Choose a CIDR block for the VPC. AWS recommends that you specify a CIDR block from the non-publicly routable, private IP address CIDR blocks such as 10.0.0.0/16, or 192.168.0.0/16, and no preference for the Availability Zone.
• Tenancy: Select a tenancy option, such as Dedicated Tenancy.
4. Click Create VPC.
Exercise 6-3: Create a subnet in a VPC.
Before you can create a subnet, you must have a VPC, so make sure you complete Exercise 6-2 before starting Exercise 6-3.
1. Open the Amazon VPC console: https://console.aws.amazon.com/vpc/.
2. In the navigation pane, choose Subnets | Create Subnet.
3. Specify the subnet details that you need and click Create Subnet.
4. Of the five subnet properties, the Name Tag, Availability Zone, and IPv4 CIDR Block are optional. You must, however, choose the VPC and also specify the IPv4 CIDR block for your subnet, such as 10.1.1.0/24.
Exercise 6-4: Create a network interface.
1. Open the Amazon EC2 console: https://console.aws.com/ec2/.
2. In the navigation pane, select Network Interfaces.
3. Select Create Network Interface.
4. Under Description, enter a name for the new interface.
5. Select the subnet for Subnet.
6. For Private IP (or IPv4 Private IP), enter the primary private IPv4 address. Otherwise, AWS selects a private IPv4 address from the subnet you chose earlier.
7. Select one or more security groups for Security Groups.
8. Click Yes, Create.
Exercise 6-5: Create a security group.
1. Open the Amazon VPC console: https://console.aws.amazon.com/vpc/;
2. In the navigation pane, select Security Groups.
3. Select Create Security Group.
4. Enter a name for the security group (my-sg, for example) and a description.
5. From the VPC menu, select your VPC’s ID and then click Yes, Create.
Exercise 6-6: Launch an EC2 instance in a subnet.
1. Open the Amazon EC2 console: https://console.aws.amazon.com/ec2/.
2. From the dashboard, choose Launch Instance.
3. Select an AMI and instance type and click Next: Configure Instance Details.
4. On the Configure Instance Details page, select the VPC, and then select the subnet in which you want to launch the instance.
5. Select Next: Add Storage.
6. On the next page, configure the storage settings for the instance. Choose Next: Configure Security Group.
7. On the Configure Security Group page, choose an existing security group or create a new security group.
8. Select Review And Launch.
9. Review the instance settings and select Launch.
10. Select a key pair you own, or create a new one. Then select Launch Instances.
Exercise 6-7: Create a NAT gateway.
1. Open the Amazon VPC console: https://console.aws.amazon.com/vpc/.
2. In the navigation pane, select NAT Gateways | Create NAT Gateway.
3. Specify the subnet in which you want to create the NAT gateway.
4. Select the allocation ID of the EIP you want to associate with the NAT gateway.
5. Choose Create A NAT Gateway.
6. Once the status of the new NAT gateway changes to Available, you can start using it.
Exercise 6-8: Create a route for a NAT gateway.
1. Open the Amazon VPC console: https://console.aws.amazon.com/vpc/.
2. In the navigation pane, select Route Tables.
3. Select the route table associated with your private subnet and choose Routes | Edit.
4. Select Add Another Route.
5. For Destination, type the value 0.0.0.00.
6. For Target, select the ID of the NAT gateway you created in Exercise 6-7.
7. Open a command prompt from one of the EC2 instances in your private subnet, and ping amazon.com to verify that the Internet connectivity is set up.
Exercise 6-9: Configure Amazon Route 53 to route traffic to an Amazon EC2 instance.
There are some prerequisites for performing this task. You must first do the following:
1. Register your domain name.
2. Choose Route 53 as the DNS service for the domain.
3. AWS recommends that you also create an EIP and associate that with your EC2 instance.
Perform the following steps to configure Route 53 to route traffic to an EC2 instance:
1. Get the IP address for the EC2 instance by going to the EC2 console and looking up the value of the Elastic IP on the Description tab. If you didn’t associate an Elastic IP with this instance, get the value of the IPv4 Public IP.
2. Open the Route 53 console: https://consoile.aws.amazon.com/route53/.
3. In the navigation pane, select Hosted Zones. Select the hosted zone with the same name as the domain for which you’re routing the traffic.
4. Select Create Record Set. Specify the following values:
• Name: the domain name (default value is the hosted zone’s name). For example, if the hosted zone has the name example.com, and you want to use test.example.com to route traffic to this instance, enter test.
• Type: A-IPv4 Address
• Alias: Accept the default value.
• TTL (seconds): Accept the default value of 300 seconds.
• Value: Enter the IP address you retrieved in step 1.
• Routing Policy: Accept Simple, the default value.
5. Select Create.
Within 60 seconds, the changes propagate to all Route 53 servers. Following the propagation, you can route traffic to the EC2 instance by using the name of the record that you created in this exercise.
Exercise 6-10: Create and update a Route 53 health check.
1. Sign in to the AWS Management Console and open the Route 53 console: https://console.aws.amazon.com/route53/.
2. Choose Health Checks in the navigation pane.
3. Choose Create Health Check to create a health check. Choose Edit Health Check to update a health check.
4. In the Configure Health Check page, enter the applicable values for each setting for the health check.
5. Create an alarm by choosing Create Alarm so that CloudWatch can send you an SNS notification when the status of a health check changes to unhealthy
6. Click Create Health Check. You should see a confirmation such as the following:
Health check with id c912740b-d9e3-4646-94b3-fdbcefe6985f has been created successfully
7. Associate the new health check with at least one Route 53 record.
Exercise 6-11: Create a CloudFront distribution.
Before you start this exercise, you must ensure that you’ve finished the prerequisites:
1. Create at least one Amazon S3 bucket or configure HTTP server as your origin servers.
2. Upload your content to the origin servers, such as Amazon S3, and grant object permissions. You must grant public read permissions to the buckets if you want the objects to be publicly readable and ensure that users can access the objects in your S3 buckets through CloudFront URLs. You will learn how to grant S3 object permissions in Exercise 8-4.
Once you’ve performed the prerequisite tasks, you are ready to create your CloudFront distribution. Follow these steps to create the distribution:
1. Open the CloudFront console at https://console.aws.amazon.com/cloudront/.
2. Select Create Distribution.
3. In the Select A Delivery Method For Your Content page, click Get Started.
4. On the Create Distribution page, enter the S3 bucket name, path, and other details under Origin Settings, by accepting the default values for most of the settings.
5. Under the Default Cache Behavior settings, accept the default values.
6. Under Distribution Settings, select the values for the distribution, such as the Price Class (maximum price prices you want to pay for the CloudFront service).
7. Once the status of the new distribution changes to Deployed, you can test the links to your objects. For example, to test the link to an object named image.jpg, copy the following HTML to a file:
<html>
<head>My CloudFront Test</head>
<body>
<p>My text content goes here.</p>
<p><img src="http://domainname/objectname" alt="my test image"/>
</body>
</html>
If your object is image.jpg and your domain name is d111111abcdef8.cloudfront, your URL for the link to the object is http://d111111abcdef8.cloudfront.net/image.jpg.
8. Open your web page in a browser and it should return the page with the embedder image file from the edge location where CloudFront has saved the object.
Questions
The following questions will help you measure your understanding of the material presented in this chapter. Read all the choices carefully because there may be more than one correct answer. Choose all the correct answers for each question.
1. What’s the best way to set up a highly available connection between your Amazon VPC and your on-premise data center?
A. Launch EC2 instances across multiple availability zones and set up route tables so that a different EC2 instance automatically takes over when an EC2 instance fails.
B. Create an AWS Direct Connect setup between your Amazon VPC and your data center.
C. Create a virtual private gateway with a route to your data center.
D. Create a virtual private gateway and ensure that you configure two customer gateways.
2. What is the reason for launching EC2 instances in a private subnet?
A. To enable users to connect to the EC2 instances faster
B. Because AWS requires you to place EC2 instances in private subnets
C. Because a public subnet has no way to reach the Internet
D. To provide an additional layer of security for the EC2 instances
3. Which of the following is not a benefit you gain from Amazon Direct Connect?
A. Lower data transfer costs
B. Higher latency
C. Connect to VPCs in different regions
D. Direct connectivity between your VPC and your onsite data center network
4. Which of the following does a default VPC have?
A. An Internet gateway and a virtual private network gateway
B. A route table that directs all IPv4 traffic destined for the Internet to the Internet gateway
C. A NAT instance
D. A physical firewall
5. Which of the following statements is true about Amazon CloudFront?
A. It delivers the latest version of a file to the users.
B. It will wait until the entire file downloads, so it can perform error checking before sending the file over to the user.
C. It forwards a file to the user as soon as it receives the first bytes of the file.
D. It waits for the user to request the file.
6. You are tracking your web page users with a tracking image that loads on each web page. You are now serving this image from us-east, but your research shows that it takes too long to load the image for users on us-west. What are the ways in which you can speed the image serving? (Choose two)
A. Use CloudFront to serve the image.
B. Serve the image directly from an Amazon S3 bucket.
C. Use Route 53 as your DNS service, and choose its latency-based routing to serve the image out of both us-east-1 and us-west-2.
D. Use cookies rather than loading the images with each web page load.
7. Which purposes does an Internet gateway server serve? (Choose two)
A. It facilitates private internal communications between the EC2 instances within a VPC.
B. It enables a public, but not a private, subnet to communicate with the Internet.
C. It provides a target in your VPC route tables for Internet-routable traffic.
D. It performs network address translation (NAT) for instances that have been assigned IPv4 addresses.
8. Which of the following are true with regard to securing your VPC with security groups and network ACLs? (Choose two)
A. Security groups control inbound and outbound traffic for your EC2 instances.
B. Security groups control inbound and outbound traffic for your subnets.
C. Network ACLs control inbound and outbound traffic for your EC2 instances.
D. Network ACLs control inbound and outbound traffic for your subnets.
9. Which of the following features can you use to investigate a suspected brute-force hacking attempt into one of your EC2 instances? (Choose three)
A. Check the access logs.
B. Enable VPC flow logs and examine the logs.
C. Check GuardDuty’s findings.
D. Explore the EC2 instance’s operating system logs.
10. How would you collect information regarding the IP address of the client making requests on a Classic Load Balancer that you’ve implemented?
A. Use access logs to gather the information.
B. Enable CloudWatch and monitor the HostConnect metric.
C. Monitor the eventSource API in AWS CloudTrail.
D. Use flow logs.
11. Which of the following are true? (Choose two)
A. You can modify the main route table.
B. You can’t modify the main route table.
C. By default, the main route table doesn’t contain a route to an Internet gateway.
D. By default, the main route table always has a route to an Internet gateway.
C. By default, the main route table contains a route to an Internet gateway.
12. When you configure CloudFront to speed up the delivery of content to your web users, which of the following is true?
A. CloudFront starts forwarding the files to the user as soon as the first byte arrives from the edge server.
B. CloudFront starts forwarding the files to the user as soon as the last byte arrives from the edge server.
C. CloudFront starts forwarding the files to the user as soon as the last byte arrives from the origin server.
D. CloudFront starts forwarding the files to the user as soon as the first byte arrives from the origin server.
13. Which of the following is an origin server in Amazon CloudFront? (Choose two)
A. An HTTP server or an Amazon S3 bucket for distributing static content
B. An Amazon S3 bucket for distributing media files on demand
C. A HTTP web server that you run on-premises for distributing media files on demand
D. An Amazon S3 bucket for static content only
14. If you don’t see a heath check for an Application Load Balancer in the CloudWatch console after updating the health check’s port, what could be the reason?
A. You must look for the health checks in the Application Load Balancer’s console.
B. You failed to restart the Application Load Balancer after making the port change.
C. You haven’t enabled your security group’s rules to ensure that they allow traffic to the new port.
D. You can’t change a health check’s port.
15. Which of the following would be good reasons to set up an AWS Direct Connect connection? (Choose three)
A. Lower network latency
B. Lower network data transfer costs
C. Private connectivity to AWS
D. Faster network data transmission through Internet-based connections
16. Which of the following statements are correct regarding inbound and outbound rules when adding security rules to a security group? (Choose two)
A. An inbound rule consists of the traffic source and the destination port (or port range). The source may be another security group, a single IP address, or an IPv4 or IPv6 CIDR block.
B. An outbound rule contains the traffic destination and the destination port (or port range). The destination may be another security group, a single IP address, or an IPv4 or IPv6 CIDR block.
C. An inbound rule consists of the traffic destination and the destination port (or port range). The source may be another security group, a single IP address, or an IPv4 or IPv6 CIDR block.
D. An outbound rule contains the traffic source and the destination port (or port range). The destination may be another security group, a single IP address, or an IPv4 or IPv6 CIDR block.
17. You can create VPC flow logs for which of the following entities?
A. VPC only
B. VPC or subnet only
C. Network interface only
D. VPC, subnet, or network interface
18. Which of the following statements are true regarding the statefulness of security groups and network ACLs? (Choose two)
A. Security groups are stateful and allow responses to allowed traffic, even if the security group’s rules don’t permit it.
B. Security groups are stateful and allow responses to allowed traffic, only if the security group’s rules permit it.
C. Network ACLs are stateless and allow responses to allowed traffic, subject to network ACL rules.
D. Network ACLs are stateless and allow responses to allowed traffic, regardless of the network ACL rules.
19. You can control traffic routing within a VPC and into and out of a VPC by using which of the following?
A. Route tables only
B. Network ACLs and security groups only
C. Route tables, network ACLs, and security groups
D. DHCP
20. An alias record type can point to which of the following? (Choose three)
A. An Application Load Balancer
B. An Amazon S3 bucket that you’ve configured as a static web site
C. Another Route 53 resource set in the same hosted zone
D. An IP address or a domain name
21. Which of the following are true of object versioning and cache invalidation when using Amazon CloudFront? (Choose two)
A. Calling the invalidation API to remove an object removes only the copy of the object on a single CloudFront edge location.
B. Calling the invalidation API to remove an object removes all copies of an object from all CloudFront edge locations.
C. If you frequently update your web files, you should use object versioning.
D. If you frequently update your web files, you must use cache invalidation by calling the invalidation API.
22. Which of the following statements are true? (Choose two)
A. A security group automatically applies to all instances that you launch.
B. A security group applies to an instance only if you specify the security group at the instance launch time or associate the security group with the instance later.
C. A network ACL automatically applies to all instances in the subnets you associate the ACL with.
D. A network ACL applies to an instance only if you specify a security group for the instance.
23. You’re running a web application in your data center located in New York and in the London AWS region. If you’re using Route 53, how would you minimize your web application’s load times?
A. Configure a latency-based routing policy.
B. Configure a weighted routing policy, with the weights heavily oriented toward New York, where the application’s data center is located.
C. Implement a simple routing policy to route all US-based traffic to New York with the least delay.
D. Run the application in a London data center.
24. Which of the following are good ways to restrict access to your web content stored on CloudFront edge locations? (Choose two)
A. Signed cookies
B. Signed URLs
C. Georestrictive polices
D. Origin access identity
25. When you terminate an EC2 instance after having assigned it an Elastic IP, what happens to the Elastic IP that you’ve assigned?
A. The Elastic IP remains associated with your AWS account, and you’ll continue to be charged for it.
B. The Elastic IP is disassociated from your AWS account.
C. The Elastic IP remains associated with your AWS account, but you won’t be charged for it.
D. The Elastic IP goes back to the pool of AWS’s available IP addresses.
26. You are using AWS Direct Connect to connect to your Amazon VPC. How do you configure your networking so you can use Direct Connect while keeping your Amazon VPC without connectivity to the Internet?
A. Configure only a VPN gateway for your VPC.
B. Configure a Direct Connect gateway for your VPC.
C. Configure an Internet gateway and a VPN gateway for your VPC.
D. Configure just a local Internet gateway.
27. Which of the following is true regarding the differences between a private subnet and a public subnet in an Amazon VPC?
A. The public subnet’s route table has a route to the Internet gateway, and the private subnet’s route table doesn’t have one.
B. The public subnet’s route table has a route to network address translation (NAT), and the public subnet’s route table doesn’t have one.
C. A private subnet has a security group, and a public subnet doesn’t have one.
D. A private subnet has a network ACL associated with it, and a public subnet doesn’t.
Answers
1. D. To establish a highly available connection, you must set up a virtual private gateway and configure two customer gateways, so you can avoid a single point of failure.
2. D. An instance inside a private subnet can’t be accessed directly by anyone from the Internet. Rather, they’d have to access it from within a VPC, thus providing an additional layer of security.
3. B. Lower, not higher, latency is a benefit of Direct Connect, since it is on a managed network. All the other alternatives point to benefits offered by Direct Connect.
4. B. A default VPC comes with a route table that reflects the Internet gateway, which is part of the default VPC.
5. C. CloudFront doesn’t wait until the entire file completes downloading and doesn’t perform any error checking. It forwards the file to the users as soon as it gets the first bytes of the file.
6. A, C. CloudFront can speed up the delivery of content by avoiding a new trip to the origin server each time a user needs to view a file. In addition, latency-based routing of DNS requests will route the user requests to the faster of the two locations.
7. C, D. An Internet gateway provides a target in your VPC for Internet-routable traffic. In addition, an Internet gateway performs NAT for instances with assigned IPv4 addresses.
8. A, D. Security groups control inbound and outbound traffic for your EC2 instances. Network ACLs control inbound and outbound traffic for your subnets.
9. B, C, D. VPC flow log output will show traffic from a single source to a specific port. Amazon GuardDuty (discussed in Chapter 11) reports on suspicious EC2 network activity. Finally, operating system logs will show evidence of any brute-force attacks.
10. A. Access logs offer the most comprehensive information, such as details about the IP addresses from which the client requests are coming. The information is more detailed than that offered by Amazon CloudWatch.
11. A, C. You can modify the main route table any time, and the main table doesn’t contain a route to the Internet gateway by default.
12. D. CloudFront doesn’t wait for the file download to complete. It starts forwarding the files to the user as soon as the first byte arrives from the origin server.
13. A, B. A is correct because, for static content, the origin server can be an S3 bucket or an HTTP server (run on an EC2 instance or on-premises). B is correct because for distributing media files on demand, the origin server must be an S3 bucket.
14. C. You must ensure that the security group has a rule that allows traffic to and from the new port for the health check.
15. A, B, C. Direct Connect offers consistently lower network latency, lowers your network data transfer costs, and lets you establish a private virtual interface from your on-premise network directly to your VPC.
16. A, B. Security groups let you filter only on destination ports, and not source ports. An inbound rule consists of the traffic source and the destination port (or port range). An outbound rule contains the traffic destination and the destination port (or port range).
17. D. You can create a flow log for a VPC, subnet, or network interface.
18. A, C. Security groups are stateful and allow all responses to traffic it has allowed to go out of the network, even if the security group’s rules don’t permit it. Network ACLs are stricter in a sense, because they are stateless but allow responses to allowed traffic only if the network ACL rules permit it.
19. C. You can use route tables, network ACLs, and security groups to control routing both within a VPC and into and out of a VPC.
20. A, B, C. An alias record type can point to a CloudFront distribution, an Elastic Beanstalk environment, an Amazon S3 bucket that you’ve configured as a static web site, an Application Load Balancer, or another Route 53 resource record set in the same hosted zone.
21. B, C. When you call the invalidation API to remove an object, it removes all copies of the object from all CloudFront edge locations. AWS recommends that you use object versioning instead of calling the invalidation API because of the many benefits offered by object versioning, including lower costs.
22. B, C. A security group applies to an instance only after you specify the security group when launching an instance or if you associate a security group with the instance later. A network ACL automatically applies to all instances in the subnets the network ACL is associated with.
23. A. AWS creates latency record sets in an AWS region, and not on a customer’s location. Your web application’s latency measurement isn’t based on its data center location (New York). Rather, the latency is based on the AWS region with which you’ve associated this record. Instead of associating the resource record with the London region, associate it with the us-east-1 region, located in the eastern U.S.
24. A, B. Signed cookies and signed URLs are the most effective ways to control access to content stored in the edge locations.
25. A. Elastic IPs are associated with your AWS account and not to EC2 instances to which you may assign them. When you delete the EC2 instance, the Elastic IP remains associated with your account, and you’ll be charged for it, to keep you from accumulating too many unused Elastic IPs.
26. A. By configuring just a VPN gateway and not an Internet gateway as well, you can use AWS Direct Connect without opening up your EC2 instances to the public Internet.
27. A. The route table in a public subnet has a route to the Internet gateway, whereas the route table in a private subnet doesn’t have one.