 Given a scenario, deploy and configure multifunction devices/printers and settings
One of the more common activities an A+ Certified Service Technician performs is initial setup and configuration of multifunction devices (MFDs) and printers. Objective 3.6 of the A+ Core 1 exam details the essential steps required to successfully install and configure these devices. An MFD, as its name implies, offers multiple operations, which typically include built-in devices for printing, faxing, scanning, copying, and, in some models, interacting with the Web. Instead of a separate device to perform each of these actions, an MFD combines them into a single multifunction device.

EXAM TIP Make sure you know the steps required to install printers and their drivers.
Keep in mind that not all MFDs are printers, but most are. Therefore, when the term printer is used in the discussion of this objective, remember that most of this material also applies to MFDs.
Unboxing, Placing, and Configuring an MFD

NOTE The following discussion on the initial setup and the configuration of an MFD is based on the installation guide of a Xerox MFD. The installation guide books that ship with most devices are proprietary, but, for the most part, the tasks and objectives are the same.
Obviously the first action you take to begin the installation and configuration of a multifunction device (MFD) is to remove it and its materials from the box or packaging. It’s best to unpack the device near to where it is to be placed. This will save you steps and help you avoid the possible loss of needed components. Typically, an installation and configuration guide is packaged with the device, along with an operations manual, toner, an installation media, a features guide, and perhaps a quick overview of each of the functions supported by the MFD.
Initial Configuration
Most of the better MFDs are configured for operation out of the box (OOTB). However, some configuration steps are required to localize and verify the operation of the device. The following is a generic list of the tasks typically performed (in the listed sequence) to set the initial configuration of an MFD:
1. Connect the MFD to the nearest AC power source available. If the AC outlet causes the power cord to create a hazard, relocate the device to remove the safety risk.
2. Connect the printer’s network adapter to the network medium as required for wired or wireless networks.
3. Confirm that the printer is recognized by the network. The printer should be configured for the network by the Dynamic Host Configuration Protocol (DHCP) and be able to communicate over the network. To test this, use the setup menu on the printer to verify the IP address assigned. If the IP address function times out, there are connection issues, but they may or may not be caused by the onboard network interface card (NIC).
4. If communications are functional with the network, power-cycle (restart) the printer. Most MFDs start up in a setup/configuration wizard mode that guides you through the settings needed. These commonly include location, time zone, and date and time, and sometimes a couple of proprietary preferences.
5. Follow the instruction in the documentation for the printer to install the appropriate print medium (ink jet, toner, and so on) and print a test page.
6. If provided as an option, print a summary of the device’s configuration settings.
7. Test each of the embedded functions of the printer:
a. From a browser, attempt to reach the IP address assigned to the printer.
b. If available, scan a document and e-mail it to yourself or to the customer.
c. If available, copy a document and e-mail it to yourself or to the customer.
d. The fax function is still available on some MDFs, but it’s beginning to disappear. If it’s present, repeat the test used for the scanner and the copier.
e. Be sure that the function testing performed verifies the functions that will be used the most.
Follow the instructions in the printer’s installation and operations manuals to complete the appropriate settings.
Device Drivers
Before the printer or any of its functions can be tested from a network client or host computer, the device driver(s) appropriate to the server’s or node’s operating system must be installed and configured.
Windows
Most printers and MFDs are plug-and-play devices on Windows systems, and once a connection is established, Windows automatically detects and installs the appropriate drivers. If the system doesn’t detect the device, you need to install the printer and the device drivers manually. You have a couple of options available to add a printer to a Windows system. One way is using the Devices and Printers option on the Control Panel and its Add a Device app. The second way is using the Printers & Scanners option of the Settings app (see Figure 3.6-1). You should also follow the installation and configuration instructions provided with the device.

FIGURE 3.6-1 The Printers & Scanners page in the Windows Settings app
macOS
The macOS connects automatically with AirPrint-compatible printers. On other compatible printers, macOS installs the device drivers automatically. If the printer is connected via USB, verify that the macOS installation is up to date so that the latest printer drivers are available. If you are installing a Wi-Fi printer on macOS, an AirPrint-compatible Wi-Fi printer is configured automatically, but noncompatible printers may need to be connected via USB temporarily for configuration.
Linux
Linux printer installation varies with the operating system distro and the drivers available. Many HP and Brother printers can use manufacturer-provided Linux drivers. To install other printers using a typical Linux graphical user interface (GUI), use the Printers or System | Printers option in your desktop environment to select a printer and use the drivers provided with the GUI. The Common Unix Printer Service (CUPS) is used if printer configuration software is not provided; install it using your Linux distribution’s package manager.
PostScript and PCL
The CompTIA A+ Core 1 exam objectives list PostScript (PScript or PS) and Printer Control Language (PCL) under the objective “Use appropriate drivers for a given OS.” However, each of these printer “drivers” was developed for use by or with a specific manufacturer’s products: PostScript by Adobe Systems and PCL by Hewlett Packard. Each of these drivers is classified as a page description language that provides a digital image layout in text and binary to a printer and provides an appearance map of a page.
PostScript
PostScript was originally developed by Adobe for its desktop publishing products as a dynamic programming language. Most PostScript-compatible printers have an interpreter that, like an interpretive programming language, translates the PostScript commands into the pixels (dots) that create the printed page on a particular printer. Figure 3.6-2 shows an example of PostScript commands, and Figure 3.6-3 shows the page produced from the code.

FIGURE 3.6-2 An example of PostScript page commands

FIGURE 3.6-3 The results printed from the PostScript example in Figure 3.6-2
NOTE Some printers refer to PostScript interpreters as raster image processors (RIPs).
PostScript commands allow laser printers to produce high-resolution graphics and text on the same printed page. PostScript 3 is the latest, current, and most likely last version for PostScript. Adobe forecasts that the Portable Document File (PDF) format will soon become the document and graphics publishing standard. PostScript images and command files can be saved as Encapsulated PostScript (.eps) files.
Printer Control Language
Printer Control Language (PCL) is often confused with Printer Command Language, which is an alias of the Page Description Language, which is confusingly also PCL. The PCL you need to know about (that is, the Printer Control Language) was developed by Hewlett-Packard as a printer control protocol for its line of laser and inkjet printers. However, it has been adapted to many other types of printers, including thermal and impact.
The current version of PCL is version 6, which has been the standard since the middle 1990s. PCL 6 consists of three parts:
• PCL 6 Enhanced Also known as PCL XL, this standard provides support for printing from GUI-based systems such as Windows.
• PCL 6 Standard This is the backward-compatible standard equivalent to PCL 5.
• Font synthesis This standard supports scalable fonts and print structure designed to be future-proof.
The basic difference between PostScript and PCL is that the former is a page description language developed for desktop publishing and the latter is a page description language developed as a printer control protocol. A page description language describes the layout and appearance of the page to be printed. Is either a device driver? Technically no, but they are printer device command sets.
EXAM TIP PCL is commonly used for basic office document and letter printing, whereas PostScript is more often used for detailed graphics printing.
Device Connectivity
There are several ways to connect a printer to a computer, but the best way to connect any particular printer is often limited to the one or two methods available on the printer itself. The most common way to connect a printer to a PC is with a USB connector. Other methods that are not nearly as popular include wireless, peer-to-peer sharing, and, even more rare, a parallel connection. On a LAN, printers are also shared on the network.
Wireless-enabled printers are gaining popularity and are being used in standalone PANs and shared LANs, However, wireless printers, like a directly connected printer, require a print app or client to be installed on the connecting PC. The newest printers, especially those connecting to a Windows system with a USB connection, are Plug and Play (PnP), which means Windows establishes the configuration and creates the linkage. However, regardless of the connection type, on all operating systems (Windows, macOS, and Linux), a device driver may be required and is normally provided with the printer. Windows and macOS include a variety of standard printer interfaces and drivers as well.
USB Connections
Virtually all PC-compatible printers provide USB connection capability, but the USB connection for a printer is usually specifically configured. A USB-enabled printer commonly has a Type-B connector on its rear panel very near an RJ-45 connector, if one is included. The printer cable then has a Type-B connector at one end and, depending on the device to which the printer is being connected, a Type-AB (see Figure 3.6-4) or perhaps even a Type-C connector.
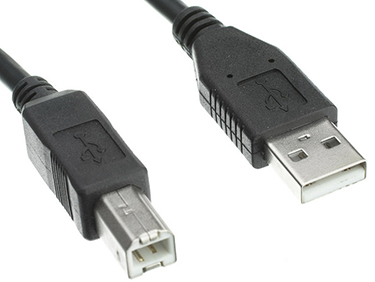
FIGURE 3.6-4 A Type-B (left) to Type-AB (right) USB printer cable
Ethernet Connections
If a printer is directly connected to a PC, no network, Ethernet, or anything is necessary. However, if the printer to be connected is a node on an Ethernet network, some configuration is necessary on the PC. Most of the major printer manufacturers, such as HP, Zebra, Canon, Lexmark, and others, provide either media with installation or configuration apps or a website that guides users through the process. However, some printers do require configuration to the network and then to a PC.
Connecting a network-capable printer to an Ethernet network is a relatively simple process. Physically, a network cable is used to connect the printer to a router, switch, or hub that is active on a network. On the printer itself, a built-in configuration or setup function will automatically configure the printer to the network or guide the user through a step-by-step setup. However, connecting to the now-networked printer is different in each operating system.
EXAM TIP Both Ethernet and wireless are listed separately in Objective 3.6 for Domain 3 of the A+ Core 1 exam. You may assume that should the exam reference Ethernet, it’s referring to a wired network. This is probably a safe assumption, but be careful with that.
Add an Ethernet Printer to a Windows System
The process for adding a connection to a network printer from a Windows 10/11 system, and most of the previous versions, includes the following steps:
1. On the Start menu, open the Settings app and access Printers & Scanners from the Devices option (refer back to Figure 3.6-1).
2. Click the plus sign icon to add a printer or scanner.
3. Windows searches its local and network connections for a printer(s) available to be added.
4. Select the device to be added and click Add Device to have the system add the appropriate drivers to the system.
5. If the printer is not found, the message “The printer I want isn’t listed” displays. Click the message to open an Add Printer dialog box that supports locating or adding a printer manually.
Add an Ethernet Printer to a macOS System
The latest versions of macOS include the capability to search for and install most network printers, much like Windows 10/11. Any adjustments needed to the automatic configuration or the capability to add a printer manually can be done in the Print & Fax section of the System Preferences function.
Add an Ethernet Printer to a Linux System
The most popular Linux distros include a service to detect and add network printers, much like Windows and macOS. On a GUI desktop such as GNOME or KDE, select either the Settings or All Settings option to display the settings options. Click the Printers icon to initiate a search and install a service that will automatically link to the printer. If no printers are found, use the Common Unix Printing System (CUPS), which is a web-based utility for managing all things printing.
Wireless Printers
The most common way to add any printer to a network, regardless of it being wireless or not, is to install it as a standalone device on the network that can be reached and used by authorized workstations on the network. Obviously, on a wireless network, any printer added would be a wireless device, which means it has a built-in wireless network adapter. For the most part, the installation and configuration software for any particular printer would be supplied by its manufacturer.
Once a wireless (or Wi-Fi) printer is configured on a LAN, the process for enabling each workstation is essentially the same as that used for connecting to a wired printer. The same utilities and apps are used, with the only exceptions concerning print characteristics and settings.
Device Sharing
Unless multiple users in an office print documents frequently, there’s little need for each user to have an individual printer. There are numerous ways to share printers, and the ones you should know are in this section.
Wired
The same ports built into a typical printer for directly connecting the printer to a single computer can also be used to share the printer. The following are three of the more commonly used methods for sharing a printer among devices:
• Use a USB hub to share a printer between two nearby computers. This method eliminates the need for the computers to be connected to a network.
• On a network, a printer attached directly to a node can be shared, provided the host computer is running and File and Print Sharing Services is activated.
• Another approach for sharing a printer on a network is to establish the printer as an addressable Ethernet network node.
Wireless
Most of today’s printers come ready to connect wirelessly to local computers and networks. Here are the most common wireless connections used to provide connectivity to a printer:
• A printer with Bluetooth is ready to connect to any computer or mobile device using Bluetooth. The devices must be in range (~10 meters), the devices must establish pairing, and a suitable printing app must be installed on the mobile devices.
• It’s also common for a printer to have Wi-Fi (802.11x) onboard, which allows it to readily join a wireless network using its own IP address and be ready to print after installation and configuration. Perhaps the hardest part of connecting a printer to a wireless network is setting the wireless configuration (SSID, password, and encryption key) using the printer’s control panel.
Public and Shared Printers
A public printer is a network node to which a user or group is granted access. For example, a public printer in a college library may require a login either to a network or possibly the printer itself, and it may require a fee. Another example is a publicly accessible printer on a customer-oriented coffee shop’s network that allows virtually anyone to e-mail documents to be printed to it. In other works, a public printer is available to the public. However, who is included in “public” may be defined differently by each network.
A shared printer is a private printer whose owner controls access to it by granting permission to selected users. Figure 3.6-5 shows the Windows 11 Control Panel’s Network and Sharing Center’s Change Sharing Options for Different Network Profiles dialog box on which the settings in the highlighted area can be used to share a printer.

FIGURE 3.6-5 The Windows Change Sharing Options for Different Network Profiles dialog box
Print Server
Although today’s printers have way more capabilities than those of the past, many lack processing power. A printer performs much better when some of its processing and management tasks are handled by a print server. There is a major difference between a network printer and a print server on a network. A network-capable printer can be added to a network as an addressable node that other nodes in the same broadcast domain can access and use. A print server works more like a router for print jobs, and, in fact, some routers also function as integrated print servers.
A print server can be in one of three forms: a special-purpose network hardware device, a function built into a printer, or software running on a network server, such as a file server. Figure 3.6-6 illustrates the first two of these forms. A hardware-based print server (also known as an external print server) is essentially a computing device dedicated to providing print queue management and, if two or more printers are connected to the device, load balancing when necessary. A network printer can also provide print server functions (commonly referred to as an internal print server) such as queue management and control. Third-party software running on network server hardware can manage all queue, load balancing, and print services and control functions for a network.

FIGURE 3.6-6 An illustration of external and internal print servers
NOTE Some external print server devices don’t provide support for all MFD functions.
Cloud Printing
A variety of cloud printing applications, such as Google’s Cloud Print, Microsoft’s Universal Print, and UniPrint’s InfinityCloud, provide users with the ability to print a document on a remote printer from virtually any location where an Internet connection is available. A cloud printing app encapsulates a document into a file and then sends it to a cloud-based print server. The cloud server routes the print file to a real printer for printing.
Cloud printing allows you to print from any device, including mobile devices, connected to a network. A cloud printing service creates a connection between a source device and an Internet-connected printer selected by the user. Cloud printing avoids the device driver, font and image compatibility, and print queue issues associated with traditional directly connected or LAN-based printing.
Remote Printing
Remote printing is something like cloud printing, but without the cloud. Essentially, remote printing replaces fax machines for sending documents from one location on a network to a printing device on the same network, regardless of whether it’s wired or wireless or on a LAN, proprietary WAN, or the Internet. Remote printing provides local or remote users with the capability to retrieve a document from a remote location and print that document on either a local or remote printer.
Configuration Settings
After you have installed a printer on a system, the next step is to review and possibly modify its configuration, which determines how the printer is to perform. On a Windows system, find the newly installed printer in the Devices and Printers on the Control Panel or Printers & Scanners in Settings and then right-click its icon and select Printing Preferences. To configure a printer in macOS, open the Print dialog box, select the printer, click Show Details, and choose the options desired. To configure a printer in Linux, see the documentation for your GUI or distro.
Options vary by device and features, but here are the ones you need to know for the A+ Core 1 exam:
• Duplex The duplex setting specifies whether and how to use each side of a printed page. Simple duplexing uses the front and back of each sheet in sequence, but advanced options can reorient the print to account for binding on any given edge as well as reorder pages to support folded booklet layouts.
• Collate Enabling the collate option prints a full copy of a multipage document before starting the next copy. When this option is disabled, the printer prints all copies of a page before moving to the next page.
• Quality The quality settings enable you to manage the tradeoffs between quality and speed, ink use, and memory use:
• The most obvious of these, resolution, specifies what DPI the document should be printed at.
• Some printers may let you choose some mode or quality presets that optimize printing for graphics or text or choose to manually configure your own advanced settings.
• Some printers may have settings that reduce ink or toner used, for economic and environmental reasons.
• Orientation Virtually all printers commonly used in SOHO environments have the capability of printing a page in either portrait (8.5" by 11") or landscape (11" by 8.5"). Plus, on many you can print a variety of different standard or customized page sizes, such as A3. On larger print systems, you might find a few other orientation settings.
• Tray settings Generally, the tray settings for a printer define the size of the paper in a paper tray, which paper tray is active (selected) when there are more than one, the type of paper in the tray (such as preformatted for checks and forms), and perhaps the thickness of the page.
NOTE The names and descriptions of settings that influence quality might discuss quality itself, ink or toner use, environmental friendliness, or even cost savings. As a result, quality-reducing settings may be scattered around multiple menus.
EXAM TIP Make sure you know the configuration settings for printers covered in this section.
Device Sharing
Unless multiple users in an office print documents frequently, there’s no need to have a printer for every computer. There are a variety of ways to share printers, as you will see in this section.
Wired
The ports that are built into a typical printer, which are provided primarily for directly connecting to a single device, are the same ports used for device sharing, as follows:
• Use a USB switch to share a printer between two nearby computers without the need for networking; if the computer is on a network, you can share the printer as long as the host computer is running. (Don’t forget to install file and print sharing services!)
• Use the Ethernet port to plug the printer into a wired network. It will have its own IP address.
Wireless
Many printers today are ready to connect wirelessly to other computers or networks.
• A printer with Bluetooth is ready to connect to any computer or mobile device with Bluetooth after pairing (just make sure you have a suitable printing app for the mobile device).
• A printer with Wi-Fi onboard (802.11 a, b, g, n, ac, or ax) is ready to join your wireless network, have its own IP address, and be ready to receive print jobs after configuration. The hardest part of the process may be entering the SSID and encryption key using the printer’s control panel.
• Infrastructure is a long name for the way that normal Wi-Fi networks work: every devices, including the printer, use an SSID to connect to an access point (AP) or router.
• Ad hoc, on the other hand, allows for direct connection between any two Wi-Fi devices without going through a router or AP. Windows does not officially support ad hoc connections, but you can find a variety of methods online for setting up an ad hoc connection to your printer.
Security
Protecting access to a printer and allowing its use to only authenticated and authorized users can be a high-priority issue in any security policy and plan. Printers aren’t always considered to be elements of risk, but there are a variety of threats to their security. Some of these areas—especially the ones that follow because you’ll likely see them on the A+ Core 1 exam—are discussed in the following sections.
User Authentication
A lot of sensitive information gets printed, especially in places like schools and hospitals, where strict privacy regulations apply. Therefore, safeguards need to be in place to make sure this information isn’t leaking out. With some types of network printers, the user must authenticate on the device after sending the print job before the job is printed. This can be done with a user code that is stored in the printer’s address book or by using various authentication servers.
Badging
Some networks include resources, data, and other assets to which access must be restricted due to security, privacy, or unauthorized use. For example, a small company may have a 3D printer on its network but wants its use restricted to only those employees who are qualified to operate it properly. This can be done through a concept called badging, which is a digital indicator that a certain user account has attained a certain security clearance or access permission. Although this is a logical process, it is essentially the same as a physical clearance to access restricted assets or facilities.
Audit Logs
In case you’re wondering what badging and audit logs have to do with multifunction printing, the short answer is security. The primary purpose of audit logs in any system is to be able to provide an event trail should there be a system security or function issue. This applies to printer events as well.
On a Windows system, the entries in the various audit log files can be viewed using the Event Viewer, a sample of which is shown in Figure 3.6-7. On a macOS system, the system logs can be displayed using the View Systems Logs option on the Console app. Linux systems store audit logs in the /var/log/audit directory and can be viewed using the aureport command tool.

FIGURE 3.6-7 The Event Viewer is used to analyze the Windows audit logs.
Secure Print
Many of the latest model printers include the ability to prevent confidential, sensitive, or classified documents from being printed. The control panel for each printer offering this feature requires a four- to ten-digit password to be entered before the document will be printed. Each printer manufacturer approaches this control a bit differently, but the process is essentially the same for all of them.
Other forms of secure printing controls offered on current printers, typically the higher-end printers and MFDs, include the following:
• Image overwrite If desired, a document image kept in the printer’s storage can be digitally shred.
• Data encryption Data in motion to and from the printer can be encrypted using SSL/TLS or IPSec.
• Unauthorized remote access Data stored on the print device is secured against outside access while in the process of being printed.
Some print systems also offer badging and limited access levels to restrict access.
Network Scan Services
Printers and MFDs that provide network scanning give you the ability to scan a document and save the scanned image file where you wish. This allows you to scan an important, confidential, or sensitive document and store the resulting image file in one or more locations. Some network scanning systems require the use of user-defined templates on where and how the document is to be stored if specified. Features common to the network scan services of the various printer and MFD manufacturers include the following:
• Server Message Block (SMB)/Common Internet File System (CIFS) file share This is a repository of files shared over a network.
• HTTP/FTP file share Similar to an SMB file share, this file share provides access to documents uploaded via HTTP or FTP.
• Scan to e-mail An original document can be scanned into an e-mail message format for transmission.
• Cloud services Often used for sharing documents to group members in scattered geographical locations, scanning to multiple locations, storage in the cloud with multiple access, and other group facilitation services.
Automatic Document Feeder
An automatic document feeder (ADF) supplies one document at a time from a tray in conjunction with the document functions of an MFD (scanner, copier, printer, photo processing, and fax). The speed of an ADF is rated in pages per minute (ppm). An ADF provides a productive means of loading multiple pages to an MFD. However, it may also be a major roadblock should it fail to operate properly.
A key feature of an ADF is the capability to feed (scan) each side of a two-sided document as separate sheets, a feature called duplexing, to an ADF function. The two types of ADF duplexing are Reversing ADF (RADF) and Duplexing ADF (DADF). As its name implies, an RADF first scans one side of a document and then reverses (flips) the document to scan the second side. A DAFD scans both sides of a document in one pass, which requires two scanners, making it obviously the more expensive of the two feed methods. Both duplexing methods are rated in images per minute (ipm).
REVIEW
Objective 3.6: Given a scenario, deploy and configure multifunction devices/printers and settings
• Most MFDs are preconfigured but may require localization and verification of device settings.
• Windows and macOS automatically install the appropriate drivers for a device added to a system.
• PostScript and PCL provide a digital image layout in text and binary to a printer.
• A printer or MFD can be configured as a private, shared, or public printer.
• Network printers are addressable nodes on a network.
• A print server can be an external, internal, or embedded device.
• Printer and MFD options can include duplexing, collation, page properties, and quality and tray settings.
• Printers can be shared using USB hubs, Ethernet switches, or wireless access ports.
• Wireless printers can connect to source devices via Bluetooth or IEEE 802.11x media.
• Print security can be enhanced though user authentication, badging, and audit logs, among other methods that limit access and to create a record of use.
• The secure print feature can prevent confidential, sensitive, or classified documents from being printed.
• Network scanning provides the capability to scan a document and save the image file wherever you wish.
• Most MFDs include automatic document feeders and flatbed scanners.
3.6 QUESTIONS
1. Total Seminars has purchased a new MFD to be added to its LAN. Which of the following can it use to connect the MFD to the network?
A. USB
B. Serial
C. RJ-45
D. IEEE 802.11
E. Any of the above
F. None of the above
2. You suspect that an attempt to gain unauthorized access to a network printer was made recently, and you want to investigate this security event. Which of the following would you use to scan the audit logs on a Windows system?
A. File Explorer
B. Microsoft Edge
C. Event Viewer
D. Telemetry Log for Office
3. You need to share a printer between two computers that, for security reasons, should not be networked. Which of the following is the best solution?
A. USB print server
B. KVM
C. Ad hoc wireless
D. USB switch
4. A user in your department is unable to print to a Bluetooth printer, even though Bluetooth is enabled on the printer and her computer. Which of the following is the most probable cause?
A. The Bluetooth devices are not paired.
B. There’s no Bluetooth router.
C. The Bluetooth cable is loose.
D. The firewall setup.
5. After a new departmental MFD is installed, users must enter an assigned code to access and print classified documents. This is an example of which of the following options? (Choose two.)
A. Secure printing
B. Remote printing
C. Badging
D. Network printing
3.6 ANSWERS
1. E Any one of these options (A through D) could be used. However, RJ-45 and IEEE 802.11 are the most commonly used means for network printing.
2. C The Event Viewer supports the viewing, selecting, and reporting of system, security, and application events on a Windows computer.
3. D A USB switch enables the USB device (such as an MFD or printer) to be shared without networking.
4. A A Bluetooth printer (or another Bluetooth device) must be paired with a computer or mobile device before it can be used.
5. A C Both secure printing and badging are forms of user authentication, which is required to gain access to the MFD and other resources.
 Given a scenario, install and replace printer consumables
Users interact with computers through their senses and the primary medium of this interaction is sight via displays and printers. The consumable “supply” necessary for a display is electricity. However, a printer, in addition to electrical power, uses other supplies and consumables to produce its visual response.
A printer’s supplies and consumables, with the exception of paper of different types, are unique to the printer and its print mechanism. Some printers use heat or electrical charges to form their output images; others use inked ribbons, wax, or sublimates. Regardless of how the printer, well, prints, it involves a consumable element. In this objective, we look at various types of printers and their components, operations, and the supplies and consumables each requires. But before we get into the particulars of each printer, we’ll talk a bit about calibration.
EXAM TIP The A+ Core 1 exam’s objectives cover the gamut of printer technologies, but its coverage focuses primarily on laser printers and inkjet printers.
Calibration
Every type of printer has some form of calibration procedure. The purpose for calibrating any printer is to ensure that the text and images it produces are legible, in alignment, and, especially on color printers, that the colors are true and don’t bleed over into one another.
Color printers, regardless of their type, should be calibrated following the manufacturer’s prescribed method (usually in the installation or user manual) out of the box and whenever major maintenance or repair is performed. Laser printers and 3-D printers especially should have a calibration step included in their periodic or preventive maintenance programs. Most home and small office printers have a calibration or print test page built into their installation or configuration menus.
Laser Printers
The technology used to print a document on a laser printer defines the consumables and supplies required and used by that printer. The print function of laser printers use the same process:
1. A cylindrical drum has an image projected onto it by an infrared laser and photoconductivity.
2. Toner is attracted to the charged areas of the drum (those not charged by the laser).
3. The toner particles are directly transferred onto paper, and heat is applied to fuse the toner onto the paper.
Not every one of these steps has a consumable element (other than electricity, that is), but obviously there are parts of the process that do.
Laser Printer Imaging Process
The imaging process of a laser print involves seven phases, each of which deals with a specific part of transferring a digital image into a visual print:
• Processing When the print command is entered, clicked, or tapped, the document or image to be printed is translated into a language such as PostScript or PCL, which is converted by a raster image processor into a bitmap image of the document that defines each line to be printed.
• Charging Also known as the conditioning step. After receiving the image of what is to be printed, the printer’s processor charges the photosensitive imaging drum with an AC charge from a primary charge roller to erase any residual charge left from a previous print image. A DC charge is then uniformly applied to ready the imaging drum for receiving the print image.
• Exposing After the imaging drum is charged, a laser applies a positive charge to the areas on the drum that represent the image of each line to be printed. A monochrome laser printer has only one drum, which prints one darker color (such as black). Some color laser printers, especially MFD printers, may have four drums, one each for cyan, magenta, yellow, and black (CMYK). The laser doesn’t actually contact the imaging drum, but its beam is reflected unto the drum via one or more mirrors.
• Developing With the print image represented on the drum electrostatically, toner is applied to the drum by an adjacent roller, which uses an electric charge to pull toner from its reservoir. The developing roller and the lower-charge portions of the imaging drum have a lower charge to that applied by the laser, and toner is attracted to areas of the drum with a higher voltage. The toner is negatively charged in the tone reservoir. As the toner is applied, it is attracted to those areas with a weaker negative charge (which works in effect like a positive charge) to provide the structure of the image to be printed.
• Transferring After the print image is set on the imaging drum, a sheet of paper is fed into the imaging process by the transfer belt, a transfer roller, or pad. A positive charge is placed on paper’s surface that is opposite the charge of the drum. As the paper moves over the drum, the image is transferred onto the paper.
• Fusing After the toner is transferred to the paper, the paper passes through extremely hot fusing rollers and pressure rollers that first melt the toner onto the surface of the paper and then apply pressure to further set (fuse) the melted toner onto the page. The paper is then moved to the output tray or sorter.
• Cleaning This phase is also referred to as the “cleaning and recharging” phase. Before the process can repeat for the next page to be printed, any residual toner is removed from the imaging drum by a neutrally charged cleaning blade that wipes the surface of the drum. A charging roller then applies a uniform negative charge to the imaging drum to remove any lingering charge (and image) from it. The process can then repeat.
EXAM TIP For sure, know the seven phases of the laser imaging process for the A+ Core 1 exam.
Laser Printer Components
The major components of a laser printer are the same regardless of manufacturer and model, with only some minor differences. In addition to the components previously explained in the laser printing process, the other parts and assemblies of a laser printer you should know about are described in the following list. These components include the imaging drum, fuser assembly, transfer belt, transfer roller, pickup rollers, separation pads, and the duplexing assembly. At least have some knowledge of what they are, what they do, and how they fit into the overall laser printing process for the A+ Core 1 exam. Figure 3.7-1 illustrates the major components of a typical laser printer.

FIGURE 3.7-1 Components inside a laser printer
EXAM TIP For the A+ Core 1 exam and the questions on Domain 3.0, know the key printer components described in this section.
• Imaging drum The imaging drum is a grounded cylinder with an ungrounded coat of photosensitive compounds. When light, from a laser, hits these particles, their electrical charge “drains” out through the grounded cylinder. It’s common on most newer model laser printers that the toner cartridge or fuser assembly also contains the imaging drum (along with other components of the imaging process), which can become worn out about the time the toner supply runs out. Figure 3.7-2 shows an example of a toner cartridge.

FIGURE 3.7-2 A laser printer toner cartridge may contain the imaging drum.
• Fuser assembly The fuser assembly is usually near the bottom of (but not included with) the toner cartridge and usually has two rollers (a pressure roller and a heated roller) to permanently fuse the toner to the paper. The heated roller has a nonstick coating such as Teflon to prevent toner from sticking.
• Transfer belt The transfer belt is a larger rotating belt in color laser printers. It works like a conveyor belt to transfer color toners to the imaging process. The transfer belt passes each of the CMYK reservoirs and collects the correct amount of each color to produce an image. On single-pass color laser printers, the transfer belt places all of the CMYK colors on the page at the same time.
• Transfer roller On monochrome laser printers, toner is pulled from its reservoir and onto the paper by a transfer roller. The transfer roller applies a positive charge to the paper, which attracts the paper to the negatively charged imaging drum and causes the toner particles to be transferred to the page. A static charge eliminator then removes the charge to keep the paper from wrapping around the drum.
• Pickup roller and separation pad These components work in tandem to feed sheets of paper to the print process. The rubber pickup roller has a rough surface that pulls a sheet forward from the paper tray. The separation pad, which is tensioned with a spring, applies pressure on the pickup roller to grab one sheet. If a printer begins having paper jams frequently, these two items and the spring could be the problem.
• Duplexing assembly Most SOHO and MFD laser printers are simplex (or single-sided) printers. Many newer and all high-end laser printers offer duplex (or two-sided) printing. In order to print on both sides of a sheet, a laser printer requires a duplexing assembly. At the end of the imaging process, the duplexing assembly pulls the sheet with one side printed back into the printer and flips the page to repeat the imaging process on the reverse side.
EXAM TIP Be familiar with the general purpose and function of each of the laser printer components discussed.
Laser Printer Maintenance
Maintenance doesn’t always mean repair. Maintenance also includes preventive measures such as cleaning, replacing, and calibrating. How frequently routine maintenance is performed on a laser printer depends on a variety of factors, but typically a printed page count is set to trigger a warning message that the maintenance should be performed. Most of the major laser printer brands provide or recommend maintenance kits (or service kits) that contain the supplies and parts used for the maintenance actions. Maintenance kits aren’t generally available for home or small office units and are intended primarily for the larger laser printers, copiers, or multifunction devices.
Maintenance kits, while extending the life of a laser printer, can’t prevent the general wear and tear on the printer. Instead, they are intended to help extend the longevity of the printer; they cannot overcome age and use.
EXAM TIP Know the contents of a maintenance kit and the elements of a maintenance program: replacing the toner or toner cartridge, applying a maintenance kit, calibrating the imaging components, and cleaning the printer.
Maintenance Kit Contents
The contents of a manufacturer’s laser printer maintenance kit can vary with different models, but in general they commonly include the following replacement parts or assemblies:
• Transfer, pickup, and feeder rollers
• Fusing assembly
• Separation pad
• Transfer rollers, belts, and pads
• Feeding unit
• Cooling fan
The maintenance kit may also include miscellaneous tools and cleaning materials appropriate to its model.
Cleaning a Laser Printer
A clean laser printer produces excellent documents clear of smudges, paper jams, and muddled print. However, cleaning a laser printer on a regular basis is also very important to the lifespan of the printer.
Cleaning Supplies
The supplies used to clean a laser printer are readily available on the market. However, some of the items are special to their purpose for what they do or don’t do. The list for the supplies used to clean a laser printer includes the following:
• Protective gear You should absolutely wear gloves (rubber or micro-foam nitrile) and a protective dust particle mask. As described earlier, toner is nasty stuff, with fine sharp-edged particles that you really don’t want to breathe in or get on dry skin.
• Toner vacuum A regular vacuum cleaner, meaning the type you’d use to clean the floor or to dust the woodwork, shouldn’t be used on electronic equipment, such as inside the case of a computer or around the imaging drum or toner cartridge of a laser printer, for two primary reasons. One, a standard vacuum cleaner generates a great amount of static electricity at the nozzle; two, any toner drawn into the vacuum may end up in its exhaust and be blown out into the air.
• Activated toner cloths These disposable (single-use) wipes attract and hold toner particles that remain on the non-electrically charged areas of the printer after it has been vacuumed.
• Alcohol Never, repeat, never use rubbing alcohol or any product containing high amounts of alcohol of any type. Standard strength isopropyl alcohol can be used to clean the areas inside a laser printer. The cleaning products used on CDs, tape drives, and other electronic elements that include a 99 percent isopropyl solution are good to use.
• Brushes and swabs Soft-bristle narrow brushes, like specially made electronics cleaning brushes or paint brushes, can be used to dust the print drum. Hard or stiff bristle brushes can cause toner to go airborne and may scratch the drum.
Cleaning Steps
Before beginning the actual cleaning process on a laser printer, you should ensure the safety of yourself and the printer. Two very important actions that should be taken before you open the printer for cleaning are (1) powering off and cooling down the printer and (2) gloving and masking up for protection.
About one hour before beginning to clean the inside of a printer, you should turn it off, unplug the power cord from the power source, and allow the printer to cool down in terms of both temperature and static electricity. As suggested in the previous section, you should wear gloves and a mask when working with toner and toner cartridges. You don’t need to wear a hazmat suit; just protect your hands and lungs.
To clean a laser printer, the following generic steps are typically used:
1. Open the printer. Refer to the printer documentation to be sure of the method used to open the printer for cleaning.
2. Identify and extract removable components. Again, refer to the printer’s documentation to find and remove all of the detached components of the printer. This is typically the toner cartridge, tone reservoir (tank, supply, bottle), and the print drum. Take care not to spill the toner and not to touch the surface of the print drum. Place the photo-sensitive print drum in a darkened area.
3. Clean the toner cartridge. Set one end of the toner cartridge on an activated toner cloth and use another cloth to remove any excess toner from its surface. Set the cartridge aside, covered and protected by activated or static-free cloths.
4. Use the toner vacuum to clean the printer. Using a toner vacuum, slowly and gently remove any toner that may have been spilled into the inside of the printer case. Be very careful not to let the vacuum contact any inside surfaces of the printer case.
5. Brush excess toner from hard-to-reach areas. Use a soft brush or cotton swab to move any toner from the nooks and crannies of the printer case and then use the vacuum to remove it from the case.
6. Clean the transfer rollers and charge rollers. Wet a cotton swab with isopropyl alcohol and gently wipe the rollers on both the top and bottom surfaces.
7. Clean the feed rollers. Using one or more cotton swabs and isopropyl alcohol, wash the paper feed roller to remove any toner residual that may have built up.
8. Reassemble the printer. Using the printer’s documentation, reinsert the components removed earlier using the same care used to remove them.
9. Clean the outside of the case. If needed, clean the outside of the printer’s case using activated toner cloths and some isopropyl alcohol.
10. Restart the printer. Reconnect the printer to a power source, power it on, and use its built-in test procedure or one of your own to verify the reassembly is correct.
EXAM TIP It’s doubtful that you will encounter a question that requires you to sequence the maintenance and cleaning steps for a laser printer. However, you should have a general understanding of the actions performed and why each step is included.
Inkjet Printers
Where laser printers are common to higher-end and high-volume printing situations, inkjet printers are the most common printer type overall, and especially in homes and small offices. Among the most apparent advantages an inkjet has over a laser printer is that its ink and print mechanisms are contained in sealed drop-in cartridges that are replaced when its ink supply is gone. Another advantage, which may actually be its best, is that inkjet printers are much less expensive than laser printers.
Inkjet Printing and Components
An inkjet printer, which is the most popular general-purpose and SOHO printer in use, prints documents and images by spraying ink on sheets of paper with a resolution of at least 300 dots per inch (dpi). In some cases, an inkjet printer can produce images in full-color and in resolutions of 600 dpi and higher. If that’s not enough, an inkjet can be the print component of a multifunction device that can make copies, send and receive fax documents, as well as scan text and images.
The characters and images printed by an inkjet are made up of small dots that are sprayed onto the surface of a page as its print head moves side to side to produce one print line at a time. However, before we look at the print process of an inkjet printer in detail, let’s first cover the components of the inkjet and the role each plays in printing a document.
EXAM TIP For the Core 1 exam, be sure you know the components of an inkjet printer and the role each plays in the printing process.
Ink Cartridge
An inkjet printer’s ink cartridge is more than just the ink supply reservoir. The ink cartridge of an inkjet printer contains one (if monochrome) or more (if CMYK) ink reservoirs and a microprocessor that communicates and coordinates with the printer’s controller to supply the correct amount (and color) of ink to the print head, which can often be a part of the ink cartridge itself.
There is no one standard size or shape for inkjet ink cartridges. An inkjet ink cartridge’s form factor and construction are unique to the specific inkjet printer, the family of printers, and, always, the manufacturer. Figure 3.7-3 shows inkjet ink cartridges from five different inkjet models, each from a different printer manufacturer.
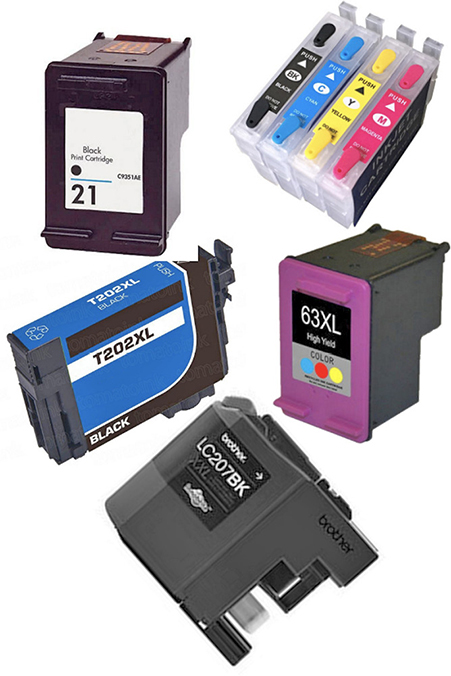
FIGURE 3.7-3 Inkjet ink cartridges vary in size and shape.
Print Head
The print head for some inkjet printer models is included in the ink cartridge. For others, the print head is a separate component altogether. Regardless of its location, an inkjet printer’s print head performs the same function, which is spraying ink onto a variety of media to form characters, numbers, and images.
Unlike most of its predecessors, which are covered later, inkjet print heads don’t contact the media. Whereas impact printers are like a rubber stamp and stamp pad or even a paint brush, an inkjet print head is more like a paint spray gun. However, within the general category of inkjet print heads, even though they may produce the same overall result, inkjet print heads can vary in the technology in use. Inkjet printer print heads use one of two different methods—piezo and thermal—for spraying ink onto a medium and it’s important to know the differences between them for the Core 1 exam.
Piezo Print Heads The piezo print method (which gets its name from the piezo crystal producing its charge) involves a very thin film that receives an electric charge. The charge causes the film to bend, which creates pressure on an ink chamber just ahead of a print head nozzle. The amount of charge determines the amount of flex, which in turn determines the amount of ink that is sprayed from the nozzle onto the surface of the medium. A piezo print head has 720 print nozzles for each of the colors it prints. High-quality printing can require multiple passes for each print line, which can slow the print speed but can also improve the print resolution.
Thermal Print Heads Thermal inkjet print heads are the most common type of inkjet printer print heads. A thermal print head, as its name suggests, uses heat and water-based inks to produce images on media. In comparison to piezo, which uses an electrical charge to create the pressure that forces the ink from a print head nozzle, thermal applies sufficient heat to the ink held in a chamber behind a nozzle to bring it to a boil. The boiling ink creates a bubble of ink vapor, which is forced through the print head nozzle, causing it to burst and spray the ink onto the medium. The chamber then cools down very quickly so that the process can repeat immediately, if needed.
Print Head Stepper Motor Regardless of the print head technology used on an inkjet printer, the print head (and ink cartridges) must be moved horizontally across the medium, typically in both directions. This motion is powered by a stepper motor, which divides the side-to-side distance of the print area into small individual distances, or steps. Some inkjet printers also use a stepper motor to park the print head when the printer is idle or powered off.
Trays, Rollers, and Feeders
The general design of most inkjet printers includes a paper tray either as a snap-in (removable) or as a built-in (nonremovable) component. In either case, the medium is pulled into the print area by a set of rollers, which also advance the paper, as directed by the printer controller, after the print head completes printing a line and is ready to move to the next one.
Some inkjet printers have a feeder in place of a tray. On an inkjet printer, a feeder snaps open either on the top or back of the printer’s chassis. A feeder won’t hold as many sheets as a tray, but it is typically able to feed specialty paper types and sizes that a tray may not be able to load. Figure 3.7-4 shows an inkjet printer with both a tray and a feeder included.

FIGURE 3.7-4 An inkjet printer featuring both a paper tray and a document feeder
Carriage Belt
The inkjet printer’s print head moves side-to-side under the power of the carriage stepper motor. The print head assembly is attached to the carriage belt, which is directly connected, although not anchored, to the stepper motor. As the stepper motor is instructed to advance or reverse, it moves the carriage belt accordingly, which in turn pulls the print head in the direction it should move.
Duplexing Assembly
As explained earlier in the discussion of laser printers, a duplexing assembly enables a printer to print on both sides of the medium. In general use, the duplexing assembly enables the printer to retract a document after it has been printed on one side back into the printer so that it can be printed on its opposite side.
Inkjet Print Process Summarized
Inkjet printers use a thermal drop-on-demand process that pumps ink from a cartridge reservoir into a small chamber connected to a spray nozzle. The printer then uses either a piezo or a thermal process to spray the ink through a nozzle in the print head and onto the paper. The ink supply is contained in one or more ink cartridges, and the ink is transferred to the paper by the print head. The ink cartridges are unique to the manufacturer and model of the printer, but print heads are one of two types: piezo or thermal.
Inkjet Printer Maintenance and Cleaning
The supplies required when cleaning an inkjet printer are the same as those listed earlier for use when cleaning a laser printer, with one addition: printer oil for lubricating the moving parts of an inkjet. However, if the printer being cleaned has a piezo print head that uses an oil-based ink, you should look for products specifically designed for cleaning this type of inkjet printer.
When cleaning an inkjet printer, focus on the print head (which may be a part of the printer ink cartridge), the ink cartridge, any paper jams or debris from past jams, and the printer’s calibration, which is covered next.
The process to clean an inkjet printer varies slightly with the manufacturer and the print process type. Before starting to clean an inkjet printer, review the printer’s documentation, looking for any cautions, warnings, or hazards. Unless the documentation prescribes a different cleaning process, these are the steps to follow:
1. Remove the ink cartridge. In most inkjet printers, the ink cartridge (or cartridges) is mounted in a caddy that moves along a stabilizer or glide bar. Gently, yet firmly, move the cartridge caddy to the middle of the bar, if the printer doesn’t automatically move it there when you open the case. With the caddy in position, power the printer off, remove the power cord from the power source, and remove the ink cartridge.
2. Clean the print head and cartridges. With the ink cartridge removed, you should have access to the print head, either on the cartridge or as a separate device attached to the ink cartridge caddy. In either case, apply isopropyl alcohol, a window cleaning solution, or a print head cleaner to a soft paper towel or cotton swab and gently swipe across the print head to remove any dried ink or to clear any clogs on the feed holes. If the printer has removable print heads, you may remove them to clean them in the same way. Wipe the ink flow areas of the ink cartridges to remove any excess ink.
3. Clean the ink cartridge caddy. Use a cotton swab to remove any ink or lint from the ink cartridge caddy.
4. Check the ribbon cables and ink reservoirs. Ink and paper lint can accumulate on the connecting cables and in recesses of the case. Using a paper towel, swab, or soft-bristle brush, remove any ink/lint debris from the case interior.
5. Clean the exterior. Using a cleaning wipe or a towel with alcohol, wipe down the exterior of the printer’s case.
6. Reassemble and test. Re-insert the ink cartridge and print heads, if necessary, and power up the printer. If available, use the print test function to ensure that the printer is properly reassembled. You should also take the time to recalibrate the printer’s alignment.
EXAM TIP Be sure that you are familiar with the inkjet printer components described in this section as well as the areas and procedures listed in the maintenance process.
Thermal Printers
A thermal printer, unlike laser or inkjet printers, doesn’t use toner or ink to create characters or images on paper. In fact, it’s the paper or a wax or resin transfer that creates the images printed when heat is applied. The two types of thermal printers, both of which use a thermal “print head” to heat the surface of the paper or material, are thermal transfer and direct thermal. A thermal printer has three primary parts: the thermal print head/heating element, a feed roller assembly that moves the medium past the print head, and tensioners that keep the medium and the print head in place.
Thermal Print Head/Heating Element
A thermal print head, or heating element, emits electrical signals to generate heat to create images on a medium. The images are created either by melting a material onto or effecting a chemical change of the medium. Thermal printing is a thermal transfer in which text, characters, or images are “printed” on any material or specifically on heat-sensitive chemically treated thermal paper.
A thermal transfer printer applies sufficient heat to a ribbon coated with a wax or resin material to melt the coating onto a medium. The melted material is absorbed by the medium, which is matched to the material it receives. The medium absorbs the melted print material, and the image becomes bonded to its surface.
Direct thermal printing, which is also called thermal printing, uses heat to create text, characters, and images on special chemically treated thermochromic paper, which is called, obviously enough, thermal paper.
Thermal transfer is typically favored over direct thermal for printing on heat-sensitive materials and because it is more durable. Thermal transfer printing is used for a variety of image transfers, including paper, T-shirts, polyester, and other synthetic materials. Figure 3.7-5 illustrates the thermal transfer print function.
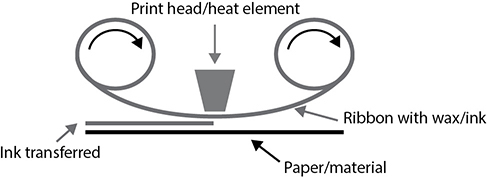
FIGURE 3.7-5 Thermal transfer printers heat the material on a ribbon to transfer it to a medium.
Thermal Printer Feed Assembly
One of the primary advantages of a thermal printer is that it’s very quiet, which is the reason this type of printer is common in libraries, restaurants, and hospitals. To support its quiet operation, the feed mechanism for the thermal paper must also be quiet. The feed assembly for a thermal printer uses rubberized rollers that grip the chemically treated paper and pull it past the thermal print head and through the print path.
Thermal Paper
Unlike thermal transfer printing, direct thermal doesn’t involve anything other than heat and thermal paper. (In other words, no ribbons, toners, inks, or waxy materials are harmed in the production of a direct thermal print.) As the thermal paper passes the print head, heat is applied to the thermal paper and its chemical coating reacts to the heat to form the characters or images being printed.
Because unprinted areas of the thermal paper remain sensitive to heat and light, direct thermal printing isn’t durable. Eventually, the images can fade or the paper can darken as a result of the paper being exposed to heat or light for any length of time. Although some two-color thermal paper is available, the majority of direct thermal printing is monochrome (either black or amber).
Thermal Printer Cleaning
The following are the steps used when cleaning a thermal head printer:
1. As should always be done, the first step in cleaning any printer, especially one that gets very hot, is to turn off the printer, remove its power cord from the power source, and let the printer cool down.
2. On most thermal printers, the print head or heating element is reached through a panel that provides access to the print head, the ribbon, a paper or label spool (depending on the type of thermal printer), as well as other parts of the printer.
3. Locate the lever that releases the print head and ribbon. Move the ribbon to the side to expose the print head.
4. Using an activated toner cloth or another type of lint-free cloth dampened with isopropyl alcohol, wipe from side to side across the print head, applying light pressure a few times to remove any built-up residue from the ribbon. Let the print head sit a short while to ensure it dries.
5. Replace the ribbon and print head and then secure the print head release lever back in its locked position.
6. Close and secure the access panel. Run a test print to make sure everything is back where it should be.
Impact Printers
There are two types of printers: impact and non-impact. So far, in this objective we’ve covered non-impact printers—those that don’t make direct forceful contact with the print medium. The basic difference between an impact and a non-impact printer should be obvious—the impact, as in the hit or strike. While most home and small office printers are increasingly non-impact printers, such as laser or inkjet, impact printers can serve a purpose, such as where multiple-part tractor-fed forms are in use.
Impact printers evolved from other impact devices—typewriters, teletypes, and the like—and have been in use since the computer first entered businesses and homes. Over the decades, impact printers were extremely popular for home or small office use. However, the quieter, clear, and often faster non-impact printers of today have replaced them for general use.
EXAM TIP Know the components (print head, ribbon, and tractor feed devices) and maintenance processes for impact printers.
Impact printer is a generic name for a family of printer types that create text and characters on paper by striking a metal or plastic print head into an inked ribbon that is pressed against the paper to transfer all or part of a line, character, or symbol on the page. Examples of impact printers (both current and in the past) are impact (also called impact-matrix) printers, ball-strike printers, daisy-wheel printers, line printers, and chain printers.
Impact Print Heads
The print heads in impact printers use either a serial or line pattern to print.
A serial impact print head creates characters in a series of columns, and a line impact print head forms its characters and graphics with dots in rows. The most common of the serial impact printers uses a set of nine print wires, each with a small ball on its striking end, arranged in a single vertical column.
Figure 3.7-6 illustrates an example of a serial impact print pattern. In this example, the shaded areas show the pins used, one column at a time, to print an uppercase letter E. In this example, six separate columns of print wire impact patterns produced the image of the letter. This illustrates how the print head strikes with the pins needed for each column and then shifts to the next column on the right. Notice that for the leftmost column, all of the wires are used, and in the next column to the right, only the top, middle, and bottom wires are struck. The only the wires needed for each column are struck to complete the remainder of the character. The dots in the shaded areas of Figure 3.7-6 represent the wires the print head strikes to create the character, nine-wire column by nine-wire column, left to right. While this example used only nine print wires, other impact print heads may use 24 wires.

FIGURE 3.7-6 The print wires of an impact printer form a character with a series of columns.
A line impact printer uses a hammer bank (also referred to as a print-shuttle) in place of the wire matrix of the serial impact printer. Like the serial method, a line impact print head travels from side to side, left to right, but instead of printing a vertical column of dots, it prints a horizontal row of dots to create each character on the print line. Whereas the serial impact print head concentrates on each character being printed, a line impact print head works on each character it prints as a part of one layer of an entire document.
As the print head travels left to right, the hammers needed for each row of each character on the line are struck. The hammer bank of the line impact print head is like turning a serial impact wire set on its side. Each of the hammers in the print head’s hammer bank is held in a tensed position by a spring that is released to allow the hammer to strike the ribbon and then be pulled back into its tense, ready position. Figure 3.7-7 illustrates a character printed by a line impact print head. Each line (indicated by number) is printed as a single strike using only the hammers needed for that line.

FIGURE 3.7-7 A line impact printer creates characters one row at a time.
NOTE A line impact printer is the faster of the two impact print methods.
The quality of the print produced by an impact printer varies widely. In draft mode (see Figure 3.7-8), the space between the dots is wide and visible. Near letter quality (NLQ) mode, also shown in Figure 3.7-8, is considered to be nearly as good as the print produced by a typewriter. To produce NLQ print, an impact printer needs a higher wire or hammer count, which means that the wires or hammers are closer together, to reprint each dot after a very slight oscillation in the print head’s position.
![]()
FIGURE 3.7-8 Examples of impact draft mode (top) and near letter quality (NLQ) bottom
Impact Components
A impact printer has a few more moving parts than non-impact printers, and all of its major parts work in concert to print documents. Here are the major components, some of which we’ve already discussed:
• Platen or tractor feed The platen in an impact printer is a rubber-coated roller that pulls a sheet of paper or document up to the printhead and, after each print line is completed, pulls the document up to align the next print line or space with the print head. A tractor feed is a pair of coordinated gear sprockets that use teeth to connect into and pull along a continuous paper stock with a tear-off pinhole track on each side of the stock. Figure 3.7-9 illustrates a tractor feed on an impact printer.

FIGURE 3.7-9 An illustration of a tractor feed unit on an impact printer printing a continuous form
• Print head As discussed earlier, an impact printer uses 9, 18, or 24 pins that are pushed out by a piezoelectric mechanism in a varying pattern to produce one vertical column of a character or graphic.
• Print ribbon When the print head pins are fired out, they strike an inked ribbon and press it onto the paper. Impact ribbons are contained in a cartridge that snaps into the printer. Ribbon cartridges pass the print head in only one direction, and when all of the ribbon has done so, it’s time to replace the cartridge. Some legacy printers may still use spooled ribbons, but these are extremely rare.
Impact Maintenance
For the A+ Core 1 exam, what you need to know about maintaining an impact printer boils down three items, as follows:
• Replacing the ribbon Most impact printers use a cartridge ribbon, like the one shown in Figure 3.7-10. A ribbon performs two vital functions in an impact printer: it provides the ink transferred to the page when struck by a pin, and it lubricates the print head’s pins, which protects them from impact damage.

FIGURE 3.7-10 An example of an impact printer cartridge ribbon
• Replacing the paper Paper jams can be a problem on impact printers, especially when a multipart form is being tractor-fed. Before each print run, verify the fit and seating of the form or continuous form paper sheet(s).
• Replacing the print head One very common issue with heavily used impact printers is damage to the print head’s pins, which can become bent or broken. This issue usually shows up as missing pins in printed characters. The only fix is to replace the print head.
3-D Printers
Additive manufacturing, which is the engineering name for three-dimension (3-D) printing, is the creation of an object by following digital instructions. The 3-D printing process is an additive procedure in which layers are added successively on or to previously applied layers.
A 3-D printer works very similar to an inkjet printer, where material is applied to the object in much the same way an inkjet sprays ink onto a page. However, instead of ink, a 3-D printer “prints” layers of melted thermoplastics or resins and fuses them together with adhesive or UV light. Figure 3.7-11 shows a 3-D printer using a plastic filament to create an object.

FIGURE 3.7-11 A 3-D printer (image courtesy of LiteWorld, LLC)
3-D Printing Filaments
A 3-D printer doesn’t keep a supply of molten material ready like an ink reservoir. Instead, a spool of plastic filament is fed into the printer, which then melts and applies the filament. “Plastic” in 3-D printing can be any thermoplastic material, which means that it will melt when heated and solidify when cooled. The types of plastics used in 3-D printers are acrylonitrile butadiene styrene (ABS), polylactic acid (PLA), and, a bit less often, polyethylene terephthalate glycol (PETG). ABS is the material used to make LEGO bricks, PLA is commonly used to make more pliable toys, and PETG is the material of your milk jug. The thermoplastic material comes on spools, is fed into the heating element of a 3-D printer, and then is applied through a nozzle (called an extruder) to the object being created.
3-D Printer Bed
An object is built on the print bed of the printer. Print beds may or may not come as a part of the printer itself. In fact, the type of plastic filament can determine the best choice for the print bed. The purpose of the print bed, other than being where the object sits, is to provide an adhesive surface for the first layer (so that the plastic doesn’t stick to the extruder) and to prevent the shifting or warping of the object at the start. Most print beds are either glass or aluminum, and some are heated.
EXAM TIP For the A+ Core 1 exam, understand how 3-D printers convert filaments and resins into objects on their print beds.
REVIEW
Objective 3.7: Given a scenario, install and replace printer consumables
• Printers use heat, electrical charges, inked ribbons, or plastic filaments to create characters and images on a medium.
• A laser printer uses an electrically charged drum and toner to create and fuse text or images on paper.
• The laser imaging process has seven phases: processing, charging, exposing, developing, transferring, fusing, and cleaning.
• The major components of a laser printer are the imaging drum, fuser assembly, transfer belt, transfer roller, pickup rollers, separation pads, and duplexing assembly.
• Inkjet printers create text and images using drops of ink sprayed onto a page.
• A thermal printer uses thermal transfer and direct thermal.
• An impact printer can use a serial or line impact print head.
• A serial impact print head prints characters as a series of columns.
• A line impact print head forms characters and graphics by printing dots in a series of rows.
• The two most common impact print heads have either 9 or 24 pins.
• The major components of an impact printer are a platen or tractor feed mechanism, the print head, and a print ribbon.
• A 3-D printer uses an additive manufacturing process to create an object by adding successive layers of thermoplastic material or resins to previously applied material.
• Calibrating a printer ensures that the text and images produced are legible and in alignment and, on color printers, that colors are true and don’t overlap.
3.7 Questions
1. Which one of the following is not one of the seven phases of the laser imaging process?
A. Charging
B. Fusing
C. Cleaning
D. Coloring
2. Which of the following are the coloring agents of a color laser printer? (Choose all that apply.)
A. Magenta
B. Cyan
C. Orange
D. Black
E. Yellow
F. Green
3. The print head technology used by inkjet printers to create characters on a medium is which of the following? (Choose two.)
A. Piezo
B. Thermal
C. Photo-sensitive
D. Impact
4. Heat is the catalyst in all forms of thermal printers. What is the element that reacts to the heat applied in direct thermal printing?
A. Dye sublimate
B. Wax or resin
C. Thermal paper
D. Inkjets
5. What is the term for the process of aligning the text, graphics, and colors of a printer?
A. Line control
B. Extrusion
C. Calibrating
D. Duplexing
3.7 ANSWERS
1. D Although color can be an element of the print produced, it is not a process in the laser imaging process.
2. A B D E The primary coloring agents are cyan, magenta, yellow, and black (CMYK).
3. A B These two technologies vaporize the ink that passes through the nozzle and onto the paper.
4. B Direct thermal printers use heat to print an image on specially treated thermal paper.
5. C Calibrating a printer ensures a sharper printed output.