Transfers, Lifts, and DIY Printmaking
Muscle Rub Transfers, by Dorothy Imagire
Heat Transfers, by Kathy Halamka
Polymer Transfers, by Peter Madden
Impossible Project Image Lifts
Lazertran™ Inkjet Lifts, by Dorothy Imagire
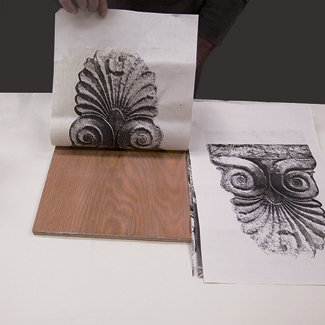
Paper Photo-Lithography, by Christine Tinsley
Gelatin Prints, by Peter Madden
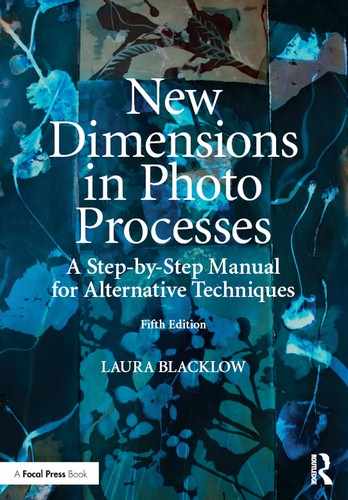
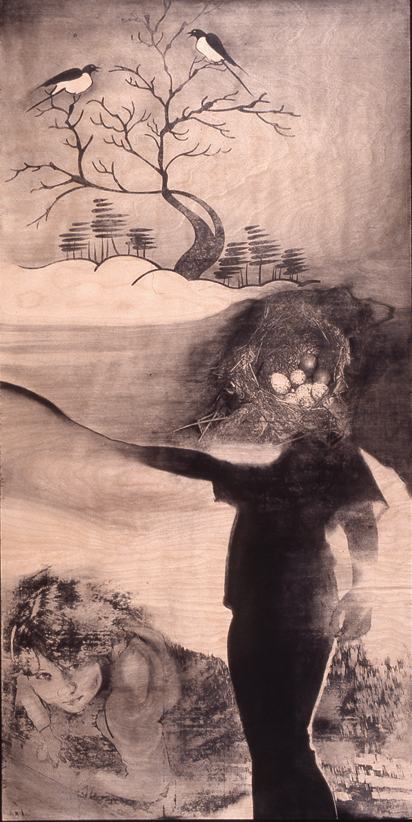
1.1 (opposite) Robert Rauschenberg, Mother-in-Law [Anagram (A Pun)], 97 ½ × 61 in. (247.7 × 154.9 cm), Inkjet pigment transfer on polylaminate, 1998. Private collection. ©Robert Rauschenberg Foundation.
The pursuit of new techniques has been a continuous theme of Rauschenberg’s work. During a trip to Cuba in spring 1952, the artist first experimented with transfer drawings, taking printed images, primarily from newspapers and magazines, placing them face down on sheets of paper, and then rubbing the backs of the images (exploiting the gradations of tone achieved by changes in pressure from an empty ballpoint pen) or other burnishing device to transfer the original to the paper.1 He also made life-size body cyanotypes (Chapter 7) on commercial, pre-coated blueprint paper in the early 1950s. By 1958, Rauschenberg employed a technical development in which he applied a chemical solvent, such as turpentine and, later, lighter fluid, to glossy magazine images, facilitating a clearer and more complete transfer. (Solvent transfers are the next item in this chapter, as well as the less toxic but closely related “muscle rub transfer” on page 12.) Subsequently, Rauschenberg sprayed a fine solvent mist on smooth and crumpled printed images, which he sent through a lithography press with natural fabrics underneath for his extraordinary Hoarfrost series. In 1991, he began using inkjet transfers (another method explained in this chapter on page 9) and eventually turned to biodegradable and soy-based dyes and water as the solvent, due to his concern for the environment.2
Please see “Muscle Rub Transfers,” below, on page 12, for another way to transfer ink off magazine pages, photo copies, and newspaper pages. Although these processes are not risk-free, muscle rub is less harmful than solvents to your health.
A fast and simple technique, transferring allows you to remove the image only from a magazine, newspaper, photocopy, or digital print, and relocate it on various surfaces such as paper, fabric, frosted acetate, wood, or lithographic stones or plates. A combination of solvent and pressure dislodges the ink from the page and allow the image, without the original paper, to adhere to the receiving surface. Reproductions of photographs or drawings in black-and-white or color can be transferred. You can write or draw onto a transferred image or onto the receiving surface before or after transferring; you can sew into them, mix media processes with transfers, or locate one image on top of another. Because most inks are oil-based and not soluble in water, transfers on cloth remain permanent when washed in mild soaps.
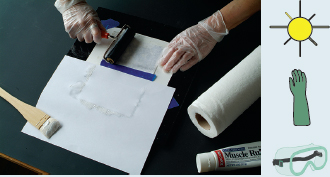
SAFETY
Be sure to work in a well-ventilated area, a place that has not just an open window, but 20 air changes per hour. The solvents used in this process, even in marker pens, are highly flammable and noxious to breathe, irritating the eyes and respiratory passages, and they have a narcotic effect on the nervous system.
They also dry the skin and can cause serious damage to the kidneys and liver. If you use citrus solvent, do not be fooled by the label “natural”; rather, avoid contact with eyes and prolonged or repeated contact with skin.
Read all warning labels and wear neoprene gloves when handling solvents. Wear an organic solvent vapor mask when working in close proximity with solvents.
Immediately replace the cap or covering on solvent containers after use, and discard paper or other materials in a manner that prevents further release of the solvents into the air you are breathing.
Do not store solvents in inappropriate containers after use (e.g., solvent eats through Styrofoam™); use metal or glass containers.
Isolate solvents from heat, sparks, electrical equipment, oxidants, and open flames.
Fumes tend to cling to the transfer after it is made, so air it out in a well-ventilated area away from your living space until the solvents have evaporated.
METHOD OVERVIEW
1. Printed page or office photo copy to be transferred is removed from its source and prepared.
2. Solvent is applied, usually to the back of the page, which seeps through to dislodge the image on the front.
3. Transfer of the image from the page is made by rubbing the back of the image, forcing the ink off the front of the page and onto the receiver.
MATERIALS
1. Image. A photocopy made with carbon-based “ink,” magazine page, or newspaper page will work well. Most magazines are printed on coated stock (clay-impregnated slick paper), which is very effective for transfers because the ink rests on the clay (kaolin), not on the paper. Make sure that the image to be transferred is not gravure-printed or varnished (as are magazine covers, generally). The newer the publication, the fresher the ink and the easier the transfer will be. The thinner the paper, such as newspaper, the less solvent and pressure needed for a transfer. Because you cannot transfer the same image material clearly more than once, copies of the same newspaper or magazine issue or photocopies of your own pictures offer an inexpensive source for multiple transfers. Expensive magazines tend to use finer reproduction methods, resulting in more detailed transfers. Even printed wallpapers can be used. I have started with a black-and-white photograph, which I put on a color copier and reproduced in any or all of the colors available on the copier, but you can also make copies and scans from flat art. The copier’s and digital printer’s color balance and zoom functions add to your aesthetic choices, and you will find that some copiers accommodate sheet sizes up to 11 × 14 in. (28 × 35.5 cm) or larger. Another way to create large images is to grid several small transfers into one larger image.
2. Metal spoon or etching or lithography press.
3. Solvent. Only silkscreen supply stores carry transparent base, and the only brand I know of still available is Naz-Dar Transparent Base number 5530 (http://www.nazdar.com/portals/0/tds/NAZDAR_5500_SV_Screen_Series.pdf). Use it on the back of the image. Pantone and Admarker, to name two companies, make blender pens for their permanent ink felt-tip markers. (A more detailed description of how to use these pens appears in the Tips section.) Oil of wintergreen or of lavender, eucalyptus oil, fabric spot remover (such as Carbona™), lighter fluid, lacquer thinner, acetone, Citra-Solv, and offset blanket wash can be applied, but these are more difficult to work with because they evaporate more quickly. I know that some artists prefer to put these solvents on the front of the picture, but I prefer the more time-consuming method of applying to the back because the stain of the solvent never gets on the receiver.
4. White scrap paper. The paper should be larger than the size of the transfer image. Inexpensive bond paper is excellent.
5. Black permanent marker. In my method, I draw the shape of the image onto a frame, which I cut out, as explained in the step-by-steps. I use a light table (see material #11, below).
6. Scissors or stencil knife.
7. Tissues or paper towels. This process can become messy from the ink removed from the non-image side of a magazine page and from stains developed as the solvent spreads.
8. Masking tape or drafting tape. Drafting tape is less sticky than masking tape and will not rip artwork when removed. To make masking tape less sticky, press the tape first onto your clothing a few times before using it.
9. Hard, smooth work surface. Imperfections in your table or desk will show in the transfer and can tear paper receivers when you apply pressure.
10. Plastic bags. For solvent trash, to prevent continued release of solvent vapors into the air you breathe, wrap up and dispose of used materials, preferably outside the rooms where you work and live.
11. Light table or window with daylight. To draw an outline of where to apply the transparent base on the back of the page, you need to hold the image up to a light and to be able to see through from the front to the back. Chapter 4, Creating the Photo-Printmaking Studio, contains directions on making an inexpensive light table.
12. Receiver. Almost any paper will be fine, and I have used transfers extensively in personal journals including smooth graph paper and drawing paper pages and ones that I have hand-bound to include Rives Heavyweight and Arches 88. Papers with bumpy surfaces like traditional cold press and watercolor paper prove difficult. Fabric, such as flat silk and cotton, can be stretched in an embroidery hoop or stapled to chip board or some other smooth surface. On the other hand, bumpy fabric, such as corduroy and many knits, work against your efforts. You can make transfers onto smooth wood. Choose a light color substrate so that the image can be seen.
13. Vapor mask and gloves. All solvents are dangerous, so a respirator and gloves should be worn, no exception, and especially if you are spraying the solvent. See #14, below.
14. Atomizer for spraying the solvents, particularly solvents that need to be applied to the image side of the paper. I would rather apply solvent to the back and wait until liquid solvent seeps through the paper because I have more control that way.
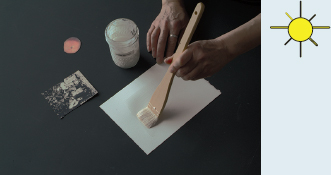
MAKING A SOLVENT TRANSFER
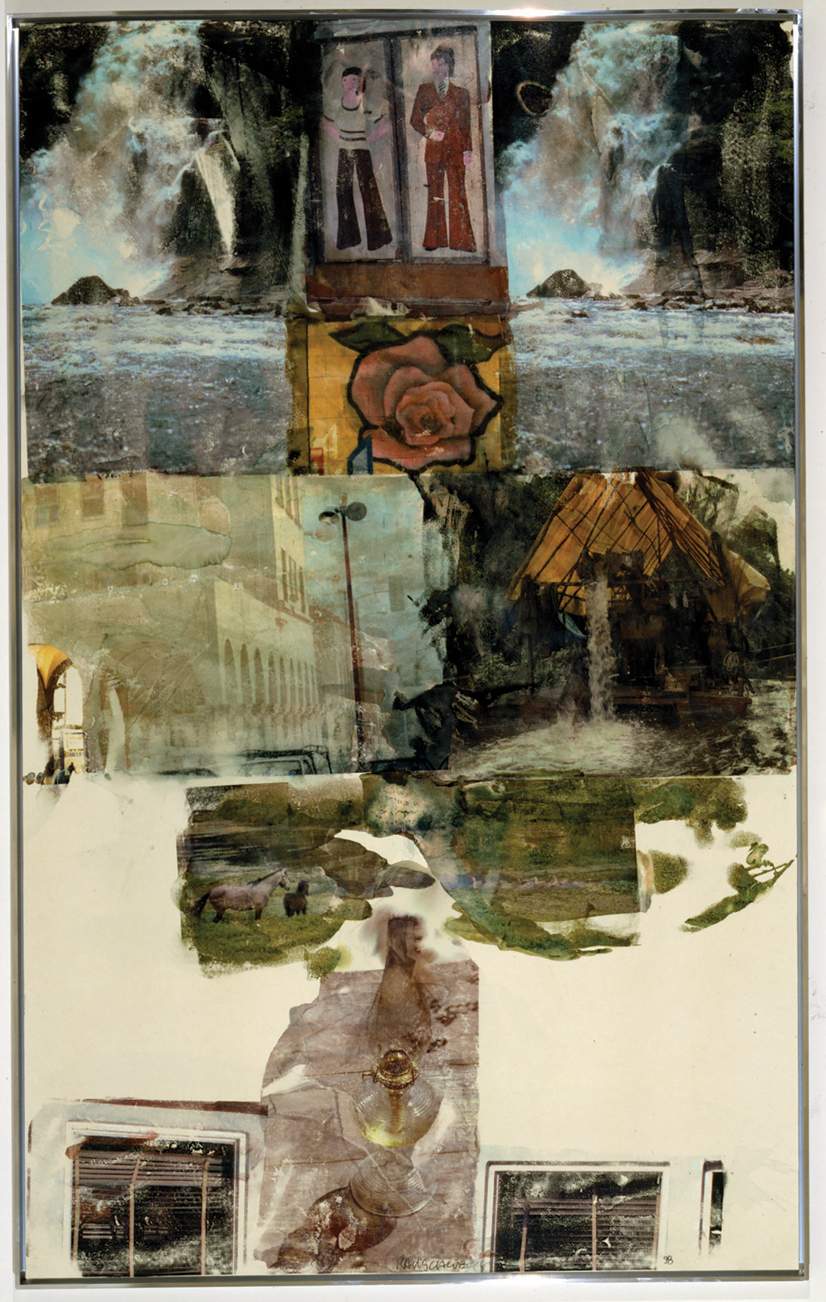
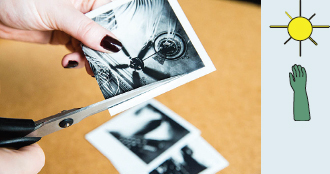
1.2 Preparing the Image
1. Prepare the image
Cut out the magazine picture or other image at least ¼ in. (6.5 mm) larger than the image all around. Working at your light table or against a day-lighted window with the image facing away from you, use a black ink marker on the back side of the image to draw the outline of the area you want transferred. Afterwards, place a piece of plain paper on the back side of the image and retrace the shape marked, using the light table or window to aid in the tracing. Leave lots of room around the shape. This method also allows you to get away from the rectangle, if you want.
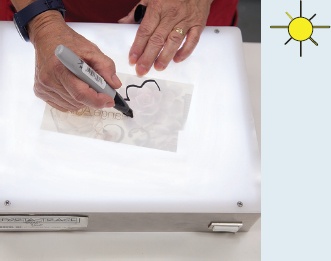
1.3 Making and Attaching the Cutout Frame
2. Make and attach the cutout frame
Cut out the shape marked on the scrap paper to create the cutout frame.
Place the image face up on your work surface. Adhere the masking or drafting tape onto the corners of the image’s back side with the sticky side of the tape facing you and the tape extending beyond the edge of the paper. Place the cutout frame over the image so that the frame lines up with the image, pressing the cutout plain paper frame to the tape. This frame, later, will prevent solvent from staining your receiver.
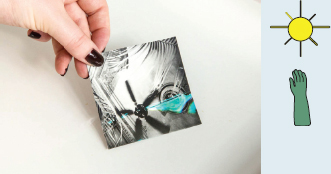
1.4 Applying the Solvent
3. Apply the solvent
Place the receiver surface face up. Position the cutout frame with the attached image face down, and tape this unit to the receiver so you form a hinge as shown in the illustration, Figure 1.4. Apply to the back of the image approximately ½ teaspoon (2.5 ml) transparent base or liquid solvent for a 5 × 7 in. (12.5 × 17.75 cm) image. Spread evenly and let the solvent sit away from the substrate for a few minutes while it absorbs into the page to chemically loosen the ink. The page will appear less opaque.
1.5 Transferring the Image
4. Transfer the image
Using the edge of the spoon, vigorously rub the back of the paper within the cutout frame window. To achieve a smooth transfer, rub in small circular strokes. To achieve a more drawing-like appearance, rub back and forth.
1.6 Checking the Transfer
5. Check the transfer
Pick up one corner and check the transfer periodically, until the image has transferred as completely as you want to the receiver material. If the picture is paler than you want, but there is more color left in the original, reposition the unit, apply more solvent if you need it, and rub carefully but vigorously on the back. Too much pressure can rip the magazine picture.
TIPS
The transferred image will appear the reverse of the original; this is an especially important consideration when transferring type. You can end up with correct-reading type by photocopying the art onto acetate, flopping the acetate, and making a wrong-reading photocopy on paper. (You can, in addition, transfer off acetate as describe on page 10.) When the wrong-reading image is transferred, it will look like the original art. With a scanned image, you can choose “mirror image” or “flip horizontal” in printer choices.
Since you are lifting the color layers from color printed material in the opposite order in which they were printed, even if the picture is black and white, hues may appear different in the transferred image. In general, select color pictures with bright, detailed highlights and deep, contrasty shadows so the transfer retains separation of tones. Low-contrast images can be frustrating to transfer with clarity, and you can waste energy trying to save such a transfer by drawing back into it because that is what the image always seems to look like: an effort at redeeming it.
The blender pen, which seems to keep odors down, can be used if you transfer small (2 in. or 5 cm square) areas at a time. Rub the marker on the back of the image, then quickly burnish. This method works best with color laser copies and computer laser prints, especially if you first copy the image onto acetate, rather than paper.
Transparencies can be made by transferring onto the dull side of frosted acetate or drafting vellum.
Older magazines and wallpaper may need more time and more solvent to penetrate and loosen the embedded ink.
1.7 Laura Blacklow, Page from Personal Journal, 8 ½ in. × 11 in. (21.6 × 28 cm), solvent transfer, rubber stamps, and ink on notebook paper. ©L.Blacklow.
I have been a journal-keeper since childhood and have developed a code, inspired by Doris Lessings’s The Golden Notebook. However, rather than keep different colored notebooks for different parts of my life as Lessing did, I developed a color system for the text so that I can integrate my life’s concurrent segments: dreams, personal observations, quotes from others, and political analysis, to name a few. I save magazine pictures in an alphabetical file (“A” is for ambulance, automobile, etc.) so I can grab one to illuminate my dream, and, ironically, I do dream in a photographic manner akin to the films of Fellini.
Crayola™ makes fabric crayons for iron-on transfers to synthetic fabrics from your nonglossy drawings on paper. For stationery, they also sell Magic Transfer Kits where you carve a design or, if you are not handy with drawing, rub your image onto their Styrofoam Transfer Printing Plates that are part of the kit. In addition, numerous companies make acceptable transfer sheets that you can put through a digital printer and afterwards dislodge the image using heat from an iron. Since good printmaking papers are rag, you can relocate photos onto the papers recommended in this book.
You can transfer onto a lithographic stone or plate. Use an acetic acid etch and then print normally. If you are using an etching or lithographic press, place the paper or cloth receiver face up on the bed of the press and place the image face down over the paper or cloth. Apply the solvent to the back of the image area and wipe off excess after it has absorbed into the paper—paper will be more transparent so that you can see through to the print on the other side. Make sure to place blotter paper on the back of the image to protect the felts of the press from the solvents, and run the complete setup with the felts through the press using the correct maximum pressure. Later in this chapter, Christine Tinsley offers Paper Photo Lithography on page 31, and that method does not require a printing press. To make transfers onto cloth, mist the front of the magazine image with spot remover (such as Carbona™) or the back with citrus solvent; you must work quickly because the spot remover evaporates.
Since images transfer in reverse, type will, in the end, print correctly for reading.
After you transfer an image, let it air out in a well-ventilated area away from the space where you are working.
TheMagicTouch, http://themagictouch.com/transfermedia.html, sells 8½ × 11 in. (size A4 in Europe) and 11 × 17 in. (size A3 in Europe) and offers an array of transfer sheets, including one that is used like Lazertran (page 28) with color or black-and-white copiers and laser printers to duplicate your image for transferring onto fabric, wood, metal, glass, or ceramic.
Although I do not know Robert Rauschenberg’s exact method, as shown in the first illustration to this chapter, I do know a few techniques to transfer inkjet images onto other surfaces.
METHOD 1
SAFETY
I do not know of any health problems with the materials and method, but it is always smart to read the Materials Safety Data Sheet on each product.
METHOD OVERVIEW
1. Image is prepared on a computer and reversed horizontally.
2. Image is inkjet printed onto a waxy sheet.
3. Print is burnished onto dampened receiver.
MATERIALS
1. Image. You will need to horizontally reverse your color or black and white picture, especially if it has text. I use Photoshop® (Image > Image Rotation > Flip Image Horizontal).
2. Transfer sheet. Remove the labels from a sheet of sticky labels or shipping labels and use the waxy side of that letter-sized backing to print on. Less rigid wax paper (waxed on both sides) or freezer paper (waxed on one side) from a grocery store can be cut to size that your printer accommodates. Be careful when you insert it, and take care not to smear the wet toner after it exits the printer. In addition, there are many commercial inkjet transfer sheets that require you to put the transfer paper through a printer, then transfer the image with heat from, for instance, an iron. HP and Epson make iron-on inkjet sheets, and William Paul and Associates, http://www.wmpaulstore.com/inkjetpaper/iron_on.htm, sells Vesta Iron On Transfer Paper from 8 ½ × 11 to 13 × 19 in. (33 cm × 48.3 cm).
A transfer sheet for covering dark fabrics and paper is made by Tailor: http://www.junetailor.com/inkjetlanding.htm. For obtaining more detail on cloth, spray fabric first with spray starch before transferring. You can wash the fabric afterwards but many of these commercial sheets leave a layer on top of, rather than imbedded in, the cloth or paper.
3. Receiver. Smooth, hot press rag paper softens the picture a little, but if your inks/toners are archival, your print will be, too. A thinner, smooth cotton paper can be found at stationery stores and is made by Cranes: kid finish AS 811. You can also use harder, thicker paper surfaces. Bienfang makes an array of smooth surfaces that are acid free, which is not the same as archival, such as 148 pound Bristol or the lighter-weight 70 pound drawing paper and parchment calligraphy paper. The pound or grams usually indicates the thickness. You can also transfer onto smooth wood and fabric that does not stretch, such as cotton muslin and onto brushed aluminum. (I have used litho plates.)
4. Sponge and water. You dampen the substrate with clean water using a clean sponge.
5. Computer with Photoshop® and inkjet printer, as explained in the first item of this Materials list.
6. Burnisher. Use the edge of a metal spoon or credit card.
MAKING AN INKJET TRANSFER

1. Print the image onto the waxy side of the transfer sheet.
2. Lightly moisten the receiver.
3. Rub the back of waxy sheet, checking often to make sure that you have applied enough pressure for the toner to fully transfer.
TIPS
Do not worry if the image looks dull after it comes out of the printer; it will transfer with deeper tones.
This method works especially well for receivers that are too large to go through your printer or fabric, which can ruin your printer.
Tape waxed paper to index or copier paper before you run it through the printer. Later, tape the waxed paper print to the receiver surface so it does not shift while transferring.
METHOD 2
I particularly like this method because I found it the easiest way to get most of the toner to transfer due to how the ink lays on the surface of the acetate.
METHOD OVERVIEW
1. Image is prepared on a computer and reversed horizontally.
2. Special acetate or thin digital photo paper is inserted into an inkjet printer, and printed onto.
3. (Optional) Receiver is brushed with gel or polymer medium and the acetate is immediately placed on the coating.
4. The back is burnished to transfer the toner only.
MATERIALS
1. Image. You will need to reverse your color or black and white picture, especially if it has text. I use Photoshop® (Image > Image Rotation > Flip Image Horizontal).
2. Transfer acetate or inkjet print on thin digital paper. I have used Apollo, a company that makes acetate for inkjet, as well as for laser printers. Other photo quality inkjet transparency films are made by 3M or Pelikan. Make sure you use inkjet acetate if that is the kind of printer you are using. The acetate on a plastic folder from an office supplier, cut to letter size, is alleged to work, too. Although a little more challenging, you can print onto inexpensive, thin, glossy, or semi-matte digital paper and transfer the ink only.
3. Receiver can be paper, fabric, or wood. See the types of receivers suggested in Method 1.
4. For acetate print transfer, you will need either a brayer that you gently roll, bookbinder’s bone folder, or even the side of your hand, because you do not need as much pressure as Method 1. A small picture could be transferred by wrapping your finger in a folded cosmetic cotton pad (for removing make up) or piece of felt. If you are starting with a digital print on photo paper, use a brayer with as much pressure as you can exert.
5. (Optional for acetate only.) I use Golden’s gel matte medium to coat the receiver with a flat brush before I transfer, and I do that fairly quickly while the medium is still a bit sticky. Liquitex makes a similar product, as does PaperArtsy Satin Glaze Fresco Finish Acrylic. Make a thin but even layer on paper or flat fabric, applying it so that it rests on the surface of the receiver.
6. Double sided tape is effective if you are having trouble putting the acetate through the printer. Tape it onto regular copier paper, and then feed it with the taped end going through first. (I have used this method for printing on velum, also.)
MAKING AN INKJET TRANSFER
1. Follow the manufacturer’s direction, which usually instruct you to print the image onto the dull side of the acetate, the side with a bit of tooth. If you are using thin digital paper, print normally.
2. Lightly moisten the receiver immediately with a brush and the gel. This procedure is optional for acetate; mandatory for digital paper.
3. So that you can make sure the image is making contact with the substrate, roll the image, rather than placing it down all at once, onto the gel with the image side down. Gently rub the back of the acetate, checking often to make sure that you have applied enough pressure for the toner to fully transfer. If you printed onto paper, use as much even pressure as you can.
TIPS
Do not burnish for more than a minute if you are using the gel, because you don’t want the gel to actually dry like glue to the acetate or photo or to smudge the ink.
As you peel the original image, start at one corner, checking to make sure that it has transferred. If not, lay the sheet down and rub some more.
Brush the receiver with a liberal coating of gel or polymer medium. Before the medium can dry, quickly place the acetate, ink down, onto the medium. Do not let it move around as you rub the back with a brayer, spoon, or bookbinder’s bone folder. Remove the acetate.
Some of my students have merely dampened the surface of hot press (smooth artist’s) paper and laid the acetate ink jet print face down on the wet surface, thoroughly burnished the back without moving the acetate, and lifted off the acetate. The ink should be on the receiver, and the acetate should be fairly clear. In the illustrations at the beginning of this chapter, Robert Rauschenberg’s inkjet transfer is said to have been done with water, too.
If you want more ideas for digital transfer methods I recommend Digital Art Studio (see Bibliography), a book full of thoroughly researched and clearly explained techniques.
by Dorothy Imagire
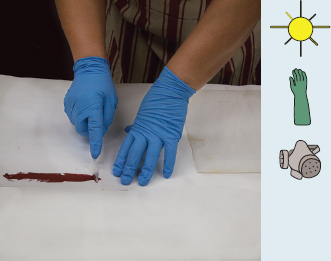
Similar to solvent transfers, but without the dramatic toxicity, the “solvent” is in the thick muscle rub base. The dissolving and evaporating process is slow, allowing you to work on a larger area; however, since the base is thicker and slower than many traditional solvents, it needs to be applied to the front of the image to be transferred.
It seems that the active transfer ingredient is salicylate, so I look for tubes with high salicylate content, and it turns out the least expensive, Walgreen’s own muscle rub, has been the most effective. (L.B.)
SAFETY
The most important warning is on the tube of muscle rub: avoid contact with the eyes, open wounds, or irritated skin. Do not ingest. Wear gloves to avoid prolonged contact and wear goggles to avoid contact with your eyes.
Methyl salicylate, an ingredient in some, but not all, muscle rubs, is a toxic extract of wintergreen that has killed children when swallowed in concentrated doses. In addition, rare but severe allergic reactions (rash; hives; itching; difficulty breathing; tightness in the chest; swelling of the mouth, face, lips, or tongue), skin redness, or irritation demands medical attention.
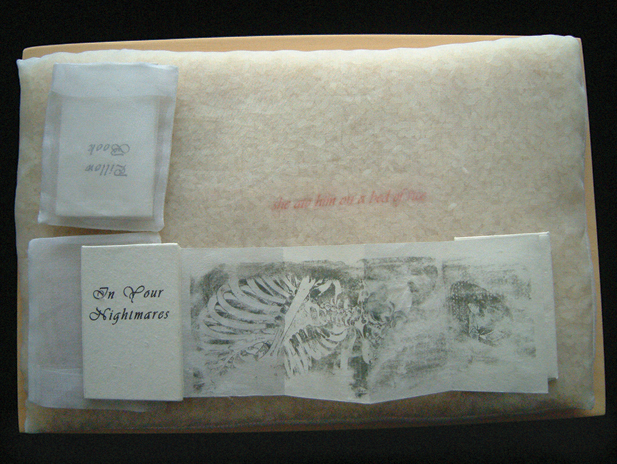
1.8 Dorothy Imagire, On a Bed of Rice, 4 × 11 × 7 in. (10.2 × 27.9 × 17.8 cm) wood, silk, rice, copy transfers on rice paper, 1998. © D. Imagire. See more of her work at www.Imagire.org.
METHOD OVERVIEW
1. Printed page to be transferred is removed from its source and prepared.
2. Muscle rub is applied to the front of the page.
3. Transfer of the image from the page is made by rubbing the back of the image, forcing the ink off the front onto the receiver.
MATERIALS
1. Image. Same as solvent transfers, except that I do not recommend this method for use with pictures on digital photo paper. (L.B.)
The image needs to be reversed to end up correct reading.
2. Burnisher, such as rubber brayer, metal spoon, bookbinder’s bone folder, or etching press.
3. Muscle rub. Available at a pharmacy—for example, Bengay is a brand name and can be used. Many other generic brands are marketed as “ultra-strength” muscle rub and sometimes will also be labeled “external analgesic and greaseless cream for relief from minor arthritis, backache, muscle and joint pain.” The generic brands seem to contain more water and are looser, but that quality is of no disadvantage because you will be trying to spread it anyway. The aroma does seem to linger, so airing out the print is helpful. The book’s author noted that she finds the tube form of muscle rub more effective than the jar.
4. Brush. A soft 1½ in. (3.75 cm) goat hair Asian brush, or any other soft brush. Inexpensive brushes can be purchased at a hardware store.
5. White scrap paper for making a frame, as shown in Solvent Transfers, page 6.
6. Scissors or stencil knife.
7. Tissues or paper towels.
8. Tape. White artist’s tape or blue painter’s tape.
9. Hard, smooth work surface.
10. Receiver. Same as solvent transfer.
11. Goggles and gloves. These items are important in order to avoid contact with eyes, open wounds, and prolonged exposure of ink in the rub’s trash to skin.
TIPS
This process is similar to solvent transfer, except that blender pens, film cleaner, or movie cleaner do not work in conjunction with the muscle rub.
I have successfully used a printing press, rolling the image through once. If you have one available, use it. Place your receiving paper on the bed first. Then coat the front of the transfer image with muscle rub and place it face down on the receiving paper. Put on felts and roll the image unit through the press. (You may want to use a barrier sheet so you do not dirty the felts. (L.B.))
You can create muscle rub transfers on fabric as well. The higher the thread count of the cloth, the more detail will be visible in the resultant image. Natural fibers such as cotton, silk, and linen absorb the ink better.
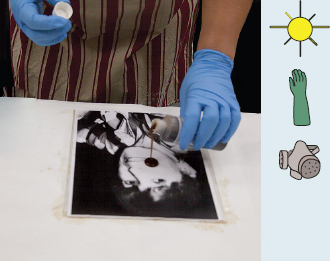
MAKING MUSCLE RUB TRANSFERS
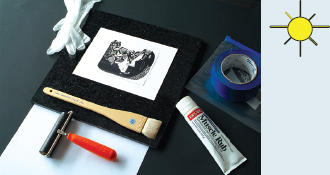
1.9 Preparing the Image. © D. Imagire
1. Prepare the image
You do not have to cut out the image unless there is a background that you do not want to include. If it is a digital image, make sure it is flipped horizontally, or if it is a copy, have the copy reversed. Any image on nonglossy paper seems to work. In addition, you can use inside pages from magazines and newspapers.
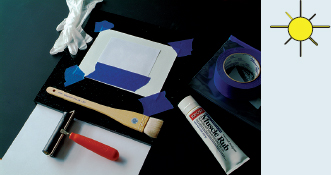
1.10 Making and Attaching the Image. © D. Imagire
2. Make and attach the image
With artist’s or blue painter’s tape, adhere the corners of the receiving paper so it does not move. Position the transfer image face-down on the receiving paper where you want the image. Tape across the top edge of the transfer image onto the receiving paper with the same tape (don’t press too hard or it will be difficult to remove later). The transfer image should be able to freely swing up.
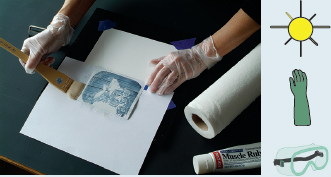
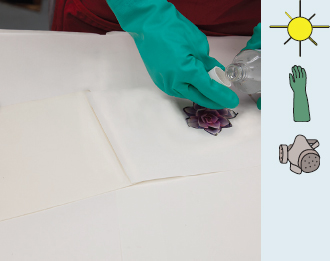
1.11 Applying the Muscle Rub. © D. Imagire
3. Apply the muscle rub
Lift the transfer image up and crease the tape so the image lies flat. Now the image side is up, although upside down. Place a piece of clean white scrap paper under the transfer image to protect the receiving paper and work space. With a 1½ in. soft brush, apply a medium coat of muscle rub on the face of the transfer image. Brush left to right, then up and down, making sure there are no visible brush strokes. Muscle rub does not work as quickly as solvent, giving you a bit more time to brush carefully. Be very cautious not to rub your eyes with muscle rub–coated hands because it will sting!
1.12 Transferring the Image. © D. Imagire
4. Transfer the image
Put the transfer image down into position on the receiving paper. Working from the top, smooth down the image with your gloved hands. Using a rubber brayer, roll down, then up, then side to side to smooth out the image and, at the same time, press it firmly onto the receiver. The paper should begin to become transparent. If the muscle rub does not appear to soak into the transfer image paper, brush more muscle rub onto the back of the image (the side that is now facing you). Use the rubber roller lightly to help spread the muscle rub and with firm pressure to transfer the image. You can peek under a corner to see how the image is transferring. Once the image has completely relocated, carefully remove the used picture and tape.
Described to the author by Kathy Halamka
1.13 Kathy Halamka, Reconstruction, 4 × 2 ft (1.2 × .6 m), charcoal and mixed media on birch with heat transfer from black and white photocopies, 2004.
MATERIALS
1. Heating tool. Associated with woodworking, options include the Lenk Heat Transfer tool (www.wlenk.com/store/113/72/Transfer-Tool.html) or Versatool by Walnut Hollow (www.walnuthollow.com) Make sure you get the model which has a handle similar to a wood burning tool but comes with a flat, round disk for the heatable head. (They are available in craft and art stores and online at Amazon, for instance. (L.B.)) You can also use a photography tacking iron or old-fashioned travel iron without steam holes.
2. Hard, firm, heat-resistant work surface.
3. Spray bottle or bowl of water to control scorching or accidental misapplication of the heat tool on the fingertips.
4. Receiver. You can use smooth paper, wood, or finely woven fabric (such as bridal or slipper satin, finely woven cotton, muslin, or rayon. (L.B.)).
5. Image. (Dry toner, darker than normal, and reversed horizontally. (L.B.)) Toner copies, such as photocopies from an office copier.
6. Low-tack tape.
MAKING A HEAT TRANSFER
1. Pre-warm your transfer tool for at least ten minutes. Sufficient heat is important for success, since dry toner’s melting point is 212–248ºF (100–120ºC).
2. Place the photocopy image-side down onto the receiver. Lightly secure the edges with low-tack tape to make sure the image stays in position. (Work on top of a flat, smooth surface. (L.B.))
3. Apply the heat tool flat to the back of the copy. Press firmly over the back of the copy in a regular circular motion. Gently lift up one corner of the photocopy paper to see if the toner has transferred.
4. Lift off the photocopy when you have transferred the amount of an image you wish. Lightly reheating the receiver will help you remove any stubborn paper.
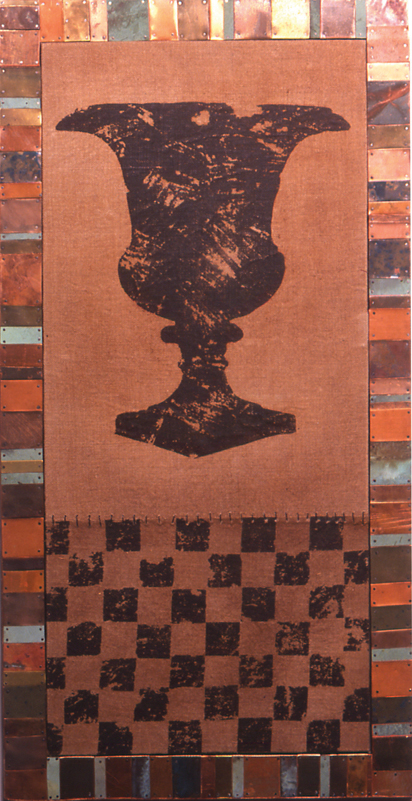
1.14 Peter Madden, Urn with Checkerboard, 16 in. × 2.5 ft. (40.64 × 76.2 cm), polymer medium transfer on linen with copper and brass border, 2001. Private collection. ©Peter Madden
By Peter Madden
This is a technique that I began to explore in the early 90s. Although the process can be a bit finicky and sometimes unpredictable, it is inexpensive, water-based, non-toxic, and can yield striking results.
METHOD OVERVIEW
1. Apply a coat of matte gel painting medium to the receiver.
2. Adhere an office copier or laser print.
3. After drying the “sandwich,” dampen and slowly remove the paper.
4. The toner or ink from the print is left embedded in the gel medium and receiver.
MATERIALS
1. Image. I found this process works best with images that are graphic and high contrast, because areas of the the picture can be lost when removing the paper.
2. Receiver. I have had the most luck transferring onto smooth wood, although I had some success with heavy printmaking papers that can withstand being wet and handled for a long amount of time and heavy fabric such as linen or old cotton bed sheets. Although the example at the beginning of this technical description is on linen, I think fabric is much more difficult to use than wood. You probably will need scrap paper when you force air bubbles from the back of the photocopy.
3. Matte acrylic gel medium, such as the one made by Liquitex, and, to apply the medium, a bristle house painting brush.
4. Burnisher. I use a towel or face cloth because the soft texture of the burnisher helps to work the photocopy into the grain of the wood. Soft paper toweling also is effective.
5. Tray with warm water and sink strainer to avoid clogging the drain with paper pulp.
6. Facial sponge made for exfoliating, to remove paper fibers. I wear thin gloves only because keeping hands in water for so long can dry the skin, but the removal of paper sometimes is assisted by the texture of your finger tips.
MAKING A GEL MEDIUM TRANSFER
1.15 Coat the Receiver
1. Coat the receiver
Brush the surface with a thin layer of matte gel medium, making sure to work the gel into the grain of the wood. A thin, even, thorough covering is all you need before applying another thin coating at a 90° angle to the first coating. The goal is to be thorough. Immediately wash the brush.
1.16 Place the Image
2. Position the image
As soon as the surface is coated, carefully place the image face down and burnish the back with a cloth or soft paper towel, making sure to smooth out bubbles or wrinkles and the image completely adheres.
1.17 Burnish the Image
3. Burnish the image
Exert a good amount of pressure and thoroughly burnish the whole image. Any excess gel medium will ooze out and can be wiped off. Because the paper is moist from the gel medium and can be fairly fragile, be careful not to tear it during this step. Keep an eye on it for about 10 to 15 minutes just to be sure that the print does not bubble or buckle as it begins to dry. If I notice such aberrations, I put a piece of scrap paper over the print and thoroughly burnish the image to the wood until the two are in as close contact as possible.
4. Dry the print-receiver unit
Allow the unit to dry thoroughly. I’ll usually set up a few prints and allow all of them to sit overnight to assure that they are bone-dry before moving on to the next step. This technique will not work unless everything is thoroughly dry because the ink or toner must have time to bond with the gel medium.
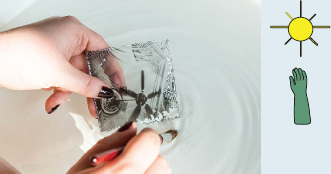
1.18 Soak the Print and Rub the Back
5. Soak the print and rub the back
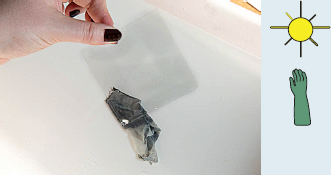
Fully soak the back of the paper. I begin by running very warm water (90°F or 32.3°C) on it until the paper becomes slightly transparent. I then cover the unit with a wet cloth in order to completely drench the paper. While the paper is still saturated with water, gently rub it with your fingertips. The fiber of the paper will begin to delaminate and fall off.
Once the bulk of the paper has been removed, you’ll be able to see your image clearly, although it will have a milky film over it from the remainder of the paper pulp. Continue to keep the print damp and gingerly remove the remaining paper. Use a facial sponge and carefully move it over the print with circular motions. This is the point where pieces of the image can be lost if you are too aggressive with it.
TIPS
You can transfer onto paper, but it should be substantial enough to hold up under soakings.
You cannot let the print-receiver unit dry too long—longer is better—before moving on to the soaking step.
As you soak the print, allow time for the water to sink in so that you can see the image through the paper before rubbing the back of the paper. Leave a wet rag on the paper if you have to take a break.
Since the paper can clog the drain, I work over a tray of warm water, continuing to wet the paper as I go along and letting the paper that I’m removing fall into the tray. I later strain the water and throw away the paper pulp.
I have used Scotchbrite® Heavy Duty Scouring Pads, available at grocery stores, to aid in paper removal.
Erring on the side of not rubbing too much during the first session with the print is better, since you can always go back, soak the print, and remove more pulp. In actual fact, after I think I am finished, I let the print dry again and take a look at areas where there is still a milky film of paper fiber on the image. Then, I will continue to wet and even more gently remove what remains.
As you can see from the example pictured here, I’ve managed to get flawless images with almost no loss of image. Sometimes I prefer prints where the loss of toner works well with my objective because the image looks scuffed, scratched or worn.
The prints are stable and, although it’s not necessary, I sometimes apply a light coat of matte polyurethane, which will steep into the remains of any paper pulp and make them appear transparent.

1.19 Rick McKee Hock, Zorro, from the series Wild History, 22 × 30 in. dye diffusion transfer print, 1989. ©Estate of Rick McKee Hock. Courtesy Visual Studies Workshop, Rochester, NY.
Rick Hock used text and images from the mass media and from fine arts. He copied comic book images, book reproductions, and other cultural artifacts onto black-and-white slide film. By inserting color filters into a Polaroid print processor, he selected the hues while he enlarged onto an 8 × 10 in. (20.25 × 25.5 cm) sheet of Polaroid film. He then used a spoon to rub the matrix image onto paper. Relishing the disadvantage of not being able to exactly repeat something and the uncertainty of his results, Hock arranged the images so that their new context changed the viewer’s understanding of hackneyed or stereotyped subject matter. Sadly, Rick died in 2015.
The contemporary equivalent of Polaroid products is made by the Impossible Project, described below. You cannot make transfers with their film, but you can make lifts. For those of you who never had the pleasure of Polaroid self-developing film and color palette, Impossible Project offers you a chance.
IMPOSSIBLE PROJECT IMAGE LIFTS
SAFETY
Read warning labels and wear protective gloves when making lifts.
A sac containing an alkaline processing gel is discharged when the film is pulled through the film holder or camera rollers. In case of contact, wipe it off immediately and quickly wash the skin with lots of water.
Be careful not to discard trash where children or pets can reach it.
Hot water can scald, so be extra careful when you use it.
METHOD OVERVIEW
1. Create a black and white or color photograph on IP film.
2. Soak the film in warm water and peel off the actual image layer of photographic dyes.
3. Adhere the photographic imagery to your substrate.
MATERIALS
1. Polaroid and/or Impossible Project equipment. Several approaches to creating a lift exist. You can start with an Impossible Universal Lab printer which is about the same price as a small camera and transforms images on a smartphone or tablet to a physical photograph with a free app. You can also shoot “live” imagery, such as a still-life, portrait, or landscape with IP I-1 analogue instant camera, which connects to a free app via Bluetooth so you can also take self portraits, double exposures, long exposures, and scan photos. Impossible Project sells and repairs Polaroid cameras, which you can load with the appropriate IP film. In addition, you can use a large-format camera outfitted with a Polaroid back (they sell and repair old ones) and their 8 ×10 in. (20.5 × 25.5 cm) film. As an aside, I understand that Cindy Sherman used a medium format and, later, a 35mm camera, with special Polaroid backs, to test lighting and props for her directorial mode3 pictures before digital devices were around.
2. Impossible Project black and white or color film. Film should be at room temperature when you use it, but storing it in a refrigerator—not a freezer—can prolong its life.
3. Receiver. You will need a paper that does not easily delaminate, such as printmaking paper. Arches makes a heavy 140 pound watercolor paper. Other papers that work well are Aquarelle watercolor (bright white), frosted acetate, drafting vellum, rice paper (softens and textures the image), and even wood veneer. Remember that smoother surfaces, such as hot-press paper, will retain more detail, while cold-press papers will create a rougher or more textured look. My students and I have attached emulsion lifts to furniture, glass, ceramics, mirrors, bottle cap interiors, plastic goggles, and other surfaces. We have used fabrics such as silk and fine cotton, where closer weaves retain more detail. Dark-colored surfaces are inclined to obscure the image, so light colors are preferable. See the section on supports in Chapter 4 for more details.
4. Hot water, thermometer, and 2 ridge-less trays. Prepare both trays with hot (160°F or 71°C) water. I use an electric fry pan for keeping the water hot because I can set the temperature to exactly 160º F. A plug-in tea pot and thermometer work, too. Using distilled water eliminates variables that might cause problems.
5. Board and drafting tape (optional). For thin paper receivers, I have used a smooth surface, such as a piece of clean Plexiglas™ or Formica™ onto which paper is adhered, a method that allows you to immerse the paper in water and not risk it curling up. Of course, the board and paper have to be smaller than the tray of water. With this method you are also unlikely to rip the paper while you attach the image.
6. Clear acetate or Mylar® sheet (optional). After the photograph’s emulsion detaches from the support, it might end up backward. Gently roll it under water onto a sheet of acetate or Mylar® so you can flip the emulsion over and place it on the receiver. In addition, my students have used acetate in order to remove the lift out of the water and attach it to large sculptural objects. Two sheets of acetate are useful: one for reversing the direction and one if you are adhering the emulsion to an object.
7. Scissors, soft brushes, and pencil. You must exactly cut—do not peel—the film’s border from the image area. In addition, a variety of round and flat watercolor brushes help remove excess chemistry and to position the emulsion. I use a pencil to lightly mark where I want to place the image on the receiver.
8. Protective gloves. The process can be messy and the chemicals caustic, so use gloves. The more tightly the gloves fit your hands, the more easily you can work.
9. Traditional marking materials (optional). You can embellish the receptor with color pencils, watercolors, pastels, dry pigment, and so forth before you apply the emulsion, and the marks can be seen in the light areas of the photo, which are the clearer areas of the emulsion.
10. Clock, phone or watch with seconds.
MAKING AN EMULSION LIFT
Photos courtesy Impossible Project
1.20 Take the Picture
1. Take the picture
Expose and fully process an instant photograph as the manufacturer recommends. Color pictures can take 30 minutes to fully develop, while black and white photos need 5–10 minutes. Fresh pictures are easier to lift than old ones. Meanwhile, heat the water and pour it into a tray or leave the hot water in an electric frying pan. Use a thermometer to check the temperature, because you may need to add more hot water at intervals. Make another tray of warm water.
1.21 Trim the Photograph
2. Trim the photograph
Using scissors, carefully cut the white border from the photographic image, which exposes the different physical layers that actually make the photo.
1.22 Soak the Image
3. Soak the image
Gently submerge the photo face up in the first tray of hot water. Let it sit for a few minutes. You will see white flakes in the water. Now turn the photo over with your gloved hand, and you will see the white layer beginning to separate from the emulsion. You can gently direct the water towards the photograph without actually touching it, and that will encourage the separation to continue. Brush the white from the emulsion, a process that takes quite a few minutes. If the water cools, add more hot water.

1.23 Remove the Positive from the Negative
4. Remove the positive from the negative
Start in one corner and gently roll the positive image diagonally from the white negative sheet under the water, where you can control it more.
1.24 Clean the Emulsion
5. Clean the emulsion
Wearing gloves, gently remove any residual white chemicals. This step is easier if done under the water.
1.25 Remove the Plastic Backing
6. Detach the plastic backing
Still at the bottom of the tray, gently separate the print, image-side up, from the plastic top layer, with the flat bristles of a small, soft brush. With your other hand, slowly push and lift the emulsion from the edges of the plastic so that it floats in the water.
1.26 Maneuver the Emulsion
7. Maneuver the emulsion
If the emulsion rolls up on itself, use the brush under water to flatten it and remove it from the plastic. (In addition, in order for the finished piece to read correctly, slip a piece of acetate or Mylar® under the floating image and maneuver the image onto it. Flip the acetate/image over so that the image is face down in the water, then remove the Mylar®.)
1.27 Adhere the Emulsion
8. Adhering the image
If the image is already correct-reading, quickly move it to the clean water tray. Place the substrate under it in the water and, using your fingers or a soft brush, guide the image as nearly as you can to the penciled receptor area, then pinch two corners of the photo to the receiver. Gently scoop up the whole unit with the image on top. (If the image is wrong-reading, first lift the acetate with the image from the water and carefully turn the unit, image side down, onto your wet paper or substrate.) Remove any debris still left on the image.
Gently rub and straighten the image, then very lightly roll the emulsion with your fingers from the middle outward, assuring the even adhesion of the emulsion to your chosen substrate. You can further position the image by dipping a corner of the emulsion-substrate unit into the water again. To perfect the placement and smooth the emulsion onto the substrate, use a wet brush above the water on the dampened receiver to move the emulsion. A flat piece of Plexiglas® underneath is helpful.
Let the image dry in a clean, arid, horizontal area.
TIPS
Lifts from live imagery with any film, although more uncertain due to the one-of-a-kind nature of the process, allow for adjustments in composition, focus, lighting, and exposure.
You can double-expose in-camera or adhere one image on top of another.
Stretching or manipulating the emulsion is easier to do while the receiver and image are wet, partially submerged in a tray of water. Thin papers, such as rice paper and tissue paper, cannot be soaked in the tray of water. Instead, try an atomizer with warm water before you attempt to attach the emulsion lift.
If you are working on a slippery substrate, such as vellum or silk, taping the receptor to a stiff backing helps to prevent it from sliding while you adhere the emulsion.
Do not touch the emulsion unnecessarily or it will rip while it is wet. You have to be patient and allow the water to do most of the work.
As you finish, you can use a small brush dipped in water to gently get under the emulsion and stretch or shape the emulsion and purposely create wrinkles.
If bubbles appear as soon as the lift is drying, use a wet, broad, flat brush to flatten the emulsion.
Keep records of your procedure as you work so you can determine the effects of different variables. The direction of the grain of the paper, for instance, can influence the natural curl of the paper and the results.
All common color photography is sensitive to ultraviolet (UV) light, heat, and humidity, so images should be stored in archival boxes with silica gel (I recycle the packets that come with vitamins) away from light and contaminants or framed and sealed under UV protective glass.
After the emulsion lift is completed and dry, you may want to spray it with fixative so that it is not as easily damaged. However, fixative is extremely toxic and hangs in the air after it is used. So, wear a respirator and gloves and spray outside or in a spray booth.
I use archival interleafing from art or framing shops to wrap around and store the print.
I advise wearing gloves as you clean the trays.
After a session, always clean the rollers in the camera or the Polaroid back and the film exit slot because dirt can cause scratch lines on the image, and old chemicals can create brown stains and clear spots. I use a lint-free material, such as Webril wipes or Photowipes™ with rubbing alcohol.
The Impossible Instant Lab Universal appears to be a wonderful device for when you are traveling and want hard copy. It is (rechargeable) battery powered, you attach your smart phone to it in order to make actual photographs, and then it collapses.
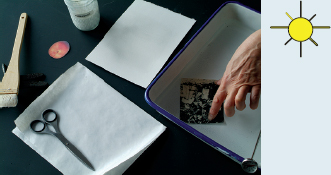
Lifts provide another simple, versatile method of removing a printed image from its page. Lifts are made by adhering either heavy tape or acrylic (polymer) medium to a printed image and separating the ink embedded in the coating of the paper from the mass of the paper. The lift can be employed as a transparent page in a book, mounted in a holder and scanned (see page 128 of the Digital Negatives chapter), stuffed and stitched, or warmed and sculpted. Another application is to enlarge or contact print a lift in a darkroom onto ortho film (see the chapter entitled “Generating Imagery: Analogue Method”) to make a positive transparency. Lifts can be used as the transparent halftone positive for photo silkscreen or as a decal to be adhered to surfaces such as fabric, acetate, paper, wood, glass, and ceramic.
SAFETY
No special precautions need be taken with materials used for making magazine lifts.
METHOD OVERVIEW
1. Printed image is selected and prepared.
2. Transparent tape, clear contact paper, or acrylic medium is applied to the front of the image.
3. When dry, the taped or coated image is then soaked in water until the paper dissolves, separating the inked image from the paper.
MATERIALS
1. Image. The inside pages of glossy magazines work best because the paper is coated with clay (kaolin), which is water-soluble. The ink rests on the kaolin, not the paper. Front and back covers do not work well because they are usually varnished, and this seals in the ink. Newspaper pages are thinner and often the images on both sides of the paper get lifted. For the decal technique, color images from high-quality magazines are the most reliable. Choose slightly contrasty images with bright, detailed highlights and clear shadows to retain tonal separation.
2. Heavy transparent tape, clear contact paper, or clear acrylic polymer medium. These are the adherents used in the different lift methods. Transparent tape usually is available in hardware stores for winterizing windows or for mail room use (also known as clear packing tape) and is effective for smaller pictures. Clear contact paper used for lining shelves works with large pictures. Clear acrylic polymer gloss (which dries clear) medium (Grumbacher Hyplar™, Golden™, Liquitex™) is sold at art stores and provides the best flexibility in the final lift. With it, you will need a brush, and inexpensive polyfoam brushes are best for laying down an even coating. Immediately after using the polymer medium, you must wash brushes with warm—not hot—water and soap or the bristles will harden.
3. Metal spoon, burnisher, bookbinder’s bone folder (my favorite tool), etching press, or paint brush. These are the applicators used in the various lift methods to assure adhesion of the magazine page to tape or contact paper, or, with the paintbrush, to apply the polymer medium; a 1½ in. (4 cm) width soft brush is recommended.
4. Brayer. This is a printer’s ink roller, usually used for linoleum printing but also practical for the polymer lift method when transferring onto fabric or acetate. Brayers can be purchased at art stores or hobby shops. Inexpensive substitutes include a kitchen rolling pin or a straight wine bottle rolled on its side.
5. Tub, sink, or dish pan and water.
6. Scissors.
7. Soft cloth. A clean, pressed piece of cloth is needed if you want to lift onto fabric, and another piece of absorbent cloth is necessary for blotting the fabric.
8. Blotter. For fabric lifts, a blotter the size of the fabric is needed.
9. Sheet of glass.
10. Receiver. Almost any paper, fabric, or surface will work. Fabric, if used, should be of medium weight and fine-woven texture for best results. Natural fibers and natural-synthetic blends work better than synthetics. When applied to clear acetate, lifts can be layered, stitched, and stuffed. When heat-sealed to each other, lifts can be inflated to create sculptural forms.
11. Hair dryer. A hair dryer hastens drying time for polymer lifts and softens the polymer for sculpting decals.
12. White paper and acetate. For lifts onto clear acetate, you need a large piece of white paper, such as shelving paper.
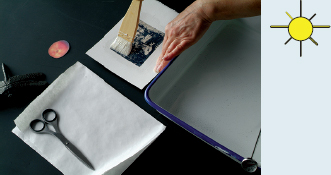
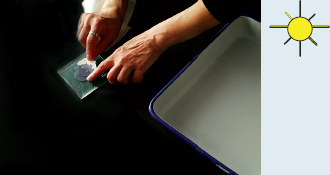
MAKING A LIFT
METHOD 1: TAPE METHOD
1. Cut and adhere the image
Cut out the magazine drawing, photograph, graphic, or type slightly larger than the image area. Press the sticky side of the tape or contact paper onto the image side. Thoroughly rub the back side of the image with a spoon or burnisher, or put this sandwich construction through an etching press.
2. Soak and dry the image
Float the taped or contact-papered image face-up in warm water for at least 15 minutes. The paper will start to delaminate. Gently rub the back of the paper, removing the paper fibers but leaving the picture’s ink stuck to the tape or contact paper.
Remove the unit from water. Weight down the lift by the corners until the piece dries, then trim as desired with scissors.
METHOD 2: ACRYLIC-MEDIUM AND MAGAZINE PICTURES METHOD
1. Prepare and coat the image
Cut out the image to be lifted, trimming off all extraneous areas. Place the image face up on a sheet of glass. Apply a thin, even layer of acrylic medium by brushing with strokes going in the same direction. Air dry or blow dry with the cool setting, and coat again at a 90° angle to the first brushing. Dry again and coat again, repeating for a total of six to eight layers, alternating the direction of the brush strokes and drying thoroughly after each coating. The polymer medium should dry clear. Wait 24 hours until you start the next step.
2. Soak and dry the image
Float the acrylic-coated image face up in warm water and soak it for 15 minutes. The paper will become soft and start to delaminate. Gently rub the back of the paper to remove the paper fibers, leaving the inked image adhered to the acrylic medium. Artist Tricia Neumyer has had great success using a handheld steamer to remove the paper. Air dry or blow-dry, if heat is needed to make the lift pliable.
TIPS
The acrylic medium method works best if you do not brush on thick coatings; otherwise the medium will penetrate too deeply into the paper fibers making delamination difficult. Rubbing or scrubbing the image as you apply the medium can smear the ink.
Acrylic lifts can be used like decals. Make sure that the surface on which you want to place the decal is clean and dry. Then coat the surface with an even layer of polymer medium. Smooth the lift made by the acrylic (polymer) medium method onto the surface with the image right side up. Hold in place for several minutes. Remove excess medium with a moist cloth.
To apply an acrylic medium lift to curved surfaces, gently heat the lift with a hair dryer until it becomes pliable, then apply the decal lift to a correctly prepared surface.
When using acrylic polymer medium, be sure to immediately wipe excess medium off your work surfaces or receiver surfaces and implements using warm water and a sponge.
To brighten the image after the fabric has dried, apply 80 percent watered-down coating of the medium to the image transfer area only.
Acrylic lifts are sensitive to heat and cold. They will soften when warmed and become brittle when chilled, even if left outside on a cold day.
METHOD 3: ACRYLIC MEDIUM LIFTS ON FABRIC
Just by making simple alterations in the lift process, you can transfer images to fabric. Note that these transfers will have the image reversed, whereas the methods described previously produce images that read correctly. Lifts transferred to fabrics will be pliable in addition to being reversed.
1. Prepare the fabric and the image
Place a clean, pressed piece of fabric on a flat, hard surface. Select your image and trim all excess before placing it face up on a sheet of glass. Brush on an even, heavy coat of acrylic medium and wait about 30 seconds. The paper of the image will curl and look semitransparent, indicating that the medium has penetrated through the paper.
2. Combine the image and the fabric
Carefully set the wet, coated image face down on the fabric. Roll a brayer over the back of the image, pressing the fabric and picture tightly together, making sure to remove wrinkles. Turn the entire piece—image and fabric—over, and roll the brayer across the fabric. Test the image piece to see if it has adhered to the fabric by picking up the edges. If the image does not cling, remove the entire piece and recoat as in Step 1 above, and reaffix the image piece to the fabric as described in this step.
3. Remove the paper backing and drying
Let the united fabric and image piece dry thoroughly, preferably overnight; then place the unit in a tub of warm water. After soaking for several minutes, the paper backing should peel away from the image with gentle rubbing. Remove the fabric from the water and lay it on a blotter, image side up. Gently wipe the image with a damp cloth to remove any pieces of paper that may remain. Hang the fabric to dry, and do not wring it.
If any part of the image peels or pulls from the fabric along with the paper backing, re-submerge the whole unit and begin peeling from the center to avoid damaging the edges. Once the fabric has dried, use polymer medium to re-glue the loose areas of the transfer.
METHOD 4: ACETATE LIFT
Images can be transferred onto acetate sheets, which are available at art stores. Like the lifts on fabric method above, this technique uses the acrylic-polymer medium to remove solely images from printed material to transfer onto a second receiver. In addition to providing a more rigid base, the transparency of the acetate together with the transparency of the dried polymer medium offer an alternative solution to the correct-reading/reverse-reading problem. The finished piece can be framed, attached to glass/mirror with gloss medium that dries clear, or used as a clear page in a hand-bound book.
1. Prepare the image
Cover a flat work surface with a large white piece of paper, such as shelving paper, drawing paper, or typing paper, and secure this sheet to the work surface. Place the trimmed image page face up on the paper and carefully set a clean sheet of acetate over the image. Tape one whole edge of the acetate sheet to the white paper, creating a hinge, and then lift the acetate back open. Mark the outline of the image piece on the white sheet of paper.
2. Coat the image
Place the image face up on a sheet of glass, and apply an even coat of acrylic polymer medium. Return the picture coated side up to the outlined position on the white sheet of paper. Lower the acetate sheet and completely smooth it over onto the image piece. Untape the acetate sheet and turn it and the adhering picture over in order to totally roll the brayer across the back of the image. Lay the acetate-image unit on a flat surface, acetate side down, and wipe off any excess medium from the acetate with a damp cloth. Allow this unit to dry thoroughly, until the medium turns transparent.
3. Remove the paper backing
Place the acetate-image unit in a tray of warm water, paper side down. Soak for several minutes until the paper backing to the image piece is soft, then turn the unit over; gently rub the paper from the acrylic coating the acetate. Blot gently and allow the acetate sheet with the image adhered to it to dry.
METHOD 5: LASER LIFT
1. Prepare the image on a computer as before, but do not use an inkjet printer. Make sure you print onto copier paper with a laser printer and that you allocate a substantial border on all four side of the picture. Or, skip the computer, use the glass platen of the copier, and make a laser copy that way.
2. Coat the image with a thin layer of acrylic gel medium.
3. Allow the medium to completely dry, then tape the paper, image side up, to a flat, smooth surface, such as a piece of glass.
4. Using a spoon, art store spatula, or palette knife, scoop out a generous amount of gloss acrylic gel and place a line of it along one border of the printed image. Brush a generous layer of the gel onto the image and smooth it with the palette knife or spatula while maintaining the layer’s thickness.
5. Allow the unit to dry for at least eight hours.
6. Cut the laser print’s border or peel the tape to separate the image from the glass or whatever surface you used as a coating area.
7. Place the coated paper image in a tray of warm water. After a few minutes, rub the front so as to dislodge and delaminate the paper from the image. Go gently because that image is imbedded solely in the gel.
By Dorothy Imagire
A Lazertran™ inkjet lift is similar in look to Impossible Project emulsion lifts, but much easier to do, and you can go directly from camera to digital printer. It does not “wiggle” like emulsion lifts—the decal is much firmer—yet somewhat flexible. Any image you have on your computer, whether scanned, imported, or created, can be printed out on Lazertran™.
SAFETY
No particular safety measures are required. Make sure you use a thermometer so you don’t burn yourself with hot water.
METHOD OVERVIEW
1. Inkjet print your image onto Lazertran™ Inkjet Decal paper. Let the image dry.
2. Put the decal paper into warm water until it loosens from the backing paper.
3. Place the decal face up onto nonabsorbent receiving material.
4. If the receiving material is absorbent, coat the material first with an acrylic medium.
MATERIALS
1. Image. You can use any image that is in your computer. Higher contrast and/or brighter colors show up better if placed on darker receiving material or transparent glass.
2. Lazertran™ Inkjet decal paper. You can purchase Lazertran™ online from www.lazertran.com. They have changed the name of some of their products, but look for “inkjet” and “waterslide” or “decal.” They also make a nice inkjet iron-on transfer as well as many other “cool” products. They are based in England, but they also have a warehouse in the United States so that your order is shipped quickly in either location.
3. Receiving material. For porous materials such as paper, canvas, wood, or stone, you can attach the decal with acrylic medium while it is wet or attach it later when it is dry. In either case, coat the porous material with the medium, place the decal, and add another coat of medium on top of the decal. Make sure you brush from the center out to remove any trapped air. Lazertran™ also works well on nonporous materials such as glass, ceramic, and shiny metals without acrylic medium, adhering with just the gum on the back of the decal. Make sure you squeegee out any air bubbles and excess water.
4. Scissors. Small nail scissors work well when cutting intricate images.
5. Acrylic medium or varnish. Your can use either matte or gloss. You can even use oil varnish, but in this case you should allow the decal to dry after it has been soaked off in water. Slide the decal onto a sheet of freezer paper or waxed paper until it is dry.
6. Freezer paper or waxed paper. Both are found in the grocery store. Freezer paper, which I prefer, has a plastic nonstick coating on one side (this is the side the decal should be placed on so it will not stick as it dries). Waxed paper sometimes works, but there is a chance the decal will stick to it.
7. Brush. Any soft brush you feel comfortable with.
8. Flat container or tray. Use any dish or pan that is larger than your cutout decal image and not too deep—about two or three inches.
9. Thermometer. An instant-read kitchen thermometer works quickly and is inexpensive, small, and easy to find. Do not use it for both cooking and nonfood processes.
10. Squeegee. May be useful on flat, nonporous surfaces.
11. Tissues or paper towels.
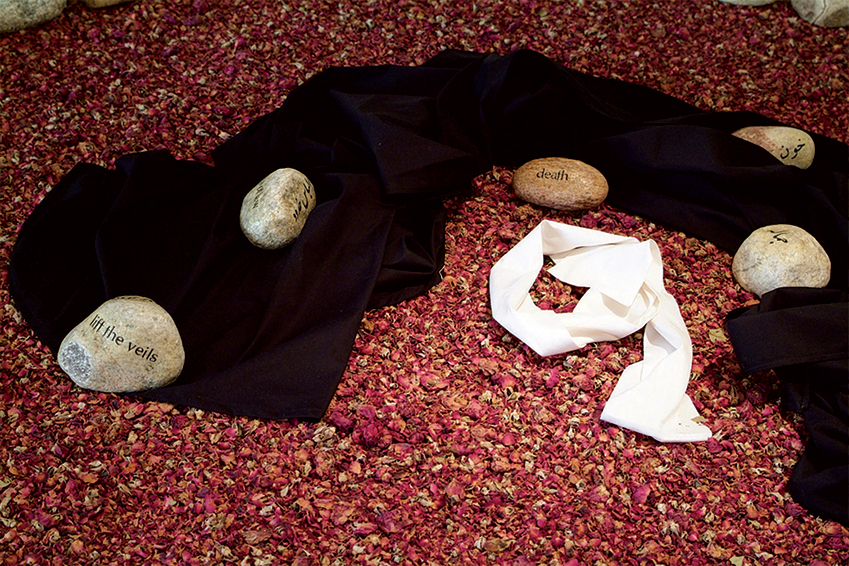
1.28 Dorothy Imagire, Tahirih, Feminist Martyr Iran, 1852, 96 in. (2.44 m) circle installation with 50 Lazertran™ decaled stones on rose buds, 2005. © D. Imagire.
Tahirih was born in Persia—now Iran—in 1817. She was an intellectual and a poet, who refused to wear the veil. In 1852, she died a martyr for her beliefs; she was strangled to death by her own white silk scarf at night in a garden in Tehran. Her body was thrown down a dry well and covered with stones. Imagire captures her spirit by using Lazertran™ inkjet decals of Tahirih’s poetry in Arabic and Persian, with some English translations, on the stones. The stones circling the rosebuds (originating in Iran, also mentioned in Tahirih’s poetry) suggest a walled garden (our word “paradise” is of Iranian origin, which literally translated means “walled garden”).
As a young girl, Imagire, of the Baha’i faith, grew up knowing that Tahirih was the first woman martyr for the Babi/Baha’is. Imagire’s mother was born and raised in Iran. See more of her art work on www.Imagire.org.
MAKING LAZERTRAN™ LIFTS
Please read all the steps before starting.
1.29 Making and Preparing the Image. © D. Imagire
1. Make and prepare the image
Your image will not be reversed, so you do not have to flip it. Print on the cream side of Lazertran™ in an inkjet printer using “colorlife” setting if you have it. If you do not have the “colorlife” setting, the “matte” setting works well (whatever setting that does not use too much ink). Use the highest quality photograph setting at the highest dpi (1440 dpi if you have it) and do not check “high speed.” Allow the inks to dry at least 30 minutes before continuing to the next step. Cut your image out, as the borders are visible when dry.
1.30 Preparing Your Receiver. © D. Imagire
2. Prepare your receiving material
If you are using porous material, such as paper or canvas, you must cover the receiver first with acrylic medium. Using a soft brush, evenly coat one layer of acrylic medium.
If you are using nonporous material, such as glass or metal, you do not need to coat it with acrylic. It should be clean and grease-free.
1.31 Releasing the Decal. © D. Imagire
3. Release the decal
Fill a shallow pan, large enough to hold your image, with warm water at about 110ºF (43.3ºC). Lower the image into the water bath. Let it soak for 30 seconds to one minute. It will curl up then slowly flatten out again. Test to see if the backing slips away from the decal. If it slips away, take it out of the water, gently shaking off excess water.
1.32 Attaching the Image on Porous Material. © D. Imagire
4. Attaching the image on porous material
Have your receiving material ready and at hand, coated with fresh, wet acrylic medium. Pull the decal one-quarter inch away from the backing and lay the image on the receiver face up. Now slide the rest of the Lazertran™ backing out from under the decal. Using a soft brush, add another coat of medium on top, working air and moisture out from the middle to the edges. The image will become more visible as it dries.
1.33 Attaching the Image on Nonporous Material. © D. Imagire
5. Attaching the image on nonporous material
You do not have to use the acrylic medium. Place the decal face up and gently squeegee (the image is fragile while wet) with the side of your finger to push out air bubbles from the middle to the edges. Leave the unit to dry. The image will become more visible as it dries.
1.34 Attaching the Image Dry. © D. Imagire
6. Attaching the image dry
If you want to dry the decal first, pull the backing one-quarter inch (5 cm) away on one side of the image and slide it onto a sheet of freezer paper. Now slide the rest of the backing out from under the decal. Let it dry until you are ready to use it. When you are ready, coat the receiving material (whether porous or not) with acrylic medium. Place the dried decal on the medium and brush on another coat of medium, working any air out from the middle to the edges.
Allow the image to dry atop the glass or non-porous surface. You can hand-color with acrylic paints, then glue the dry image to your art work.
TIPS
For porous materials that need to be prepared with a coat of acrylic medium, you might want to brush the whole area, even beyond the image, because the medium is slightly visible. If the medium has dried, just apply a thin, wet coating before applying the decal.
Nonporous materials do not need to be coated with acrylic medium, if the decal is applied wet. However if the decal has dried (a more practical method, which allows you more time to arrange images), attach the decal as you would on porous materials by first coating with acrylic medium, then applying a top coat of the medium.
Clear or white areas on your image will not be see-through but slightly milky.
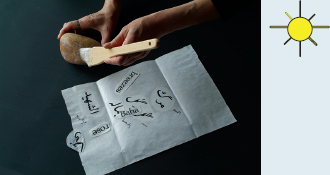
By Christine Tinsley
SAFETY
Mineral spirits, aka “white spirits” and other solvents, are hazardous from inhalation (high concentrations of mineral spirits can result in respiratory irritation or even pulmonary edema), ingestion (can be aspired into the lungs), and, to a lesser degree, by absorption (can remove protective skin oils and increase the possibility of a rash or dermatitis). Wear protective gloves and respirator, avoid eye contact (goggles help), and wash skin when contaminated. In addition, less toxic methods of clean up, such as using orange oil (CitraSolv, De-Solv-it, and the most eco-friendly ZAcryl D-Solv) are readily available, show no carcinogenic or neurotoxin hazards comparable to petrochemical solvents, and are biodegradable. However, handle these products with care: ensure good ventilation and take fire precautions when using orange oil solvents.
Stay away from the more toxic turpentine. (L.B.)
All paints contain a binder with pigment particles, but some—such as lead (found in flake white), cadmium, cobolt, and manganese and mercurial sulfides—are riskier that others. Chrome yellow and zinc yellow may cause lung cancer, skin ulcerations, and rashes, while lamp black and carbon black may cause skin cancer. So, use the least toxic forms of the pigment’s color instead. (L.B.)
If the color is labeled a “hue,” the manufacturer is indicating that the color does not contain a level of toxic metal to worry about. When in doubt, look up the Materials Safety Data Sheet on your supplies. (L.B.)
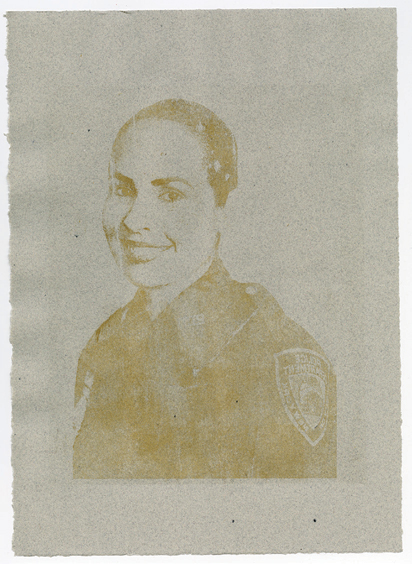
1.35 Christine Tinsley, Yahaida, from the SisterVet Series, Photo-lithograph from copier image using Winsor & Newton oil paints on Rives BFK, 11 × 14 in. (28 × 35.56 cm), 2016. ©Christine Tinsley, www.ChristineTinsley.com.
Do not eat, drink, or smoke near paint and solvents. You risk accidentally carrying toxins to your mouth and skin. (L.B.)
Although gum arabic can be found as an additive to food and cough medicines, it can interact with many medications, especially ones for respiratory disease, and create complications.
Pregnant and breast-feeding women should avoid gum arabic. (L.B.)
METHOD OVERVIEW
1. A high-contrast black and white photo copy is made.
2. The copy “plate” is rubbed with gum arabic.
3. The copy is sponged with water, then inked; the arabic acts as a paint attractor while the water repels.
4. Paper is pressed onto the copy, transferring the ink/paint only and creating a print on the receiver.
MATERIALS
1. Two soft rubber brayers. Available in the printmaking section of an art store, one will be used for inking and the other, for applying pressure.
2. Disposable palette (best) or waxed paper.
3. Palette knife.
4. Protective gloves, respirator (especially if you are unsure of the ventilation).
5. Sponges. You will need two, from the grocery store.
6. Two water containers. Each should hold at least 64 oz. (2 L) and not be used for any other purpose.
7. Oil paints. Winsor & Newton and Grumbacher are dependable, readily available brands.
8. Gum arabic. Found in an art store, usually the weight is 14° baume.
9. Solvent and mask. Orange zest solvents, named in the Safety section, above, are probably the safest. Mineral Spirits, for cleaning up, seem to be less toxic than other petro-chemicals. Wear an organic vapor mask. Never use benzene.
10. High contrast photo copies. Make two copies of each image, so one can be used as the trial and one for the finished print.
11. Flat, smooth, covering, such as Plexiglas®, for inking the image. You will also need paper towels.
12. Receiver. Rag paper is more resilient.
13. Baby wipes for cleaning the image border and the equipment.
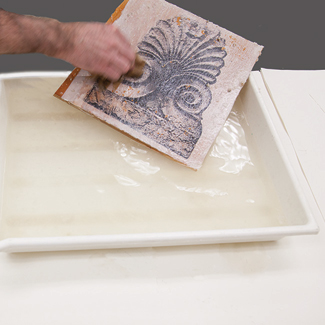
MAKING A PAPER PHOTO-LITHOGRAPH
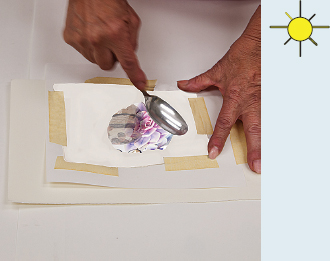
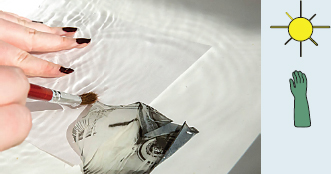
1.36 Prepare the Ink
1. Prepare the ink
Along one edge of the palette, squeeze out a 1 ½ to 2 in. (3.8 to 5 cm) link of oil paint. In U.S. currency, the dollop of ink should be about the size of a quarter. Then, using a palette knife, spread it into a line.
1.37 Prepare the Plate
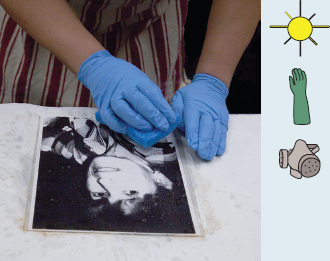
2. Prepare the plate
Pour out a quarter (coin) size of gum arabic onto the dry Plexiglas®. With your gloved hand, smooth the arabic over the entire area. Place the copy, image side up, on the plexi, and pour another dollop of gum arabic in the middle of the image. With your gloved hand, smooth the arabic to completely cover the whole sheet of copier paper, starting in the center and carefully removing air bubbles with the side of your hand as you evenly spread it to the edge of the paper. You will notice that the gum does not stick to the white areas.
1.38 Wet the Paper
3. Wet the paper
Once the copy is flat, use your gloved hand to rub another dollop of gum Arabic over the image and onto the borders. With the sponge, load it with water, then soak the paper by squeezing the sponge over the print. Lift up excess water by blotting the image with a sponge. Repeat this wetting and blotting procedure, making sure that the paper is evenly soaking wet.
1.39 Ink the Image
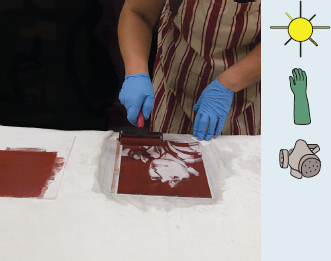
4. Ink the image
Use the brayer to make a flat, even rectangle of ink on the palette. Make sure the ink is evenly sticking to the roller, then roll the ink onto the image. First go in one direction, completely covering the black parts of the image, then pick up some more ink and roll at a 90° angle onto the print. In order to make sure the roller is loading completely and also inking completely, a special motion it used: when the brayer comes to the end of the rectangle of ink (or rectangle of the image), lift it and let it spin before putting it down again. This is called charging or discharging the ink.
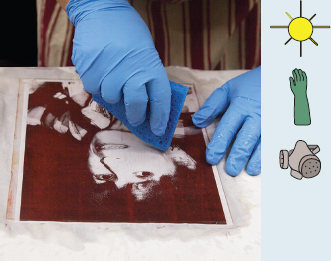
1.40 Keep the White Areas Clean
5. Keep the white areas clean
Using the sponge, pick up water and soak the print again. Delicately blot, then use the edge of the sponge to lightly lift up spots where ink might have stuck to the white of the image. Repeat Steps 3–5 at least three times. At the final stage, delicately rub the white border with baby wipes to remove excess ink.
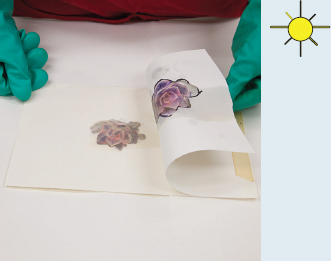
6. Create a hinge and make the first print
Tape one edge of the copier paper to one edge of the receiver paper. With a clean brayer, press the back of the receiver up and down, then side to side. The amount of pressure determines the amount of ink that will deposit on the receiver. Some artists put the unit through a press at this point. Take off your gloves so as not to dirty the receiver, and at the hinge, lift up the receiver paper to see the image. If it is not dark enough, repeat Steps 3–5 and check the print quality again. Do not remove the hinge, because it is the device that keeps the inked print and receiver aligned.

1.41 Create a Hinge and Make the First Print
TIPS
One way to make sure that the plexi does not move while you are using it is to create a suction by sprinkling a few drops of water on your work table and laying the dry plexi on top.
If the gum arabic is resisting being evenly distributed over the image and is too sticky, add a few drops of water and continue spreading it. You may need to add more gum, too.
The more times you wet, then ink and print the copy image, the darker the resultant reproduction on the receiver.
The inked copy can be dried and used as the art, too.
Using baby wipes to start the cleaning-up process limits your exposure to toxins. However, in order to completely remove paint from the brayer, the next step is orange zest solvents, then, as a last resort, mineral spirits. Wear a vapor mask and gloves. (L.B.)
The historical solvent, used by painters hundreds of years ago, was spike lavender oil, and it is available again from makers such as The Oil Treehouse, a manufacturer which does not use any turpentine, mineral spirts, lead, cobalt, or cadmium in any of their products. (L.B.)
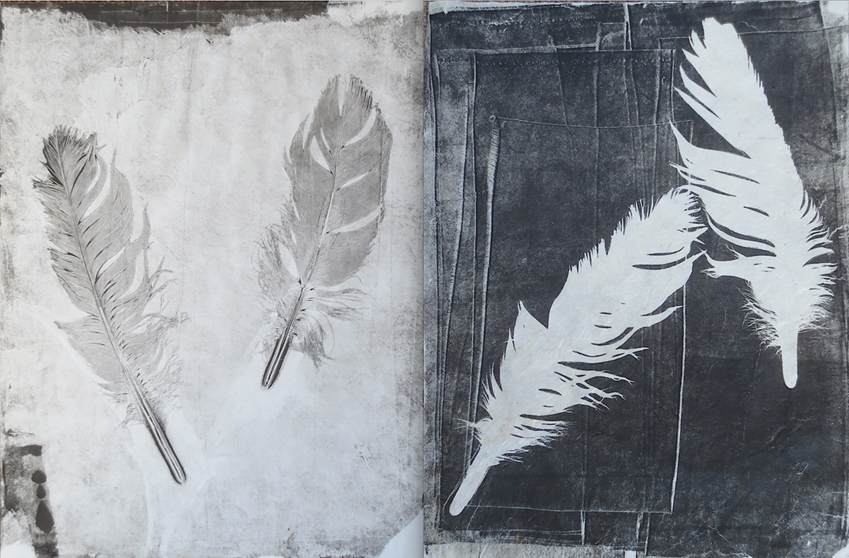
1.42 Peter Madden, detail, Icarus 2, Gelatin print on Lama Li paper, 9 × 24 in. (22.86 × 61 cm), 2016. ©Peter Madden The example shown here is a double page from a one-of-a-kind, handmade book of monochromatic gelatin prints. See more on www.PeterMadden.com.
By Peter Madden
Although this method is not literally made from any photographically derived image, it looks photographic and is so direct and stress-free, I could not resist putting it into this book. The manufacturers claim that water-based ink is non-toxic and gluten free(!). (L.B.)
The original process, developed in the late 1950s by Francis S. Merrit, Director of Haystack Mountain School of Crafts in Maine, utilized large plates of gelatin that were poured inside a clay perimeter on a large sheet of heavy glass. Because the early process needed huge drums of industrial strength gelatin composed of grains that were large and time-consuming to dissolve, this variation is much easier; I was taught this technique at Haystack Mountain School of Crafts on Deer Isle, Maine. It is fast, water-based, non-toxic, inexpensive and has endless possibilities that provide results ranging from images that appear to be some sort of photographic process to prints that are more traditionally painterly. It is akin to monoprinting, but rather than working on a hard glass or plexiglass surface, a supple plate of gelatin is used with water-based inks.
METHOD OVERVIEW
1. Commercial gelatin is prepared, poured into a pan, and allowed to harden.
2. Gelatin is inked, and a shallow object is pressed into ink.
3. Paper is placed onto the ink and rubbed from the back.
4. Paper or receiver is lifted off the surface and allowed to dry.
MATERIALS
The proportions below are for making a printing surface in a 9 × 12 in. (22.86 × 30.48 cm) pan and can be multiplied accordingly to create a larger printing surface.
1. Shallow pan, cookie sheet, disposable aluminum baking pan, or plastic lunch tray without too high a lip, because a tall brim makes inking the surface and pressing the print difficult. Containers for take-out sushi or salads are convenient because they have a lid which assists in preserving the gelatin “plate” for reuse. Otherwise, plastic wrap carefully sealed around the gelatin and receptacle can be used.
2. Eight envelopes of Knox or similar gelatin available at a grocery store totaling 8 oz. (226.8 g).
3. Water. You will need 1 cup (236.5 cc) cold water and 3 cups (709.76 cc) water heated to boiling. (I found 2 cups (473.2 cc) cold and 2 cups hot water easier to mix. (L.B.))
4. Ink. I use Speedball water-based wood-block printing inks. Stay away from oil-based inks, because they immediately damage the gelatin.
5. Brayer. You will need one soft brayer that fits into the pan into which the gelatin is poured. Wider brayers (and containers) end up with less brayer marks in the final print; however, I enjoy the marks that the brayer leaves from uneven rolls of ink. If you want strokes in the print, apply ink with a brush.
6. Object. Any object with a texture, such as keys, scissors, feathers, doll clothes, sea shells, clothes pins, paint brushes, your own hand, lace, coins, stencils, twine or rope, leaves, rubber stamps, knitted or crocheted items.
7. Receiver. Papers without a lot of texture, such as Japanese papers, work best for picking up detail. Any thin material with a smooth surface and some absorbency should work easily, such as paper bags, paper towels, gift wrapping tissue, vellum, copier paper, and printed book pages or maps. I have used wood, cardboard, Rives heavy weight printmaking paper, and book boards as substrates, also.
8. Waxed paper and tape to secure it to your work table or a disposable paper palette.
9. Tweezers are helpful for lifting up an object from the inked gelatin. A rubber spatula helps mix the gelatin and prevents scraping a metal pan when you are removing the gelatin.
10. Sponge or paper towels and cool water to wipe the gelatin after making a print and before rolling ink again or changing the color of the ink.
11. Ink retarder (optional). Speedball makes Block Printing Retarder, Waterbased, and Liquitex sells Slo-Dry Fluid Retarder that reduce the speed with which the rolled-out ink dries. Retarder is especially helpful if you are creating a large print.
12. Fork or kitchen wire whisk for mixing the gelatin and spoon for scooping out lumps and air bubbles from the gelatin.
13. Mixing bowl, such as Pyrex™ that will withstand hot water and hold 32 oz. (946.35 cc).
MAKING A GELATIN PRINT
1. Make the gelatin
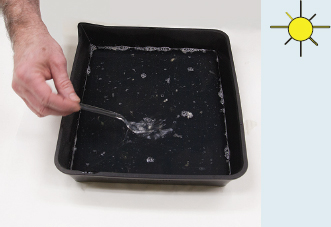
1.43 Make the Gelatin
Pour the cold water into a mixing bowl and sprinkle the gelatin on the cold water. Tip and shake the bowl a bit to assure that all of the gelatin has been moistened, but do not stir it because the motion will cause lumps that are difficult to remove later. Allow this mixture to sit while the water boils. Slowly and gently pour in the boiling water, being careful not to create bubbles.
Making sure not to create any bubbles or foam, slowly stir the gelatin mixture again with a fork or whisk until the gelatin is thoroughly dissolved and there are no lumps.
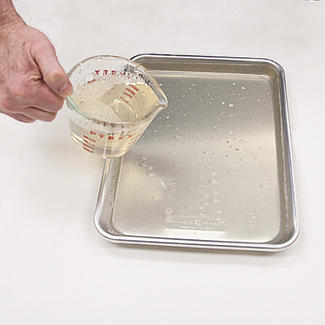
1.44 Form the Gelatin
2. Form the gelatin
Pour the gelatin into a cookie sheet or similar mold.
Any lumps or bubbles can be pushed to the edge and scooped out with a spoon. The surface should be as smooth as possible so as not to interfere with picking up clear details when printing. The plate can be left out in cool air or put in the refrigerator for approximately ten minutes to speed the process or solidifying.
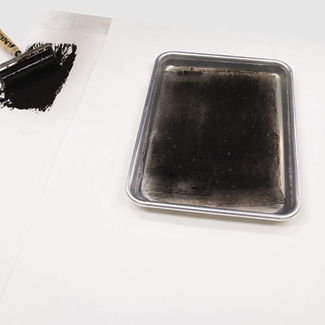
1.45 Ink the Gelatin
3. Ink the gelatin
At this point, there are several different ways to proceed, and each method produces different results. The following instructions are for making prints similar to the example at the beginning of this chapter.
Using a soft rubber brayer, roll the ink out on a palette or a piece of waxed paper taped to your work table. The aim is to spread the ink evenly so you get a thin, even coating on the brayer. Colors can be mixed with a spoon on your palette and then rolled out evenly or left unblended in order to create a split palette/rainbow on the brayer.
Apply a very thin coating of the ink to the surface of the gelatin plate with the rubber brayer. The layer of ink should be thin enough that it is still transparent. Be vigilant as you go over the surface with your brayer; with careful rolling, you can erase any marks that the brayer leaves.
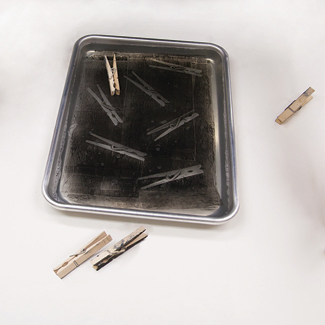
1.46 Prepare the Image
4. Prepare the image
Gently place the object where you want it on the surface of the gelatin. Be careful not to slide it around, as this movement will result in a blurry print. Softly press the object into the gelatin, bearing in mind that you only want to make an impression in the ink’s surface and not a deep mark in the gelatin. Carefully remove the object, making sure not to leave any fingerprints—sometimes a pair of tweezers comes in handy. You should be able to see a clear imprint of the object on the surface of the ink.
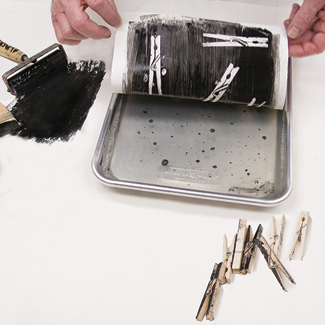
1.47 Pull the Print
5. Pull the print
Take a piece of paper (or cardboard or wood), gently lay it down on the gelatin plate and softly press it with the flattened palm of your hand, making sure the substrate closely contacts the inked surface in order to pick up all the detail. Remove the paper, and there you have your first print!
VARIATIONS ON GELATIN PRINTING
The way of printing described above will give you a “positive” image from your object on a solid background.
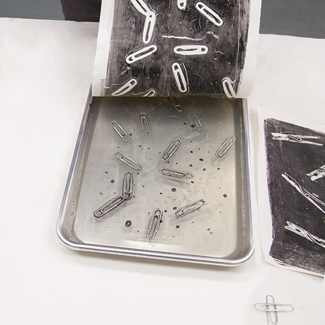
1.48 Create a Positive
6. Create a positive
A way to get a different sort of print is to ink the gelatin, place an object on the ink, gently press a piece of paper over the object and pick up all the ink around the object as described in the steps above. (At the same time, the action of making the first print creates a crisp impression of the object in the ink.) Remove the paper, and you will have created a silhouette print of the object. Take away the object after you make the silhouette. Now, place another piece of paper and gently rub, which will pick up the image‘s marks that have been left behind on the gelatin-inked surface. This method gives you a crisp image of your object on a clean background because all of the surrounding ink has been removed by the first piece of paper.
TIPS
When I incorporated the simpler version, rather than the original industrial-strength method, into my book arts curriculum 25 years ago, I found that using easily dissolved Knox gelatin works just as well. In addition, the gelatin is readily available in the baking section of any supermarket.
Using an aluminum baking tin from a grocery store works fine as the carrier for the gelatin and is simpler, too. Use a pan with a low lip, such as a cookie sheet.
When pouring the gelatin into a pan, make sure the pan is not angled but is horizontal so that the gel settles evenly. In addition, if you put the pan in a refrigerator, make sure the pan remains horizontal as it cools.
Cooling the gelatin in a refrigerator is a good idea in warm temperatures or high humidity. However, the plate should be allowed to return to room temperature for printing.
Depending on your location and the temperature, it may be difficult to use this technique unless you can work in an air-conditioned room. For instance, I attempted to teach this process in Greece, but with the high temperature and bright sun, the plates completely dissolved within a few minutes.
Because this process recently has become popular, a quick Google search will show the myriad of objects artists have been using. One of the great pleasures is experimenting with a variety of materials that can get a bit of ink on them and which later can be washed.
Inevitably, an object you’re working with may break the surface of the gelatin, creating a mark that will show on any other prints that you do. Not the end of the world! Gently rinse the ink off the surface of the gelatin with cool water. Try to run the water on the edge of the pan and not directly on the gelatin. Gently rub your gloved hand over the ink to clean the gelatin. Blot it dry with a paper towel.
In addition, you can utilize this rinse if you are changing colors and want to completely remove the color you had been working with.
In order to re-use the “plate” if it has started to lose its smooth surface, scrape the gelatin into a microwave-safe bowl with a splash of water, heat until the gelatin is liquefied, and re-pour and cool the mold.
Two other ways of using the gelatin plate are to simply to use the entire surface to draw or write on, creating one-of-a-kind prints, or to carve into the gelatin, as you would with a linoleum block or wood block, creating a matrix that can be printed over and over again.
A refrigerated gelatin plate can be stored with a tight cover in a refrigerator for about a week and can produce, literally, hundreds of prints. I used a gelatin plate into which I had carved, to make my holiday cards one year—I was able to print over 150 of them, each slightly different, in less than an hour.
You can clean the pan by pouring hot water on the gelatin to melt it.
The prints will dry quickly and can be printed over with a different color ink for a more complex image, or you can combine them with the processes in this book.
NOTES
1 Solomon R. Guggenheim Museum website: https://www.guggenheim.org/artwork/5207.
2 Robert Rauschenberg Foundation website: http://www.rauschenbergfoundation.org/artist/chronology.
3 Directorial mode is a term coined by A. D. Coleman in his still-interesting book of essays, Light Readings. Albuquerque: University of New Mexico Press, 2nd rev. ed., 1998. Respected critic Lucy Soutter used the term narrative photography in the 1990s. Both writers are describing photographs in which the pictures look “taken” but are actually set up and “made.”