
Deploying an OSGi bundle to be enabled on the Web can be a little more demanding than deploying a standard OSGi bundle containing business services, because it has to be managed by an underlying OSGi'fied web container. Throughout the book you've explored many variations to do just this, starting off with a stand-alone OSGi web bundle in Chapter 1 and continuing on with an examination of the use of the standard Web Archive (WAR) format employed in Java web applications in Chapter 2.
In Chapter 3, you got your first glimpse of how Spring-DM tackles the issue of deploying web-bound bundles containing servlets and JSP files, through a special hybrid-WAR called a shared services WAR that takes advantage of OSGi's features. Then in Chapter 5, you learned how the SpringSource DM Server makes web enablement of Spring and OSGi applications more manageable through artifacts like Web Modules and Platform Archives (PARs).
So what could you be possibly missing out on? Well, all the available configuration options and the little subtleties that weren't mentioned in the earlier chapters for enabling web applications using Spring and OSGi. This chapter will concentrate exclusively on the following web access features available in Spring-DM:
Using an alternate web container other than the default Apache Tomcat
Using Transport Layer Security (TLS)—HTTPS
Using Adobe's Flex in a web bundle
Simply installing a bundle containing servlets and JSP files in an OSGi environment does not mean it will be enabled on the Web. You need to take certain steps to make the underlying OSGi environment and bundle operate with the same JSP files and servlets you would typically use in a non-OSGi environment.
In Chapter 1 you took the longest and most limited route, which was to manually register OSGi's HttpService backed by a Jetty Java web server, as well as manually registering a servlet with this service. Not only was this a very tedious process, but it also lacked support for more common artifacts used in Java web applications like JSP files and JSTL.
In order to simplify the whole process for web applications in OSGi, Spring-DM allows you to use Java's de facto web application format: WAR. As you explored in the introductory sample on Spring-DM in Chapter 3, a WAR can be treated as an OSGi bundle so long as it contains the necessary OSGi manifest.
The most important aspect of Spring-DM treating a WAR as an OSGi bundle is that it delegates the processing of a WAR to a web container that also needs to be present in the same OSGi environment. In more technical terms, the web application creation and thread management is delegated to the web container.
This raises an interesting question. If a WAR is treated as an OSGi bundle, how does Spring-DM determine whether it needs to be delegated to a web container? This is done through Spring-DM's extender mechanism.
Recall from Chapter 4 that each bundle installed after Spring-DM's extenders have been activated will be inspected for the presence of certain trigger points. If a bundle is installed with a. war extension, it will automatically trigger Spring-DM's web extender to delegate the bundle for processing to the underlying web container.
The bootstrapping process of a bundle (WAR) in a web container, however, is very different from that in a non-OSGi'fied web container. In a non-OSGi'fied web container, the web container operates under a single class loader, making a series of classes available to all installed WARs and at the same time loading classes from each WAR into a separate child class loader. In an OSGi'fied web container this is not the case, since a web container is split into different bundles, each having its own class loader.
The advantage to this approach is that you can pick and choose what bundles (JARs) make up your web container, as in Chapter 1 when we used a single bundle or in Chapter 3 when we added more bundles to support things like JSP files and JSTL. The disadvantage, though, is that bundles (WARs) deployed in an OSGi'fied container need to take this into account.
Spring-DM delegates a bundle (WAR) to the underlying OSGi'fied web container for processing, but this does not mean the bundle (WAR) will automatically have access to the same resources as in a non-OSGi'fied web container. These resources are the following:
Java classes provided by the web container like
javax.servletandjavax.servlet.httpJava classes included in the bundle's own
/WEB-INF/classes/directoryJava libraries (JARs) included in the bundle's (WAR's) own
/WEB-INF/lib/directoryJava application classes containing business logic
This means that upon delegating a bundle (WAR) to an OSGi'fied container, the container will also need to contain the necessary OSGi headers to load these resources. Listing 8-1 illustrates what most bundles designed as web applications contain at a minimum.
Example 8-1. Import Java Servlet Packages
Import-Package: javax.servlet,
 javax.servlet.http,
 javax.servlet.resources
This last listing allows a bundle (WAR) access to Java's servlet packages that are available by default in non-OSGi'fied web containers, and which are by far the most common in web applications.
Additional packages available by default in a non-OSGi'fied web container can range from a JSP compiler, to JSTL libraries, to logging libraries. Adding these packages to a bundle's (WAR's) MANIFEST.MF file is dependent on the nature of the bundle itself (e.g., if a JSP file is used in a bundle, the page would require loading whatever JSP compiler classes/packages are used by the web container).
Note
In addition to using the Import-Package header, you can also use the Require-Bundle header as a shorter route to accessing a web container's classes/packages. See Chapter 6, which contains a more extensive explanation on the use of this header.
Besides the classes/packages a bundle (WAR) is required to import explicitly and which are typically provided by a web container, it may also be necessary to load classes/packages that are contained in the bundle (WAR) itself.
In a standard WAR, the directories /WEB-INF/classes and /WEB-INF/lib/ are inspected for the presence of classes and libraries, which are then loaded into its private class loader. This is part of the bootstrapping process for non-OSGi'fied web containers—see Chapter 3 's "Application Servers: Classpath Loaders" section for more background on this topic.
In an OSGi'fied web container, this bootstrapping process does not take place. The reason it does not take place is because OSGi does not require special directories to load classes; it simply loads classes from the root directory of the bundle or from whatever Import-Package statements are made in a bundle's MANIFEST.MF file. Nevertheless, if you wish to support backward compatibility with these standard WAR directories, OSGi allows you to do so using the Bundle-Classpath header as illustrated in Listing 8-2.
Example 8-2. Alternative Classpath Locations in a Bundle Using Bundle Classpath
Bundle-Classpath: .,
 WEB-INF/classes,
 WEB-INF/lib/math.jar,
 WEB-INF/lib/spelling.jar
This listing illustrates how the Bundle-Classpath header expands a bundle's classpath to additional directories or JAR files. The first statement,. (dot), indicates to load classes from the root directory of the bundle—OSGi's default—while the second value indicates to load classes from the WEB-INF/classes directory.
The last two statements specify the loading of two embedded JARs into the bundle's classpath. It should be noted, however, that embedding JARs in a bundle (WAR) is discouraged. Consider OSGi'fying and deploying embedded JARs as stand-alone bundles themselves, since this allows a JAR's classes to be shared among more bundles and takes advantage of things like versioning.
The only exception to embedding a JAR in a bundle (WAR) is if the licensing of a JAR prohibits its modification, which is a necessary step to OSGi'fying a JAR. Otherwise, embedded JARs should be avoided. See the section "Introducing the BND Tool" in Chapter 7 for instructions on OSGi'fying JARs, and review Chapter 6, which discusses versioning, in case you're embedding JARs to avoid class clashes.
Finally, we come to the application classes containing business logic. In a standard WAR, it's common practice to package everything an application requires in directories like /WEB-INF/classes and /WEB-INF/lib/ due to the sandbox class-loader nature of WARs. In an OSGi environment, though, application classes containing business logic are spread out across numerous bundles, not to mention application logic can also be available as OSGi services. So how does a bundle (WAR) access this application logic contained in other bundles?
Accessing classes in other bundles is very straightforward; it's simply a matter of using either Import-Package or Require-Bundle headers in a bundle's (WAR's) MANIFEST.MF file. However, accessing OSGi services also requires taking into account the delegation process of a bundle (WAR) to a web container.
Spring-DM always attempts to create an OSGi context—the OsgiBundleXmlApplication Context kind—on every bundle it inspects that contains Spring artifacts, something that is used to access and register services (Chapter 4 discuss this topic). In a bundle (WAR), though, given that thread management is delegated to the web container, this context is not visible unless explicitly specified.
Spring-DM solves this issue through a special context class named OsgiBundleXml WebApplicationContext—note the Web keyword in between Xml and Application—that hooks into a bundle's OSGi context (the OsgiBundleXmlApplicationContext kind) and which is configured in a web application's web.xml file. You've already used this approach earlier in the book, but Listing 8-3 illustrates the approach once more.
Example 8-3. OSGiBundleXMLWebApplicationContext Used in aweb.xml File
<context-param>
   <param-name>contextClass</param-name>
      <param-value>
org.springframework.osgi.web.context.support.OsgiBundleXmlWebApplicationContext
      </param-value>
</context-param>

<listener>
    <listener-class>
       org.springframework.web.context.ContextLoaderListener
    </listener-class>
</listener>
Note the use of the contextClass parameter with a value of OsgiBundleXmlWebApplication Context, as well as Spring's context configuration bootstrap listener org.springframework.web.context.ContextLoaderListener.
The <listener> declaration is typical of web.xml files used to configure Spring web applications. However, the contextClass value is Spring-DM (OSGi) specific. By using this special contextClass class, a bundle (WAR) can access OSGi services from other bundles, even though its thread management is delegated to the web container.
Once this context class is defined in a bundle's (WAR's) web.xml file, it would then be assigned to whatever web artifact requires use of OSGi services. For example, assuming you had a servlet in this same application, you would use a statement like the one in Listing 8-4 to make the servlet OSGi aware.
Example 8-4. OSGi-Aware Servlet Using OSGiBundleXMLWebApplicationContext in aweb.xml File
<servlet>

    <description>
         Pro Spring-OSGi MVC Dispatch Servlet
     </description>

     <display-name>DispatcherServlet</display-name>
      <servlet-name>helloworld</servlet-name>
           <servlet-class>
              org.springframework.web.servlet.DispatcherServlet
           </servlet-class>
            <load-on-startup>1</load-on-startup>
            <init-param>
              <param-name>contextClass</param-name>
              <param-value>org.springframework.osgi.web.context.support.
OsgiBundleXmlWebApplicationContext</param-value>
            </init-param>
       </servlet>
Note the servlet is assigned an <init-param> value pointing to the specially provided Spring-DM OsgiBundleXmlWebApplicationContext class. Once a servlet is initialized in this form, access to OSGi's context—the OsgiBundleXmlApplicationContext kind—is performed using the servlet's own configuration file.
For example, given this last servlet is named helloworld, it's left to the servlet's configuration file, which by default would be named helloworld-servlet.xml, to access OSGi's context. Listing 8-5 illustrates this servlet's configuration file.
Example 8-5. Servlet Configuration File Accessing OSGi Resources via Spring-DM
<?xml version="1.0" encoding="UTF-8"?>
<beans xmlns="http://www.springframework.org/schema/beans"
xmlns:xsi="http://www.w3.org/2001/XMLSchema-instance"
xmlns:osgi="http://www.springframework.org/schema/osgi"
xmlns:context="http://www.springframework.org/schema/context"
xsi:schemaLocation="http://www.springframework.org/schema/beans
http://www.springframework.org/schema/beans/
spring-beans.xsd
http://www.springframework.org/schema/context
http://www.springframework.org/schema/context/
spring-context-2.5.xsd
http://www.springframework.org/schema/osgi
http://www.springframework.org/schema/osgi/Â>
spring-osgi.xsd">
<osgi:reference id="helloWorldService"Â
interface="com.apress.springosgi.ch3.service.HelloWorldService"/>
<bean id="helloWorldController"
class="com.apress.springosgi.ch3.web.HelloWorldController">
<property name="helloWorldService" ref="helloWorldService"/>
</bean>
</beans>Note the use of Spring-DM's osgi namespace, as well as the use of Spring-DM's <reference> element, which imports an OSGi service that is later injected into the servlet. Were it not for the OsgiBundleXmlWebApplicationContext context class, it would not be possible for a bundle (WAR) to access any OSGi services.
One more configuration option available for web bundles (WARs) is the Spring-DM header Web-ContextPath. This header is used to indicate the web context—URL subdirectory—under which a bundle (WAR) should be deployed. Listing 8-6 illustrates the use of this header.
By placing this statement in a bundle (WAR), you are telling the underlying OSGi'fied web container to deploy this bundle under the web container's /chapter8app/ subdirectory (e.g., http://localhost:8080/chapter8app/).
If this value is not specified in a bundle (WAR), the same conventions as those for non-OSGi'fied web containers are applied: the web context is defined by the bundle's (WAR's) name (e.g., a bundle [WAR] named helloworld.war would be deployed under the URL http://localhost:8080/helloworld/).
Now that you are aware of the various concepts that need to be taken into account in order to deploy OSGi web bundles (WARs), I will move on to more specific topics related to web applications and how they need to be tackled in the context of Spring and OSGi.
The market offers various web containers that can be used to deploy web applications. In Chapter 1 you leveraged the Jetty web server (a.k.a. web container), and in the remainder of the book you've used the Apache Tomcat web container. Both of these web containers are fully supported by Spring-DM, which is to say Spring-DM can delegate the installation of bundles (WARs) to either of these web containers. By default, however, Spring-DM is configured to delegate bundles (WARs) to an instance of Apache Tomcat.
So how do you change Spring-DM to delegate to another web container? To better answer this question, I will describe the entire process related to Spring-DM using a web container.
Spring-DM's spring-osgi-web-extender.jar bundle starts the entire process. When this bundle is activated, it will attempt to locate an OSGi'fied Apache Tomcat instance. If it cannot find one, you will receive an error:
Exception in thread "WebExtender-Init"`java.lang.NoClassDefFoundError:
org/apache/CatalinaLoader
If an Apache Tomcat instance is found and all its class dependencies are resolved, Spring-DM will then attempt to locate an OSGi service registered as org.apache.catalina.Service. If it cannot find such a service, you will receive an error message:
org.springframework.osgi.OsgiException: Cannot create Tomcat deployer
If the previous steps succeed, your OSGi'fied web container along with Spring-DM will be ready to accept web bundles (WARs) and delegate them to the underlying web container. As you will note, besides having an OSGi'fied web container on hand, there are two steps necessary to use a different web container with Spring-DM:
Override Spring-DM's default extender value to use another web container.
Have a service registration bundle to bootstrap the OSGi'fied web container.
In order to override Spring-DM's default web container, it's necessary to use OSGi fragments. As outlined in Chapter 4 's "OSGi Fragments with Spring-DM" section, Spring-DM extenders expose a series of values that can be overridden using fragments (see Table 4-6 in Chapter 4).
In the particular case of Spring-DM's web extender, it uses the web container specified as the value of the warDeployer bean. The current values supported by this bean are
TomcatWarDeployerJettyWarDeployer
As their names imply, these support the Apache Tomcat and Jetty web containers, respectively.
Once a fragment overriding the warDeployer bean is installed, it will attach itself to Spring-DM's web extender bundle, so once activation occurs, an attempt to locate the explicitly configured OSGi'fied web container is performed.
In addition to overriding Spring-DM's default web container using a fragment, it's also necessary to bootstrap the OSGi'fied web container and register its core functionality as a service. If you think about the way a non-OSGi'fied web container operates, this step becomes more obvious.
An OSGi'fied web container consists of various pieces, or bundles, making it more modular than its non-OSGi'fied counterpart. However, these modules still need to work in sync to provide the desired functionality. On what port will the web container run? How do you configure something like a SSL certificate? What if you want to use subdomains? And more importantly, how are applications (WARs) linked to a web container? All these questions are resolved at the time a web container is bootstrapped.
Both Apache Tomcat and the Jetty web container rely on configuration files— server.xml and jetty.xml—to deal with the issues raised by these questions. So we need to use a special bundle containing a web container's configuration files, one that upon deployment will mimic the bootstrapping process and later register the web container as a service for the benefit of web bundles (WARs).
Much like the Spring-DM warDeployer bean, the creators of Spring-DM offer a prebuilt starter bundle to achieve this bootstrap process for both Apache Tomcat and the Jetty web container. In the next section, I will provide a hands-on example for all the steps just outlined, migrating Chapter 7 's application to use the Jetty web container instead of Apache Tomcat.
The first step in using the Jetty web container for Spring-DM applications consists of creating a fragment that targets Spring-DM's web extender bundle and modifies the default value for the warDeployer bean. In Chapter 4 you learned to create precisely this fragment. Listings 4-30 and 4-31 illustrated the two files that make up the fragment, whereas Listing 4-32 illustrated the layout for the fragment bundle. You can refer to these listings for further explanation on the particular layout and syntax this fragment needs to use.
To avoid the trouble of building this fragment using an Apache Ant script or some other tool, you can use the Spring-DM fragment jetty.web.extender.fragment.osgi-1.0.jar, included in Spring-DM's distribution under the lib directory. This fragment overrides Spring-DM's default web container setting and tells Spring-DM to use Jetty—it of course contains the exact layout as in Listing 4-32 and contents from Listings 4-30 and 4-31.
Next, you will need to install an OSGi'fied version of the Jetty web container. Since Jetty was one of the web containers to adopt OSGi, its core bundles already come OSGi'fied in its standard download—unlike Apache Tomcat. You can download the Jetty web container from the following link: http://dist.codehaus.org/jetty/.
However, even though Jetty's core bundles (JARs) are OSGi'fied, some of the dependencies included in its download are not. Therefore, you will need to download the corresponding OSGi'fied versions from the SpringSource Enterprise Bundle Repository, some of which are already used by Apache Tomcat. The bundles required to run the Jetty web container are the following:
Core bundles:
jetty-util-x.jar, jetty-x.jar, jetty-naming-x.jar, jetty-plus-x.jar, jetty-annotations.jar, and jetty-management-x.jar(all included in Jetty's downloadlibdirectory)Core dependency bundles:
java.annotation-x.jarandjavax.mail-x.jar(available at the SpringSource Enterprise Bundle Repository)JSP and servlet bundles:
javax.servlet-2.5.0.jar, javax.el-1.0.0.jar, javax.servlet.jsp-2.1.0.jar, org.apache.commons.el-1.0.0.jar, jasper.osgi-5.l5.25, org.apache.taglibs.standard-1.1.2.jar, and javax.servlet.jsp.jstl-1.1.2.jar(already used by Apache Tomcat, and downloaded from the SpringSource Enterprise Bundle Repository)
Note
Jetty uses the same JSP compiler, Jasper, as Tomcat.
In addition to the OSGi'fied Jetty web container, recall that you will also need a starter OSGi bundle to bootstrap the container and register it as a service. This bundle, named jetty.start.osgi-1.0.0.jar, can be found in the lib directory of the Spring-DM distribution. Once you have all these bundles, copy all of them to a subdirectory named jetty in the same deployment directory used to run the application created in Chapter 7. Next, you will need to modify the Eclipse Equinox configuration file config.ini inside the configuration directory, as reflected in Listing 8-7.
Example 8-7. Eclipse Equinox config.ini Using Jetty Web Server
org.osgi.framework.system.package=javax.naming,javax.naming.directory,javax.naming
.spi,javax.management,javax.management.loading,javax.management.modelmbean,javax.man
agement.openmbean,javax.management.remote,javax.net,javax.rmi,javax.rmi.CORBA,org.om
g.CORBA,org.omg.CORBA.portable,org.omg.CORBA_2_3.portable,javax.net.ssl,javax.crypto
,javax.crypto.interfaces,javax.crypto.spec,javax.security.auth,javax.security.sasl,j
avax.security.auth.spi,javax.security.auth.callback,javax.security.auth.login,javax.
security.cert,javax.xml.parsers,javax.xml.xpath,javax.xml.transform.sax,javax.xml.tr
ansform.dom,javax.xml.namespace,javax.xml.transform,javax.xml.transform.stream,javax
.xml.validation,org.xml.sax,org.xml.sax.helpers,org.xml.sax.ext,com.sun.org.apache.x
alan.internal,com.sun.org.apache.xalan.internal.res,com.sun.org.apache.xml.internal.
utils,com.sun.org.apache.xpath.internal,com.sun.org.apache.xpath.internal.jaxp,com.s
un.org.apache.xpath.internal.objects,com.sun.org.apache.xml.internal,org.w3c.dom,org .w3c.dom.traversal,org.w3c.dom.ls,javax.sql,javax.transaction,sun.misc osgi.bundles=logging/com.springsource.ch.qos.logback.core-0.9.9.jar@start, logging/com.springsource.ch.qos.logback.classic-0.9.9.jar, logging/com.springsource.slf4j.api-1.5.0.jar@start, logging/com.springsource.slf4j.org.apache.commons.logging-1.5.0.jar@start, logging/com.springsource.slf4j.org.apache.log4j-1.5.0.jar@start, db/com.springsource.javax.persistence-1.0.0.jar@start, db/com.springsource.org.apache.commons.dbcp-1.2.2.osgi.jar@start, db/com.springsource.javax.transaction-1.1.0.jar@start, db/com.springsource.org.apache.commons.pool-1.3.0.jar@start, db/com.springsource.com.mysql.jdbc-5.1.6.jar@start, jetty/com.springsource.javax.servlet-2.5.0.jar@start, jetty/com.springsource.javax.el-1.0.0.jar@start, jetty/com.springsource.javax.servlet.jsp-2.1.0.jar@start, jetty/com.springsource.org.apache.commons.el-1.0.0.jar@start, jetty/jasper.osgi-5.5.23-20080305.122359-4.jar, jetty/com.springsource.org.apache.taglibs.standard-1.1.2.jar, jetty/com.springsource.javax.servlet.jsp.jstl-1.1.2.jar, jetty/jetty-util-6.1.11.jar@start, jetty/jetty-6.1.11.jar@start, jetty/com.springsource.javax.mail-1.4.1.jar@start, jetty/jetty-naming-6.1.11.jar@start, jetty/jetty-plus-6.1.11.jar@start, jetty/com.springsource.javax.annotation-1.0.0.jar@start, jetty/jetty-annotations-6.1.11.jar@start, jetty/jetty-management-6.1.11.jar@start,jetty/jetty.start.osgi-1.0.0.jar@start,jetty/jetty.web.extender.fragment.osgi-1.0.0.jar,springcore/com.springsource.edu.emory.mathcs.backport-3.0.0.jar@start, springcore/com.springsource.org.apache.commons.collections-3.2.0.jar@start, springcore/com.springsource.net.sf.cglib-2.1.3.jar@start, springcore/com.springsource.org.aopalliance-1.0.0.jar@start, springcore/org.springframework.core-2.5.4.A.jar@start, springcore/org.springframework.beans-2.5.4.A.jar@start, < Followed by more Spring bundle >
Note the various bundle statements and those that are to be installed from the jetty subdirectory. The installation order for each bundle is relevant—just like for Apache Tomcat—but notice the two bundles in bold. The jetty.start.osgi-1.0.0.jar bundle is the one used to bootstrap the Jetty web container, whereas the jetty.web.extender.fragment.osgi-1.0.0.jar bundle is the fragment used to override Spring-DM's default web container, Apache Tomcat.
It's critical that this last fragment be installed prior to Spring-DM's web extender. In this manner, once Spring-DM's web extender is installed, the fragment will be attached immediately, and upon activation the extender will in turn delegate to a Jetty web container instance.
Further note the line at the top of the file that starts with org.osgi.framework.system.packages. This is a special requirement for running the Jetty web container, which further illustrates OSGi's more stringent class-loading approach.
The Jetty web container relies on some classes that, even though they are included in Java SE, are optional to the architecture set forth by the Eclipse Equinox OSGi implementation. These classes/packages are included in the rt.jar JAR inside Java SE's jre/lib directory. In Eclipse Equinox it's necessary to explicitly import such classes/packages using this configuration parameter.
With this new configuration file in place, starting an Eclipse Equinox instance with the application designed in the previous chapter would deliver pages served by the Jetty web container. At first sight it won't be evident, but if you attempt to access a nonexistent URL, you will see a "404 Page Not Found" error with the legend "Powered by Jetty://."
Next, I will describe SSL/TLS, which is one of the most common security features used by web applications in general, as it relates to OSGi.
Transport Layer Security and its predecessor, Secure Sockets Layer (SSL),[20] set forth the mechanisms to access applications in a secure fashion over the Web. Though SSL is the predecessor to TLS, you will more often hear the term SSL used interchangeably with TLS to describe the process of securing web application. Given this fact, and considering this is not a security book exploring the subtleties between SSL and TLS, I will also just use the term SSL from this point forward.
For end users, SSL translates into an https:// site—note the s for security—that allows them to access the application in a secure fashion. For application developers, this entails installing a security certificate, as well as configuring a web container to support SSL.
Given the different installation processes for OSGi'fied and non-OSGi'fied containers, using SSL with an OSGi'fied web container also requires taking different steps from those used for non-OSGi'fied containers. Next, I will describe these steps, which use Apache Tomcat, as they relate to the application you created in Chapter 7.
The first thing you need to do is create a web container configuration file, just like you would for a non-OSGi'fied web container, to support SSL. In the case of Apache Tomcat, this process consists of adding a new <Connector> element to enable SSL to the server.xml configuration file. Listing 8-8 illustrates this.
Example 8-8. Apache Tomcat server.xml Using SSL
<Server port="8005" shutdown="SHUTDOWN">
  <Service name="Catalina">

    <Connector port="8080"/>


    <Connector port="8443" minProcessors="5" maxProcessors="75"

         enableLookups="true" disableUploadTimeout="true"

         acceptCount="100" debug="0" scheme="https" secure="true"

         clientAuth="false" sslProtocol="TLS"/>


    <Engine name="Catalina" defaultHost="localhost">
      <Host name="localhost" unpackWARs="false" autoDeploy="false"
       liveDeploy="false" deployOnStartup="false"
       xmlValidation="false" xmlNamespaceAware="false"/>
    </Engine>

  </Service>
</Server>
Note this last listing has two <Connector> elements, one with the port attribute value of 8080, which corresponds to the nonsecure address on which the web container will run, and another with the port attribute value of 8443, which corresponds to the secure address on which the web container will run. The remainder of the listing represents the most basic configuration file for an Apache Tomcat web container.
The next thing you need to do is create a JKS keystore. A keystore is a Java SE security concept that is central to operating SSL, since the keystore is where Apache Tomcat will look up all the required credentials to enable SSL.
To expedite the setup process, I will illustrate how to use the keytool utility—part of Java SE—to create a keystore value directly (known as a dummy SSL certificate). Normally, in order to use SSL on a production site, you need to create a Certificate Signing Request (CSR) containing your company's information and site domain, send this information to a signing authority—a commercial service—for authentication, and upon approval convert it into a JKS keystore.
Listing 8-9 illustrates the simplest steps you need to take to create a JKS keystore using the keytool utility.
Note
The keytool utility is available in the bin directory of every Java SE JDK.
Example 8-9. JKS Keystore-Generating Sequence Using the keytool Utility
[web@localhost ~]$ keytool -genkey -alias tomcat -keyalg RSA
Enter keystore password:  changeit
What is your first and last name?

  [Unknown]:  Daniel Rubio
What is the name of your organizational unit?
  [Unknown]:  Editorial
What is the name of your organization?
  [Unknown]:  Apress
What is the name of your City or Locality?
  [Unknown]:  Berkeley
What is the name of your State or Province?
  [Unknown]:  CA
What is the two-letter country code for this unit?
  [Unknown]:  US
Is CN=Daniel Rubio, OU=Unknown, O=Apress, L=Berkley, ST=CA, C=US correct?
  [no]:     yes
Enter key password for <tomcat>
        (RETURN if same as keystore password):    changeit
[web@localhost ~]$
This listing will generate a JKS keystore for Apache Tomcat—note the flag alias tomcat upon invocation. The series of questions represent information that would otherwise be used to generate a CSR to obtain a certificate. Also note the use of the password value changeit, which is the default password used by Apache Tomcat to access a JKS keystore.
This process will generate a file named .keystore—in binary format—under the home directory of the user performing the operation.
Note
Apache Tomcat will always look for a .keystore file in the home directory of the owner running the web container, as well as attempt to access it using the changeit password. If you use a different location and password, you need to configure SSL (Listing 8-8 ' s <Connector> element) with the additional attributes keystoreFile and keystorePass to specify an alternative location for a .keystore file and password, respectively.
Once you have the .keystore file in place, you just need to fulfill a dependency for using SSL with Apache Tomcat. The tomcat-util.jar file includes a series of classes used by Apache Tomcat SSL, but we haven't had a need for this bundle (JAR) yet. Unfortunately, this bundle is not available from the SpringSource Enterprise Bundle Repository where you downloaded other Apache Tomcat files.
In order to fulfill this dependency, you will need to download a non-OSGi'fied Apache Tomcat distribution from http://archive.apache.org/dist/tomcat/tomcat-5/ and OSGi'fy this JAR yourself using BND.
The tomcat-util.jar file is located under the server/lib directory of the Apache Tomcat download. Listing 8-10 illustrates the instruction to convert this file to an OSGi'fied JAR using the BND utility. Chapter 7 contains a more detailed look at BND.
Example 8-10. . OSGi'fying tomcat-util.jar Using BND
java -jar bnd-0.0.249.jar wrap -output tomcat-util-osgi.jar tomcat-util.jar
This last statement invokes BND on the tomcat-util.jar JAR and outputs a bundle named tomcat-util-osgi.jar with the necessary MANIFEST.MF file needed to operate under an OSGi environment.
You now have all the parts necessary to use SSL with Apache Tomcat, but you still need to take one additional step to enable SSL on an OSGi'fied version of the web container. The Apache Tomcat configuration using SSL (Listing 8-8) needs to be packaged in a bundle, though not just any bundle. It needs to be a fragment targeting Apache Tomcat's starter bundle.
Recall that OSGi'fied web containers in Spring-DM are started by special bundles containing default configurations that later register the web containers as services. By using a fragment, a new SSL-enabled configuration can be attached to a starter bundle that effectively overrides the default configuration.
Listing 8-11 illustrates the layout for this fragment bundle, and Listing 8-12 shows the accompanying MANIFEST.MF file for the fragment bundle.
Example 8-11. Fragment Structure Used to Install SSL
+META-INF-+
                   |
                   +-MANIFEST.MF
+conf-+
           |
           +-server.xml
Example 8-12. MANIFEST.MF for Fragment Used to Install SSL
Bundle-Version: 1.0
Bundle-SymbolicName: com.apress.springosgi.ch8.ssl
Fragment-Host: org.springframework.osgi.catalina.start.osgi
Bundle-Name: HelloWorld Spring-OSGi SSL Certificate Configuration
Bundle-Vendor: Pro Spring-OSGi
Bundle-ManifestVersion: 2
The layout consists of two directories:
The standard
META-INFdirectory containing a bundle'sMANIFEST.MFfile.The conf directory containing the new
server.xmlconfiguration file for Apache Tomcat (Listing 8-8). Note the conf directory is the same directory as the one used by a non-OSGi'fied Apache Tomcat web container to locate its configuration file.
The MANIFEST.MF file used by the fragment targets a bundle with symbolic name value of org.springframework.osgi.catalina.start.osgi. This last bundle is precisely the starter bundle provided by Spring-DM that bootstraps an OSGi'fied version of Apache Tomcat. Therefore, once the Spring-DM server attaches this fragment to this host bundle, it will use the new configuration file employing SSL (Listing 8-8) to bootstrap the OSGi'fied web container. However, it will now also start an https:// version of the same server.
Finally, you need to take care of the installation for the SSL fragment. Since this fragment will override the default configuration files in the startup bundle, it needs to be installed prior to this bundle, so that upon activation the new configuration has already been attached. Listing 8-13 illustrates the relevant section for the Eclipse Equinox config.ini file as it pertains to Chapter 7 's sample application, but now using SSL.
Example 8-13. Eclipse Equinox config.ini Using SSL
tomcat/com.springsource.javax.servlet.jsp.jstl-1.1.2.jar@start, tomcat/catalina.osgi-5.5.23-SNAPSHOT.jar@start,tomcat/tomcat-util-osgi.jar@start,tomcat/tomcat-ssl-osgi.jar,tomcat/catalina.start.osgi-1.0-20080425.161832-4.jar@start, springcore/com.springsource.edu.emory.mathcs.backport-3.0.0.jar@start, springcore/com.springsource.org.apache.commons.collections-3.2.0.jar@start, < Followed by more Spring bundles >
In this last listing, the tomcat-util-osgi.jar file represents the OSGi'fied version of tomcat-util.jar—the output from Listing 8-10 and a dependency for using SSL--whereas tomcat-ssl-osgi.jar is the fragment represented in Listing 8-11. Note that both are installed prior to the starter bundle catalina.start.osgi-1.0.0.jar, and therefore the SSL server.xml configuration file is used at the time the web container is bootstrapped.
If you run this new configuration with the provided application, you would need to visit the URL https://localhost:8443/ in order to access the secure version of the application. Upon visiting this address, be advised you will be presented with ominous warnings from all browsers, indicating you are about to enter an insecure site even though you are using https://. Ignore such warnings and proceed.
These last warnings are because the backing JKS keystore was created via a dummy SSL certificate using keytool. To avoid these warnings, the JKS keystore would have to be created using a signed certificate that coincided with the domain being accessed.
In addition, you may see a few errors or warnings not related to OSGi. If you see the error message "Keystore was tampered with, or password was incorrect," this indicates Apache Tomcat was not able to access the keystore using the default or provided password value and location. You will need to erase and re-create the JKS keystore file appropriately in order for Apache Tomcat to enable SSL access.
Another non-OSGi related warning you may observe is a ClassNotFoundException for the classes PureTLSImplementation and JSSE15Factory. These are known warnings even for non-OSGi versions of Apache Tomcat[21] and can be ignored since they have no effect on accessing an application using SSL.
This concludes looking at the steps needed to enable SSL on an OSGi'fied version of Apache Tomcat. Next, I will discuss another topic that has enjoyed recent success alongside Java web applications: the presentation format Flash generated through Flex.
Web interfaces are generally designed around a mix of languages that include HTML, JavaScript, and Cascading Style Sheets (CSS), just to name a few. These languages are what most JSP files and servlets generate once they are processed on the server side. Other approaches like Flash were created to deal with some of the limitations imposed by these languages and deliver what are now known as Rich Internet Applications (RIAs).The appeal for using technologies like Flash stems from both its unique feature set and outright deficiencies in the staple languages—HTML, JavaScript, and CSS—used by most web applications. Some of these areas include the following:
Fragmented support for HTML, JavaScript, and CSS across browsers: This can cause problems ranging from layout discrepancies to browser crashes. Creating a single web interface that will behave equally across different browser vendors and versions is nearly impossible. Flash uses its own runtime across all browsers guaranteeing streamlined behavior.
Better support for manipulating large amounts of data in a browser: Browsers and with it languages like HTML and JavaScript were never intended to manipulate or process data in large amounts, and doing so often leads to unresponsive applications. Flash uses its own runtime, which is more robust for these purposes.
Greater feature set of display elements: Flash was designed to provide more visual effects than a combination like HTML and CSS. Its feature set has long been the basis for animations and game-like behaviors for applications on the Web.
Real-time communication between browser and server: The stateless nature of web applications has never made time-sensitive applications easy to design. And though techniques like AJAX and Comet have given a lift to the classic trio of HTML, JavaScript, and CSS, Flash's runtime has long been designed to solve this type of problem.
Until recently though, Flash, which is perhaps synonymous with the RIA acronym, has lacked a programmatic approach, much like JSP's programmatic approach to creating HTML, JavaScript, and CSS interfaces. This has changed, however, with the appearance of Flex.
The following list summarizes some key points about Flex:[22]
Flex applications are Flash applications:
Flex is a programmer-centric way to create Flash-based RIAs.
Flex applications are rendered using Flash Player 10.
Like all Flash RIAs, Flex SWF files are processed by the client, rather than the server.
The Flex framework contains the predefined class libraries and application services necessary to create Flex applications:
The framework is available in a free SDK and the Eclipse-based IDE named Flex Builder.
The framework includes a compiler that is available as a stand-alone tool or as part of Flex Builder.
The class libraries and application services provide developers with standard components and tools for quick application development. Standard UI components can be extended and customized.
Flex applications are written using MXML and/or ActionScript:
MXML is an XML-based markup language that is primarily used to lay out application display elements.
ActionScript is an ECMAScript-compliant object-oriented programming language that is primarily used for application logic.
MXML and ActionScript code are compiled into binary SWF files.
From this brief summary, you will probably realize Flex is a pretty extensive topic, and there are indeed entire books written on the subject alone. So be advised that even though the following example is a very basic Flex-based interface designed to integrate with Spring and OSGi, you may need to consult other resources to get a stronger grasp for its concepts.
Flex applications start off as MXML files containing markup language. These MXML files are always transformed (compiled) into SWF files—Flash files—that represent the final delivery format, which is executed on end users' browsers. The process for compiling an MXML file into a SWF file can be done either manually, using a compiler provided by the Flex SDK, or automatically once the first request is made to a particular MXML file—a process that is strikingly similar to JSP files, which are compiled on the first request. No matter the approach used, SWF (Flash) files will always be delivered to end users' browsers and never MXML (Flex) files.
Figure 8-1 shows a rendered version of a Flash interface (generated by Flex) used by this chapter's application—the same application as in Chapters 5 and 7.
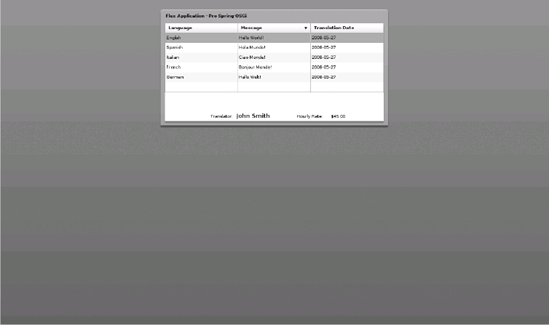
Notice how the layout looks sharper than a standard HTML and CSS interface. Additionally, notice how the column headers contain small arrows; if a user clicks any of these arrows, the data is sorted according to the column values. In addition, each time a user selects a line, it's automatically demarcated with another color.
This last sorting feature illustrates a powerful mechanism that is embedded in Flash's runtime engine. Incorporating this sorting behavior in an HTML and JavaScript interface would not only require a lot more work, but also be more error prone given the discrepancies between browser versions. This also applies to the coloring scheme, which can be troublesome to design using something like HTML and CSS.
But let's not digress on Flash's strong points, rather let's analyze how this interface is made up using MXML markup. Listing 8-14 illustrates the markup that makes up Figure 8-1.
Example 8-14. Flex statichome.mxml Using XML Data Sources
<?xml version="1.0" encoding="utf-8"?>

<mx:Application xmlns:mx="http://www.adobe.com/2006/mxml"
  layout="vertical" horizontalAlign="center">

    <mx:CurrencyFormatter id="cFormat" precision="2" currencySymbol="$"
useThousandsSeparator="true"/>
 <mx:Model id="messages" source="/data/messages.xml"/>
 <mx:XML id="translators" source="/data/translators.xml"/>
<mx:Panel width="530" layout="absolute"
title="Flex Application - Pro Spring-OSGi">
<mx:Label horizontalCenter="0" y="1"
text="HelloWorld Messages"
fontSize="16" fontWeight="bold"/>
<mx:DataGrid id="hwSpringFlex" width="510"
dataProvider="{messages.helloworld}">
<mx:columns>
<mx:DataGridColumn headerText="Language" width="75">
<mx:itemRenderer>
<mx:Component>
<mx:Label text="{data.language}"/>
</mx:Component>
</mx:itemRenderer>
</mx:DataGridColumn>
<mx:DataGridColumn headerText="Message" width="75">
<mx:itemRenderer>
<mx:Component>
<mx:Label text="{data.message}"/>
</mx:Component>
</mx:itemRenderer>
</mx:DataGridColumn>
<mx:DataGridColumn headerText="Translation Date" width="75">
<mx:itemRenderer>
<mx:Component>
<mx:Label text="{data.translationDate}"/>
</mx:Component>
</mx:itemRenderer>
</mx:DataGridColumn>
</mx:columns>
</mx:DataGrid>
<mx:Label x="105" y="210" text="Translator:"/>
<mx:Label x="165" y="207"
fontWeight="bold" fontSize="13" id="lblTranslator"
text="{translators.translator.(@id ==
hwSpringFlex.selectedItem.translatorID).name}"/>
<mx:Label x="305" y="210" text="Hourly Rate:"/>
<mx:Label x="385" y="210" id="lblHourlyRate"
text="{cFormat.format(translators.translator.(@id ==
hwSpringFlex.selectedItem.translatorID).hourlyRate)}"/>
</mx:Panel>
</mx:Application>The first thing to note is how this MXML file obtains its initial data. Notice how the elements <mx:Model> and <mx:XML> point toward XML files that are further referenced by ID inside the <mx:DataGrid> element. These XML files represent the initial data set for the application and are located alongside the MXML file in either a development environment or server-side space.
Once compilation of the MXML file takes place, creating a SWF (Flash) file, the XML files or any other resources referenced inside the MXML will be attached to the SWF file, creating a self-contained application that will be sent to a user's browser. This is a critical step to understanding the Flash/Flex architecture.
On the initial response by the server to a browser, much, if not all, of the application's logic and data are sent to a user. Depending on a user's interaction, the (now) Flash application might call back to obtain more data, which is where the integration aspect with Spring comes into the picture.
But before elaborating on the particularities of Flex and Spring integration, it's important to provide more background on this call-back mechanism. The call-back mechanism initially starts off as MXML snippets declared on the main interface, which once compiled and sent to the browser (as a SWF file) will then perform the necessary calls to a server's endpoint.
The call-back snippets along with the server-side endpoints that process these requests can be of various types. A Flash application can call back using any of the following methods:[23]
It can use the
HttpServicecomponent to send HTTP requests to a server and consume the response. Although theHTTPServiceis typically used to consume XML, it can be used to consume other types of responses. The FlexHTTPServiceis similar to theHttpReXMLquestcomponent available in AJAX.It can use the
WebServicecomponent to invoke SOAP-based web services.It can use the
RemoteObjectcomponent to directly invoke methods of Java objects deployed in your application server, and consume the return value. The return value can be a value of a primitive data type, an object, a collection of objects, an object graph, etc. In distributed computing terminology, this approach is generally referred to as remoting. This is also the terminology used in Spring to describe how different clients can access Spring beans remotely.In addition to the RPC-type services described previously, the Flex Data Management Services provide an innovative and virtually code-free approach to synchronizing data between the client application and the middle tier.
The first two approaches operate on server endpoints that are not directly related to the use of Spring. Under these circumstances, Spring components or Spring-DM services need to be wrapped as REST or SOAP services. Furthermore, using any of these two XML-based callback approaches lacks the more sophisticated Flash capabilities like real-time communication and synchronization.
The remaining two methods take full advantage of Flash's capabilities. However, this also requires the deployment of Flex data services. Flex data services is a group of JARs and configuration files especially designed to attend callback methods performed by Flash clients—and in fact, Flash data services are often quoted as a server itself (Flash server).
The use of Flex data services or Flash server leads us to the first integration issues with Spring. If a Flex data service processes callback methods from Flash clients, how does a Flex data service access a Spring component or Spring-DM service? This consists of multiple steps.
The first thing that needs to be done is configure Flex data services to access Spring components. For this purpose, a special Spring factory[24] is used to instantiate Spring components and integrate them with Flex data services. This factory is configured in Flex's data services services-config.xml configuration file, as illustrated in Listing 8-15.
Example 8-15. Flex Data Services Configured with Spring Factory in services-config.xml
<factories>
<factory id="spring" class="flex.samples.factories.SpringFactory">
</factories>
This last statement prepares Flex data services to access Spring components. Next, it's necessary to indicate the specific Spring components that will be accessible from Flex data services and at what endpoint they will be accessible. This is achieved in Flex's data services' remoting-config.xml configuration file. Listing 8-16 illustrates the remoting-config.xml configuration file for a bean named HelloWorld.
Example 8-16. Spring Bean Configured to Be Accessed As a Flex Data Service in remote-config.xml
<destination id="helloWorldEndpoint">
      <properties>
          <factory>spring</factory>
          <source>helloWorldBean</source>
      </properties>
</destination>
This last listing defines the destination helloWorldEndpoint. Notice how the endpoint declares the <factory> element pointing to the factory ID defined in Listing 8-15, and the <source> element points to a helloWorldBean value. The helloWorldBean value represents an actual bean configured in a web application's Spring context inside the applicationContext.xml file.
Once the Spring factory and individual Spring components are configured in Flex data services, any callback method can be invoked directly on a Spring component from Flex clients. The actual MXML snippet performing the callback to a Spring-bound Flex data service component would look like the one in Listing 8-17.
Example 8-17. Flex MXML Snippet Remoting Call on a Spring-Backed Flex Data Service
<mx:RemoteObject id="hw" destination="helloWorldEndpoint"/>
<mx:Button label="Say HelloWorld" click="hw.hello()"/>
<mx:TextInput id="SayingHello" text="{hw.message}"/>
Notice how the call is made to the destination helloWorldEndpoint, which is where a Flex data service backed by a Spring bean was configured. Upon a request to this endpoint, which is triggered by a user clicking a button (<mx:Button>), Flex data services would invoke the hello() method belonging to the Spring bean, which given the previous configuration would obtain its data directly from a Spring component or Spring-DM service. Finally, the resulting value is displayed through the RemoteObject ID hw using the <mx:TextInput> element.
Knowing the steps needed to integrate Spring and Flex, we can now move on to OSGi's specific configuration as it relates to Flex. For the purpose of this chapter's application, the web bundle (WAR) will have Flex's data services embedded in its structure. Listing 8-18 illustrates the layout for this bundle.
Example 8-18. Flex Data Services Embedded in a Web Bundle (WAR)
+META-INF-+
                   |
                   +-MANIFEST.MF

+WEB-INF-+
                  |
                  +-web.xml
                  |
                  +-server.xml
                  |
                      +-flex-+
                             |
                             |-services-confix.xml
                             |
                             |-remoting-config.xml
                             |
                             |-(More Flex data services configuration files and JAR)
Notice how the WEB-INF directory contains a flex directory; it's this directory which holds Flex data services' configuration files and JARs. This same approach is typically used for deploying Flex data services in a non-OSGi environment. Another alternative can be to deploy Flex data services in their own WAR, but this setup would go beyond the scope of this book.
Next, it's necessary to take into account class/package visibility. Flex data services relies on several classes/packages for its proper operation. In order for them to be accessible in an OSGi environment, it's necessary to explicitly declare them in a web bundle's (WAR's) MANIFEST.MF file. Listing 8-19 illustrates this MANIFEST.MF file for a web bundle (WAR) using Flex/Flash.
Example 8-19. MANIFEST.MF File for a Web Bundle (WAR) Using Flex/Flash
Bundle-Version: 1.0 Bundle-SymbolicName: com.apress.springosgi.ch8.web Bundle-Name: HelloWorld Spring-OSGi Web Bundle-Vendor: Pro Spring-OSGi Bundle-Classpath: ., WEB-INF/classes,WEB-INF/flexlibs/flex-messaging-common.jar,WEB-INF/flexlibs/flex-messaging.jar,WEB-INF/flexlibs/flex-messaging-opt.jar,WEB-INF/flexlibs/flex-messaging-req.jar,WEB-INF/flexlibs/flex-spring-factory.jar,WEB-INF/flexlibs/flex-bootstrap.jar,Import-Package: com.apress.springosgi.ch8.model;version="1.0.0", com.apress.springosgi.ch8.service;version="1.0.0", javax.management, javax.naming, javax.xml.parsers, javax.xml.transform, javax.xml.transform.stream, javax.xml.transform.dom, org.xml.sax, org.xml.sax.helpers, org.xml.sax.ext, org.w3c.dom, org.w3c.dom.traversal, org.springframework.core.io, org.springframework.beans, org.springframework.beans.factory, org.springframework.context, org.springframework.beans.factory.xml, org.springframework.beans.factory.support, javax.servlet;version="2.5.0",
javax.servlet.http;version="2.5.0",
 javax.servlet.resources;version="2.5.0",
 org.springframework.aop;version="2.5.4",
 org.springframework.core;version="2.5.4",
 org.springframework.ui;version="2.5.4",
 org.springframework.stereotype;version="2.5.4",
 org.springframework.context.support;version="2.5.4",
 org.springframework.web.context;version="2.5.4",
 org.springframework.web.context.support;version="2.5.4",
 org.springframework.web.servlet;version="2.5.4",
 org.springframework.web.servlet.handler;version="2.5.4",
 org.springframework.web.servlet.mvc;version="2.5.4",
 org.springframework.web.servlet.view;version="2.5.4",
 org.springframework.web.bind.annotation;version="2.5.4",
 org.springframework.osgi.service.importer;version="1.2.0",
 org.springframework.osgi.web.context.support;version="1.2.0",
 org.springframework.osgi.service.importer.support;version="1.2.0"
Web-ContextPath: /
Notice this last listing relies on the Bundle-Classpath header and has values pointing toward various Flex-provided JAR files. This allows the bootstrapping of Flex data services to take place without ClassNotFoundException errors. Further note how the Import-Package values differ from other web bundles (WARs) used in the book; the lack of JSP and JSTL packages and the addition of javax.management and javax.naming are particularities due to the Flex/Flash-based nature of the bundle.
Recall from the start of the chapter that I mentioned embedding JARs in a web bundle (WAR) was discouraged, but this last listing illustrates the exception to this rule: licensing. The JARs on which Flex data services depend are proprietary, therefore it's against their licensing scheme to modify them. This concludes coverage of the topic of Flex with Spring and OSGi, as well as the overall topic of web applications using Spring and OSGi.
In this chapter you started by learning how Spring-DM determines whether a bundle is web bound and needs to be delegated to an OSGi'fied web container. Next, you learned the necessary provisions a web bundle (WAR) needs to take into account for it to be successfully deployed in an OSGi'fied web container.
You then explored how Spring-DM delegates web bundles (WAR) to an underlying OSGi'fied web container for processing and how this influences the brand selected to deploy web bundles into. Immediately after, you took to the task of switching Spring-DM's default web container—Apache Tomcat—in favor of the Jetty web container.
Next, you learned how to enable SSL on an OSGi'fied web container, seeing how it's possible to create secure access for Spring/OSGi applications. This last step also illustrated how both Spring-DM's out-of-the-box supported web containers—Apache Tomcat and Jetty—can be configured to support more sophisticated features like their non-OSGi'fied versions through the use of OSGi fragments.
Finally, you learned about Flex in the context of Spring and OSGi. You explored how to use this technology inside web bundles (WAR) by embedding Flex data services, allowing remote Flash clients to access Spring components backed by OSGi services.
[20] Wikipedia, "Transport Layer Security," http://en.wikipedia.org/wiki/Transport_Layer_Security
[21] http://mail-archives.apache.org/mod_mbox/tomcat-users/200512.mbox/%[email protected]%3E
[22] http://www.adobe.com/products/flex/overview/
[23] Christophe Coenraets, "Using Flex with Spring,"http://coenraets.org/flex-spring/
[24] http://www.adobe.com/cfusion/exchange/index.cfm?event=extensionDetail&loc=en_us&extid=