
Congratulations for making it this far. As you worked your way through the book, you've seen many different ways to load and access content inside Flash and Flex applications. In the previous chapter, you even saw how to work with XML data using data components and ActionScript 2.0 in Flash Professional.
This chapter describes how to update XML content in SWF applications by using ActionScript 3.0. You'll see how to change the values of elements as well as the structure of loaded XML content.
Earlier in the book, in Chapter 3, you learned about the properties, methods, and events of the XML class. You saw that some of the methods can modify the structure of an XML object. In this chapter, we will look more closely at those methods. Specifically, this chapter covers changing the values of nodes and attributes; adding, duplicating, and deleting nodes; modifying namespaces; and changing element and attribute names.
As with the other chapters, you can download the resource files from http://www.friendsofed.com.
Note that the XML structure changes made in the examples in this chapter won't affect any external data source. Within this chapter, the changes will occur only within the SWF application that you create. In order to send modified content to the server, you'll need to use the approaches shown in the next chapter.
I think it helps you to work through the explanations in this chapter in Flash or Flex. Before we get started, you might find it useful to set up your testing files.
Before we dive into the content of this chapter, let's take a moment to set up the Flash and Flex applications for testing the code samples in the next few sections. As in previous chapters, I've used simple procedural code for the Flash examples and class-based code for the Flex examples.
We're using the file authors.xml for these examples. It contains information about several authors and the books that they've published.
For the Flash examples, create a new Flash ActionScript 3.0 document and load the authors.xml document into an XML object called authorsXML. You can use the following code to load the external content into Flash:
var authorsXML:XML;
var request:URLRequest = new URLRequest("authors.xml");
var loader:URLLoader = new URLLoader();
initApp();
stop();
function initApp():void {
  loader.addEventListener(Event.COMPLETE, completeHandler);
  loader.load(request);
}
function completeHandler(e:Event):void {
  authorsXML = XML(e.target.data);
  trace(authorsXML);
}
You'll replace the trace() action in the completeHandler() function with the ActionScript lines shown in the following examples.
You can also work through the code samples with Flex Builder. Create a new Flex project and application file with the names of your choosing. Create an assets folder in the src folder of your Flex project. Add the XML document authors.xml to this folder.
For simplicity, use an <mx:XML> element to load the XML content. Add this element to your application file and set the source property to the authors.xml file as shown here:
<mx:XML id="authorsXML" source="assets/authors.xml" />
Add the following creationComplete attribute to the <mx:Application> element:
creationComplete="initApp(event)"
Add the following code block:
<mx:Script>
  <![CDATA[
    import mx.events.FlexEvent;
    private function initApp(e:FlexEvent):void {
      //add testing lines here
    }
  ]]>
</mx:Script>
You'll add the code examples inside the initApp() function. Replace the //add testing lines here comment with the code that you want to test. Because we'll be using trace() statements, you'll need to debug rather than run the Flex application.
Let's start by seeing how to change the values of elements and attributes.
You can change the values of elements and attributes easily. Bear in mind that when you make these changes, you'll be changing only the values within the SWF application. The changes won't affect the XML data source, so you won't be updating an external XML document or database at the same time.
You update element and attribute values by first locating the relevant node or attribute and then assigning the new value with an equal sign (=). You can use E4X expressions, XML methods, or a mix of both to create the path to the target element or attribute.
The process of assigning values is straightforward. However, you must remember that any expressions that you construct must return a single XML element. You can't assign a value to an expression that returns an XMLList. In that case, you would be trying to assign a single value to more than one XML element at the same time, and you would get an error.
To see how this approach works, we'll change the name of the first author in the XML object from Alison Ambrose to Alan Amberson. These values appear in the first <author> element in the <authorFirstName> and <authorLastName> elements. We can assign the new values to these elements by using the following lines of code:
authorsXML.author[0].authorFirstName = "Alan";
authorsXML.author[0].authorLastName = "Amberson";
If we use a trace() action to view the value of the first <author> element, we should see the following author name values:
<authorFirstName>Alan</authorFirstName>
<authorLastName>Amberson</authorLastName>
We've successfully updated the text inside these two elements.
it's also possible to use the replace() method to assign a new value to an element, as shown here:
authorsXML.author[0].replace("authorFirstName",
  "<authorFirstName>Alan</authorFirstName>");
The first argument to the method indicates what you're replacing. Here, it's the <authorFirstName> element. The second argument provides the replacement content—in this case, <authorFirstName>Alan </authorFirstName>. You'll notice that the second argument requires the opening and closing tags to be included.
Using the replace() method is obviously more cumbersome than adding a simple assignment that uses an equal sign. However, this method allows you to specify a different element structure to use as a replacement. It would be possible to replace the <authorFirstName> element with a completely different set of elements.
Note
You can also use the replace() method to change an element name or completely modify the XML structure of the specified element. This use of replace() is covered in the "Editing content" section later in the chapter.
Modifying attribute values is just as easy. For example, we can change the value of the authorID attribute of the first author using the following line:
authorsXML.author[0].@authorID="99";
Tracing the value of the first <author> element shows the following content:
<author authorID="99">
We've successfully changed the value of the attribute.
It is possible to change more than one value at a time by working through the entire collection. For example, you could modify more than one element or attribute by looping through the collection and treating each item individually.
For example, to add the number 10 before each of the current authorID attribute values, you could use the following code:
for each(var aXML:XML in authorsXML.author) {
  aXML.@authorID = "10" + aXML.@authorID;
}
This example uses a for each statement to iterate through all of the <author> elements in the XML object. You can then treat each <author> individually. Because the code treats the elements separately, each <author> element is an XML object in its own right.
Tracing the XML tree for this example shows the following values for each of the <author> elements:
<author authorID="101">
<author authorID="102">
<author authorID="103">
<author authorID="104">
The code changes all attributes to include the number 10 at the start. Note that, unlike what is shown in the preceding code block, the opening elements won't all appear next to each other when you run the example.
You can find all of these examples saved in the file changingValues.fla and ChangingValues.mxml with your other chapter resources.
Unfortunately, it's not quite as easy to modify XML element and attribute structures. In the next section, you'll see how to use methods of the XML class to make changes to XML structures.
Chapter 3 demonstrated how to use several of the methods of the XML class to modify the structure of an existing XML object. I've summarized these methods in Table 8-1.
Table 8.1. Methods of the XML class for modifying XML content
Method | Description |
|---|---|
append | Adds the specified child node at the end of the child nodes collection of the identified node |
copy() | Makes a copy of an existing node |
| Inserts a new child node after the identified child node |
| Inserts a new child node before the specified child node |
| Adds the specified child node at the beginning of the child nodes of the identified node |
| Replaces a specified property, perhaps an element or attribute, with the provided value |
| Replaces children of an XML object with specified content |
We'll now work through each of these methods in a little more detail so you can see how they work. A little later in the chapter, in the "Working through a modification example" section, you will use some of the methods in a practical application.
We'll start by examining the appendChild() method.
The appendChild() method adds a new child node at the end of the current collection of child nodes. It takes a single argument—the child to append—and adds it as the last child element. Here is an example:
var newAuthor:XML =
  <author id="5">
    <authorFirstName>Sas</authorFirstName>
    <authorLastName>Jacobs</authorLastName>
  </author>
authorsXML.appendChild(newAuthor);
The code starts by creating a new XML object called newAuthor. It then assigns the details of the new node to this object, including the structure and values of elements and attributes. The last line of the code calls the appendChild() method from the root element authorsXML. It passes the new XML object to the method. Tracing the authorsXML object shows that the new element is added as the last child of the <allAuthors> element. The end of the XML object follows:
<author id="5">
    <authorFirstName>Sas</authorFirstName>
    <authorLastName>Jacobs</authorLastName>
  </author>
The append Child() method can add the new child element at any point in the XML object. It doesn't need to refer to the root element. The following code block shows how to add a new child book to the second <author> element:
var newBook:XML = <book bookID="10">
  <bookName>Hearty Soups</bookName>
  <bookPublishYear>2008</bookPublishYear>
  </book>;
authorsXML.author[1].books.appendChild(newBook);
After running this code, the list of books by this author includes the following:
<books>
  <book bookID="5">
    <bookName>Outstanding dinner parties</bookName>
    <bookPublishYear>2003</bookPublishYear>
  </book>
  <book bookID="9">
    <bookName>Cooking for fun and profit</bookName>
    <bookPublishYear>2007</bookPublishYear>
  </book>
  <book bookID="10">
    <bookName>Hearty Soups</bookName>
    <bookPublishYear>2008</bookPublishYear>
  </book>
</books>
The new book appears last in the list of all books by this author.
Instead of creating the new element separately, you can also add it directly as an argument to the append Child() method. In the following example, the new XML element appears inside the call to the append Child() method.
authorsXML.appendChild(<author id="5"><authorFirstName>Sas</authorFirstName><authorLastName>Jacobs</authorLastName></author>);
You can see that this approach produces some unwieldy code. My preference is to create the child element separately, as it makes the code easier to read.
It's also possible to set the child elements of the new XML object as properties using dot notation. You can see this approach in the following example:
var newAuthor:XML = <author id="5"></author>;
newAuthor.authorFirstName = "Sas";
newAuthor.authorLastName = "Jacobs";
Instead of using XML structures, the code defines the child elements as properties. This approach creates the same result, and you'll use it in examples later in the chapter.
The prependChild() method works in much the same way as appendChild(), except that it adds the new child element as the first child of the selected parent. Using this method moves all of the existing child elements to a position one ahead of their original position.
We could use the same new <author> element and add it as the first child with the following code:
var newAuthor:XML = <author id="5">
    <authorFirstName>Sas</authorFirstName>
    <authorLastName>Jacobs</authorLastName>
  </author>;
authorsXML.prependChild(newAuthor);
If you add this example and trace the authorsXML object, you'll see the new element appearing as the first child of the <allAuthors> element. The existing elements appear afterward.
In the previous examples, we created the new node by assigning its value directly to an XML object. You also saw that it's possible to add the children with dot notation instead of writing them to the XML object.
Another approach is to use the copy() method to duplicate an existing node. Once you've replicated the structure, you can change the values and then insert the copied element using the append Child() or prependChild() method. Here's an example of this approach:
var cookbookXML:XML = authorsXML.author[0].books.book[0].copy();
cookbookXML.@bookID = "10";
cookbookXML.bookName = "Hearty Soups";
cookbookXML.bookPublishYear = "2008";
authorsXML.author[1].books.prependChild(cookbookXML);
This example creates a new XML object by calling the copy() method on the first book of the first author. Any <book> element would do here; it's only the structure that interests us.
The next three lines assign the new values to the copied <book> element structure. The final line calls the prependChild() method to add the new <book> element as the first child of the <books> element for the second author. Running the code sample produces the same output that you saw earlier.
If you want to add a new element that has a complex structure, you'll probably find that using the copy() method will be quicker than the previous approaches. It is likely to take more work to create the element structure and insert it with append Child() or prependChild() than it is to copy the structure and modify the values.
Both the insertChildAfter() and insertChildBefore() methods insert a new child node at a specific place in the XML object. You could use these methods to add a new child node at a position other than as the first or last child. The difference between the two methods is obvious from their names.
The insertChildAfter() and insertChildBefore() methods take the same two arguments. The first argument is the position at which to insert the new element. The second argument is the new child element to insert. Here's an example showing the insertChildAfter() method:
var newAuthor:XML = <author id="5">
  <authorFirstName>Sas</authorFirstName>
  <authorLastName>Jacobs</authorLastName>
  </author>;
authorsXML.insertChildAfter(authorsXML.author[1], newAuthor);
In this example, the code adds the new <author> element after the second author. If you add the code to the sample files, the new author will appear after Douglas Donaldson and before Lucinda Larcombe.
We could achieve the same result using the following insertChildBefore() method, as follows:
authorsXML.insertChildBefore(authorsXML.author[2], newAuthor);
This example inserts a new <author> element before the current third author. It will move the existing third and later <author> elements one position forward, so that the current third element becomes the fourth and so on.
Using the insertChildBefore() method with any element at index 0 is equivalent to using the prependChild() method. It adds the new element as the first child.
Similarly, using the insertChildAfter() method and specifying the index of the last child element is equivalent to using appendChild(). It adds the new element as the last child.
The replace() method works a little differently from the other methods. It allows you to change the structure of the XML content by replacing one XML element with entirely different content. It's up to you whether you preserve the existing XML structure.
The replace() method takes two arguments. The first is the property to replace. You can express this argument as the String name of an element or attribute. It can also be provided as the index of a child element. The second argument is the replacement content. You need to provide this argument as an XML object.
You could use the replace() method to replace the first <author> element with a <publisherName> element, as shown here:
authorsXML.replace(0, "<publisherName>FOE</publisherName>");
Here, we've specified the first child of the authorsXML object by providing the index 0. This number equates to the first <author> element in the XML object. Its replacement is an entirely new element name.
The following example shows how to use a String value for the element that will be replaced.
authorsXML.author[0].replace("books", "<nobooks/>");Here, the code replaces the first author's <books> element with an empty <nobooks> element. Running the code and tracing the output produces the following change to the first author:
<author authorID="1">
  <authorFirstName>Alison</authorFirstName>
  <authorLastName>Ambrose</authorLastName>
  <nobooks/>
</author>
We could also replace the entire contents of the first <author> element, as shown here:
authorsXML.author[0].replace("*",
  "<authorFirstName>Alan</authorFirstName>");
The code uses the wildcard operator * to specify that all children of the first <author> element are to be replaced. Running this example produces the following result, where there is a single child element for this <author> element:
<author authorID="1">
  <authorFirstName>Alan</authorFirstName>
</author>
However, you couldn't use the following code to provide a replacement value:
authorsXML.author[0].replace("*",
  "<authorFirstName>Alan</authorFirstName>
  <authorLastName>Amberson</authorLastName>");
If you tried to use this code, you would get an error message indicating that the document markup was not well-formed. This code is invalid because the replacement value is not a valid XML object. Instead, it contains two elements that aren't inside a single root element.
If the objective were to replace the <authorFirstName> and <authorLastName> elements in the first <author> element, you would need to use the following approach:
authorsXML.replace(0,"<author><authorFirstName>Alan</authorFirstName><authorLastName>Amberson</authorLastName></author>");
You could also add the first child only using the replace() method, and then call the append Child() method to add the second element afterward.
The setChildren() method replaces all of the children of the specified element with the content passed to the method. You can pass either an XML or XMLList object to the method.
This previous example:
authorsXML.author[0].replace("*",
  <authorFirstName>Alan</authorFirstName>")
is equivalent to the following line:
authorsXML.author[0].setChildren(<authorFirstName>Alan</authorFirstName>);
In the previous section's example, you couldn't pass an XMLList argument to the replace() method. That invalid example could be replaced with the following valid example:
authorsXML.author[0].setChildren(<author><authorFirstName>Alan</authorFirstName> <authorLastName>Amberson</authorLastName></author>);
You can delete content by using the delete() ActionScript operator. The following example removes the first <author> element from the authorsXML object:
delete(authorsXML.author[0]);
If you test this line, the first author in the XML tree becomes Douglas Donaldson. All <author> elements move down one position.
Note
Note that delete() is not specifically a method of the XML object. Rather, it is an ActionScript 3.0 operator that can be used in circumstances other than working with XML content.
You can find the Flash and Flex examples saved as modifyingStructure.fla and ModifyingStructure.mxml respectively with the chapter resources. Don't forget that you will need to debug the Flex application to view the results of the trace() actions in the examples.
One area that we haven't yet touched on in any detail is how to make modifications to the names of elements and attributes. We also haven't looked at how you can make changes to namespaces. Remember that a namespace associates an element with a particular URI. It allows you to ensure that each element and attribute name in an XML document can be uniquely identified, even if you have more than one with the same name.
Let's start by looking at namespaces. The examples in this section use a slightly different XML document, authorsNS.xml. Make sure you modify your code to load this file instead of authors.xml. For the Flex example, make sure you add the file to the assets folder in your Flex project as well.
You can add a namespace to an XML object using the addNamespace() method. The method receives the namespace that you want to add as an argument. You provide the namespace either as a Namespace object or as a QName object.
When you load the new XML file, you'll see that the root element of the new authorsXML object contains two namespaces.
<allAuthors xmlns:sj="http://www.sasjacobs.com/ns/"
  xmlns:aa="http://www.alisonambrose.com/ns/">
The following example shows how to add a third namespace to the root element:
var ns:Namespace = new Namespace("foe", "http://www.foe.com/ns/");
authorsXML.addNamespace(ns);
The code starts by creating a new Nam espace object with the prefix foe that references the URI http://www.foe.com/ns/. It then uses the addName space() method to add the namespace attribute to the root element.
After running this example, you should see the following root element:
<allAuthors xmlns:sj="http://www.sasjacobs.com/ns/"
  xmlns:aa="http://www.alisonambrose.com/ns/"
  xmlns:foe="http://www.foe.com/ns/">
The code adds the third namespace listed in this root element.
Adding a namespace to the root element means that it's available to all other child elements. However, you don't need to add the namespace to the root element. You can add it anywhere in the XML document tree, as shown here:
authorsXML.author[0].books.addNamespace(ns);
This line of code would add the namespace to the <books> element of the first author, indicating that it is within that namespace:
<books xmlns:foe="http://www.foe.com/ns/">
It's also possible to determine the namespace from an existing element and apply it to another element. The author Saul Sorenson has the namespace http://www.saulsorenson.com/ns/ in his <author> element. You can see it in the following line:
<author authorID="4" xmlns:ss="http://www.saulsorenson.com/ns/">
In the next example, we'll refer to this namespace and add it to the second <author> element as well.
var ss:Namespace = authorsXML.author[3].namespace("ss");
authorsXML.author[1].addNamespace(ss);
In this example, the object ss refers to the namespace prefixed with ss in the third <author> element. The code adds this namespace to the second <author> element using the addNamespace() method. Tracing the XML content shows the following opening element for the second author:
<author authorID="2" xmlns:ss="http://www.saulsorenson.com/ns/">
The ss namespace appears as a new namespace for this <author> element.
You can remove a namespace from an existing element with the removeNamespace() method. Let's see an example.
The root element of the authorsNS.xml file contains two namespaces, as shown here:
<allAuthors xmlns:sj="http://www.sasjacobs.com/ns/"
  xmlns:aa="http://www.alisonambrose.com/ns/">
These elements have the prefixes sj and aa. We'll remove the namespace prefixed with aa with the following code:
authorsXML.removeNamespace(aa);
Running the example and displaying the XML object shows only one namespace remaining in the root element.
<allAuthors xmlns:sj="http://www.sasjacobs.com/ns/">
Again, you can remove the namespace from elements other than the root element. We can remove the namespace declaration from the last <author> element using the following code:
var ss:Namespace = authorsXML.author[3].namespace("ss");
authorsXML.author[3].removeNamespace(ss);
If you used this code and traced the XML object, this <author> element would appear as follows:
<author authorID="4">
The element doesn't contain any namespaces.
The setName space() method sets the namespace associated with an XML object. You could use this to apply the namespace from one XML object to another and set it as the default namespace. Consider the following code block:
var myXML:XML = <greeting>Hello world</greeting>;
var aa:Namespace = authorsXML.namespace("aa");
myXML.setNamespace(aa);
trace(myXML.toXMLString());
This block of code creates a new XML object called myXML with some simple content. The second line determines the namespace associated with the aa prefix in the authorsXML XML object and stores it in a Name space object called aa. The third line calls the setNamespace() method of the myXML object, passing the aa namespace as an argument. When you view the modified XML tree for the myXML object, you see the following element:
<aa:greeting xmlns:aa="http://www.alisonambrose.com/ns/">
  Hello world</aa:greeting>
The setNamespace() method adds the aa namespace to this XML object. It also sets aa as the default namespace by adding the prefix aa to the root element <greeting>.
Note
Note that I had to use the toXMLString() method here to display the XML content, as the myXML object contains only simple content. If I used toString() instead, I would have seen only the text Hello world.
You can find all of these examples saved in the modifyingNamespaces.fla and ModifyingNamespaces.mxml files.
As well as working with namespaces, you can also change the names of elements and attributes. We'll continue working with the authorsNS.xml file for the next set of examples.
You can change a local element name or attribute using the setLocalName() method of the XML object. You need to pass the new element name when calling this method. The method doesn't change the prefix in a qualified name.
We could use the following line of code to change the name of the root element of the authorsXML object to authorList:
authorsXML.setLocalName("authorList");Applying this code results in the following newly named root element:
<authorList xmlns:sj="http://www.sasjacobs.com/ns/"
  xmlns:aa="http://www.alisonambrose.com/ns/">
In addition to the root element, you can also change the names of other elements farther down the document tree. The following example changes the first author element name from <author> to <myAuthor>:
authorsXML.author[0].setLocalName("myAuthor");Viewing the XML document tree shows that the element is renamed to <myAuthor>, as shown in the following line:
<myAuthor authorID="1">
The setLocalName() method also works to change the name of attributes, as shown in the following example:
authorsXML.author[0][email protected]("myID");
Introducing this change rewrites the first author element, as shown here:
<author myID="1">
You can also change the qualified name of an element or attribute using the setName() method. Again, the method receives a String argument indicating the new name to use for the element. If you apply this method to an unqualified element, the result is the same as applying the setLocalName() method.
For example, the following line produces the same output as calling the setLocalName() method:
authorsXML.author[0].setName("myAuthor");In both cases, you end up with the element <myAuthor>, as shown here:
<myAuthor authorID="1">
The difference between the setLocalName() and setName() methods will be apparent with an example that includes a namespace. The third author in the XML document, Lucinda Larcombe, has the following opening <author> element:
<ll:author authorID="3"
  xmlns:ll="http://www.lucindalarcombe.com/ns/">
Notice that the element name author is qualified with the prefix ll, which refers to the namespace http://www.lucindalarcombe.com/ns/. We can change only the author portion of the element name with the setLocalName() method, as shown in these lines of code:
var ll:Namespace =new Namespace("http://www.lucindalarcombe.com/ns/"); authorsXML.ll::author[0].setLocalName("myAuthor");
Notice that we needed to prefix the element with the namespace ll, as shown in the XML document. We also needed to use the :: operator to indicate that the prefix belonged to the author element. Because this is the only <author> element with the ll prefix, we referred to it using an index value of 0: ll::author[0].
Running this example produces the following element for this author:
<ll:myAuthor authorID="3"
  xmlns:ll="http://www.lucindalarcombe.com/ns/">
The prefix ll remains in the element, but the local name of the element is changed from author to myAuthor.
If we use the setName() method instead, we'll see a different result. The following line of code uses the setName() method on the same element. Again, the element name is qualified with the prefix ll.
authorsXML.ll::author[0].setName("myAuthor");Applying this code, you should see the following change to the element:
<myAuthor authorID="3"
  xmlns:ll="http://www.lucindalarcombe.com/ns/">
The element is no longer qualified by the prefix ll. However, the namespace declaration remains.
These examples demonstrate that you should be very careful with the setName() and setLocalName() methods when working with qualified element names!
You can find all the examples referred to in this section saved in the files modifyingNames.fla and ModifyingNames.mxml.
Now that we've covered the ways that you can modify an XML document, let's work through an example so you can see some of these concepts in action.
We'll work through an example that demonstrates how to modify an XML tree structure. We'll use the resource file authorsAndBooks.xml, which you've seen in other chapters.
In this example, we'll load the contents of the document and display a list of authors in a ComboBox and their books in an editable DataGrid. We'll use the application to add, modify, and delete book details for the selected author. We'll use XML class methods to modify the XML object to keep it consistent with the changes made in the interface.
In the Flash example, I'll show a simplistic version, using procedural code. The Flex version uses class files.
Here are the instructions to set up the Flash example:
Open the starter file
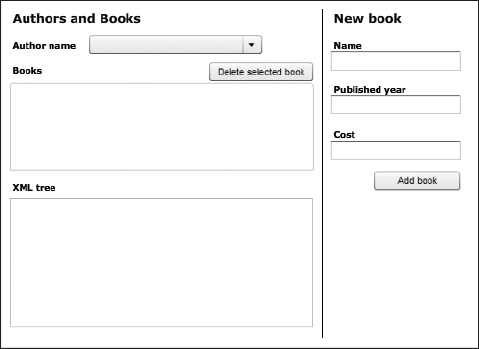
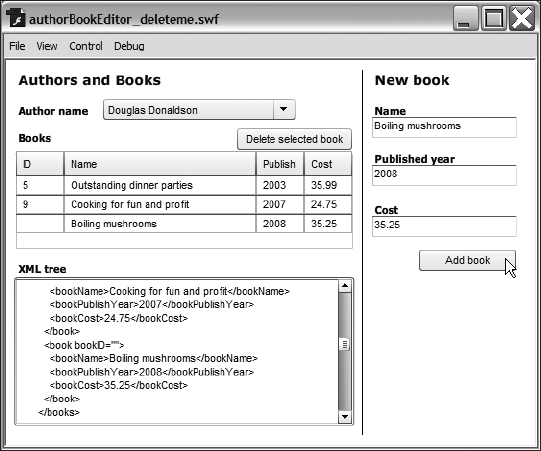
authorBookEditor.flain Flash. Figure 8-1 shows the interface. The application will populate the ComboBox with authors from the loadedXMLobject. It will show the books for each author in an editable DataGrid below the author name. A TextArea control will show the contents of theXMLobject.A user can add details of a new book, modify a row in the DataGrid, or select a row in the DataGrid to delete a book.
Create a new layer called
actions. Open theActionspanel using the F9 shortcut and add the following code to load the external XML document. If you've worked through the previous exercises, there's nothing new in this code, but I'll explain it after the listing.import fl.data.DataProvider; var authorsXML:XML; var authorList:XML; var booksList:XML; var request:URLRequest = new URLRequest("authorsAndBooks.xml"); var loader:URLLoader = new URLLoader(); initApp(); stop();This script block starts by importing the
DataProviderclass, which the application will use to populate both theComboBoxand DataGrid controls. The code creates threeXMLobjects. The first isauthorsXML, which will store the complete XML tree from the loaded content. The secondXMLobject,authorList, will populate the ComboBox. The thirdXMLobject,booksList, will store the books for each author and populate the DataGrid.The code then creates a
URLRequestobject calledrequestand aURLLoaderobject calledloader. TheURLRequestrequests theauthorsAndBooks.xmlfile and assumes that the XML document is in the same folder as the Flash application.The second-to-last line calls a function named
initApp() to set up the application. You'll create this function in the next step. The code block finishes with astop() action.The
initApp() function sets up the application and loads the external XML document. Add the following code at the bottom of theActionspanel. It contains two other functions, which I'll explain after the listing.function initApp():void { loader.addEventListener(Event.COMPLETE, completeHandler); authors_cbo.labelFunction = getFullName; loader.load(request); } function completeHandler(e:Event):void { authorsXML = XML(e.target.data); authorList = new XML(authorsXML.authors); authors_cbo.dataProvider = new DataProvider(authorList); tree_txt.text = authorsXML.toXMLString(); } function getFullName(item:Object):String{ return item.authorFirstName + " " + item.authorLastName; }First, the
initApp() function adds an event listener to theloaderobject. The listener will respond when the loader dispatches thecompleteevent by calling the functioncompleteHandler(). In other words, this handler function will process the loaded content to make it available to the application.The
initApp() function also sets thelabelFunctionproperty for theauthors_cbocontrol so that it can display the full name of each author. The function finishes by calling theload() method of theloaderobject to request the external XML document.The
completeHandler() function receives an Event as an argument and uses thetarget.dataproperty of thisEventobject to locate the loaded data. The first line casts this data as anXMLobject, assigning it to theauthorsXMLobject. You need to do this because the content is loaded asStringdata.The function creates an
XMLobject containing the list of authors by targeting the<authors>element in the XML document with the E4X expressionauthorsXML.authors. The third line of thecompleteHandler() function sets thedataProviderproperty for the ComboBox control to thisXMLobject. ThelabelFunctionfor the ComboBox will format the appearance of the data in the ComboBox. The final line displays aStringrepresentation of the loaded XML content in the TextArea component calledtree_txt.The
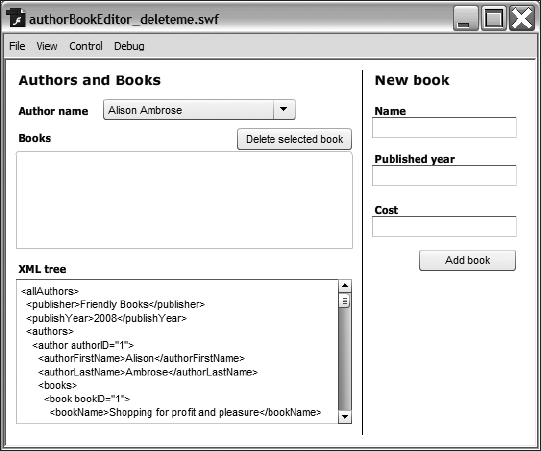
getFullName() label function should be familiar to you from the earlier examples. It creates the full name by locating the first and last names of the author in the<authorFirstName>and<authorLastName>elements. It joins these elements with a space in between.At this point, the application has loaded the XML document and populated the ComboBox control. Test the movie and check that the external XML document loads successfully. Figure 8-2 shows how the interface should appear at this point. You should see the TextArea populated with the loaded XML document and the ComboBox displaying the first author name,
Alison Ambrose.The application now needs to load the books for the author displayed in the ComboBox. When the application first starts, it will display the first author's books in the DataGrid to match the value initially shown in the ComboBox. When the user selects a different author, the books shown will change. To accomplish this, the application needs to detect when the selection in the ComboBox changes, and then locate the
<books>element for the selected author.Add the following line to the
initApp() function to detect a change in the ComboBox component:authors_cbo.addEventListener(Event.CHANGE, changeHandler);
Each change in the selected value in the ComboBox calls the
changeHandler() function. Add the followingchangeHandler() function at the bottom of theActionspanel:function changeHandler(e:Event):void { var authorIndex:int = e.target.selectedIndex; loadBooks(authorIndex); }The
changeHandler() function receives anEventas an argument. You can determine theselectedIndexfrom thetargetof this event, which is the ComboBox control.The function assigns the
selectedIndexvalue of the ComboBox to theauthorIndexvariable. The number will be the same as the author index from theXMLobject, as both are zero-sbased.The function finishes by calling another function,
loadBooks(), passing the value of theselectedIndexproperty. TheloadBooks() function will populate the DataGrid component.Add the
loadBooks() function shown here to theactionslayer:function loadBooks(authorIndex:int):void { var booksDP:DataProvider; booksList = new XML(authorsXML.authors.author[authorIndex].books); booksDP = new DataProvider(booksList); books_dg.dataProvider = booksDP; }Each time the user selects a new author, the
loadBooks() function will locate that author's books and use them to populate the DataGrid.This function starts by declaring a
DataProviderobject calledbooksDP, which the application will use to populate the DataGrid. It then locates the<books>element using the E4X expressionauthorsXML.authors.author[authorIndex].books. Notice that the E4X expression includes theauthorIndexpassed from thechangeHandler() function.The
loadBooks() function sets the returnedXMLListas the source for thebooksList XMLobject. It then assigns thebooksListobject to theDataProviderobject. Finally, thebookDPobject is assigned as thedataProviderfor the DataGrid.If you tested the application now, you wouldn't see any books populated initially. That's because you need to add another call to the
loadBooks() function, which runs when the XML content first loads. This call will allow you to see the first author's books.Add the line shown in bold to the
completeHandler() function:function completeHandler(e:Event):void { authorsXML = XML(e.target.data); authorList = new XML(authorsXML.authors); authors_cbo.dataProvider = new DataProvider(authorList);loadBooks(0);tree_txt.text = authorsXML.toXMLString(); }Once the content is loaded, the application will call the
loadBooks() function, passing the first author's index of 0 as an argument.Test the application again and check that the books for the first author appear when the application first loads. You also need to test that you can see other authors' books when you change the selection in the ComboBox.
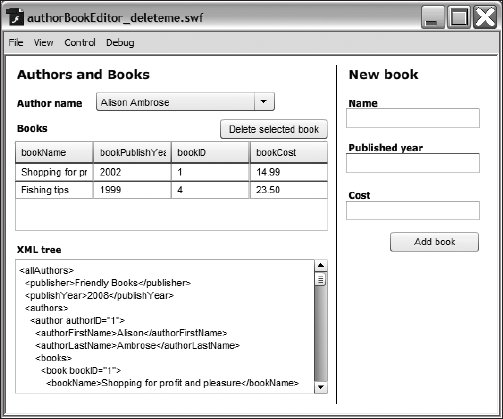
Figure 8-3 shows the interface when the application first loads.
The DataGrid doesn't look too good. The column headings are the default field names, and the book titles are cut off. You can fix the way it looks by calling another function,
setupDataGrid(), which formats the DataGrid's appearance.Add the following function call to the end of the
completeHandler() function. The new line appears in bold.function completeHandler(e:Event):void { authorsXML = XML(e.target.data); authorList = new XML(authorsXML.authors); authors_cbo.dataProvider = new DataProvider(authorList); loadBooks(0);setupDataGrid();tree_txt.text = authorsXML.toXMLString(); }You also need to add the
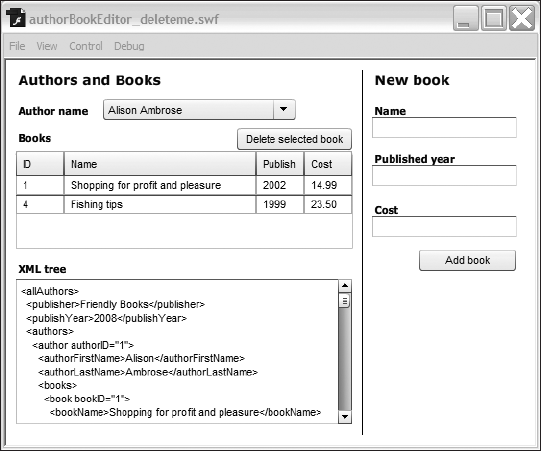
setupDataGrid() function to youractionslayer.function setupDataGrid():void { books_dg.columns = ["ID", "Name", "Publish year", "Cost"]; books_dg.columns[0].width = 50; books_dg.columns[1].width = 200; books_dg.columns[2].width = 50; books_dg.columns[3].width = 50; books_dg.columns[0].dataField = "bookID"; books_dg.columns[1].dataField = "bookName"; books_dg.columns[2].dataField = "bookPublishYear"; books_dg.columns[3].dataField = "bookCost"; books_dg.columns[0].editable = false; }The role of this function is to set column headings, widths, and assign which data field to display. This function starts by declaring the column headings for the DataGrid. It refers to each column using its position in the
columnscollection.The function then sets the
widthanddataFieldproperties for each column. Feel free to modify thewidthsettings to display more or less of each column.The function finishes by making the first column read-only. The application needs to do this because the users should not be able to change the bookID field. Normally, that field would be the primary key and would be allocated externally.
Test the application again. The DataGrid looks much better, as shown in Figure 8-4.
The application has now set up the interface to display thedata. The next step is to allow the users to modify the books for each author. They will be able to add, edit, and delete book information.
Let's start by providing the functionality to add a new book. You'll need to add a handler function that responds when the user clicks the
Add bookbutton.Add the following line to the
initApp() function:addRow_btn.addEventListener(MouseEvent.CLICK, addClickHandler);
This line adds an event listener that responds when a user clicks the
addRow_btnbutton. You also need to add theaddClickHandler() function shown here:function addClickHandler(e:MouseEvent):void { var newBookName:String = name_txt.text; var newPublishYear:String = year_txt.text; var newBookCost:String = cost_txt.text; var newBookXML:XML; if(newBookName.length > 0 && newPublishYear.length > 0 &&newBookCost.length > 0) { books_dg.addItem({bookName: newBookName,bookPublishYear: newPublishYear, bookCost: newBookCost}); newBookXML = <book bookID=''></book>; newBookXML.bookName = newBookName; newBookXML.bookPublishYear = newPublishYear; newBookXML.bookCost = newBookCost; authorsXML.authors.author[authors_cbo.selectedIndex].books.appendChild(newBookXML); tree_txt.text = authorsXML.toXMLString(); } }This function responds to the click of the
Add bookbutton and receives aMouseEventas an argument. It starts by adding the user entries to three variables:newBookName, newPublishYear, andnewBookCost. The function also declares anXMLobject that will store the new XML content.The function checks that the user has entered values in each of the
Name, Published year, andCostTextInput controls. If so, it uses theaddItem() method of the DataGrid to add the new entry. The code creates an object made up of name/value pairs and passes this object to theaddItem() method. Notice that the code uses the field name from theXMLobject, rather than the column headings, to indicate where you want users to enter each new piece of information.After adding the new row, the function then creates a
<book>element for thenewBookXMLobject. Notice that this element has one attribute that doesn't have a value. Normally, you would get thebookIDvalue from the database.The function then assigns the
bookName, bookPublishYear, andbookCostproperties to thenewBookXMLobject. This approach provides a quick way to add the child elements to the<book>element.The function finishes by using the
appendChild() method to add thenewBookXMLobject to the<books>element of the selected author. Notice that you pass theauthors_cbo.selectedIndexas the author index. Finally, the function displays the updatedXMLobject in the TextArea control.Note that I haven't provided any processing in case the user clicks the button without filling in all of the TextInput controls. Feel free to add a text field and display a message to deal with this situation.
Test the application again. You should be able to enter details of a new book and add it to the DataGrid and
XMLobject. Figure 8-5 shows an example of adding a new book to the author Douglas Donaldson. As I mentioned, we didn't create an ID for this book because that would most likely be managed by the database.You can see that the new book appears at the bottom of the list of books for Douglas Donaldson. It also appears as a new
<book>element in his list of all books. Because the code uses theappendChild() method, the book appears as the last child of the<books>element.Let's see how to delete a book from the DataGrid and the
XMLobject. The user will select a row in the DataGrid and click theDelete selected bookbutton. You'll need to add a listener for the click of this button.Add the following line to the
initApp() function:delete_btn.addEventListener(MouseEvent.CLICK, deleteClickHandler);
This line adds an event listener that responds when the
Delete selected bookbutton is clicked. Add thedeleteClickHandler() function now.function deleteClickHandler(e:MouseEvent):void { var bookIndex:int = books_dg.selectedIndex; var authorIndex:int = authors_cbo.selectedIndex; if (bookIndex != −1) { books_dg.removeItemAt(bookIndex); delete(authorsXML.authors.author[authorIndex].books.book[bookIndex]); tree_txt.text = authorsXML.toXMLString(); } }This function receives a
MouseEventas an argument. It starts by declaring two variables: one for the index of the selected book, calledbookIndex, and one for the index of the selected author, calledauthorIndex. It populates these variables with theselectedIndexproperties from each control.The function checks to make sure that the user has selected a row in the DataGrid. In this case, the
selectedIndexproperty of the DataGrid will have a value other than−1.If a row is selected, the function finds the selected book and author indices and uses the
removeItemAt() method of the DataGrid. It passes the index of the book to delete, which corresponds to the index of the<book>element in theDataProvider.Finally, the function uses the
delete() ActionScript 3.0 operator to remove the<book>element from theauthorsXMLobject. The code locates the relevant book with an E4X expression that targets the relevant author and book indices. The function finishes by displaying aStringrepresentation of theXMLobject in theTextArea.Test the application. You should be able to select a row in the
DataGridand click theRemove selected rowbutton to remove the row. Check that the book has also been removed from theXMLobject by looking in theTextArea.The last task is to allow users to modify the values in a row of the
DataGrid. They can modify anything except for thebookID. In this case, the application is going to respond when the editing ends, which can be done with aDataGridEvent. You'll need to start by importing this class with the following statement at the top of theActionspanel:import fl.events.DataGridEvent;
The application can now use a
DataGridEventin theaddEventListener() call. You'll need to add an event listener that responds when the editing of a cell finishes.Add the next line to the
initApp() function:books_dg.addEventListener(DataGridEvent.ITEM_EDIT_END,
itemEditEndHandler);This line responds to
ITEM_EDIT_END, which occurs when the user finishes editing an individual cell. The application will need to check if anything has changed, and if so, process the changes to that value.Add the handler function
itemEditEndHandler() to theactionslayer:function itemEditEndHandler(e:DataGridEvent):void { var dg:DataGrid = e.target as DataGrid; var field:String = e.dataField; var row:Number = Number(e.rowIndex); var col:int = e.columnIndex; var oldVal:String; var newVal:String; oldVal = e.itemRenderer.data[field]; newVal = dg.itemEditorInstance[dg.columns[col].editorDataField]; if (oldVal != newVal) { modifyXMLTree(dg.columns[col].dataField, row, newVal) } }This function starts by declaring dg as a
DataGridobject and assigning the target of the DataGridEvent to this object. Thetargetproperty refers to the DataGrid, but notice that the code needed to use an as statement to type it correctly.The function identifies the
dataFieldbeing changed using the propertye.dataFieldand assigns it to the variablefield. This value is aString. The function also locates the row and column of the edit using therowIndexandcolumnIndexproperties.The
itemEditHandler() declares variables for the old and changed values so the application can compare the two. It will treat them both asStringvariables, even if they contain numbers. AStringdata type is suitable, as all values will be treated as aStringin theXMLobject.The function finds the original value by looking at the
itemRendererproperty for theDataGridEvent. This property gets the item renderer for the item being displayed in the cell. TheitemRenderermakes available a property calleddata, which the function can use to find the original value of the field. The function uses the expressione.itemRenderer.data[field]. Thefieldvariable created earlier determines the field name to use.The
itemEditEndHandler() function finds the changed value by looking at theitemEditorInstanceproperty of the DataGrid. This property returns a reference to the active item editor after the user starts editing a cell. You can use it to locate changed values in edited cells, as you can see in the line that assigns a value to thenewValvariable. The function passes the field name to the expressiondg.itemEditorInstance[dg.columns[col].editorDataField].Finally, the function compares the original and changed values, and calls the
modifyXMLTree() function if these values are different. The application doesn't need to respond if the values are the same, because that means the user hasn't made a change.You have yet to create the
modifyXMLTree() function, but it will receive the name of thedataField, therowbeing edited, and thenewValvariable.You can't test this functionality yet because no modifications are processed. Add the following
modifyXMLTree() function:function modifyXMLTree(fieldName:String, elementIndex:int,
newVal:String):void{ var newXMLString:String = "<" + fieldName + ">" + newVal +"</" + fieldName + ">"; authorsXML.authors.author[authors_cbo.selectedIndex].books.book[elementIndex].replace(fieldName, newXMLString); tree_txt.text = authorsXML.toXMLString(); }This function processes the changes to the cell value in the
XMLobject. It starts by creating a new variable that contains anXML Stringmade up of the field name and the new value. ThenewXMLStringvariable will contain something in the form of <fieldName>New value <fieldName>. The field name can be taken from one of the three columns and can have only the values ofbookName, bookPublishYear, orbookCost.The function then locates the relevant book element, finding which author is selected in the ComboBox and using the
rownumber as the<book>element index. It uses thereplace() method to replace the entire existing element with the changed element, passing theStringvalue that it created earlier.This function finishes by displaying a string representation of the updated
XMLobject in the TextArea.Test the application again. You should be able to change the values in one of the DataGrid cells and see it immediately update in the TextArea. Notice that each time you edit a cell, the updates take place.
That's it for the finished application. If you want to check what you've done, the complete code from the actions layer follows:
import fl.data.DataProvider;
import fl.events.DataGridEvent;
var authorsXML:XML;
var authorList:XML;
var booksList:XML;
var request:URLRequest = new URLRequest("authorsAndBooks.xml");
var loader:URLLoader = new URLLoader();
initApp();
stop();
function initApp():void {
loader.addEventListener(Event.COMPLETE, completeHandler);
authors_cbo.addEventListener(Event.CHANGE, changeHandler);
addRow_btn.addEventListener(MouseEvent.CLICK, addClickHandler);
delete_btn.addEventListener(MouseEvent.CLICK, deleteClickHandler);
books_dg.addEventListener(DataGridEvent.ITEM_EDIT_END,
itemEditEndHandler);
authors_cbo.labelFunction = getFullName;
loader.load(request);
}
function completeHandler(e:Event):void {
authorsXML = XML(e.target.data);
authorList = new XML(authorsXML.authors);
authors_cbo.dataProvider = new DataProvider(authorList);
loadBooks(0);
setupDataGrid();
tree_txt.text = authorsXML.toXMLString();
}
function itemEditEndHandler(e:DataGridEvent):void {
var dg:DataGrid = e.target as DataGrid;
var field:String = e.dataField;
var row:Number = Number(e.rowIndex);
var col:int = e.columnIndex;
var oldVal:String;
var newVal:String;
oldVal = e.itemRenderer.data[field];
newVal = dg.itemEditorInstance[dg.columns[col].editorDataField];
if (oldVal != newVal) {
modifyXMLTree(dg.columns[col].dataField, row, newVal);
}
}
function changeHandler(e:Event):void {
  var authorIndex:int = e.target.selectedIndex;
  loadBooks(authorIndex);
}function addClickHandler(e:MouseEvent):void {
var newBookName:String = name_txt.text;
var newPublishYear:String = year_txt.text;
var newBookCost:String = cost_txt.text;
var newBookXML:XML;
if(newBookName.length > 0 && newPublishYear.length > 0 &&
newBookCost.length > 0) {
books_dg.addItem({bookName: newBookName,
bookPublishYear: newPublishYear, bookCost: newBookCost});
newBookXML = <book bookID=''></book>;
newBookXML.bookName = newBookName;
newBookXML.bookPublishYear = newPublishYear;
newBookXML.bookCost = newBookCost;
authorsXML.authors.author[authors_cbo.selectedIndex].
books.appendChild(newBookXML);
tree_txt.text = authorsXML.toXMLString();
}
}
function deleteClickHandler(e:MouseEvent):void {
var bookIndex:int = books_dg.selectedIndex;
var authorIndex:int = authors_cbo.selectedIndex;
if (bookIndex != −1) {
books_dg.removeItemAt(bookIndex);
delete(authorsXML.authors.author[authorIndex].books.
book[bookIndex]);
tree_txt.text = authorsXML.toXMLString();
}
}
function getFullName(item:Object):String{
return item.authorFirstName + " " + item.authorLastName;
}
function loadBooks(authorIndex:int):void {
  var booksDP:DataProvider;
  booksList = new XML(authorsXML.authors.author[authorIndex].books);
  booksDP = new DataProvider(booksList);
  books_dg.dataProvider = booksDP;
}
function setupDataGrid():void {
  books_dg.columns = ["ID", "Name", "Publish year", "Cost"];
  books_dg.columns[0].width = 50;
  books_dg.columns[1].width = 200;
  books_dg.columns[2].width = 50;
  books_dg.columns[3].width = 50;
  books_dg.columns[0].dataField = "bookID";
  books_dg.columns[1].dataField = "bookName";
  books_dg.columns[2].dataField = "bookPublishYear";
  books_dg.columns[3].dataField = "bookCost";
  books_dg.columns[0].editable = false;
}function modifyXMLTree(fieldName:String, elementIndex:int,newVal:String):void{ var newXMLString:String = "<" + fieldName + ">" + newVal +"</" + fieldName + ">"; authorsXML.authors.author[authors_cbo.selectedIndex].books.book[elementIndex].replace(fieldName, newXMLString); tree_txt.text = authorsXML.toXMLString(); }
You can find the completed file saved as authorBookEditor_completed.fla with the chapter resources.
Let's see how you might work through the same example in Flex Builder. In this case, the application will use a class-based approach.
Open the starter file
AuthorBookEditor.mxmlin Flex Builder. You can copy the file and paste it into your existing Flex project. The interface for the application, shown in Design view of Flex Builder, appears in Figure 8-6.As with the Flash version of this example, you'll populate the ComboBox with a list of authors from the external XML document. When an author is selected, the application will show the books for that author in the DataGrid component beneath the author name. It will show a
Stringrepresentation of theXMLobject in the TextArea at the bottom of the interface. To the right, TextInput controls allow a user to enter new book details.If you're using a new Flex project, create an
assetsfolder inside thesrcfolder of the project. Copy theauthorsAndBooks.xmlfile to this folder. The file contains the details of the authors and their books.You'll load the XML document with the
MyXMLLoaderHelperclass that you created in Chapter 5. The class exists in thexmlUtilitiespackage, so add a folder of that name to your Flex project. Copy the fileMyXMLLoaderHelper.as from the chapter resources to thexmlUtilitiesfolder. You can also use the version that you created yourself in Chapter 5.This class file handles the loading of the external XML file. It also returns a specified child element from the XML object. However, you'll need to modify the class file to add a little more functionality for this example.
Because the XML file that you're loading is complicated, you're going to define the
<authors>element from the external file as its ownXMLobject. This approach will allow you to work with just that part of the XML document and make it easier to locate the<books>element for each author.Add two new private variable declarations with the other declarations:
private var xmlRootString:String; private var xmlRoot:XML;
The first variable will store the name of the element to use as the new
XMLobject root. In this case, the newXMLobjectxmlRootwill store the<authors>element information with all of its child elements.The application will pass in an additional parameter to the
loadXML() method to specify the child element to use for the newXMLobject root. Modify the function as shown in bold here. It will assign the new parameter to thexmlRootStringvariable.public function loadXML(xmlFile:String
, rootElement:String):void {xmlRootString = rootElement;try { xmlLoader.load(new URLRequest(xmlFile)); } catch (e:Error) { trace ("Can't load external XML document"); } }You also need to modify the
completeHandler() private method as shown in bold:private function completeHandler(e:Event):void { xmlAllContent = XML(e.target.data);xmlRoot = XML(xmlAllContent.child(xmlRootString));dispatchEvent(new Event(Event.COMPLETE)); }The new line assigns the XML content from the specified child element to the
xmlRootobject. Because thechild() method actually returns anXMLListobject, the code needs to cast it as anXMLobject so there isn't a type mismatch.The class file needs a new public method to return the
XMLobject to the calling application. Add the followinggetXML() method:public function getXML():XML { return xmlAllContent; }The final change to the class file is to modify the
getChildElements() public method to find a child of thexmlRootobject instead of thexmlAllContentelement. Change the first line as shown here in bold:childElements =
xmlRoot.child(elementName);The complete class file follows in case you want to check that you've included all of the changes correctly:
package xmlUtilities { import flash.net.URLLoader; import flash.net.URLRequest; import mx.collections.XMLListCollection; [Bindable] public class MyXMLLoaderHelper { private var xmlAllContent:XML; private var xmlLoader:URLLoader; private var xmlRootString:String; private var xmlRoot:XML; private var childElements:XMLList; private var childElementsCollection: XMLListCollection; public function MyXMLLoaderHelper() { xmlLoader = new URLLoader(); xmlLoader.addEventListener(Event.COMPLETE, completeHandler); } public function loadXML(xmlFile:String,rootElement:String):void { xmlRootString = rootElement; try { xmlLoader.load(new URLRequest(xmlFile)); } catch (e:Error) { trace ("Can't load external XML document"); } } public function getXML():XML { return xmlAllContent; } public function getChildElements(elementName:String):XMLListCollection { childElements = xmlRoot.child(elementName); childElementsCollection = new XMLListCollection(childElements); return childElementsCollection; }private function completeHandler(e:Event):void { xmlAllContent = XML(e.target.data); xmlRoot = XML(xmlAllContent.child(xmlRootString)); dispatchEvent(new Event(Event.COMPLETE)); } } }You'll make further changes to this class as part of building this example, so leave the file open in Flex Builder.
You need to initialize the application and call the
loadXML() method of our custom class to load the external document into the application. Switch to theAuthorBookEditor.mxmlfile and add the following code, including theinitApp() function, to an<mx:Script>block at the top of the file:import mx.collections.XMLListCollection; import xmlUtilities.MyXMLLoaderHelper; import mx.events.FlexEvent; private var myXMLLoader:MyXMLLoaderHelper; private function initApp(e:FlexEvent):void { myXMLLoader = new MyXMLLoaderHelper(); myXMLLoader.addEventListener(Event.COMPLETE, completeHandler); myXMLLoader.loadXML("assets/authorsAndBooks.xml", "authors"); } private function completeHandler(e:Event):void { }This code starts by importing the classes that the application needs, including the
XMLListCollection, the custom classMyXMLLoaderHelper, and theFlexEventclass. TheXMLListCollectionwrapper class will work withXMLListCollectionobjects returned from the custom class. As you saw earlier in the book, this class provides additional functionality to anXMLListobject and is suitable as aDataProviderfor list-based components.The code block then declares a private variable,
myXMLLoader, which is an instance of the custom class. The code block includes theinitApp() function, which creates a new instance of theMyXMLLoaderHelperclass and assigns an event listener to respond to thecompleteevent.The function also calls the
loadXML() method of the custom class, passing the external XML document file name and target element name.I've included the function signature for the
completeHandler() function without any code. You'll need to call this function in thecreationCompleteattribute of the<mx:Application>element as shown in bold in the following code, so make the change in your own file.<mx:Application xmlns:mx="http://www.adobe.com/2006/mxml" layout="absolute"
creationComplete="initApp(event)">You'll modify the
completeHandler() function to display the author names in the ComboBox control. The code will call thegetChildElements() method of the custom class to return anXMLListCollectioncontaining all of the<author>elements. It will assign this object as thedataProviderproperty for the ComboBox.The
completeHandler() function will also populate the TextArea with aStringrepresentation of the loadedXMLobject. The application will use this TextArea control to keep track of the current contents of theXMLobject.Add the following lines to the
completeHandler() function:authors_cbo.dataProvider = myXMLLoader.getChildElements("author"); tree_txt.text = myXMLLoader.getXML().toXMLString();The first line sets the
dataProviderproperty of the ComboBox to theXMLListCollectionreturned by thegetChildElements() method of themyXMLLoaderclass.As the full name doesn't appear in a single element in the
dataProvider, the application will need to use alabelFunctionin the ComboBox control to display this value. You've seen this function earlier in the book. Add it to the<mx:Script>block.private function getFullName(item:Object):String { return item.authorFirstName + " " + item.authorLastName; }The function joins the author's first and last names with a space in between to create a full name.
You also need to assign the
getFullName() function to the ComboBox so it knows how to create the label. Modify theinitApp() function as shown here in bold to assign it as thelabelFunctionproperty.private function initApp(e:FlexEvent):void { myXMLLoader = new MyXMLLoaderHelper(); myXMLLoader.addEventListener(Event.COMPLETE, completeHandler);authors_cbo.labelFunction = getFullName;myXMLLoader.loadXML("assets/authorsAndBooks.xml", "authors"); }Test the movie and check that the ComboBox populates correctly with the full name of each author. Figure 8-7 shows how the interface should appear if you run the application and view it in a web browser.
Now it's time to load the books for the author selected in the ComboBox. When the application first loads, it should show the books for the first author.
The class file needs a public method that returns the
<books>element for the selected author. Switch to the custom class file and add the followinggetBooks() public method:public function getBooks(authorIndex:int):XMLListCollection { bookElements = xmlAllContent.authors.author[authorIndex].books.book; bookElementsCollection = new XMLListCollection(bookElements); return bookElementsCollection; }This method takes as its only argument the selected author index from the ComboBox. This value equates to the index of the
<author>element in theXMLobject.The method creates an
XMLListcalledbookElementsfrom the list of all<book>elements for the current author. It does this using the E4X expressionxmlAllContent.authors.author[authorIndex].books.book. ThegetBooks() method then creates anXMLListCollectionfrom thisXMLListobject and returns it to be used as thedataProviderproperty for the DataGrid.The application file calls this public method in two places. First, it calls the method after the ComboBox is loaded so the application can display the first author's books. It also calls the method in response to a change in the
selectedIndexof the ComboBox so that the application can repopulate the DataGrid with the correct books.Switch to the application file and add the following line to the
completeHandler() function:books_dg.dataProvider = myXMLLoader.getBooks(0);
This line calls the
getBooks() public method when the application initializes, passing the first author index of 0. It sets the returnedXMLListCollectionas thedataProviderfor the DataGrid, showing the books for the first author whose name displays in the ComboBox.For the second method call, add the following line to the
initApp() function:authors_cbo.addEventListener(ListEvent.CHANGE, changeHandler);
Whenever the author chosen in the ComboBox changes, the application will call the
changeHandler() function.Now, you need to add the
changeHandler() function. Add the following code block to your application file:private function changeHandler(e:Event):void { books_dg.dataProvider = myXMLLoader.getBooks(e.target.selectedIndex); }The
changeHandler() function again sets thedataProviderproperty for the DataGrid by calling thegetBooks() public method of themyXMLLoaderobject. This time, it passes theselectedIndexfrom the ComboBox to specify which<author>element to target. It finds the correct author usinge.target.selectedIndex.You need to set up the DataGrid to display the columns correctly before testing the application. If you tested the application now, you would see only the
bookIDdisplayed in the DataGrid; the remaining information wouldn't appear.The easiest way to modify the setup of the DataGrid is within the MXML element itself. Modify the element as shown here. Notice that you need to rewrite the
<mx:DataGrid>element with a closing tag.<mx:DataGrid width="350" height="150" id="books_dg" editable="true"> <mx:columns> <mx:DataGridColumn headerText="ID" dataField="@bookID" editable="false" width="50"/> <mx:DataGridColumn headerText="Name" dataField="bookName" width="200"/> <mx:DataGridColumn headerText="Publish year" dataField="bookPublishYear" width="50"/> <mx:DataGridColumn headerText="Cost" dataField="bookCost" width="50"/> </mx:columns> </mx:DataGrid>The
<mx:DataGrid>element includes the list of all columns to display inside the<mx:columns>element. Each column contains aheaderText, dataField, andwidthattribute. ThedataFielddetermines which element to display from thedataProvider, and the value equates to the name of a child element. Notice that the expression uses an @ sign to indicate thatbookIDis an attribute.The first
<mx:DataGridColum>element also sets the first column to be read-only so that the user can't edit thebookIDvalue. Normally, this value would equate to the primary key in the data source and would be maintained externally. Because the<mx:DataGrid>element contains the attributeeditable="true", it will be possible for a user to edit all other columns.Test the application again. You should see the book information displaying correctly in the DataGrid, as shown in Figure 8-8.
Now that the interface is set up, it's time to look at adding, editing, and deleting book information. Remember that the application will change only the
XMLobject in the SWF application, and not in the external document, as Flex isn't capable of updating external content.When you finish building this application, the class file will contain public methods that add, edit, and delete
<book>elements from theXMLobject. The application file will call these methods to process the updates made in the interface. Before it continues, it will need to know that the updates have been completed. Each of the public methods must dispatch an event to the application, notifying it that this has occurred.After the application receives this event, it can refresh the
dataProviderfor the DataGrid and display the updatedXMLobject in the TextArea control. This process must occur with every type of modification made in the interface.You'll create a new event in the class file to be dispatched when changes have been completed. This event is called
xmlUpdated, and you'll create a handler function in the application file to respond when it is notified of the event.Switch to the custom class file
MyXMLLoaderHelper.as. Declare the event by adding the following[Event]metadata tag above the class declaration:[Event(name="xmlUpdated", type="flash.events.Event")]
This is an event called
xmlUpdatedwith an Event type. In this case, the application doesn't need a customEventobject, because you're not passing information with the event. The metadata tag needs to declare this event so that the application file will recognize it correctly.Switch to the application file and add a handler for this new event in the
initApp() function, as shown here:myXMLLoader.addEventListener("xmlUpdated", xmlUpdatedHandler);Whenever the application file is notified of the
xmlUpdatedevent, it will call thexmlUpdatedHandler() function. Add thexmlUpdatedHandler() function that follows to the<mx:Script>block:private function xmlUpdatedHandler(e:Event):void { books_dg.dataProvider = myXMLLoader.getBooks(authors_cbo.selectedIndex); tree_txt.text = myXMLLoader.getXML().toXMLString(); }This handler function sets the
dataProviderproperty for thebooks_dgcontrol, which effectively refreshes the content in the DataGrid. It also displays aStringrepresentation of theXMLobject in the TextArea component so that you can see the updated content. You'll want to repeat these steps every time a user changes book details.Now it's time to add more functionality so that a user can make modifications to the books. You'll start by seeing how to add a new book to the currently selected author.
You need an event handler that responds when a user clicks the
Add bookbutton. Add the following line to theinitApp() function:addRow_btn.addEventListener(MouseEvent.CLICK, addClickHandler);
You also need to add the
addClickHandler() function to the<mx:Script>block. The function follows. Note that it references a public method of a custom class,addBook(), that you have yet to create.private function addClickHandler(e:MouseEvent):void { var newBookName:String = name_txt.text; var newPublishYear:String = year_txt.text; var newBookCost:String = cost_txt.text; var authorIndex:int = authors_cbo.selectedIndex; if(newBookName.length > 0 && newPublishYear.length > 0&& newBookCost.length > 0) { myXMLLoader.addBook(authorIndex, newBookName, newPublishYear,newBookCost); } }The
addClickHandler() function receives aMouseEvent as an argument. The function declares variables for each of the user entries and checks that the user entered a value for each one. If this is the case, the function calls theaddBook() method of themyXMLLoaderinstance, passing the selected author index as well as the new values. You'll set up this public method next.I didn't add any functionality to deal with the situation where a user doesn't enter all of the information for a book and then clicks the button. Feel free to extend this example to display an error message in the interface when this occurs.
Switch to the
MyXMLLoaderHelperclass file. Add the followingaddBook() public method to process the new book details:public function addBook(authorIndex:int, bookName:String,
bookPublishYear:String, bookCost:String):void { var newBookXML:XML; newBookXML = <book bookID=''></book>; newBookXML.bookName = bookName; newBookXML.bookPublishYear = bookPublishYear; newBookXML.bookCost = bookCost; xmlAllContent.authors.author[authorIndex].books.appendChild(newBookXML); dispatchEvent(new Event("xmlUpdated")); }This method receives the
selectedIndexfrom the ComboBox and the new book values as parameters. TheselectedIndexis calledauthorIndex, and this value corresponds with the node index for the<author>element in theXMLobject.The
addBook() method declares a new localXMLobject callednewBookXMLand populates it with a<book>element containing an emptybookIDattribute. It then adds thebookName, bookPublishYear, andbookCostproperties to this object. Notice that, instead of usingappendChild(), you've used dot notation to speed up the process.This method finishes by using the
appendChild() method to add the newly created<book>element as the last child of the current author's<books>element. In the last line, the method finishes by dispatching anxmlUpdatedevent to inform the application that the updating of theXMLobject is complete. The application will then respond by calling thexmlUpdatedHandler() function.Test the application and enter a new book. The application should add the new book to the selected author, updating both the DataGrid and TextArea. Figure 8-9 shows a new book added to the author Douglas Donaldson. It appears in both the XML tree in the TextArea and as a new row at the bottom of the DataGrid.
You'll now add functionality so that a user can delete a book from the DataGrid and
XMLobject. By selecting a row and clicking theDelete selected bookbutton, a user can remove a book. Start by adding an event listener to respond when theDelete selected bookbutton is clicked.Add the following line to the
initApp() function in the MXML file:delete_btn.addEventListener(MouseEvent.CLICK, deleteClickHandler);
Add the following
deleteClickHandler() function to the<mx:Script>block. This method calls adeleteBook() public method from the class file that you'll add shortly.private function deleteClickHandler(e:MouseEvent):void { var bookIndex:int = books_dg.selectedIndex; var authorIndex:int = authors_cbo.selectedIndex;; if (books_dg.selectedIndex != −1) { myXMLLoader.deleteBook(authorIndex, bookIndex); } }The
deleteClickHandler() function receives aMouseEventas an argument and declares two variables: one for the selected DataGrid row index, calledbookIndex, and one for the selected author index, calledauthorIndex. It assigns values for these variables.The function then checks that the user has selected a row in the DataGrid. If no row is selected, the
selectedIndexwill have a value of−1.The function finishes by calling the
deleteBook() public method of themyXMLLoaderobject to carry out the deletion. It passes both theauthorIndexandbookIndexso that the public method will be able to locate the correct element.Switch to the
MyXMLLoaderHelperclass file. Add the followingdeleteBook() public method to handle the book deletion:public function deleteBook(authorIndex:int, bookIndex:int):void { delete(xmlAllContent.authors.author[authorIndex].books.book[bookIndex]); dispatchEvent(new Event("xmlUpdated")); }This public method uses the ActionScript
3.0 delete() operator to remove the relevant<book>element. It locates the correct element with the E4X expressionxmlAllContent.authors.author[authorIndex].books.book[bookIndex]. The method then dispatches thexmlUpdatedevent to notify the application that the updates are finished.Test the application and make sure that you can remove a row from the DataGrid. If you look at the TextArea control, you should see that the element has been removed from the
XMLobject as well.The final task is to allow the user to edit entries in the DataGrid. A user will be able to modify any value except for the
bookID. As I've noted, that value is usually allocated by the external data source.As with the Flash example, the application will handle when the editing of an individual cell ends by responding to a
DataGridEvent. The updating will happen immediately after each cell has been edited.Switch to the application file. Import the
DataGridEventclass with the followingimportstatement. Add it with the otherimportstatements at the top of the<mx:Script>block.import mx.events.DataGridEve
Add the following event listener to the
initApp()function:books_dg.addEventListener(DataGridEvent.ITEM_EDIT_END,
itemEditEndHandler);The application responds when the user finishes editing a cell by referencing
ITEM_EDIT_END. This value indicates that the editing of a cell is ending, and it will allow the application to capture both the starting and ending values.Add the following
itemEditEndHandler() function to process the changes to the cell value:function itemEditEndHandler(e:DataGridEvent):void { var authorIndex:int = authors_cbo.selectedIndex; var dg:DataGrid = e.target as DataGrid; var field:String = e.dataField; var row:Number = Number(e.rowIndex); var col:int = e.columnIndex; var oldVal:String = e.itemRenderer.data[field]; var newVal:String = dg.itemEditorInstance[dg.columns[col].editorDataField]; if (oldVal != newVal) { myXMLLoader.modifyXMLTree(authorIndex,dg.columns[col].dataField, row, newVal); } }This function calls a public method,
modifyXMLTree(), which you have yet to add to the class file. It starts by declaring an object for the DataGrid and locating it with the expressione.target. The code uses as to type the object correctly as aDataGrid.The function identifies the
dataFieldbeing modified as well as the row and column being changed. It also declares variables for the original and changed values so that they can be compared to see if a change actually took place.If the values are not the same—that is, something has been modified—the
itemEditEndHandler() function calls themodifyXMLTree() public method of themyXMLLoaderobject. It passes the name of the field being edited; the row number in the DataGrid, which will equate to the<book>node index; and the new value entered by the user.Switch to the class file and add the
modifyXMLTree() method shown here:public function modifyXMLTree(authorIndex:int, fieldName:String,
elementIndex:int, newVal:String):void{ var newXMLString:String = "<" + fieldName + ">" + newVal +"</" + fieldName + ">"; xmlAllContent.authors.author[authorIndex].books.book[elementIndex].replace(fieldName, newXMLString); dispatchEvent(new Event("xmlUpdated")); }This public method creates a new
Stringvariable that contains the changed value, formatted as an XML element. It uses thefieldNamevalue passed from the MXML file for the element name. It will produce a variable containing the structure <fieldName>New value</fieldName>.The
modifyXMLTree() method then uses an E4X expression to locate the relevant<book>element being edited. In the expressionxmlAllContent.authors.author[authorIndex].books.book[elementIndex], theauthorIndexindicates which<author>element to target; theelementIndexindicates the<book>index to use. The function uses thereplace() method to update the existing element and replace it with the provideStringcontent. Finally, the function dispatches thexmlUpdatedevent so that the application can refresh the interface.Test the application and check that you can edit the name, publish year, and cost of each item. Also make sure that the contents of the TextArea control are updated with each of your changes.
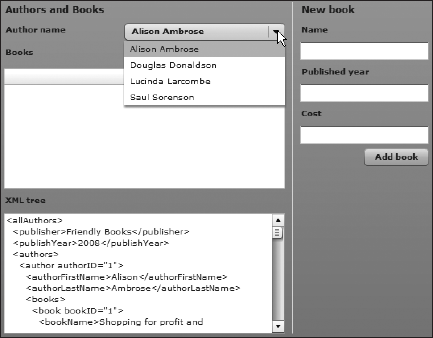
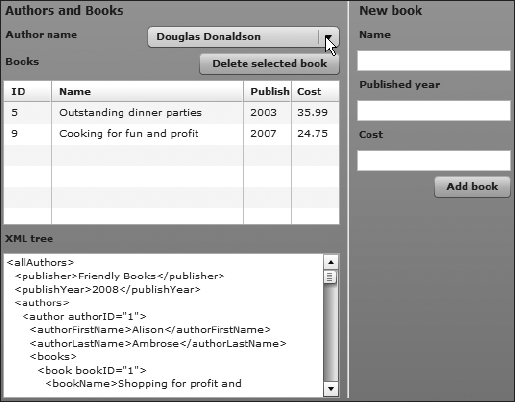
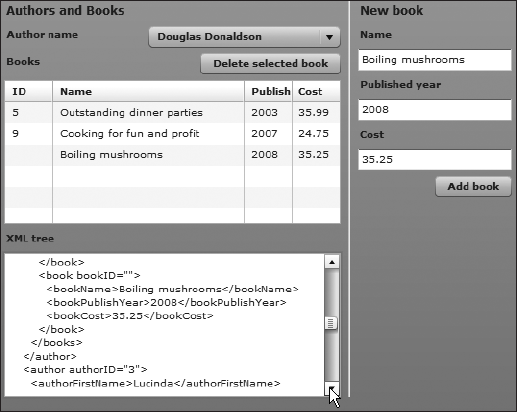
Congratulations! You've now completed the Flex application. The complete MyXMLLoaderHelper.as class file follows so you can check your work. The file is also included with the chapter resources.
package xmlUtilities {
import flash.events.Event;
import flash.net.URLLoader;
import flash.net.URLRequest;
import mx.collections.XMLListCollection;
[Bindable]
[Event(name="xmlUpdated", type="flash.events.Event")]
public class MyXMLLoaderHelper {
private var xmlAllContent:XML;
private var xmlLoader:URLLoader;
private var xmlRootString:String;
private var xmlRoot:XML;
private var childElements:XMLList;
private var childElementsCollection: XMLListCollection;
private var bookElements:XMLList;
private var bookElementsCollection:XMLListCollection;
public function MyXMLLoaderHelper() {
xmlLoader = new URLLoader();
xmlLoader.addEventListener(Event.COMPLETE, completeHandler);
}
public function loadXML(xmlFile:String, rootElement:String):void{
xmlRootString = rootElement;
try {
xmlLoader.load(new URLRequest(xmlFile));
}
catch (e:Error) {
trace ("Can't load external XML document");
}
}
public function getXML():XML {
return xmlAllContent;
}
public function getChildElements(elementName:String):
XMLListCollection {
childElements = xmlRoot.child(elementName);
childElementsCollection = new XMLListCollection(childElements);
return childElementsCollection;
}
public function getBooks(authorIndex:int):XMLListCollection {
bookElements = xmlAllContent.authors.author[authorIndex].
books.book;
bookElementsCollection = new XMLListCollection(bookElements);
return bookElementsCollection;
}public function addBook(authorIndex:int, bookName:String,
bookPublishYear:String, bookCost:String):void {
var newBookXML:XML;
newBookXML = <book bookID=''></book>;
newBookXML.bookName = bookName;
newBookXML.bookPublishYear = bookPublishYear;
newBookXML.bookCost = bookCost;
xmlAllContent.authors.author[authorIndex].books.
appendChild(newBookXML);
dispatchEvent(new Event("xmlUpdated"));
}
public function deleteBook(authorIndex:int, bookIndex:int):void {
delete(xmlAllContent.authors.author[authorIndex].
books.book[bookIndex]);
dispatchEvent(new Event("xmlUpdated"));
}
public function modifyXMLTree(authorIndex:int, fieldName:String,
elementIndex:int, newVal:String):void{
var newXMLString:String = "<" + fieldName + ">" + newVal +
"</" + fieldName + ">";
xmlAllContent.authors.author[authorIndex].books.
book[elementIndex].replace(fieldName, newXMLString);
dispatchEvent(new Event("xmlUpdated"));
}
private function completeHandler(e:Event):void {
xmlAllContent = XML(e.target.data);
xmlRoot = XML(xmlAllContent.child(xmlRootString));
dispatchEvent(new Event(Event.COMPLETE));
}
}
}The complete application file follows. It is also saved as AuthorBookEditor_completed.mxml with the chapter resources.
<?xml version="1.0" encoding="utf-8"?>
<mx:Application xmlns:mx="http://www.adobe.com/2006/mxml"
layout="absolute" creationComplete="initApp(event)">
<mx:Script>
<![CDATA[
import mx.events.ListEvent;
import mx.collections.XMLListCollection;
import xmlUtilities.MyXMLLoaderHelper;
import mx.events.FlexEvent;
import mx.events.DataGridEvent;
private var myXMLLoader:MyXMLLoaderHelper;private function initApp(e:FlexEvent):void {
myXMLLoader = new MyXMLLoaderHelper();
myXMLLoader.addEventListener(Event.COMPLETE,completeHandler);
myXMLLoader.addEventListener("xmlUpdated",xmlUpdatedHandler);
authors_cbo.addEventListener(ListEvent.CHANGE,changeHandler);
addRow_btn.addEventListener(MouseEvent.CLICK,
addClickHandler);
delete_btn.addEventListener(MouseEvent.CLICK,
deleteClickHandler);
books_dg.addEventListener(DataGridEvent.ITEM_EDIT_END,
  itemEditEndHandler);
authors_cbo.labelFunction = getFullName;
myXMLLoader.loadXML("assets/authorsAndBooks.xml", "authors");
}
private function completeHandler(e:Event):void {
authors_cbo.dataProvider = myXMLLoader.getChildElements("author");
tree_txt.text = myXMLLoader.getXML().toXMLString();
books_dg.dataProvider = myXMLLoader.getBooks(0);
}
private function getFullName(item:Object):String {
  return item.authorFirstName + " " + item.authorLastName;
}
private function changeHandler(e:Event):void {
books_dg.dataProvider = myXMLLoader.getBooks(
e.target.selectedIndex);
}
private function addClickHandler(e:MouseEvent):void {
var newBookName:String = name_txt.text;
var newPublishYear:String = year_txt.text;
var newBookCost:String = cost_txt.text;
var authorIndex:int = authors_cbo.selectedIndex;
if(newBookName.length > 0 && newPublishYear.length > 0
&& newBookCost.length > 0) {
myXMLLoader.addBook(authorIndex, newBookName,
newPublishYear, newBookCost);
}
}
private function deleteClickHandler(e:MouseEvent):void {
var bookIndex:int = books_dg.selectedIndex;
var authorIndex:int = authors_cbo.selectedIndex;;
if (books_dg.selectedIndex != −1) {
myXMLLoader.deleteBook(authorIndex, bookIndex);
}
}private function itemEditEndHandler(e:DataGridEvent):void {
var authorIndex:int = authors_cbo.selectedIndex;
var dg:DataGrid = e.target as DataGrid;
var field:String = e.dataField;
var row:int = e.rowIndex;
var col:int = e.columnIndex;
var oldVal:String = e.itemRenderer.data[field];
var newVal:String = dg.itemEditorInstance[dg.columns[col].
editorDataField];
if (oldVal != newVal) {
myXMLLoader.modifyXMLTree(authorIndex, dg.columns[col].
dataField, row, newVal)
}
}
private function xmlUpdatedHandler(e:Event):void {
books_dg.dataProvider = myXMLLoader.getBooks(authors_cbo.
selectedIndex);
tree_txt.text = myXMLLoader.getXML().toXMLString();
}
]]>
</mx:Script>
<mx:HBox x="10" y="10">
<mx:VBox>
<mx:Label text="Authors and Books" fontWeight="bold"
fontSize="12"/>
<mx:HBox width="100%">
<mx:Label fontWeight="bold" text="Author name"/>
<mx:Spacer width="100%"/>
<mx:ComboBox width="200" id="authors_cbo"/>
</mx:HBox>
<mx:HBox width="100%">
<mx:Label fontWeight="bold" text="Books"/>
<mx:Spacer width="100%"/>
<mx:Button label="Delete selected book" id="delete_btn"/>
</mx:HBox>
<mx:DataGrid width="350" height="150" id="books_dg" editable="true">
  <mx:columns>
    <mx:DataGridColumn headerText="ID" dataField="@bookID"
      editable="false" width="50"/>
    <mx:DataGridColumn headerText="Name" dataField="bookName"
      width="200"/>
    <mx:DataGridColumn headerText="Publish year"
      dataField="bookPublishYear" width="50"/>
    <mx:DataGridColumn headerText="Cost" dataField="bookCost"
      width="50"/>
  </mx:columns>
</mx:DataGrid><mx:Label fontWeight="bold" text="XML tree"/>
<mx:TextArea width="350" height="150" id="tree_txt"/>
</mx:VBox>
<mx:VRule height="100%"/>
<mx:VBox>
<mx:Label text="New book" fontWeight="bold" fontSize="12"/>
<mx:Label text="Name" fontWeight="bold"/>
<mx:TextInput id="name_txt"/>
<mx:Label text="Published year" fontWeight="bold"/>
<mx:TextInput id="year_txt"/>
<mx:Label text="Cost" fontWeight="bold"/>
<mx:TextInput id="cost_txt"/>
<mx:HBox width="100%">
<mx:Spacer width="100%"/>
<mx:Button label="Add book" id="addRow_btn"/>
</mx:HBox>
</mx:VBox>
</mx:HBox>
</mx:Application>Before we finish, there are some points to consider from these examples.
There are several points to note about these exercises:
The example changes only the structure and content of the
XMLobject within the SWF application. It doesn't update the external file. Neither Flash nor Flex has the ability to update external content for obvious security reasons. You would need some server-side code to carry out the updates. You'll see how to communicate with the server in the next chapter.In both versions of the application, if a user clicked a button inappropriately, we didn't display an error message. As an exercise, you might want to add this functionality to the application.
There is no validation of the new or changed entries made by the user. In a -real-world application, you would handle the user entries a little more robustly. For example, you would check that the new value entered in the year field was an appropriate number. You would also check that the price was a numeric value, and format it to display as a
Stringwith two decimal places. I'll leave those niceties up to you as an area for self-study.There are other ways that you could have created the Flex application. Flex provides data binding opportunities that may have made it easier to keep the XML object synchronized with a DataGrid
dataProviderand a TextArea control. However, the aim of this exercise was to show you how to modify XML content within Flex, so that's what we did! Feel free to tackle the job of modifying the example yourself if you wish.
In this chapter, I've shown you how to update the contents of an XML object. You've seen how to add, edit, and delete XML content, as well as how to modify element names and namespaces. We worked through an example that demonstrated how you might modify an XML tree with ActionScript 3.0. You saw how to do so in Flash and Flex, using both a procedural and class-based approach.
While it was possible to update the content within the SWF application, your updates didn't affect the external content. You would need the SWF application to communicate with the server where the updates would be processed. Communicating with the server is the topic of the next chapter.