
Accelerators were introduced in IE 8 as a way to reduce the number of steps required for targeted access to web services. They provide developers with a way to make page content actionable without constructing binary extensions. IE makes a number of Accelerators available during the first-run experience, linking users to Microsoft web services such as Windows Live Search and Bing Maps.
In this chapter I discuss how you can build rich Accelerators that provide a seamless link between page content with web services. I begin with some basics—the purpose, basic techniques, and technical overview of tags, variables, and structure needed to define them. I demonstrate how you can link these models with new or existing services, offer users the opportunity to install and manage Accelerators, and develop some interesting and compelling scenarios that were quite difficult prior to IE 8.
Accelerators are context menu extensions that integrate common online activities into the browser (see Figure 4-1 for an example Accelerator. Accelerators make use of the HTTP GET and POST requests, forwarding selected web page content to web services. Users decide which Accelerator to use based on a set of categories defined by the Accelerators they have installed.
Accelerators provide some unique advantages over binary context menu extensions and Browser Helper objects (BHOs). Namely, they offer a streamlined install experience, a good end-user management story, consistent UI behavior, good performance and reliability, and a simpler security model.

Accelerators cannot execute binary code, nor can they directly access the DOM. Given their markup-based nature, the browser handles interpretation and execution. Downloaded Accelerators are stored in the registry and copied to users' Application Data folders.
Note
Accelerators were originally called "activities" when they were introduced for IE 8 beta 1. Using both names when searching for more information or code snippets can help improve the result set.
Accelerators are listed in two menus: the Accelerator menu (accented with a blue "gleam" icon) and the context menu. These menus are shown in Figure 4-2.

The Accelerator gleam is only shown after a text selection. The icon, displayed in Figure 4-3, is shown near the text selection. This icon cannot be suppressed by web content.

When either menu is triggered, IE displays the default Accelerators in each category for a given context. Categories are defined by Accelerators themselves in their markup and represent the general use cases they cover, and the defaults are the user-selected default Accelerators in each category. Accelerators not marked as category defaults are listed in the All Accelerators submenu.
There are three Accelerator contexts: selection, link, and document. Table 4-1 lists these three contexts for posterity.
The selection context refers to any time text is selected on a document. The link context refers to a situation where a context menu is triggered over a link or the text selected is a link. The document context covers all other cases, when Accelerators are called without selected text or a targeted link. Categories, defaults, and context are covered in more detail later in this chapter.
An Accelerator with preview support will receive events when a user scrolls over it in either the context menu or the Accelerator menu. This action will launch a small preview window, as shown in the previous example (Figure 4-1). Preview windows allow Accelerators to provide some initial information about how their associated web service will react to the input content.
Once clicked, IE will trigger an execute event on a given Accelerator. This navigates to a web service specified in the Accelerator's definition file. Navigations are opened in a new tab, and a tab group is formed between the original link and the new Accelerator navigation (or merged with the original page's existing tab group). The Accelerator definition XML, described in subsequent sections, can pass a wide variety of data to a web service based on the context an Accelerator was run in.
The OpenService XML schema, discussed in the previous section, provides a way for Accelerators to be defined using simple markup. This schema is made up of two main elements: tags and variables. OpenService tags are used to both define metadata describing the extentsion itself and specify that the browser should perform when certain events occur. OpenService variables are used to inform IE what data should be sent to a web service during an action.
Accelerator tags are used to instruct IE how to use, display, and execute a specific extension. Table 4-2 outlines the tags that can be used in constructing an Accelerator XML definition file and their individual descriptions.
Table 4.2. Tags in the OpenService Specification
Tag | Description |
|---|---|
<os:openServiceDescription> | Root tag of the Accelerator |
<os:homepageUrl> | Specifies the home page of the Accelerator's web service |
<os:display> | Parent tag for display information such as a name and icon |
<os:name> | Specifies the name of the Accelerator |
<os:icon> | Specifies a link to a 16×16-pixel icon in icon (ICO) format |
<os:description> | Specifies the description of the Accelerator |
Parent tag for actions in an Accelerator | |
<os:activityAction> | Defines an action within an Accelerator |
<os:preview> | Specifies a web service for previewing content |
<os:execute> | Specifies a web services for handling content |
<os:parameter> | Specifies data to be sent to a web service |
The <os:openServiceDescription> tag is the root tag in an extension's XML definition. The set of tags directly following the root (<os:homepageUrl>, <os:display>, <os:name>, <os:icon>, and <os:description>) represents metadata that explains what the control is and does.
<os:activity> contains action tags that inform IE how to send page content to one or many web services. It also contains one metadata element—the category attribute—allowing developers to specify the type of the add-on (such as Mail, Maps, or Search).
Actions (<os:activityAction>) define the context or contexts in which the Accelerator can be run: selection (representing content highlighted on a page), document (representing the document itself), and link (an <a> tag referring to a URL).
The last tags, execute and/or preview, define the events an action will respond to. The execute tag (<os:execute>) handles the onClick event, fired when a user clicks an Accelerator's context menu item. The preview tag (<os:preview>) is used for the onHover event of that same object (when a user places their mouse over that same item). One or both of these tags must be present in an action.
The OpenService XML definition provides variables as a way for IE to know what page content it should send to a web service. They represent items such as the source URL, content that was highlighted, and information about a link. They are only permitted within <os:preview>, <os:execute>, and <os:parameter> tags—the tags ultimately responsible for instructing IE how to talk to web services.
Table 4-3 outlines the variables IE can pass to a web service.
Table 4.3. Variables in the OpenService Specification
Variable | Context(s) | Return Types | Description |
|---|---|---|---|
{documentUrl} | All | Text | The entire URL of the active page |
{documentTitle} | All | Text | The title of the active page |
{documentDomain} | All | Text | The domain of the active page |
{documentHost} | All | Text | The fully qualified domain of the active page |
{selection} | Selection | Text, HTML | The selected content on the current page |
{link} | Link | Text | The entire URL of the selected link |
{linkText} | Link | Text | The inner text of the selected link |
{linkRel} | Link | Text | The object relationship of the selected link |
{linkType} | Link | Text | The MIME type of the link (if specified) |
{linkDomain} | Link | Text | The domain of the selected link |
{linkHost} | Link | Text | The fully qualified domain of the selected link |
Security and privacy mitigations prevent variables from being used in all cases. The following rules are in place to limit the amount of potentially private data leaked to a web service:
The
{selection}variable is only available in the selection context.The
{selection}variable cannot be used by a preview except in the selection context.No variables will be transmitted between insecure and secure protocols (for instance, between HTTP and HTTPS contexts).
Variables will not be transmitted from a less-restrictive security zone to one with more restriction (for instance, from the intranet zone to the Internet zone).
Accelerators that do not pertain to the current context will not be shown (for instance, an Accelerator that doesn't implement the link context will not be displayed when a user accesses the context menu over an
<a>tag).
The most basic Accelerator has two parts: first, an XML file defining when, why, and how it should operate; and second, a web service that handles and displays when a user interacts with it.
The following sections walk through the construction of an Accelerator called Tweet This! The first version lets users post text selected on a page to Twitter as a tweet. A tweet is a 140-character string posted to Twitter, describing what a person is doing for a given moment in time (aka microblogging). Figure 4-4 shows the first iteration of the extension.

The XML file that defines Tweet This! is used by IE to create a new context menu UI element and access the web service. The code sample in Listing 4-1 shows this markup.
Example 4.1. XML Definition for the First Iteration of Tweet This!
<?xml version="1.0" encoding="UTF-8" ?>
<os:openServiceDescription
   xmlns:os="http://www.microsoft.com/schemas/openservicedescription/1.0">
   <os:homepageUrl>http://examples.proiedev.com/04/basic/xmlservice/</os:homepageUrl>
   <os:display>
      <os:name>Tweet This!</os:name>
<os:icon>http://examples.proiedev.com/04/basic/xmlservice/favicon.ico</os:icon>
<os:description>Tweet website content to your Twitter account.</os:description>
</os:display>
<os:activity category="Twitter">
<os:activityAction context="selection">
<os:execute
action="http://examples.proiedev.com/04/basic/xmlservice/service.php"
method="get">
<os:parameter name="mode" value="execute" type="text" />
<os:parameter name="type" value="selection" type="text" />
<os:parameter name="documentUrl" value="{documentUrl}" type="text" />
<os:parameter name="selection" value="{selection}" type="text" />
</os:execute>
</os:activityAction>
</os:activity>
</os:openServiceDescription>Note
This and the remaining examples in this chapter use XML tags and variables described in Tables 4-2 and 4-3. Refer back to those tables for detailed information on how each portion of the XML file works.
The definition begins by creating a root <os:openServiceDescription> tag. The home page of the Accelerator is set in <os:homepageUrl> tags. Display information is defined in the <os:display> tag: the name is Tweet This, the icon is an ICO file residing on the same domain as the <os:homepageUrl>, and the description reads "Tweet website content to your Twitter account."
The <os:activity> defines how IE will call the Twitter web service handler. This example uses the category attribute tag to state that its category is a Twitter extension. The <os:activityAction> tag tells the browser to send the currently selected content to the web service if it's being used in the context of a selection. (Since only the selection context was defined, IE will not send information or display the Accelerator when nothing on the current page is selected).
The <os:execute> tag binds the <os:activityAction> tag to the extension's click event. It also specifies the web service URL with the action attribute and the HTTP method in the method attribute. <os:execute> has four child <os:parameter> tags, each defining a piece of data that IE will send to Twitter. The first two are hard-coded variables that indicate the initiating event (execute) and the context (selection). The last two parameters surface the source document's URL {documentURL} and the text selected on that page {selectedText}.
The Tweet This! Accelerator uses a server-side script (shown in Listing 4-2) to convert data sent from IE into a Twitter post. The script submits a string no longer than 140 characters and one that contains plain text. In addition to the posting requirements, this script includes a link to the source page that is minified through a URL-shortening service.
Example 4.2. Web Service Handler for the Tweet This! Accelerator
<?php

   //  Include some necessary functions (truncateString, getHTTPVar, ...)
   require_once('functions.php'),

   //  Set the HTTP method used for passed variables
   $method             = METHOD_GET;

   //  Get values from HTTP variables
   $documentUrl        = getHTTPVar("documentUrl",   $method);
   $selection          = getHTTPVar("selection",     $method);

   //  Function to build a tweet (minify a URL and truncate a string
   //  to 140 characters)
   function buildTweet() {

      global $documentUrl;
      global $selection;

      //  Minify the URL (e.g., TinyURL)
      $minifiedURL = minifyURL($documentUrl);

      //  Truncate the text + URL to 140 characters or less
      $output  = truncateString($selection, 140 - strlen($minifiedURL));
      $output .= " " . $minifiedURL;

      //  Return the output (urlencoded if specified)
      return  urlencode($output);

   }

   //  Execute the Accelerator
   header('Location: http://twitter.com/home?status=' . buildTweet(true));

?>
The web service begins by reading the document URL and the page selection sent to it via an HTTP GET request. The page uses a special function for this (getHTTPVar()) that sanitizes the string for safe use. The document URL is then made into a short string (minified) through TinyURL.
The script takes selected content and minified URL and uses them to create a new message that is 140 or less characters in length. This value is sent to Twitter through an HTTP redirect, posting the string to a user's account (one opened in the same session context as the Accelerator).
Accelerators can handle three basic contexts, or types of data: selections, links, and documents. When the Accelerator icon or the context menu is triggered on a page, IE displays the Accelerators that are registered for a specific context. For instance, if the context menu is triggered over a text selection, only those Accelerators registered for the selection context are available.
The following sections describe each of these contexts and how they can be handled by Accelerators and their related web services.
The selection context represents content selected on a web page. Selected content can be text or a combination of text, images, and other content. Data from the selection context is served to a web service via the {selection} variable as either text or HTML. Listing 4-3 shows an XML definition that registers for the selection context.
Example 4.3. Accelerator XML for the Selection Context
...
<os:activityAction context="selection">
   <os:execute
      action="http://examples.proiedev.com/04/basic/post/service.php"
      method="post">
      <os:parameter name="mode" value="execute" type="text" />
      <os:parameter name="type" value="selection" type="text" />
      <os:parameter name="documentUrl" value="{documentUrl}" type="text" />
      <os:parameter name="selection" value="{selection}" type="text" />
   </os:execute>
</os:activityAction>
...
An action registers for the selection context through the context attribute of <os:activityAction>, setting its value to selection. The content can be passed to a web service through the {selection} variable previously mentioned. You can set web services to receive text contained within a selection by setting the type attribute of the parameter using the {selection} variable to text. You can set them to receive HTML from this variable by setting the same attribute to html.
Listing 4-4 shows the Tweet This! Accelerator handling content from the selection context.
Example 4.4. Tweet This! Web Service Handler for the Selection Context
//  Set the HTTP method used for passed variables
$method             = METHOD_POST;

//  Get values from HTTP variables
$documentUrl        = getHTTPVar("documentUrl",   $method);
$selection          = getHTTPVar("selection",     $method);

//  Function to build a tweet (minify a URL and truncate a string
//  to 140 characters)
function buildTweet() {

  global $documentUrl;
  global $selection;

  //  Minify the URL (e.g., TinyURL)
  $minifiedURL = minifyURL($documentUrl);

  //  Truncate the text + URL to 140 characters or less
  $output  = truncateString($selection, 140 - strlen($minifiedURL));
$output .= " " . $minifiedURL; // Return the output (urlencoded if specified) return urlencode($output); }
In this example, the web service grabs the values from {documentUrl} and {selection} through the HTTP request. It proceeds to build a new Twitter message whose content is based on the {selection} text and that creates a link to the value stored in {documentUrl}.
Special care should be used when accepting HTML from the {selection} variable. Content in this context could contain script intended for cross-site scripting attacks. IE's XSS filter will trigger if the browser detects script being displayed directly from this context in a web service; however, it will not catch all instances. Web services intending to receive raw HTML content from a selection context should properly sanitize this content before using it for internal functionality or displaying it to users.
Note
Web services that receive HTML content from an Accelerator's {selection} context should take care to sanitize return values before using it for internal functionality or displaying it to users. IE's XSS filter may trigger if this content is used improperly, but it should not be relied upon to secure users or sites in all cases.
The link context represents Accelerators run when a link is the target of Accelerator execution. Links include any object (text, image, or otherwise) that is encapsulated in an <a> tag. Accelerators opting into this context have a number of link-specific variables available to them: {linkText}, {linkRel}, {linkType}, {linkDomain}, and {linkHost}. Listing 4-5 shows the Tweet This! Accelerator opting into the link context.
Example 4.5. Accelerator XML for the Link Context
...
<os:activityAction context="link">
<os:execute
action="http://examples.proiedev.com/04/content/link/service.php"
method="post">
<os:parameter name="link" value="{link}" type="text" />
<os:parameter name="linkText" value="{linkText}" type="text" />
</os:execute>
</os:activityAction>...An action registers for the link context through the context attribute of <os:activityAction>, setting its value to link. The content can be passed to a web service through any of the {link...} variables. These variables can only be transmitted via text formatting (unlike {selection}, which can be sent as either text or HTML).
Listing 4-6 shows the Tweet This! web service extended to handle the link context. In this case, the service uses the {linkText} passed from the Accelerator as the message content and the {link} variable as the target URL.
Example 4.6. Tweet This! Web Service Handler for the Link Context
// Set the HTTP method used for passed variables
$method = METHOD_POST;
// Get values from HTTP variables
$link = getHTTPVar("link", $method);
$linkText = getHTTPVar("linkText", $method);
// Function to build a tweet (minify a URL and truncate a string
// to 140 characters)
function buildTweet() {
global $link;
global $linkText;
// Minify the URL (e.g., TinyURL)
$minifiedURL = minifyURL($link);
// Truncate the text + URL to 140 characters or less
$output = truncateString($linkText , 140 - strlen($minifiedURL));
$output .= " " . $minifiedURL;

  //  Return the output (urlencoded if specified)
  return  urlencode($output);

}The document context represents execution of an Accelerator without a clear target—essentially, it is the catchall case, covering everything besides selection or link targeting. For instance, right-clicking any space in a document or on an image will trigger Accelerators opting into the document context. The {documentUrl}, {documentTitle}, {documentDomain}, and {documentHost} variables are available in this context. Listing 4-7 shows the Tweet This! Accelerator handling the document context.
Example 4.7. Accelerator XML for the Document Context
...
<os:activityAction context="document">
   <os:execute
      action="http://examples.proiedev.com/04/content/link/service.php"
      method="post">
      <os:parameter name="documentUrl" value="{documentUrl}" type="text" />
      <os:parameter name="documentTitle" value="{documentTitle}" type="text" />
   </os:execute>
</os:activityAction>
...
An action registers for the document context through the context attribute of <os:activityAction>, setting its value to document. The content can be passed to a web service through any of the {document...} variables. These variables can only be transmitted via text formatting.
Listing 4-8 shows the Tweet This! web service handling the document context. In this case, the service uses the {documentTitle} as the Twitter post content and the {documentUrl} as the target link.
Example 4.8. Tweet This! Web Service Handler for the Document Context
//  Set the HTTP method used for passed variables
$method             = METHOD_POST;

//  Get values from HTTP variables
$documentUrl        = getHTTPVar("documentUrl",   $method);
$documentTitle      = getHTTPVar("documentTitle", $method);

//  Function to build a tweet (minify a URL and truncate a string
//  to 140 characters)
function buildTweet() {

  global $documentUrl;
  global $documentTitle;

  //  Minify the URL (e.g., TinyURL)
  $minifiedURL = minifyURL($documentUrl);

  //  Truncate the text + URL to 140 characters or less
  $output  = truncateString($documentTitle, 140 - strlen($minifiedURL));
  $output .= " " . $minifiedURL;

  //  Return the output (urlencoded if specified)
  return  urlencode($output);

}Accelerators have the option to provide content previews without having to make a full navigation to a web service. Previews are displayed as small windows (320×240 pixels) to the right or left of the context menu. They become visible when the mouse enters an Accelerator's menu UI and disappear when it leaves that same area. An example of the preview can be seen in the Map with Bing Accelerator, shown in Figure 4-5.
Adding a preview to an Accelerator requires two changes be made to it: the insertion of an <os:preview> tag into its XML definition and the inclusion of a web service that provides a page supporting the size and security constraints of the preview window.

Adding a preview window the Tweet This! Accelerator follows the same process. First, <os:preview> tags are added to any <os:activityAction> where a preview window is desired. In this case, a preview window will be added to all the contexts (selection, document, and link). Listing 4-9 shows the result of this change.
Example 4.9. Tweet This! XML Definition with Preview Support
...
      <os:activityAction context="document">
         <os:preview
            action="http://examples.proiedev.com/04/twitter/service.php"
            method="post">
            <os:parameter name="mode" value="preview" type="text" />
            <os:parameter name="type" value="document" type="text" />
            <os:parameter name="documentUrl" value="{documentUrl}" type="text" />
            <os:parameter name="documentTitle" value="{documentTitle}" type="text" />
         </os:preview>
      ...
      </os:activityAction>
      <os:activityAction context="selection">
         <os:preview
            action="http://examples.proiedev.com/04/twitter/service.php"
            method="post">
            <os:parameter name="mode" value="preview" type="text" />
            <os:parameter name="type" value="selection" type="text" />
            <os:parameter name="documentUrl" value="{documentUrl}" type="text" />
            <os:parameter name="selection" value="{selection}" type="text" />
         </os:preview>
      ...
      </os:activityAction>
      <os:activityAction context="link">
         <os:preview
            action="http://examples.proiedev.com/04/twitter/service.php"
method="post">
<os:parameter name="mode" value="preview" type="text" />
<os:parameter name="type" value="link" type="text" />
<os:parameter name="link" value="{link}" type="text" />
<os:parameter name="linkText" value="{linkText}" type="text" />
</os:preview>
...
</os:activityAction>
...Each <os:preview> tag needs to pass the same information as the <os:execute> tags in each action. To do this, the <os:parameter> tags in each sibling <os:execute> are copied over, the only change to the copies being the value of the mode tags.
The second half of the change is shown in Listing 4-10. The update adds HTML to the web service that is specially formatted to display in the preview window. Logic is added to the server side, which either displays the preview content or calls into Twitter based on whether the preview or execute mode was used.
Example 4.10. Web Service Handler for the Tweet This! Accelerator with Preview Support
<?

   ...

   //  Execute the Accelerator if the mode is set to MODE_EXECUTE
   if($mode == MODE_EXECUTE) {
      header('Location: http://twitter.com/home?status=' . buildTweet(true));
      exit();
   }

   //  Otherwise, display the preview!

?>

<html>
   <head>
      <meta http-equiv="X-UA-Compatible" content="IE=edge">
      <meta http-equiv="Pragma" content="no-cache">
      <title>Tweet This! Preview</title>
                <link type="text/css" rel="stylesheet" href="styles/preview.css">
   </head>
   <body>
      <div id="container">
      <div id="container">
         <div id="logo">
            <img src="images/logo.png">
         </div>
         <div id="preview"><img id="shadow" src="images/shadow.png"></div>
         <div id="content"><? echo(buildTweet()); ?></div>
      </div>
   </body>
</html>
Figure 4-6 shows the Tweet This! Accelerator being used to preview content before sending data to the Twitter web service.

IE provides a simple model for deploying Accelerators inside or outside of the browser. The following sections review script-based and COM-based interfaces that can be used to install and deploy Accelerators onto user accounts.
The most common method for installing and deploying Accelerators is through a web page using markup and JavaScript. Accelerators can be installed using the AddService() function, located on the window.external JavaScript object (see Listing 4-11).
Example 4.11. The window.external.AddService() Method
window.external.AddService('twitter.Accelerator.xml'),This call can be tied to any user-initiated object or event such as the onClick event of a <button>. Listing 4-12 shows a link that allows a user to install the Tweet This! Accelerator when clicked.
Example 4.12. Using AddService in an <a> Tag
<a href="javascript:window.external.AddService
('twitter.Accelerator.xml'), return false;">
Install the Tweet This! Accelerator
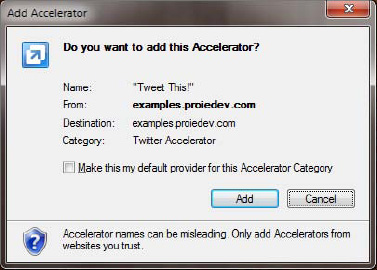
</a>Invocation of AddService() presents a user with an installation dialog (see Figure 4-7). The dialog contains an Accelerator's name, source web site, destination, and category. A user may set the new Accelerator as the default service provider for a specific category.
Users can access the new Accelerator through the context menu immediately after installation.
The isServiceInstalled() method (see Listing 4-13) allows developers to check if an Accelerator is already installed. Web services may invoke isServiceInstalled() to control the display of Accelerator installation buttons on web pages. They may also call it to provide specially formatted content for those users that have a given Accelerator installed.
Example 4.13. The window.external.isServiceInstalled() Method
window.external.isServiceInstalled('twitter.Accelerator.xml'),This API may only be called on pages from the Accelerator's domain; for example, it cannot be called to determine if a competitor's Accelerator is installed.
Accelerator installation is not limited to web sites; binary applications that wish to install Accelerators can do so through public OpenService COM interfaces. These interfaces expose functionality that mimics that found in the JavaScript functions, allowing Accelerators to be installed by pointing IE to the URL of their XML definition. The following sections demonstrate these interfaces and detail how Accelerators are stored in the registry and user-owned folders after installation.
IE exposes a number of interfaces that handle the installation and management of Accelerators. Exposed OpenService interfaces may be found in the openservice.idl definition file.
Binary applications installing Accelerators will use two interfaces and one coclass to do so: IOpenServiceManager, IOpenService, and the OpenServiceManager coclass. Listing 4-14 shows a C# interop file that defines the existence of these items for use in a .NET application.
Example 4.14. C# Interop Definition for Interfaces Used in Accelerator Installation
[Guid("098870b6-39ea-480b-b8b5-dd0167c4db59")]
[ComImport, ClassInterface(ClassInterfaceType.None)]
public class OpenServiceManager
{
   //  Coclass exposed through IEOpenServiceObjects
}

[Guid("5664125f-4e10-4e90-98e4–e4513d955a14")]
[ComImport, InterfaceType(ComInterfaceType.InterfaceIsIUnknown)]
public interface IOpenServiceManager
{
   void InstallService(
      [MarshalAs(UnmanagedType.LPWStr)] string pwzServiceUrl,
      out IOpenService ppService);

   void UninstallService(
      IOpenService pService);

   void GetServiceByID(
      [MarshalAs(UnmanagedType.LPWStr)] string pwzID,
      out IOpenService ppService);
}

[Guid("C2952ED1-6A89-4606-925F-1ED8B4BE0630")]
[ComImport, InterfaceType(ComInterfaceType.InterfaceIsIUnknown)]
public interface IOpenService
{
   void IsDefault(
      [MarshalAs(UnmanagedType.Bool)] out bool pfIsDefault);

   void SetDefault(
      [MarshalAs(UnmanagedType.Bool)] bool fDefault,
      IntPtr hwnd);

   void GetID(
      [MarshalAs(UnmanagedType.BStr)] out string pbstrID);
}
A sample project—the Manage Accelerators application—was created to highlight the use of the OpenService COM definitions. The sample shown in Figure 4-8 is a simple form containing a text box, a check box, and a button.

The text box accepts a URL pointing to an Accelerator's XML definition file. The check box tells the sample to either request that the Accelerator be installed as a default for its category (checked) or install without requesting default status (unchecked). The button handles the installation process through its mouse click event handler.
The installation process, shown in Listing 4-15 through an event handler, begins with the definition of IOpenServiceManager and IOpenService objects. The openServiceManager variable is set to a new instance of the OpenServiceManager coclass, based on the IOpenServiceManager interface. The openService variable is defined as an IOpenService type but is left uninitialized; the installer function will use this variable to reference a new IOpenService object created during the installation process.
Example 4.15. Button Event Handler That Triggers an Accelerator Installation
//  Handle the onClick event of the Install button
private void buttonInstallAccelerator_Click(object sender, EventArgs e)
{

   //  Create the OpenServiceManager and IOpenService objects
   IOpenServiceManager openServiceManager = (IOpenServiceManager) new OpenServiceManager();
   IOpenService openService;

   //  Install the service and have an object representation saved to
   //  the openService placeholder
   openServiceManager.InstallService(
      this.textServiceURL.Text,      // URL of the Accelerator
      out openService                // Created OpenService object
      );

   //  If instructed to set as default, do so by calling the SetDefault
   //  function on the openService object.  Send this form's window handle
   //  in case a modal dialog needs to be thrown
   if (this.checkDefault.Checked)
      openService.SetDefault(true, this.Handle);

}
The InstallService() function is called from the openServiceManager variable to initiate an Accelerator installation. This function accepts a URL pointing to an XML file (in this case, the string is found in the sample application's text box) and a variable to write a newly created IOpenService object (the uninitialized openService variable in Listing 4-15). If this function successfully installs the Accelerator, the openService variable will be set to a valid object using the IOpenService interface.
Successfully installed Accelerators can be set as the default extension in their category through the SetDefault() method on an IOpenService object. The Manage Accelerators example provides a check box allowing a user to decide if an Accelerator should be installed as a default. The SetDefault() function is called on the openService variable when this option is selected. This function accepts two parameters: a Boolean setting the Accelerator to the default (true) or not (false), and a window handle (HWND) of a visible window owned by the calling application.
The registry and user folders can be used to install an Accelerator outside of IE. Data is stored in the HKEY_CURRENT_USERSoftwareMicrosoftWindowsCurrentVersionInternet SettingsActivities registry key. Local copies of an Accelerator's XML definition are saved in IE's Application Data folder for a given user. Listing 4-16 highlights the structure of the registry key.
Example 4.16. Example of an Accelerator That Passes a Version Value
HKEY_CURRENT_USER
   Software
      Microsoft
         Windows
            CurrentVersion
               Internet Settings
                  Activities
                     (Category)
                        (Domain)
                           (Action1)
                              preview
                                 (Parameter1)
                                 ...
                                 (Parametern)
                              execute
                                 (Parameter1)
                                 ...
                                 (Parametern)
                           (Action2)
                              ...
                           (Action3)
                              ...
Accelerators are stored in keys based on their category (Map, Email, etc.). Each category specifies the default Accelerator for itself in the DefaultActivity value. Under each category is a folder for the Accelerator's host domain; note the limitation of one host domain per category, as mentioned in the previous section on categories and defaults. Table 4-4 highlights these keys and values, as well as their corresponding mapping in the OpenService XML schema.
Table 4.4. Keys and Values for a Category Key ...Activities(Category)
Name | Value Type | XML Mapping | Description/Range | |
|---|---|---|---|---|
Value | (Default) | REG_SZ | - | Not used |
Value | DefaultActivity | REG_SZ | <os:activityAction> | String representing the link |
Key | {Domain} | - | - | Registry key representing a preview action and parameters |
The {Domain} key under a {Category} represents an Accelerator. Most of the values under this key directly map to values specified in the metadata of the XML definition file, with a few notable exceptions. The Description, DisplayName, HomepageUrl, Icon, and Verb values map directly to attributes and values found in the OpenService XML schema. Of the remaining values, ContentMask presents the most unique construct; its value must be a bitmask of all supported contexts whose values map to the OpenServiceActivityContentType enumeration in Listing 4-17.
Example 4.17. The OpenServiceActivityContentType Enum, Used for the ContentMask Bitmask
public enum OpenServiceActivityContentType
{
   ActivityContentNone = −1,     // Ignore
   ActivityContentDocument,      // 1
   ActivityContentSelection,     // 2
   ActivityContentLink,          // 4
   ActivityContentCount          // Ignore
};
Table 4-5 details all the values associated with this key in further detail.
Table 4.5. Keys and Values for a Domain Key ...Activities(Category)(Domain)
Name | Value Type | XML Mapping | Description/Range | |
|---|---|---|---|---|
Value |
|
|
| Not used |
Value |
|
|
| Integer from 1 to 3, representing the number of actions handling each context |
Value |
|
|
| Integer bitmask of all contexts handled by actions; values map to the |
Value |
|
|
| Integer representing deletion state; either 0 (present) or 1 (deleted) |
Value |
|
|
| String used as the description |
Value |
|
|
| String used as the display name |
Value |
|
|
| String indicating the Accelerator's source domain |
Value |
|
|
| String representing the Accelerator's URL origin |
Value |
|
|
| Integer representing enabled state; either 0 (disabled) or 1 (enabled) |
Value |
|
|
| String representing the home page of the Accelerator's creator |
Value |
|
|
| String pointing to the Accelerator's identifying icon |
|
| Integer; value must equal 1 | ||
Value |
|
|
| String representing the Accelerator's category |
Value |
|
|
| String representing the local file system location of the Accelerator's XML definition |
Value |
|
|
| String representing the Accelerator's XML URL |
Key |
|
|
| Registry keys representing up to three actions associated with an Accelerator; each action covers a specific context |
The Domain key also contains subkeys that define actions (supported contexts and their web service definitions) for the Accelerator. One to three action keys can exists (one is required), and each is sequentially numbered from one to three (e.g., Action1, Action2, Action3). Contents of these keys are described in the following paragraphs.
An Accelerator can have at least one and up to three Action{1..3} keys. These keys represent Accelerator actions that handle one of the three available contexts: selection, link, or document. The Context value represents this information, whose value is the same as that contained in the context attribute of the <os:activityAction> tag. HasPreview is a Boolean DWORD, where 0 means there is no preview associated with an Accelerator and 1 indicates there is one (which means a corresponding preview key must exist). The execute and preview keys represent the execute and preview methods defined in an Accelerator's <os:execute> and <os:preview> tags, respectively. Table 4-7 highlights the details of these attributes and keys.
Table 4.6. Keys and Values for an Execute or Preview Key ...(Domain)(Action#)
Name | Value Type | XML Mapping | Description/Range | |
|---|---|---|---|---|
Value |
|
|
| Not used |
Value |
|
|
| String representing the Accelerator's context (selection, document, link) |
Value |
|
|
| Integer representing whether an Accelerator has a preview (1) or doesn't (0) |
Key |
|
| Registry key representing an execute action and parameters | |
Key |
|
|
| Registry key representing a preview action and parameters |
The execute and preview keys map to the <os:execute> and <os:preview> tags, respectively, in an Accelerator's XML definition. All values under this key, save for ParamCount, directly map to the attributes in each tag. Parameters are stored as sequentially numbered child keys, the total number of which is reflected in the ParamCount value. Detailed information can be found in Table 4-7.
Table 4.7. Keys and Values for an Execute or Preview Key ...(Domain)(Action#)(execute|preview)
Name | Value Type | XML Mapping | Description/Range | |
|---|---|---|---|---|
Value |
|
|
| Not used. |
Value |
|
|
| String representing the web service to be called. |
Value |
|
|
| String specifying the HTTP request type, either get or post. |
Value |
|
|
| String specifying the MIME type of the request sent to a web service. |
Value |
|
|
| String specifying the character set of the web service request. |
Value |
|
|
| Integer representing the number of parameters defined for this method. |
Key |
|
| Registry key representing parameters for this method. The key count must match the number in ParamCount. |
Parameters for execute and preview methods each have a key named in sequential order starting with Parameter1. These keys and their values directly map to the structure found in the OpenService <os:parameter> tag. The name value represents the parameter name, the same value found in the name attribute of <os:parameter>; the type and value values also map to attributes with the same names in this tag. Detailed information can be found in Table 4-8.
Table 4.8. Keys and Values for a Parameter Key ...(Domain)(Action#)(execute|preview)(Parameter#)
Name | Value Type | XML Mapping | Description/Range | |
|---|---|---|---|---|
Value |
|
|
| Not used. |
Value |
|
|
| String representing the name of a parameter to be sent to a web service. |
Value |
|
|
| String representing format of replacement variables such as |
Value |
|
|
| String representing the value of the parameter to be sent to a web service. |
Listing 4-18 aims to clarify the preceding tables. The following registry script represents an export of the Tweet This! Accelerator. The file begins with the category key (in this case, "Twitter") and continues on to the definition of individual parameters; the export demonstrates the structure of an Accelerator's registry entry and the hierarchy of its data.
Example 4.18. Registry Export of the Tweet This! Accelerator
Windows Registry Editor Version 5.00

[HKEY_CURRENT_USERSoftwareMicrosoftWindowsCurrentVersionInternet SettingsActivitiesTwitter]

[HKEY_CURRENT_USERSoftwareMicrosoftWindowsCurrentVersionInternet SettingsActivitiesTwitterproiedev.com]
"Icon"="C:\Users\mattcrow\AppData\LocalLow\Microsoft\Internet Explorer\Services\Twitter_proiedev.com.ico"
"Description"="Tweet website content to your Twitter account."
"HomepageURL"="http://examples.proiedev.com/04/twitter/"
"Domain"="proiedev.com"
"Verb"="Twitter"
"DisplayName"="Tweet This!"
"XMLUrl"="http://examples.proiedev.com/04/twitter/twitter.xml"
"XML"="C:\Users\mattcrow\AppData\LocalLow\Microsoft\Internet Explorer\Services\Twitter_proiedev.com.xml"
"DownloadUrl"="http://examples.proiedev.com/04/twitter/"
"Type"=dword:00000001
"Enabled"=dword:00000001
"Deleted"=dword:00000000
"ActionCount"=dword:00000003
"ContentMask"=dword:00000007

[HKEY_CURRENT_USERSoftwareMicrosoftWindowsCurrentVersionInternet SettingsActivitiesTwitterproiedev.comAction1]
"Context"="document"
"HasPreview"=dword:00000001

[HKEY_CURRENT_USERSoftwareMicrosoftWindowsCurrentVersionInternet SettingsActivitiesTwitterproiedev.comAction1execute]
"Action"="http://examples.proiedev.com/04/twitter/service.php"
"Method"="post"
"Enctype"="application/x-www-form-urlencoded"
"Accept-charset"="utf-8"
"ParamCount"=dword:00000004

[HKEY_CURRENT_USERSoftwareMicrosoftWindowsCurrentVersionInternet SettingsActivitiesTwitterproiedev.comAction1executeParameter1]
"Name"="mode"
"Value"="execute"
"Type"="text"

...
There are a myriad of settings that are set in the Accelerator installation process. While some use of the registry is unavoidable, developers should use either the script-based or COM versions of the OpenService APIs for installation and management of Accelerators.
Accelerators specify a category in their XML definition that best describes their activity. The default Accelerator for each category is chosen either by the user through web-based installation and Manage Add-Ons, or by a binary application run under user consent. If an Accelerator is installed as a default service provider, or if it is the only Accelerator in a given category, it will be shown on the top level of its context menu; otherwise, it will be in the second-level Accelerator submenu (see Figure 4-9).

The lack of a fixed set of categories lends itself to abuse. Accelerators can "automatically" become a default provider and earn better placement by creating unique category names. Although the results are tempting, developers must avoid creating unique categories for every Accelerator offered. Not only does this add to clutter in a user's context menu, too many Accelerators may turn off users to a brand. Since Manage Add-Ons offers an easy way for users to remove them, Accelerators for a specific brand can easily be uninstalled if they provoke a user to do so.
Accelerators must be uninstalled from the Manage Add-Ons interface within IE (see Figure 4-10). Developers cannot uninstall Accelerators from a web page via JavaScript.

Users can disable an Accelerator by selecting an Accelerator and clicking the Disable button in the information pane, as shown in Figure 4-11.
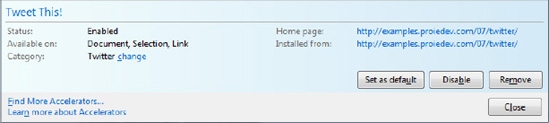
This pane also allows for two more actions: "Remove as default" removes an Accelerator as the default for its category, and Remove uninstalls the Accelerator.
Developers may come across a number of issues outside of the ones outlined here. The following sections cover some more advanced topics, such as using Accelerators for third-party services and localization.
Accelerators can be upgraded in the same way they are installed—using the AddService() method. Instead of being given a standard installation dialog, users are asked if they wish to replace the existing Accelerator, as shown in Figure 4-12.

There is no automatic, push-down mechanism whereby a web service can upgrade previously installed Accelerators. Accelerators can, however, be designed to pass a version number to a web service via a <parameter> tag. Users can then be prompted to upgrade an Accelerator from that service.
Listing 4-19 shows an Accelerator that passes version information to its web service. On receipt of the version variable, a web service may return a notice to a user that an upgrade is necessary through the preview window or the target page.
Example 4.19. Example of an Accelerator That Passes a Version Value
...
    <activityAction context="selection">
        <execute
          action="http://examples.proiedev.com/book/examples/flip/flip.html"
          method="get">
            <parameter name="t" value="{selection}" type="text" />
            <parameter name="version" value="1.0" type="text" />
        </execute>
    </activityAction>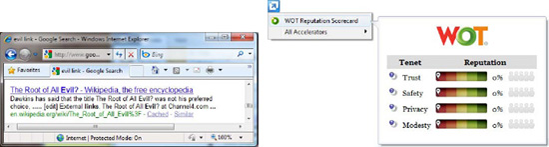
...Accelerators don't need to defer to a new window or even implement the execute method in their definition. Preview windows can be used to create rich experiences without the need to navigate to a web service. Figure 4-13 demonstrates an Accelerator called the WOT Reputation Scorecard, and an extension that uses APIs provided by the Web-of-Trust link reputation service. This Accelerator allows users to learn the reputation of a URL before navigating to it.
Listing 4-20 shows the XML definition for this Accelerator. For each context, the only method is available is preview, which routes link information back to a web service. There is no execute method.
Example 4.20. XML for the WOT URL Reputation Accelerator
<?xml version="1.0" encoding="UTF-8" ?>
<os:openServiceDescription
   xmlns:os="http://www.microsoft.com/schemas/openservicedescription/1.0">
   <os:homepageUrl>http://examples.proiedev.com/04/advanced/mixed/</os:homepageUrl>
   <os:display>
      <os:name>WOT Reputation Scorecard</os:name>
      <os:icon>http://examples.proiedev.com/04/advanced/mixed/favicon.ico</os:icon>
      <os:description>The WOT community has rated millions of websites.
         Use their warnings to protect yourself from online scams, sites
         with adult content and spam.
      </os:description>
   </os:display>
   <os:activity category="Safety">
      ...
      <os:activityAction context="link">
         <os:preview
            action="http://examples.proiedev.com/04/advanced/mixed/service.php" k
            method="post">
            <os:parameter name="mode" value="document" type="preview" />
            <os:parameter name="type" value="document" type="link" />
            <os:parameter name="documentDomain" value="{documentDomain}" type="text" />
            <os:parameter name="linkDomain" value="{linkDomain}" type="text" />
         </os:preview>
      </os:activityAction>
   </os:activity>
</os:openServiceDescription>
Listing 4-21 is the web service for this Accelerator. Unlike the Tweet This! example, the main focus of this page is to display content in the preview window without navigating to a web service.
Example 4.21. XML for the WOT URL Reputation Accelerator
<html>
   <head>
      <meta http-equiv="X-UA-Compatible" content="IE=edge">
      <meta http-equiv="Pragma" content="no-cache">
      <title>WOT URL Reputation Service</title>
                <link type="text/css" rel="stylesheet" href="styles/preview.css">
   </head>
   <body topmargin="0" leftmargin="0">
      <div id="logo"><img src="images/logo.png" width="100px" height="38px"></div>
      <table border="0" cellpadding="0" cellspacing="0" align="center">
         <thead>
            <tr>
               <td width="71px" colspan="2" align="center">Tenet</td>
               <td width="171px" colspan="3" align="center">Reputation</td>
            </tr>
         </thead>
         <tbody>
            <? foreach($components as $k => $v) { ?>
            <tr>
               <td width="16px"><img src="images/<? echo(getReputationIcon($k)); ?>"></td>
               <td width="55px"><? echo(getComponentName($k)); ?></td>
               <td width="100px" class="testimony"><img src="images/marker.png"
                  style="margin-left: <? echo(getMarkerPos($k)); ?>px;"></td>
               <td width="20px"><? echo(getReputationValue($k)); ?>%</td>
               <td width="51px"><img src="images/<? echo(getConfidenceIcon($k)); ?>"></td>
            </tr>
            <? } ?>
         </tbody>
      </table>
   </body>
</html>
When this service receives link information, it queries the WOT API for information on that link. It uses the preview window to format the results of this API call into content consumable by an end user.
The OpenService schema does not provide for the built-in localization of Accelerators. Developers may localize Accelerators by creating an XML definition for each supported language. Listings 4-22 and 4-23 show an Accelerator localized in English and Spanish, respectively.
Example 4.22. The Tweet This! Accelerator Localized in English
<?xml version="1.0" encoding="UTF-8" ?>
<os:openServiceDescription
   xmlns:os="http://www.microsoft.com/schemas/openservicedescription/1.0">
   <os:homepageUrl>http://examples.proiedev.com/04/basic/xmlservice/</os:homepageUrl>
   <os:display>
      <os:name>Tweet This!</os:name>
      <os:icon>http://examples.proiedev.com/04/basic/xmlservice/favicon.ico</os:icon>
<os:description>
Share and discover what's happening right now,
anywhere in the world.
</os:description>
...Example 4.23. The Tweet This! Accelerator Localized in Spanish
<?xml version="1.0" encoding="UTF-8" ?>
<os:openServiceDescription
   xmlns:os="http://www.microsoft.com/schemas/openservicedescription/1.0">
   <os:homepageUrl>http://examples.proiedev.com/04/basic/xmlservice/</os:homepageUrl>
   <os:display>
      <os:name>¡Publique su selección con Twitter!</os:name>
      <os:icon>http://examples.proiedev.com/04/basic/xmlservice/favicon.ico</os:icon>
      <os:description>
         Comparte y descubre qué está pasando ahora mismo
         en cualquier lugar del mundo.
      </os:description>
...
A localized Accelerator may point to a localized web service. A variable can be passed to a web service indicating a desired localization for that service. Listing 4-24 is an example of this—a service receives a locale parameter that it can use to render the page—in this case, en-us for US English.
Example 4.24. Passing a Target Language to a Web Service Using Parameters
...
<activityAction context="selection">
   <execute
      action="http://examples.proiedev.com/book/examples/flip/flip.html"
      method="get">
      <parameter name="t" value="{selection}" type="text" />
      <parameter name="version" value="1.0" type="text" />
      <parameter name="locale" value="en-us" type="text" />
   </execute>
</activityAction>
...Other applications and browsers are free to use the Accelerator model in their platforms under the Creative Commons license. While no browsers have implemented Accelerators as of this book's publication, a Firefox add-on is available. Michael Kaply's IE8 Accelerators for Firefox places Accelerators into the Firefox context menu in the same way as IE. It can be downloaded from the Firefox Add-Ons site (http://addons.mozilla.org).
Accelerators can be used to create extensions that link a wide variety of services to IE's context menu. Despite the wide range of potential Accelerators, there are a common set of best practices that should be followed during the design, development, and deployment process.
Users are provided with Accelerator information—its name, description, category, and so on—during the installation process and later on through the Manage Add-Ons interface (see Figure 4-14). This metadata is defined in the XML definition file for each Accelerator.

Providing relevant information allows users to make informed decisions about Accelerators and stay in control of their browsing experience.
Security is an important aspect of Accelerator design. Accelerators offer users and developers a new way of associating web content to web services, but along with this comes an increased attack surface. Developers must take a careful look at what data will be sent to a web service and how that web service handles data—this includes controlling how data is integrated into a web service. Thorough planning can prevent malicious activity such as script injection and denial-of-service attacks.
To protect users from denial-of-service and drive-by attacks, the web browser instance shown in preview mode places limits on active content. ActiveX controls can run, but the controls must be already installed and approved to run on the service's domain before they can be used by the preview; no information bar will be shown.
Developers must also be mindful of script injection attacks when designing Accelerators. An example of this form of attack is shown in Listing 4-25, in which the script is sent through a GET variable.
Example 4.25. An Example Script Injection Attack Using GET Variables
http://www.example.com/action.php?t=%3Cscript%3Ealert(%22Pwnd.%22)%3B%3C%2Fscript%3E
Other forms of XSS attacks, such as DOM-based and persistent script injection via GET and POST variables, are not mitigated by the browser. Despite built-in protections such as IE's XSS filter and Firefox's NoScript extension, it's always a good idea to sanitize input of variables from an Accelerator (or other input methods). Client-side Accelerator code may use the window.toStaticHTML() sanitization method in IE 8 to mitigate against script injection. When using server-side languages such as PHP, Ruby, and ASP.NET, developers should take advantages of built-in or library-based sanitization functions before rendering untrusted input. The Microsoft Anti-XSS library is a great starting point for developers looking to help fight against this problem.
Performance of web pages belonging to a service can also impact the experience of using an Accelerator. IE allows users to determine their own tolerance for slow controls by displaying a "Loading . . ." screen during an Accelerator's loading process. Fast-loading pages will avoid such an experience. Tooling applications like the IE Developer Tools, Fiddler, and Firebug can be used to ensure page load time is kept to a minimum.
The preview window is 320 pixels in width by 240 pixels in height on a 96-dots-per-inch (dpi) display. Any content rendered in the preview pane will be trimmed to this size; scrollbars are disabled as well.
High DPI mode (120 or 144 dpi) should be considered when creating Accelerators. When IE is running in High DPI mode, the preview windows will be expanded by appropriate measure (e.g., 120 percent for 120 dpi).
The following checklist highlights some best practices developers can use to design, build, and deploy quality Accelerators:
Provide concise and relevant information in the Accelerator XML definition.
Create a deployment, installation, and upgrade plan for an Accelerator.
Ensure that web services handling content from an Accelerator do so securely.
Design preview pages to work for the 320×240 preview window.
Optimize the performance of pages that are rendered as Accelerator previews.
Accelerators offer a simple way to bridge the gap between web services and the browser user interface. In this chapter, I discussed the Accelerator platform and how you can easily expose web services for use on any pages your users visit.
The subjects covered in this section are relevant for more than just Accelerators; the concepts of XML definitions and restrictive security models are recurring themes in IE extensions. As I move ahead, keep these concepts and their roles in the overall browser programming model in mind.