
We have learned a lot of ways in which the HTML5 media elements can be manipulated and modified using JavaScript. Some of the video manipulations—in particular when used in Canvas—can be very CPU intensive and slow. Web Workers are a means to deal with this situation.
Web Workers[120] are a new functionality in HTML5. They provide a JavaScript API for running scripts in the background independently of any user interface scripts, i.e. in parallel to the main page and without disrupting the progress of the main page. Any JavaScript program can be turned into a Web Worker. For interaction with the main page you need to use message passing, since Web Workers do not have access to the DOM of the web page. Essentially, Web Workers introduce threading functionality into the Web.
We will not provide an in-depth introduction to Web Workers here. You will find other HTML5 books or articles that do so. A good introduction is provided by Mozilla[121] at https://developer.mozilla.org/En/Using_web_workers or the introduction by John Resig[122]. Instead, we focus here specifically on how to use Web Workers with HTML5 media. As with every HTML5 technology, Web Workers are still novel and improvements of both their specifications and implementations can be expected. Here are the functions and events that Web Workers currently introduce:
The
Worker()constructor, which defines a JavaScript file as a Web Worker,The
messageanderrorevents for the worker,The
postMessage()method used by a worker that activates themessageevent handler of the main page,The
postMessage()method used by the main page that activates themessageevent handler of the worker to talk back,JSON, used for message passing,
The
terminate()method used by the main page to terminate the worker immediately,The error event consisting of a human readable
messagefield, thefilenameof the worker, and thelinenowhere the error occurred,The
importScripts()method used by a worker to load shared JavaScript files,The ability of Web Workers to call XMLHttpRequest.
Note that Web Workers will work only when used on a web server, because the external script needs to be loaded with the same scheme as the original page. This means you cannot load a script from a "data:", "javascript:", or "file:" URL. Further, a "https:" page can only start Web Workers that are also on "https:" and not on "http:".
Also note that the IE version used for this book does not support Web Workers yet. With the getImageData() and putImageData() bug in IE mentioned in the previous chapter, none of the non-worker examples in this chapter work either in IE, so we can't show any screen shots from IE.
In this section we look at a simple example that explains how to turn an HTML5 video page with JavaScript operations on the video data into one where the operations on the video data are being executed in a Worker thread and then fed back to the main web page.
As an example, we use a sepia color replica of the video in the Canvas. Listing 7-1 shows how this is achieved without a Web Worker.
Example 7.1. Sepia coloring of video pixels in the Canvas
<video controls height="270px" width="480px" >
      <source src="HelloWorld.mp4"  type="video/mp4">
      <source src="HelloWorld.webm" type="video/webm">
      <source src="HelloWorld.ogv"  type="video/ogg">
    </video>
    <canvas width="400" height="300" style="border: 1px solid black;">
    </canvas>
    <canvas id="scratch" width="400" height="300" style="display: none;">
    </canvas>
    <script>
      window.onload = function() {
        initCanvas();
      }
      var context, video, sctxt;
      function initCanvas() {
        video = document.getElementsByTagName("video")[0];
        canvas = document.getElementsByTagName("canvas")[0];
        context = canvas.getContext("2d");
        scratch = document.getElementById("scratch");
        sctxt = scratch.getContext("2d");
        video.addEventListener("play", playFrame, false);
      }
      function playFrame() {
        w = 320; h = 160;
        sctxt.drawImage(video, 0, 0, w, h);
        frame = sctxt.getImageData(0, 0, w, h);
        // Loop over each pixel of frame
        for (x = 0; x < w; x ++) {
          for (y = 0; y < h; y ++) {
            // index in image data array
            i = x + w*y;
            // grab colors
r = frame.data[4*i+0];
g = frame.data[4*i+1];
b = frame.data[4*i+2];
// replace with sepia colors
frame.data[4*i+0] = Math.min(0.393*r + 0.769*g + 0.180*b,255);
frame.data[4*i+1] = Math.min(0.349*r + 0.686*g + 0.168*b,255);
frame.data[4*i+2] = Math.min(0.272*r + 0.534*g + 0.131*b,255);
}
}
context.putImageData(frame, 0, 0);
if (video.paused || video.ended) { return; }
setTimeout(function () {
playFrame();
}, 0);
}
</script>Each pixel in the frame that is grabbed into the scratch Canvas is replaced by a new RGB value calculated as a sepia mix from the existing colors.[123] The modified frame is then written out into a visible Canvas.
Note that we have to make sure the new color values do not exceed 255, because there are only 8 bits used to store the colors; i.e. any value larger than 255 may lead to an overflow value and thus a wrong color. This, in fact, happens in Opera, while the other browsers limit the value before assigning. In any case, using a Math.min function on the color values is the safe thing to do.
Figure 7-1 shows the result. If you look at the example in color, you will see that the video on top is in full color and the Canvas below is sepia-colored.

Figure 7.1. Painting a sepia colored video replica into a Canvas in Firefox, Safari, Opera, and Chrome (left to right).
Now, we can try and speed up the sepia color calculation—which loops over every single pixel and color component of the captured video frames—by delegating the calculation-heavy JavaScript actions to a Web Worker. We'll perform a comparison of speed further down. Listing 7-2 shows the web page code and 7–3 the JavaScript that is the Web Worker for Listing 7-2. The Web Worker code is located in a different JavaScript resource called "worker.js". It has to be delivered from the same domain as the main web page. This is currently the only way in which you can call a Web Worker. Discussions are under way to extend this to allow inline defined Web Workers.[124]
Example 7.2. Sepia coloring of video pixels using a Web Worker
<video controls height="270px" width="480px" >
        <source src="HelloWorld.mp4"  type="video/mp4">
        <source src="HelloWorld.webm" type="video/webm">
        <source src="HelloWorld.ogv"  type="video/ogg">
      </video>
      <canvas width="400" height="300" style="border: 1px solid black;">
      </canvas>
      <canvas id="scratch" width="400" height="300" style="display: none;">
      </canvas>
    <script>
      window.onload = function() {
        initCanvas();
      }
      var worker = new Worker("worker.js");
      var context, video, sctxt;
      function initCanvas() {
        video = document.getElementsByTagName("video")[0];
        canvas = document.getElementsByTagName("canvas")[0];
        context = canvas.getContext("2d");
        scratch = document.getElementById("scratch");
        sctxt = scratch.getContext("2d");
        video.addEventListener("play", postFrame, false);
        worker.addEventListener("message", drawFrame, false);
      }

      function postFrame() {
        w = 320; h = 160;
        sctxt.drawImage(video, 0, 0, w, h);
        frame = sctxt.getImageData(0, 0, w, h);
        arg = {
          frame: frame,
          height: h,
          width: w
        }
        worker.postMessage(arg);
      }
      function drawFrame (event) {
        outframe = event.data;
        if (video.paused || video.ended) {
          return;
        }
        context.putImageData(outframe, 0, 0);
        setTimeout(function () {
          postFrame();
        }, 0);
}
</script>In Listing 7-2 we have marked the new commands in bold. You will notice how the Web Worker is created, a message prepared and then sent, and a function prepared that will take the sepia colored frame as a message from the Web Worker when it finishes and sends it on. The key here is that we have separated the preparation of the data for the calculations in postFrame and the drawing of the results in drawFrame.
The Web Worker that does the calculations is stored in a different file, here called worker.js. It contains only the callback for the onmessage event of the web page; it has no other data or functions to initialize. It receives the original frame from the web page, calculates the new pixel values, replaces them in the picture, and passes this redrawn picture back to the web page.
Example 7.3. JavaScript Web Worker for Listing 7-2
onmessage = function (event) {
// receive the image data
var data = event.data;
var frame = data.frame;
var h = data.height;
var w = data.width;
var x,y;
// Loop over each pixel of frame
for (x = 0; x < w; x ++) {
for (y = 0; y < h; y ++) {
// index in image
i = x + w*y;
// grab colors
r = frame.data[4*i+0];
g = frame.data[4*i+1];
b = frame.data[4*i+2];
// replace with sepia colors
frame.data[4*i+0] = Math.min(0.393*r + 0.769*g + 0.189*b, 255);
frame.data[4*i+1] = Math.min(0.349*r + 0.686*g + 0.168*b, 255);
frame.data[4*i+2] = Math.min(0.272*r + 0.534*g + 0.131*b, 255);
}
}
// send the image data back to main thread
postMessage(frame);
}This example provides a good handle on how to hook up video with a Web Worker. You cannot pass a Canvas directly into a Web Worker as a parameter to the postMessage function, because it is a DOM element and the Web Worker doesn't know about DOM elements. But you can pass ImageData to the worker. Thus, the way to manipulate video is to grab a video frame with getImageData(), put it into a message, and send it to the Web Worker with postMessage(), where the message event triggers the execution of the video manipulation algorithm. The result of the calculations is returned to the main thread through a postMessage() call by the Web Worker with manipulated image data as a parameter. This hands control over to the onmessage event handler of the main thread to display the manipulated image using putImageData() into the Canvas.
Because Web Workers are supported in all browsers except for IE, the results of the Web Workers implementation of the sepia toning is no different to the non-worker implementation and its results looks the same as in Figure 7-1.
Note that if you are developing in Opera and you expect your Web Worker to be reloaded on a SHIFT-reload of the web page, you will be disappointed. So make sure to keep an extra tab open with a link to the JavaScript file of the Web Worker and make sure to reload that one separately.
The sepia example is a simple one, so a question arises whether the overhead incurred by packaging the message (i.e. copying the message data, including the frame), unpacking it, and doing the same for the result, plus the delay in calling the events, actually outweighs the gain achieved by delegating the video manipulation to a thread.
We compare the number of frames manipulated when run in the main thread with the number of frames that a Web Worker crunches through to discover the limits of the approach. Note that this approach is based on the self-imposed requirement to keep the Web Worker display and video playback roughly in sync rather than allowing the Web Worker to be slower. Table 7-1 shows the results as the number of frames processed during all of the four-second-long "Hello World" example video.
Table 7.1. Performance of the browsers without (left) and with (right) Web Workers on the sepia example
Firefox | Safari | Chrome | Opera | ||||
|---|---|---|---|---|---|---|---|
89 | 53 (WW) | 87 | 96 (WW) | 77 | 54 (WW) | 93 | 95 (WW) |
The results in Table 7-1 were achieved on a machine with the same load by reloading the example multiple times and taking the maximum achieved number of recolored frames. Note that the algorithm with Web Workers on Firefox and Chrome churns through fewer frames than when the code is run on the main web page. For Safari there is a speed increase running it in the worker, while Opera basically achieves the same performance with or without a Web Worker.
These results seem to be influenced by the way in which the browsers implement Web Worker support. Note that we are not comparing the performance between the different browsers, which is clearly influenced by the speed of their JavaScript engines. But we see the effects of both the way in which each browser implements Web Workers and the speed of the JavaScript engine.
Opera is built as a single-threaded browser, so its current implementation of Web Workers interleaves code execution in the single thread. This is in contrast to Mozilla's implementation in Firefox, where the Web Worker is actually a real operating system thread and the spawning of multiple workers can take advantage of multiple processor cores. The overhead introduced by spawning a full OS-level thread in our simple example here seems to incur a penalty on the number of frames that can be decoded or handed over from the main thread during the time of playback.
The primary advantage of using a Web Worker is that the main thread's workload is reduced such that it can continue executing at top speed. In particular, it can keep rendering the browsers UI, keep checking your mail, etc. In our example this refers particularly to the playback speed of the video. In the sepia example, our main thread wasn't particularly overloaded with the calculation, so introducing Web Workers didn't actually achieve much. So let's look at something a bit more challenging.
The general idea behind motion detection is to take the difference between two successive frames in a video and determine whether there was a large enough change to qualify as motion. Good motion detectors can cope with the change of lighting conditions, moving cameras, and camera and encoding artifacts. For our purposes, we will simply determine whether a pixel has changed to determine if there was motion. It's a simplistic but fairly effective approach and will do for demonstration purposes.
The practical approach to motion detection includes preprocessing of the frames by turning them into a gray-scale image. Because color doesn't influence motion, this is a reasonable abstraction and it reduces the number of calculations necessary, since differences don't have to be calculated on all channels, but only on a single dimension.
Gray-scaling is achieved by calculating the luminance—i.e. the light intensity—of each pixel and replacing the red, green, and blue channel values with the luminance value. Since they then all have identical values, the frame won't have any colors any more and will therefore appear gray.
It is possible to calculate the luminance from an average of the original red, green, and blue channel values, but that does not represent human perception of luminance well. As it turns out, the best way to calculate luminance is by taking 30% of red, 59% of green, and 11% of blue.[125] Blue is perceived as a very dark color and green a very bright one, contributing differently to the human perception of luminance.
Listing 7-4 shows the JavaScript Web Worker that creates a gray-scaled version of the video using this algorithm. The main thread that goes with this Web Worker is identical to Listing 7-2. Figure 7-2 shows the resulting screenshots in different browsers. Note that if you can't see it in color, the video on top is in full color and the Canvas below is in black and white.
Example 7.4. Gray-scaling of video pixels using a Web Worker
onmessage = function (event) {
// receive the image data
var data = event.data;
var frame = data.frame;
var h = data.height;
var w = data.width;
var x,y;
// Loop over each pixel of frame
for (x = 0; x < w; x ++) {
for (y = 0; y < h; y ++) {
// index in image data array
i = x + w*y;
// grab colors
r = frame.data[4*i+0];
g = frame.data[4*i+1];
b = frame.data[4*i+2];
col = Math.min(0.3*r + 0.59*g + 0.11*b, 255);
// replace with black/white
frame.data[4*i+0] = col;
frame.data[4*i+1] = col;
frame.data[4*i+2] = col;
}
}
// send the image data back to main thread
postMessage(frame);
}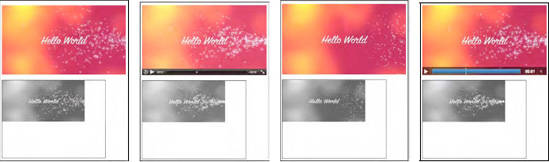
Figure 7.2. Painting a gray-scaled video replica into a Canvas in Firefox, Safari, Opera, and Chrome (left to right)
Now that we have seen that this algorithm creates a gray-scaled image, we can appreciate that we don't actually need the full gray-scaled image to calculate the motion difference between two such images. There is a lot of repetition that we can avoid in the three color channels, and we are also not interested in the value of the alpha channel. Thus, we can reduce the frames to an array of the luminance values.
We now move to implementation of the motion detection. To visualize which pixels have been identified as motion pixels, we will paint them in a rare color. We chose a mix of green=100 and blue=255. Listing 7-5 shows the Web Worker that implements the motion detection. The main thread is still the same as in Listing 7-2.
Example 7.5. Motion detection of video pixels using a Web Worker
var prev_frame = null;
var threshold = 25;
function toGray(frame) {
grayFrame = new Array (frame.data.length / 4);
for (i = 0; i < grayFrame.length; i++) {
r = frame.data[4*i+0];
g = frame.data[4*i+1];
b = frame.data[4*i+2];
grayFrame[i] = Math.min(0.3*r + 0.59*g + 0.11*b, 255);
}
return grayFrame;
}
onmessage = function (event) {
// receive the image data
var data = event.data;
var frame = data.frame;
// convert current frame to gray
cur_frame = toGray(frame);// avoid calling this the first time
if (prev_frame != null) {
// calculate difference
for (i = 0; i < cur_frame.length; i++) {
if (Math.abs(prev_frame[i] - cur_frame[i]) > threshold) {
// color in pixels with high difference
frame.data[4*i+0] = 0;
frame.data[4*i+1] = 100;
frame.data[4*i+2] = 255;
}
}
}
// remember current frame as previous one
prev_frame = cur_frame;
// send the image data back to main thread
postMessage(frame);
}You will have noticed that this Web Worker actually has some global data because we have to remember the previous frame's data across different calls to this Web Worker. We initialize this array with null such that we can avoid performing the difference calculation on the first call to this Web Worker. The other global variable is the threshold, which we've chosen to set to 25, which gives a reasonable tolerance to noise.
You will recognize the toGray() function from the previous algorithm, except we store only the shortened array of gray values per image frame.
In the callback function for the onmessage event, we first calculate the gray-scaled version of the current image frame, then use this to compare it with the previous frame and color in the pixels with a luminance difference larger than the threshold. We then remember the current frame's luminance values as the prev_frame for the next iteration and post the adjusted image frame back to the main thread for display.
Figure 7-3 shows the results of this algorithm applied to the "Hello World" video in all browsers except IE.
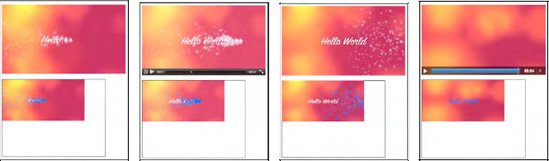
Figure 7.3. Motion detection results on a video using Web Workers in Firefox, Safari, Opera, and Chrome (left to right).
Because the "Hello World" video is not very exciting to showcase motion detection, Figure 7-4 shows the effects of the algorithm on some scenes of the "Elephants Dream" video.
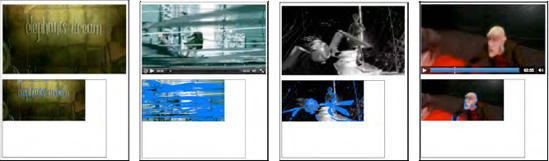
Figure 7.4. Motion detection results on a second video using Web Workers in Firefox, Safari, Opera, and Chrome (left to right)
As you are watching this algorithm work on your videos, you will immediately notice its drawbacks and certainly you can come up with ideas on how to improve the performance or apply it to your needs, such as alerting for intruders. There are many better algorithms for motion detection, but this is not the place to go into them.
Let's again look at the performance of this algorithm in the different browsers. Table 7-2 shows the comparison as before between an implementation without Web Workers and one with. The number signifies the number of frames displayed in the Canvas when the algorithm is run without or with Web Workers for the four second "Hello World" video.
Table 7.2. Performance of browsers without (left) and with (right) Web Workers on the motion detection
Firefox | Safari | Chrome | Opera | ||||
|---|---|---|---|---|---|---|---|
82 | 48 (WW) | 64 | 62 (WW) | 105 | 75 (WW) | 140 | 129 (WW) |
In this case, there are basically two loops involved in every iteration of the Web Worker and there is global data to store. The implementation on the main web page achieves more manipulated frames for all of the browsers. The difference for Safari and Opera is not substantial, but the differences for Firefox and Chrome are surprisingly high. This means the Web Worker code is actually fairly slow and cannot keep up with the video playback speed. The Web Workers thus take a lot of load off the main thread to allow the video to playback with less strain. The differences still are not visible when running the algorithm with or without Web Workers, since the video plays back smoothly in both situations. So let's take another step in complexity and introduce some further video processing.
In image processing, and therefore video processing, the segmentation of the displayed image into regions of interest is typically very CPU intensive. Image segmentation is used to locate objects and boundaries (lines, curves, etc.) in images aiming to give regions that belong together the same label.
We will implement a simple region segmentation approach in this section and demonstrate how we can use Web Workers to do the processing-intensive tasks in a parallel thread and relieve the main thread to provide smooth video playback.
Our region segmentation is based on the pixels identified by motion detection using the algorithm of the previous section. In a kind of region-growing approach[126], we will then cluster those motion pixels together that are not too far apart from each other. In our particular example, the distance threshold is set to 2; i.e. we limit the clustering to a 5x5 area around the motion pixel. This clustering can result in many motion pixels being merged into a region. We will display a rectangle around all the pixels in the largest region found per frame.
We will start this by developing a version without Web Workers. Generally, this probably is the best approach, because it makes it easier to debug. Right now, there are no means to easily debug a Web Worker in a web browser. As long as you keep in mind how you are going to split out the JavaScript code into a Web Worker, starting with a single thread is easier.
Listing 7-6 shows the playFrame() function in use by the web page for the segmentation. The remainder of the page in Listing 7-1 stays the same. Also, it uses the toGray() function of Listing 7-5. It looks long and scary, but actually consists of nice blocks provided through comments, so we will walk through these blocks next.
Example 7.6. Segmentation of video pixels using a Web Worker
// initialisation for segmentation
var prev_frame = null;
var cur_frame = null;
var threshold = 25;
var width = 320;
var height = 160;
region = new Array (width*height);
index = 0;
region[0] = {};
region[0]['weight'] = 0;
region[0]['x1'] = 0;
region[0]['x2'] = 0;
region[0]['y1'] = 0;
region[0]['y2'] = 0;
function playFrame() {
sctxt.drawImage(video, 0, 0, width, height);
frame = sctxt.getImageData(0, 0, width, height);
cur_frame = toGray(frame);
// avoid calculating on the first frame
if (prev_frame != null) {
// initialize region fields
for (x = 0; x < width; x++) {
for (y = 0; y < height; y++) {
i = x + width*y;
// initialize region fields
if (i != 0) region[i] = {};
region[i]['weight'] = 0;
if (Math.abs(prev_frame[i] - cur_frame[i]) > threshold) {
// initialize the regions
region[i]['weight'] = 1;region[i]['x1'] = x;
region[i]['x2'] = x;
region[i]['y1'] = y;
region[i]['y2'] = y;
}
}
}
// segmentation: grow regions around each motion pixels
for (x = 0; x < width; x++) {
for (y = 0; y < height; y++) {
i = x + width*y;
if (region[i]['weight'] > 0) {
// check the neighbors in 5x5 grid
for (xn = Math.max(x-2,0); xn <= Math.min(x+2,width-1); xn++) {
for (yn = Math.max((y-2),0);
yn <= Math.min((y+2),(height-1)); yn++) {
j = xn + width*yn;
if (j != i) {
if (region[j]['weight'] > 0) {
region[i]['weight'] += region[j]['weight'];
region[i]['x1'] = Math.min(region[i]['x1'],
region[j]['x1']);
region[i]['y1'] = Math.min(region[i]['y1'],
region[j]['y1']);
region[i]['x2'] = Math.max(region[i]['x2'],
region[j]['x2']);
region[i]['y2'] = Math.max(region[i]['y2'],
region[j]['y2']);
}
}
}
}
}
}
}
// find one of the heaviest pixels, i.e. one of the largest clusters
max = 0;
index = 0; // reset
for (x = 0; x < width; x++) {
for (y = 0; y < height; y++) {
i = x + width*y;
if (region[i]['weight'] > max) {
max = region[i]['weight'];
index = i;
}
}
}
}
// remember current frame as previous one and get rectangle coordinates
prev_frame = cur_frame;
x = region[index]['x1'];y = region[index]['y1'];
w = (region[index]['x2'] - region[index]'x1']);
h = (region[index]['y2'] - region[index]['y1']);
// draw frame and rectangle
context.putImageData(frame, 0, 0);
context.strokeRect(x, y, w, h);
calls += 1;
if (video.paused || video.ended) {
return;
}
setTimeout(function () {
playFrame();
}, 0);
}The code starts with an initialization of the memory constructs required to do the segmentation. The prev_frame and cur_frame are the gray-scale representations of the previous and current frames being compared. The threshold like before, is one that identifies pixels with motion. Width and height identify the dimensions of the video display in the Canvas. The region array is an array of hashes that contain information about each currently regarded image pixel: its weight is initially 1, but will grow larger as more pixels are close to it; the (x1,y1) and (x2,y2) coordinates signify the region from which pixel weights have been added. The index is eventually the index of the region array with the largest cluster.
In playFrame() we start by extracting the current frame from the video and calculating its gray-scale representation. We perform the segmentation only if this is not the very first frame. If it is indeed the first frame, a region of (0,0) to (0,0) will result and be painted on the Canvas.
To perform the segmentation, we first initialize the region fields. Only those that qualify as motion pixels are set to a weight of 1 and an initial region consisting of just their own pixel.
Then, we execute the region growing on the 5x5 grid around these motion pixels. We add the weight of all the motion pixels found in that region around the currently regarded motion pixel to the current pixel and set the extent of the region to the larger rectangle that includes those other motion pixels.
Because we want to mark only a single region, we then identify the last one of the largest clusters, which is the cluster found around one of the heaviest pixels (the one with the largest weight). It is this cluster that we will paint as a rectangle, so we set the index variable to the index of this pixel in the region array.
Finally, we can determine the rectangular coordinates and paint the frame and rectangle into the Canvas. We then set a timeout on another call to the playFrame() function, which makes it possible for the main thread to undertake some video playback before performing the image analysis again for the next frame.
Note that in some circumstances the extent of the region is incorrectly calculated with this simple approach. Whenever a vertical or horizontal shape traces back in rather than continuing to grow, the last motion pixel checked will be the heaviest, but it will not have received the full extent of the region. A second run through this region would be necessary to determine the actual size of the region. This is left to the reader as an exercise.
Figure 7-5 shows the results of this algorithm applied to the "Hello World" video.
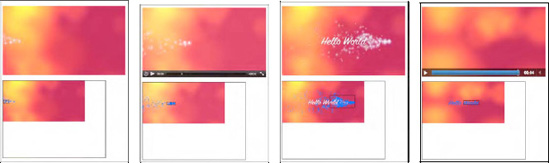
Figure 7.5. Image segmentation results on a motion detected video in Firefox, Safari, Opera, and Chrome (left to right)
Note that the video playback in all browsers except Safari now is seriously degraded. The videos are all becoming jerky and it is obvious that the browser is having a hard time finding enough cycles to put into video decoding rather than spending it on the JavaScript. This is a clear case for taking advantage of the help of Web Workers. Turning down the frequency with which the analysis is done will work, too, but it does not scale with the capabilities of the browser.
We have designed the code base such that it is easy to move the video manipulation code into a Web Worker. We will hand over the current video frame and its dimensions into the Web Worker and receive back from it the coordinates of the rectangle to draw. You may want to also manipulate the frame colors in the Web Worker as before and display them in a different color to verify the segmentation result.
The code for the postFrame() and drawFrame() functions of the main web page is given in Listing 7-7. The remainder of the main web page is identical to Listing 7-2. The code for the Web Worker contains much of Listing 7-6, including the initialization and the toGray() function and a function to deal with the onmessage event, receive the message arguments from the main web page, and post the frame and the four coordinates back to the main page. The full implementation is left to the reader or can be downloaded from the locations mentioned in the Preface of the book.
Example 7.7. Segmentation of video pixels using a Web Worker
function postFrame() {
w = 320; h = 160;
sctxt.drawImage(video, 0, 0, w, h);
frame = sctxt.getImageData(0, 0, w, h);
arg = {
frame: frame,
height: h,
width: w
}
worker.postMessage(arg);
}
function drawFrame (event) {
msg = event.data;
outframe = msg.frame;
if (video.paused || video.ended) {
return;
}context.putImageData(outframe, 0, 0);
// draw rectangle on canvas
context.strokeRect(msg.x, msg.y, msg.w, msg.h);
calls += 1;
setTimeout(function () {
postFrame();
}, 0);
}Let's look at the performance of this algorithm in the different browsers. Table 7-3 shows the comparison between an implementation without Web Workers and one with. As before, the numbers represent the number of frames the Canvas has painted for the four-second-long example video. The program will always try to paint as many video frames into the Canvas as possible. Without Web Workers, this ends up being on the main thread and the machine is working as hard as it can. With Web Workers, the main thread can delay the postMessage() function without an effect on the performance of the main thread. It can thus hand over fewer frames to the Web Worker to deal with.
Table 7.3. Performance of browsers without (left) and with (right) Web Workers for motion segmentation
Firefox | Safari | Chrome | Opera | ||||
|---|---|---|---|---|---|---|---|
36 | 22 (WW) | 35 | 29 (WW) | 62 | 50 (WW) | 76 | 70 (WW) |
The smallest difference in the number of frames that the Web Worker is given to the amount that is processed when there is only one thread is in Safari and Opera. In Firefox, the Web Worker runs rather slowly, processing only a small number of frames.
Using Web Workers relieves all of the stress from the main threads of Firefox and Chrome and makes the video run smoothly again. The only browser left struggling with a jerky video playback is Opera, which doesn't use proper threading on Web Workers, so this was to be expected.
Note that the video runs on the main thread, while the Canvas is fed from the Web Worker, and we are only measuring the performance of the Web Worker. Unfortunately, we cannot measure the performance of the video element in terms of number of frames played back. However, a statistics API is in preparation for the media elements in the WHATWG that will provide us with this functionality once implemented in browsers.
Determining whether a face exists in an image is often based on the detection of skin color and the analysis of the shape that this skin color creates.[127] We will take the first step here toward such a simple face detection approach, namely the identification of skin color regions. For this, we will be combining many of the algorithms previously discussed in this chapter.
The direct use of RGB colors is not very helpful in detecting skin color, since there is a vast shade of skin tones. However, as it turns out, the relative presence of RGB colors can help overcome this to a large degree. Thus, skin color detection is normally based on the use of normalized RGB colors. A possible condition to use is the following:
base = R + G + B r = R / base g = G / base b = B / base
(0.35 < r < 0.5) AND (0.2 < g < 0.5) AND (0.2 < b < 0.35) AND (base > 200)
This equation identifies most of the pixels typically perceived as "skin color", but also creates false positives. It works more reliably on lighter than on darker skin, but in actual fact it is more sensitive to lighting differences than skin tone. You may want to check out the literature to find improved approaches.[128] We will use this naïve approach here for demonstration purposes.
The false positive pixels can be filtered out by performing a shape analysis of the detected regions and identify distinct areas such as eyes and mouth positions. We will not take these extra processing steps here, but only apply the above equation and the previously implemented segmentation to find candidate regions of potential faces.
Listing 7-8 shows the code of the main web page and Listing 7-9 shows the Web Worker.
Example 7.8. Main thread of the face detection approach using a Web Worker
<video controls height="270px" width="480px" >
<source src="video5.mp4" type="video/mp4">
<source src="video5.ogv" type="video/ogg">
<source src="video5.webm" type="video/webm">
</video>
<canvas width="400" height="300" style="border: 1px solid black;">
</canvas>
<canvas id="scratch" width="400" height="300" style="display: none;">
</canvas>
<script>
window.onload = function() {
initCanvas();
}
var worker = new Worker("worker.js");
var context, video, sctxt, canvas;
function initCanvas() {
video = document.getElementsByTagName("video")[0];
canvas = document.getElementsByTagName("canvas")[0];
context = canvas.getContext("2d");
scratch = document.getElementById("scratch");
sctxt = scratch.getContext("2d");
video.addEventListener("play", postFrame, false);
worker.addEventListener("message", drawFrame, false);
}
function postFrame() {
w = 320; h = 160;
sctxt.drawImage(video, 0, 0, w, h);
frame = sctxt.getImageData(0, 0, w, h);arg = {
frame: frame,
height: h,
width: w
}
worker.postMessage(arg);
}
function drawFrame (event) {
msg = event.data;
outframe = msg.frame;
context.putImageData(outframe, 0, 0);
// draw rectangle on canvas
context.strokeRect(msg.x, msg.y, msg.w, msg.h);
if (video.paused || video.ended) {
return;
}
setTimeout(function () {
postFrame();
}, 0);
}
</script>Example 7.9. Web Worker for the face detection approach of Listing 7-8
// initialisation for segmentation
  var width = 320;
  var height = 160;
  var region = new Array (width*height);
  var index = 0;
  region[0] = {};
  region[0]['weight'] = 0;
  region[0]['x1'] = 0;
  region[0]['x2'] = 0;
  region[0]['y1'] = 0;
  region[0]['y2'] = 0;

  function isSkin(r,g,b) {
    base = r + g + b;
    rn = r / base;
    gn = g / base;
    bn = b / base;
    if (rn > 0.35 && rn < 0.5 && gn > 0.2 && gn < 0.5 &&
        bn > 0.2 && bn < 0.35 && base > 250) {
      return true;
    } else {
      return false;
    }
  }

  onmessage = function (event) {
    // receive the image data
    var data = event.data;
var frame = data.frame;
var height = data.height;
var width = data.width;
// initialize region fields and color in motion pixels
for (x = 0; x < width; x++) {
for (y = 0; y < height; y++) {
i = x + width*y;
if (i != 0) region[i] = {};
region[i]['weight'] = 0;
// calculate skin color?
if (isSkin(frame.data[4*i],frame.data[4*i+1],frame.data[4*i+2])) {
// color in pixels with high difference
frame.data[4*i+0] = 0;
frame.data[4*i+1] = 100;
frame.data[4*i+2] = 255;
// initialize the regions
region[i]['weight'] = 1;
region[i]['x1'] = x;
region[i]['x2'] = x;
region[i]['y1'] = y;
region[i]['y2'] = y;
}
}
}
// segmentation
for (x = 0; x < width; x++) {
for (y = 0; y < height; y++) {
i = x + width*y;
if (region[i]['weight'] > 0) {
// check the neighbors
for (xn = Math.max(x-2,0); xn <= Math.min(x+2,width-1); xn++) {
for (yn = Math.max((y-2),0);
yn <= Math.min((y+2),(height-1)); yn++) {
j = xn + width*yn;
if (j != i) {
if (region[j]['weight'] > 0) {
region[i]['weight'] += region[j]['weight'];
region[i]['x1'] = Math.min(region[i]['x1'],
region[j]['x1']);
region[i]['y1'] = Math.min(region[i]['y1'],
region[j]['y1']);
region[i]['x2'] = Math.max(region[i]['x2'],
region[j]['x2']);
region[i]['y2'] = Math.max(region[i]['y2'],
region[j]['y2']);
}
}
}
}
}
}
}// find one of the heaviest pixels, which is one of the largest clusters
max = 0;
index = 0; // reset
for (x = 0; x < width; x++) {
for (y = 0; y < height; y++) {
i = x + width*y;
if (region[i]['weight'] > max) {
max = region[i]['weight'];
index = i;
}
}
}
// send the image data + rectangle back to main thread
arg = {
frame: frame,
x: region[index]['x1'],
y: region[index]['y1'],
w: (region[index]['x2'] - region[index]['x1']),
h: (region[index]['y2'] - region[index]['y1'])
}
postMessage(arg);
}You will notice that the code is essentially the same as for motion region detection, except we can remove some of the administrative work required to keep the difference frames, and the toGray() function has been replaced with an isSkin() function.
For our example we have chosen a Creative Commons licensed video about "Science Commons"[129]. Some of the resulting analyzed frames are shown in Figure 7-6. These are all displayed in real time while the video plays back.
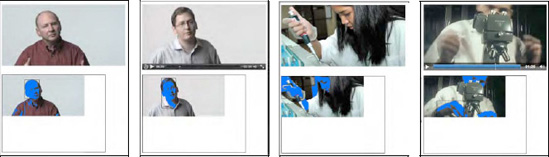
Figure 7.6. Face detection results on a skin color detected video in Firefox, Safari, Opera, and Chrome (left to right)
These examples show where the skin color algorithm works well: the two screenshots from Opera and Chrome show that the region segmentation didn't get the faces, but the hands, which take up larger regions.
Examples of false positives on skin color are shown in Figure 7-7.
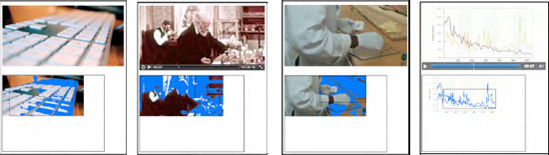
Figure 7.7. False positives on face detection using skin color in Firefox, Safari, Opera, and Chrome (left to right).
The display of the analysis results in the Canvas underneath the video quickly degrades with increasingly complex computational tasks like the ones discussed in this chapter. If you wanted to continue displaying good quality video to your audience, but do the analysis in the background, it is probably best to drop the pixel coloring in the Canvas and to only paint the rectangular overlays for the detected regions onto the original video. This will provide you with a better performance from the Web Worker thread.
In this chapter we looked at using Web Workers to take over some of the heavy lifting involved in video processing when run inside web browsers in real-time. We analyzed their use for simple video processing approaches, such as sepia toning, and found that for such simple tasks the overhead created by spawning a thread and passing the data through messages back and forth is not worth off-loading the processing.
We also analyzed their use for larger challenges, such as motion detection, region segmentation, and face detection. Here, the advantage of using a Web Worker is that the incurred processing load can be offloaded from the main thread, freeing it to continue staying responsive with the user. The downside is that the browser does not work as hard at the video processing part and the Web Worker can become starved of video frames. Thus, the increased responsiveness of the browsers overall is paid for by a smaller framerate in video processing.
Web Workers are most productive for tasks that do not need a lot of frequent reporting back and forth between the Web Worker thread and the main thread. The introduction of a simpler means for a Web Worker to get access to the frames in a video outside the message passing path would also be helpful to make Web Workers more productive for video processing.
Most of the algorithms used in this chapter were very crude, but this book does not intend to show you how to do image analysis well. Find yourself a good video analysis book and the latest research results in these fields and go wild. The big news is: you can now do it in your web browser in real time, and Web Workers can help you do it such that it won't disrupt the speed of the display of your main web page.
[120] See http://www.whatwg.org/specs/web-workers/current-work/
[121] See https://developer.mozilla.org/En/Using_web_workers
[122] See http://ejohn.org/blog/web-workers/
[123] According to a mix published at http://www.builderau.com.au/program/csharp/soa/How-do-I-convert-images-to-grayscale-andsepia-tone-using-C-/0,339028385,339291920,00.htm
[124] See http://lists.whatwg.org/pipermail/whatwg-whatwg.org/2010-October/028844.html
[125] See many more details about luminance at http://www.scantips.com/lumin.html
[126] See http://en.wikipedia.org/wiki/Segmentation_%28image_processing%29#Clustering_methods
[127] See http://en.wikipedia.org/wiki/Face_detection
[128] See for example http://www.icgst.com/GVIP05/papers/P1150535201.pdf for an improved approach.
[129] See http://sciencecommons.org/