Most of the time, when you take pictures, you wouldn't think of how you would decorate them later. You take them just because you want to capture the moment. Let's say you have one of them printed later, and then you decide to put it in a nice frame with a type of special glass, so on and so forth. But you can put the same picture in a different frame later if you change your mind. Even though you have changed the frame for the picture, the picture is still the same one without being affected, because you were just adding something to the picture but not changing it.
In object-oriented software, we borrowed a similar idea to add "something" (behavior) to other objects without losing their original flavor—so an augmented object would be an enhanced version of the same class (a framed picture). Any "enhancement" (a frame) can be put on and taken off dynamically. We call this design pattern Decorator, as a decorator object can add to another decorator or the original object to extend its features, leaving the original behaviors intact.
In this chapter, we will first discuss the concepts of the pattern and when to use it. Then we will move forward to discuss how to take advantage of the pattern to design a series of image filtering classes for UIImage objects.
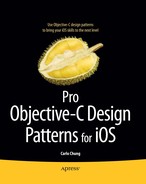
A classic Decorator pattern contains a parent, abstract Component class that declares some common operation for other concrete components. An abstract Component class can be refined into another abstract class called Decorator. A Decorator contains another Component reference. A ConcreteDecorator defines some extended behavior for other Components or Decorators alike and will execute the embedded Component's operation with its own. Their relationships are illustrated in Figure 16-1.
Component defines some abstract operation that its concrete classes will override to have their own specific operations. Decorator is an abstract class that defines a "decorative" behavior to extend other instances of Component (or Decorator) by embedding it in a Decorator object. Its default operation method is just simply to send a message to its embedded component. ConcreteDecoratorA and ConcreteDecoratorB override the parent's operation to augment its own added behavior to the component's operation through super. If you need to add just one responsibility to the component, then you can omit the abstract Decorator class and let the ConcreteDecorators forward any requests to the component directly. If there are objects linked up this way, then it's like forming a chain of operations with adding one behavior over another, as illustrated in an object diagram in Figure 16-2.

Note
THE DECORATOR PATTERN: Attaches additional responsibilities to an object dynamically. Decorators provide a flexible alternative to subclassing for extending functionality.[14]
There are three common situations where you would consider using it:
You want to add responsibility to individual objects dynamically and transparently without affecting other objects.
You want to extend the behavior of a class that is impractical to do so. A class definition may be hidden and unavailable for subclassing—or each behavioral extension to a class would require a tremendous amount of subclasses to support each combination of features.
Extended responsibilities of a class can be optional.
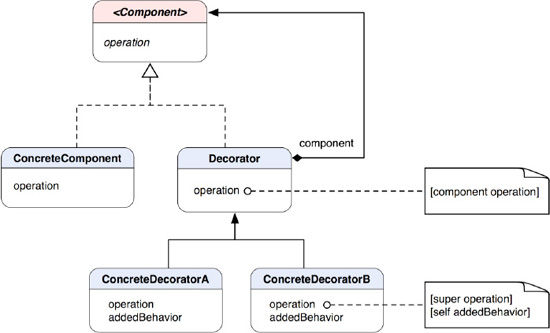
In the previous section, we discussed how different decorators can be connected at runtime with an internal component embedded in each decorator node, as shown in Figure 16-2. It also illustrates that each decorator is changing an embedded component from outside, or simply changing the skin of an object. The key is each node has no idea what's changing it.
However, when each node is aware of other different nodes internally, the link will instead grow in a different direction, i.e., inside the guts. That pattern is called Strategy (see Chapter 19). Each node needs to accommodate a set of different APIs internally to hook up another strategy node. A visual representation of the concept is shown in Figure 16-3.
The bottom-line differences between changing the "skin" (decorators) and "guts" (strategies) of an object are summarized in Table 16-1.
Image filtering is a process with which we can modify images' attributes, like colors and geometry. We can have a filter that can change the hue of an image, or a Gaussian filter for blurring it so it looks like it is out of focus. We can even apply some sort of 2D warping transformation to it, so it doesn't look flat on a surface. There are many different possible filters out there we can use to put some "special effects" on images. A lot of photo editing software packages, like Photoshop and GIMP, come with a variety of filters. What does the image filtering do with the Decorator pattern in the first place?
The Decorator pattern is a way to add new behavior and responsibility to an object without altering any existing behaviors and interfaces. So let's say an image object contains only interfaces that allow clients to manage its attributes but nothing else. We want to add some fancy stuff to it, like a transformation filter, but we don't want to modify the existing interfaces that the image object already has. What we can do is to define another class that is the same as the image object but contains a reference to another image object to augment any behavior to. The new class has a method to draw itself to a drawing context. In its draw method, it applies its transformation algorithm to its embedded image reference, draws the whole thing, and returns a resulting image. We can picture the process as laying an extra layer of glass on top of a picture. The picture doesn't need to care about the glass, and when we look at it we still call it a picture. The glass itself can have some sort of tint, a wavy texture on the surface, or anything else to make the picture look different. Later if we want to apply another layer of filter to the image, then we can define another filter class, just like the one for transformation with which we can apply the same mechanism to augment its own operations to an image. Filters other than the transformation filter can pick up the resulting image and continue the process. One thing, though—the image being passed along the line of decorating filters doesn't need to be always the original one but should be the same type. So the image returned from a transformation filter is a transformed image. Then when it's passed through to a color filter, the returned image will be a tinted-transformed image, so on and so forth.
UIImage in the UIKit of the Cocoa Touch framework can be instantiated as image objects. The UIImage class itself has quite limited interfaces to manipulate an image. There is nothing more than just a few properties about an image, such as the image size, color space, etc. We are going to extend an ordinary image object with some image manipulation tools available from the Quartz 2D framework. There are two approaches to implement the pattern, true subclasses and categories.
In the true subclass approach, we will have a structure similar to the original flavor of the pattern, as shown in Figure 16-1. The only difference is that the terminal component type is a category of UIImage, not a subclass of it. There is a little structural problem that prevents us from sharing with the same "interface" that UIImage implements. UIImage is a direct subclass of NSObject but nothing else. It's a sort of terminal class on its own. In order to use a kind of "Component" interface (like the parent interface in the class diagram in Figure 16-1) to bring both UIImage and our filter classes together, we need to have a creative solution. At this point, we are facing two problems:
We need to make our image filter classes the same as
UImage, butUIImagedoesn't have any high-level interface to share with (subclassing is not a kind of solution that this pattern suggests).UIImagehas multiple methods related to drawing its content to a current drawing context, such asdrawAsPatternInRect:,drawAtPoint:,drawAtPoint:blendMode:alpha:,drawInRect:, anddrawInRect:blendMode:alpha:. Allowing image filter classes to implement the same methods is complicated and may not achieve the kind of result we want due to the way Quartz 2D works. We will get to that a little later.
What are we going to do? First of all, it's for sure that we need an interface to share UIImage with a bunch of filter classes to make this pattern work, so both types of classes can share the same base type. And we don't like the idea of using UIImage as a high-level type for that purpose (i.e., subclassing it) because it will make every filter heavy to use. We create an interface called ImageComponent as a protocol as the ultimate base type for everyone. But wait a minute; did we just mention UIImage doesn't inherit any interface but just a direct subclass of NSObject? That's correct—so that's where we need a creative solution. We will create a category of UIImage that implements ImageComponent. Then the compiler will know UIImage and ImageComponent are related and won't complain about it. UIImage doesn't even know it has a new base type. Only the people who use the filters will need to know about that.
Also, we are not going to mess with the original draw* methods defined in UIImage, but how can we augment any drawing behavior to another ImageComponent? We will get to that in just a little bit.
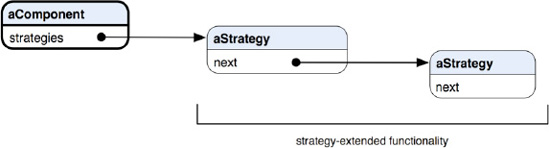
The class diagram that shows their static relationships is shown in Figure 16-4.
ImageComponent protocol declares an abstract interface with all draw* methods from UIImage. Any concrete ImageComponent and decorators alike should be able to handle those calls. A draw* message for an instance of UIImage will let it draw its own content in the current graphics context. Each of the methods also respects any transforms and other effects applied to the context. So we can inject our own filtering before any draw* operations.
Our concrete component here is a type of UIImage, but we don't want to make a subclass of it just for making it part of the game, so we define a category for it. The UIImage (ImageComponent) category adopts ImageComponent protocol. Since all methods declared in the protocol are already in UIImage, we don't need to implement them in the category. The category basically does nothing more than to tell the compiler that it's also a kind of ImageComponent.
ImageFilter is like the abstract Decorator class in Figure 16-1. ImageFilter's apply method allows concrete filter subclasses to augment extra behavior to the base component_'s behaviors. Instead of overriding all draw* methods to inject any filtering behavior, we use a single method, (id) forwardingTargetForSelector:(SEL) aSelector, to handle all that. forwardingTargetForSelector: is defined in NSObject, which allows subclasses to return an alternate receiver to handle aSelector. An instance of ImageFilter will first test to see if aSelector is a draw* message. If so, it will send itself an apply message to augment any behavior before returning the base component_ to respond with default behavior. The default implementation of apply does nothing. That missing information should be provided by subclasses. This approach can keep the architecture simple rather than letting each concrete filter class implements the same mechanism to augment behaviors.
Both ImageTransformFilter and ImageShadowFilter focus on providing their own filter algorithms by overriding the apply method. They inherit the abstract ImageFilter base class that has a reference to another ImageComponent with a private member variable component_. Different objects of ImageComponent can be connected at runtime, like in Figure 16-5.

Figure 16-5. An object diagram showing each ImageComponent is referenced in another instance of ImageComponent at each level.
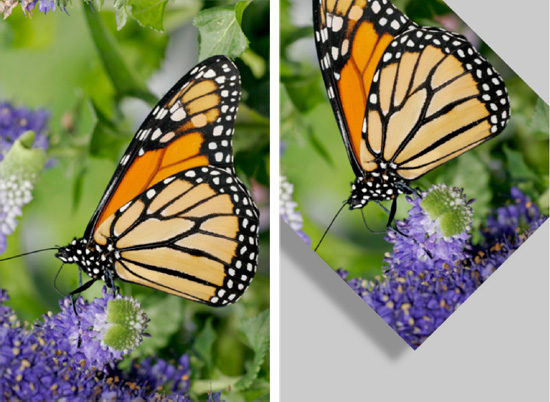
The right end of the chain is the original image as shown on the left side in Figure 16-6. After we first add it to anImageTransformFilter and then add anImageTransformFilter to anImageShadowFilter, the client will get something like the right-hand image in Figure 16-6. Each node is encapsulated as component_ of another instance of ImageComponent. An analogy of it is a bigger fish swallowing another smaller fish and so on. Obviously, the client doesn't realize any details about the decorators and whatnot but just a reference to an instance of the same old UIImage (as a form of ImageComponent because UIImage is implementing ImageComponent through its category).
It's getting exciting. Let's see how we can knock it off in code. The first one we are going to look at is the abstract ImageComponent that is declared as a protocol in Listing 16-1.
Example 16-1. ImageComponent.h
@protocol ImageComponent <NSObject>

// We will intercept these
// UIImage methods and add
// additional behavior
@optional
- (void) drawAsPatternInRect:(CGRect)rect;
- (void) drawAtPoint:(CGPoint)point;
- (void) drawAtPoint:(CGPoint)point
           blendMode:(CGBlendMode)blendMode
               alpha:(CGFloat)alpha;
- (void) drawInRect:(CGRect)rect;
- (void) drawInRect:(CGRect)rect
          blendMode:(CGBlendMode)blendMode
              alpha:(CGFloat)alpha;

@end
The entire draw* methods are declared as @optional, as we want any ImageComponent to be able to support the operations but we don't actually override them in implementing classes. The keyword @optional tells the compiler not to complain when it can't find the corresponding implementations for the methods.
Listing 16-2 shows the declaration of a category for UIImage so we can use it with other decorators later.
Example 16-2. UIImage+ImageComponent.h
#import "ImageComponent.h"

@interface UIImage (ImageComponent) <ImageComponent>

@end
It conforms to the ImageComponent protocol without any actual implementation at all. Now we move forward to our core decorator class, ImageFilter. Its class declaration is shown in Listing 16-3.
Example 16-3. ImageFilter.h
#import "ImageComponent.h"
#import "UIImage+ImageComponent.h"

@interface ImageFilter : NSObject <ImageComponent>
{
  @private
  id <ImageComponent> component_;
}

@property (nonatomic, retain) id <ImageComponent> component;

- (void) apply;
- (id) initWithImageComponent:(id <ImageComponent>) component;
- (id) forwardingTargetForSelector:(SEL)aSelector;

@end
It's keeping a reference to ImageComponent as component_, which would be decorated by any other concrete decorators. ImageFilter overrides forwardingTargetForSelector: and declares apply. Its implementation is shown in Listing 16-4.
Example 16-4. ImageFilter.m
#import "ImageFilter.h"

@implementation ImageFilter

@synthesize component=component_;


- (id) initWithImageComponent:(id <ImageComponent>) component
{
  if (self = [super init])
  {
    // save an ImageComponent
    [self setComponent:component];
}
return self;
}
- (void) apply
{
// should be overridden by subclasses
// to apply real filters
}
- (id) forwardingTargetForSelector:(SEL)aSelector
{
NSString *selectorName = NSStringFromSelector(aSelector);
if ([selectorName hasPrefix:@"draw"])
{
[self apply];
}
return component_;
}
@endThere is not much going on in the initWithImageComponent: method. It just simply assigns an ImageComponent reference from the parameter to itself. Also, its apply method does nothing for now until we see it again in concrete filter classes later.
What's interesting here is that we are using forwardingTargetForSelector: to intercept message calls that an instance of ImageFilter doesn't know how to respond to. The method allows subclasses to forward an alternative receiver to the runtime so the original message will be forwarded. But we are interested only in anything with a prefix of @"draw", and then we forward anything else straight to component_ by returning it to the runtime. For example, when the message drawAtRect: is sent to an instance of ImageFilter, it will be caught in the forwardingTargetForSelector: method pending for an alternative receiver because ImageFilter doesn't have any implementation for it. Since the message contains a prefix of "draw", it forwards itself an apply message to do anything before component_ picks up the message later.
Next, we are ready to get some real filters. The first one we are going to create is ImageTransformFilter, as shown in Listing 16-5.
Example 16-5. ImageTransformFilter.h
#import "ImageFilter.h"

@interface ImageTransformFilter : ImageFilter
{
  @private
  CGAffineTransform transform_;
}

@property (nonatomic, assign) CGAffineTransform transform;

- (id) initWithImageComponent:(id <ImageComponent>)component
                    transform:(CGAffineTransform)transform;
- (void) apply; @end
ImageTransformFilter is a subclass of ImageFilter and overrides the apply method. It also declares a private member transform_ as CGAffineTransform with an associated property that can access it. Since CGAffineTransform is a C struct, the property should be an assign type because a value of it cannot be retained like other Objective-C objects. The filter has its own method for initialization. The initWithImageComponent: (id <ImageComponent>)component transform: (CGAffineTransform)tranform methodtakes an instance of ImageComponent and a value of CGAffineTransform during initialization. component will be forwarded to the initWithComponent: method of super, and transform will be assigned to the private member variable, as shown in Listing 16-6.
Example 16-6. ImageTransformFilter.m
@implementation ImageTransformFilter

@synthesize transform=transform_;


- (id) initWithImageComponent:(id <ImageComponent>)component
                    transform:(CGAffineTransform)transform
{
  if (self = [super initWithImageComponent:component])
  {
    [self setTransform:transform];
  }

  return self;
}

- (void) apply
{
  CGContextRef context = UIGraphicsGetCurrentContext();

  // setup transformation
  CGContextConcatCTM(context, transform_);
}

@end
In the apply method, we get a reference of CGContextRef from a Quartz 2D function UIGraphicsGetCurrentContext(). We are not going into the details of Quartz 2D drawing here. Once we have a valid current context reference, we pass the transform_ value to CGContextConcatCTM() to add it to the context. Whatever is drawn on the context later will be transformed with the passed-in CGAffineTransform value. The affine transform filtering is now complete.
Like ImageTransformFilter, ImageShadowFilter is also a direct subclass of ImageFilter and overrides only the apply method. In the method shown in Listing 16-7, we obtain a current graphics context to draw stuff in, then we set up a Quartz 2D function call, CGContextSetShadow(), to add a drop shadow in the context. Then the rest of the process is pretty much the same as the ImageTransformFilter's. Whatever is drawn in the context afterward will have a drop shadow effect, as shown in the right-hand image in Figure 16-6.
Example 16-7. ImageShadowFilter.m
#import "ImageShadowFilter.h"

@implementation ImageShadowFilter

- (void) apply
{
  CGContextRef context = UIGraphicsGetCurrentContext();

  // set up shadow
  CGSize offset = CGSizeMake (−25,  15);
  CGContextSetShadow(context, offset, 20.0);
}

@end
Now we have fleshed out all the filters and are ready to keep the ball rolling in client code. In the sample project for this chapter, there is a class called DecoratorViewController that will run all the filters just defined in its viewDidLoad method, as shown in Listing 16-8.
Example 16-8. viewDidLoad Method in DecoratorViewController.m
- (void)viewDidLoad
{
  [super viewDidLoad];

  // load the original image
  UIImage *image = [UIImage imageNamed:@"Image.png"];


  // create a transformation
  CGAffineTransform rotateTransform = CGAffineTransformMakeRotation(-M_PI / 4.0);
  CGAffineTransform translateTransform = CGAffineTransformMakeTranslation(
                                                         -image.size.width / 2.0,
                                                          image.size.height / 8.0);
  CGAffineTransform finalTransform = CGAffineTransformConcat(rotateTransform,
                                                             translateTransform);


  // a true subclass approach
  id <ImageComponent> transformedImage = [[[ImageTransformFilter alloc]
                                                            initWithImageComponent:image
                                                            transform:finalTransform]
                                                            autorelease];
  id <ImageComponent> finalImage = [[[ImageShadowFilter alloc]
                                                initWithImageComponent:transformedImage]
                                                autorelease];

  // create a new DecoratorView
  // with a filtered image
  DecoratorView *decoratorView = [[[DecoratorView alloc]
                                                initWithFrame:[self.view bounds]]
                                                autorelease];
[decoratorView setImage:finalImage]; [self.view addSubview:decoratorView]; }
We first create an image reference to the original butterfly image shown on the left side in Figure 16-6. Then we construct a CGAffineTransform to rotate and translate the image accordingly. Both the image and the transform are used to initialize an instance of ImageTransformFilter as the first filter for the image. Then we use the whole component to construct an instance of ImageShadowFilter to add a drop shadow obtained from the ImageTransformFilter step. At this point, finalImage is the head of the link that contains ImageTransformFilter, ImageShadowFilter, and the original image. Then we assign the whole component to an instance of DecoratorView before we add it to the controller as a subview. What DecoratorView does is to draw an image in its drawRect:rect method, as shown in Listing 16-9.
Example 16-9. drawRect:rect Method in DecoratorView.m
- (void)drawRect:(CGRect)rect
{
// Drawing code.
[image_ drawInRect:rect];
}DecoratorView keeps a target reference of UIImage as image_. The drawRect:rect method forwards a message of drawInRect:rect to image_ with its rect parameter. Then the whole chain of decorative operations will go from there. ImageShadowFilter will pick up the message first. After it sets up a drop shadow in a current graphics context and returns the embedded component_ from the forwardingTargetForSelector: method, the same message will be forwarded to the returned component_ as the next step. At this time, component_ is, in fact, the instance of ImageTransformFilter when we constructed the chain in the previous steps. It also gets caught with the same forwardingTargetForSelector: method and sets a current context up with a predefined CGAffineTransform value. Then it returns the embedded component_ again like what ImageShadowFilter does. But this time, it's the original butterfly image—so when it's returned from ImageTransformFilter and picks up the message as the last step, it will draw in the current context with respect to all the drop shadows and affine transform. That's the whole sequence of operations in which we get a transformed and drop-shadowed image, as shown in Figure 16-6.
Note
Filters can be connected in different orders.
We can use categories to create the same thing with a little twist. The next section will show you how.
In the category approach, we only need to add the filters to the UIImage class as categories, and they will work just like separate UIImage classes—but they are not. This is the beauty of categories in Objective-C. We are going to add two filters, one for applying a 2D transformation to an image and the other one for dropping a shadow on it. A class diagram that illustrates their relationships is shown in Figure 16-7.
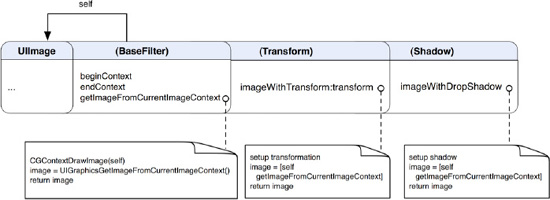
Like in the previous section, we will implement transformation and shadow filters. We have three categories for this approach, UIImage (BaseFilter), UIImage (Transform), and UIImage (Shadow). From now on, I will refer to them as BaseFilter, Transform, and Shadow respectively. BaseFilter defines some basic 2D drawing chores that draw itself in the current drawing context similar to the abstract class ImageFilter in the last section. Other filter categories can use the same method to draw whatever image reference is being held by it. Both Transform and Shadow are not inheriting the BaseFilter, but they are in the same lineage, as they are all categories of the UIImage. Methods defined in the BaseFilter can be used in both Transform and Shadow categories without any inheritance like subclassing does. The Transform category defines an imageWithTransform:transform method that takes a transform reference (we will get to the details a bit later), applies it to an internal image reference, and lets it draw itself and then return the transformed image. The Shadow category defines an imageWithDropShadow method that drops a shadow to an internal image reference and returns a final image that has the effect applied. You have probably already noticed that they can also be linked up like the ones in the true subclass approach described in the previous section. An object diagram that illustrates that is shown in Figure 16-8.
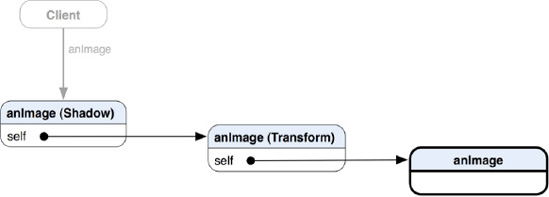
Figure 16-8. An object diagram shows how different filter categories refer to other instances of UIImage at runtime.
The right end of the link is the original image, like the left-hand image in Figure 16-6. After adding the original image to a Shadow filter and then a Transform filter, the client that is referencing an image object will get something that looks like the right-hand image in Figure 16-6. The structure of the link is very similar to the true subclass version except that each category is using self as a reference to the underlying image reference instead of a separate reference like component_.
Let's cut some code. We will first define BaseFilter that has some default behaviors for other concrete filters, as illustrated in Listing 16-10.
Example 16-10. UIImage+BaseFilter.h
@interface UIImage (BaseFilter) - (CGContextRef) beginContext; - (UIImage *) getImageFromCurrentImageContext; - (void) endContext; @end
BaseFilter has three methods that help draw itself in the current context, as in Listing 16-11.
Example 16-11. UIImage+BaseFilter.m
#import "UIImage+BaseFilter.h"
@implementation UIImage (BaseFilter)
- (CGContextRef) beginContext
{
// Create a graphics context with the target size
// On iOS 4 and later, use UIGraphicsBeginImageContextWithOptions
// to take the scale into consideration
// On iOS prior to 4, fall back to use UIGraphicsBeginImageContext
CGSize size = [self size];
if (NULL != UIGraphicsBeginImageContextWithOptions)
UIGraphicsBeginImageContextWithOptions(size, NO, 0);
elseUIGraphicsBeginImageContext(size);
CGContextRef context = UIGraphicsGetCurrentContext();
return context;
}
- (UIImage *) getImageFromCurrentImageContext
{
[self drawAtPoint:CGPointZero];
// Retrieve the UIImage from the current context
UIImage *imageOut = UIGraphicsGetImageFromCurrentImageContext();
return imageOut;
}
- (void) endContext
{
UIGraphicsEndImageContext();
}
@endbeginContext is almost the same as the one in the true subclass version. All necessary scaffolding for drawing itself in the current context is taking place in there. Once a context is ready to be drawn on, the method will return it to whoever asked for it.
getImageFromCurrentImageContext draws itself with the context and returns an image out of it by calling UIGraphicsGetImageFromCurrentImageContext().
Then a message of endContext wraps up the process with a Quartz 2D function call, UIGraphicsEndImageContext(), to clean up context-related resources.
Now we are ready for our real filter categories. The first one we are going to look at is the Transform category. Transform has only one method that takes a CGAffineTransform structure and applies it to an image. Its declaration is in Listing 16-12.
Example 16-12. UIImage+Transform.h
@interface UIImage (Transform) - (UIImage *) imageWithTransform:(CGAffineTransform)transform; @end
Its implementation is very straightforward, as shown in Listing 16-13.
Example 16-13. UIImage+Transform.m
#import "UIImage+Transform.h"
#import "UIImage+BaseFilter.h"
@implementation UIImage (Transform)
- (UIImage *) imageWithTransform:(CGAffineTransform)transform
{
CGContextRef context = [self beginContext];// setup transformation CGContextConcatCTM(context, transform); // Draw the original image to the context UIImage *imageOut = [self getImageFromCurrentImageContext]; [self endContext]; return imageOut; } @end
It takes a CGAffineTransform structure that has information to an affine transform matrix. The method passes transform and a context to a Quartz 2D function, CGContextConcatCTM(context, transform). Then transform is added to the current drawing context. Now it sends the getImageFromCurrentImageContext message self that was defined in the BaseFilter category to draw itself on the screen. After an instance of UIImage is returned from the message call, it sends an endContext message to itself to close the current drawing context and finally returns the image.
We've got our Transform filter done. It's easy, isn't it? Now we can define our Shadow filter just as easily as that one, as in Listing 16-14.
Just like the Transform filter, Shadow is a category of UIImage and has a single method. The method doesn't take any parameters, but it has a couple more steps in an implementation than the Transform filter does. We can see how to drop a shadow on an image in Listing 16-15.
Example 16-15. UIImage+Shadow.m
#import "UIImage+Shadow.h"
#import "UIImage+BaseFilter.h"
@implementation UIImage (Shadow)
- (UIImage *) imageWithDropShadow
{
CGContextRef context = [self beginContext];
// set up shadow
CGSize offset = CGSizeMake (−25, 15);
CGContextSetShadow(context, offset, 20.0);
// Draw the original image to the context
UIImage * imageOut = [self getImageFromCurrentImageContext];
[self endContext];return imageOut; } @end
We first construct some attributes for a shadow we want with a Quartz 2D function call, CGSizeMake (−25, 15), where the two parameters represent offsets in both X and Y directions. Then we pass a graphics context in CGContextSetShadow(context, offset, 20.0), which is another Quartz 2D function, with a floating-point parameter 20.0 that indicates a blurring factor. Finally, like in the addTranform: method of the Transform category, it draws itself out onscreen, grabs a returned UIImage from it, and then returns it.
So far, we've got everything we needed to do image filtering for an instance of UIImage. How are we going to use them? We are going to throw them in the same viewDidLoad method of DecoratorViewController, as shown in Listing 16-16.
Example 16-16. viewDidLoad Method in DecoratorViewController.m
- (void)viewDidLoad
{
[super viewDidLoad];
// load the original image
UIImage *image = [UIImage imageNamed:@"Image.png"];
// create a transformation
CGAffineTransform rotateTransform = CGAffineTransformMakeRotation(-M_PI / 4.0);
CGAffineTransform translateTransform = CGAffineTransformMakeTranslation(
-image.size.width / 2.0,
image.size.height / 8.0);
CGAffineTransform finalTransform = CGAffineTransformConcat(rotateTransform,
translateTransform);
// a category approach
// add transformation
UIImage *transformedImage = [image imageWithTransform:finalTransform];
// add shadow
id <ImageComponent> finalImage = [transformedImage imageWithDropShadow];
// create a new image view
// with a filtered image
DecoratorView *decoratorView = [[[DecoratorView alloc]
initWithFrame:[self.view bounds]]
autorelease];
[decoratorView setImage:finalImage];
  [self.view addSubview:decoratorView];
}The original image reference and the transformation setup, etc., are the same as in Listing 16-8 of the true subclass version. The only differences are that imageWithTransform: that applies a transformation to an image is executed by the image itself, and it returns a transformed image (the original is intact). Then the transformed image executes imageWithDropShadow to drop a shadow on itself, and then returns a dropped-shadow version of itself as a new image called finalImage. Then finalImage will be added to imageView and displayed on the screen just like in the true subclass approach. A one-line version of putting all the filters together with the original image can go like this:
finalImage = [[image imageWithTransform:finalTransform] imageWithDropShadow];
At this point, can you tell any differences between the category and true subclass approaches? That's correct—the filters of UIImage in categories are instance methods vs. real subclasses in the true subclass approach. There is no inheritance in the category approach as all of the filters are still part of UIImage! We use ImageComponent as an abstract type in the true subclass approach, while we can use UIImage all the way throughout the category approach. However, like using true subclasses, any filter can be applied in different orders in the category approach.
The design for the category version seems simpler for implementing the same image filtering on a UIImage object. It's simpler because we were using categories and no actual subclassing and encapsulating of another UIImage object in order to extend a decorator link. In the next section, we will talk about some pros and cons of using categories to adopt the pattern.
We have introduced the Decorator pattern with its concepts and different approaches to implement it in Objective-C. A true subclass implementation uses a more structured approach to connect different decorators. A categories approach is simpler and more lightweight than its counterpart. It's suitable for applications that require only a small amount of decorators for existing classes. Although categories are different from actual subclassing and cannot strictly adapt the original flavor of the pattern, They fulfill the intent to solve the same kind of problems. The Decorator pattern is a natural choice for designing applications like the image filtering example. Any combination of image filters can be applied or removed dynamically without affecting the integrity of the original behaviors of UIImage.
In the next chapter, we will see a design pattern that is similar to the Decorator pattern but serves different purposes. It's called Chain of Responsibility.
[14] The original definition appeared in Design Patterns, by the " Gang of Four " (Addison-Wesley, 1994).