
Chapter 2
Getting Around in Lion
This chapter shows you how to get around the Lion OS, walking you through how to use Lion's built-in utilities to make navigating the operating system a lot easier. To that end, we will cover the basics of using the Finder file application, the Dock (which serves as Lion's main menu), and a few application tricks that make using Lion a more pleasurable experience. We will also cover how to use the Stacks feature, which gives you an alternative to the Finder for manipulating files on your system. Finally, we will cover Airdrop and Bluetooth, which enable you to share the files on your system with other Mac users.
The Finder is Lion's most important app because it lets you reference and retrieve the files that you create. Without a proper understanding of the Finder, you may find it difficult to use Lion effectively.
The most obvious way to navigate the Lion OS is to use the combination of a keyboard and mouse (or possibly, a trackpad). Using these effectively can help you increase how quickly you find and access what you are looking for, whether it's a file, application, or device. When combined with shortcut keys, a keyboard and mouse make navigating Lion simple and enjoyable.
CAUTION: If you haven't already read the Quick Start Guide in Part 1 of this book, please take a few minutes to do so now. You should do this before you read any further, use the Setup app, or do anything else. This guide tells you how to find lots of useful things in this book, and it provides some great beginning and advanced time-saving tips and tricks that will help you get up and running quickly.
Using the Finder
The most commonly used utility in Lion is the Finder. This application allows you to explore your Mac's file system, which contains all of the files that are created by both the system (e.g., when applications are installed) and by you (e.g., when you decide to create a word processing document and save it to your hard disk).

NOTE: The Finder icon, like all icons, can be both left- and right-clicked. This section of the chapter assumes that you are using the left-click button of your mouse.
By default, the Finder icon is the leftmost icon in the Dock at the bottom of your screen (see Figure 2–1).
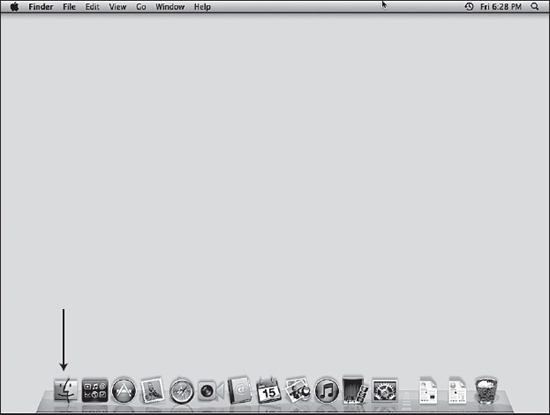
Figure 2–1. The Finder icon
Clicking the Finder icon launches the Finder application, which presents a window that lets you quickly navigate to a handful of places on your system that you are likely to use frequently. The folders you see are set up so that you can access and organize your files quickly and easily. For example, the folder setup separates different types of files from one another. Word processing documents are separated from your photos, which are separated from your music, and so on (see Figure 2–2).
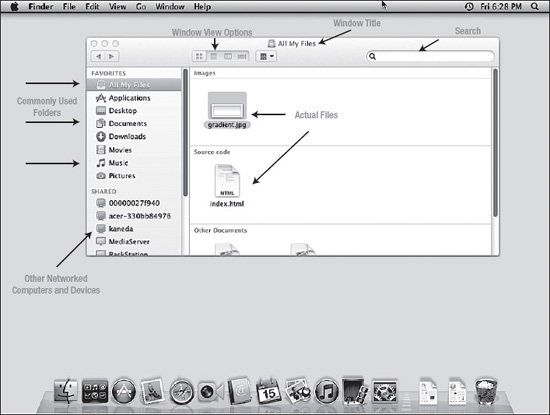
Figure 2–2. The Finder's window layout
Table 2–1 provides a complete description of the Finder window and the menu items it contains.
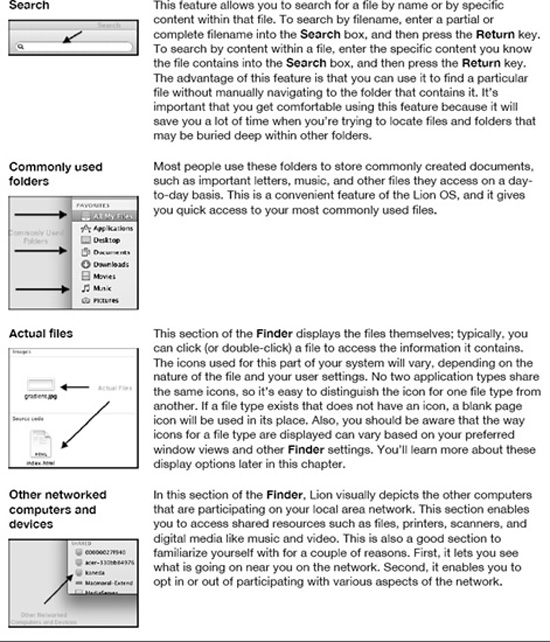
The Window View Options
In the upcoming sections, we'll take a closer look at what the View Options window can do for you, including how it can help you select the options that best fit your preferred style of navigation. You can choose from four basic view options for your windows: Icon, List, Column, and Cover Flow.
The Icon View
The Icon view displays the contents of your windows as icons. This is the best view to use if you're new to Lion or you're a visual person who prefers a more graphical approach to navigating your computer (see Figure 2–3).
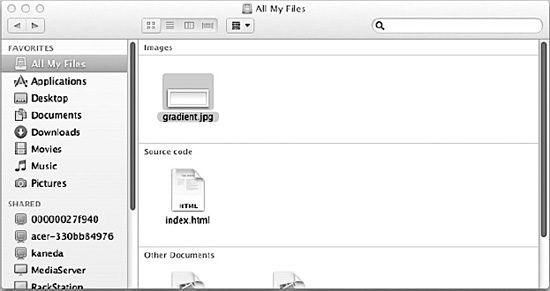
Figure 2–3. The Icon view
The List View
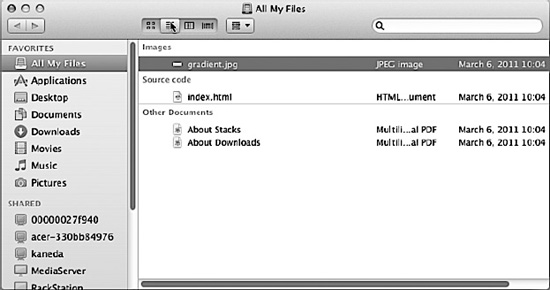
The List view displays files as a text-based list. While you can still see the icons to the left of the filename, they are much smaller in this view. This view is meant to give you a scrolling list of your content, and it allows you to see many more items at once. This view also displays important information about your files, including the file type, date, and other pertinent information. This is a good view to choose when you want to see a lot of files at a glance (see Figure 2–4).
The Column View
The Column view displays your files in a column format (see Figure 2–5). The advantage to this view is that it lets you access multiple directories and files at once. This view is generally adopted by more advanced users; however, it can be useful if you want to compare the contents of two or more directories. It can also prove useful if you need to see a file's history (e.g., when it was created, last modified, or last opened), or you want to return quickly to where you were.
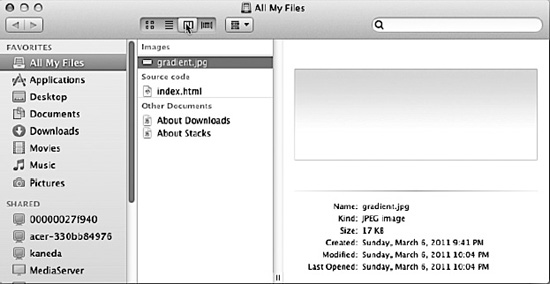
Figure 2–5. The Column view
The Cover Flow View
The Cover Flow view shows off some of the advanced graphical features for navigating the Lion operating system. This view allows you to interact with Lion's files and folders as though they were a on a carousel in a store. It provides a complete graphical preview of the file's contents; a detailed description of the file; and easy access to neighboring files, which can be seen without any extra effort on your part. This view takes some getting used to, but it also provides one of the easiest ways to get around Lion (see Figure 2–6).
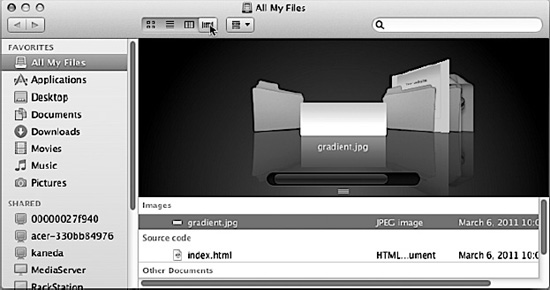
Figure 2–6. The Cover Flow view
Learning to use the different Finder views can help you quickly find your files in a manner that best matches your preferred style of using your computer. I recommend that you start with the Icon view because it is the easiest view to use, and it makes navigation much more manageable. Once you become comfortable with using the Icon view, I recommend that you gradually try out the other view styles. Knowing when and how to use the different view options is critical in getting the most out of the Lion operating system.
Finder Preferences
If you're a new Lion user who is accustomed to using Windows, you may find that one of the most difficult aspects of using Lion is that it behaves differently from Windows in almost every respect. These differences even extend to how files are displayed, stored, and accessed. Fortunately, Lion offers an intuitive way of helping you adjust to the layout of your files and folders. For example, the Finder includes a few important interface options that let you tailor the Lion operating system so that you can be more productive. These options help you control the way content is displayed as you navigate and use Lion. Specifically, these features allow you to customize the way the Finder works, so you can alter its behavior to suit your particular preferences. You can access the Finder's Preferences… menu in one of two ways. First, you can hold down the Command key and then press the Comma key (,). Second, you can simply navigate to the Preferences… menu option under the Finder menu (see Figure 2–7).
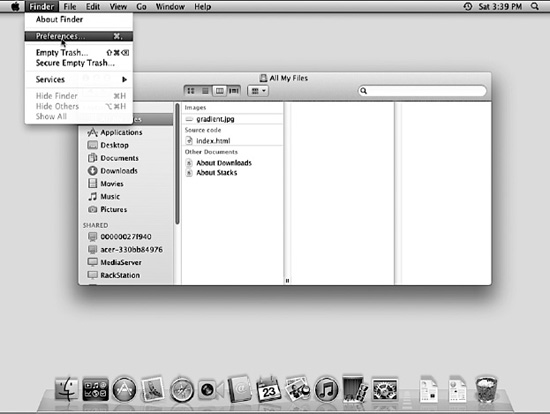
Figure 2–7. The Finder's Preferences… menu
In the upcoming sections, you'll learn all about customizing the Finder's various options.
The General Tab
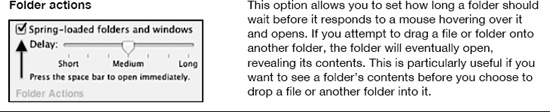
Let's begin by looking at the General tab of the Finder app's Preferences… menu (see Figure 2–8). Knowing what you want displayed on your desktop is an important aspect of setting up your system. Choosing the right options enables you to keep your desktop environment as clean as possible. Table 2–2 describes the various features available for the Finder in the General tab.
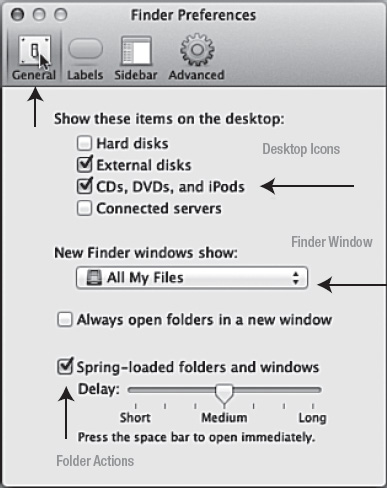
Figure 2–8. The Finder app's General tab
The Labels Tab
The Labels tab allows you to keep track of folders and files by assigning different color schemes to them. This allows you to easily identify and recognize folders and files without having to read their names or preview their contents. This feature simplifies the process of viewing and retrieving the correct files and folders you may be looking for (see Figure 2–9).
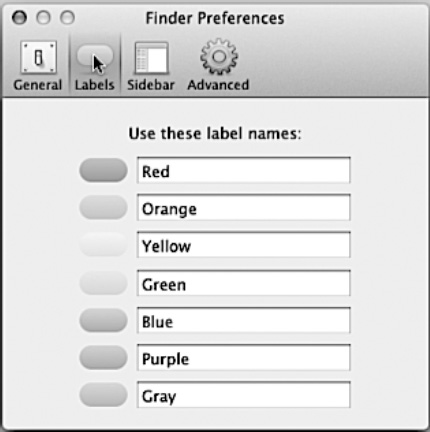
Figure 2–9. The Finder app's Labels tab
The Sidebar Tab
The Sidebar tab (see Figure 2–10) allows you to tweak the contents of the Finder app's Sidebar menu. This tab is great for minimizing the content seen when initially launching the Finder. Used appropriately, the options in this tab help you decrease the overall clutter seen in the Finder's sidebar.
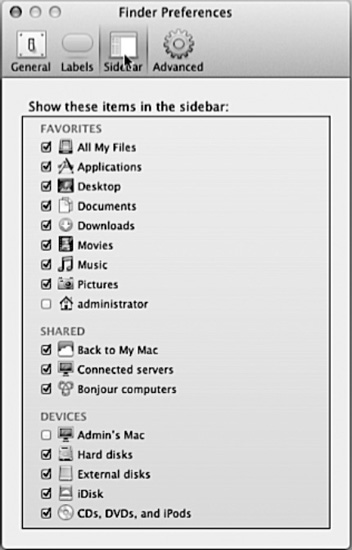
Figure 2–10. The Finder app's Sidebar tab
The Advanced Tab
Some of the more advanced options in the Finder app's Preferences… menu affect the way Lion functions. For example, the Advanced tab lets you change the way files are deleted. It is important to understand how functions like file deletion can affect your file management. A poor understanding of this essential function can lead to unwanted consequences, such as unintentionally deleting a file permanently. Lion's Show warning before emptying the Trash option helps you protect against such accidental deletions by prompting you to confirm that you do in fact want to delete a given file permanently. Further, you can use the Empty Trash securely option to make sure that the data is 100% unrecoverable once it is deleted. It is best to have this option turned on if you are in a place where security is an issue.
NOTE: Selecting the Empty Trash securely option causes all deleted files to be completely unrecoverable. Selecting this option will slow down the process of deleting files, but you may find the extra couple of seconds required to be well worth the wait because of the security advantages this option provides. I highly recommend that you employ this feature to ensure that items you want deleted from your Mac are deleted irrevocably.
File extensions indicate the file format of a given file. For example, a file with the .doc extension indicates that the file is stored in Microsoft Word format. If you have Microsoft Word installed, it will open all files with the .doc extension. Lion is intelligent enough to create these associations, so it is recommended that you allow the operating system to manage these associations for the sake of simplicity. The option to show file extensions—and give warnings if and when they are changed—is a good option to use when you are dealing with a lot of similar file types, such as .doc and .docx. However, it is recommended that you stick with the default extension options if you do not fully understand what file extensions do (see Figure 2–11).
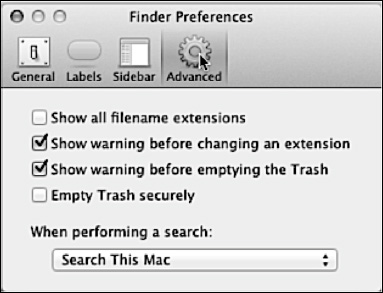
Figure 2–11. The Finder app's Advanced tab
The Finder App's Right-Click Options
Right-clicking a file or folder while using the Finder brings up a special menu that changes depending on the context (see Figure 2–12). The options exposed in this menu allow you to do several things with a folder, file, or group of files. Table 2–3 describes various menu options you will see when right-clicking a file or folder.
NOTE: The options you see when you right-click a file or folder when using the Finder can vary significantly. The specific options displayed depend greatly on the nature of the folder or file you right-click.
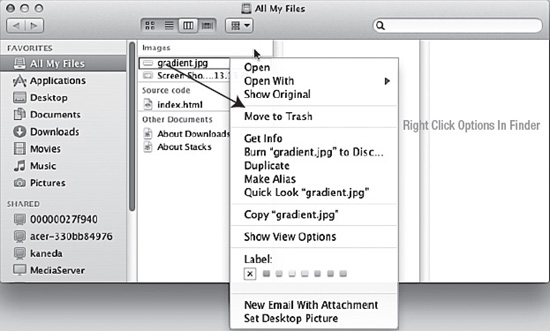
Figure 2–12. A special context menu displayed after right-clicking a file in the Finder
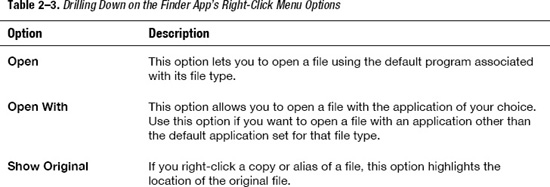
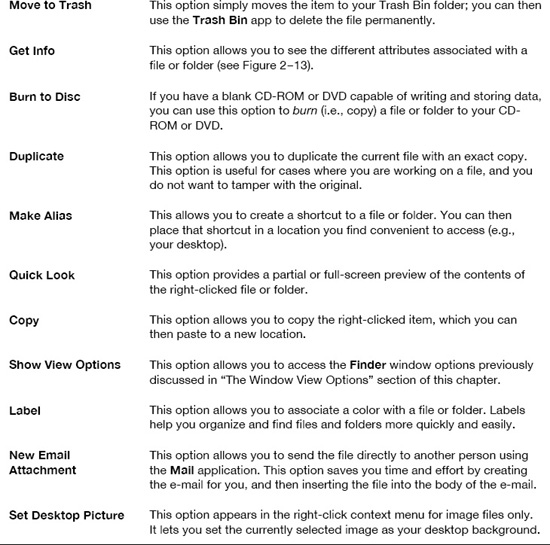
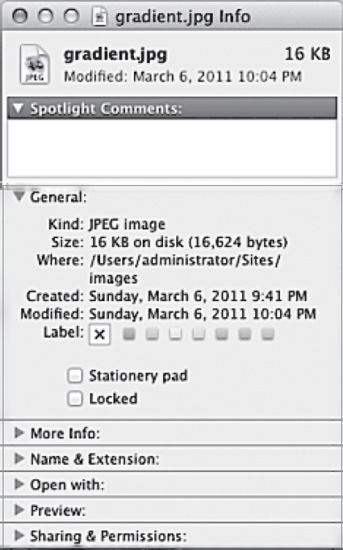
Figure 2–13. Viewing a file's attributes
Stacks
Mac OS X Lion was constructed around the basic premise that empowering users means giving them immediate access to the information on their system in an organized and easy-to-retrieve fashion. One way of achieving this is by ensuring that users have the flexibility to choose how they would like things to appear on their screen. Lion's Stacks feature provides users with an easy-to-use interface for accessing files. This approach for accessing files differs significantly from the approach provided by the Finder. For example, the Stacks feature overhauls accessibility on the Mac by letting you access files in a Grid, List, or Fan view. It is the content contained within the stacks that makes these views unique. Rather than seeing everything you have on your system, you get to specify exactly what shows up and how in a stack.
By default, the Stacks feature is located in the lower-right corner of your primary user window. It sits to the right of the Dock's divider line, which separates your application shortcuts from your stack items (see Figure 2–14).
Figure 2–14. The location of your stacks
Using the Stacks feature is quite simple. You begin by selecting the icon type that you wish to use for a given stack. You can choose from one of two views: Folder or Stack. Selecting the Folder view will display a Folder icon that represents your stack; and selecting the Stack view will display a preview of the contents in a stack in icon form (see Figures 2–15 and 2–16 for a quick look at the differences).

Figure 2–15. Folder views of stacks

Figure 2–16. Stack views of stacks
Notice that one view displays the Folder icons, while the other displays a preview of the most recent document contained in a stack. Both views have their advantages. The Folder view simplifies the look and feel of the Stacks feature, blending it neatly into the desktop environment. On the other hand, the Stack view gives you a pictorial representation of the contents in a stack. This view enables you to examine a stack based on its contents, rather than its folder type. To choose your preferred view for a given stack, simply right-click that stack and select a view (see Figure 2–17).
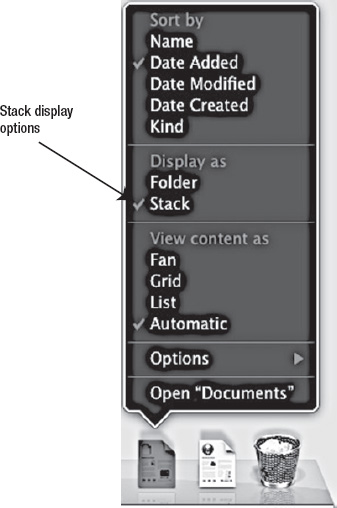
Figure 2–17. Your stack display options
Once you have chosen your display type, the icons for the items in that stack will change appropriately. After making these changes, you will want to configure how you view the files and folders contained within your stack.
Stack Viewing
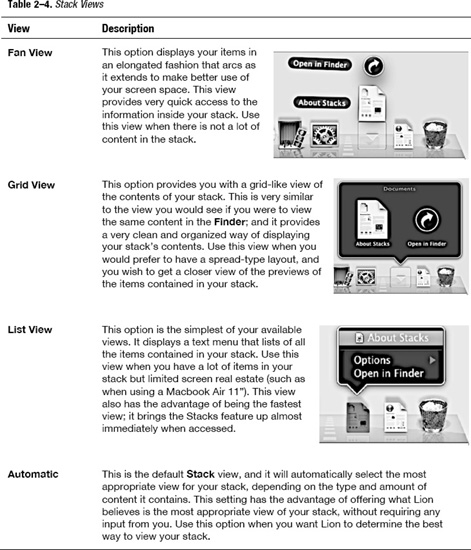
The Stack view itself has three view modes: Grid, List, and Fan. Table 2–4 offers a quick rundown of the advantages of each view.
To create additional stacks, use the Finder to navigate to a folder you would like to have quick access to, and then drag that folder into the Stacks area to the right of the Dock's dividing line (see Figure 2–18 for more details).
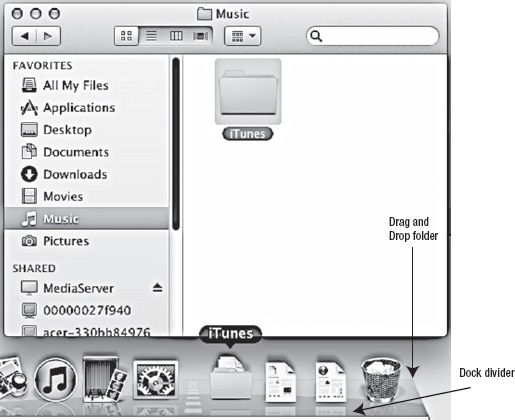
Figure 2–18. Creating a new stack
The Stacks feature provides quick and simple access to your files—without requiring that you launch the Finder. Moreover, this feature can greatly reduce the need to rely on Lion's built-in search methods to find the files you want to retrieve.
Airdrop
The Airdrop feature is a new and truly innovative feature introduced by the Lion OS that makes sharing files extremely easy for Lion users. Airdrop solves the age-old problem of trading files between two Mac users who do not have an external storage device on hand, but who do not wish to go through the trouble of creating a folder, creating a user, and then configuring things to make that folder accessible to that user. The Airdrop approach also less cumbersome than sending files through e-mail.
By default, Lion sets up an ad-hoc Wi-Fi network between participating computers, enabling Mac users to exchange files wirelessly. Under this approach, sharing document-type files (which are typically quite small) occurs almost instantaneously. This approach can also make sharing files between office personnel safe and easy, while also allowing two strangers in a coffee shop to meet and exchange information securely.
Using Airdrop is extremely simple. You begin by accessing the Airdrop folder in the Finder (see Figure 2–19).
Figure 2–19. Accessing Airdrop
Upon accessing Airdrop, you will see the Airdrop icon change into an animated radar beacon, as shown in the image below.
![]()
Once the beacon is displayed and animated, you will notice that the bottom of the Finder window now displays the image of a fortune cookie (see Figure 2–20).
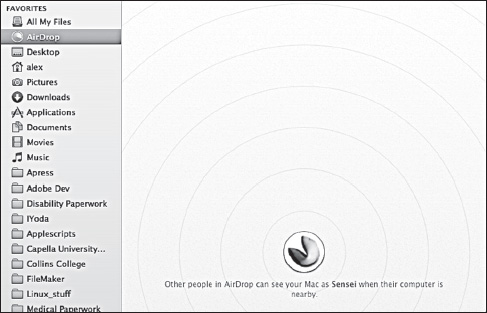
Figure 2–20. Airdrop's Finder window
You are now ready to begin sharing files with other Mac users who also have the Airdrop feature enabled. To share a file with another Airdrop user, simply drag and drop it into the Airdrop area on the image of the intended recipient. Doing so will present that user with a prompt that asks if she would like to accept the file exchange. If so, the fortune cookie will turn into an image icon that represents the recipient. If more than one Airdrop user is in the vicinity, then you will see multiple users in your Airdrop window. In that case, you can simply drag the file onto the image of the intended recipient.
Using Airdrop is just that simple. This feature was created to enable users to share specific files without giving access to the rest of the files on the Mac sharing the file. Another nice aspect of this feature: it easily bridges the gap between power users and novices when it comes to file sharing.
NOTE: Airdrop does not work on some older Mac models; and as a result, it may be unavailable to some users.
Bluetooth—the Airdrop Alternative
Fortunately, there is hope for Lion users who were hoping to use the Airdrop feature, only to discover they do not have the appropriate hardware. Almost all Macs made in 2006 or later ship with Bluetooth networking built into them. This file-sharing technology has the advantage of being compatible with any Bluetooth–capable device, not just other Macs. Thus, you could use this technology to transfer files to and from a Bluetooth–enabled phone, MP3 player, or video device. Bluetooth is slower than Wi-Fi, so don't expect blistering transfer speeds when moving your files. Still, it is a very usable and convenient option for exchanging files where one party can't use the Airdrop feature.
Transferring files with your Mac's Bluetooth capability is not difficult; however, it does require a few more steps than using Airdrop to accomplish the same task. Follow these steps to use Bluetooth to transfer a file between two Macs:
- From the Bluetooth menu located on Lion's main menu at the top of the screen, select Send File… (see Figure 2–21).
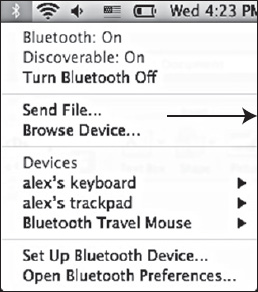
Figure 2–21. Bluetooth's Send File… menu option
- Select the file(s) you wish to send.
- Select the Bluetooth recipient you wish to send the file to (see Figure 2–22).
- Click Send once you have selected the intended recipient.
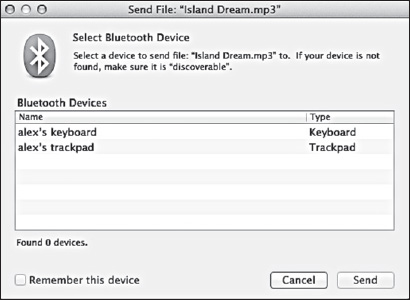
Figure 2–22. Selecting a Bluetooth device to send a file to
The rule here is that each recipient must have Bluetooth enabled before this type of file transfer will work. To enable Bluetooth on your Mac, go to your system preferences either by clicking the System Preferences icon in your Dock or by typing the words “System Preferences” into the Spotlight search box (see Figure 2–23).
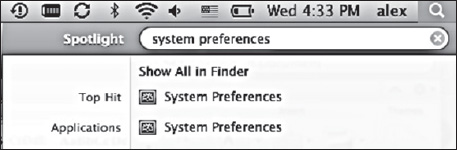
Figure 2–23. Using the Spotlight search box to find the System Preferences folder
Next, select the Bluetooth preferences option (see Figure 2–24).

Figure 2–24. The Bluetooth preferences icon
At this point, you will see a dialog for setting that technology's options. Make sure that Bluetooth is turned on (see Figure 2–25).

Figure 2–25. Turning Bluetooth on
After you turn Bluetooth on, you must enable sharing via Bluetooth. To do so, select the Sharing Setup option from the same window (see Figure 2–26).
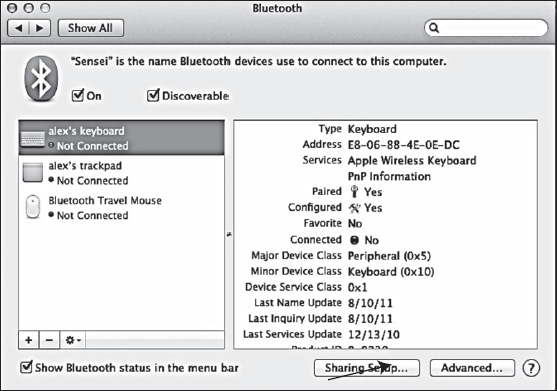
Figure 2–26. The Bluetooth Sharing Setup options
To complete this process, you need to enable Bluetooth sharing and configure the options you wish to use to transfer files between yourself and other Bluetooth users (see Figure 2–27).
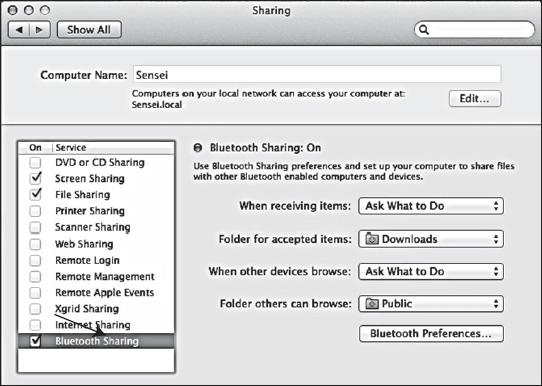
Figure 2–27. Enabling Bluetooth sharing
Once you are satisfied with the way your Bluetooth sharing preferences are arranged, you can proceed to share files using Bluetooth technology.
File sharing with Bluetooth isn't the ideal approach; however, it does provide an excellent alternative to the Airdrop feature, should you need one.
Using Launchpad
Launchpad lets you quickly access your favorite and most-used applications with one simple click. It also allows you to view your application list using the full screen of your Mac. This application works similarly to the Launch Pad app on an iPad or iPhone, allowing you to bundle and group similar files and folders (see Figure 2–28).
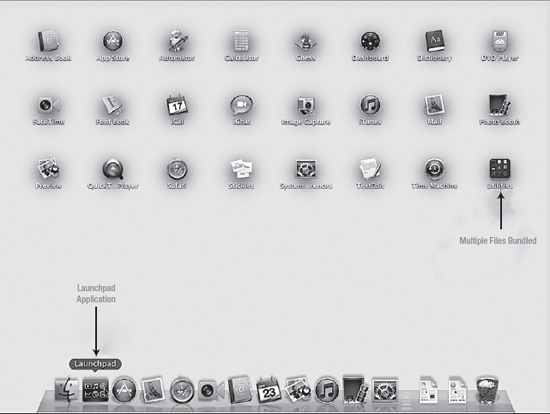
Figure 2–28. The Lion Launchpad app
Spotlight Searching
The Finder's Spotlight box can greatly simplify your user experience and enhance your productivity. This box gives you a granular way to search for files, folders, e-mails, and even recently visited websites. You can use Spotlight searches to find anything associated with what you are looking for. For example, assume you type the words “my cat” into the Spotlight box. The Finder can find all of the files on your computer with names containing “my cat.” But it does much more than that: it can also find any e-mails, documents, or images that have the words “my cat” located somewhere in them. This feature uses the index of your entire Mac, so there are virtually no limits on what it can find. Thus, a search for “Paul” will provide a link to his information in your address book. It will also find any documents you've created that contain his name. To conduct a Spotlight search, simply click the magnifying glass icon in the upper-right corner of your Mac's main menu. You can also bring up the Spotlight box by holding down the Command key and then pressing the Spacebar key (see Figure 2–29).

Figure 2–29. The Spotlight box
Summary
This chapter has covered some of the applications commonly used to navigate the Lion operating system. I have walked you through the various options available, explaining how these options work so you can get the most of out of your Lion desktop experience right out of the gate. I have also covered a couple different approaches for sharing your files with other Mac users. Remember to try out different options, so you can figure what approaches best suit your needs. There is no single right way to navigate the Lion OS; the best way to do this will be different for everyone. Your job is to experiment until you find the combination that works best for you.