
C H A P T E R 7
Using the WebSocket API
In this chapter, we'll explore what you can do with the most powerful communication feature in the HTML5 specification: WebSocket, which defines a full-duplex communication channel that operates through a single socket over the web. WebSocket is not just another incremental enhancement to conventional HTTP communications; it represents a large advance, especially for real-time, event-driven web applications.
WebSocket provides such an improvement from the old, convoluted “hacks” that are used to simulate a full-duplex connection in a browser that it prompted Google's Ian Hickson—the HTML5 specification lead—to say:
“Reducing kilobytes of data to 2 bytes…and reducing latency from 150ms to 50ms is far more than marginal. In fact, these two factors alone are enough to make WebSocket seriously interesting to Google.”
We'll show you in detail just why WebSocket provides such a dramatic improvement, and you'll see how—in one fell swoop—WebSocket makes all the old Comet and Ajax polling, long-polling, and streaming solutions obsolete.
Overview of WebSocket
Let's take a look at how WebSocket can offer a reduction of unnecessary network traffic and latency by comparing HTTP solutions to full duplex “real time” browser communication with WebSocket.
Real-Time and HTTP
Normally when a browser visits a web page, an HTTP request is sent to the web server that hosts that page. The web server acknowledges this request and sends back the response. In many cases—for example, for stock prices, news reports, ticket sales, traffic patterns, medical device readings, and so on—the response could be stale by the time the browser renders the page. If you want to get the most up-to-date real-time information, you can constantly refresh that page manually, but that's obviously not a great solution.
Current attempts to provide real-time web applications largely revolve around polling and other server-side push technologies, the most notable of which is “Comet”, which delays the completion of an HTTP response to deliver messages to the client.
With polling, the browser sends HTTP requests at regular intervals and immediately receives a response. This technique was the first attempt for the browser to deliver real-time information. Obviously, this is a good solution if the exact interval of message delivery is known, because you can synchronize the client request to occur only when information is available on the server. However, real-time data is often not that predictable, making unnecessary requests inevitable and as a result, many connections are opened and closed needlessly in low-message-rate situations.
With long-polling, the browser sends a request to the server and the server keeps the request open for a set period of time. If a notification is received within that period, a response containing the message is sent to the client. If a notification is not received within the set time period, the server sends a response to terminate the open request. It is important to understand, however, that when you have a high message-volume, long-polling does not provide any substantial performance improvements over traditional polling.
With streaming, the browser sends a complete request, but the server sends and maintains an open response that is continuously updated and kept open indefinitely (or for a set period of time). The response is then updated whenever a message is ready to be sent, but the server never signals to complete the response, thus keeping the connection open to deliver future messages. However, since streaming is still encapsulated in HTTP, intervening firewalls and proxy servers may choose to buffer the response, increasing the latency of the message delivery. Therefore, many streaming solutions fall back to long-polling in case a buffering proxy server is detected. Alternatively, TLS (SSL) connections can be used to shield the response from being buffered, but in that case the setup and tear down of each connection taxes the available server resources more heavily.
Ultimately, all of these methods for providing real-time data involve HTTP request and response headers, which contain lots of additional, unnecessary header data and introduce latency. On top of that, full-duplex connectivity requires more than just the downstream connection from server to client. In an effort to simulate full-duplex communication over half-duplex HTTP, many of today's solutions use two connections: one for the downstream and one for the upstream. The maintenance and coordination of these two connections introduces significant overhead in terms of resource consumption and adds lots of complexity. Simply put, HTTP wasn't designed for real-time, full-duplex communication as you can see in the Figure 7-1, which shows the complexities associated with building a web application that displays real-time data from a back-end data source using a publish/subscribe model over half-duplex HTTP.
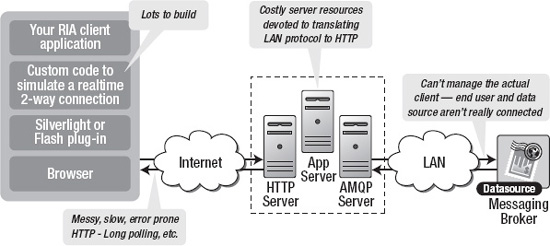
Figure 7-1. The complexity of real-time HTTP applications
It gets even worse when you try to scale out those solutions. Simulating bidirectional browser communication over HTTP is error-prone and complex and all that complexity does not scale. Even though your end users might be enjoying something that looks like a real-time web application, this “real-time” experience has a high price tag. It's a price that you will pay in additional latency, unnecessary network traffic and a drag on CPU performance.
Understanding WebSocket
WebSocket was first defined as “TCPConnection” in the Communications section of the HTML5 specification by Ian Hickson (lead writer of the HTML5 specification). The specification evolved and changed to WebSocket, which is now an independent specification (just like Geolocation, Web Workers and so on), to keep the discussion focused.
Both TCPConnection and WebSocket are names that refer to lower-level networking interfaces. TCP is a fundamental transport protocol for the Internet. WebSocket is a transport protocol for web applications. It provides a bidirectional stream of data that arrives in order, much like TCP. As with TCP, higher-level protocols can run over WebSocket. To be part of the Web, rather than connecting to an Internet host and port, WebSocket connects to URLs.
WHAT DO WEBSOCKET AND MODEL TRAINS HAVE IN COMMON?
The WebSocket Handshake
To establish a WebSocket connection, the client and server upgrade from the HTTP protocol to the WebSocket protocol during their initial handshake, as shown in Figure 7-2. Note that this connection description represents draft 17 of the protocol.

Figure 7-2. The WebSocket Upgrade handshake
Listing 7-1. The WebSocket Upgrade Handshake
From client to server:

GET /chat HTTP/1.1

Host: example.com

Connection: Upgrade

Sec-WebSocket-Protocol: sample

Upgrade: websocket

Sec-WebSocket-Key: 7cxQRnWs91xJW9T0QLSuVQ==

Origin: http://example.com


[8-byte security key]


From server to client:


HTTP/1.1 101 WebSocket Protocol Handshake
Upgrade: websocket
Connection: Upgrade
Sec-WebSocket-Accept: 7cxQRnWs91xJW9T0QLSuVQ==
WebSocket-Protocol: sample
Once established, WebSocket messages can be sent back and forth between the client and the server in full-duplex mode. This means that text-based messages can be sent full-duplex, in either direction at the same time. On the network each message starts with a 0x00 byte, ends with a 0xFF byte, and contains UTF-8 data in between.
The WebSocket Interface
Along with the definition of the WebSocket protocol, the specification also defines the WebSocket interface for use in JavaScript applications. Listing 7-2 shows the WebSocket interface.
Listing 7-2. The WebSocket Interface
[Constructor(DOMString url, optional DOMString protocols),

 Constructor(DOMString url, optional DOMString[] protocols)]

interface WebSocket : EventTarget {

  readonly attribute DOMString url;


  // ready state

  const unsigned short CONNECTING = 0;

  const unsigned short OPEN = 1;

  const unsigned short CLOSING = 2;

  const unsigned short CLOSED = 3;

  readonly attribute unsigned short readyState;

  readonly attribute unsigned long bufferedAmount;


  // networking

  [TreatNonCallableAsNull] attribute Function? onopen;

  [TreatNonCallableAsNull] attribute Function? onerror;

  [TreatNonCallableAsNull] attribute Function? onclose;

  readonly attribute DOMString extensions;

  readonly attribute DOMString protocol;

  void close([Clamp] optional unsigned short code, optional DOMString reason);


  // messaging

  [TreatNonCallableAsNull] attribute Function? onmessage;

           attribute DOMString binaryType;

  void send(DOMString data);

  void send(ArrayBuffer data);

  void send(Blob data);

};
Using the WebSocket interface is straightforward. To connect a remote host, just create a new WebSocket instance, providing the new object with a URL that represents the end-point to which you wish to connect. Note that a ws:// and wss:// prefix indicates a WebSocket and a secure WebSocket connection, respectively.
A WebSocket connection is established by upgrading from the HTTP protocol to the WebSocket protocol during the initial handshake between the client and the server, over the same underlying TCP/IP connection. Once established, WebSocket data frames can be sent back and forth between the client and the server in full-duplex mode. The connection itself is exposed via the message event and send method defined by the WebSocket interface. In your code, you use asynchronous event listeners to handle each phase of the connection life cycle.
myWebSocket.onopen = function(evt) { alert("Connection open ..."); };

myWebSocket.onmessage = function(evt) { alert( "Received Message:  "  +  evt.data); };

myWebSocket.onclose = function(evt) { alert("Connection closed."); };
A Dramatic Reduction in Unnecessary Network Traffic and Latency
So how efficient can WebSocket be? Let's compare a polling application and a WebSocket application side by side. To illustrate polling, we will examine a web application in which a web page requests real-time stock data from a web server using a traditional polling model. It does this by polling a Java Servlet that is hosted on a web server. A message broker receives data from a fictitious stock price feed with continuously updating prices. The web page connects and subscribes to a specific stock channel (a topic on the message broker) and uses an XMLHttpRequest to poll for updates once per second. When updates are received, some calculations are performed and the stock data is displayed as shown in Figure 7-3.
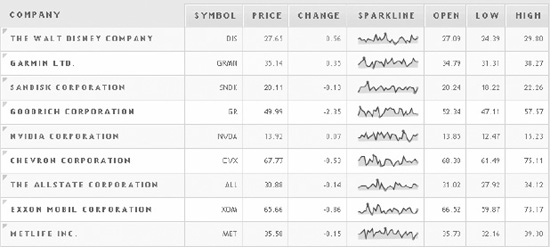
Figure 7-3. Example JavaScript stock ticker application
It all sounds great, but a look under the hood reveals there are some serious issues with this application. For example, in Mozilla Firefox with Firebug, you can see that GET requests hammer the server at one-second intervals. Looking at the HTTP headers reveals the shocking amount of overhead that is associated with each request. Listings 7-3 and 7-4 show the HTTP header data for just a single request and response.
Listing 7-3. HTTP Request Header
GET /PollingStock//PollingStock HTTP/1.1

Host: localhost:8080

User-Agent: Mozilla/5.0 (Windows; U; Windows NT 5.1; en-US; rv:1.9.1.5) Gecko/20091102

 Firefox/3.5.5

Accept: text/html,application/xhtml+xml,application/xml;q=0.9,*/*;q=0.8

Accept-Language: en-us

Accept-Encoding: gzip,deflate

Accept-Charset: ISO-8859-1,utf-8;q=0.7,*;q=0.7

Keep-Alive: 300

Connection: keep-alive

Referer: http://www.example.com/PollingStock/

Cookie: showInheritedConstant=false; showInheritedProtectedConstant=false;

 showInheritedProperty=false; showInheritedProtectedProperty=false;

 showInheritedMethod=false; showInheritedProtectedMethod=false;

 showInheritedEvent=false; showInheritedStyle=false; showInheritedEffect=false
Listing 7-4. HTTP Response Header
HTTP/1.x 200 OK

X-Powered-By: Servlet/2.5

Server: Sun Java System Application Server 9.1_02

Content-Type: text/html;charset=UTF-8

Content-Length: 21

Date: Sat, 07 Nov 2009 00:32:46 GMT
Just for fun (ha!), we can count all the characters. The total HTTP request and response header information overhead contains 871 bytes and that does not even include any data. Of course, this is just an example and you can have less than 871 bytes of header data, but there are also common cases where the header data exceeded 2,000 bytes. In this example application, the data for a typical stock topic message is only about 20 characters long. As you can see, it is effectively drowned out by the excessive header information, which was not even required in the first place.
So, what happens when you deploy this application to a large number of users? Let's take a look at the network overhead for just the HTTP request and response header data associated with this polling application in three different use cases.
- Use case A: 1,000 clients polling every second: Network traffic is (871 × 1,000) = 871,000 bytes = 6,968,000 bits per second (6.6 Mbps)
- Use case B: 10,000 clients polling every second: Network traffic is (871 × 10,000) = 8,710,000 bytes = 69,680,000 bits per second (66 Mbps)
- Use case C: 100,000 clients polling every 1 second: Network traffic is (871 × 100,000) = 87,100,000 bytes = 696,800,000 bits per second (665 Mbps)
That's an enormous amount of unnecessary network overhead. Consider if we rebuilt the application to use WebSocket, adding an event handler to the web page to asynchronously listen for stock update messages from the message broker (more on that in just a little bit). Each of these messages is a WebSocket frame that has as little as two bytes of overhead (instead of 871). Take a look at how that affects the network overhead in our three use cases.
- Use case A: 1,000 clients receive 1 message per second: Network traffic is (2 × 1,000) = 2,000 bytes = 16,000 bits per second (0.015 Mbps)
- Use case B: 10,000 clients receive 1 message per second: Network traffic is (2 × 10,000) = 20,000 bytes = 160,000 bits per second (0.153 Mbps)
- Use case C: 100,000 clients receive 1 message per second: Network traffic is (2 × 100,000) = 200,000 bytes = 1,600,000 bits per second (1.526 Mbps)
As you can see in Figure 7-4, WebSocket provides a dramatic reduction of unnecessary network traffic compared to the polling solution.
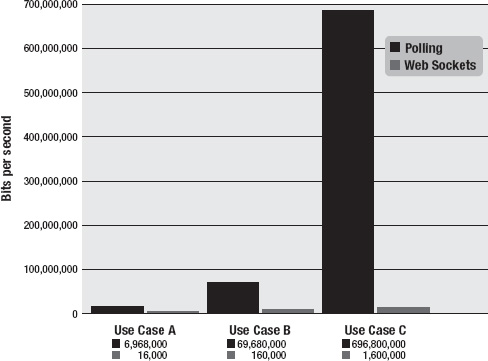
Figure 7-4. Comparison of the unnecessary network overhead between the polling WebSocket traffic
And what about the reduction in latency? Take a look at Figure 7-5. In the top half, you can see the latency of the half-duplex polling solution. If we assume, for this example, that it takes 50 milliseconds for a message to travel from the server to the browser, then the polling application introduces a lot of extra latency, because a new request has to be sent to the server when the response is complete. This new request takes another 50ms and during this time the server cannot send any messages to the browser, resulting in additional server memory consumption.
In the bottom half of the figure, you see the reduction in latency provided by the WebSocket solution. Once the connection is upgraded to WebSocket, messages can flow from the server to the browser the moment they arrive. It still takes 50 ms for messages to travel from the server to the browser, but the WebSocket connection remains open so there is no need to send another request to the server.
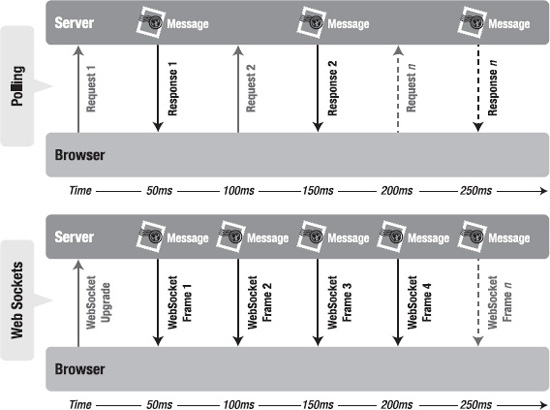
Figure 7-5. Latency comparison between the polling and WebSocket applications
WebSocket provides an enormous step forward in the scalability of the real-time web. As you have seen in this chapter, WebSocket can provide a 500:1 or—depending on the size of the HTTP headers—even a 1000:1 reduction in unnecessary HTTP header traffic and 3:1 reduction in latency.
Writing a Simple Echo WebSocket Server
Before you can use the WebSocket API, you need a server that supports WebSocket. In this section we'll take a look at how a simple WebSocket “echo” server is written. To run the examples for this chapter, we have included a simple WebSocket server written in Python. The sample code for the following examples is located in the WebSocket section of the book web site.
WEBSOCKET SERVERS
To run the Python WebSocket echo server accepting connections at ws://localhost:8000/echo, open a command prompt, navigate to the folder that contains the file, and issue the following command:
python websocket.py
We have also included a broadcast server that accepts connections at ws://localhost:8080/broadcast. Contrary to the echo server, any WebSocket message sent to this particular server implementation will bounce back to everyone that is currently connected. It's a very simple way to broadcast messages to multiple listeners. To run the broadcast server, open a command prompt, navigate to the folder that contains the file, and issue the following command:
python broadcast.py
Both scripts make use of the example WebSocket protocol library in websocket.py. You can add handlers for other paths that implement additional server- side behavior.
![]() Note This is only a server for the WebSocket protocol, and it cannot respond to HTTP requests. The handshake parser is not fully HTTP compliant. However, because WebSocket connections begin with an HTTP request and rely on the Upgrade header, other servers can serve both WebSocket and HTTP on the same port.
Note This is only a server for the WebSocket protocol, and it cannot respond to HTTP requests. The handshake parser is not fully HTTP compliant. However, because WebSocket connections begin with an HTTP request and rely on the Upgrade header, other servers can serve both WebSocket and HTTP on the same port.
Let's see what happens when a browser tries to communicate with this server. When the browser makes a request to the WebSocket URL, the server sends back the headers that finish the WebSocket handshake. A WebSocket handshake response must contain an HTTP/1.1 101 status code and Upgrade connection headers. This informs the browser that the server is switching from the HTTP handshake to the WebSocket protocol for the remainder of the TCP session.
![]() Note If you are implementing a WebSocket server, you should refer to the protocol draft at the IETF at
Note If you are implementing a WebSocket server, you should refer to the protocol draft at the IETF at http://tools.ietf.org/html/draft-ietf-hybi-thewebsocketprotocol or the latest specification.
# write out response headers

self.send_bytes("HTTP/1.1 101 Switching Protocols
")

self.send_bytes("Upgrade: WebSocket
")

self.send_bytes("Connection: Upgrade
")

self.send_bytes("Sec-WebSocket-Accept: %s
" % self.hash_key(key))


if "Sec-WebSocket-Protocol" in headers:

    protocol = headers["Sec-WebSocket-Protocol"]

    self.send_bytes("Sec-WebSocket-Protocol: %s
" % protocol)
WebSocket Framing
After the handshake, the client and server can send messages at any time. Each connection is represented in this server by a WebSocketConnection instance. The WebSocketConnection's send function, shown in Figure 7-6, writes out a message according to the WebSocket protocol. The bytes preceding the data payload mark the frame length and type. Text frames are UTF-8 encoded. In this server, each WebSocket connection is an asyncore.dispatcher_with_send, which is an asynchronous socket wrapper with support for buffered sends.
Data sent from the browser to the server is masked. Masking is an unusual feature of the WebSocket protocol. Every byte of payload data is XORed with a random mask to ensure that WebSocket traffic does not look like other protocols. Like the Sec-WebSocket-Key hash, this is meant to mitigate an arcane form of cross-protocol attack against non-compliant network infrastructure.
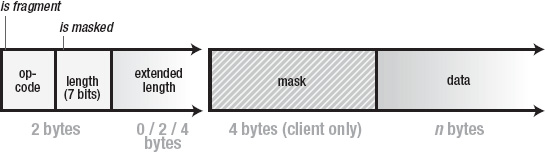
Figure 7-6. Components of a WebSocket frame
![]() Note There are many other asynchronous I/O frameworks for Python and other languages. Asyncore was chosen because it is included in the Python standard library. Note also that this implementation uses draft 10 of the protocol. This is a simple example designed for testing and illustration.
Note There are many other asynchronous I/O frameworks for Python and other languages. Asyncore was chosen because it is included in the Python standard library. Note also that this implementation uses draft 10 of the protocol. This is a simple example designed for testing and illustration.
WebSocketConnection inherits from asyncore.dispatcher_with_send and overrides the send method in order to frame text and binary messages.
def send(self, s):

  if self.readystate == "open":

    self.send_bytes("x00")
self.send_bytes(s.encode("UTF8"))
self.send_bytes("xFF")
Handlers for WebSocketConnections in websocket.py follow a simplified dispatcher interface. The handler's dispatch() method is called with the payload of each frame the connection receives. The EchoHandler sends back each message to the sender.
class EchoHandler(object):

    """

    The EchoHandler repeats each incoming string to the same WebSocket.

    """


    def __init__(self, conn):

        self.conn = conn


    def dispatch(self, data):

        self.conn.send("echo: " + data)
The basic broadcast server broadcast.py works in much the same way, but in this case when the broadcast handler receives a frame, it sends it back on all connected WebSockets as shown in the following example:
class BroadcastHandler(object):

    """

    The BroadcastHandler repeats incoming strings to every connected

    WebSocket.

    """


    def __init__(self, conn):

        self.conn = conn


    def dispatch(self, data):

        for session in self.conn.server.sessions:

            session.send(data)
The handler in broadcast.py provides a lightweight message broadcaster that simply sends and receives any data. This is sufficient for the purposes of our example. Be aware that this broadcast service does not perform any input verification as would be desirable in a production message server. A production WebSocket server should, at the very least, verify the format of incoming data.
For completeness, Listings 7-5 and 7-6 provide the complete code for websocket.py and broadcast.py. Note that this is just an example server implementation; it is not suited for production deployment.
Listing 7-5. Complete Code for websocket.py
#!/usr/bin/env python


import asyncore

import socket

import struct

import time

from hashlib import sha1

from base64 import encodestring
class WebSocketConnection(asyncore.dispatcher_with_send):
TEXT = 0x01
BINARY = 0x02
def __init__(self, conn, server):
asyncore.dispatcher_with_send.__init__(self, conn)
self.server = server
self.server.sessions.append(self)
self.readystate = "connecting"
self.buffer = ""
def handle_read(self):
data = self.recv(1024)
self.buffer += data
if self.readystate == "connecting":
self.parse_connecting()
elif self.readystate == "open":
self.parse_frame()
def handle_close(self):
self.server.sessions.remove(self)
self.close()
def parse_connecting(self):
"""
Parse a WebSocket handshake. This is not a full HTTP request parser!
"""
header_end = self.buffer.find("
")
if header_end == -1:
return
else:
header = self.buffer[:header_end]
# remove header and four bytes of line endings from buffer
self.buffer = self.buffer[header_end + 4:]
header_lines = header.split("
")
headers = {}
# validate HTTP request and construct location
method, path, protocol = header_lines[0].split(" ")
if method != "GET" or protocol != "HTTP/1.1" or path[0] != "/":
self.terminate()
return
# parse headers
for line in header_lines[1:]:
key, value = line.split(": ")
headers[key] = value headers["Location"] = "ws://" + headers["Host"] + path
self.readystate = "open"
self.handler = self.server.handlers.get(path, None)(self)
self.send_server_handshake_10(headers)
def terminate(self):
self.ready_state = "closed"
self.close()
def send_server_handshake_10(self, headers):
"""
Send the WebSocket Protocol draft HyBi-10 handshake response
"""
key = headers["Sec-WebSocket-Key"]
# write out response headers
self.send_bytes("HTTP/1.1 101 Switching Protocols
")
self.send_bytes("Upgrade: WebSocket
")
self.send_bytes("Connection: Upgrade
")
self.send_bytes("Sec-WebSocket-Accept: %s
" % self.hash_key(key))
if "Sec-WebSocket-Protocol" in headers:
protocol = headers["Sec-WebSocket-Protocol"]
self.send_bytes("Sec-WebSocket-Protocol: %s
" % protocol)
def hash_key(self, key):
guid = "258EAFA5-E914-47DA-95CA-C5AB0DC85B11"
combined = key + guid
hashed = sha1(combined).digest()
return encodestring(hashed)
def parse_frame(self):
"""
Parse a WebSocket frame. If there is not a complete frame in the
buffer, return without modifying the buffer.
"""
buf = self.buffer
payload_start = 2
# try to pull first two bytes
if len(buf) < 3:
return
b = ord(buf[0])
fin = b & 0x80 # 1st bit
# next 3 bits reserved
opcode = b & 0x0f # low 4 bits
b2 = ord(buf[1])
mask = b2 & 0x80 # high bit of the second byte
length = b2 & 0x7f # low 7 bits of the second byte # check that enough bytes remain
if len(buf) < payload_start + 4:
return
elif length == 126:
length, = struct.unpack(">H", buf[2:4])
payload_start += 2
elif length == 127:
length, = struct.unpack(">I", buf[2:6])
payload_start += 4
if mask:
mask_bytes = [ord(b) for b in buf[payload_start:payload_start + 4]]
payload_start += 4
# is there a complete frame in the buffer?
if len(buf) < payload_start + length:
return
# remove leading bytes, decode if necessary, dispatch
payload = buf[payload_start:payload_start + length]
self.buffer = buf[payload_start + length:]
# use xor and mask bytes to unmask data
if mask:
unmasked = [mask_bytes[i % 4] ^ ord(b)
for b, i in zip(payload, range(len(payload)))]
payload = "".join([chr(c) for c in unmasked])
if opcode == WebSocketConnection.TEXT:
s = payload.decode("UTF8")
self.handler.dispatch(s)
if opcode == WebSocketConnection.BINARY:
self.handler.dispatch(payload)
return True
def send(self, s):
"""
Encode and send a WebSocket message
"""
message = ""
# always send an entire message as one frame (fin)
b1 = 0x80
# in Python 2, strs are bytes and unicodes are strings
if type(s) == unicode:
b1 |= WebSocketConnection.TEXT
payload = s.encode("UTF8")
elif type(s) == str:
b1 |= WebSocketConnection.BINARY
payload = s message += chr(b1)
# never mask frames from the server to the client
b2 = 0
length = len(payload)
if length < 126:
b2 |= length
message += chr(b2)
elif length < (2 ** 16) - 1:
b2 |= 126
message += chr(b2)
l = struct.pack(">H", length)
message += l
else:
l = struct.pack(">Q", length)
b2 |= 127
message += chr(b2)
message += l
message += payload
if self.readystate == "open":
self.send_bytes(message)
def send_bytes(self, bytes):
try:
asyncore.dispatcher_with_send.send(self, bytes)
except:
pass
class EchoHandler(object):
"""
The EchoHandler repeats each incoming string to the same WebSocket.
"""
def __init__(self, conn):
self.conn = conn
def dispatch(self, data):
try:
self.conn.send(data)
except:
pass
class WebSocketServer(asyncore.dispatcher):
def __init__(self, port=80, handlers=None):
asyncore.dispatcher.__init__(self)
self.handlers = handlers
self.sessions = [] self.port = port
self.create_socket(socket.AF_INET, socket.SOCK_STREAM)
self.set_reuse_addr()
self.bind(("", port))
self.listen(5)
def handle_accept(self):
conn, addr = self.accept()
session = WebSocketConnection(conn, self)
if __name__ == "__main__":
print "Starting WebSocket Server"
WebSocketServer(port=8080, handlers={"/echo": EchoHandler})
asyncore.loop()
You may have noticed an unusual key calculation in the WebSocket handshake. This is intended to prevent cross-protocol attacks. In short, this should stop malicious WebSocket client code from spoofing connections to non-WebSocket servers. Hashing a GUID and a random value is enough to positively identify that the responding server understands the WebSocket protocol.
Listing 7-6. Complete Code for broadcast.py
#!/usr/bin/env python


import asyncore

from websocket import WebSocketServer


class BroadcastHandler(object):

    """

    The BroadcastHandler repeats incoming strings to every connected

    WebSocket.

    """


    def __init__(self, conn):

        self.conn = conn


    def dispatch(self, data):

        for session in self.conn.server.sessions:

            session.send(data)


if __name__ == "__main__":

    print "Starting WebSocket broadcast server"

    WebSocketServer(port=8080, handlers={"/broadcast": BroadcastHandler})

    asyncore.loop()
Now that we've got a working echo server, we need to write the client side. The web browsers implement the connecting half of the WebSocket Protocol. We can use the API from JavaScript to communicate with our simple server.
Using the WebSocket API
In this section, we'll explore the use of WebSocket in more detail.
Checking for Browser Support
Before you use the WebSocket API, you will want to make sure there is support in the browser for what you're about to do. This way, you can provide some alternate text, prompting the users of your application to upgrade to a more up-to-date browser. Listing 7-7 shows one way you can test for browser support.
Listing 7-7. Checking for Browser Support
function loadDemo() {

  if (window.WebSocket) {

    document.getElementById("support").innerHTML = "HTML5 WebSocket is supported in your

                                       browser.";

  } else {

     document.getElementById("support").innerHTML = "HTML5 WebSocket is not supported in

                                        your browser.";

  }

}
In this example, you test for browser support in the loadDemo function, which might be called when the application's page is loaded. A call to window.WebSocket will return the WebSocket object if it exists, or trigger the failure case if it does not. In this case, the page is updated to reflect whether there is browser support or not by updating a previously defined support element on the page with a suitable message.
Another way to see if WebSocket is supported in your browser, is to use the browser's console (Firebug or Chrome Developer Tools for example). Figure 7-7 shows how you can test whether WebSocket is supported natively in Google Chrome (if it is not, the window.WebSocket command returns “undefined.”)
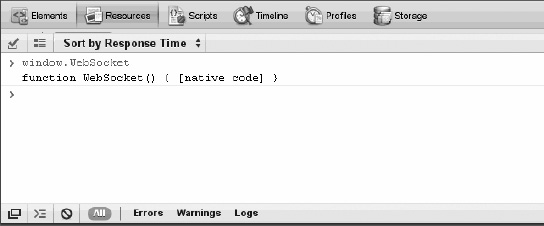
Figure 7-7. Testing WebSocket support in Google Chrome Developer Tools
Basic API Usage
The sample code for the following examples is located on the book web site in the WebSocket section. This folder contains a websocket.html file and a broadcast.html file (and a tracker.html file used in the following section) as well as the WebSocket server code shown previously that can be run in Python.
Creating a WebSocket object and Connecting to a WebSocket Server
Using the WebSocket interface is straight-forward. To connect to an end-point, just create a new WebSocket instance, providing the new object with a URL that represents the end-point to which you wish to connect. You can use the ws:// and wss:// prefixes to indicate a WebSocket and a WebSocket Secure connection, respectively.
url = "ws://localhost:8080/echo";

w = new WebSocket(url);
When connecting a WebSocket, you have the option of listing the protocols your application can speak. The second argument to the WebSocket constructor can be a string or array of strings with the names of the “subprotocols” that your application understands and wishes to use to communicate.
w = new WebSocket(url, protocol);
You can even list several protocols:
w = new WebSocket(url, [“proto1”, “proto2”]);
Hypothetically, proto1 and proto2 are well defined, perhaps even registered and standardized, protocol names that both the client and server can understand. The server will select a preferred protocol from the list. When the socket opens, its protocol property will contain the protocol that the server chose.
onopen = function(e) {

  // determine which protocol the server selected

  log(e.target.protocol)

}
Protocols you might use include Extensible Messaging and Presence Protocol (XMPP, or Jabber), Advanced Message Queuing Protocol (AMQP), Remote Frame Buffer (RFB, or VNC) and Streaming Text Oriented Messaging Protocol (STOMP). These are real-world protocols spoken by many clients and servers. Using a standard protocol ensures interoperability between web applications and servers from different organizations. It also opens the door for public WebSocket services. You can speak to a server using a known protocol. Client applications that understand the same protocol can then connect and participate.
This example does not use a standard protocol. We aren't introducing external dependencies or taking the space to implement a complete standard protocol. As an example, it uses the WebSocket API directly, just as you would if you were starting to write code for a new protocol.
Adding Event Listeners
WebSocket programming follows an asynchronous programming model; once you have an open socket, you simply wait for events. You don't have to actively poll the server anymore. To do this, you add callback functions to the WebSocket object to listen for events.
A WebSocket object dispatches three events: open, close, and message. The open event fires when a connection is established, the message event fires when messages are received, and the close event fires when the WebSocket connection is closed. The error event fires in response to unexpected failure. As in most JavaScript APIs, there are corresponding callbacks (onopen, onmessage, onclose, and onerror) that are called when the events are dispatched.
w.onopen = function() {

  log("open");

  w.send("thank you for accepting this websocket request");

}

w.onmessage = function(e) {

  log(e.data);

}

w.onclose = function(e) {

  log("closed");

}

w.onerror = function(e) {

  log(“error”);

}
Let's have another look at that message handler. The data attribute on the message event is a string if the WebSocket protocol message was encoded as text. For binary messages, data can be either a Blob or an ArrayBuffer, depending on the value of the WebSocket's binaryType property.
w.binaryType = "arraybuffer";

w.onmessage = function(e) {

  // data can now be either a string or an ArrayBuffer

  log(e.data);

}
Sending Messages
While the socket is open (that is, after the onopen listener is called and before the onclose listener is called), you can use the send function to send messages. After sending one or more messages, you can also call close to terminate the connection, or you can also leave the connection open.
document.getElementById("sendButton").onclick = function() {

    w.send(document.getElementById("inputMessage").value);

}
That's it. Bidirectional browser communication made simple. For completeness, Listing 7-8 shows the entire HTML page with the WebSocket code.
In more advanced uses of WebSocket, you may want to measure how much data is backed up in the outgoing buffer before calling send(). The bufferedAmount attribute represents the number of bytes that have been sent on the WebSocket that have not yet been written onto the network. This could be useful for throttling the rate at which the application sends data.
document.getElementById("sendButton").onclick = function() {

  if (w.bufferedAmount < bufferThreshold) {

    w.send(document.getElementById("inputMessage").value);

  }

}
In addition to strings, WebSocket can send binary data. This is especially useful to implement binary protocols, such as the standard Internet protocols typically layered on top of TCP. The WebSocket API supports sending Blob and ArrayBuffer instances as binary data.
var a = new Uint8Array([8,6,7,5,3,0,9]);

w.send(a.buffer);
Listing 7-8. websocket.html Code
<!DOCTYPE html>

<title>WebSocket Test Page</title>


<script>

    var log = function(s) {

        if (document.readyState !== "complete") {

            log.buffer.push(s);

        } else {

            document.getElementById("output").textContent += (s + "
")

        }

    }

    log.buffer = [];


    if (this.MozWebSocket) {

        WebSocket = MozWebSocket;

    }


    url = "ws://localhost:8080/echo";

    w = new WebSocket(url);

    w.onopen = function() {

        log("open");

        // set the type of binary data messages to ArrayBuffer

        w.binaryType = "arraybuffer";


        // send one string and one binary message when the socket opens

        w.send("thank you for accepting this WebSocket request");

        var a = new Uint8Array([8,6,7,5,3,0,9]);

        w.send(a.buffer);

    }

    w.onmessage = function(e) {

        log(e.data.toString());

    }

    w.onclose = function(e) {

        log("closed");

    }

    w.onerror = function(e) {

        log("error");

    }


    window.onload = function() {

        log(log.buffer.join("
"));

        document.getElementById("sendButton").onclick = function() {

            w.send(document.getElementById("inputMessage").value);
}
}
</script>
<input type="text" id="inputMessage" value="Hello, WebSocket!"><button id="sendButton">Send</button>
<pre id="output"></pre>
Running the WebSocket Page
To test the websocket.html page that contains the WebSocket code, open a command prompt, navigate to the folder that contains the WebSocket code, and issue the following command to host the HTML file:
python -m SimpleHTTPServer 9999
Next, open another command prompt, navigate to the folder that contains the WebSocket code, and issue the following command to run the Python WebSocket server:
python websocket.py
Finally, open a browser that supports WebSocket natively and navigate to http://localhost:9999/websocket.html.
Figure 7-8 shows the web page in action.
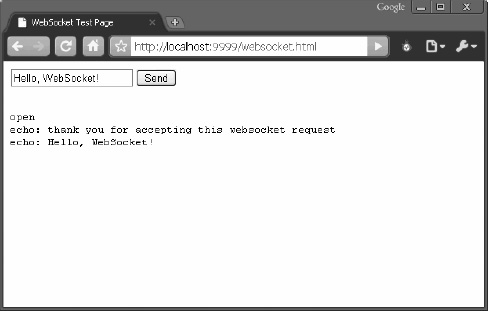
Figure 7-8. websocket.html in action
The example code folder also contains a web page that connects to the broadcast service that was created in the previous section. To see that action, close the command prompt that is running the WebSocket server and navigate to the folder that contains the WebSocket code, and issue the following command to run the python WebSocket server.
python broadcast.py
Open two separate browsers that supports WebSocket natively and navigate (in each browser) to http://localhost:9999/broadcast.html.
Figure 7-9 shows the broadcast WebSocket server in action on two separate web pages.
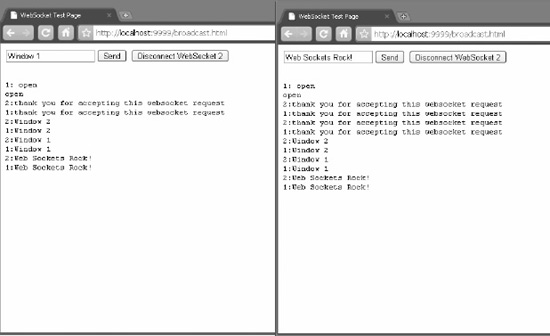
Figure 7-9. broadcast.html in action in two browsers
Building a WebSocket Application
Now that we've seen the basics of WebSocket, it's time to tackle something a little more substantial. Previously, we used the HTML5 Geolocation API to build an application that allowed us to calculate distance traveled directly inside our web page. We can utilize those same Geolocation techniques, mixed together with our new support for WebSocket, and create a simple application that keeps multiple participants connected: a location tracker.
![]() Note We'll be using the broadcast WebSocket server described above, so if you aren't familiar with it you should consider taking some time to learn its basics.
Note We'll be using the broadcast WebSocket server described above, so if you aren't familiar with it you should consider taking some time to learn its basics.
In this application, we'll combine WebSocket and Geolocation by determining our location and broadcasting it to all available listeners. Everyone who loads this application and connects to the same broadcast server will regularly send their geographic location using the WebSocket. At the same time, the application will listen for any messages from the server and update in real-time display entries for everyone it hears about. In a race scenario, this sort of application could keep runners informed of the location of all their competitors and prompt them to run faster (or slow down).
This tiny application does not include any personal information other than latitude and longitude location. Name, date of birth, and favorite ice cream flavor are kept strictly confidential.
YOU WERE WARNED!
But that's enough warnings… Let's dig into the code. As always, the entire code sample is located online for your perusal. We'll focus on the most important parts here. The finished application will look like Figure 7-10. Although ideally, this would be enhanced by overlaying it on a map.

Figure 7-10. The Location Tracker application
Coding the HTML File
The HTML markup for this application will be kept deliberately simple so that we can focus on the data at hand. How simple?
<body onload="loadDemo()">


<h1>HTML5 WebSocket / Geolocation Tracker</h1>


<div><strong>Geolocation</strong>: <p id="geoStatus">HTML5 Geolocation is

 <strong>not</strong> supported in your browser.</p></div>

<div><strong>WebSocket</strong>: <p id="socketStatus">WebSocket is <strong>not</strong>

 supported in your browser.</p></div>
</body>
Simple enough that we only include a title and a few status areas: one status area for Geolocation updates, and another to log any WebSocket activity. The actual visuals for location data will be inserted into the page as messages are received in real-time.
By default, our status messages indicate that a viewer's browser does not support either Geolocation or WebSocket. Once we detect support for the two HTML5 technologies, we'll update the status with something a little friendlier.
<script>


    // reference to the WebSocket

    var socket;


    // a semi-unique random ID for this session

    var myId = Math.floor(100000*Math.random());


    // number of rows of data presently displayed

    var rowCount = 0;
The meat of this application is once again accomplished via the script code. First, we will establish a few variables:
- A global reference to our
socketso that any function can access it later. - A random
myIdnumber between 0 and 100,000 to identify our location data online. This number is merely used to correlate changes in location over time back to the same source without using more personal information such as names. A sufficiently large pool of numbers makes it unlikely that more than one user will have the same identifier. - A
rowCountwhich holds how many unique users have transmitted their location data to us. This is largely used for visual formatting.
The next two functions should look familiar. As in other example applications, we've provided utilities to help us update our status message. This time, there are two status messages to update.
    function updateSocketStatus(message) {

        document.getElementById("socketStatus").innerHTML = message;

    }


    function updateGeolocationStatus(message) {

        document.getElementById("geoStatus").innerHTML = message;

    }
It is always helpful to include a user-friendly set of error messages whenever something goes wrong with location retrieval. If you need more information on the error handling associated with Geolocation, consult Chapter 5.
    function handleLocationError(error) {

        switch(error.code)

        {

        case 0:

          updateGeolocationStatus("There was an error while retrieving your location: " +
error.message);
break;
case 1:
updateGeolocationStatus("The user prevented this page from retrieving a
location.");
break;
case 2:
updateGeolocationStatus("The browser was unable to determine your location: " +
error.message);
break;
case 3:
updateGeolocationStatus("The browser timed out before retrieving the location.");
break;
}
}
Adding the WebSocket Code
Now, let's examine something more substantial. The loadDemo function is called on the initial load of our page, making it the starting point of the application.
function loadDemo() {
// test to make sure that sockets are supported
if (window.WebSocket) {
// the location of our broadcast WebSocket server
url = "ws://localhost:8080";
socket = new WebSocket(url);
socket.onopen = function() {
updateSocketStatus("Connected to WebSocket tracker server");
}
socket.onmessage = function(e) {
updateSocketStatus("Updated location from " + dataReturned(e.data));
}
}
The first thing we do here is set up our WebSocket connection. As with any HTML5 technology, it is wise to check for support before jumping right in, so we test to make sure that window.WebSocket is a supported object in this browser.
Once that is verified, we make a connection to the remote broadcast server using the connect string format described above. The connection is stored in our globally declared socket variable.
Finally, we declare two handlers to take action when our WebSocket receives updates. The onopen handler will merely update the status message to let the user know that we made a successful connection. The onmessage will similarly update the status to let the user know that a message has arrived. It will also call our upcoming dataReturned function to show the arriving data in the page, but we'll tackle that later.
Adding the Geolocation Code
The next section should be familiar to you from Chapter 5. Here, we verify support for the Geolocation service and update the status message appropriately.
var geolocation;
if(navigator.geolocation) {
geolocation = navigator.geolocation;
updateGeolocationStatus("HTML5 Geolocation is supported in your browser.");
}
// register for position updates using the Geolocation API
geolocation.watchPosition(updateLocation,
handleLocationError,
{maximumAge:20000});
}
As before, we watch our current location for changes and register that we want the updateLocation function called when they occur. Errors are sent to the handleLocationError function, and the location data is set to expire every twenty seconds.
The next section of code is the handler which is called by the browser whenever a new location is available.
function updateLocation(position) {
var latitude = position.coords.latitude;
var longitude = position.coords.longitude;
var timestamp = position.timestamp;
updateGeolocationStatus("Location updated at " + timestamp);
// Send my location via WebSocket
var toSend = JSON.stringify([myId, latitude, longitude]);
sendMyLocation(toSend);
}
This section is similar to, but simpler than, the same handler in Chapter 5. Here, we grab the latitude, longitude, and timestamp from the position provided by the browser. Then, we update the status message to indicate that a new value has arrived.
Putting It All Together
The final section calculates a message string to send to the remote broadcast WebSocket server. The string here will be JSON encoded:
"[<id>, <latitude>, <longitude>]"
The ID will be the randomly calculated value already created to identify this user. The latitude and longitude are provided by the geolocation position object. We send the message directly to the server as a JSON encoded string.
The actual code to send the position to the server resides in the sendMyLocation() function.
If a socket was successfully created—and stored for later access—then it is safe to send the message string passed into this function to the server. Once it arrives, the WebSocket message broadcast server will distribute the location string to every browser currently connected and listening for messages. Everyone will know where you are. Or, at least, a largely anonymous “you” identified only by a random number.
Now that we're sending messages, let's see how those same messages should be processed when they arrive at the browser. Recall that we registered an onmessage handler on the socket to pass any incoming data to a dataReturned() function. Next, we will look at that final function in more detail.
function dataReturned(locationData) {
// break the data into ID, latitude, and longitude
var allData = JSON.parse(locationData);
var incomingId = allData[1];
var incomingLat = allData[2];
var incomingLong = allData[3];
The dataReturned function serves two purposes. It will create (or update) a display element in the page showing the position reflected in the incoming message string, and it will return a text representation of the user this message originated from. The user name will be used in the status message at the top of the page by the calling function, the socket.onmessage handler.
The first step taken by this data handler function is to break the incoming message back down into its component parts using JSON.parse. Although a more robust application would need to check for unexpected formatting, we will assume that all messages to our server are valid, and therefore our string separates cleanly into a random ID, a latitude, and a longitude.
// locate the HTML element for this ID
// if one doesn't exist, create it
var incomingRow = document.getElementById(incomingId);
if (!incomingRow) {
incomingRow = document.createElement('div'),
incomingRow.setAttribute('id', incomingId);
Our demonstration user interface will create a visible <div> for every random ID for which it receives a message. This includes the user's ID itself; in other words, the user's own data will also be displayed only after it is sent and returned from the WebSocket broadcast server.
Accordingly, the first thing we do with the ID from our message string is use it to locate the display row element matching it. If one does not exist, we create one and set its id attribute to be the id returned from our socket server for future retrieval.
incomingRow.userText = (incomingId == myId) ?
'Me' :
'User ' + rowCount;
rowCount++;
The user text to be displayed in the data row is easy to calculate. If the ID matches the user's ID, it is simply ‘me'. Otherwise, the username is a combination of a common string and a count of rows, which we will increment.
Once the new display element is ready, it is inserted into the end of the page. Regardless of whether the display element is newly created or if it already existed—due to the fact that a location update was not the first for that particular user—the display row needs to be updated with the current text information.
// update the row text with the new values
incomingRow.innerHTML = incomingRow.userText + " \ Lat: " +
incomingLat + " \ Lon: " +
incomingLong;
return incomingRow.userText;
}
In our case, we will separate the user text name from the latitude and longitude values using a backslash (properly escaped, of course). Finally, the display name is returned to the calling function for updating the status row.
Our simple WebSocket and Geolocation mashup is now complete. Try it out, but keep in mind that unless there are multiple browsers accessing the application at the same time, you won't see many updates. As an exercise to the reader, consider updating this example to display the incoming locations on a global Google Map to get an idea of where HTML5 interest is flourishing at this very moment.
The Final Code
For completeness, the Listing 7-9 provides the entire tracker.html file.
Listing 7-9. The tracker.html Code
<!DOCTYPE html>
<html lang="en">
<head>
<title>HTML5 WebSocket / Geolocation Tracker</title>
<link rel="stylesheet" href="styles.css">
</head>
<body onload="loadDemo()">
<h1>HTML5 WebSocket / Geolocation Tracker</h1>
<div><strong>Geolocation</strong>: <p id="geoStatus">HTML5 Geolocation is
<strong>not</strong> supported in your browser.</p></div>
<div><strong>WebSocket</strong>: <p id="socketStatus">WebSocket is <strong>not</strong>
supported in your browser.</p></div>
<script>
// reference to the WebSocket
var socket; // a semi-unique random ID for this session
var myId = Math.floor(100000*Math.random());
// number of rows of data presently displayed
var rowCount = 0;
function updateSocketStatus(message) {
document.getElementById("socketStatus").innerHTML = message;
}
function updateGeolocationStatus(message) {
document.getElementById("geoStatus").innerHTML = message;
}
function handleLocationError(error) {
switch(error.code)
{
case 0:
updateGeolocationStatus("There was an error while retrieving your location: " +
                        error.message);

          break;

        case 1:

          updateGeolocationStatus("The user prevented this page from retrieving a

                        location.");

          break;

        case 2:

          updateGeolocationStatus("The browser was unable to determine your location: " +

                        error.message);

          break;

        case 3:

          updateGeolocationStatus("The browser timed out before retrieving the location.");

          break;

        }

    }
function loadDemo() {
// test to make sure that sockets are supported
if (window.WebSocket) {
// the location where our broadcast WebSocket server is located
url = "ws://localhost:8080";
socket = new WebSocket(url);
socket.onopen = function() {
updateSocketStatus("Connected to WebSocket tracker server");
}
socket.onmessage = function(e) {
updateSocketStatus("Updated location from " + dataReturned(e.data));
}
}
var geolocation;
if(navigator.geolocation) { geolocation = navigator.geolocation;
updateGeolocationStatus("HTML5 Geolocation is supported in your browser.");
// register for position updates using the Geolocation API
geolocation.watchPosition(updateLocation,
handleLocationError,
{maximumAge:20000});
}
}
 function updateLocation(position) {

        var latitude = position.coords.latitude;

        var longitude = position.coords.longitude;

        var timestamp = position.timestamp;


        updateGeolocationStatus("Location updated at " + timestamp);


        // Send my location via WebSocket

        var toSend = JSON.stringify([myId, latitude, longitude]);

        sendMyLocation(toSend);

    }
    function sendMyLocation(newLocation) {

        if (socket) {
            socket.send(newLocation);

        }

    }
function dataReturned(locationData) {
// break the data into ID, latitude, and longitude
var allData = JSON.parse(locationData)
var incomingId = allData[1];
var incomingLat = allData[2];
var incomingLong = allData[3];
        // locate the HTML element for this ID

        // if one doesn't exist, create it

        var incomingRow = document.getElementById(incomingId);

        if (!incomingRow) {

            incomingRow = document.createElement('div'),

            incomingRow.setAttribute('id', incomingId);
            incomingRow.userText = (incomingId == myId) ?

                                        'Me'            :

                                        'User ' + rowCount;


            rowCount++;
document.body.appendChild(incomingRow);
}
        // update the row text with the new values

        incomingRow.innerHTML = incomingRow.userText + " \ Lat: " +

                                incomingLat + "  \ Lon: " +

                                incomingLong;


        return incomingRow.userText;

    }
</script>
</body>
</html>
Summary
In this chapter, you have seen how WebSocket provides a simple, yet powerful mechanism for creating compelling, real-time applications.
First we looked at the nature of the protocol itself, and how it interoperates with existing HTTP traffic. We compared the network overhead demands of current polling-based communication strategies versus the limited overhead of WebSocket.
To illustrate WebSocket in action, we explored a simple implementation of a WebSocket server to show how simple it is to implement this protocol in practice. Similarly, we examined the client-side WebSocket API, noting the ease of integration it provides with JavaScript.
Finally, we walked through a more complex sample application which combined the power of Geolocation with WebSocket to demonstrate how well the two technologies can work together. Now that we've seen how HTML5 brings TCP-style network programming to the browser, we'll turn our attention to gathering more interesting data than just a user's current location. In the next chapter, we look at the enhancements made to form controls in HTML5.