
C H A P T E R 9
![]()
TechieTogs: An Example E-commerce Site
Over the last eight chapters, we have covered a lot of new technologies, skills, and techniques and seen how they can be applied to accomplish specific programming goals. Now the time has come to put WebMatrix to use in a real-world context by building a realistic e-commerce application.
The application we will build, TechieTogs, will be an e-commerce site that sells clothing. The public-facing side of the site will feature all of the elements you would usually expect to find on a shopping site, such as a catalog, shopping cart, and checkout. The product catalog will be managed using a series of pages that are only accessible to site administrators, thereby providing full CRUD (create, read, update, and delete) facilities.
We will be building the site over the course of the next three chapters:
- This chapter will focus on the foundation stages: designing the core infrastructure of the site, including the database, layouts, and site structure. We will also create pages to allow the user to browse and search the product catalog and will make use of web helpers to add social networking features.
- Chapter 10 will help us add more features to the site, including processes for membership, a shopping cart, and checkout.
- The final components will be covered in Chapter 11, where we will implement the site management pages; this is where the site administrators will go to manage the catalog, as well as view and amend orders.
Along the way, we will see how best to make the most of the feature-rich environment provided by WebMatrix and ASP.NET Web Pages in order to help us develop real-world web sites. This will include the following:
- Creating a database to store the product and order data using Microsoft SQL Server Compact Edition
- Utilizing layout pages, helpers, and functions to maximize code reuse
- Using the WebMatrix membership system to authenticate users and secure parts of the site
- Using web helpers to provide interaction with popular social networking and bookmarking sites
- Making use of the ASP.NET Web Pages HTML helpers and validation in order to provide an optimal user experience.
Getting Started
To get started, we'll need to create a new web site in WebMatrix. Choose to create a site based on the Empty Site template and name it TechieTogs. Next, we'll spend a few minutes setting up the basic site infrastructure.
Page Layout
We will utilize WebMatrix layout pages to create a single template, which will contain header and footer sections, for the public-facing side of our site. The pages we subsequently create within the site will place their content between these two sections. This approach will make it easy to make changes to the site design in the future because all the public pages in the site will use a single layout.
Create a folder called ‘Shared’ in the root of the site. Within this folder, create two sub-folders called ‘Layouts’ and ‘Partials’. We will use these folders to organize the layout and partial pages, respectively.
Inside the layouts folder, create a new file called _Layout.cshtml (see Figure 9-1). This file will contain the default layout for the user-facing pages within your application.
![]() Note By default, IIS won't deliver pages named with a leading underscore ( _ ) directly to a client browser. Here we have taken advantage of this convention by naming our layout page in just such a way. This will prevent users from browsing to them directly.
Note By default, IIS won't deliver pages named with a leading underscore ( _ ) directly to a client browser. Here we have taken advantage of this convention by naming our layout page in just such a way. This will prevent users from browsing to them directly.
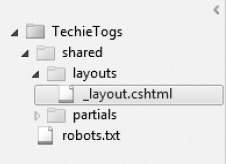
Figure 9-1. The structure of the shared folder, which will contain all our layout and partial pages
In _Layout.cshtml, replace the default markup generated by WebMatrix with the following:
<!DOCTYPE html>
<html lang="en">
<head>
<meta charset="utf-8" />
<title>TechieTogs - @Page.Title</title>
<link href="@Href("~/Css/Style.css")" rel="stylesheet" />
@RenderSection("head", required: false)
</head>
<body>
<div id="page">
<div id="header">
<p class="logo"><a href="@Href("~/")">TechieTogs</a></p>
</div>
<div id="content">
@RenderBody()
</div>
<div id="footer">
©@DateTime.Now.Year TechieTogs. All rights reserved.
</div>
</div>
</body>
</html>In this markup, we have defined a header and footer section and included a call to the RenderBody() method, where the content of our page will be inserted. Note also that we have defined a @RenderSection called ‘head’ that we can use to insert code and markup into the page's <head> tags. However, as we may not wish to make use of this section in every content page, we mark it as optional by setting the required parameter to false:
@RenderSection("head", required: false)
In the <title> tag, we output the value stored in the Title property of the Page object. This will enable us to set the page title separately within each content page.
The layout page relies on a CSS (Cascading Style Sheet) file to define its appearance. Create a new folder in the root of the site called ‘Css’ and, within it, add a new style sheet file called Style.css. The content of Style.css is listed below:
/* General Styles

---------------------------------*/

*, html, body {

    margin: 0px;

    padding: 0px;

}
body {

    background-color:#efefef;

    color: #333;

    font-family: Verdana, Helvetica, Sans-Serif;

    font-size: .75em;

}


a:link {

    color: #333399;

    text-decoration: none;

}


a:visited {

    color: #333399;

    text-decoration: none;

}


a:hover {

    color: #a70202;

    text-decoration: none;

}


h1, h2 {

    margin-bottom: 10px;

}


input, select

{

    padding: 5px;

}


input[type="text"]

{

    border: 1px solid #cdcdcd;

}


/* Layout

---------------------------------*/

#page {

    margin: 0 auto;

    width: 960px;

    background-color: #fff;

}


#header {

    height: 60px;

}


#content, #footer {

    border-top: 1px solid #cdcdcd;

    clear: both;
    margin: 0px 10px 0px 10px;

    padding: 20px;

}


#footer {

    color:#cdcdcd;

    padding: 10px;

    text-align: center;

}


.logo a {

    float: left;

    margin: 15px;

    font-size: 3em;

}
The combination of these two files defines the default layout page for our site. We will add additional elements to both of these files as we progress with the site's development.
![]() Note If you are unfamiliar with the use of Cascading Style Sheets and wish to find further information, I strongly recommend Andy Budd's excellent book CSS Mastery: Advanced Web Standards Solutions - 2nd Edition, published by friends of ED.
Note If you are unfamiliar with the use of Cascading Style Sheets and wish to find further information, I strongly recommend Andy Budd's excellent book CSS Mastery: Advanced Web Standards Solutions - 2nd Edition, published by friends of ED.
Let's see the layout page in action by adding a default page to the site. Create a file called Default.cshtml in the site root and replace the default markup with a paragraph of placeholder text (notice the absence of <html>, <head>, and <body> tags here—these are supplied by the layout page, into which our content page is merged):
@{

    Layout = "~/Shared/Layouts/_Layout.cshtml";

    Page.Title = "Home Page";

}


<h1>Home Page</h1>


<p>

    Lorem ipsum dolor sit amet, consectetur adipiscing elit. Sed nec interdum nisi.

    Ut dui ligula, porttitor sit amet feugiat nec, sodales eget magna.

    Donec id eros et felis vulputate porttitor euismod vel est.

    Vivamus posuere interdum quam a faucibus. Mauris vestibulum cursus dictum.

    Duis blandit eleifend metus, in suscipit arcu faucibus at.

    Curabitur ipsum enim, molestie sit amet faucibus ac, vehicula ac libero.

    Class aptent taciti sociosqu ad litora torquent per conubia nostra, per inceptos

    himenaeos.

</p>
Notice in the code block at the top of the page that we specified the layout page and set the Page.Title property. We do not need to define a head section here to match the @RenderSection call in _Layout.cshtml given that we declared it as optional.
Run the page by pressing F12 or clicking the Run button in the WebMatrix IDE Ribbon Control. Figure 9-2 shows the page output to the browser:
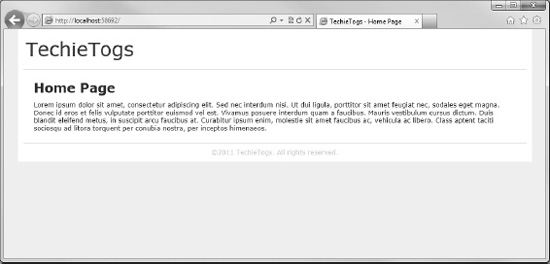
Figure 9-2. The default page containing placeholder text to test out the layout page
Now that we have a working layout page, which we will eventually use to display our product catalog, it's time to add a database to our site.
Adding a Database
In this section, we will create a new SQL Server Compact database using the WebMatrix IDE. This database will store all the data necessary for the operation of our application. This will include data related to the product catalog, orders, and account membership.
To add a database to the site, use the Workspace Selector at the bottom left-hand side of the WebMatrix IDE to navigate to the Databases workspace. Click the New Database button in the Database section of the Ribbon Control (see Figure 9-3) to add a new SQL Server Compact Edition database to the project.
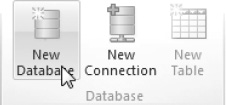
Figure 9-3. Click the “New Database” button in the Ribbon Control to add a database to the project
Right-click the database in the Navigation Pane, located on the left-hand side of the IDE, and rename the database as TechieTogsData.sdf.
Creating Tables to Store the Product Catalog
Given that our first job is to create a product catalog, we will create tables for this now. We will add any additional tables we require to the database during the development process. For the product catalog, we will require two tables. The first of these two tables will contain the products; the second table will contain the categories to which each of these products can belong. On our site, each product will be assigned to a single category.
Click the New Table button in the Ribbon Control and, using the WebMatrix IDEs integrated table editor, add the fields described in Table 9-1:
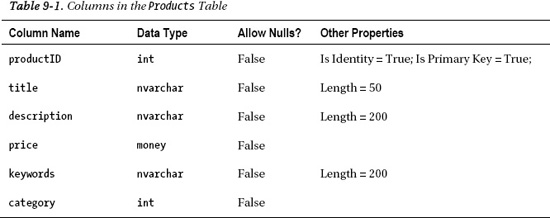
- The
productIDcolumn will store a unique integer, which we will use as a reference for each individual product. The value of this column will be automatically generated by SQL Server Compact when a new row is inserted into the table. - The
titlecolumn will hold a product name of up to 50 characters. - The
descriptioncolumn will be used to store up to 200 characters of descriptive text about each of the products in the table. - The data type of the
pricecolumn is declared asmoney; the column is designed to store monetary data values and will store the unit price per product. - The
keywordscolumn will hold a string of distinct words related to the product, which may be useful for our users when they are performing a product search but which do not necessarily appear in the producttitleordescriptioncolumns. - The final column,
category, is a foreign-key field, which is used to link an individual product to a product category.
Once you've added all the columns in the table editor, save the table by clicking the Save icon in the top left-hand corner of the IDE, and name the table ‘Products’ when prompted (see Figure 9-4):
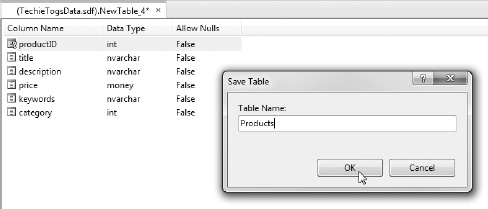
Figure 9-4. The Products table in the WebMatrix table editor and the Save Table dialog box
Next, we'll create the Categories table. This table will contain just two columns: the first column will be a unique category ID, which will be referenced by the category column of the Products table, and the second column will store the title of the category.
Click the New Table button on the left-hand side of the Ribbon Control and enter the two columns detailed in Table 9-2:

Once you have created the columns, save the table as ‘Categories.’
Adding Data to the Tables
In order to see the tables in the Navigation Pane, right-click the Tables node under TechieTogsData.sdf and choose Refresh from the context menu. Now, double-click the Categories table to open it in Data view.
In the Data view, the WebMatrix IDE allows us to enter values by typing them directly into the table. We will use this method for now to create some sample data, but later, in Chapter 11, we will create an interface that allows site administrators to perform this function within the site.
Enter the three categories shown in Figure 9-5. Note that entering a value into the categoryID column will generate an error because it is an identity column whose values can only be generated by the database.
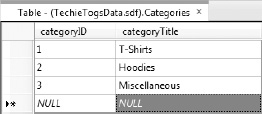
Figure 9-5. Values entered into the Categories table
Next, we'll add some sample data into the Products table by double-clicking the Products table in the Navigation Pane and entering the data seen below, in Figure 9-6, directly into the editor.
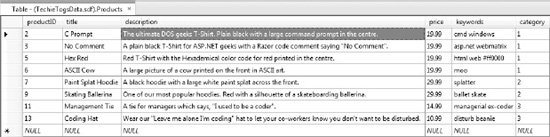
Figure 9-6. Values entered into the Products table
Now that we have some suitable sample products and categories, we can start work on our product catalog pages in order to display them to users.
Creating a Product Catalog
The product catalog can be broken down into two main components: the category list that we display on every page and another page that displays items from the selected category. Given that we want to display the list of categories on every page, the best place to accomplish this is in the layout page.
Open the _Layout.cshtml file we created earlier in the shared folder. Inside this file, we will insert a reference to a partial page containing the logic and presentation for the category list. The category list will be displayed in a column on the left-hand side of the page, so amend the markup inside _Layout.cshtml as highlighted in the listing below:
<!DOCTYPE html>


<html lang="en">

    <head>

        <meta charset="utf-8" />
<title>TechieTogs - @Page.Title</title>
<link href="@Href("~/Css/Style.css")" rel="stylesheet" />
@RenderSection("head", required: false)
</head>
<body>
<div id="page">
<div id="header">
<p class="logo"><a href="@Href("~/")">TechieTogs</a></p>
</div>
<div id="content">
<div id="categories">
@RenderPage("~/Shared/Partials/_Categories.cshtml")
</div>
<div id="main">
@RenderBody()
</div>
</div>
<div id="footer">
©@DateTime.Now.Year TechieTogs. All rights reserved.
</div>
</div>
</body>
</html>
The content <div> now has two child <div> tags: one containing a call to RenderPage(), which will display a partial page containing the category list, and another containing the existing call to RenderBody(), where our main page content will be rendered.
The RenderPage() method call within the “categories” <div> requests a partial page called _Categories.cshtml from the /Shared/Partials folder. We will create this page in a moment.
First, we need to add a couple of styles to our CSS file in order to lay out the categories-related <div> in a 150-pixel-wide column to the left of the main <div>. Add the following to the bottom of your /Css/Style.css file:
#categories {

    float:left;

    width:150px;

}


#main {

    float:right;

    width: 720px;

    margin-bottom: 20px;

    border-left: 1px solid #cdcdcd;

    padding-left:20px;

}
The Categories List
Now we are ready to create the /Shared/Partials/_Categories.cshtml file requested by the RenderPage() method in the layout page. We have named the page with a leading underscore to prevent IIS from serving the page if a user was to browse to it directly. Add the page to your project, and replace the default markup with the following:
@{

    var db = Database.Open("TechieTogsData");

    var sqlSelect = "SELECT * FROM Categories;";

}


<ul>

@foreach (var category in db.Query(sqlSelect))

{

    <li><a href="/Products/@category.categoryTitle">@category.categoryTitle</a></li>

}

</ul>
In this code, we selected all the categories from the database, then iterated through the result of the query, adding each category title to an HTML unordered list in the form of a list item.
The content of the list item <li> is rendered as a hyperlink pointing to the products page, which we will create in the next section. This hyperlink also passes the value of the categoryTitle field in the URL. By passing the categoryTitle, instead of the categoryID, in the href attribute of the hyperlink, we are able to provide human-readable, search-engine-friendly URLs.
For instance, to view all the products within the Hoodies category, rather than requiring the categoryID in the URL:
http://domain-name/Products/2
the user can browse directly to:
http://domain-name/Products/hoodies
This is clearly a neater solution, both in terms of Search Engine Optimization (SEO) and usability. However, it requires a little extra work later on, both to display the products within the category and to ensure that no duplicate category names are created.
Finally, we'll add three new CSS styles to the bottom of our style sheet at /Css/Style.css:
#categories ul {

    border-bottom: 1px solid #cdcdcd;

    margin-bottom: 20px;

}


#categories ul li {

    list-style: none;

    border-top: 1px solid #cdcdcd;

    margin: 0;

    padding: 10px;

}


#categories ul li:hover {

    background-color: #ddd;

}
Now when you run Default.cshtml in the browser, you will see the categories listed vertically on the left-hand side of the page, as shown in Figure 9-7.
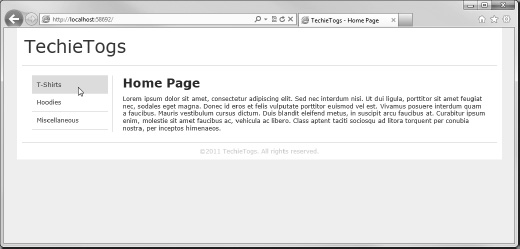
Figure 9-7. The Default page, showing the list of category links on the left-hand side
The content of this page is being combined from three sources (not including the style sheet) by WebMatrix before it is sent to the user's browser. The header and footer come from the layout page (_Layouts.cshtml), the category listing is generated by a partial page (_Categories.cshtml), and the content in the main part of the page is generated by Default.cshtml. Figure 9-8 further illustrates this point.
This layout page technique is quite useful to us because we can now display the header, footer, and categories on every page simply by setting the layout page to /Shared/Layouts/_Layout.cshtml. If we want to make a change to the design in the future, we can do it in this one file rather than having to change every page in the site. Remember: stay DRY—Don't Repeat Yourself!

Figure 9-8. The three files combined to render the final output
Do not worry about the placeholder text for now. We will replace it with something more useful in Chapter 11. For now, we need to focus on creating our Product Listings page.
The Product Listings Page
The Product Listings page will display a summary of all the products within the selected category. Each product summary will contain a link to a Product Details page, where we will present the user with the ability to place an order.
Create a new file in the root of the site called Products.cshtml. Enter the following code block at the top of the page:
@{


    Layout = "~/Shared/Layouts/_Layout.cshtml";


    var categoryTitle = UrlData[0];


    if (categoryTitle.IsEmpty())

    {

        Response.Redirect("/Default");

    }


    Page.Title = categoryTitle;


    var db = Database.Open("TechieTogsData");

    var sqlSelect = "SELECT productID, title, price FROM Products " +

                "LEFT OUTER JOIN Categories ON Products.category = Categories.categoryID " +

                "WHERE Categories.categoryTitle = @0";


    var products = db.Query(sqlSelect, categoryTitle);


}
In this code block, we set the layout page, get the category title from the UrlData collection, which contains any data passed as part of the URL, and assign it to a variable, categoryTitle. Next, we check that the value of the categoryTitle variable is not empty, redirecting the user back to the Default page if this is the case:
var categoryTitle = UrlData[0];


if (categoryTitle.IsEmpty())

{

    Response.Redirect("/Default");

}
We then set the Title property of the Page to the categoryTitle and open a connection to the TechieTogsData database:
Page.Title = categoryTitle;


var db = Database.Open("TechieTogsData");
Following this, we create the SQL required to retrieve the productID, title, and price of all the products within the selected category.
In order to provide user- and SEO-friendly URLs, we pass only the category title to the page from the link in the categories list. Because we store only the category ID against each product in the Products table, we need to perform an SQL LEFT OUTER JOIN between Products and Categories in the SELECT statement in order to use the Categories.categoryTitle as the criterion in the WHERE clause.
![]() Note If you have never come across SQL joins before, do not worry; just trust that the code does what it says. However, if, like me, you cannot bear not knowing how something works, take a look at the “Using Joins” page of the MSDN online library at http://msdn.microsoft.com/en-us/library/ms191472.aspx.
Note If you have never come across SQL joins before, do not worry; just trust that the code does what it says. However, if, like me, you cannot bear not knowing how something works, take a look at the “Using Joins” page of the MSDN online library at http://msdn.microsoft.com/en-us/library/ms191472.aspx.
Finally, we call the Query() method against the database, passing in the SQL statement and the categoryTitle (which is inserted into the query in place of the @0) as parameters:
var sqlSelect = "SELECT productID, title, price FROM Products " +

            "LEFT OUTER JOIN Categories ON Products.category = Categories.categoryID " +

            "WHERE Categories.categoryTitle = @0";


var products = db.Query(sqlSelect, categoryTitle);
Now we'll add some markup and Razor code to the body of the page to display a summary of the products contained within the selected category. Each product summary will be displayed within an HTML unordered list and will state the title and price of the product. The product title will provide a link to a Product Details page, which we will create in the next section. From the Product Details page, the customer will be able to add the item to his or her shopping cart. We will also provide a ‘More Details’ link in the UI to the same page for the sake of clarity, in case the user doesn't realize that the product title is a hyperlink.
Add the following code to the page immediately underneath the code block you just added, removing any default markup:
<div id="contentTitle">

    <h1>@categoryTitle</h1>

</div>


@if (products.Count() == 0)

{

    <p>

        No items found in this category.

        Try browsing one of the categories listed to the left.

    </p>

}

else

{

    <ul id="productsList">

        @foreach (var item in products) {

            <li>

                <h3>
                    <a href="/ProductDetails/@item.productID">@item.title</a>

                </h3>

                <p class="price">

                    £@item.price

                </p>

                <p>

                    <a href="/ProductDetails/@item.productID" class="detailsButton">

                        More Details

                    </a>

                </p>

            </li>

        }

    </ul>

}
Here, we have added an <h1> header tag to the page, displaying the category title. Following this, we check the result of a call to the Count() method of the IEnumerable<dynamic> returned by the Query() method of the Database object to see if any rows have been returned (i.e., the selected category contains at least one product). If no rows have been returned, we display a helpful message to the user:
@if (products.Count() == 0)

{

    <p>

        No items found in this category.

        Try browsing one of the categories listed to the left.

    </p>

}
If at least one product has been found in the category, we iterate over the result of the query using a foreach loop, adding each product as a list item to an unordered list:
<ul id="productsList">

    @foreach (var item in products) {

        <li>

            <h3>

                <a href="/ProductDetails/@item.productID">@item.title</a>

            </h3>

            <p class="price">

                £@item.price

            </p>

            <p>

                <a href="/ProductDetails/@item.productID" class="detailsButton">

                    More Details

                </a>

            </p>

        </li>

    }

</ul>
The following CSS, to be added to the bottom of /Css/Style.css, styles the <h1> header tag and the productsList unordered list. The CSS displays the products in three columns across the page (see Figure 9-9):
#main h1 {

    border-bottom: 1px dashed #cdcdcd;

}


/* Product List

---------------------------------*/

#productsList {

    list-style: none;

    margin: 0px;

    padding: 0px;

}


#productsList li{

    float: left;

    margin: 12px;

    width: 215px;

}


#productsList h3 {

    font-size: 1.75em;

    font-weight: normal;

    margin-bottom: 5px;

    padding: 0px;

}


#productsList .price {

    font-size: 1em;

    font-style: italic;

    color: #999;

}
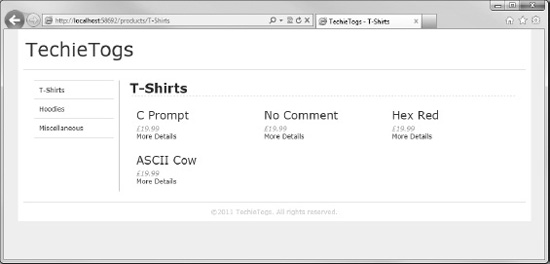
Figure 9-9. The Products page showing product summaries for the T-Shirts category
The Product Details Page
The final page in our product catalog will display the full product details and provide the user with a way to add the product to his or her shopping cart. We will be implementing the shopping cart and checkout in the next chapter, so in this section, we will simply be providing the UI in the products page to facilitate this.
The code for the page is fairly straightforward, so let's just plough straight in. Create a page called ProductDetails.cshtml in the root of the site, and replace the auto-generated content with the following code block:
@{


    Layout = "~/Shared/Layouts/_Layout.cshtml";


    var productID = !UrlData[0].IsEmpty() ? UrlData[0] : "0";


    var db = Database.Open("TechieTogsData");

    var sqlSelect = "SELECT * FROM Products WHERE productID = @0";


    var product = db.QuerySingle(sqlSelect, productID);


}
In this code, we start by setting the layout page and getting the productID from the UrlData. We use the C# Ternary Operator (?:) to assign the value of the UrlData[0] parameter to the variable productID if UrlData[0] does not contain an empty string.
If UrlData[0] does contain an empty string, i.e., no product ID has been passed in the URL, we set the productID variable to "0". Because the Products.productID column has been defined as an auto-generated identity field, we can be sure that there will never be a product row in the table with a productID of zero.
var productID = !UrlData[0].IsEmpty() ? UrlData[0] : "0";
Next, we open a database connection to TechieTogsData, and pull out the row with a matching productID, using the QuerySingle() method on the Database object, and pass in the variable containing the SQL SELECT statement and the productID.
Now we have the initial data set up, we can add some markup and Razor code to display the product details and order form. Insert the following immediately underneath the code block we just added:
@if (product == null)

{

    <p>

        Unable to fetch product details.

        Try browsing one of the categories listed to the left.

    </p>

}

else

{

    Page.Title = product.title;

    <text>

        <h1>@product.title</h1>

        <div id="productDetails">
            <p class="price">

                £@product.price

            </p>

            <p>@product.description</p>

        </div>

        <div id="orderForm">

            <form action="/Cart" method="post">

                <fieldset>

                    <legend>Place Order</legend>

                    <p>

                        <label for="size">Size:</label>

                        <select name="size">

                            <option value="S">Small</option>

                            <option value="M">Medium</option>

                            <option value="L">Large</option>

                            <option value="XL">Extra Large</option>

                        </select>

                    </p>

                    <p>

                        @Html.Hidden("productID", productID)

                        @Html.Hidden("price", product.price)

                        <input type="submit" value="Add to Cart" />

                    </p>

                </fieldset>

            </form>

        </div>

    </text>

}
The first task this code performs is to check that a product has been returned by the query. If no product has been returned, it displays a useful message to the user:
@if (product == null)

{

    <p>

        Unable to fetch product details.

        Try browsing one of the categories listed to the left.

    </p>

}
To take into account a product that has been returned, we set the page title to the value of the product title and render the product details to the page. As well as the product details, we also display an order form. The order form contains, first, a drop-down list, from which the user can select the product size he or she requires, second, two hidden fields that store the product ID and price, and, lastly, a Submit button with which the customer can add the product to his or her shopping cart. Note that the action and method attributes of the <form> tag specify that we wish the data to be posted to the Cart.cshtml page. We are only going to define the basic UI for the order form here; the form posts its values to Cart.cshtml, which we will be implementing in the next chapter.
All that remains is to style the page by adding the following styles to the default style sheet, /Css/Style.css:
/* Product Details
---------------------------------*/


#productDetails {

    float: left;

    width: 450px;

}


#productDetails .price {

    font-size: 1em;

    font-style: italic;

    color: #999;

    margin-bottom: 10px;

}


#orderForm {

    float:left;

}


#orderForm fieldset {

   width: 230px;

    margin: 0px;

    padding: 10px;

    border: 1px solid #cdcdcd;

}


#orderForm legend {

    font-weight: bold;

    padding:0px 10px 0px 10px;

}


#orderForm label {

    font-weight: bold;

    padding-right: 5px;

}


#orderForm p {

    padding: 5px 0px 5px 0px;

}


#orderForm input[type="submit"] {

    margin-top:20px;

    padding: 5px;

    width: 100%;

}
Run the project from the default page, choose a category and a product, and then you will be presented with a page similar to the one seen here in Figure 9-10.
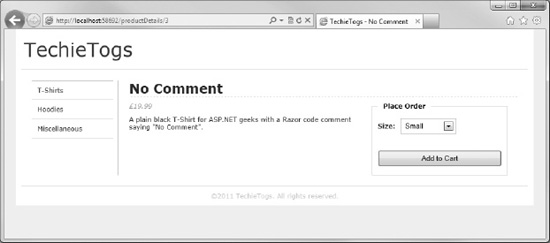
Figure 9-10. The Product Details page
Adding Social Networking Features
In this section, we will make use of ASP.NET web helper packages to add social-networking features to our product catalog. In particular, we will add Twitter, Facebook, and Google +1 buttons to the Product Details page. This will allow users to easily share a link to an item they like within our catalog with friends/followers.
Navigate to the Site workspace and open the ASP.NET Web Sites Administration site using the link in the Content Pane. Enter a password and remove the leading underscore in the filename of the /App_Data/Admin/_Password.config file when prompted.
Next, search for the ASP.NET Web Helpers Library 1.15 and Google +1 Helper 0.1.1 packages within the Package Manager and click the Install button next to both.
![]() Note A much more detailed explanation of how to install packages using the WebMatrix Package Manager can be found in “Chapter 8 – Using Web Helper Packages.” In particular, this chapter also includes detailed instructions regarding the use of the ASP.NET Web Helpers Library package.
Note A much more detailed explanation of how to install packages using the WebMatrix Package Manager can be found in “Chapter 8 – Using Web Helper Packages.” In particular, this chapter also includes detailed instructions regarding the use of the ASP.NET Web Helpers Library package.
The Google +1 Helper Package
Displaying a Google +1 button on your page enables Google+ users to publicly recommend pages across the web.
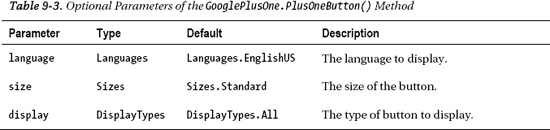
When you installed the Google +1 Helper package, the Package Manager added a single file to your project: App_Code/GooglePlusOne.cshtml. This file has just one helper method, PlusOneButton(). It has three optional parameters, which are listed below in Table 9-3. The values of the Languages, Sizes, and DisplayTypes enumerations can be seen in the App_Code/GooglePlusOne.cshtml file installed by the package.
To insert a Google +1 button into a page called the PlusOneButton() method, setting any of the optional parameters is required. For example, the following code displays the button shown in Figure 9-11:
@GooglePlusOne.PlusOneButton(language: GooglePlusOne.Languages.EnglishUK,

                             size: GooglePlusOne.Sizes.Tall)
Figure 9-11. The Google +1 button rendered by the PlusOneButton() method
Adding Google +1, Twitter, and Facebook Buttons
Open the ProductDetails.cshtml file in the WebMatrix IDE and add the <fieldset>, highlighted in bold below, to the bottom of the orderForm <div>:
<div id="orderForm">

    <form action="/Cart" method="post">

        <fieldset>

            <legend>Place Order</legend>

            <p>

                <label for="size">Size:</label>

                <select name="size">

                    <option value="S">Small</option>

                    <option value="M">Medium</option>

                    <option value="L">Large</option>

                    <option value="XL">Extra Large</option>

                </select>

            </p>

            <p>

                @Html.Hidden("productID", productID)

                @Html.Hidden("price", product.price)

                <input type="submit" value="Add to Cart" />
            </p>

        </fieldset>

    </form>

    <fieldset>

        <legend>Share</legend>

        <p>

            @GooglePlusOne.PlusOneButton()

        </p>

        <p>

            @Twitter.TweetButton(tweetText: "Check this out on the TechieTops site!",

                                userName: "stevelydford",

                                dataCount: "horizontal")

        </p>

        <p>

            @{ string currentUrl = Request.Url.ToString(); }

            @Facebook.LikeButton(currentUrl,

                                 width:230,

                                 buttonLayout:"standard",

                                 height:25,

                                 showFaces:false)

        </p>

    </fieldset>

</div>
The Google +1 Button, Twitter TweetButton, and Facebook LikeButton will now be displayed directly under the order form (see Figure 9-12).
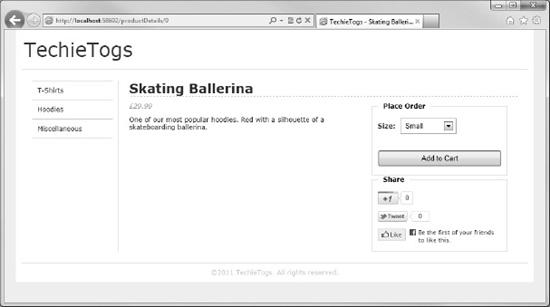
Figure 9-12. The Google +1, Twitter, and Facebook buttons added to the Product Details page
Searching the Catalog
As well as offering the ability to browse the catalog by category, we want the user to be able to search the database for products. In this section, we'll add this feature to our site by creating a partial page containing a search form, which we'll render in the layout page. When the user submits the search form, he or she will be taken to a separate page, which will query the database and display the search results.
So let's start by adding the search form to the layout page. Add a file called _Search.cshtml to the /Shared/Partials folder. Replace the auto-generated content with the following form:
<form action="/Search.cshtml" method="post">

    @Html.TextBox("searchTerm")

    <input type="Submit" value="Search" />

</form>
This partial page renders a very simple form, one containing only a textbox and a submit button. The form attributes are set to POST the values of the controls to our search page at /Search.cshtml.
Now let's add the search form to the layout page. Open /Shared/Layouts/_Layout.cshtml and amend the header <div> to match the following example:
<div id="header">

    <p class="logo"><a href="@Href("~/")">TechieTogs</a></p>

    <div id=”headerRight”>

        <div id="search">@RenderPage("~/Shared/Partials/_Search.cshtml")</div>

    </div>

</div>
We'll append the following style to our style sheet at /Css/Style.css, which positions the search form on the right-hand side of the page header (see Figure 9-13):
#headerRight{

    float:right;

    margin-right: 20px;

}


#search {

    margin-top: 40px;

    text-align: right;

}
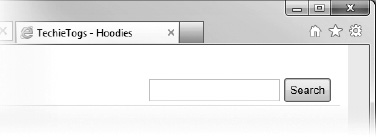
Figure 9-13. The search form added to the header in the layout page
Now that we have the search form in place, add a new file, Search.cshtml, to the root of the site; this will be the page that accepts the form post data, queries the database, and displays the results. Delete the markup generated by WebMatrix and enter the following:
@{


    Layout = "~/Shared/Layouts/_Layout.cshtml";

    Page.Title = "Catalog Search";


    var db = Database.Open("TechieTogsData");


    var searchWords = Request["searchTerm"].Split(' '),

    IEnumerable<dynamic> result = Enumerable.Empty<string>();


    var sqlSelect = "SELECT productID, title FROM Products WHERE " +

                    "title LIKE @0 OR description LIKE @0 OR keywords LIKE @0";


    foreach(var word in searchWords)

    {

        result = result.Concat(db.Query(sqlSelect, "%" + word + "%").ToList());

    }


}
The first three lines of this code set the layout page and title and open a connection to the TechieTogsData database. The user may decide to enter more than one word into the search text box, so the next line takes the value of the searchTerm form item posted to the page and splits it into an array of strings, using a space character as the separator.
var searchWords = Request["searchTerm"].Split(' '),
Each element of the array returned by the call to the Split() method now contains an individual word.
In order to search for multiple words in the database, we will perform a separate database query for each word, selecting all rows where the word matches the title, description, or keywords columns. We will concatenate together all the separate query results into an IEnumerable<dynamic> variable, called result, and iterate over it to display the combined results to the user.
In order to achieve this, we first need to instantiate an empty IEnumerable<dynamic>:
IEnumerable<dynamic> result = Enumerable.Empty<string>();
Failure to carry out this instantiation would cause a “use of unassigned local variable” compiler error when later calling the IEnumerable.Concat() extension method.
We then define the SQL statement that will be used to query the Products table and iterate over the searchWords array, executing the SQL for each word in the array. We append the result of each separate query to the IEnumerable<dynamic> named result by passing the IEnumerable<dynamic> returned by the Database.Query() method to the Concat() extension method:
var sqlSelect = "SELECT productID, title FROM Products WHERE " +

                "title LIKE @0 OR description LIKE @0 OR keywords LIKE @0";


foreach(var word in searchWords)

{

    result = result.Concat(db.Query(sqlSelect, "%" + word + "%").ToList());

}
Add the following markup and Razor code under the code block, which displays the results to the user in an HTML unordered list. This is achieved by simply iterating over the result collection and rendering a hyperlink to the Product Details page:
<h1>Search Results</h1>


<p>@result.Count() products found matching: <em>@Request["searchTerm"]</em></p>


<ul id="searchResult">

    @foreach (var item in result)

    {

        <li>

            <a href="/ProductDetails/@item.productID">@item.title</a>

        </li>

    }

</ul>
Then, add the following style to /Css/Style.css in order to format the search results.
/* Search Results

---------------------------------*/


#searchResult li {

    margin-top: 10px;

    font-size: 1.2em;

    list-style: none;

}
When a user performs a search, he or she is presented with a results page similar to the one shown here in Figure 9-14.
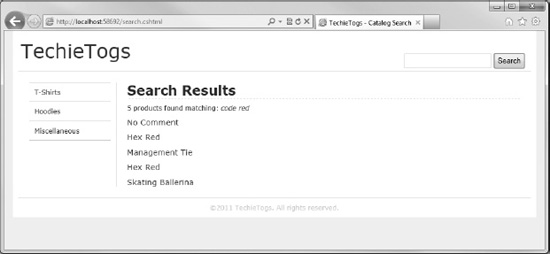
Figure 9-14. The search results displayed to the user
Custom Error Pages
While it is good coding practice to attempt to deal with any likely user actions and prevent errors, it is a near-impossible task to deal with them all.
At present, if an error occurs in your application, the user will be presented with an error page similar to Figure 9-15 if the error originated from IIS or to Figure 9-16 if the ASP.NET runtime produced the error.
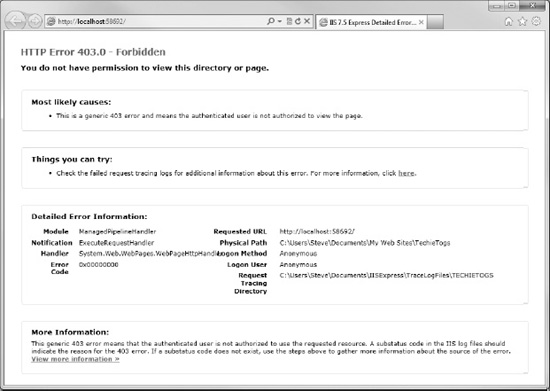
Figure 9-15. An HTTP 403 Error page produced by IIS
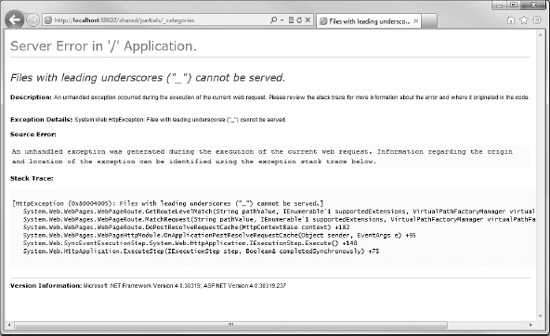
Figure 9-16. An error page produced by the ASP.NET runtime
While these pages can be informative during development, it would be much better to present a friendlier page to the user should they encounter an error. Fortunately, this is a relatively simple task in ASP.NET Web Pages.
Displaying a Default Error Page
First, we will need an error page to display. Create a new file called Error.cshtml in the root of the site and replace the default markup with the following:
@{

    Layout = "~/Shared/Layouts/_Layout.cshtml";

    Page.Title = "ERROR";

}


<h1>ERROR</h1>

<p>

    Unfortunately an error has occurred and

    we were unable to process your request.

</p>

<p>

    <br />Please try browsing the categories

    listed on the left to view our full

    product range.

</p>
Custom error pages are configured in the Web.config file of an ASP.NET web site. Given that we don't currently have a Web.config file in our site, add one to the root folder. You will find the Web.Config (4.0) file type listed as the last item under the ‘All’ tab of the New File dialog (see Figure 9-17).
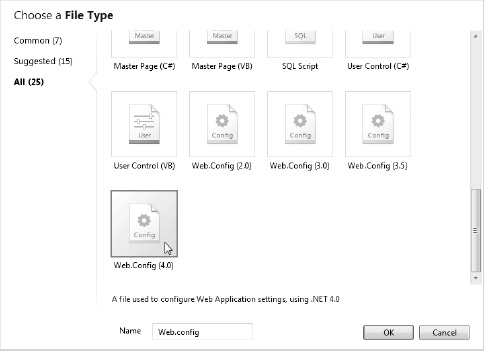
Figure 9-17. Adding a Web.config file to your application
The Web.config file is an XML-based file that contains information about the various configuration options available to ASP.NET web sites. The file will have been created with some base content. Amend the file to look like the following:
<?xml version="1.0"?>


<configuration>


    <system.web>

        <compilation debug="false" targetFramework="4.0" />

        <customErrors mode="On" defaultRedirect="/Error"/>

    </system.web>


</configuration>
The customErrors element we have just added tells the server to display the page specified in the value of the defaultRedirect attribute. Now, rather than receiving one of the default error pages seen in Figure 9-15 or Figure 9-16, the user will see the one shown below in Figure 9-18.
To test this page, you will need to generate an error. One way to do this is to browse to ProductDetails.cshtml, passing an invalid product ID in the URLData. For example:
http://localhost:<port>/ProductDetails/2h
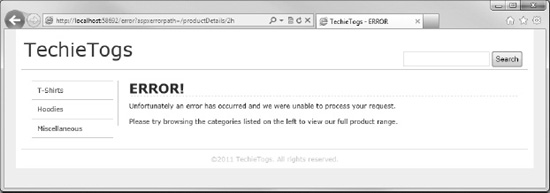
Figure 9-18. The custom error page
The mode attribute of the customErrors element in Web.config can contain one of three possible values; On, Off, or RemoteOnly. Setting the attribute to On or Off enables or disables the custom error page respectively. However, from a development point of view, the most useful value is often RemoteOnly, which specifies that custom errors are shown only to remote clients and that ASP.NET errors, often showing useful debugging information, are shown to the localhost.
404 – Not Found Errors
The custom error page we have implemented will show the friendly error page seen in Figure 9-18 whenever an error is encountered by the web server or ASP.NET. However, if the user browses to a page that does not exist, he or she will still receive the default IIS HTTP Error 404 page, as seen here in Figure 9-19:
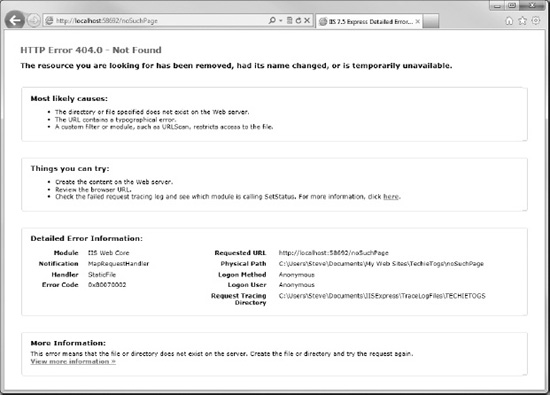
Figure 9-19. The default IIS 404 – Not Found error page
As with the default error page, we can instruct WebMatrix to display a custom 404 page via the Web.config file. Amend your Web.config file, adding the <system.webServer> element highlighted in the code sample below:
<?xml version="1.0"?>


<configuration>


    <system.web>

        <compilation debug="false" targetFramework="4.0" />

        <customErrors mode="On" defaultRedirect="/Error"/>

    </system.web>


    <system.webServer>

        <httpErrors errorMode="Custom">

            <remove statusCode="404" subStatusCode="-1" />

            <error statusCode="404" subStatusCode="-1"

                prefixLanguageFilePath=""

                path="../Error/404"
                responseMode="Redirect" />

        </httpErrors>

    </system.webServer>


</configuration>
This new element instructs IIS to redirect 404 errors to the ../Error.cshtml page, passing a value of 404 in the URL.
We'll make use of the UrlData by amending the Error.cshtml page to display a “File Not Found” message if relevant. Make the changes to the Error.cshtml page highlighted below:
@{

    Layout = "~/Shared/Layouts/_Layout.cshtml";


    var message = UrlData[0] == "404" ? "File Not Found" : "ERROR!";

    Page.Title = message;

}


<h1>@message</h1>

<p>

    Unfortunately an error has occurred and

    we were unable to process your request.

</p>

<p>

    <br />Please try browsing the categories

    listed on the left to view our full

    product range.

</p>
This code inspects the value of the UrlData[0] parameter and sets the value of the message variable accordingly. The value of the message variable is then used to set the page title and contents of the <h1> tag.
The resulting page is shown in Figure 9-20.
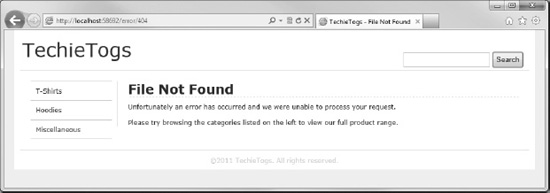
Figure 9-20. The custom 404 – Not Found error page
Summary
In this chapter, we have completed the first part of our e-commerce application, TechieTogs. We have a fully working, dynamic, data-driven product catalog linked to an SQL Server Compact Edition database, which allows the user to browse the products by category.
We have added social networking features to the Product Details page to allow the user to share links to our products on Twitter, Facebook, and Google+ and implemented search functionality to help the user find products in the catalog.
Finally, we've defined a custom error page to display friendly error and “file not found” messages to users if necessary.
In the next chapter, we will add a shopping cart, checkout features, and a membership system.