
C H A P T E R 10
![]()
eshop*
In several chapters of this book, I’ve used examples taken from three different versions of an online bookshop application: eshop (see Chapter 3), eshopx (introduced in Chapter 6), and eshopf (the subject of Chapter 8). In this chapter, I’ll complete the description of those applications so that you can use them as models for your own.
All three versions have the same functionality and generate almost identical HTML pages. Their differences are in their implementation. The main difference between the first two versions, eshop and eshopx, is that the JSP code in eshop is in standard JSP syntax, while the code in eshopx is in XML syntax. The third version of the application, eshopf, is quite different from the first two, because I implemented it with JSF. This required me to replace the original servlet with the JSF servlet. Although I used eshopx as a base for developing eshopf, I obviously had to rewrite the user interface almost from scratch.
For your convenience, I have included the code of all three applications in the software package for this chapter. The three folders are identical to those you have already encountered in Chapters 3, 6, and 8.
The eshop Application
In Chapter 3, where I introduced eshop, I described the objects this application deals with (product categories, books, shopping cart, and orders) and the operations the user can perform on those objects. I then described the MVC architecture of eshop. In particular, I listed the methods of the DataManager class (Table 3-1), described the initialization of the servlet (Listing 3-9 and Table 3-2), summarized how the servlet handles incoming requests, and listed the JSP pages (Table 3-3). I also took you through a typical user session.
In Chapter 6, I described the SQL scripts shop_create.sql (Listing 6-1), shop_populate.sql (Listing 6-3) and shop_orders.sql (Listing 6-7), which create the shop database containing categories, books, and orders. I also showed you the code of Category.java (Listing 6-6). Then, I devoted the whole “DB Access in eshop” section to describing how the data manager updates the database via the peer methods (Figure 6-5 and Listings 6-10 to 6-13).
In this chapter, I’ll start by listing all the subfolders and files in the eshop application folder (see Listing 10-1, where the folder names are in bold).
Listing 10-1. The eshop Files
css

    eshop.css

images

    1.gif, 2.gif, 3.gif, 4.gif, 5.gif, 6.gif

    bg_header.gif
    bg_menu.gif

    cart.gif

jsp

    BookDetails.jsp

    Checkout.jsp

    LeftMenu.jsp

    OrderConfirmation.jsp

    SearchOutcome.jsp

    SelectCatalog.jsp

    ShoppingCart.jsp

    TopMenu.jsp

META-INF

    MANIFEST.MF

WEB-INF

    web.xml

    classes

        eshop

            ShopServlet.class

            ShopServlet.java

            beans

                Book.class, Book.java

                CartItem.class, CartItem.java

                Category.class, Category.java

                Customer.class, Customer.java

            model

                BookPeer.class, BookPeer.java

                CategoryPeer.class, CategoryPeer.java

                DataManager.class, DataManager.java

                OrderDetailsPeer.class, OrderDetailsPeer.java

                OrderPeer.class, OrderPeer.java

                shop.sql
To complete the description of the ShopServlet class, I need to show you how it selects the appropriate JSP page on the basis of the request, thereby fulfilling its role as a controller. Listing 10-2 shows the code of the doPost method (as I mentioned already in Chapter 3, doGet simply executes doPost).
Listing 10-2. ShopServlet.java - doPost Method
protected void doPost(HttpServletRequest request,

    HttpServletResponse response) throws ServletException, IOException {

  String base = "/jsp/";

  String url = base + "index.jsp";

  String action = request.getParameter("action");

  if (action != null) {

      switch (action) {

      case "search":

        url = base + "SearchOutcome.jsp";

        break;

      case "selectCatalog":

        url = base + "SelectCatalog.jsp";

        break;
      case "bookDetails":

        url = base + "BookDetails.jsp";

        break;

      case "checkOut":

        url = base + "Checkout.jsp";

        break;

      case "orderConfirmation":

        url = base + "OrderConfirmation.jsp";

        break;

      default:

        if (action.matches("(showCart|(add|update|delete)Item)"))

          url = base + "ShoppingCart.jsp";

        break;

      }

    }

  RequestDispatcher requestDispatcher =

    getServletContext().getRequestDispatcher(url);

  requestDispatcher.forward(request, response);

  }
As you can see, doPost obtains the request parameter named action and then uses it to form the correct URL of the JSP page. It then uses the request dispatcher obtained from the servlet context to forward control to the page. If no action parameter exists or if it doesn’t match any of the expected strings, the servlet will execute the default page (/jsp/index.jsp).
To cover the eshop functionality in detail, I’ll show you what happens in a typical user session, as I already did in Chapter 3. This time, though, instead of showing it from the point of view of the user, I’ll look at the behavior of the application on the server. The architecture of eshop is consistent with the general MVC architecture shown in Figure 3-2.
What Happens When the Application Starts
The user starts the application by typing http://localhost:8080/eshop/shop/ in his or her browser. The doGet method of ShopServlet is executed, and that simply executes doPost. The doPost method, as I just explained, doesn't find a request parameter named action, so it forwards the request to index.jsp.
The index.jsp page, like all other pages of eshop, displays a header with a link to the shopping cart and a menu on the left-hand side with search and selection controls (see Figure 10-1). It does so by including two separate modules, as follows:
<jsp:include page="TopMenu.jsp" flush="true"/>

<jsp:include page="LeftMenu.jsp" flush="true"/>
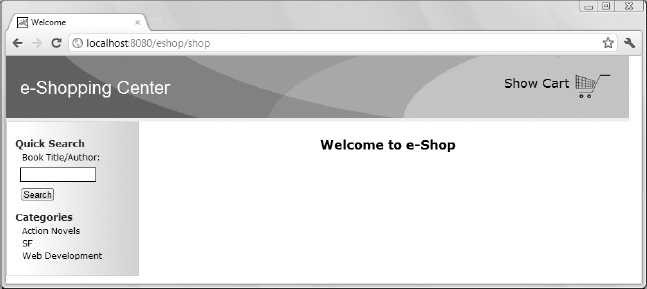
Figure 10-1. E-shop’s home page
The central area of the page only displays the text welcome to e-Shop.
The TopMenu.jsp module is trivial. Essentially, it consists of the following element:
    <a class="link2" href="<%=base%>?action=showCart">Show Cart

      <img src="<%=imageURL%>/cart.gif" border="0"/></a>
where the two variables are obtained from the application scope
  String base = (String)application.getAttribute("base");

  String imageURL = (String)application.getAttribute("imageURL");
The action parameter set to showCart causes ShopServlet to forward the request to /jsp/ShoppingCart.jsp.
The LeftMenu.jsp module has to do more. It displays a search field and a list of selectable book categories. The code to accept a search request is as follows:
<p>Book Title/Author:</p>

  <form style="border: 0px solid; padding: 0; margin: 0;">

    <input type="hidden" name="action" value="search"/>

    <input id="text" type="text" name="keyword" size="15"/>

    <input id="submit" type="submit" value="Search"/>

    </form>
Notice the presence of the hidden parameter named action with the value "search", which causes ShopServlet to forward the request to /jsp/SearchOutcome.jsp when the user clicks on the Search button to perform a book search.
Here’s the code that lists the book categories:
<%

    Hashtable<String, String> categories = dataManager.getCategories();

    Enumeration<String> categoryIds = categories.keys();

    while (categoryIds.hasMoreElements()) {

      Object categoryId = categoryIds.nextElement();
      out.println("<p><a href=" + base + "?action=selectCatalog&id="

        + categoryId.toString() + ">" + categories.get(categoryId) + "</a></p>"

        );

      }

  %>
The DataManager method getCategories only executes another method of the data model
  public Hashtable<String, String> getCategories() {

    return CategoryPeer.getAllCategories(this);

    }
that interrogates the database to obtain identifiers and names of the available categories (see Listing 10-3).
Listing 10-3. CategoryPeer.java—getAllCategories Method
public static Hashtable<String, String>

    getAllCategories(DataManager dataManager) {

  Hashtable<String, String> categories = new Hashtable<String, String>();

  Connection connection = dataManager.getConnection();

  if (connection != null) {

    try {

      Statement s = connection.createStatement();

      String sql = "select category_id, category_name from categories";

      try {

        ResultSet rs = s.executeQuery(sql);

        try {

          while (rs.next()) {

            categories.put(rs.getString(1), rs.getString(2));

            }

          }

        finally { rs.close(); }

        }

      finally {s.close(); }

      }

    catch (SQLException e) {

      System.out.println("Could not get categories: " + e.getMessage());

      }

    finally {

      dataManager.putConnection(connection);

      }

    }

  return categories;

  }
I’ve highlighted the lines that do all the work: first, the database query is performed, and then the result is saved in a hash table in which the key is the category ID and the value is the category name.
LeftMenu.jsp uses the content of the hash table to generate one link for each category with the statement:
out.println("<p><a href=" + base + "?action=selectCatalog&id="

  + categoryId.toString() + ">" + categories.get(categoryId) + "</a></p>"

  );
as shown in the following example for action novels:
<p><a href=/eshop/shop?action=selectCatalog&id=3>Action Novels</a></p>
Notice that the action parameter is set to selectCatalog. This is done for all categories and causes ShopServlet to forward the request to /jsp/SelectCatalog.jsp when the user clicks on a category name.
As you can see from the code of CategoryPeer.java, I took great care to ensure that the database connection is closed before the method returns. Also notice that I logged a message to the standard output (mapped by Tomcat to the file stdout_yyyymmdd.log) if the database access fails. In a real-world application, you should throw an exception with an error message that you can then display to the user.
Handling Requests for Book Selection and Book Search
As you saw in the previous section, when the user selects a book category or performs a search, the pages displayed are SelectCatalog.jsp and SearchOutcome.jsp, respectively. Both pages display a list of books and are similar to each other. Actually, they are so alike that I merged them into a single page in the JSF version of the application, eshopf, as you’ll see later in this chapter. Figure 10-2 shows the list you will see when you search for the letter F (or f, as the searches are case insensitive), while Figure 10-3 shows the list of books in the category Action Novels.

Figure 10-2. Titles and author names containing an F
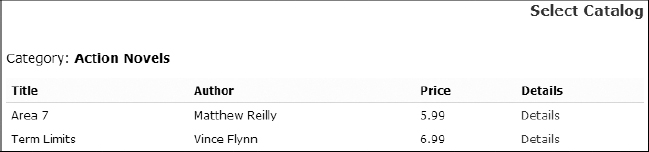
Figure 10-3. Action Novels
In SelectCatalog.jsp, the requested category is specified by the id parameter. To obtain the category name, you execute the DataManager method getCategoryName
public String getCategoryName(String categoryID) {

  Category category = CategoryPeer.getCategoryById(this, categoryID);

  return (category == null) ? null : category.getName();

  }
and this loads the category record from the database via the corresponding peer method.
In SearchOutcome.jsp, the search string is in the keyword parameter.
To obtain the list of books, SelectCatalog.jsp executes the following statement in a scriptlet:
while SearchOutcome.jsp executes the statement:
ArrayList books = dataManager.getSearchResults(keyword);
For each book in the list, both pages generate a link such as the following one:
<a class="link1" href="/eshop/shop?action=bookDetails&bookId=3">Details</a>
With the action parameter set to bookDetails, ShopServlet forwards the request to BookDetails.jsp.
Displaying the Book Details
By now, the mechanism should be pretty clear: each JSP page passes its key request parameter to a DataManager method that encapsulates the business logic. This is how the view and the model of the MVC architecture are kept separate, making it possible for the web-page designers and the software developers to work independently. One creates visually appealing and clear pages, and the other handles the databases. The signatures of the data model methods are the only interface needed between page designers and software developers.
BookDetails.jsp passes the bookId request parameter to the DataManager method getBookDetails:
public Book getBookDetails(String bookID) {

  return BookPeer.getBookById(this, bookID);

  }
and the BookPeer method getBookById gets the corresponding book record from the database.
To buy the book (see Figure 10-4), the user then clicks on a link that looks like this in HTML:
<a class="link1" ="/eshop/shop?action=addItem&bookId=4">Add To Cart</a>
With the action parameter set to addItem, ShopServlet forwards the request to ShoppingCart.jsp.
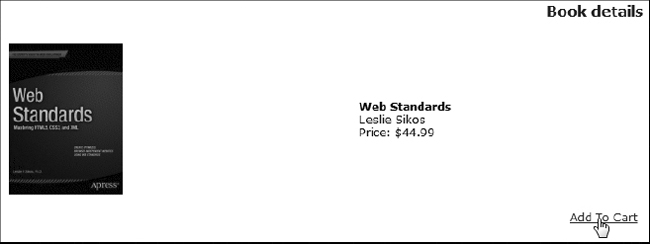
Figure 10-4. Buying a book
Managing the Shopping Cart
The application displays the shopping cart (see Figure 10.5) not only when the user clicks on the Add to Cart link while viewing the book details but also when the user clicks on the shopping cart link in the header of any page. The difference is that in the first case, the action parameter passed to ShoppingCart.jsp has the value addItem, while in the second case the value is showCart.
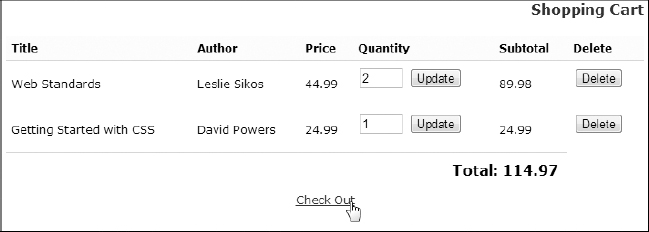
Figure 10-5. The shopping cart
The shopping cart itself is an object of type Hashtable<String, String> stored as a session attribute. Note that the scope of the attribute must be session, because the shopping cart must be available across multiple HTTP requests. The hashtable key is the book ID, while the value is an object of type CartItem. The CartItem class has no methods except the getters and setters for the author, title, price, bookID, and quantity properties.
It’s appropriate to save the book price in the shopping cart, because the user should pay the price shown in the book details when he or she clicks on Add to Cart, even if the book price stored in the database is then changed before the order is completed.
For each shopping cart item, ShoppingCart.jsp displays the quantity of books in an input field and adds the Update and Delete buttons enclosed in separate forms. This makes it possible for the user to modify the number of copies ordered or to remove an item altogether. Here’s an example of an update form:
<form>

    <input type="hidden" name="action" value="updateItem"/>

    <input type="hidden" name="bookId" value="4"/>

    <input type="text" size="2" name="quantity" value="1"/>

    <input type="submit" value="Update"/>

    </form>
and here’s an example a delete form:
<form>

  <input type="hidden" name="action" value="deleteItem"/>

  <input type="hidden" name="bookId" value="4"/>

  <input type="submit" value="Delete"/>

  </form>
When the user clicks on one of the buttons, ShopServlet forwards the request back to ShoppingCart.jsp.
Before displaying the content of the cart, ShoppingCart.jsp needs to do some work that depends on the value of the action parameter (see Table 10-1).
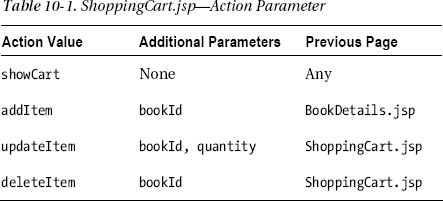
To handle addItem, ShoppingCart.jsp obtains the book details from the data manager via the getBookDetails method and creates a new CartItem object, which it then adds to the cart. To handle updateItem, ShoppingCart.jsp uses the setQuantity method to update the quantity in the cart item identified by bookId. To handle deleteItem, ShoppingCart.jsp simply removes the cart item identified by bookId from the cart.
After listing the cart content, ShoppingCart.jsp displays this link:
<a class="link1" href="<%=base%>?action=checkOut">Check Out</a>
With the action parameter set to checkOut, ShopServlet forwards the request to Checkout.jsp.
Accepting an Order
Checkout.jsp asks the user to provide his or her personal and financial data (see Figure 10-6).

Figure 10-6. Checking out
When the user clicks on the Confirm Order button, the hidden action parameter is set to orderConfirmation, which causes ShopServlet to forward the request to OrderConfirmation.jsp. In real life, you should implement validation on as many fields as possible.
To perform validation of the user’s inputs, you have to decide what fields to validate, whether the validation should take place on the client or on the server (or on both), whether to check the fields one by one or all together, and what technique to use.
There are some fields that you cannot really validate (e.g., the contact name). Others might not be critical enough to warrant the effort you would need to spend in order to implement validation. For example, to check the delivery address provided via a simple form like that of Figure 10-6, you could parse the field, extract the country, if present, the ZIP/post code, and check whether they are consistent. To minimize the risk of input errors, it would make more sense to break down the address into several fields and give a multiple choice of countries and, depending on the chosen country, on ZIP codes. This would involve quite a bit of work, and the lists would have to be kept up to date, for example, by downloading them from an online service. All in all, you might decide to forego such complex checks. That said, it is not uncommon for web sites to check that the format of the ZIP code is consistent with the country.
In general, how far you go with validation is something you need to decide on a case-by-case basis.
Concerning the question of whether to validate on the server or on the client, my advice is to always validate on the server. This is mainly because a user could manage to work around validation done on the client with unknown consequences. The fact that validation on the client provides immediate feedback to the user might encourage you to do both types of validation. On the other hand, in order to do so, you effectively duplicate the same checks in JavaScript on the client and in your application on the server.
Ajax, which you learned in Chapter 7, relies on checks done on the server; but because it relies on transferring a minimum amount of data in both directions, Ajax also provides a quick turnaround.
With the check-out form of Figure 10-6, I would make sure the user has typed something in all fields and that the values of the credit-card number and expiry date are plausible. The best time to do checks on an individual field is when the value of the corresponding HTML element changes: that is, when the user modifies the value of a field and then clicks outside it.
As a warm-up exercise, let’s see how you can easily check that the user has typed something into all fields of the form when he or she clicks on Confirm Order. For this check, you can use a straight JavaScript function, like that shown in Listing 10-4.
Listing 10-4. nonemptyForm.js
function validateForm() {

  var f = document.getElementById("frm");

  var k = -1;

  for (var i = 1; i < f.length && k < 0; i++) {

    if(f.elements[i].value.length == 0) k = i;

    }

  if (k >= 0) alert("Field " + f.elements[k].name + " empty");

  return (k < 0);

  }
As you can see, it is pretty straightforward: you check in a loop all fields of the form named frm and display an alert with the name of the first element you find to be empty. You will find nonemptyForm.js in the folder eshop project of the software package for this chapter. To use it, you need to copy it to the folder eshopjsp and change the file eshopjspCheckout.jsp in two places.
The first change is necessary to load the JavaScript file. All you need to do is insert the line
<script type="text/javascript" src="/eshop/jsp/nonemptyForm.js"></script>
immediately before the form element.
The second change links the validation function to the form’s submit button. You do it by adding the two attributes id and onsubmit to the form element, as in:
<form action="" id="frm" onsubmit="return validateForm()">
Figure 10-7 shows what happens when you leave a field empty and hit the Confirm Order button.
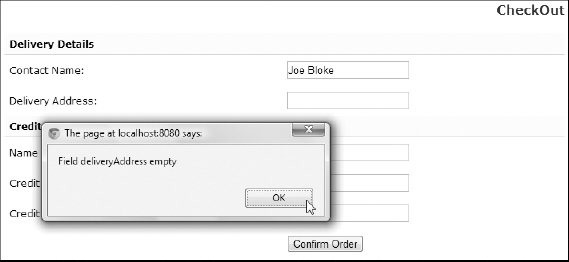
Figure 10-7. Empty-form check with JavaScript
To validate all fields individually, you need to associate a checking function to each input field in Checkout.jsp you want to validate. Let’s do it entirely on the client side first. Listing 10-5 shows the modified Checkout.jsp, with the added or updated lines in bold. You will find the file immediately inside the eshop project folder. Later, we will move validation to the server using Ajax.
Listing 10-5. Checkout.jsp (modified for client-side validation)
<%@page language="java" contentType="text/html"%>

<%@page import="java.util.Hashtable"%>

<%@page import="eshop.beans.CartItem"%>

<html>

<head>

  <meta http-equiv="Content-Type" content="text/html; charset=UTF-8"/>

  <title>Check Out (with client validation)</title>

  <link rel="stylesheet" href="/eshop/css/eshop.css" type="text/css"/>

  </head>

<body>

<jsp:include page="TopMenu.jsp" flush="true"/>

<jsp:include page="LeftMenu.jsp" flush="true"/>

<div class="content">

  <h2>CheckOut (with client validation)</h2>

<%

  @SuppressWarnings("unchecked")

  Hashtable<String, CartItem> shoppingCart =

      (Hashtable<String, CartItem>)session.getAttribute("shoppingCart");

  if (shoppingCart != null && !shoppingCart.isEmpty()) {
%>
<script type="text/javascript" src="/eshop/jsp/validForm.js"></script>
<form action="" id="frm" onsubmit="return validateForm()">
<input type="hidden" name="action" value="orderConfirmation"/>
<table class="checkout">
<tr>
<th colspan="2">Delivery Details</th>
</tr>
<tr>
<td>Contact Name:</td>
<td><input type="text" name="contactName"/></td>
</tr>
<tr>
<td>Delivery Address:</td>
<td><input type="text" name="deliveryAddress"/></td>
</tr>
<tr>
<th colspan="2">Credit Card Details</th>
</tr>
<tr>
<td>Name on Credit Card:</td>
<td><input type="text" name="ccName"/></td>
</tr>
<tr>
<td>Credit Card Number:</td>
<td><input type="text" name="ccNumber"
onchange="valNumber(this.value)"
/></td>
</tr>
<tr>
<td>Credit Card Expiry Date:</td>
<td><input type="text" name="ccExpiryDate"
onchange="valExpiry(this.value)"
/></td>
</tr>
<tr>
<td> </td>
<td><input type="submit" value="Confirm Order"/></td>
</tr>
</table>
</form>
<%
}
else {
%><p class="error">ERROR: You can't check out an empty shopping cart!</p><%
}
%>
</div>
</body>
</html>
What could be simpler than that? Let’s look together at validForm.js (Listing 10-6).
var numberOk = true;

var expiryOk = true;


function valNumber(val){

  numberOk = true;

  val += "";

  if (val != "undefined" && val != "null" && val != "") {

    var nnn = "";

    for (var k = 0; k < val.length && numberOk == true; k++) {

      var c = val.charAt(k);

      if (c >= '0' && c <= '9') {

        nnn += c;

        }

      else if (c != ' ') {

        numberOk = false;

        alert("Invalid characters in the credit card number");

        }

      }

    if (numberOk && nnn.length != 15 && nnn.length != 16) {

      alert("Credit card numbers can only have 15 or 16 digits");

      numberOk = false;

      }

    }

  }


function valExpiry(val){

  expiryOk = true;

  val += "";

  if (val != "undefined" && val != "null" && val != "") {

    var nnn = "";

    for (var k = 0; k < val.length && numberOk == true; k++) {

      var c = val.charAt(k);

      if (c != ' ') nnn += c;

      }

    if (nnn.length != 5 || nnn.charAt(2) != "/") {

      expiryOk = false;

      alert("The format of the expiry date must be MM/YY");

      }

    else {

      var month = (nnn.charAt(0) - '0') * 10 + (nnn.charAt(1) - '0'),

      if (month < 1 || month > 12) {

        expiryOk = false;

        alert("Invalid expiry month");

        }

      else {

        var year = (nnn.charAt(3) - '0') * 10 + (nnn.charAt(4) - '0'),

        var now = new Date();

        var thisYear = now.getFullYear() - 2000;

        var thisMonth = now.getMonth() + 1;
        if (year * 12 + month < thisYear * 12 + thisMonth) {

          expiryOk = false;

          alert("The credit card has expired");

          }

        }

      }

    }

  }


function validateForm() {

  if (numberOk != true) {

    alert("Invalid credit card number");

    return false;                                              //-->

    }

  if (expiryOk != true) {

    alert("Invalid credit card expiry date");

    return false;                                              //-->

    }

  var f = document.getElementById("frm");

  var k = -1;

  for (var i = 1; i < f.length && k < 0; i++) {

    if(f.elements[i].value.length == 0) k = i;

    }

  if (k >= 0) alert("Field " + f.elements[k].name + " empty");

  return (k < 0);

  }
The function validateForm is an extension of the function with the same name defined in nonemptyForm.js (Listing 10-4). The only difference is that before ensuring all fields contain something, it checks whether the two flags numberOk and expiryOk are true. If not, it reports an error and returns false, so that the form is not submitted.
The two flags are set respectively in the two functions valNumber and valExpiry. The function valNumber accepts as valid credit-card numbers all strings that contain either 15 or 16 numeric digits plus any number of spaces. valExpiry only accepts as valid expiry dates strings in the format MM/YY plus, again, any number of spaces.
To try out the validation, replace the version of Checkout.jsp originally in the eshopjsp folder with the modified one, and copy validForm.js to the same eshopjsp folder. Figure 10-8 shows an example of an invalid expiry date.
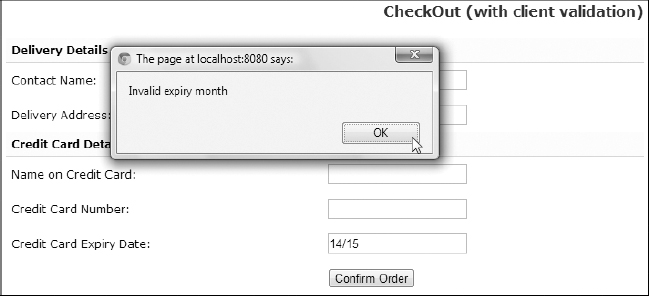
Figure 10-8. Individual field validation with JavaScript
Before we move the validation of credit-card number and expiry date to the server, we need to take a few things into consideration.
The first ‘A’ of Ajax stands for “Asynchronous.” Although you can actually use it in synchronous mode, if you do so, your page might hang while waiting for the server to respond. However, if you use it asynchronously, it is possible the user could attempt to submit the form before the validation responses from the server arrive. This should be avoided because what’s the point of asking for validation if you don’t wait for the reply? It would result in the server receiving non-validated (and therefore possibly invalid) field values.
The simplest way to wait for Ajax to complete its dialogs with the server is to block the submit button until all validations have been completed and let the user know why he or she cannot submit the page. You could also keep the submit button disabled (i.e., grayed out) until Ajax has done its job. You could also add disabled check boxes beside the fields being validated, which your JavaScript code ticks when the corresponding validation has been done successfully. I favor the minimalist approach: unless you are forced to address the user, you keep quiet. This makes for cleaner pages and simpler coding. In most cases, by the time the user clicks on the submit button, Ajax will have done its job, and the user will remain unaware of what has been going on behind the scene.
If you look at validForm.js (Listing 10-6), you will see that we can use for this purpose the two variables numberOk and expiryOk. All we need to do is set them to a special value while the client is waiting for the server to respond. Then we can extend the check of the two flags in validateForm, so that if necessary we can ask the user to wait.
To avoid confusion, I made a copy of validForm.js, which I then renamed validFormAjax.js. To use it, after copying it to eshopjsp, you will only need to change in Checkout.jsp the script element to load validFormAjax.js instead of validForm.js. During my tests, I also changed the title of Checkout.jsp, from “Check Out (with client validation)” to “Check Out (with server validation),” but it is not necessary for you to do so. To have validation with Ajax working, you will also need to copy to the eshopjsp folder the two files ccNumber.jsp and ccExpiry.jsp, which perform the validation on the server. More about that later.
Listing 10-7 shows validFormAjax.js.
Listing 10-7. validFormAjax.js
var numberOk = "";

var expiryOk = "";


function valNumber(val){

  numberOk = "waiting";

  var ajaxReq;

  try { // Firefox, Opera, IE 9, Chrome

    ajaxReq = new XMLHttpRequest();

    }

  catch (e) { // older IEs

    try{

      ajaxReq = new ActiveXObject("Msxml2.XMLHTTP");

      }

    catch (e) {

      try{ // still older IEs

        ajaxReq = new ActiveXObject("Microsoft.XMLHTTP");

        }

      catch (e) {

        alert("Your browser does not support Ajax!");
        return false;

        }

      }

    }

  ajaxReq.open("GET", "/eshop/jsp/ccNumber.jsp?v="+val);

  ajaxReq.send(null);

  ajaxReq.onreadystatechange = function() {

    if(ajaxReq.readyState == 4) {

      numberOk = ajaxReq.responseText;

      if (numberOk.length > 0) alert(numberOk);

      }

    }

  }


function valExpiry(val){

  expiryOk = "waiting";

  var ajaxReq;

  try { // Firefox, Opera, IE 9, Chrome

    ajaxReq = new XMLHttpRequest();

    }

  catch (e) { // older IEs

    try{

      ajaxReq = new ActiveXObject("Msxml2.XMLHTTP");

      }

    catch (e) {

      try{ // still older IEs

        ajaxReq = new ActiveXObject("Microsoft.XMLHTTP");

        }

      catch (e) {

        alert("Your browser does not support Ajax!");

        return false;

        }

      }

    }

  ajaxReq.open("GET", "/eshop/jsp/ccExpiry.jsp?v="+val);

  ajaxReq.send(null);

  ajaxReq.onreadystatechange = function() {

    if(ajaxReq.readyState == 4) {

      expiryOk = ajaxReq.responseText;

      if (expiryOk.length > 0) alert(expiryOk);

      }

    }

  }


function validateForm() {

  if (numberOk.length > 0) {

    if (numberOk == "waiting") {

      alert(   "Waiting for the server to validate the credit"

             + " card number.
Try again in a second or two."

             );

      }

    else {

      alert(numberOk);

      }

    return false;                                              //-->

    }

  if (expiryOk.length > 0) {

    if (expiryOk == "waiting") {

      alert(   "Waiting for the server to validate the credit"

             + " card expiry date.
Try again in a second or two."

             );

      }

    else {

      alert(expiryOk);

      }

    return false;                                              //-->

    }

  var f = document.getElementById("frm");

  var k = -1;

  for (var i = 1; i < f.length && k < 0; i++) {

    if(f.elements[i].value.length == 0) k = i;

    }

  if (k >= 0) alert("Field " + f.elements[k].name + " empty");

  return (k < 0);

  }
As you can see, the two functions valNumber and valExpiry no longer contain any check of the input fields. Instead, they have become very similar to the function ajaxFun contained in the file ajax.js of Chapter 7 (Listing 7-16).
If you look at the handling of the credit-card number, you will see that numberOk is now initialized to an empty string and set to "waiting" immediately inside the valNumber function. valNumber uses Ajax to execute the JSP page ccNumber.jsp, which accepts the value entered by the user as the input parameter named v. The response received from the server is stored directly into numberOk.
As you will see in a moment, the validating page ccNumber.jsp returns an empty response when the validation is successful, or an error message describing the error.
valExpiry is almost identical to valNumber, and validateForm is pretty self-explanatory.
The two validating JSP pages are shown in Listings 10-8 and 10-9. They contain the Java implementation of the checks that used to be in the JavaScript functions valNumber and valExpiry when they didn’t use Ajax.
Listing 10-8. ccExpiry.jsp
<%@page language="java" contentType="text/html"

  %><%

  String val = request.getParameter("v");

  String res = "";

  if (val != null && val != "") {

    String nnn = "";

    for (int k = 0; k < val.length() && res.length() == 0; k++) {

      char c = val.charAt(k);

      if (c >= '0' && c <= '9') {

        nnn += c;

        }

      else if (c != ' ') {

        res = "Invalid characters in the credit card number";

        }

      }

    if (res.length() == 0 && nnn.length() != 15 && nnn.length() != 16) {

      res = "Credit card numbers can only have 15 or 16 digits";

      }

    }

  out.print(res);

  %>
Listing 10-9. ccNumber.jsp
<%@page language="java" contentType="text/html"

  %><%@page import="java.util.Calendar,java.util.GregorianCalendar"

  %><%

  String val = request.getParameter("v");

  String res = "";

  if (val != null && val != "") {

    String nnn = "";

    for (int k = 0; k < val.length() && res.length() == 0; k++) {

      char c = val.charAt(k);

      if (c != ' ') nnn += c;

      }

    if (nnn.length() != 5 || nnn.charAt(2) != '/') {

      res = "The format of the expiry date must be MM/YY";

      }

    else {

      int month = (nnn.charAt(0) - '0') * 10 + (nnn.charAt(1) - '0'),

      if (month < 1 || month > 12) {
        res = "Invalid expiry month";

        }

      else {

        int year = (nnn.charAt(3) - '0') * 10 + (nnn.charAt(4) - '0'),

        GregorianCalendar now = new GregorianCalendar();

        int thisYear = now.get(Calendar.YEAR) - 2000;

        int thisMonth = now.get(Calendar.MONTH) + 1;

        if (year * 12 + month < thisYear * 12 + thisMonth) {

          res = "The credit card has expired";

          }

        }

      }

    }

  out.print(res);

  %>
Figure 10-9 shows an example of eshop with the validation done on the server.
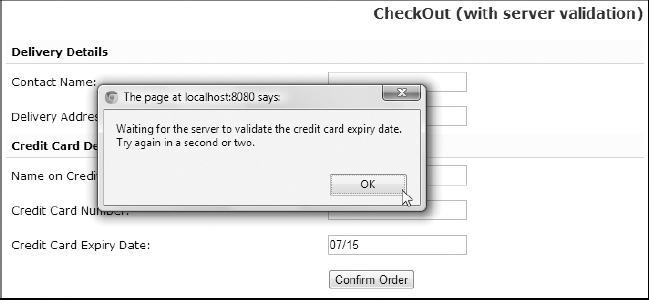
Figure 10-9. Waiting for the server to respond
To see the “waiting” alert, “touch” ccExpiry.jsp (e.g., insert a space anywhere, remove it, and save the file) and then, after typing something in the expiry-date field, click on Confirm Order before doing anything else. The little time needed by Tomcat to recompile the JSP page will be enough to make validFormAjax.js display the alert.
Providing the Payment Details
In this skeleton implementation of eshop, OrderConfirmation.jsp only saves the order in the database. In a real-world situation, it should perform a series of checks, including verifying with a bank that the credit card is valid and not blocked.
All the work to store the order in the database is done in the DataManager method insertOrder, which I’ve already discussed in Chapter 6.
The eshopx Application
After completing eshop, I showed you how to create the eshopx application by replacing the JSP pages with JSP documents (i.e., modules in XML syntax). This required us to move scriptlet code to JSP custom tags.
Listing 10-10 shows the annotated list of files and folders that constitute eshopx.
Listing 10-10. The Eshopx Files
css

    eshop.jspx  (replaces eshop.css)

images  (content unchanged)

jsp  (all pages rewritten as XML documents)

    BookDetails.jspx

    Checkout.jspx

    LeftMenu.jspx

    OrderConfirmation.jspx

    SearchOutcome.jspx

    SelectCatalog.jspx

    ShoppingCart.jspx

    TopMenu.jspx

META-INF  (content unchanged)

WEB-INF

    web.xml  (minor update)

    classes

        eshop  (ShopServlet unchanged)

            beans  (content unchanged)

            model  (content unchanged)

            tags  (new folder)

                AddBookTag.class, AddBookTag.java

                BookDetailsTag.class, BookDetailsTag.java

                BooksInCartTag.class, BooksInCartTag.java

                BooksInCategoryTag.class, BooksInCategoryTag.java

                CategoryNameTag.class, CategoryNameTag.java

                DeleteBookTag.class, DeleteBookTag.java

                InsertOrderTag.class, InsertOrderTag.java

                RoundToCentTag.class, RoundToCentTag.java

                SearchResultsTag.class, SearchResultsTag.java

                UpdateBookTag.class, UpdateBookTag.java

    tlds (new folder)

        eshop.tld
As you can see, I only changed the view part of the application (i.e., the JSP modules), while I didn’t need to touch the controller and the model (i.e., the servlet, the beans, the peer classes, and the data manager). This confirms the advantage of implementing an MVC architecture.
As I already mentioned, the views of eshop and eshopx differ in the implementation but are functionally identical.
Style Sheet
I replaced the shop.css file used in eshop with shop.jspx. Listing 10-11 shows the differences between the two files.
Listing 10-11. shop.jspx
<?xml version="1.0" encoding="UTF-8"?>

<jsp:root

  xmlns:jsp="http://java.sun.com/JSP/Page"

  xmlns:c="http://java.sun.com/jsp/jstl/core"

  version="2.1"

  >

<jsp:directive.page

  language="java"

  contentType="text/css; charset=UTF-8"

  pageEncoding="UTF-8"

  />

<c:url var="imgUrl" value="/images"/>

<jsp:text>

  ----------  shop.css lines 1 - 42  ----------

  background: url(${imgUrl}/bg_header.gif) no-repeat top left;

  ----------  shop.css lines 44 - 82  ----------

  background: url(${imgUrl}/bg_menu.gif) repeat-y top left;

  ----------  shop.css lines 84 - 105  ----------

  background: url(${imgUrl}/menubar.gif) repeat-x bottom left;

  ----------  shop.css lines 107 - 206 (the last one)  ----------

</jsp:text>

</jsp:root>
As you can see, I only wrapped shop.css inside a jsp:text element and changed three lines. If you look at the original lines, it should become clear why I did it:
background: url(/eshop/images/bg_header.gif) no-repeat top left;

background: url(/eshop/images/bg_menu.gif) repeat-y top left;

background: url(/eshop/images/menubar.gif) repeat-x bottom left;
The string "/eshop/images" of shop.css has become "${imgUrl}" in shop.jspx, and if you look at the beginning of shop.jspx, you’ll notice that the variable imgUrl is set as follows:
<c:url var="imgUrl" value="/images"/>
The advantage of doing it with the EL expression is that c:url takes care of adding the application folder (i.e., /eshop) before the relative URL /images. This makes it possible to deploy the application in any folder. You should try to avoid hard-coding paths.
Obviously, you need to change the way in which the style sheet is loaded in the JSP modules. In eshop, with shop.css, you needed to include the following line in the <head> element:
<link rel="stylesheet" href="/eshop/css/eshop.css" type="text/css"/>
In eshopx, with shop.jspx, you need to write the line
<c:url var="cssUrl" value="/css/eshop.jspx"/>
and then include the following line in the <head>:
By doing so, you remove the hard-coded /eshop path from all JSP modules, which is a good thing to do.
web.xml
When moving from eshop to eshopx, I needed to modify in web.xml the definitions of two parameters: base and imageURL. The definition of base changed from /eshop/shop to /shop, because in eshop, I used base as follows:
<a class="link1" href="<%=base%>?action=checkOut">Check Out</a>
while in eshopx, I first define the page attribute myURL as
<c:url value="${base}" var="myURL">

  <c:param name="action" value="checkOut"/>

  </c:url>
and then use the attribute to make the link, as follows:
<a class="link1" href="${myURL}">Check Out</a>
As I said when talking about the style sheet, c:url accepts in the value attribute URLs relative to the application folder and then completes them to make them relative to the server root. Within eshop, you had to include the application folder in base, because you didn’t form the URL with c:url.
The definition of imageURL changed from /eshop/images/ to /images/ because I used imageURL in eshop as follows:
<img src="<%=imageURL%>cart.gif" border="0"/>
while in eshopx, I first define the page attribute imgURL:
<c:url value="${imageURL}" var="imgURL"/>
and then use the attribute in the img element:
<img src="${imgURL}cart.gif" border="0"/>
Thanks to these two changes, I could remove all hard-coded references to the application directory in eshopx.
But these small changes in the handling of the images cause a problem in the welcome page of the application.
Perhaps you will recall that in Chapter 4, when talking about c:url, I mentioned that Tomcat attaches a jsessionid string to a URL before sending it to the client in the response.
Tomcat does it when it opens a new session, to handle clients that don’t accept cookies. When Tomcat receives subsequent requests from the same client and they contain the session cookie, it stops appending the session ID string to the URLs, because it knows that it is unnecessary.
Now, the welcome page (index.jspx) includes TopMenu.jspx, which contains the two lines
<c:url value="${imageURL}" var="imgURL"/>

...

<img src="${imgURL}cart.gif" border="0"/>
to display the image of the shopping cart.
When you view http://localhost:8080/eshopx/shop the first time, Tomcat creates a session and then systematically attaches the jsessionid string to all URLs. This means that the value of the src attribute of the img tag becomes something like this:
"/eshopx/images/;jsessionid=AC559D1E83F5714252E310897A65A3D3cart.gif"
As a result, when the client browser requests the image of the cart, Tomcat cannot find it, and the shopping cart cannot be displayed. At best, with some browsers, you get a “broken image” icon. All subsequent pages, including a reloaded welcome page, unless you disable the cookies in your browser, are OK.
Fortunately, Servlet 3.0 lets you switch off the appending of the session ID. All you need to do is add in the body of web-app the following element:
<session-config>

  <tracking-mode>COOKIE</tracking-mode>

  </session-config>
It tells Tomcat to use the cookie (and nothing else) to track the session. By default, the session-config element contains both the COOKIE and the URL tracking modes.
With this change, everything works fine, although it makes the acceptance of cookies compulsory for the users.
At the time of writing, Eclipse doesn’t recognize the tracking-mode element and reports an error, as shown in Figures 10-10 and 10-11. This doesn’t affect the normal working of the application.

Figure 10-10. Eclipse reports an error in web.xml

Figure 10-11. Eclipse’s description of the web.xml error
JSP Documents
To explain how I converted the JSP pages of eshop (with extension jsp) to the corresponding JSP documents of eshopx (with extension jspx), I’ll go through one example in detail.
Listing 10-12 shows OrderConfirmation.jsp. I choose it because it is one of the simplest modules.
Listing 10-12. OrderConfirmation.jsp
01: <%@page language="java" contentType="text/html"%>

02: <%@page import="java.util.Hashtable"%>

03: <%@page import="eshop.beans.CartItem"%>

04: <jsp:useBean id="dataManager" scope="application"

05:   class="eshop.model.DataManager"/>

06: <html>

07: <head>
08:   <meta http-equiv="Content-Type" content="text/html; charset=UTF-8"/>

09:   <title>Order</title>

10:   <link rel="stylesheet" href="/eshop/css/eshop.css" type="text/css"/>

11:   </head>

12: <body>

13: <jsp:include page="TopMenu.jsp" flush="true"/>

14: <jsp:include page="LeftMenu.jsp" flush="true"/>

15: <div class="content">

16:   <h2>Order</h2>

17:   <jsp:useBean id="customer" class="eshop.beans.Customer"/>

18:   <jsp:setProperty property="*" name="customer"/>

19: <%

20:     @SuppressWarnings("unchecked")

21:     Hashtable<String, CartItem> cart =

22:         (Hashtable<String, CartItem>)session.getAttribute("shoppingCart");

23:     long orderId = dataManager.insertOrder(customer, cart);

24:     if (orderId > 0L) {

25:       session.invalidate();

26:   %>

27:       <p class="info">

28:         Thank you for your purchase.<br/>

29:         Your Order Number is: <%=orderId%>

30:         </p>

31: <%

32:       }

33:     else {

34:       %><p class="error">Unexpected error processing the order!</p><%

35:       }

36:   %>

37:   </div>

38: </body>

39: </html>
When converting to the XML syntax, you first need to replace the first 11 lines of the JSP page with those shown in Listing 10-13.
Listing 10-13. Top Portion of OrderConfirmation.jspx
01: <?xml version="1.0" encoding="UTF-8"?>

02: <jsp:root

03:   xmlns:jsp="http://java.sun.com/JSP/Page"

04:   xmlns:c="http://java.sun.com/jsp/jstl/core"

05:   xmlns:eshop="urn:jsptld:/WEB-INF/tlds/eshop.tld"

06:   version="2.1"

07:   >

08: <jsp:directive.page

09:   language="java"

10:   contentType="application/xhtml+xml;charset=UTF-8"

11:   />

12: <jsp:output omit-xml-declaration="false"/>

13: <jsp:output

14:   doctype-root-element="html"
15:   doctype-public="-//W3C//DTD XHTML 1.0 Strict//EN"

16:   doctype-system="http://www.w3.org/TR/xhtml1/DTD/xhtml1-strict.dtd"

17:   />

18: <c:url var="cssUrl" value="/css/eshop.jspx"/>

19: <html xmlns="http://www.w3.org/1999/xhtml">

20: <head>

21:   <title>Order</title>

22:   <link rel="stylesheet" href="${cssUrl}" type="text/css"/>

23:   </head>
In XML format, you no longer need to declare the Java classes, but you need to declare the namespaces of JSP, the JSTL core, and the custom library. The page directive becomes a jsp:directive.page element. Also, notice that the style sheet is loaded as I explained in a previous section.
Lines 12–18 of OrderConfirmation.jsp remain practically the same, the only difference being that now the two modules have the extension jspx. The last three lines (37–39) also remain the same. You only have to append the end tag of jsp:root.
The major changes take place in lines 19–36. They are replaced by the code shown in Listing 10-14.
Listing 10-14. Central Portion of OrderConfirmation.jspx
31: <eshop:insertOrder var="orderID" customer="${customer}"/>

32: <c:choose>

33:   <c:when test="${orderID > 0}">

34:     <p class="info">

35:       Thank you for your purchase.<br/>

36:       Your Order Number is: <c:out value="${orderID}"/>

37:       </p>

38:     </c:when>

39:   <c:otherwise>

40:     <p class="error">Unexpected error processing the order!</p>

41:     </c:otherwise>

42:   </c:choose>
Line 31 of OrderConfirmation.jspx is the XML equivalent of lines 20–25 plus line 32 of OrderConfirmation.jsp. Notice that in eshop, the order ID is returned by the insertOrder method and stored in the scripting variable orderID, while in eshopx, the order ID is stored into the EL variable orderID directly by the custom tag eshop:insertOrder.
The if/else of lines 24 and 33 in the JSP code is replaced in the JSPX code by the elements c:choose/c:when/c:otherwise of lines 32–33 and 39. As I said on other occasions, you cannot use c:if because a c:else doesn’t exist.
To complete the picture, let’s look at Listing 10-15, which shows the doEndTag method of InsertOrderTag.java.
Listing 10-15. InsertOrderTag.java—doEndTag Method
  public int doEndTag() {

    ServletContext context = pageContext.getServletContext();

    DataManager dataManager =(DataManager)context.getAttribute("dataManager");

    HttpSession session = pageContext.getSession();

    @SuppressWarnings("unchecked")

    Hashtable<String, CartItem> cart =
        (Hashtable<String, CartItem>)session.getAttribute("shoppingCart");

    long orderID = dataManager.insertOrder(customer, cart);

    if (orderID > 0L) session.invalidate();

    pageContext.setAttribute(var, new Long(orderID).toString());

    return EVAL_PAGE;

    }
Not surprisingly, here you find (highlighted in bold) the code originally in lines 20–25 of OrderConfirmation.jsp that executes the dataManager method insertOrder and terminates the user session if the insertion succeeds.
On the basis of this example, you should now be able to figure out how to convert the other modules. In the next section, you’ll find additional information concerning the eshop custom tag library.
Custom Tags and TLD
EL expressions can include bean properties. This means that they can invoke “getter” methods. What they cannot do is invoke methods that require input parameters. You can work around that difficulty by setting an attribute with c:set and picking it up in a bean method.
For example, in SelectCatalog.jspx, the request parameter id specifies a book category, and you need to know the category name. This operation requires a database search, which you can implement with the following custom tag:
<eshop:categoryName var="cat" catID="${param.id}"/>
It accepts the ID as an input and sets the variable cat to the category name. The doEndTag method of CategoryNameTag.java is simple:
public int doEndTag() {

  ServletContext context = pageContext.getServletContext();

  DataManager dataManager =(DataManager)context.getAttribute("dataManager");

  pageContext.setAttribute(var, dataManager.getCategoryName(catID));

  return EVAL_PAGE;

  }
The getCategoryName method of the data manager (invoked exclusively by the doEntTag method of CategoryNameTag.java) is even simpler:
public String getCategoryName(String categoryID) {

  Category category = CategoryPeer.getCategoryById(this, categoryID);

  return (category == null) ? null : category.getName();

  }
Instead of defining the custom tag, you could add the categoryID property to the data manager
private String categoryID = "0";

public void setCategoryID(String categoryID) {

  this.categoryID = categoryID;

  }
and remove its input parameter from the getCategoryName method.
Then, in SelectCatalog.jspx, you could replace the eshop:categoryName element with jsp:setProperty to set the categoryID in the data manager and c:setVar to invoke the getCategoryName method:
<jsp:setProperty name="dataManager" property="categoryID"

    value="${param.id}"/>

<c:set var="cat" value="${dataManager.categoryName}"/>
The result would be the same. I didn’t do it in that way because it makes the code less “transparent,” but it is ultimately a matter of taste. I just want to make the point that you can replace the input parameters of bean methods by setting bean properties with jsp:setProperty. Then, you only need to name the getter methods appropriately (e.g., getWhatever), and you’ll be able to execute them with an expression such as ${myBean.whatever}.
In any case, I introduced a total of ten tags, as listed in Table 10-2.
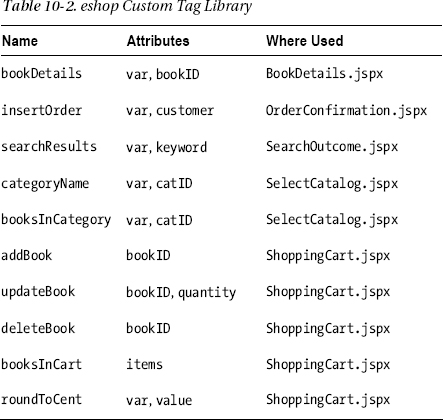
Listing 10-16 shows an example of a TLD tag element.
Listing 10-16. A TLD Tag element
<tag>

  <description>Insert an order into storage</description>

  <display-name>insertOrder</display-name>

  <name>insertOrder</name>

  <tag-class>eshop.tags.InsertOrderTag</tag-class>

  <body-content>empty</body-content>

  <attribute>

    <name>var</name>

    <type>java.lang.String</type>

    <rtexprvalue>true</rtexprvalue>
    </attribute>

  <attribute>

    <name>customer</name>

    <type>eshop.beans.Customer</type>

    <rtexprvalue>true</rtexprvalue>

    </attribute>

  </tag>
The eshopf Application
Although I used eshopx as a basis for the JSF version of the application, its architecture is quite different from that of the first two versions. This is partly due to the fact that I had to replace ShopServlet with the standard FacesServlet class. In the process, I also removed the custom tags I had introduced in eshopx. In this section, I’ll refer to the eshopf application as described in Chapter 8 after the addition of a custom converter, a custom validator, and a custom component with a separate renderer.
Listing 10-17 shows the annotated list of files and folders that constitute eshopf. The folders marked “= eshopx” have the same content as the corresponding folders of eshopx (not of the original eshop); the modules marked “rewritten” are completely different from the previous versions; and those marked “~ eshop” are those obtained by updating the corresponding modules in eshop.
Listing 10-17. The Eshopf Files
css

    eshopf.jspx  (updated version of eshop.jspx)

images  (content = eshopx)

jsp

    BookDetails.jspx  (~ eshop)

    Checkout.jspx  (~ eshop)

    LeftMenu.jspx  (~ eshop)

    ListBooks.jspx  (update of SelectCatalog.jspx + SearchOutcome.jspx)

    OrderConfirmation.jspx  (~ eshop)

    ShoppingCart.jspx  (~ eshop)

    TopMenu.jspx  (~ eshop)

META-INF

    MANIFEST.MF  (= eshopx)

    context.xml  (new file)

WEB-INF

    faces-config.xml  (new file)

    web.xml  (rewritten)

    classes

        eshop  (ShopServlet removed)

            beans

               Book.class, Book.java  (= eshopx)

               CartItem.class, CartItem.java  (~ eshop)

               Category.class, Category.java  (= eshopx)

               Customer.class, Customer.java  (= eshopx)

               ShopManager.class, ShopManager.java  (new file)

            components  (new folder)

               InputEntryComponent.class, InputEntryComponent.java

            converters  (new folder)

               CCNumberConverter.class, CCNumberConverter.java
            model

               BookPeer.class, BookPeer.java  (= eshopx)

               CategoryPeer.class, CategoryPeer.java  (~ eshop)

               DataManager.class, DataManager.java  (~ eshop)

               OrderDetailsPeer.class, OrderDetailsPeer.java  (= eshopx)

               OrderPeer.class, OrderPeer.java  (= eshopx)

               shop.sql  (= eshopx)

            renderers  (new folder)

               InputEntryRenderer.class, InputEntryRenderer.java

            tags  (removed all the custom tags of eshopx)

               InputEntryTag.class, InputEntryTag.java  (new file)

            validators  (new folder)

               CCExpiryValidator.class, CCExpiryValidator.java

   tlds

       eshop.tld  (rewritten)
In fact, I described almost everything in Chapter 8. In this chapter, I’ll systematically go through the changes I made to eshopx to transform it into eshopf.
web.xml and context.xml
In eshopx, I defined ShopServlet.java to implement the controller part of the MVC architecture. In eshopf, this function is performed by the standard FacesServlet. As a result, I had to rewrite most of web.xml. In particular, I replaced the servlet element used in the web.xml version of eshopx
<display-name>ShopServlet</display-name>

<servlet-name>ShopServlet</servlet-name>

<servlet-class>eshop.ShopServlet</servlet-class>
with this:
<servlet-name>Faces Servlet</servlet-name>

<servlet-class>javax.faces.webapp.FacesServlet</servlet-class>

<load-on-startup>1</load-on-startup>
I also changed the body of servlet-mapping from this:
<servlet-name>ShopServlet</servlet-name>

<url-pattern>/shop/*</url-pattern>
to this:
<servlet-name>Faces Servlet</servlet-name>

<url-pattern>*.jsf</url-pattern>
In eshopx, to access the database containing books, book categories, and orders, I defined the initialization parameters jdbcDriver, dbURL, dbUserName, and dbPassword. They were used in ShopServlet to set up an object of type DataManager, which implemented the model part of the MVC architecture and interfaced to the database. The replacement of ShopServlet with FacesServlet forced me to implement a different mechanism in eshopf for passing the database parameters to the data manager.
I defined the database as a resource external to the application by creating the context.xml file in the META-INF folder with the following content:
<Context debug="5" reloadable="true" crossContext="true">

  <Resource

      name="jdbc/mysql"

      auth="Container"

      type="javax.sql.DataSource"

      username="root"

      password=""

      driverClassName="com.mysql.jdbc.Driver"

      url="jdbc:mysql://localhost:3306/shop"

      maxActive="8"

      maxIdle="4"

      />

  <Valve

      className="org.apache.catalina.valves.AccessLogValve"

      directory="logs"

      prefix="eshopf-access."

      suffix=".log"

      pattern="common"

      resolveHosts="false"

      />

  </Context>
I then registered the resource in the web.xml file as follows:
<resource-ref>

  <res-ref-name>jdbc/mysql</res-ref-name>

  <res-type>javax.sql.DataSource</res-type>

  <res-auth>Container</res-auth>

  </resource-ref>
Note that with this mechanism, you effectively pool the connections to the database, thereby achieving a more efficient use of resources. I leave up to you to retrofit eshopx with this mechanism. To complete the conversion from eshopx to eshopf, I also removed the definition of the initialization parameters base and imageURL from web.xml, because they were no longer needed, and I added the element to direct Tomcat to perform the basic authentication needed to access the database resource. Listing 8-8 shows the full web.xml file of eshopf.
Style Sheet
CSS lets you define new styles by adding attributes to already defined styles. This “cascading” mechanism is a form of inheritance, and therefore it requires an underlying hierarchical structure. CSS uses the structure provided by HTML documents instead of creating its own. This is fine as long as you write the HTML code yourself or generate it with JSP. When you use JSF, though, the control you have on the generated HTML is reduced. As a result, you have to pay greater attention when designing the style sheets.
When converting eshopx to eshopf, I encountered this issue in several places and had to modify the style-sheet file accordingly.
For example, in eshopxcsseshop.jspx, I first defined .box (lines 130–133)
and then extended it to define .box p (lines 134–139)
.box p {

  font-size: 12px;

  padding: .2em 1em .2em 1em;

  margin: 0px;

  border: 0px;

  }
I know, I didn’t need to repeat margin:0px, but these things happen when you cut and paste!
In any case, LeftMenu.jspx uses the two styles as follows:
<div class="box">

  ...

  <p>Book Title/Author:</p>

  ...

  </div>
In eshopf, I replaced the HTML p element with a h:outputText component, which generates an HTML span element, not a p. Therefore, if I had left the style sheet unchanged, the .box p style wouldn’t have had any effect, and the search box would have been rendered as shown in Figure 10-12.
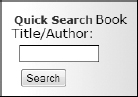
Figure 10-12. Wrong style in the search box
Not nice.
To resolve the issue, I defined in eshopfcsseshopf.jspx the new style .box_p as follows (lines 153–159):
.box_p {

  font-size: 12px;

  padding: .2em 1em .2em 1em;

  margin: 0px;

  border: 0px;

  display: block;

  }
By writing in eshopfjspLeftMenu.jspx the code
<h:panelGroup styleClass="box">

  ...

  <h:outputText styleClass="box_p" value="Book Title/Author:"/>

  ...

  </h:panelGroup>
I could generate the following HTML output:
<span class="box">

  ...

  <span class="box_p">Book Title/Author:</span>

  </span>

and this resulted in the correct formatting of the search box, as shown in Figure 10-13.
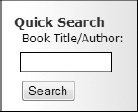
Figure 10-13. Correctly styled search box
In case you are wondering, the effect of display:block is to insert a new line before and after and take up the full width available. You will find that I applied it a few times in the style sheet for eshopf to ensure that the generated page looked as similar as possible to the corresponding page of eshopx (and eshop).
As a last remark about styles, I would like to point out that I could have “salvaged” the inheritance from h:panelGroup to h:outputText by renaming the .box p style of eshopx.jspx to .box .p, and then writing the h:outputText component as follows:
<h:outputText styleClass="p" value="Book Title/Author:"/>
This would have worked because the span element it generates is enclosed inside the span element generated by h:panelGroup. I would have still needed to add the display:block style, however. There are often several ways to achieve the same result, and sometimes it is just a matter of what comes to mind first.
This issue concerning style sheets is a disadvantage of using JSF, but it becomes less and less important as you become familiar with the HTML code that JSF generates. Furthermore, you’ll normally start developing directly with JSF. When converting eshopx into eshopf, I was dealing with an existing user interface that I wanted to alter as little as possible.
JSP Documents
I had to modify all JSP documents. This shouldn’t be a surprise, considering that the JSP documents generate the HTML pages that the user sees in his or her web browser. In Chapter 8, I described all the JSF components you need for eshopf. Therefore, it wouldn’t make much sense to do it again here. In this section, I’ll only tell you how JSF allows you to merge two separate JSP documents of eshopx (SelectCatalog.jspx and SearchOutcome.jspx) into a single document of eshopf (ListBooks.jspx).
The two modules were already very similar in eshopx. Without considering page titles, text headers, and error messages, the differences boiled down to less than a handful of lines. In SearchOutcome.jspx, I was using the custom tag eshop:searchResults, while in SelectCatalog.jspx, I was first obtaining the category name with eshop:categoryName and then the list of books with eshop:booksInCategory.
After converting the two modules to use JSF, the list of books in both cases was obtained from a property of shopManager: when the user performed a search via the search field of LeftMenu.jspx, the method that filled in the list of books in shopManager was searchBooks, and when the user selected a category, the method was selectCategory.
The only difference left between the two modules was in a couple of messages. To make the merging possible, I added the categoryName property to shopManager and reset it to null within the searchBooks method. In this way, I could use the name of the category as a flag, because it would be null after a search and non-null after a category selection.
Perhaps I could have also merged the JSP documents in eshopx, but it would have required some “awkward” coding, while it works out quite naturally with JSF.
Java Modules
One major change I made was to replace the custom tags defined in eshopx with the eshop.beans.ShopManager class. I did this to take advantage of JSF.
For example, to update the number of copies of a book in eshopx, you use the custom tag UpdateBook. Listing 10-18 shows the code to implement the tag.
Listing 10-18. Eshopx—UpdateBookTag.java
package eshop.tags;


import java.util.Hashtable;

import javax.servlet.jsp.tagext.TagSupport;

import javax.servlet.http.HttpSession;

import eshop.beans.CartItem;


public class UpdateBookTag extends TagSupport {

  static final long serialVersionUID = 1L;

  private String bookID;

  private String quantity;


  public void setBookID(String bookID) {

    this.bookID = bookID;

    }


  public void setQuantity(String quantity) {

    this.quantity = quantity;

    }


  public int doEndTag() {

    HttpSession session = pageContext.getSession();

    @SuppressWarnings("unchecked")

    Hashtable<String, CartItem> shoppingCart =

        (Hashtable<String, CartItem>)session.getAttribute("shoppingCart");

    CartItem item = (CartItem)shoppingCart.get(bookID);

    if (item != null) {

      item.setQuantity(quantity);

      }

    return EVAL_PAGE;

    }

  }
In eshopf, the following JSF component of ShoppingCart.jspx takes care of updating the number of copies:
<h:inputText id="quantity" value="#{item.quantity}" size="2"

    required="true"

    requiredMessage="What? Nothing?"

    converterMessage="An integer, please!"

    validatorMessage="At least one copy!"

    >

  <f:validateLongRange minimum="1"/>

  </h:inputText>
As a result, when you trigger an update by pressing the corresponding button
<h:commandButton action="#{shopManager.updateItem}" value="Update"/>
there’s nothing left for the updateItem method of the shop manager to do:
public String updateItem() {

  return null;

}
Another example is the RoundToCent tag, which rounds amounts in dollars to two decimal places in eshopx. This is necessary because sometimes the result of multiplying the price of a book by the ordered quantity results in a sequence of '9's after the decimal point. Here is an example of its usage taken from ShoppingCart.jspx:
<eshop:roundToCent var="itemPrice" value="${item.quantity * item.price}"/>
In eshopf, I introduced the subtotal attribute to the CartItem bean and added the functionality to recalculate it and round it to two decimals after every shopping cart update. This is the only update I made to the four eshop.beans modules.
Of the eshop.model modules, I only needed to modify CategoryPeer.java and DataManager.java. In CategoryPeer.java, I changed the getAllCategories method to return a list of categories instead of an object of type java.util.Hashtable. I then changed the getCategories methods in DataManager.java and ShopManager.java accordingly. This allowed me to display the list of categories in LeftMenu.jspx with the following JSF element without having to do any type conversion:
<h:dataTable value="#{shopManager.categories}" var="category">
In DataManager, besides the change to the getCategories method that I’ve already discussed and the removal of the getCatIDs method that was no longer needed, I only updated the algorithm used in the getConnection method to open a database connection. This was necessary because I had replaced the database initialization parameters of eshopx with a JNDI resource.
In eshopx, DataManager opened a database connection by invoking the static getConnection method of the java.sql.DriverManager class:
conn = DriverManager.getConnection(getDbURL(), getDbUserName(), getDbPassword());
The dbURL, dbUserName, and dbPassword attributes were set by ShopServlet using the servlet initialization parameters. In eshopf, the code to obtain a database connection is as follows:
Context ctx = new InitialContext();

if (ctx != null){

  Context envContext  = (Context)ctx.lookup("java:/comp/env");

  if (envContext != null) {

    DataSource ds = (DataSource)envContext.lookup("jdbc/mysql");

    if (ds != null) {

      conn = ds.getConnection();
      }

    }

  }
Finally, I added Java modules to implement a custom JSF component, a converter, a renderer, and a validator. Please refer to the corresponding sections of Chapter 8 for their description.
Summary
In this chapter, I completed the description of the various versions of the online bookshop example and explained what I had to do in order to convert standard JSP syntax to XML syntax and then to use JSF.
This chapter completes the main body of the book. After the first introductory chapter, I took you through five chapters about JSP, application architectures, JSP actions, XML, and databases, followed by two chapters about JSF and one about Tomcat.
Next, two appendixes will help you in two areas that, although not part of the core technologies explained in this book, are essential to develop web applications. Appendix A will talk about HTML and its associated technologies, like JavaScript and CSS, while Appendix B will provide a quick reference of SQL. The third appendix will list all the abbreviations you have encountered in the book.
What more is there to say?
I hope that you’ll find this book useful. Perhaps, in a few areas I could have gone a bit deeper or provided additional examples, but a lot of ground had to be covered in a limited space.
I wish you all the best. Happy programming!