Expert Section: Using the Runtime APIs
In Chapters 7 and 8, you learned about the dynamic features of Objective-C and the design and architecture of the runtime system that implements these features. In this Expert Section chapter, you are going to finish Part 2 of this book with several example programs that will enable you to get more hands-on experience with the runtime system features and its APIs. You’ll create a dynamic proxy using the NSInvocation API, perform dynamic loading of your own custom framework bundle using the NSBundle API, and create a program that makes extensive use of the runtime library APIs. Believe me, after this chapter is done, you’ll be well on your way to mastering the intricacies of the Objective-C runtime system!
Extending a Program with Loadable Bundles
Objective-C provides numerous dynamic programming features. These features increase the power and flexibility of the language, and enable you to modify a program during execution. In Chapter 7, you discussed dynamic loading and briefly described how the Foundation Framework NSBundle class can be used to manage bundles. Now you are going to create a program that utilizes these features to extend a running program using a loadable bundle.
Approach
For this example, you’ll actually develop two projects. In one project, you’ll code the program that uses a loadable bundle, and in the other project, you’ll create the loadable bundle. You’ll proceed as follows:
- In Project 1, develop a protocol and a class that conforms to this protocol.
- In Project 2, develop a loadable bundle comprised of a different class conforming to this protocol.
- In Project 1, use the NSBundle class to find and load this bundle, create an object from a class in the bundle (developed in step 2), and then invoke a method on this object.
Sounds like fun, right? OK, let’s get started!
In Xcode, create a new project by selecting New ![]() Project … from the Xcode File menu. In the New Project Assistant pane, create a command-line application. In the Project Options window, specify DynaLoader for the Product Name, choose Foundation for the Project Type, and select ARC memory management by selecting the Use Automatic Reference Counting check box. Specify the location in your file system where you want the project to be created (if necessary, select New Folder and enter the name and location for the folder), uncheck the Source Control check box, and then click the Create button.
Project … from the Xcode File menu. In the New Project Assistant pane, create a command-line application. In the Project Options window, specify DynaLoader for the Product Name, choose Foundation for the Project Type, and select ARC memory management by selecting the Use Automatic Reference Counting check box. Specify the location in your file system where you want the project to be created (if necessary, select New Folder and enter the name and location for the folder), uncheck the Source Control check box, and then click the Create button.
Now you’re going to create a protocol and a class that conforms to the protocol. You probably recall from Chapter 2 that a protocol declares methods and properties that can be implemented by any class. Combined with dynamic typing, this provides an idea mechanism for specifying a set of methods implemented by a class that is dynamically loaded from a bundle. Select New ![]() File … from the Xcode File menu, select the Objective-C protocol template, name the protocol Greeter, select the DynaLoader folder for the files location and the DynaLoader project as the target, and then click the Create button. A header file named Greeter.h has been added to the Xcode project navigator pane. Click this file to display the Greeter protocol (see Listing 9-1).
File … from the Xcode File menu, select the Objective-C protocol template, name the protocol Greeter, select the DynaLoader folder for the files location and the DynaLoader project as the target, and then click the Create button. A header file named Greeter.h has been added to the Xcode project navigator pane. Click this file to display the Greeter protocol (see Listing 9-1).
Listing 9-1. Greeter Protocol Template File
#import <Foundation/Foundation.h>

@protocol Greeter <NSObject>

@end
In the editor pane, update the Greeter.h file as shown in Listing 9-2.
Listing 9-2. Greeter Protocol Updates
#import <Foundation/Foundation.h>

@protocol Greeter <NSObject>

- (NSString *) greeting:(NSString *)salutation;

@end
This protocol declares a method named greeting that takes an NSString pointer as its parameter and returns an NSString pointer. Now let’s implement a class that conforms to the Greeter protocol. Select New ![]() File … from the Xcode File menu, select the Objective-C class template, name the class BasicGreeter (select NSObject in the Subclass of drop-down list), select the DynaLoader folder for the files location and the DynaLoader project as the target, and then click the Create button. Next, in the Xcode project navigator pane, select the resulting header file named BasicGreeter.h and update the interface as shown in Listing 9-3.
File … from the Xcode File menu, select the Objective-C class template, name the class BasicGreeter (select NSObject in the Subclass of drop-down list), select the DynaLoader folder for the files location and the DynaLoader project as the target, and then click the Create button. Next, in the Xcode project navigator pane, select the resulting header file named BasicGreeter.h and update the interface as shown in Listing 9-3.
Listing 9-3. BasicGreeter Interface
#import <Foundation/Foundation.h>
#import "Greeter.h"

@interface BasicGreeter : NSObject <Greeter>

@end
The template BasicGreeter interface has been updated to adopt the Greeter protocol; now select the BasicGreeter.m file and update the implementation as shown in Listing 9-4.
Listing 9-4. BasicGreeter Implementation
#import "BasicGreeter.h"

@implementation BasicGreeter

- (NSString *) greeting:(NSString *)salutation
{
  return [NSString stringWithFormat:@"%@, World!", salutation];
}

@end
The BasicGreeter implementation defines the greeting: method (and thus conforms to the Greeter protocol), returning a text string that begins with the method’s input parameter. Now let’s test this class. Select the main.m file and update the main() function, as shown in Listing 9-5.
Listing 9-5. BasicGreeter main() Function
#import <Foundation/Foundation.h>
#import "BasicGreeter.h"

int main(int argc, const char * argv[])
{
  @autoreleasepool
  {
    id<Greeter> greeter = [[BasicGreeter alloc] init];
    NSLog(@"%@", [greeter greeting:@"Hello"]);
  }
  return 0;
}
First, the function creates a BasicGreeter object and assigns it to a variable named greeter. This variable is declared to be of type id and conforms to the Greeter protocol. It then invokes the greeting: method on the object, and logs the result in the output pane. By declaring the variable as
id<Greeter> greeter
it can be assigned to any Objective-C object that conforms to the Greeter protocol. If you compile and run the program now, the output pane displays “Hello, World!” (see Figure 9-1).
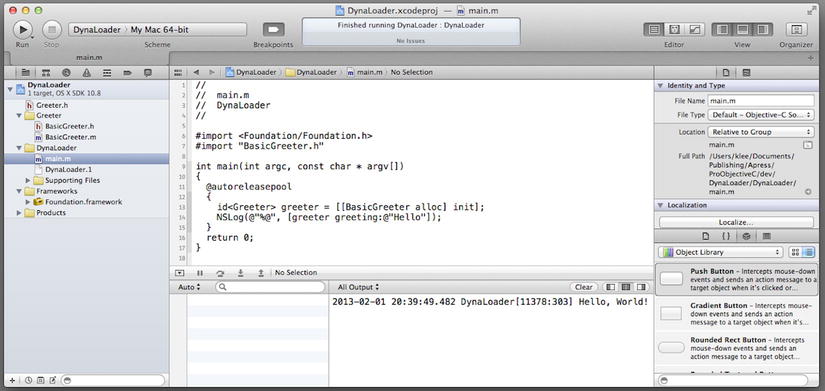
Figure 9-1. DynaLoader program output
Great! You have completed step 1. Now you will create another class that conforms to the Greeter protocol, this time packaged in a loadable bundle.
Step 2: Creating a Loadable Bundle
Xcode makes it easy to create a loadable bundle. It’s simply another type of project. First, create a new project by selecting New ![]() Project … from the Xcode File menu. In the New Project Assistant pane under OS X, select Framework & Library, and then select Bundle (see Figure 9-2).
Project … from the Xcode File menu. In the New Project Assistant pane under OS X, select Framework & Library, and then select Bundle (see Figure 9-2).
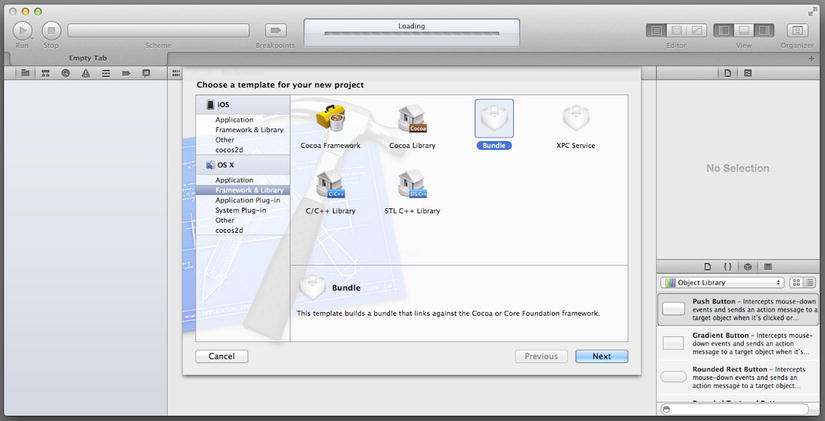
Figure 9-2. Xcode New Project Assistant, selecting a Bundle project template
Next, in the Project Options window, specify CustomGreeter for the Product Name, an Organization Name (optional value), and a Company Identifier (the default value is fine, but any name will suffice). Select Cocoa for the Framework the bundle will link against, and select ARC memory management by checking the Use Automatic Reference Counting check box. Specify the location in your file system where you want the project to be created (if necessary, select New Folder and enter the name and location for the folder), uncheck the Source Control check box, do not add to any project or workspace, and then click the Create button. The workspace window shown in Figure 9-3 is displayed.

Figure 9-3. CustomGreeter bundle template
Cool. Xcode created an empty bundle. In the project navigator pane under the Products group, notice the CustomGreeter.bundle file. This is the bundle to which you’ll add your code and resources. Also note the CustomGreeter-Info.plist file. It is a required file that contains information about the bundle’s configuration. Now let’s add a class to this bundle that implements the Greeter protocol. First, you need to include the Greeter.h header file in the bundle. Fortunately, Xcode provides a simple mechanism for importing files into a project. Hold down the Ctrl key and (from the Xcode project navigator pane) select the CustomGreeter project. A drop-down window then displays a set of options. Select the Add Files to “CustomGreeter” … option (see Figure 9-4).
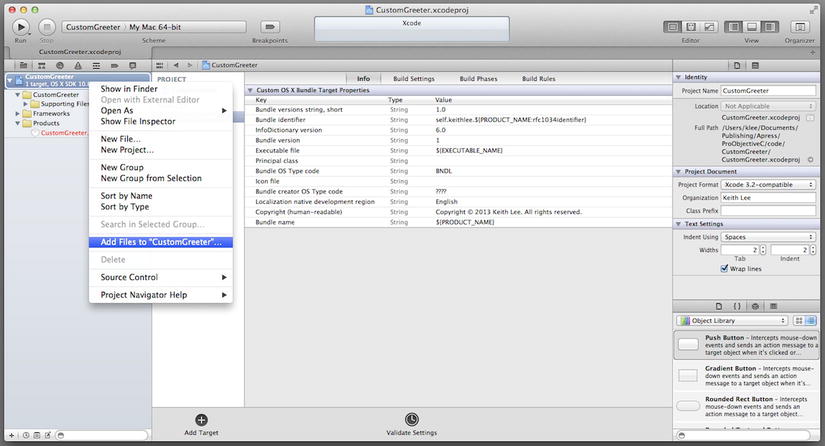
Figure 9-4. Adding files to CustomGreeter option
The Greeter.h file is located under the DynaLoader project folder that you created in step 1. Navigate to this project folder, select the file, and click the Add button (see Figure 9-5) to add it to the CustomGreeter bundle.
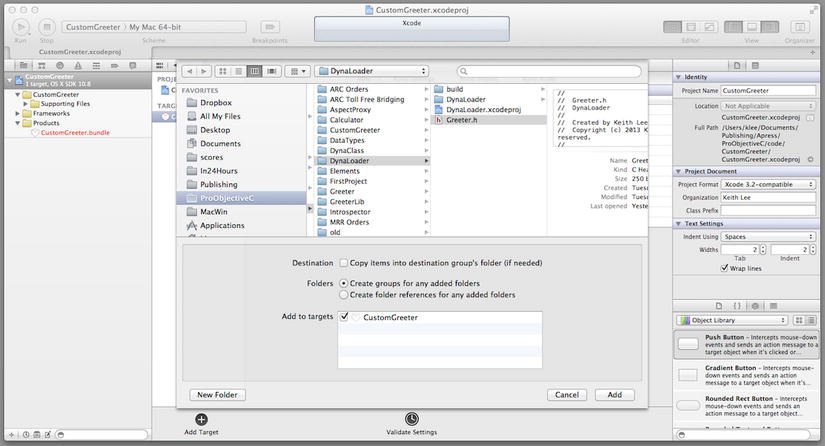
Figure 9-5. Adding the Greeter.h file to the CustomGreeter bundle
Now add a new class to the bundle that conforms to this protocol. Select New ![]() File … from the Xcode File menu, select the Objective-C class template, name the class CustomGreeter (select NSObject in the Subclass of drop-down list), select the CustomGreeter folder for the files location and the CustomGreeter project as the target, and then click the Create button. In the Xcode project navigator pane, select the resulting header file named CustomGreeter.h and update the interface, as shown in Listing 9-6.
File … from the Xcode File menu, select the Objective-C class template, name the class CustomGreeter (select NSObject in the Subclass of drop-down list), select the CustomGreeter folder for the files location and the CustomGreeter project as the target, and then click the Create button. In the Xcode project navigator pane, select the resulting header file named CustomGreeter.h and update the interface, as shown in Listing 9-6.
Listing 9-6. CustomGreeter Interface
#import <Foundation/Foundation.h>
#import "Greeter.h"

@interface CustomGreeter : NSObject <Greeter>

@end
As with the BasicGreeter class, the template CustomGreeter interface has been updated to adopt the Greeter protocol. Now select the CustomGreeter.m file and update the implementation as shown in Listing 9-7.
Listing 9-7. CustomGreeter Implementation
#import "CustomGreeter.h"

@implementation CustomGreeter

- (NSString *) greeting:(NSString *)salutation
{
  return [NSString stringWithFormat:@"%@, Universe!", salutation];
}

@end
The CustomGreeter implementation defines the greeting: method (and thus conforms to the Greeter protocol), returning a text string that begins with the method’s input parameter. Now compile the bundle by selecting Build from the Xcode Product menu. And that’s it—you’ve created a loadable bundle that includes a class (CustomGreeter) that conforms to the Greeter protocol. In the Xcode project navigator pane, note the CustomGreeter.bundle file in the Products group. Select this bundle file and note in the Xcode file inspector (on the right side of the Xcode workspace window) the full path shown in Figure 9-6. This indicates the path to the CustomGreeter.bundle file that you’ll need when you load the bundle using the NSBundle class.
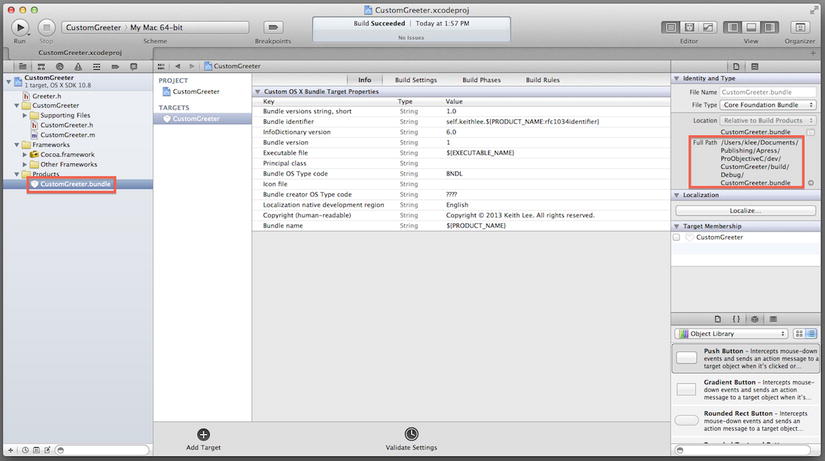
Figure 9-6. CustomGreeter.bundle full path
Step 3: Dynamically Loading the Bundle
Now that you have created a loadable bundle, let’s use it to dynamically create an object (from a bundle class) and invoke a method on it. In Xcode, return to the DynaLoader project, select the main.m file in the project navigator pane, and update the main() function as shown in Listing 9-8.
Listing 9-8. Using NSBundle to Load a Bundle
#import <Foundation/Foundation.h>
#import "BasicGreeter.h"

int main(int argc, const char * argv[])
{
  @autoreleasepool
  {
    id<Greeter> greeter = [[BasicGreeter alloc] init];
    NSLog(@"%@", [greeter greeting:@"Hello"]);

    // Now create a bundle at the specified path (retrieved from input argument)
    NSString *bundlePath;
    if (argc != 2)
    {
      // No bundle path provided, exit
      NSLog(@"Please provide a path for the bundle");
    }
    else
    {
      bundlePath = [NSString stringWithUTF8String:argv[1]];
      NSBundle *greeterBundle = [NSBundle bundleWithPath:bundlePath];
      if (greeterBundle == nil)
      {
        NSLog(@"Bundle not found at path");
      }
      else
      {
        // Dynamically load bundle
        NSError *error;
        BOOL isLoaded = [greeterBundle loadAndReturnError:&error];
        if (!isLoaded)
        {
          NSLog(@"Error = %@", [error localizedDescription]);
        }
        else
        {
          // Bundle loaded, create an object using bundle and send it a message
          Class greeterClass = [greeterBundle classNamed:@"CustomGreeter"];
          greeter = [[greeterClass alloc] init];
          NSLog(@"%@", [greeter greeting:@"Hello"]);

          // Done with dynamically loaded bundle, now unload it
          // First release any objects whose class is defined in the bundle!
          greeter = nil;
          BOOL isUnloaded = [greeterBundle unload];
          if (!isUnloaded)
          {
            NSLog(@"Couldn't unload bundle");
          }
        }
      }
    }
  }
  return 0;
}
I know, you added a lot of code here, but don’t worry. You’ll take this one step at a time. Functionally, the updates implement the following logic:
- Retrieve the bundle path argument
- Create an NSBundle object
- Load the bundle
- Get a bundle class
- Unload the bundle
- Set the bundle path argument
Let’s discuss the code for each of these in turn.
Retrieving the Bundle Path Argument
As you’ve probably observed by now, an Objective-C main() function specifies two parameters: argc and argv. These parameters enable you to pass arguments to the program on execution.
int main(int argc, const char * argv[])
The parameter argc is the number of arguments to the program, and the space-separated argument values are stored in the argv array. The first argument in the argv array (argv[0]) is the name of the program executable, thus the value of the argc parameter is always one or more. Consider, for example, that the DynaLoader program was executed from the command line as follows:
> DynaLoader /CustomGreeter.bundle
The main() function variable argc would have a value of 2 and the argv array would have two elements: the value of the first would be DynaLoader and the second would be /CustomGreeter.bundle. The main() function has been updated to require that the bundle path be provided as an input argument to the program. The following code from Listing 9-8 verifies that the program has the correct number of arguments and then creates the path.
NSString *bundlePath;
if (argc != 2)
{
  // No bundle path provided, exit
  NSLog(@"Please provide a path for the bundle");
}
else
{
  bundlePath = [NSString stringWithUTF8String:argv[1]];
The conditional logic (if (argc != 2)) checks to make sure that the argc count is two (one for the program name and one for the bundle path). If the count is not equal to two, a message is logged to the output pane and the program exits; otherwise, the path is assigned to the proper input parameter (argv[1]) and the program continues.
The next set of statements creates an NSBundle object using the bundle path and verifies that the object was successfully created. The code uses an NSBundle convenience class method to create and initialize the class instance for the bundle at the specified path.
+ (NSBundle *) bundleWithPath:(NSString *) fullPath;
The code attempts to create a bundle object using the provided path; if it is not successful, it logs a message to the output pane.
bundlePath = [NSString stringWithUTF8String:argv[1]];
NSBundle *greeterBundle = [NSBundle bundleWithPath:bundlePath];
if (greeterBundle == nil)
{
  NSLog(@"Bundle not found at path");
}
Loading a Bundle
Now the code attempts to dynamically load the bundle. NSBundle provides several methods to load a bundle into the Objective-C runtime. The instance method used here loads a bundle and stores an error object in the parameter if any errors occurred.
- (BOOL)loadAndReturnError:(NSError **) error;
The method returns a Boolean value of YES if the bundle is successfully loaded or has already been loaded. Notice that the method takes a variable of type NSError ** as its parameter; if the bundle is not successfully loaded, this enables the method to return an NSError object with error information (later in this book you’ll learn all about error handling using the Foundation Framework NSError class). The code loads the bundle and performs a conditional check on the return value, logging an error message to the output pane if the bundle was not loaded successfully.
NSError *error;
BOOL isLoaded = [greeterBundle loadAndReturnError:&error];
if (!isLoaded)
{
  NSLog(@"Error = %@", [error localizedDescription]);
}
Next, the code gets a bundle class, creates an instance of the class, and invokes a method on the object, logging the result returned by the method to the output pane.
Class greeterClass = [greeterBundle principalClass];
greeter = [[greeterClass alloc] init];
NSLog(@"%@", [greeter greeting:@"Hello"]);
The NSBundle instance method principalClass is used to retrieve the principal class of the bundle. The principal class controls all other classes in a bundle, and its classname is specified in the bundle’s Info.plist file. If the name is not specified, the first class loaded in the bundle is the principal class. Because CustomGreeter.bundle contains only one class (CustomGreeter), the method loads a CustomGreeter class object. Next, an instance of the class is created and initialized. Note that this instance is assigned to the existing variable named greeter that was declared to be of type id<Greeter>. Because the CustomGreeter class also conforms to the Greeter protocol, this assignment is valid and causes neither a compile-time nor a runtime error.
Once the bundle is no longer needed, it can be unloaded, thereby conserving system resources. This is done with the following code from Listing 9-8.
greeter = nil;
BOOL isUnloaded = [greeterBundle unload];
if (!isUnloaded)
{
  NSLog(@"Couldn't unload bundle");
}
The runtime system requires that, prior to unloading a bundle, any objects created by a bundle class must be released; hence the greeter object is set to nil. The NSBundle unload method is used to unload a previously loaded bundle. In the preceding code, the result returned from the method invocation is tested to verify that the bundle was unloaded successfully; if not, a message is logged to the console.
Retrieving the Bundle Path Argument
As mentioned, the DynaLoader program takes an argument that specifies the full path of the bundle to be dynamically loaded. So prior to running the program, you have to identify the full path to the CustomGreeter.bundle and then run the program with this path set as its input argument. In step 2, you indicated how to view the full path of the CustomGreeter bundle (refer to Figure 9-6). In Xcode, open the CustomGreeter project (if not already opened), select CustomGreeter.bundle in the project navigator pane, and then note the bundle full path in the file inspector. Now add this path to the Xcode copy buffer by dragging and selecting it, and then selecting Copy from the Xcode Edit menu (see Figure 9-7).
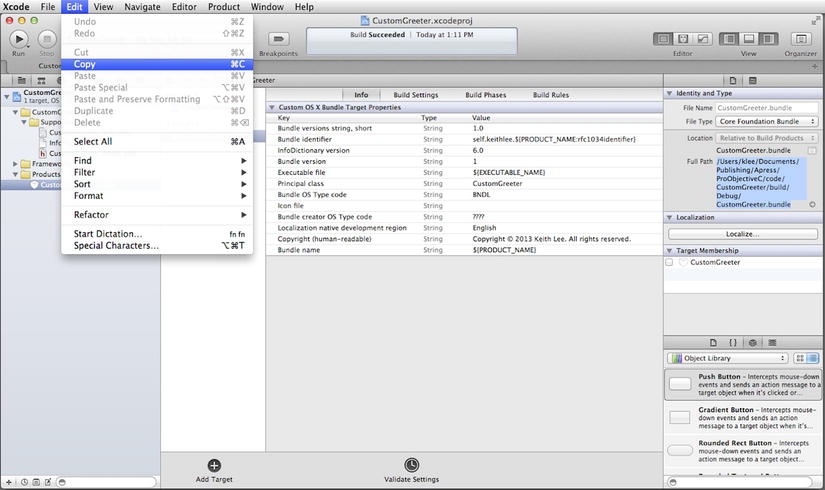
Figure 9-7. Copying the CustomGreeter.bundle full path
In Xcode, open the DynaLoader project, select DynaLoader from the Scheme button at the top of the toolbar, and then select Edit Scheme … from the scheme drop-down (see Figure 9-8).
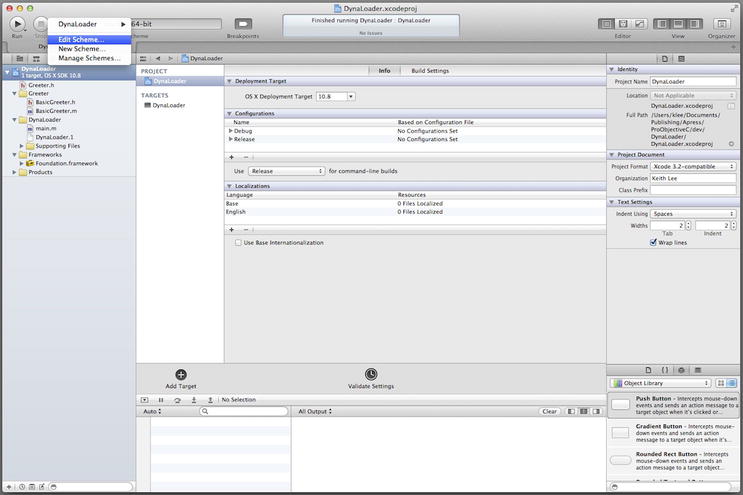
Figure 9-8. Edit CustomGreeter project scheme
A scheme defines build and test settings for an Xcode project or workspace. The build configuration information includes the arguments passed when the target program is executed, so this is where you’ll specify the full path for the CustomGreeter bundle. In the Scheme editing dialog, select the Arguments tab to edit the arguments passed on program launch.
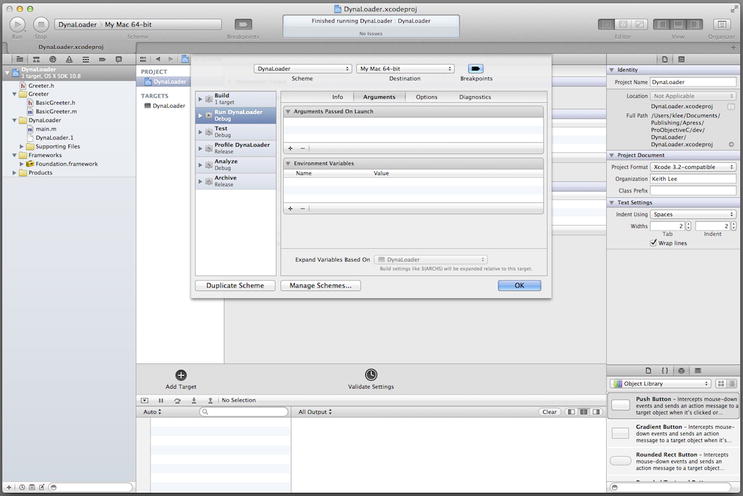
Under the Arguments Passed on Launch section, select the + button to add an argument. Now click inside the corresponding field to select it, paste the bundle path you copied earlier into the field by selecting Paste from the Xcode Edit menu, and click the Return button to store this value in the argument field. Finally, click the OK button to complete the update (see Figure 9-10).

Figure 9-10. Adding bundle path using the Scheme editor
The file path argument will now be passed to the DynaLoader program on launch. When you compile and run the DynaLoader program, you should observe the messages in the output pane shown in Figure 9-11.
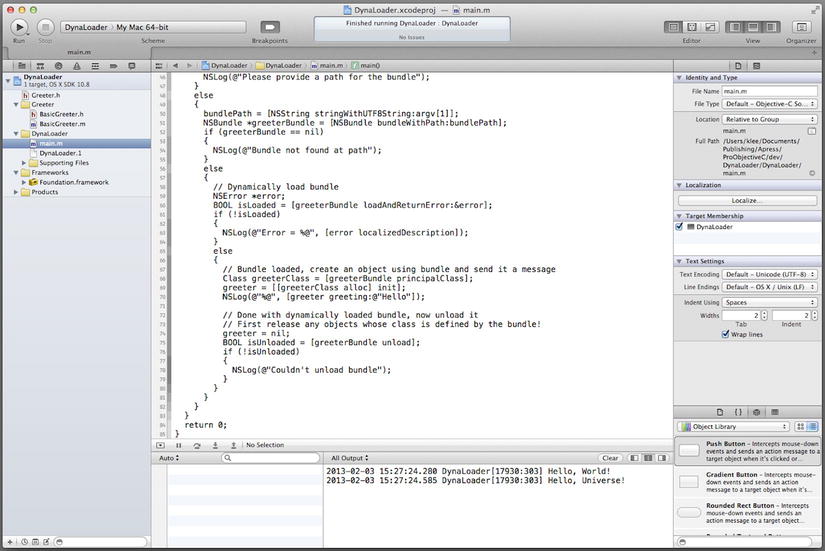
Figure 9-11. DynaLoader program output
As shown in the output pane, the greeting: method is first invoked on BasicGreeter object, and then it is invoked on a CustomGreeter object that is created from the dynamically loaded CustomGreeter bundle. This demonstrates how dynamic loading using the NSBundle class enables code and resources to be added to a running program.
Now you’ll create a program that uses the runtime APIs to dynamically create a class and a class instance, and then dynamically add a variable to the instance.
In Xcode, create a new project by selecting New ![]() Project … from the Xcode File menu. In the New Project Assistant pane, create a command-line application. In the Project Options window, specify RuntimeWidget for the Product Name, choose Foundation for the Project Type, and select ARC memory management by selecting the Use Automatic Reference Counting check box. Specify the location in your file system where you want the project to be created (if necessary, select New Folder and enter the name and location for the folder), uncheck the Source Control check box, and then click the Create button.
Project … from the Xcode File menu. In the New Project Assistant pane, create a command-line application. In the Project Options window, specify RuntimeWidget for the Product Name, choose Foundation for the Project Type, and select ARC memory management by selecting the Use Automatic Reference Counting check box. Specify the location in your file system where you want the project to be created (if necessary, select New Folder and enter the name and location for the folder), uncheck the Source Control check box, and then click the Create button.
Now select the main.m file and add the code shown in Listing 9-9.
Listing 9-9. Using NSBundle to Load a Bundle
#import <Foundation/Foundation.h>
#import <objc/runtime.h>
#import <objc/message.h>

// Method implementation function for the display selector
static void display(id self, SEL _cmd)
{
  NSLog(@"Invoking method with selector %@ on %@ instance",
        NSStringFromSelector(_cmd), [self className]);
}

int main(int argc, const char * argv[])
{
  @autoreleasepool
  {
    // Create a class pair
    Class WidgetClass = objc_allocateClassPair([NSObject class], "Widget", 0);

    // Add a method to the class
    const char *types = "v@:";
    class_addMethod(WidgetClass, @selector(display), (IMP)display, types);

    // Add an ivar to the class
    const char *height = "height";
    class_addIvar(WidgetClass, height, sizeof(id), rint(log2(sizeof(id))),
                  @encode(id));

    // Register the class
    objc_registerClassPair(WidgetClass);

    // Create a widget instance and set value of the ivar
    id widget = [[WidgetClass alloc] init];
    id value = [NSNumber numberWithInt:15];
    [widget setValue:value forKey:[NSString stringWithUTF8String:height]];
    NSLog(@"Widget instance height = %@",
          [widget valueForKey:[NSString stringWithUTF8String:height]]);

    // Send the widget a message
    objc_msgSend(widget, NSSelectorFromString(@"display"));

    // Dynamically add a variable (an associated object) to the widget
    NSNumber *width = [NSNumber numberWithInt:10];
    objc_setAssociatedObject(widget, @"width", width,
                             OBJC_ASSOCIATION_RETAIN_NONATOMIC);

    // Retrieve the variable's value and display it
    id result = objc_getAssociatedObject(widget, @"width");
    NSLog(@"Widget instance width = %@", result);
  }
  return 0;
}
Functionally, this code does the following:
- Define a method implementation function
- Create and register a class
- Create an instance of the class
- Dynamically add a variable to the instance
Next, you’ll examine the code and we’ll discuss how it implements this functionality.
Defining a Method Implementation
As you saw in Chapter 8, an Objective-C method is simply a C-language function that takes at least two arguments: self and _cmd. Immediately after the import statements, the code in Listing 9-9 defines a function that you’ll use to add a method to a class.
// Method implementation function for the display selector
static void display(id self, SEL _cmd)
{
  NSLog(@"Invoking method with selector %@ on %@ instance",
        NSStringFromSelector(_cmd), [self className]);
}
Creating and Registering a Class
To dynamically create a class with the runtime APIs, you must perform the following steps:
- Create a new class and metaclass.
- Add methods and instance variables to the class (if any).
- Register the newly created class.
This functionality is implemented with the following code from Listing 9-9.
// Create a class pair
Class WidgetClass = objc_allocateClassPair([NSObject class], "Widget", 0);

// Add a method to the class
const char *types = "v@:";
class_addMethod(WidgetClass, @selector(display), (IMP)display, types);

// Add an ivar to the class
const char *height = "height";
class_addIvar(WidgetClass, height, sizeof(id), rint(log2(sizeof(id))),
              @encode(id));

// Register the class
objc_registerClassPair(WidgetClass);
The runtime class_addMethod function takes as arguments the class to which the method should be added, the selector that specifies the name of the method being added, the function that implements the method, and a character string—known as type encodings—that describes the types of arguments and the return value of the method. Each possible type is represented by a type code; for example, the character “v” is the code for a void, “@” is the code for an object (whether a pointer to an Objective-C class or the id type), and “:” is the code for the SEL type. The complete list of type encodings are specified in the Apple Objective-C Runtime Programming Guide. The codes in the types parameter of the class_addMethod must be arranged in a defined order: the first code is for the return type, the second code is for method’s implicit self parameter (the id type), the third code is for the type of the method’s implicit _cmd parameter (the SEL type), and the remaining codes are for the types of each of the explicit parameters of the method. Thus for the display method, the corresponding types array has a value of “v@:.”
The code creates an instance of the dynamically added class, sets its instance variable to a value, and then invokes the instance method. It also logs messages to the output pane to show the instance variable value and the method invocation.
Dynamically Adding a Variable to a Class Instance
Objective-C does not provide the capability for adding instance variables to an object; however, a feature of the runtime—associated objects—can be used to effectively mimic this functionality. An associated object is an object that is attached to a class instance, referenced by a key. This can be used in a variety of scenarios; for example, with Objective-C categories that don’t permit instance variables. When you create an associated object, you specify the key mapped for the association, the memory management policy for the associated object, and its value. The following code from Listing 9-9 demonstrates use of the runtime APIs for associated objects.
// Dynamically add a variable (an associated object) to the widget
NSNumber *width = [NSNumber numberWithInt:10];
objc_setAssociatedObject(widget, @"width", width,
                         OBJC_ASSOCIATION_RETAIN_NONATOMIC);

// Retrieve the variable's value and display it
id result = objc_getAssociatedObject(widget, @"width");
NSLog(@"Widget instance width = %@", result);
The runtime APIs include an enum that lists the possible values for the memory management policy. In this policy, OBJC_ASSOCIATION_RETAIN_NONATOMIC, assigns a nonatomic strong reference to the associated object. This is similar to creating a property with the attributes nonatomic, strong. When you compile and run the RuntimeWidget program, you should observe the messages in the output pane shown in Figure 9-12.
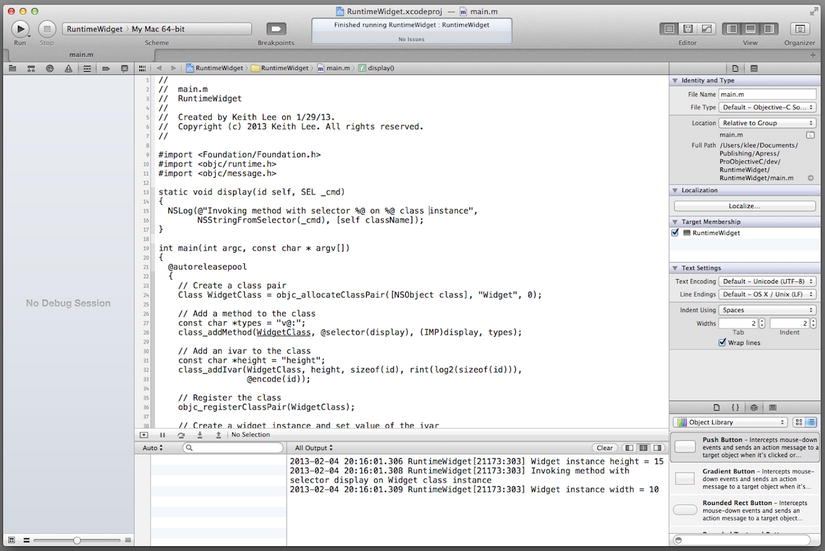
Figure 9-12. RuntimeWidget program output
This example demonstrates how to use the runtime APIs to dynamically create classes, class instances, and associated objects. Please refer to the Apple Objective-C Runtime Reference for the complete guide to the runtime APIs.
The final program demonstrates dynamic message forwarding using the Foundation Framework NSInvocation and NSProxy classes. In Chapter 3, you learned that Objective-C provides several types of message forwarding options: fast forwarding using the NSObject forwardingTargetForSelector: method and normal (full) forwarding using the NSObject forwardInvocation: method.
One of the benefits of normal forwarding is that it enables you to perform additional processing on an object message, its arguments, and return value. Used in conjunction with NSProxy, it provides an excellent mechanism for implementing aspect-oriented programming (AOP) in Objective-C. AOP is a programming paradigm that aims to increase program modularity by separating cross-cutting functionality (that rely on or affect many parts of a program) from its other parts. NSProxy is a Foundation Framework class specifically designed for proxying. It functions as the interface to the real class. Here, you create a subclass of NSProxy and implement the forwardInvocation: method, thereby enabling messages sent to the real (i.e., subject) class to be decorated with the desired cross-cutting functionality. An overall diagram of the components that you’ll implement in this program and their interrelationships are depicted in Figure 9-13.
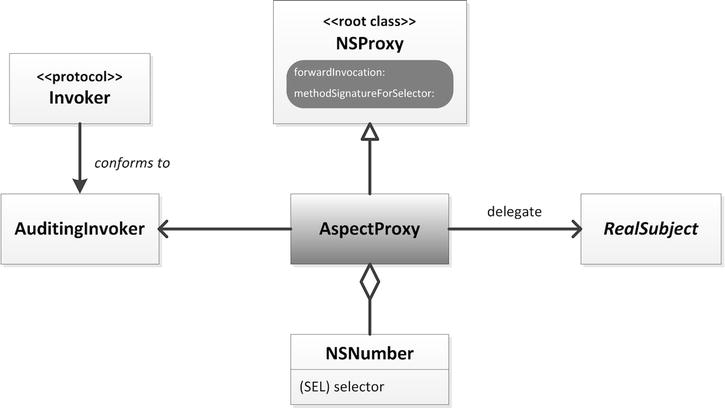
Figure 9-13. AspectProxy class diagram
Don’t worry. You’ll take it one step at a time. Let’s begin with the Invoker protocol.
In Xcode, create a new project by selecting New ![]() Project … from the Xcode File menu. In the New Project Assistant pane, create a command-line application. In the Project Options window, specify AspectProxy for the Product Name, choose Foundation for the Project Type, and select ARC memory management by checking the Use Automatic Reference Counting check box. Specify the location in your file system where you want the project to be created (if necessary, select New Folder and enter the name and location for the folder), uncheck the Source Control check box, and then click the Create button.
Project … from the Xcode File menu. In the New Project Assistant pane, create a command-line application. In the Project Options window, specify AspectProxy for the Product Name, choose Foundation for the Project Type, and select ARC memory management by checking the Use Automatic Reference Counting check box. Specify the location in your file system where you want the project to be created (if necessary, select New Folder and enter the name and location for the folder), uncheck the Source Control check box, and then click the Create button.
Now you’re going to create a protocol and a class that conforms to the protocol. Select New ![]() File … from the Xcode File menu, select the Objective-C protocol template, name the protocol Invoker, select the AspectProxy folder for the files location and the AspectProxy project as the target, and then click the Create button. A header file named Invoker.h has been added to the Xcode navigator pane. In the editor pane, update the Greeter.h file, as shown in Listing 9-10.
File … from the Xcode File menu, select the Objective-C protocol template, name the protocol Invoker, select the AspectProxy folder for the files location and the AspectProxy project as the target, and then click the Create button. A header file named Invoker.h has been added to the Xcode navigator pane. In the editor pane, update the Greeter.h file, as shown in Listing 9-10.
Listing 9-10. Invoker Protocol
#import <Foundation/Foundation.h>

@protocol Invoker <NSObject>

// Required methods (must be implemented)
@required
- (void) preInvoke:(NSInvocation *)inv withTarget:(id) target;
// Optional methods
@optional
- (void) postInvoke:(NSInvocation *)inv withTarget:(id) target;

@end
This protocol declares two methods. preInvoke:withTarget: is a required method (it must be implemented by any class that conforms to this protocol) that implements cross-cutting functionality performed immediately prior to invoking the method on the real object. The method named preInvoke:withTarget: is an optional method that implements cross-cutting functionality performed immediately after invoking the method on the real object.
Now you’ll implement a class that conforms to this protocol, implementing the desired cross-cutting functionality. Select New ![]() File … from the Xcode File menu, select the Objective-C class template, name the class AuditingInvoker (select NSObject in the Subclass of drop-down list), select the AspectProxy folder for the files location and the AspectProxy project as the target, and then click the Create button. In the Xcode navigator pane, select the resulting header file named AspectProxy.h and update the interface as shown in Listing 9-11.
File … from the Xcode File menu, select the Objective-C class template, name the class AuditingInvoker (select NSObject in the Subclass of drop-down list), select the AspectProxy folder for the files location and the AspectProxy project as the target, and then click the Create button. In the Xcode navigator pane, select the resulting header file named AspectProxy.h and update the interface as shown in Listing 9-11.
Listing 9-11. AuditingInvoker Interface
#import <Foundation/Foundation.h>
#import "Invoker.h"

@interface AuditingInvoker : NSObject <Invoker>

@end
The template AuditingInvoker interface has been updated to adopt the Invoker protocol. Now select the AuditingInvoker.m file and update the implementation as shown in Listing 9-12.
Listing 9-12. AuditingInvoker Implementation
#import "AuditingInvoker.h"

@implementation AuditingInvoker

- (void) preInvoke:(NSInvocation *)inv withTarget:(id)target
{
  NSLog(@"Creating audit log before sending message with selector %@ to %@ object",
        NSStringFromSelector([inv selector]), [target className]);
}

- (void) postInvoke:(NSInvocation *)inv withTarget:(id)target
{
  NSLog(@"Creating audit log after sending message with selector %@ to %@ object",
        NSStringFromSelector([inv selector]), [target className]);
}

@end
The AuditingInvoker implementation defines the preInvoke:withTarget: and the postInvoke:withTarget: methods, and thus it conforms to the Invoker protocol. The methods merely log appropriate messages to the Xcode output pane. OK, now that you’re done implementing the cross-cutting functionality, let’s tackle the NSProxy subclass.
Now you’re going to create the proxy class. It will subclass NSProxy and implement the message forwarding methods forwardInvocation: and methodSignatureForSelector:. Select New ![]() File … from the Xcode File menu, select the Objective-C class template, name the class AspectProxy (select NSObject in the Subclass of drop-down list), select the AspectProxy folder for the files location and the AspectProxy project as the target, and then click the Create button. In the Xcode navigator pane, select the resulting header file named AspectProxy.h and update the interface as shown in Listing 9-13.
File … from the Xcode File menu, select the Objective-C class template, name the class AspectProxy (select NSObject in the Subclass of drop-down list), select the AspectProxy folder for the files location and the AspectProxy project as the target, and then click the Create button. In the Xcode navigator pane, select the resulting header file named AspectProxy.h and update the interface as shown in Listing 9-13.
Listing 9-13. AspectProxy Interface
#import <Foundation/Foundation.h>
#import "Invoker.h"

@interface AspectProxy : NSProxy

@property (strong) id proxyTarget;
@property (strong) id<Invoker> invoker;
@property (readonly) NSMutableArray *selectors;

- (id)initWithObject:(id)object andInvoker:(id<Invoker>)invoker;
- (id)initWithObject:(id)object selectors:(NSArray *)selectors
          andInvoker:(id<Invoker>)invoker;
- (void)registerSelector:(SEL)selector;

@end
The interface adds three properties and three methods. The proxyTarget property is the real object to which messages are forwarded through the NSProxy instance. The invoker property is an instance of a class (which conforms to the Invoker protocol) that implements the cross-cutting functionality desired. The selectors property is a collection of selectors that define the messages on which the cross-cutting functionality will be invoked. Two of the methods are initialization methods for an AspectProxy class instance, and the third method, registerSelector:, is used to add a selector to the current list. Now select the AspectProxy.m file and update the implementation as shown in Listing 9-14.
Listing 9-14. AspectProxy Implementation
#import "AspectProxy.h"

@implementation AspectProxy

- (id)initWithObject:(id)object selectors:(NSArray *)selectors
          andInvoker:(id<Invoker>)invoker
{
  _proxyTarget = object;
  _invoker = invoker;
  _selectors = [selectors mutableCopy];
  return self;
}

- (id)initWithObject:(id)object andInvoker:(id<Invoker>)invoker
{
  return [self initWithObject:object selectors:nil andInvoker:invoker];
}

- (NSMethodSignature *)methodSignatureForSelector:(SEL)sel
{
  return [self.proxyTarget methodSignatureForSelector:sel];
}

- (void)forwardInvocation:(NSInvocation *)inv
{
  // Perform functionality before invoking method on target
  if ([self.invoker respondsToSelector:@selector(preInvoke:withTarget:)])
  {
    if (self.selectors != nil)
    {
      SEL methodSel = [inv selector];
      for (NSValue *selValue in self.selectors)
      {
        if (methodSel == [selValue pointerValue])
        {
          [[self invoker] preInvoke:inv withTarget:self.proxyTarget];
          break;
        }
      }
    }
    else
    {
      [[self invoker] preInvoke:inv withTarget:self.proxyTarget];
    }
  }

  // Invoke method on target
  [inv invokeWithTarget:self.proxyTarget];

  // Perform functionality after invoking method on target
  if ([self.invoker respondsToSelector:@selector(postInvoke:withTarget:)])
  {
    if (self.selectors != nil)
    {
      SEL methodSel = [inv selector];
      for (NSValue *selValue in self.selectors)
      {
        if (methodSel == [selValue pointerValue])
        {
          [[self invoker] postInvoke:inv withTarget:self.proxyTarget];
          break;
        }
      }
    }
    else
    {
      [[self invoker] postInvoke:inv withTarget:self.proxyTarget];
    }
  }
}

- (void)registerSelector:(SEL)selector
{
  NSValue* selValue = [NSValue valueWithPointer:selector];
  [self.selectors addObject:selValue];
}

@end
The initialization methods initialize an AspectProxy object instance accordingly. Note that as NSProxy is a base class, there is no call to [super init] at the beginning of these methods. The registerSelector: method adds another selector to the collection, as mentioned earlier. The implementation of methodSignatureForSelector: returns an NSMethodSignature instance for the method to be invoked on the target object. The runtime system requires that this method be implemented when performing normal forwarding. The implementation of forwardInvocation: invokes the method on the target object and conditionally invokes the AOP functionality if the selector for the method invoked on the target object matches one of the selectors registered in the AspectProxy object. Whew. When you’ve had enough time to digest this, let’s move on to the main.m file and test out your program!
Let’s test the AspectProxy, but first let’s add a target class to the proxy. You’ll use the Calculator class that you implemented in Chapter 7. It declares the following methods:
- (NSNumber *) sumAddend1:(NSNumber *)adder1 addend2:(NSNumber *)adder2;
- (NSNumber *) sumAddend1:(NSNumber *)adder1 :(NSNumber *)adder2;
As you learned earlier in this chapter, Xcode provides a simple mechanism for importing files into a project. Hold down the Ctrl key and (from the Xcode project navigator pane) select the AspectProxy project. A drop-down window displays a set of options. Select the Add Files to “AspectProxy” … option. Navigate over to the Calculator project folder, select the Calculator.h and Calculator.m files, and click the Add button to add them to your AspectProxy project. OK, now with that done, let’s update the main()function to create a calculator proxy and invoke its methods, causing the AOP AuditingInvoker methods to be invoked as well. In the project navigator pane, select the main.m file and update it as shown in Listing 9-15.
Listing 9-15. AspectProxy main() Function
#import <Foundation/Foundation.h>
#import "AspectProxy.h"
#import "AuditingInvoker.h"
#import "Calculator.h"

int main(int argc, const char * argv[])
{
  @autoreleasepool
  {
    // Create Calculator object
    id calculator = [[Calculator alloc] init];
    NSNumber *addend1 = [NSNumber numberWithInteger:-25];
    NSNumber *addend2 = [NSNumber numberWithInteger:10];
    NSNumber *addend3 = [NSNumber numberWithInteger:15];

    // Create proxy for object
    NSValue* selValue1 = [NSValue valueWithPointer:@selector(sumAddend1:addend2:)];
    NSArray *selValues = @[selValue1];
    AuditingInvoker *invoker = [[AuditingInvoker alloc] init];
    id calculatorProxy = [[AspectProxy alloc] initWithObject:calculator
                                                   selectors:selValues
                                                  andInvoker:invoker];

    // Send message to proxy with given selector
    [calculatorProxy sumAddend1:addend1 addend2:addend2];

    // Now send message to proxy with different selector, no special processing!
    [calculatorProxy sumAddend1:addend2 :addend3];

    // Register another selector for proxy and repeat message
    [calculatorProxy registerSelector:@selector(sumAddend1::)];
    [calculatorProxy sumAddend1:addend1 :addend3];

  }
  return 0;
}
First, the code creates a Calculator object and some data values. Next, it creates a proxy for the Calculator object, initializing it with a selector for the sumAddend1:addend2: method and an AuditingInvoker instance. Notice the following statement:
NSArray *selValues = @[selValue1];
The notation @[] is used to create an array literal. In Part 4 of this book, you’ll examine Objective-C literals in depth. The sumAddend1:addend2: message is sent to the proxy. This causes the proxy to perform the AOP functionality of the AuditingInvoker instance in addition to the method on the Calculator object. Next, the sumAddend1:: message is sent to the proxy; because this method is not yet registered on the proxy when it is invoked, the AOP functionality is not performed. Finally, the sumAddend1:: selector is added to the proxy and the message is resent to the proxy; because the selector is now registered, the AOP functionality is now performed. When you compile and run the AspectProxy program, you should observe the messages in the output pane shown in Figure 9-14.
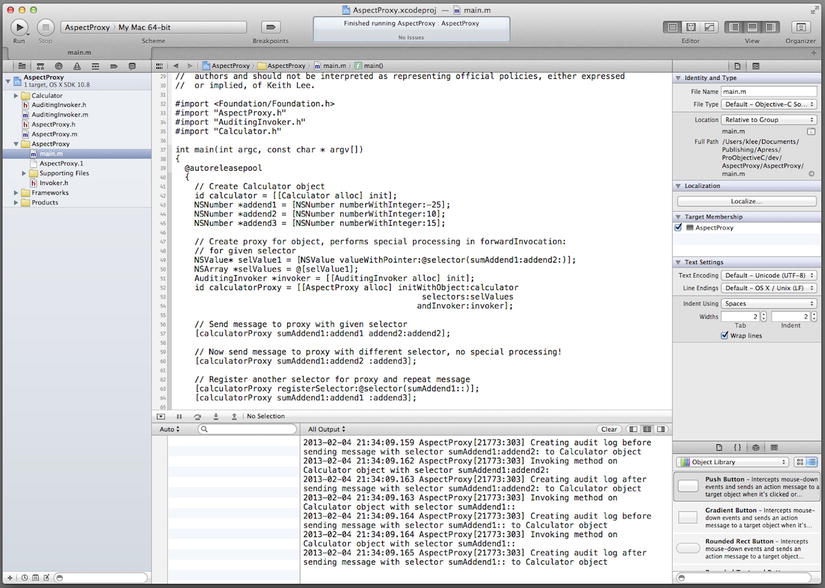
Figure 9-14. AspectProxy program output
Observe from the messages in the output pane that invoking the sumAddend1:addend2: method on the calculator proxy results in the proxy calling the preInvoke: method on the AuditorInvoker object, followed by the target method sumAddend1:addend2: method on the real subject (Calculator object), and finally the postInvoke: method on the AuditorInvoker object. Because the sumAddend1:addend2: method was registered with the calculator proxy, this matches the expected behavior. Next, the sumAddend1:: method is invoked on the calculator proxy. Because this method is not registered with the proxy, it only forwards this method call to the Calculator object, and does not call the AuditorInvoker methods. Finally, the sumAddend1:: method is registered with the proxy and the method is called again. This time, it calls the AOP methods on the AuditorInvoker object and the sumAddend1:: method on the real subject, as expected.
Roundup
In this chapter, you implemented three programs that together use numerous features of the Objective-C runtime system and its APIs. You also learned how to create loadable bundles and import code into a project using Xcode. You should now have a good understanding of the runtime system, its place in the Objective-C platform, and how to use its features and low-level APIs in your own programs. I recommend that you review these programs carefully, modify them to try out other features/behaviors, and become very familiar with the concepts demonstrated here. Now that you have these skills under you belt, why not take a break and give yourself a chance to let this all soak in. In Part 3, you’ll explore the Foundation Framework.