
As with any software project you can name, building a game starts with building a good, solid foundation. Of course Corona sets you on good footing from the word go, but how you architect the code is at least as important as what the library you use provides.
Many considerations must be taken into account. How do you move from screen to screen? How do you organize your graphics and audio resources? How do you structure the code so that it’s logical and at least somewhat extensible in the future, should you decide to enhance the game for your customers?
All of this, and more, is what this chapter is all about. Before I even get to questions of architecture, though, you probably should get an idea of what you’re building, shouldn’t you?!
The Year Is 2258 . . . The Name of the Place . . . err, Game . . .
Quick: how many sci-fi movies and television shows have you seen, how many books have you read, in which colonists on some faraway planet need to be rescued? I don’t know what it is about colonists that makes them so needy, but it sure seems like they’re always in trouble and someone always has to go get them out of harm’s way! Furthermore, at least in video games, that person always winds up being you, doesn’t it?
Well, welcome to Astro Rescue!
You are the pilot of a rescue ship; call it the U.S.S. Colonist Saver. You have to fly a distant solar system to rescue some colonists under attack from aliens. Your job is simple: when a colonist materializes near a landing platform and signals SOS to you, you fly down, land on the pad, wait for them to board, and then take off again. Once you have rescued all the colonists, you fly back into the landing bay of your mothership and move on to the next planet. All the while, you have to avoid the aliens that occasionally fly by and shoot plasma balls at you, and refuel when fuel canisters appear . . . because that’s what fuel canisters do in space, I guess, just magically appear in the middle of nowhere! (Hey, I’ve never been in space, have you? It could be true!)
As far as game concepts go, I’ll admit this isn’t going to go head to head with Angry Birds on the sales charts. However, what it will do very well is allow us to explore a large chunk of Corona functionality. It will demonstrate all of the most important core concepts in the world of Corona development that you would need to build nearly any game you can imagine—perhaps one that will topple those angry avians!
Mapping out the Astro Rescue Game
The first step in developing a game, or any piece of software for that matter, is to conceptualize at a high level what the thing will look like, what the parts of the project will be. For this game, at the highest level, we have these parts:
- Title screen
- Main menu screen
- A settings screen for adjusting a few settings the game will support
- The game itself
- An ending scene when the player finishes the game
It may not look like much, but it actually brings us to the first concept in Corona that in all probability you’ll use very often as you write your games: the Storyboard API.
A DISCLAIMER OR TWO
Writing a game, or any piece of software really, is largely an art form, regardless of what your boss at work wants to think! We professional developers are of course constantly striving to make it as much of an engineering discipline as possible, and obviously it largely is. However, there will always a portion that is far less rigid than any engineering discipline, such as architecture or electrical engineering.
The result of this is that it is common to find two talented developers have solved the same problem in two very different ways. There’s nothing wrong with that; it’s to be expected, really, and is probably even truer for game development (until you get to large-scale projects at least, where you have to introduce more rigidity to get things done). The point is only that as you progress through the book, you may not always agree with every choice I’ve made. However, I’ll do my best to always give you the reasons why I’ve done things certain ways, and even discuss alternatives that I considered along the way.
It’s also worth pointing out that since this book is obviously a learning exercise, and Astro Rescue was written for that express purpose, I’ve sometimes done things in it that I probably wouldn’t do normally, just to give you examples of varied approaches to things and to open the discussion of as many parts of Corona as possible. Again, I’ll do my best to point those places out to you, so you understand what’s really a “best practice” and what’s more for educational purposes only.
Last, this book isn’t meant to be an exhaustive Corona reference. It would take killing a lot more trees than this to cover everything! I’ve endeavored to cover the things that you are most likely to need the most when writing a game, those that in my estimation you will use most commonly. I’ve attempted to give you a good, solid foundation on which to build your house, not detailed blueprints for every single room you might want to build. I highly encourage you to peruse the Corona documentation itself after reading this book, since it goes into much more depth and covers a few topics in detail that are only touched upon in this book.
You’re Sceneing Things: The Storyboard API
When you fire up Astro Rescue, the first thing you see is the title screen, as seen in Figure 3-1. Obviously you can’t tell from the printed page (yet—but that technology is coming!), but the background is a subtly moving “color tunnel,” and the whole thing appears from the center of the screen and expands outward; it doesn’t just show up on the screen unannounced. This screen represents the first “scene” in your game.

Figure 3-1 . The Astro Rescue title scene
What is a scene? Simply put, it’s an individual screen in a game (well, usually an individual screen, it doesn’t have to be). Corona provides an API specifically for managing scenes called the Storyboard API. This API provides a well-defined code structure for your scenes, defines lifecycle events that a scene needs, and exposes functions for managing scenes in various ways.
Note A given scene does not necessarily have to be a single physical screen, although that’s nearly always the case. If you have a menu scene, for example, you may decide that you want your settings screen to be a part of the menu scene in terms of code structure. You can do this, but what you are forced to do then is essentially to write code that, to a large degree, does what the Storyboard API does for you anyway. So, unless you have a really good reason to do otherwise, a single screen should correspond to a single scene.
The basic code structure when interacting with this API is called a scene object, which is a fancy way of saying a Lua table with specified methods attached to it representing the various events in the life of a scene. What does such a scene object look like? The basic outline of a scene object is as you see in Listing 3-1.
Listing 3-1. The Basic Structure of a Storyboard Scene
local storyboard = require( "storyboard" )
local scene = storyboard.newScene()

-- Called when the scene's view does not exist.
function scene:createScene(inEvent)
end

-- Called BEFORE scene has moved on screen.
function scene:willEnterScene(inEvent)
end

-- Called AFTER scene has moved on screen.
function scene:enterScene(inEvent)
end

-- Called BEFORE scene moves off screen.
function scene:exitScene(inEvent)
end

-- Called AFTER scene has moved off screen.
function scene:didExitScene(inEvent)
end

-- Called prior to the removal of scene's "view" (display group).
function scene:destroyScene(inEvent)
end

-- Add scene lifecycle event handlers.
scene:addEventListener("createScene", scene);
scene:addEventListener("willEnterScene", scene);
scene:addEventListener("enterScene", scene);
scene:addEventListener("exitScene", scene);
scene:addEventListener("didExitScene", scene);
scene:addEventListener("destroyScene", scene);

return scene;
Typically, each scene is in its own Lua source file named after the scene. Therefore, in Astro Rescue, since the title scene is rather uncreatively named titleScene, the code for it is found in the file titleScene.lua.
Note While that is most typical, and is what I’ve done in Astro Rescue, another approach is to use the storyboard.createScene() function, which returns to you a scene object to which you can then add your event listeners. That way, you can have a single Lua file that defines multiple scenes if you wish, and you can even dynamically create scenes (although trying to come up with a reasonable use case for that gave me a headache!). My experience is this is not done often though, and it’s not a pattern I’d suggest using in any case, as it leads to much larger source files than is comfortable to navigate.
To activate a scene only requires a single line of code:
storyboard.gotoScene("titleScene", "flip", 500);
That triggers Corona to load up titleScene.lua and begin to run through the event listeners of the scene object, which are:
- createScene
- willEnterScene
- enterScene
- exitScene
- didExitScene
- destroyScene
This list represents the order in which the lifecycle event listeners will be called as well. Now, this is the complete list of events that a scene can respond to, but it doesn’t have to respond to all of them. You can handle only the events that make sense for your use case.
Every Event Needs a Handler
Don’t worry, I’m going to discuss what each of these is used for shortly, but before I do that there are some other points to touch on. Did you notice this batch of statements at the end of the scene template in Listing 3-1?
scene:addEventListener("createScene", scene);
scene:addEventListener("willEnterScene", scene);
scene:addEventListener("enterScene", scene);
scene:addEventListener("exitScene", scene);
scene:addEventListener("didExitScene", scene);
scene:addEventListener("destroyScene", scene);
These statements are what activate, so to speak, the event listeners. Here’s the basic rundown. Every object in Corona has the ability to respond to various events that can occur. Many different events are generated over the course of a Corona app running. Some are related to user input (screen touches, accelerometer movements, etc.); some are related to generic lifecycle events, like your application starting up or a new frame being drawn to the screen; some are related to physics simulations; and so on. You’ll meet many different events throughout this book but for now I’m only interested in the six already listed that are related to scenes.
Each of those addEventListener() calls tells Corona that the scene object (since that’s what we’re calling the method on) wants to be notified when one of these events occurs. For each call, we specify the string name of the event we’re interested in as well as the function to call in response. Now, in this case, we are not specifying a function directly but instead passing a reference to the scene object itself. When you pass an object reference (remember that object in Corona means table), then when the event occurs Corona looks for a method on the object named after the event. If it finds one, it calls the function; otherwise the event is essentially ignored. This is sometimes referred to as a table listener, as opposed to a function listener, which is when you pass a reference to a plain old function to addEventListener().
Now, look at that scene template again. Notice that each of the methods added to it match one of our scene events. Those won’t actually be called unless we register them as event listeners, but once we do that, it means that the lifecycle events for the scene will be handled by our scene object’s methods.
The Life (and Death) of a Scene
What are the scene lifecycle events actually for, you ask? It’s pretty straightforward.
- createScene: This occurs once per scene and is where you will do most of your setup tasks that should only occur once per scene. For example, typically you would load graphics and audio resources here. This event won’t fire, however, if the scene’s view display group already exists (a display group is something I’ll get into in chapter 4, but for now it’s enough to say it’s a container for your graphics).
- willEnterScene: When you tell Corona to go to a scene, you can do so with various transition effects. Those transitions take some amount of time. This event occurs before the transition begins. It can fire multiple times—every time you go to the scene, in fact. Typically this event is not used quite as often as most others, enterScene specifically. When this event fires, nothing for the new scene is visible to the user.
- enterScene: This event occurs after any transition effect finishes and is typically where you start any animations that need to start and hook up any event listeners for dealing with user input.
- exitScene: This event fires when a you transition from the current scene to a new scene, before any specified transition effect begins, and applies to the current scene. Here is where you typically would do any cleanup tasks, including stopping animations and stopping event listeners for user input. You might also clean up graphic and audio resources, but as I’ll discuss in a moment you might not!
- didExitScene: This fires after the transition effect on the current scene finishes. Like willEnterScene, you tend to use this event less than the other events, but it can be used for cleanup tasks if you need to. For example, maybe you want your game character to continue walking even as the current scene transitions off screen. If you stop the animation in exitScene, you won’t get what you want because the animation won’t be running as the scene transitions off screen. Stopping it in didExitScene will let the animation continue until the scene transition completes.
- destroyScene: When a scene is purged, this event fires. More specifically, any time the scene’s view display group is removed, this event fires just prior to that removal. This is where you should do any real cleanup tasks such as destroying graphics and audio resources.
Making the Transition: Transition Effects
So, let me talk about a few things that I glossed over a bit. First, whenever you transition to a new scene you have the option of doing so with a transition effect. The Storyboard API provides a number of built-in transitions to choose from:

Most of these are self-explanatory, but since you should have the Astro Rescue source code already, you can simply change the last line in main.lua (which you’ll be exploring shortly), the storyboard.gotoScene() call, and specify any of these in place of "flip" to see them in action for yourself.
Scene Purging for Fun and Profit
The next thing to discuss is when and how scenes get removed from memory. The short and simple answer is that they don’t! Once you go to a scene and the Storyboard API loads its source file, the scene object defined in it doesn’t go away unless you tell it to.
The long and more complex answer is that isn’t quite true!
First, I need to be a little more specific: your view object is, under normal circumstances, never removed from memory, period. You can pretty well assume that’s always true. What I’m really talking about is the view’s display group getting removed, which for my purposes here means the graphics related to your scene. This can be removed either automatically or manually. When memory is running low, the Storyboard API may choose to purge scenes (never the current scene) to free up memory. It does this intelligently, purging the least-recently used scene. It can also happen manually if you call storyboard.purgeScene(), which purges a specific named scene, or storyboard.purgeAll(), which, as I’m sure you can guess, purges all loaded scenes (again, except the current scene).
There are two other methods that can result in a purge: storyboard.removeScene() and storyboard.removeAll(). The difference between these and the purge methods is that the remove methods actually do remove the view object as well! Therefore, while it’s true that Corona won’t ever purge your scene objects automatically, you are free to do so yourself if you wish. It is somewhat unusual to use the remove methods in my experience, but you certainly can if you need to.
There is also a property you can set, storyboard.purgeOnSceneChange. When true, the scene you’re leaving will be purged automatically whenever you transition to a new scene.
Lastly, you can disable even the auto-purging of scenes during low memory conditions by setting storyboard.disableAutoPage to true. I would caution against this, though, as you may find your game doesn’t play well on low-end devices if you do.
There’s a bit of a balancing act here: purging with every scene transition avoids low memory conditions, but it can also negatively impact performance, since a scene’s resources are completely loaded and destroyed every time you transition between scenes. For example, not purging the menu scene (Figure 3-2) might make sense so you can move in and out of it as quickly as possible. By default, the Storyboard API won’t automatically purge unless low memory conditions occur, but if your game is particularly memory-hungry you may want to set storyboard.purgeOnSceneChange to true.
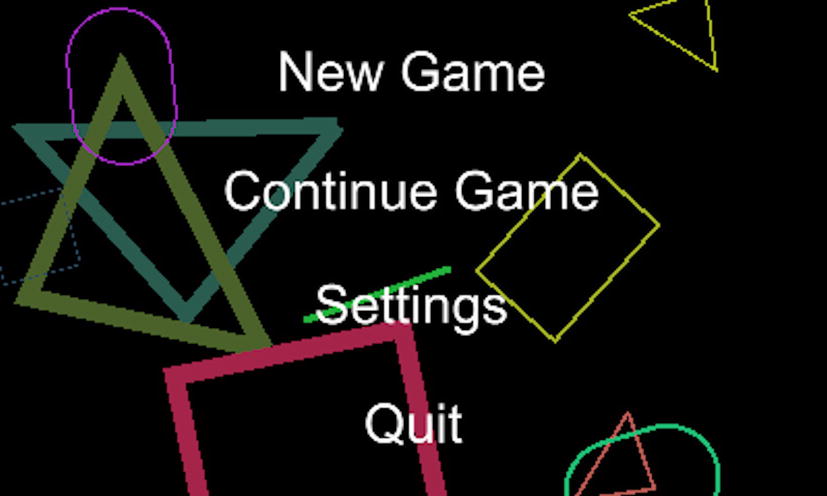
Figure 3-2 . The Astro Rescue main menu scene
In the case of Astro Rescue, it being a relatively simple game, you can get away with purging every scene every time. I prefer to do this when I can get away with it because it keeps the game’s runtime memory requirements lean-and-mean. The bottom line, though, is you have to make this decision on a case-by-case basis, and in either case you need to understand what happens by default.
Back to the Beginning: The main.lua file
Now, I kind of had you jump into the deep end of the pool here by talking about scenes and events and all that, but it was a reasonable place to start after talking about the overall flow of screens in the game. Now that I have done that, you really do need to swim back to the wading area a bit and see where it all truly starts, which is in the main.lua file.
Since this is the starting point for the game, both logically and in practice when it’s run, I’ll just tear through this file bit by bit to show you what’s going on in it.
Global Imports
The first few lines that start things off are:
json = require("json");
utils = require("utils");
storyboard = require("storyboard");
storyboard.purgeOnSceneChange = true;
There are a couple of modules that you need throughout the game, so importing them into global scope makes sense. These are:
- json: This provides JSON (JavaScript Object Notation) support for encoding and decoding Lua objects. It may seem odd to use JSON in Lua, but as you’ll see, this is a quick and easy way to save objects in a format that is universal and therefore easier to work with in external tooling.
- utils: This is a collection of custom utility functions that I wrote. You’ll be looking at this after main.lua and some configuration files.
- storyboard: This is, of course, the Corona Storyboard API that you looked at earlier.
At this point, you also tell the Storyboard API that you want to purge your scenes whenever the game transitions away from them. As mentioned earlier, this is fine for a small game like this, where the scenes load quickly even on pokey devices, but it’s something you most likely wouldn’t want to do in a larger game unless you had specific memory concerns. In that case, you’re probably more likely to want to purge individual scenes specifically, but again, this is something you need to determine in your specific instance).
Global Variables
As discussed in Chapter 2, you generally want to try and avoid putting too much in global scope. That being said, there’s nearly always a few things that belong there . . . or if belong is too strong a word, there’s things that are certainly made simpler by being global. The first two are:
titleMusic = nil;
titleMusicChannel = nil;
No game would be complete without some sounds, and Astro Rescue is no exception! You certainly will have some sound effects during gameplay of course, and you have two pieces of music (composed by yours truly!) to choose from. One plays during the title scene (as well as the main menu and settings scenes; see Figure 3-3) and one during the ending scene (Figure 3-4) when the player finishes the game (you’ll notice I didn’t do so well in that particular game!).
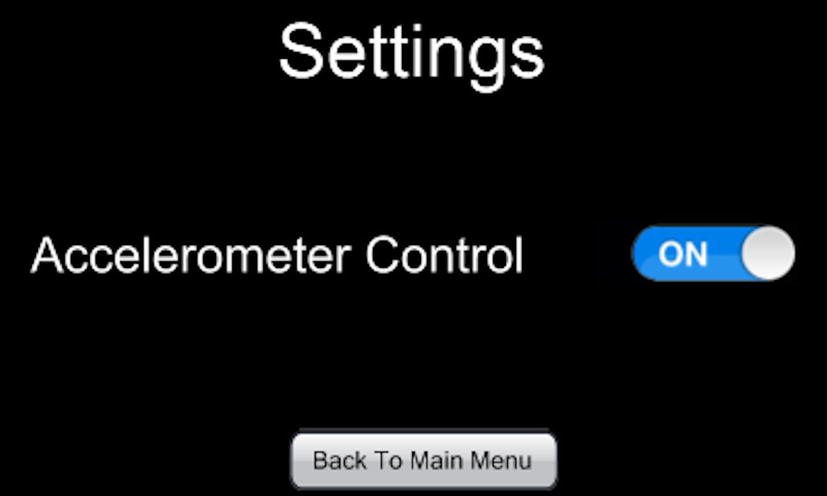
Figure 3-3 . The Astro Rescue settings scene
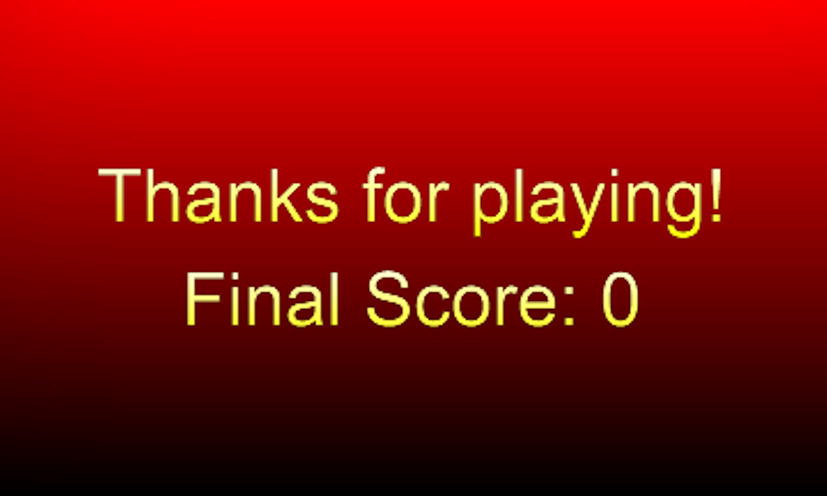
Figure 3-4 . The Astro Rescue ending scene
While audio is something you’ll look at in depth later on, for now I’ll tell you that when you load a sound, whether a sound effect or a music file, you’ll get a reference to an object that is the audio resource you loaded. When you want to play it, Corona will hand a channel number back to you. Any device has a certain number of audio channels on which sounds can be played, and each audio resource playing at any given time is assigned a channel to play on. You can manipulate a playing sound by manipulating the channel via various functions Corona provides (e.g., things like stopping or restarting a piece of music). That’s why you have two variables: titleMusic is the reference to the loaded music file; and titleMusicChannel is the channel it’s currently playing on, if any. You’ll see this same pattern throughout the code and you’ll likely follow this pattern too in your own games. The only exception is if you don’t intend to manipulate a sound later on, then you probably don’t need to keep track of what channel it’s being played on.
After those variables, you have one that deals with player control:
usingAccelerometer = false;
In Astro Rescue, you have the ability to control your ship via touch screen or accelerometer (i.e., tilting your phone or tablet). To be more precise, you in fact control the ship’s horizontal motion with the accelerometer (if you decide to), but you still handle vertical thrust via touch events. In either case, the code needs to know which mode of control is being used, and that’s what usingAccelerometer is for. By default, the game uses touch controls only, so it is false, but the user can set it to true in the settings scene that you will explore in Chapter 4.
Last, we have an object:
gameData = {
  level = 1,
  score = 0
};
This is a basic Lua table where the state of the game that we need to persist between program executions resides, so the player can continue the game where it was left off. Only the level the game is currently on and the score are important to record. Things like how much fuel the player has is acceptable to reset every time they play. This also means that if she stops playing in the middle of a level, any progress on that level will not be saved. It’s of course a judgment call whether that’s acceptable or not. Creating a positive experience for the player dictates that you should save any progress that matters frequently. What matters, of course, is a matter of perspective. Given the simple nature of this game, and given that it’s for learning purposes and not something I’m looking to sell, I see no problem saving just the current level and forcing the player to restart the level when she continues a game. However, as they say on the Interwebs: YMMV (your mileage may vary)!
Dealing with Game State: File I/O Operations
You saw the gameData object a moment ago; now I’m going to show you the three functions that deal with it. You may have been asking yourself why that was done as a table and not just plain old variables. There’s actually a method to that madness, and it harkens back to that JSON library you imported. First, look at how gameData is saved:
function saveGameData()
  local path = system.pathForFile("gameData.json", system.DocumentsDirectory);
  if path ∼= nil then
    local fh = io.open(path, "w+");
    fh:write(json.encode(gameData));
    io.close(fh);
  end
end
The functions in the io.* namespace of the Corona API provide the functionality you need to work with files, but before doing that you need to get a full, absolute path to the file you want to work with. For that you have the system.pathForFile() function, which takes care of all the tricky cross-platform issues for you.
This function takes two arguments: the name of the file you want to work with and the base directory it’s in. In almost all cases, you’ll use one of the constants defined in the system.* namespace:
- system.CachesDirectory gets you a path to a location meant for you to store data that is to persist across application executions.
- system.DocumentsDirectory is similar in that files stored there are meant to be persistent. The primary difference is that on iOS devices, files stored in system.DocumentsDirectory are backed up by synchronizing whereas system.CachesDirectory is not.
- The system.ResourcesDirectory constant gets you a path to the location where your application resources (e.g., things like your sound and image files) are stored. However, due to security restrictions, you can only read files using this path, never write them.
- system.TemporaryDirectory is where you can place files that only need to exist for the current run of the program.
Note In the simulator, you can view the files in system.DocumentsDirectory and system.TemporaryDirectory by using the Show Project Sandbox option on the File menu. Anything stored in the other two directories is not visible this way.
Therefore, for your purposes, you would want to use either system.CachesDirectory or system.DocumentsDirectory. Since there’s no good reason not to have the game state backed up on iOS devices, go with system.CachesDirectory.
The next step is to ensure that you get a full, absolute path to the file from the call to system.pathForFile(). Assuming you do, you can then open the file by calling io.open(). This function accepts the path you got and the mode to open the file in. Here you use "w+", which means write mode where all previous data will be overridden. The other modes are
- "r": Read mode (the default). The file pointer is placed at the beginning of the file.
- "w": Write-only mode. Overwrites the file if the file exists. If the file does not exist, creates a new file for writing.
- "a": Append mode (write only). The file pointer is at the end of the file if the file exists. That is, the file is in the append mode. If the file does not exist, it creates a new file for writing.
- "r+": Update mode (read/write). All previous data is preserved. The file pointer will be at the beginning of the file. If the file exists, it will only be overwritten if you explicitly write to it.
- "w+": Update mode (read/write). All previous data is erased. Overwrites the existing file if the file exists. If the file does not exist, creates a new file for reading and writing.
- "a+": Append update mode (read/write). Previous data is preserved, writing is only allowed at the end of file. The file pointer is at the end of the file if the file exists. The file opens in the append mode. If the file does not exist, it creates a new file for reading and writing.
You get a handle to the file in the variable fh, which you can then call methods on to perform various I/O operations. The write() method is used in this case, which accepts a variable-length list of arguments that can be strings or numbers. In this case, the json.encode() method , which is part of the JSON library that was imported at the start, is used to convert the gameData object to a string of JSON. It probably would have been easier to do something like:
fh:write(gameData.level, gameData.score);
However, I wanted to show usage of the JSON functionality Corona provides. It may not be very important for this use case, but when you are reading and writing things like level data, it’s helpful if it’s in a common format like JSON so external tooling can edit it easily.
Last, you need to close the file with a call to io.close(), passing the handle to the file, and you’re done.
Reading in saved game state is a little more involved, but not much:
function loadGameData()
  local path = system.pathForFile("gameData.json", system.DocumentsDirectory);
  if path ∼= nil then
    local fh = io.open(path, "r");
    if fh == nil then
      clearGameData();
    else
      gameData = json.decode(fh:read("*a"));
      io.close(fh);
    end
  end
end
The code begins identically to saving state but starts to differ once you determine you have a path to the file. In this case the call to io.open() specified the "r" method for reading, and then you check if the file was actually opened. The io.open() method will return nil if the file couldn’t be opened (plus an error message as part of a multivalue return, but for your purposes here the error message is ignored). If the file can’t be opened, then a call to clearGameData() is made (which I’ll show you next), which effectively resets the game state so a new game can begin.
If the file is opened, though, that’s where the read from the file is done via the call to the read() method on the fh variable, your file handle. The argument passed to this method is one of three values:
- "*l": Reads the next line (skipping the end of line), returning nil on end of file (EOF). This is the default format.
- "*n": Reads a number. This is the only format that returns a number instead of a string.
- "*a": Reads the whole file, starting at the current position (which is where you start at this point in the code). On end of file, it returns the empty string.
The string that is read in from the file is passed to json.decode(), which takes the string of JSON and translates it to a Lua table, which then becomes the value of gameData. The file is then closed and your work is done.
The clearGameData() method is very simple.
function clearGameData()
  gameData.level = 1;
  gameData.score = 0;
  saveGameData();
end
The two pieces of actual game state are reset to what they should be for a new game, and the state is saved so that next time through there is a saved file to read in.
Where It All Begins: Initial Execution
The three methods just examined aren’t the first executable code hit, though; that distinction goes to this line of code:
display.setStatusBar(display.HiddenStatusBar);
The display.* namespace is where nearly all the graphics-related functionality in Corona lives, and as such you’ll be getting very familiar with it. This first encounter with it is used to hide the status bar that most modern mobile OSs have at the top of the screen. Note that not all devices support a status bar, but since most games are meant to run full screen with none of the typical OS chrome around them, it’s a good idea to attempt to hide it like this regardless (and in any case, no harm is done if this doesn’t apply to the current device). You can also use the display.DefaultStatusBar to show it, make it translucent with display.TranslucentBar, or make it black using display.DarkStatusBar (again, all subject to device support).
After that I like to do some initial logging, like so:
os.execute("cls");
utils:log("main", "ASTRO RESCUE STARTING...");
utils:log("main", "Environment: " .. system.getInfo("environment"));
utils:log("main", "Model: " .. system.getInfo("model"));
utils:log("main", "Device ID: " .. system.getInfo("deviceID"));
utils:log("main", "Platform Name: " .. system.getInfo("platformName"));
utils:log("main", "Platform Version: " .. system.getInfo("version"));
utils:log("main", "Corona Version: " .. system.getInfo("version"));
utils:log("main", "Corona Build: " .. system.getInfo("build"));
utils:log("main", "display.contentWidth: " .. display.contentWidth);
utils:log("main", "display.contentHeight: " .. display.contentHeight);
utils:log("main", "display.fps: " .. display.fps);
utils:log("main", "audio.totalChannels: " .. audio.totalChannels);
The first line of code uses the execute() method of the os.* namespace. This namespace houses functions that allow you to interact with the OS at a more native level. It’s also where date and time functionality lives. Here, the execute() method accepts a string command to run. The command is entirely dependent on what the OS allows you to do. For example, passing "ls" on an Android device will generate a directory listing (subject to security restrictions). Here, the "cls" command clears the console window in the simulator so that each execution starts the console display fresh. Otherwise, each execution would append to what is already in the console window, which can get messy quickly.
Following that are a series of utils:log() calls. This is a method of the utils object that was required earlier that simply logs messages (and objects) to the console. I’ll get into that method near the end of this chapter, but for now just think of it as an extended print() function, which is a global function that is the basic Corona function for outputting text to the console window.
The system.getInfo() method allows you to get the values of various environment variables and properties, including things like
- The environment we’re running in (simulator or not)
- What model the device is (e.g., "Nexus One")
- The unique ID of the device
- The platform name (e.g., "win" in the Windows simulator)
- Platform version
- Corona version and build number
- The width and height of the screen (the display.contentWidth and display.contentHeight properties, respectively)
- The frame rate the game runs at (display.fps, 30 in the case of Astro Rescue)
- The total number of audio channels available on the device (32 in the Windows simulator).
Once that logging is done, you have to perform a typical task in games:
math.randomseed(os.time());
The math.* namespace is, unsurprisingly, where you find all sorts of mathematical functions, things like calculating square roots; rounding, trigonometric, and logarithm functions; and randomseed(), which seeds the random number generator. To get a different sequence of numbers each time the program executes (roughly different, and assuming enough time between invocations) you pass to it the number returned by os.time(), which is the current system time in milliseconds.
Next, you have to deal with an audio issue:
audio.reserveChannels(2);
Naturally, the audio.* namespace contains all the audio-related functionality, one of which is the reserveChannels() method. As touched upon earlier, normally when you play a sound it gets assigned a channel. If you play a bunch of sounds consecutively, there’s every chance it will get assigned the same channel each time. Normally this is fine, but sometimes you want to have a little more control and know exactly what channel will be used by what sound. Moreover, sometimes you want to ensure that you always have free channels available for specific purposes. That’s precisely what this line of code does: it reserves two channels (1 and 2, specifically) that will never be auto-assigned when a new sound is played. These channels are what the game will use to play music later, but I’ll get to that in the next chapter.
Last, we have two more lines of code to close out main.lua:
utils:log("appInit", "Going to titleScene");
storyboard.gotoScene("titleScene", "flip", 500);
This is a quick log message to let you know via the console window that the game is about to show the first scene, and then the same sort of storyboard.gotoScene() call already discussed. This is what truly kicks off Astro Rescue and puts the title scene on the screen.
I’ve mentioned the utils.lua file, and now it’s time to see what’s in it. This is a small collection of utility-type functions that I’ve written over time, and my suggestion is to always have such a file that is 100% portable from project to project. It’ll save you a lot of time.
My version, which in fact is only a subset of the one I use in my real Corona projects (you have to make some editorial decisions when writing a book!) begins like so:
local utils = {
  isSimulator = false,
  isIOS = false,
  isAndroid = false,
  isWin = false,
  isMac = false
};
While 99% of the time you don’t need to be concerned with what environment you’re app is running in, there are occasions where it comes into play. So, I have these flags that I can check to tell me if I’m running in the simulator, or on an iOS device versus an Android device, or whether it’s the Windows versus the Mac version of the simulator.
Of course, flags are no good unless you actually set them, and fortunately Corona provides a way to get the information you’ll need to set them properly:
if string.lower(system.getInfo("environment")) == "simulator" then
  utils.isSimulator = true;
end
if string.lower(system.getInfo("platformName")) == "iphone os" then
  utils.isIOS = true;
end
if string.lower(system.getInfo("platformName")) == "android" then
  utils.isAndroid = true;
end
if string.lower(system.getInfo("platformName")) == "win" then
  utils.isWin = true;
end
if string.lower(system.getInfo("platformName")) == "mac os x" then
  utils.isMac = true;
end
The environment variable tells you whether you’re running in the simulator or not, and the platformName gives you the rest of the information for the other flags.
Talking to Yourself: Log Messages
Earlier I showed you a call to the utils:log() function, and I talked about the print() function there, which is a global function Corona provides (Lua more specifically, but that’s just a bit of trivia for all intents and purposes). That function is actually good most of the time, but it has some problems. Namely, when you try to print a table, most of the time you’ll simply get something like this:
table: 025C6528
That is what you will see if, for example, you use
print(gameData);
as the last line in main.lua (the number may change each time but you get the idea). That’s not very helpful! So, the utils:log() function deals with tables and provides a more useful output of them. It also allows the log message to be even more useful by allowing you to log a location (meant to be a filename but in no way enforced as such), a message, and optionally an object.
function utils:log(inFilename, inMessage, inObject)
  if inObject == nil then
    inObject = " ";
  else
    inObject = " - " .. json.encode(inObject);
  end

  local logMessage = inFilename .. " - " .. inMessage .. inObject;
  print(logMessage);
end
First, if the inObject argument is nil, then it will be outputted as a single space, just to keep the final outputted text looking right. If it’s not nil, however, then the json.encode() function (which you already know about) is used to provide an actual dump of the object. Then the actual output message is constructed and your friendly neighborhood print() function is used to actually output it.
The upshot of all of this is that you get a consistent log message format, so, for example, if you execute:
utils:log("main.lua", "Here's gameData:", gameData);
then what gets printed is:
main.lua - Here's gameData: - {"score":0,"level":1}
That’s a much more helpful bit of logging than what print() alone gives you, and without having to do all that formatting every time you want to log something.
You could of course extend this function in a number of ways, perhaps outputting the current time so you can have a rudimentary profiling capability. It’s really up to you, but having a function like this is a very helpful thing to have.
Audio Mish-Mosh: Handling Cross-Platform Audio Concerns
The last function in utils.lua deals with a slightly sticky situation around audio. Essentially, this is one of those situations where you do have to take what device the app is running on into account. You see, for music, Mac (the simulator) and iOS devices use the .m4a format, whereas Android and the simulator under Windows uses the .ogg format. At least at present, there is no common format, aside from .wav, which isn’t typically appropriate for music since .ogg and .m4a tend to be a lot smaller due to compression.
function utils:getAudioFilename(inAudioName)
  if utils.isIOS == true then
    return inAudioName .. ".m4a";
  elseif utils.isAndroid == true then
    return inAudioName .. ".ogg";
  elseif utils.isWin == true then
    return inAudioName .. ".ogg";
  elseif utils.isMac == true then
    return inAudioName .. ".m4a";
  else
    return inAudioName .. ".ogg";
  end
end
So, any time you want to play some music, you’re of course going to (spoiler alert!) tell the Corona Audio API the name of the file you want to play. Do so by calling this function and passing it the name of the file sans extension. This function will then determine what environment it’s running in and return the full filename with the appropriate extension so that you get the .ogg or .m4a versions as appropriate. Just like with the utils:log() function, it’s much better to have this bit of common code in one place rather than have a bunch of if statements strewn throughout the code.
Then, the Closer Comes in to Finish the Ninth Inning
At the top of utils.lua you create the utils object, including a few flags. Then you add the methods to it. Since Lua will execute this file top to bottom, at the end you have a complete utils object with all the fields and methods you want. Therefore, to make this a proper module, the last step is to return that object:
return utils;
In main.lua, recall you did:
utils = require("utils");
Now it should be apparent why: the utils object built up in utils.lua is local to it and therefore not accessible to code anywhere else. By returning it at the end and holding the reference to it in that global utils variable, you now have a single instance of the utils object that you can access from anywhere, which is the general pattern of a Lua module.
Even Further Back: build.settings and config.lua
In a sense you’ve moved through this opening volley of code in reverse order, starting with scenes, then main.lua, then utils.lua. In a strange twist, it actually works to explain it that way! However, there’s one more piece of the puzzle that actually comes even before all of that, and that’s the build.settings and config.lua files, both of which come in the form of a Lua object.
The build.settings File
The build.settings file defines build-time properties and meta information that is (mostly) platform specific. The three most common elements that you’ll use are the androidPermissions element, the plist element under the iphone element, and the orientation element, all of which are present in the build.settings file for Astro Rescue:
settings = {

  orientation = {
    default = "landscape"
  },

  androidPermissions = {
    "android.permission.VIBRATE"
  },

  iphone = {
    plist = {
      UIStatusBarHidden = true,
      UIApplicationExitsOnSuspend = true,
      CFBundleIconFile = "Icon.png",
      CFBundleIconFiles = {
        "Icon.png",
        "[email protected]",
        "Icon-72.png",
        "[email protected]",
        "Icon-Small.png",
        "Icon-Small-50.png",
        "[email protected]"
      }
    }
  }

}
The orientation element is the simplest one: it tells Corona what orientation the game is to be played in. As you’ll see in the “config.lua File” section, all graphical coding in Corona is done against a virtual screen, independent of the physical screen of the device the game is running on. By configuring it as landscape, that virtual screen acts like a screen on a device that is (typically) wider than it is tall, like most smartphones when turned on their side.
Notice that here you’re defining the default orientation, but there’s more you can do within the orientation element. You can also handle how the screen will auto-rotate when the player turns the device. For example, when you’re playing Astro Rescue as it’s meant to be played, it looks like Figure 3-5.
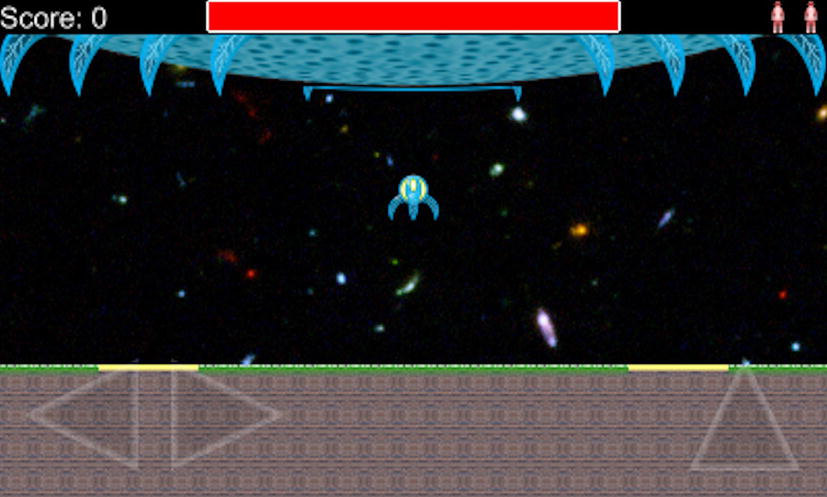
Figure 3-5 . Astro Rescue played as it’s meant to be played
What happens if the player rotates the screen 180 degrees, though? What they get is what you see in Figure 3-6.
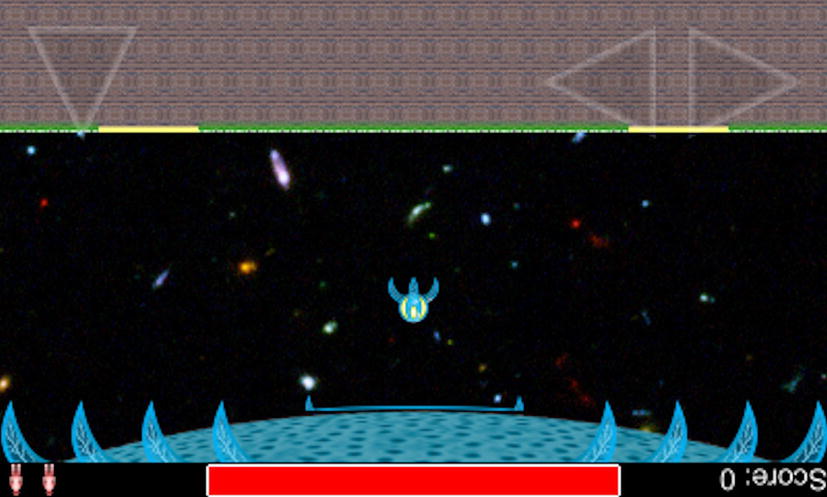
Figure 3-6 . I daresay it’s going to be a lot harder to play this way!
As you can see, that’s not quite what we want because, after all, shouldn’t it be the player’s choice which way to hold the device? To allow for this, add one more thing to the orientation element:
supported = {
  "landscapeLeft", "landscapeRight"
}
Now Astro Rescue supports landscape orientation both ways and will effectively rotate that virtual screen I mentioned to match the physical screen and keep right side up all the time.
In addition to landscapeLeft and landscapeRight you can also explicitly support portrait and portraitUpsideDown. For Astro Rescue, though, only the landscape orientations are needed since the game isn’t meant to be played in portrait under any circumstances.
Next is the androidPermissions element. This is where you define what permissions the Android build of the game will need. These are the permissions the user is shown when he installs the game. In the case of Astro Rescue we only need to specify the permission allowing the application to vibrate the device (assuming it supports vibration) when an explosion of the ship occurs during the game. The permissions here are numerous and of course Android specific, so I won’t describe all the possible permissions here. The Android developer documentation that Google supplies will list all the possible permissions; you simply add the values you need to the list in this element, and Corona and Android take care of the rest.
Note It’s good practice only to add permissions your application actually needs. Don’t take the lazy approach and just list everything you think you might need someday, as the intention of the Android permission system is that users can intelligently decide if an application is taking too many liberties with their device and data.
Last is the iphone.plist element, which is where we can set iOS-specific metadata that winds up in the Info.plist file built into every iOS application bundle. Since this element, like androidPermissions, is a platform-specific setting, and this book is focused on a library designed to make cross-platform development easier, I won’t go into too much detail here. Apple’s documentation provides all the possible values you can place here, but it’s only right to describe the values you see in the Astro Rescue build.settings file:
- UIStatusBarHidden: Specifies whether the status bar is initially hidden when the app launches.
- UIApplicationExitsOnSuspend: Specifies whether the app terminates instead of running in the background.
- CFBundleIconFile: A string with the name of the 57×57-pixel icon.
- CFBundleIconFiles: An array of strings containing the filenames of various application icons of various sizes for different iOS device screen resolutions and usages. My advice here is to create a single 512×512 application icon and simply resize it down as necessary.
- CFBundleDisplayName: A string that provides the display name of the bundle; that is, the text under the application’s icon.
Note In the Astro Rescue code download, you’ll also find an iTunesArtwork file, which is actually a PNG without the extension. You see this large graphic in iTunes Coverflow as you flip through your applications. It’s 512×512, hence my suggestion above: start with this one and shrink it down as needed, so you’ll always have your canonical One Icon Graphic to Rule Them All™ to serve as the basis for other usage.
The config.lua File
The config.lua file is where you can specify runtime configuration information that, in a sense, sets up the runtime environment for your application. Along with some other things, it’s largely where the virtual screen I mentioned is defined.
The way Corona works is that you design your application to run against a virtual screen, meaning a specified screen size. For example, in Astro Rescue, I’ve developed it against a virtual screen size of 480×800, a fairly common Android screen size. As you can see, the width and height in this file sets this up:
application = {
  content = {
    fps = 30,
    width = 480,
    height = 800,
    scale = "letterbox"
  }
}
What happens when you run the game on a screen with different dimensions? Well, Corona does intelligent content scaling for you, meaning it will resize everything to fit the physical screen. So, if the actual dimensions of the physical screen are 960×1600, then Corona simply has to double all the graphics, since your virtual screen size is half the physical screen size, and your application will fill the entire screen. Likewise, if the screen size is actually 240×400 . . . well, first of all, you should probably upgrade your device! Nevertheless, Corona will scale it down to fit in that case as well.
Now, I’m sure the question running through your head is what happens if the screen size is not an even multiple of the virtual screen size? The simple answer is it depends on the scale setting you see there. The letterbox setting that I’m using for Astro Rescue means that Corona will always maintain the same aspect ratio when it scales as the virtual screen, the cost being that you may end up with black bars on the sides of the physical screen, just like when you watch a letterboxed movie on your television.
You could also specify "none" as the scale value, in which case no scaling would be done. This is fine if you only want to support a specific-resolution device, but obviously that limits your potential user base, so it usually isn’t what you’ll want. The "zoomEven" scale option also maintains aspect ratio but will scale the content to fill the screen, even if that means some content is cut off. Last, "zoomStretch" will fill the screen without cutting off any content, but will not maintain aspect ratio. In my experience, most of the time you’ll want to use "letterbox" or "zoomEven". You also should design to a screen size that will scale evenly to the greatest number of target physical screen sizes possible. Corona used to recommend using the original iPhone size of 320×480 as your basis, but I personally find that to be a little too small for my tastes. The 480×800 I’ve used in Astro Rescue will scale nicely on most current devices with fairly little letterboxing, although you do see it on some devices.
Although not shown here, it’s important to note that there are two more attributes you can set that impact content scaling in a way: "xAlign" and "yAlign". These tells Corona how you want your scaled content aligned on the physical screen. By default it is centered, which is nearly always what you want. This results in black bars evenly distributed on the sides (or top and bottom) of the screen, just like watching a movie on a television. You can, however, align it to the left or right, top or bottom, if you so choose.
Note If you’re interested (and you probably will be when doing your own games!), there are tricks that will allow you to fill that letterbox bleed area with content. It can get a bit tricky to pull off effectively, though, so I’ve left that discussion out here, but a quick look in the Corona forums will turn it up in no time.
The last attribute specified here is "fps", which is the target frame rate of the game. Two values are valid here: 30 and 60. Note, though, that this is the target rate, so if your code takes more than 33 milliseconds to render a frame then you’ll start dropping frames. Also note that this frame rate, without delving into time-based main loops, affects the speed at which your game runs. For a game like Astro Rescue, 60 fps would cause it to run too fast.
I’ll just quickly mention some of the other attributes that can be present in this file that you may or may not need to use at some point. As with other things that aren’t directly used in Astro Rescue itself, you should look to the Corona documentation for more details if and when you need these attributes.
The launchpad attribute turns Corona LaunchPad analytics on or off. Launchpad is a service offered to Corona subscribers that helps developers market and monetize their application. Think of things like ads and social media public relations. It also provides analytic capabilities, which is primarily what this setting is for. With it, you can see who’s running your application, what devices they’re using, all that sort of insightful information.
Last, you can configure options that deal with dynamic image resolution in this file. This is the ability to swap in higher-resolution versions of your graphical resources for devices like the new iPad with its Retina display. Sure, you can use dynamic content scaling alone to achieve the same basic effect, which ensures that your graphics are the right size to fill the screen. However, you do this at the cost of clarity. Anytime you scale an image, you lose a little clarity. It might only be a little bit, in which case it’s probably going to be fine on most devices. The alternative is to use higher-resolution images instead, ones that are already sized properly for those high-DPI devices. That way, there’s no clarity loss, no blurriness introduced, and no fuzzy edges and those sorts of artifacts.
To do this, you define an imageSuffix attribute under the content attribute that defines the naming convention your graphics will use. For example:
{
  ["@2"]=2,
  ["-60p"]=.6
}
What this tells Corona is that when your game uses a graphic file named spaceship.png, and the game is running on a device with a screen that is exactly two times the virtual screen size defined by width and height, it should instead look for a file named [email protected] and use that instead. If spaceship.png is a 120×120 image then [email protected] should be 240×240. That way, you can have your art team draw it properly at that size and not simply let Corona resize the smaller version.
The second value, ["-60p"]=.6, may look a little funky, but all it is saying is that if the physical screen size is 60% the size of the virtual screen, then use an image named spaceship-60p.png instead. You have complete control over these dynamic sizes.
Caution It’s important to keep in mind that this dynamic substitution happens at runtime, which means that all the different versions of a single graphic must be included in your application bundle. If you aren’t careful you can wind up with a file size that is much larger than you expect, even when 90% of the graphics won’t even be used on a given device! My advice is to use dynamic content scaling as far as you can, but use dynamic image resolution when it goes too far. If your virtual screen is 320×480 then you’re probably fine with dynamic scaling out to 640×960, which just so happens to be the iPhone 4 screen versus the smaller iPhone 3GS. After all, Corona’s scaling algorithm is quite good! However, to support the iPad at 1024×768 you may want to consider dynamic substitution for the larger screen to avoid too much blurring.
Summary
In this chapter, you explored the core architecture of the Astro Rescue game. You looked at the configuration files that Corona supports. You explored the Storyboard API and learned how it allows you to break our game into separate scenes.
You also looked at some concepts that tie into all of this, including events and event listeners. You got your first look at some of the system API and display API. Last, you began to understand the overall code structure of the game.
In Chapter 4, you’ll start to explore the real core of the Astro Rescue game. You’ll see in detail what makes the title scene and main menu scene tick, among other things, and begin to explore things like graphics, transitions, and user interface widgets.