Title, Menu, and Settings Scenes
Okay, so you know Astro Rescue has a title scene, a menu scene, and a settings scene, in addition to the actual game scene itself. In Chapter 3 we saw all these, on top of all of the basic configuration files and the beginnings of the actual code in main.lua.
Now it’s time to move into the scenes themselves. Some are quite simple (the title scene), while the others (menu and settings) have a little more meat on their bones, as the saying goes. All three of the scenes we’re looking at in this chapter are actually quite small in terms of overall amount of code, but the nice thing about them is they’ll force us to look at quite a bit of the Corona API along the way.
I’ll kick things off with what is most definitely the simplest of the bunch, the title scene.
Welcome, Ladies and Gents: The Title Scene
The title scene, as shown in Figure 4-1, doesn’t have a lot going on, but it introduces a number of Corona API features that you’ll use throughout the game. In action, though, it is much more interesting than on the printed page: the background does a cool rotating tunnel-y thingamajig. It’s fairly subtle, but gives a nice animated background over which the title graphic can be superimposed.

Figure 4-1 . The Astro Rescue title scene
As discussed in Chapter 3, the Storyboard API is used for this scene, which means that it all starts with a scene object:
local scene = storyboard.newScene();
This call gives you back an object that has all the internal plumbing needed for Corona to work with your scene. That plumbing isn’t generally important to you, save for a few bits that leak out into your sphere of responsibility, as we’ll see shortly. Going forward, I’ll leave this line of code out when discussing other scenes as it’s the same for all scenes, but rest assured it’s present as the first line of code for each and every scene in the game.
First things first—you have some variables to declare:
local bg1;
local bg2;
local rot = 0;
Note that all of these variables are declared as local, so they are only visible within this module, meaning to the code in the titleScene.lua file. The variables bg1 and bg2 are references to the background graphic, which you can find in the file titleBackground.png. Why there are two variables, when logically you would expect to only see one (seeing as there’s only a single background graphic file), is because of the animation that happens with it (and that’s the purpose of the variable rot as well, which just stores a number).
Creating the Scene
That’s jumping ahead a bit, though. Before you get to that, you have to see where the scene’s work begins, in the createScene() method:
function scene:createScene(inEvent)

  utils:log("titleScene", "createScene()");
Out of habit, I like to have an entry message in each function or method, with the exception of those that are called excessively and would clog up the console window. I also typically have an exit message, but not always. This just makes it easier to glance at the console window when running in the simulator and see the overall flow through my code. That’s all this first line of code does, and you’ll see similar lines throughout the game so I won’t generally mention it again unless there’s something unusual about one of the calls.
A Little Jaunt into Audio
The next two lines of code deal with the music that plays behind this scene (in fact, behind all three of the scenes discussed in this chapter):
titleMusic = audio.loadStream(utils:getAudioFilename("titleMusic"));
audio.play(titleMusic, { channel = 1, loops = -1, fadein = 500 });
The audio.* namespace has quite a few functions and properties; audio.loadStream() is just one of them. This method is responsible for opening an audio file for streaming, which means chunks of it are read in from storage as it is played, as opposed to audio.loadSound(), which you’ll see in the game code that loads the audio file into memory completely in one go. Generally, when you want to play music it is better to stream it, since those files tend to be a lot bigger than sound effects used during gameplay. You simply pass this method the name of the audio file to load, including the path. The getAudioFilename() in the utils class is used here, which handles getting the appropriate type based on operating system and environment, as discussed in Chapter 3.
The audio.loadStream() method returns a handle to the audio resource that you can then pass to methods in the audio.* namespace, such as audio.play(), which starts playing it. You pass that handle to audio.play() as well as an options object that defines how you want the audio played. Here, I specify the channel to play it on as 1, which you’ll recall from Chapter 3 was one of the two channels I reserved for this purpose. I also pass -1 for the loops attribute to indicate I want the audio to loop back around at the end and start playing again continuously. You can pass any number for loops. A value of 0 means to play the sound exactly once and stop, 1 means play it once and then loop it once (so it plays twice in total), and so on. Last, the fadein value of 500 means that the audio will fade in to full volume over the course of 500 milliseconds, which matches the time it takes the scene to transition onto the screen fully, so the audio plays nicely synchronized with that animation.
Note Although typically you do not need to reserve channels, I actually have run into some issues that required me to do so. I’m still not sure what the root cause was, but what was happening is that the channel returned by audio.play() wouldn’t be valid later when I tried to stop() the music. This shouldn’t have happened and I actually suspect it was a bug in Corona, but the simple solution was just to reserve channels for the two music files that are played in Astro Rescue and use them specifically for each music file. That solved the problem, so my suggestion is don’t reserve channels unless you come up against a situation like this where you need to, since it’s better to let Corona (and the operating system) manage the channels automatically. I just wanted you to understand why I did it this way.
The other two options you can pass to audio.play() are duration, which means play the audio for the exact number of milliseconds specified and then stop, regardless of whether the audio was actually finished or not; and onComplete, which is a reference to a function that will be called when the audio finished playing. This is referred to as a callback function and is a common idiom seen throughout Corona. It allows you to trigger actions when specific events occur, in this case when the audio finishes playing. We’ll see such callbacks a number of times as we progress through the Astro Rescue code.
Although I haven’t done it here, you might also want to call the audio.setVolume() method. This accepts a volume value between 0 and 1, as well as an options object that includes a single channel attribute. A value of 0 for channel will adjust the volume of all channels, whereas omitting the options object entirely sets the master volume, which is a bit different than adjusting all channels (the volume of a given channel is effectively scaled by the master volume).
Tip The notion of an options object is very common to many Corona functions so you’ll see it all over the place going forward. I personally prefer this API design pattern, since it is more self-documenting. For example, audio.play(h,{ loop:-1,fadein:500}); is quite a bit clearer than audio.play(h,-1,500); since you don’t need to go checking documentation for parameter orders and meanings with the options object design. It also means you don’t have to worry about breaking your code if you mess up the order, since the order of the attribute in an options object doesn’t matter, whereas it does for a plain old function call.
Although not used in Astro Rescue, a few other members of the audio.* namespace are worth mentioning now:
- audio.pause() and audio.resume() allow you to pause and resume a playing audio file, be it a stream or not. You pass to them the channel number to pause or resume.
- audio.getDuration() returns the length of a loaded audio resource in milliseconds. You pass to this the handle returned by audio.loadStream() or audio.loadSound().
- audio.rewind() and audio.seek() allow you to rewind and start an audio resource playing from the beginning or jump to a specific point in time of the audio resource, respectively. For resources loaded with audio.loadSound() you pass this a channel number, and for those loaded with audio.loadStream() you can actually pass either a channel number or a handle. Resources loaded with audio.loadSound() are allowed to be shared on multiple channels simultaneously, while resources loaded with audio.loadStream() cannot and you must load multiple instances of it if you need to play it on more than one channel at a time. So, the meaning of handle and channel are essentially identical when dealing with resources loaded by audio.loadStream() but not resources loaded with audio.loadSound().
- audio.freeChannels, audio.totalChannels, audio.reservedChannels, and audio.usedChannels are informational properties that tell you, respectively, how many channels are currently free, how many in total are available on the system, how many are reserved, and how many are currently in use.
Our First Foray into Graphics
Now that you have seen how audio works, you can start to look at the other big sense you use when playing a game: the visual. In other words, graphics! Like audio, everything related to graphics is found almost entirely in a single display.* Corona API namespace. Moreover, all of the action takes place using a single entity: the DisplayObject construct. You don’t create DisplayObject instances yourself; instead you create graphical elements using methods available in the display.* namespace, such as loading a PNG file:
bg1 = display.newImage("titleBackground.png", true);
bg1.x = display.contentWidth / 2;
bg1.y = display.contentHeight / 2;
bg1.xScale = 2;
bg1.yScale = 2;
self.view:insert(bg1);
Everything that gets drawn on the screen in Corona is ultimately a DisplayObject. Draw an image using a JPEG file? It’s a DisplayObject. Draw a single line? It’s a DisplayObject. Draw some text? Yep, DisplayObject again! This is a much more powerful approach than it may at first seem; because the DisplayObject class has a number of properties and methods, it means that anything on the screen has them.
Caution The true at the end tells Corona you want the full-resolution version of the image. By default, Corona will do some internal scaling of larger images to conserve texture space. While that’s generally what you want, I’ve found that many times it will result in images that aren’t drawn fully, especially when dealing with full-screen images like the background image. My advice is to always pass true when loading images unless you have a specific reason not to, just to avoid this problem. That being said, watch your texture memory usage and change to true if you see it getting too large.
For example, positioning an image is accomplished easily by setting values for the x and y attributes, as you can see in the previous bit of code. Here, I want to center the background image, so I take the width and height of the screen as available in display.contentWidth and display.contentHeight and divide each by 2.
That takes some explanation, though, because if you’ve done any work with graphics before you would usually expect that x and y specify the top left-hand corner of the image, but in this case that’s not true. By default, DisplayObjects have a reference point that is actually their center, and it is this reference point that you’re changing when you update x and y. Now, if you prefer to have the top left-hand corner be the reference point, you’re welcome to do so by calling the setReferencePoint() method on your DisplayObject and passing it display.TopLeftReferencePoint. From then on, graphics will position as you expect. You can specify other reference points as well, including all the corners and midpoints on the edges in the same way, but the top left-hand corner and center are the two you’ll see the most (and are the only two used in Astro Rescue).
In addition, you can change the size of any DisplayObject by setting xScale and yScale, as done here, to make the background image twice its normal size (the “why” behind that is coming up shortly!)
The final piece of the puzzle is the self.view:insert(bg1); line and it introduces another concept: the DisplayGroup. Every scene has a DisplayGroup associated with it that contains all of the DisplayObjects used in the scene. A DisplayGroup is in fact just a specialized form of DisplayObject that can have child elements. This means that it supports all of the same methods and properties as a DisplayObject does. The benefit to this is that if you have a bunch of DisplayObjects—for example, asteroids on the screen in a game—and you want to do something to all of them, you only need to do it to the DisplayGroup and they’re done! Want to make them all twice as big horizontally? Assuming bg is the DisplayGroup they’re all in, then you just call bg.xScale=2; and that’s that! The self.view reference is the DisplayGroup that Storyboard automatically creates for you and attaches to the scene object created at the top of this source file (self obviously refers to the scene in this context). Calling the insert() method on it, and passing the bg1 DisplayObject reference to it, is all it takes to get the background image into the scene’s DisplayGroup. And yes, before you ask, there’s a corresponding remove() method to take elements out of a DisplayGroup, but as you’ll see in the section on the destroyScene() method, there’s a better way than that.
It is important to realize, however, that as you add DisplayObjects to a DisplayGroup you are also effectively defining the z index, or stacking order, of the elements within the DisplayGroup. In other words, an item added after bg1, for example, will appear on top of it. That comes into play because although it isn’t shown here, there is another copy of the background image created in the variable bg2. This too gets added to the group, so it would obscure bg1 when drawn (which, since they are the same image, would not visually make any difference).
However, as you know, the background has a little rotation animation thing going on, and the first part to how that works is accomplished with this line of code:
bg2.alpha = .5;
That sets the alpha, or transparency, of the second copy of the background image to half. This means that bg1 will be visible through it a little bit. I’ll jump the gun a bit here and tell you that the rotation effect is accomplished simply by rotating bg1 and bg2 in opposite directions, but that wouldn’t accomplish anything if the one on top weren’t semitransparent—hence why this line of code is needed.
The last little bit of code in createScene() is this:
  local gfxTitleHeader = display.newImage("titleHeader.png", true);
  gfxTitleHeader.x = display.contentCenterX;
  gfxTitleHeader.y = display.contentCenterY;
  self.view:insert(gfxTitleHeader);

end
As you know by now, this is creating a DisplayObject, this time the title graphic. Note that this is the last DisplayObject created, and that’s no accident: it gets inserted into self.view last, which means it’ll be on top of both of the background images.
The Stage
One other important concept to be aware of is the stage. This is a special DisplayGroup representing the screen itself. All DisplayObjects, whether specifically added to a DisplayGroup or not, are automatically a child of the stage. More precisely, if you do not add them to a DisplayGroup explicitly, they are direct children of the stage. If you add them to a DisplayGroup, self.view for example, then they’re indirect children of the stage because their parent self.view is a direct child of the stage. If you’re working with the Storyboard API, as we are in Astro Rescue, then you generally won’t deal with the stage directly at all since you’ll be dealing with view-specific DisplayGroups instead.
However, it’s important to understand this because what if I didn’t add the title graphic to self.view? Well, you should go give that a try! What happens is that when the title scene is transitioned on and off the screen, the title graphic won’t be a part of the transition. You see, the transition between scenes is accomplished by animating the self.view DisplayGroup, changing its properties over time really, which, remember, will affect all of its children too. If something isn’t in the group then it won’t be animated, but it still will be drawn to the screen because it’s still a child of the stage, as is the self.view. There are times when you might want that to happen, but usually it’ll be a mistake, and an easy one to fix: make sure the offending DisplayObjects are added to self.view and you’re good to go.
Starting the Scene
After the createScene() method is executed, the enterScene() method comes next:
function scene:enterScene(inEvent)

  utils:log("titleScene", "enterScene()");

  Runtime:addEventListener("touch", scene);

  Runtime:addEventListener("enterFrame", scene);

end
The only goal here is to set up listeners for two events: touch and enterFrame. I’ll talk about them in the exact opposite order, just to be different!
You’ll recall that in config.lua you specified a frame rate of 30 fps. For every one of those frames Corona generates an enterFrame event. Now, you could, in theory at least, get away with writing an entire game without ever using that event, but that would be a bit unusual.
Generally, you want to do something for each of those frames. Maybe you want to move the player around the screen, or update the scrolling star field in the background (or rotate some background images—hint hint!). In either case, you want to execute some code when a new frame is about to be drawn so you can do your updates before Corona puts anything on the screen. The enterFrame event serves exactly that purpose.
To deal with enterFrame you need to listen for the event. When you call the addEventListener() on an object that supports it you’re saying that object wants to be notified whenever a given event occurs, and when it does, to call the specified function.
You can attach event listeners to many objects, but what if you don’t have a specific object to attach it to? That’s where the Runtime object comes into play. Runtime is a global object that Corona maintains for this purpose. With it, you can listen for events that are more global in nature, such as enterFrame. The alternative is to have a specific object listen for the event, which you could do, perhaps the title graphic in this case, and do all your work there. That’s pretty unusual, though, as you generally want to listen for events at as high a level as makes sense and not force it to a lower level that isn’t really necessary.
Take, for example, the other event listener set up here, the one for the touch event. Touch events are typically done at a lower level, perhaps the title graphic for example, because frequently the touch interaction is meant for a specific object, so you want to register the touch on that specific object on the screen. What that would mean is that when the title graphic itself is touched, the specified function is called, but not if anything else is touched.
What if you want the user to be able to touch anywhere on the screen, though? That’s where Runtime comes into play: it handles the touch event on a global level, same as enterFrame. It won’t matter what object you touch; the event listener you set up will fire.
Tip In fact, you can have multiple listeners for a given event. So, for example, if you were going to manipulate the title graphic and also the background graphic, you could attach an enterFrame listener to both and have the update code in two separate functions. Sometimes that’s a good idea as it keeps the code for a given object encapsulated in a sense within the object, but more usually you’ll see a single function in the case of enterFrame events. The touch event handler is a little different and depends on the use case, but simply put, in this case we want the touch to register anywhere on the screen; hence using Runtime there is the right thing to do.
Now, the astute reader will notice that I didn’t pass a reference to a function as the second argument to addEventListener() but actually passed a reference to the scene object. This too is valid, but it means that you need to ensure you have methods named after the events on the scene object, enterFrame() and touch() in this case. That’s a good way to do things because it keeps your code encapsulated within your scene object and avoids any potential naming conflicts. However, the choice is entirely yours. You could pass references to stand-alone functions if you preferred, or even pass functions inline, as I’ve done in a number of places throughout the Astro Rescue code. Different strokes for different folks! Also, note that if you do this for multiple objects then that single method will need to determine what object was actually touched and act accordingly. This may or may not be work you want to do, but again, circumstances will dictate which approach makes sense.
Exiting the Scene
Just like enterScene(), we have just a very small amount of work to do in exitScene():
function scene:exitScene(inEvent)

  utils:log("titleScene", "exitScene()");

  Runtime:removeEventListener("touch", scene);

  Runtime:removeEventListener("enterFrame", scene);

end
Any time you add an event handler to Runtime you should remove it, and most usually the place to do so is in exitScene(), with them being set up in enterScene().
Note Event listeners set up on specific objects don’t need to be removed if the object is added to self.view because those resources are cleaned up automatically when the scene’s DisplayGroup is destroyed by the Storyboard API. However, the caveat is that you can’t have any references to the object in your code aside from the DisplayGroup, otherwise that reference will keep the object, and hence the event listener, from being cleaned up. In other words, a memory leak (and maybe worse if that event listener still fires when you don’t expect it to!).
The trick here is that you need to pass to removeEventListener() not only the name of the event to stop listening for, but a reference to the function (or object, as is the case here) that handles it. This is tricky because if you use inline functions you won’t have such a reference and you’ll end up with a memory leak unless the object the listener is attached to gets destroyed automatically as previously described. Basically, be careful with inline event handlers!
Destroying the Scene
When the scene is finally destroyed by the Storyboard API, you get a call to our destroyScene() method:
function scene:destroyScene(inEvent)

  utils:log("titleScene", "destroyScene()");

  bg1:removeSelf();
  bg1 = nil;
  bg2:removeSelf();
  bg2 = nil;

end
Cleaning up resources in Corona is a two-step process: removing the object and nilling the reference to it. For the two background images we use the removeSelf() method, which is present by virtue of their being DisplayObjects. This one method call takes care of removing the object from its parent group and destroying the resource. However, Lua will maintain a table for this resource, although one with no real value. To get rid of that we have to ensure that any references to the table are nilled out. The variables bg1 and bg2 are the only two such references, so setting them to nil completes the procedure.
Caution A DisplayObject can only ever, directly at least, be a child of a single DisplayGroup. The DisplayGroup that is its parent could be itself a child of another, but that’s fine because the DisplayObject itself is still only the direct child of one DisplayGroup. If you insert a DisplayObject into a DisplayGroup after it was already inserted into another, it is removed from the first and moved to the second. Watch out for this as it’s a nasty, subtle bug that’s a pain to track down!
Some Unused Scene Event Handlers
If you browse through the Astro Rescue code, you’ll notice that the willEnterScene() and didExitScene() methods are present but are empty, save for some logging. These aren’t needed for your purposes here, but out of habit I prefer to have all the Storyboard lifecycle methods present so it takes less time later if I need to add something in them. There’s certainly no harm in them being present but empty.
Handling Touch
The next method in our scene object is that touch() method I mentioned earlier:
function scene:touch(inEvent)

  utils:log("titleScene", "touch()");

  if inEvent.phase == "ended" then
    utils:log("titleScene", "Going to menuScene");
    storyboard.gotoScene("menuScene", "crossFade", 500);
  end

  return true;

end
Its purpose is very simple: when the user touches anywhere on the screen, you want to transition to the menu scene. However, touch events are more complex than they might at first seem.
Think about touching something (let’s keep it family friendly and go with your phone!). A touch is really a combination of events: the start of the touch when contact is made, perhaps some movements as you glide your finger around the surface, and then the end of the touch when contact is broken. Corona’s touch events provide you with this level of granularity in the object passed in to the event handler, inEvent in this case.
This object has a phase attribute that tells you what part of the touch event occurred. I only want to start transitioning to the new scene when the user lifts their finger off the screen, so we look for the ended phase. When it occurs it’s a simple matter of calling storyboard.gotoScene(), as we saw in main.lua, and telling it to go to the menuScene. I also want a crossfade animation, meaning the title scene is fading out as the menu scene is fading in, so that’s the transition effect I specify. I want this to happen over half a second, so 500 milliseconds is the third argument passed.
In addition to the phase the inEvent object contains other information, such as
- name: The name of the event, such as "began" or "ended".
- target: A reference to the object that was touched.
- x and y: The location on the screen of the touch event.
Note Every type of event, of which touch is just one, has its own sets of attributes. While you’ll see a few others, I leave it as an exercise for the reader to take a look at the Corona documentation for the others that aren’t used in Astro Rescue.
Continuous Action
Earlier, you saw the event listener added for the enterFrame event. As I explained there, since the scene object itself was passed as the listener to addEventListener(), there needs to be an enterFrame() method on the object, and that’s the next bit of code:
function scene:enterFrame(inEvent)

  bg1.rotation = rot;
  bg2.rotation = -rot;
  rot = rot + 1;
  if rot == 359 then
    rot = 0;
  end

end
As you can see, there’s not much to it. That rot variable that we saw at the start is first used to set the value of the rotation attribute of both background images, rotation being another of the attributes all DisplayObjects have. The rotation occurs around the reference point of the images, which you’ll recall is by default the center for a DisplayObject. That makes perfect sense here, and is another reason you may want to think twice about changing the reference point: rotations become a little tougher to deal with because you get an off-center rotation, which usually isn’t what you want.
Note This also explains the scaling you saw when bg1 and bg2 were loaded; without that, as the images rotate, you would see corners come into view and the illusion would be broken. Go ahead and comment out the xScale and yScale values to see what I mean.
In any case, the value of rot is negated for the bg2 image, which means it’ll wind up rotating counter to bg1. Recall that bg2 has an opacity set to half, so bg1 is partially visible through it. With them rotating in opposite directions you get the subtle little animation you see when you run the game. Since 360 and zero are essentially equivalent, the rotation simply loops around to zero when it hits 359 degrees, which gives us a continuous rotation. The rot value updates 30 times a second, which as it happens is a nice speed for the effect.
Wrapping up the Title Scene
There’s just a small bit of code remaining in titleScene.lua, and it’s code that executes as soon as the module is loaded, since it’s not within any function:
utils:log("titleScene", "Beginning execution");

scene:addEventListener("createScene", scene);
scene:addEventListener("willEnterScene", scene);
scene:addEventListener("enterScene", scene);
scene:addEventListener("exitScene", scene);
scene:addEventListener("didExitScene", scene);
scene:addEventListener("destroyScene", scene);

return scene;
You know what this is all about from Chapter 3: all the lifecycle event handlers for the scene have to be registered or none of the code you just looked at will ever execute! Last, the scene object is returned, as required to make this a proper Lua module, and as the Storyboard API dictates we do.
What’ll You Have? The Menu Scene
After users leaves the title scene they are transported, as if through some form of magic (!), to the main menu scene. Well, main menu scene implies there’s another menu scene somewhere, and there’s not, so just plain menu scene will suffice. This scene is, err, seen in Figure 4-2 and is actually the most action-packed of all three of the scenes discussed in this chapter, both in terms of what’s happening on the screen and what’s happening in the code.

Figure 4-2 . The Astro Rescue main menu scene
Creating the Scene
The scene creation begins, as usual, in the createScene() method with a little bit of logging and a new method call:
function scene:createScene(inEvent)

  utils:log("menuScene", "createScene()");

  self.buildShapes();
I’ll show you the buildShapes() method shortly, but for now I’m sure you can guess by the name that it is responsible for building those shapes you see in the background of the scene. Before that, though, you have some audio code:
if audio.isChannelPlaying(1) == false then
  audio.rewind(titleMusic);
  audio.play(titleMusic, { channel = 1, loops = -1 });
end
Here we get to see a little more of the Audio.* API in action. Since in main.lua you told the Storyboard API to purge scenes any time it switches between them, you have a little bit of a potential problem with the music. You’ll recall that the music begins playing in titleScene. However, there is another path to the menu scene: after the player stops playing the game. In this situation, the title music would not be playing. To deal with this, the audio.isChannelPlaying() method is called to see if channel 1 is playing (remember channel 1 was reserved for this particular music resource). If it is then there’s nothing to do, because the user must have come from the title scene (more precisely, the user hasn’t started playing the game yet, which is what triggers the music to stop playing). If it’s not playing, though, then you have to make sure you start at the beginning by calling audio.rewind() on the titleMusic stream resource and then start playing it again. This ensures that the music is played in all cases when the menu scene is shown.
Next, you need to create the menu items for the user to click, beginning with the Start Game text:
local txtStartGame =
  display.newText("New Game", 0, 0, native.systemFont, 52);
txtStartGame.x = display.contentCenterX;
txtStartGame.y = display.contentCenterY - 170;
txtStartGame:addEventListener("touch",
  function(inEvent)
    if inEvent.phase == "ended" then
      clearGameData();
      audio.stop(1);
      utils:log("menuScene", "Start Game tapped");
      storyboard.gotoScene("gameScene", "zoomOutIn", 500);
    end
  end
);
self.view:insert(txtStartGame);
The display.newText() creates a text object, which is a DisplayObject at the end of the day, so you can manipulate it like any other graphic resource. You pass to this method the text to create, the x and y coordinates of the top left-hand corner of the text, the font to use (either native.systemFont or native.systemFontBold), and the size of the text. Once the text is created, you position it by manipulating x and y attributes because, again, this is just a specialized DisplayObject and that’s the simplest way to move one around (yes, there are other ways, as you’ll see later).
You also need to add an event listener to it to handle touch events. Recall on the title scene where you used Runtime to add the event listener? Well, in this case, you want to register touches on this object only, so the touch event listener is attached to that. I again use an inline event handler here, just because I tend to like that approach since it keeps all the code related to this object contained in the same area of the source, but that’s entirely a style choice.
In any case, when the touch event occurs you check to see what phase is in progress and in this case, only the event that ended has relevance. So, the user can hold her finger on this text object as long as she wants, but the action won’t be triggered until she lifts her finger.
Once that happens, there are a couple of tasks to perform. First, game data needs to be cleared, as discussed in Chapter 3, so that the player is starting fresh. The title music then needs to be stopped, which is a simple matter of calling audio.stop(1); where 1 is the channel the resource is playing on (you typically would use a variable here, the one that recorded what channel the resource was played on, but since you reserved this channel specifically for this music, the number is hard-coded instead). Last, a transition to the gameScene is started, which you’ll start exploring in Chapter 5 when you start getting into the game code itself.
Tip The positions of the menu items are simply eyeballed. The horizontal position is simple: display.contentCenterX conveniently provides the x coordinate of the center of the screen, and since a DisplayObject by default has a center reference point, this centers all the text. The vertical value, however, is a little trickier and is where the eyeballing comes into play. Once you have the center of the screen with display.contentCenterY, you just adjust it up or down as appropriate to get the spacing you want. Sure, I could have calculated this value dynamically based on number of menu items, size of each, and so on, but for a simple menu like this, that’s just added complexity. Certainly, if you were doing this game for real to sell, I would suggest going through that extra effort just so that when you move, add, or subtract items later, their positions are maintained automatically.
Next, you have the Continue Game menu option. However, I haven’t shown that code here because aside from the text obviously being different, there’s only one other difference: the clearGameData(); call is replaced by a loadGameData(); call. If you remember from Chapter 3 what these methods do, it should be obvious why this is so: in this case, you need to retrieve the saved game state so the player can pick up where she left off.
The next text object is the Settings option, and again I haven’t shown this code (in the interest of sparing the life of a tree or two!) because the only substantive change is in the event handler, where the only thing that needs to happen is to transition to the settings scene.
Finally, you have the Quit menu option, which does have some important differences:
  local txtQuit = display.newText("Quit", 0, 0, native.systemFont, 52);
  txtQuit.x = display.contentCenterX;
  txtQuit.y = display.contentCenterY + 170;
  txtQuit:addEventListener("touch",
    function(inEvent)
      if inEvent.phase == "ended" then
        utils:log("menuScene", "Quit tapped");
        audio.fadeOut({ channel = 1, time = 500 });
        transition.to(scene.view, { alpha = 0, time = 500,
          onComplete = function()
            os.exit();
          end
        });
      end
    end
  );
  self.view:insert(txtQuit);

end
There’s not a whole lot more going on here, or so it seems at first, but in fact the callback function here introduces a new concept that is incredibly powerful in Corona: the transition.* API.
With a grand total of only four methods, the transition.* namespace is one of the smallest in Corona land, but despite that it’s really one of the most powerful. Take this particular event handler, for example. The goal you’re trying to accomplish is to gently fade the screen to black over the course of half a second. Now, you know at this point that you can mess with the alpha attribute of the scene.view DisplayGroup to pull that off. You could set up a variable that has a starting value of 1, since that’s the maximum alpha value. Then every time the enterFrame event occurs you could decrease the value by .06 (the maximum alpha value of 1 divided by one-half of our frame rate of 30 fps, so 1 / 15, or .06, rounded down) and update the alpha attribute of scene.view, and you would get what you want.
However, that sounds to me like too much work! Instead, a single line of code can accomplish the same thing! The transition.to() method allows us to animate the attribute(s) of an object over a period of time. The word animate here simply means “to change over time.” Therefore, first you pass to it what object we want to animate, scene.view in this case, plus an options object. The options object contains two attributes: alpha and time. The time attribute is obvious: how many milliseconds should this transition, or animation if you will, take to complete? 500 milliseconds is half a second, of course, so that is the answer here.
The alpha attribute’s value defines the target value of the attribute. You’re fading to black, which means we want the DisplayGroup to become completely transparent, so a value of 0 is the right answer.
It’s optional to have an event handler to a transition like this, but in the case of exiting you actually want to be made aware of when the transition complete so you can shut the application down. So, set up a function and pass it as the value of onComplete, and when it fires you have only to call os.exit().
Caution One thing to be very aware of is that Apple will not accept applications for publication in their store that have an explicit “exit” or “quit” function like Astro Rescue does, and so using this particular API call in any way in your app will keep it from getting past Apple’s scrutiny. As a learning exercise like this, it’s fine, but keep this in mind when working on your own games.
In addition to os.exit(), which simply shuts the application down, the os.* namespace provides a number of other OS-related functions:
- Getting the current system date and/or time: os.date() and os.time()
- Getting the approximate number of seconds of CPU time the application has used: os.clock()
- Getting the amount of time between two time values: os.difftime()
- Deleting or renaming a file or directory: os.remove() and os.rename() (these two are actually a little out of place if you ask me, but so be it!)
Getting back to the notion of transitions though, you also have the transition.from() method to use. This works the exact opposite of transition.to(): you specify the starting value in the call and the current value of the attribute to be manipulated becomes the ending value.
Whether you use transition.to() or transition.from(), they share a common set of options. In addition to time and onComplete they are as follows:
- transition: This allows you to specify an easing function, which is used to change the value over time. The default easing function, linear, just changes the value consistently over the specified period (or over the default period of 500 milliseconds). However, if for example you want to speed up the animation the closer it gets to the end, you could specify the easing.inExpo function instead. Easing functions are, frankly, a little hard to describe and are better seen, so I won’t attempt to document all of them here; the Corona documentation should be your go-to source for that (or, better still, trying each one). Also, note that you can write your own easing function. It’s just a regular Lua function with a specific method signature that returns a value each time it’s called.
- delay: This allows you to specify some number of milliseconds to wait before the animation begins (defaults to none).
- delta: This is a Boolean. When false, which is the default, the values you specify for the attributes to be changed are specific values, so if you say alpha 1 it means animate alpha to a value of 1, assuming a call to transition.to(). If you specify delta as true, though, then that same value of 1 means change the value of the alpha attribute by one. If the current value were 0, then you would get the same effect. If it were already 1, though, then you’d be changing it to a value of 2 over the lifetime of the transition, which for alpha probably won’t do what you want. It seems that Corona clamps the value to 1, so in this case it wouldn’t do any harm, but imagine changing colors instead and you can see how you wouldn’t get the result you want. Oftentimes, using true for delta is convenient if you’re moving an object, which of course you can do my manipulating the x and y attributes. If you want to move a spaceship 50 pixels to the right from its current position, for example, setting delta to true and x to 50 would accomplish that. Setting delta to false would result in the ship moving to absolute position 50,y where y is its current y coordinate (assuming that wasn’t being animated at the same time—yes, you can animate as many attributes at the same time as you wish!).
When you’re specifying options for a transition, any attributes of the options object that aren’t one of these known attributes are assumed to be the names of attributes of the object you are animating. So, alpha, x, y and strokeWidth would all qualify for example.
The last important thing about transitions to know is that when you call transition.to() or transition.from(), what’s returned to you is a reference to a tween, which is the term used to describe an animation over time. Often, you won’t care about this, but sometimes there will be cases, as is true in Astro Rescue as you’ll see in later chapters, where you may want or even need to stop a transition before it completes. When this situation arises you can pass that tween reference to transition.cancel() and thy will is done!
The last method in the namespace, transition.dissolve(), is a shortcut for a common transition where you transition between two overlapping images, with one fading to transparent while the other fades to opaque. You can accomplish the exact same thing with two simultaneous to and from animations, but this method provides a shortcut since it’s so common.
Caution When using transition.dissolve() you do not have access to the onComplete and onBegin callbacks, nor can you cancel it. This is something to think carefully about if you want this sort of transition. While it’s more work to deal with two transition calls and potentially two cancel calls, if that’s a need in your project you don’t really have much choice.
Some Unused Scene Event Handlers
As with the title scene, a few methods are not used in this scene: willEnterScene(), enterScene(), exitScene(), didExitScene(), and destroyScene(). They aren’t needed for your purposes here so they’re just empty methods (empty save for the logging, which I personally still like to see in the console so I know things are happening as expected).
Oh, Those Beautiful Shapes!
Now you’ll go back to the future and look at that buildShapes() method that was called early in the enterScene() method. It’s a fairly good-sized chunk of code, but it’s also relatively simple and straightforward.
function scene:buildShapes()

  for i = 1, 10 do

    local shape = scene.createShape();
    shape.xScale = math.random(1, 3);
    shape.yScale = shape.xScale;
    shape:setReferencePoint(display.CenterReferencePoint);
    shape.x = math.random(display.contentWidth);
    shape.y = math.random(display.contentHeight);
    shape.rotation = math.random(1, 360);
    if math.random(1, 2) == 1 then
      shape.rotateClockwise = true;
    else
      shape.rotateClockwise = false;
    end

    shape.rotateTransition = function(inShape)
      if inShape.rotateClockwise then
        transition.to(inShape, {
          time = 3000, delta = true, rotation = 360,
          onComplete = inShape.rotateTransition
        });
      else
        transition.to(inShape, {
          time = 3000, delta = true, rotation = -360,
          onComplete = inShape.rotateTransition
        });
      end
    end;

    shape.rotateTransition(shape);

    scene.view:insert(shape);

  end

end
The point of this method is to create 10 random shapes for the background of the menu scene; hence the loop. The first thing done is to call scene.createShape(), which returns a DisplayObject that is some shape (it’s random, so you won’t know which). Since this is a DisplayObject, you know that all the usual methods and properties are available, so the xScale and yScale properties are set. The value they are set to is determined by a call to math.random(), which simply takes the lower and upper bounds and returns a number within the range (inclusive of the bounds values), so a number between and including 1 and 3 in this case. Note that to maintain a proper aspect ratio, the values need to be set the same, so yScale is set to xScale after its value is randomly set.
Do you remember earlier when I said that DisplayObjects always have their reference point set to center by default? Well, it turns out that isn’t always true. Specifically, when you draw a graphic from scratch, as the createShape() method does, it isn’t true. However, in order to get a proper rotation, you want to use the center point, as previously discussed, so that is done next.
Next, the shape is positioned randomly on screen using the screen’s width and height values as the bounds. When calling math.random() with only a single number, the range is automatically taken to be 1 to X, where X is the number you pass in.
Note You could also pass no arguments, which gets you a number between 0 and 1.
Following that, the amount the shape starts rotated is randomly set, as is the direction it’s rotating. Note here that rotateClockwise is what is sometimes referred to as an expando attribute, meaning an attribute you add at runtime (expanding on the object, so to speak; hence the name). Lua is a dynamic language and you can do this sort of thing any time you want. This is highly convenient because it means you can avoid having global variables and instead store values that apply to a given object directly on the object.
The next bit is where things get a bit interesting. Again, you add an expando attribute to the shape object, but this time it’s a method named rotateTransition(). This is perfectly fine in Lua land, just like expando attribute are. This method kicks off a transition, one for clockwise rotation and one for counterclockwise rotation, depending on the current value of shape.rotateClockwise. In contrast to the transitions described earlier, this one uses that delta attribute to rotate the shape a full 360 degrees (or –360 degrees for counterclockwise rotation) starting from whatever its current value is (remember, it’s random, so not doing this via delta would have required more work, something most people like to avoid whenever possible!). When the transition completes, the same rotateTransition() method on the shape is called. The onComplete callback handler receives a reference to the object it belongs to, so you can easily make this call, as you can see.
Last, to kick off the action, make a direct call to shape.rotateTransition(), which you can do like you would for any other method of an object, since that’s exactly what it is at this point! This gets the shape rotating. Of course, the shape is inserted into the scene’s view as well. Do this 10 times and you have a nice, random background of rotating shapes.
While I’m not sure I’d put a game on the market with this particular background, it certainly serves the purpose of learning here and now quite well.
Creating Graphics from Scratch
The buildShapes() method calls the createShape() method 10 times to create a random shape, which is up next for your review:
function scene:createShape()

  local whatShape = math.random(1, 6);
  local shape;
First, decide what shape we’re going to draw. There’s six of them, and each one is drawn slightly differently. Start with the first shape, a simple, plain, boring, straight line:
if whatShape == 1 then
  shape = display.newLine(0,0, 75,0);
  shape.width = math.random(1, 6);
  shape:setColor(
    math.random(25, 200), math.random(25, 200), math.random(25, 200)
  );
Yep, that’s it! The display.newLine() method accepts four arguments, X1, Y1, X2, and Y2 where X1, Y1 are one endpoint of the line and X2, Y2 is the other endpoint, and returns a LineObject (which is an enhanced DisplayObject). Remember, though, that buildShapes() is going to randomly move this line around, so what coordinates are used here are kind of irrelevant and really just serve to define the length of the line, which will always be 75 pixels.
I also wanted to introduce some variety into all these shapes by randomly determining their width and color. The width is done first, which is just an attribute of DisplayObject. The setColor() method is then used to randomly determine the color. This accepts three values: red, green, and blue (it can also accept a fourth alpha value, but that is optional). I chose the range for all three values as 25 to 200 so that the shapes don’t get either too dark or too light behind the menu text.
The next shape is the most complex and is a five-pointed star:
elseif whatShape == 2 then
  shape = display.newLine(0,-110, 27,-35);
  shape:append(
    105,-35, 43,16, 65,90, 0,45, -65,90, -43,15, -105,-35, -27,-35, 0,-110
  );
  shape.width = math.random(1, 6);
  shape:setColor(
    math.random(25, 200), math.random(25, 200), math.random(25, 200)
  );
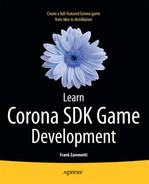
First, a simple line is drawn as in the previous section. Then, to that line is appended a series of lines by calling the append() method on it. This may look complicated, but all append() really does is accept any number of X, Y pairs representing a new endpoint, and the line is extended from its last endpoint to each new endpoint. You can build any vector-type object you like this way. For example, you could build a square manually:
local l = display.newLine(100,100, 200,100);
l:append(200,200, 100,200, 100,100);
Look at Figure 4-3 to visualize this.
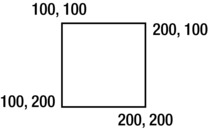
Figure 4-3 . The Astro Rescue main menu scene
The line with endpoints 100, 100 and 200, 100 is first drawn, then a line from 200, 100 (the last endpoint of the line) to 200, 200 is drawn to produce the right edge, then from 200, 200 to 100, 200 to make the bottom edge, and last 100, 200 to 100, 100 to complete the square.
Tip Lua is of course agnostic about how you space things, but I find that writing code where I have to specify multiple X/Y coordinate pairs as X1,Y1, X2,Y2, X3,Y3 with the space between pairs but none between X and Y components makes it clearer.
The third random shape is a rectangle:
elseif whatShape == 3 then
  shape = display.newRect(0,0, 150,100);
  shape.strokeWidth = math.random(1, 6);
  shape:setStrokeColor(
    math.random(25, 200), math.random(25, 200), math.random(25, 200)
  );
  shape:setFillColor(0, 0, 0, 0);
Corona provides the display.newRect() method for this. All you need to feed it is the upper left-hand and bottom right-hand corners of the rectangle and that’s all it needs to draw you a rectangle. As opposed to the two previous shapes, this time you need to use the strokeWidth attribute to set the width of the lines and the setFillColor() method to set the color. Why is that? Well, because display.newRect() returns not a LineObject but a VectorObject, which, like LineObject, is a type of DisplayObject.
The main difference between a VectorObject and a plain DisplayObject is the ability to fill the shape. Since we don’t actually want a filled square though, just the outline, filling the square with black (RGB 0, 0, 0) to match the background color works well.
Caution It also means that if you’re working with filled shapes you have to take care with your stacking order, because a filled rectangle will occlude content behind it, unless you also change its opacity. The menu items are drawn after the shapes so we have none of that concern here.
The fourth shape is actually just a specialized form of rectangle, and if you remember grade school, you’ll recognize it as a little something known as a square!
elseif whatShape == 4 then
  shape = display.newRect(0,0, 75,75);
  shape.strokeWidth = math.random(1, 6);
  shape:setStrokeColor(
    math.random(25, 200), math.random(25, 200), math.random(25, 200)
  );
  shape:setFillColor(0, 0, 0, 0);
That shouldn’t need any further explanation beyond what was given for the rectangle, so let’s instead move on to the next shape:
elseif whatShape == 5 then
  shape = display.newRoundedRect(0,0, 150,100, 50);
  shape.strokeWidth = math.random(1, 6);
  shape:setStrokeColor(
    math.random(25, 200), math.random(25, 200), math.random(25, 200)
  );
  shape:setFillColor(0, 0, 0, 0);
This is, again, a rectangle. However, it’s a specialized kind that has rounded corners, and Corona provides a method for this common need. The only real difference with this as opposed to a plain rectangle is the additional fifth argument passed to display.newRoundedRect(), which is the radius of the corners. I’ve chosen a radius of 50, which is quite a bit, so that really what you wind up with is an oval. That is done simply so that it’s visually different than a rectangle.
The final shape is a triangle:
elseif whatShape == 6 then
  shape = display.newLine(100,100, 200,100);
  shape:append(150,40, 100,100);
  shape.width = math.random(2, 6);
  shape:setColor(
    math.random(25, 200), math.random(25, 200), math.random(25, 200)
  );
end
With the previous discussion of the star, you have all the tools you need to understand this code as well. I should also point out that for the use case here, the coordinates used to construct this triangle (and the star) don’t really matter. As with the line, buildShapes() is going to position this shape anyway, so the coordinates are only relevant in that they are relative to each other and therefore meaningful within the context of drawing the shape initially. If you were instead using these shapes to dynamically construct the background for a level in your game, then the coordinate used would likely have some meaning to the world you are constructing at large.
Only one step remains to complete this method:
  return shape;

end
Send that shape on back to buildShapes() and your work here is done!
Note The only method for shape-drawing that isn’t used here is display.drawCircle(), which accepts values for X and Y of the center of the circle and its radius. You get back from it a plain DisplayObject; there is no specialized subclass like for rectangles and lines. That wasn’t used, of course, because a rotating circle wouldn’t actually look like it was doing anything!
Wrapping up the Menu Scene
As usual, finish up the settings scene as you finished the previous two, namely by hooking up the event listeners and returning the scene object:
utils:log("menuScene", "Beginning execution");

scene:addEventListener("createScene", scene);
scene:addEventListener("willEnterScene", scene);
scene:addEventListener("enterScene", scene);
scene:addEventListener("exitScene", scene);
scene:addEventListener("didExitScene", scene);
scene:addEventListener("destroyScene", scene);

return scene;
Note The consistent form of a scene’s code is one of the main benefits to using the Storyboard API in the first place. Once you have the basic template in place it becomes cookie-cutter and requires no thought or effort on your part, leaving your valuable brainpower free to make your games that much better!
The Choice Is Yours: The Settings Scene
The final scene to explore is the settings scene, as shown in Figure 4-4. It’s a very simple scene with just a single option, but it’s interesting in that it introduces a whole new facility that Corona has to offer: widgets.
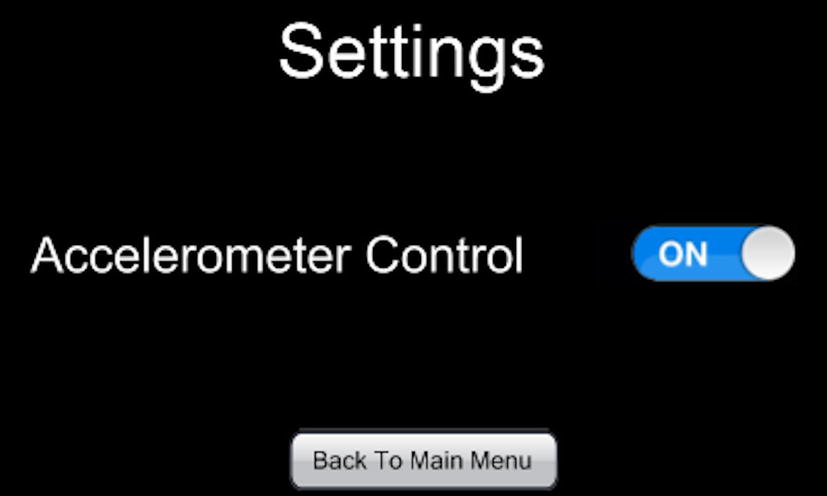
Figure 4-4 . The Astro Rescue settings scene
Following the usual instantiation of the scene object comes the first bit of code that touches on the widget.* namespace:
local widget = require("widget");
widget.setTheme("theme_ios");
To use widgets, you need to include the Corona module for them. This implicitly means that the widget code and resources aren’t loaded and available by default, which is an efficiency gain on the part of Corona. Once you have the widget module loaded and you “catch” the returned object resulting from loading the Lua source file for the module, the first thing to do is to decide what theme you want to use.
When you set the theme, which you should do before creating any actual widgets, you reference a Lua file that defines the theme, theme_ios.lua in this case, which is one that is included with Corona. You can create your own theme by defining the attributes such as image resources to use to draw each widget, or modify an existing theme to your tastes. Creating a theme file is a specialized task, though, and is something outside the scope of this book. For the purposes of Astro Rescue, the iOS theme will be fine. This means the settings scene will have an Apple-inspired look to it in terms of the widgets on Android, but that’s fine (and some would even consider it a good thing, those that are fans of Apple’s aesthetic choices anyway).
Creating the Scene
After that you encounter the createScene() method, as you should be coming to expect when looking at the code for a Storyboard scene:
function scene:createScene(inEvent)

  utils:log("settingsScene", "createScene()");

  local txtTitle = display.newText("Settings", 0, 0, native.systemFont, 72);
  txtTitle.x = display.contentCenterX;
  txtTitle.y = 50;
  self.view:insert(txtTitle);
This is the title text at the top, created as you saw in the menu scene code.
Following that is the label to the left of the option switch. This again is typical text creation code as you’ve seen before, with a few differences:
local txtAccelerometerControl = display.newText(
  "Accelerometer Control", 0, 0, native.systemFont, 48
);
txtAccelerometerControl:setReferencePoint(display.TopLeftReferencePoint);
txtAccelerometerControl.x = 30;
txtAccelerometerControl.y = display.contentCenterY - 20;
self.view:insert(txtAccelerometerControl);
You will note here that the text DisplayObject isn’t using its default reference point and is instead switched to the top left-hand corner. This is done simply to make positioning it a little easier: if the reference point was the center then the math to calculate the X coordinate would be just a little more involved. Granted, it still wouldn’t exactly be rocket science, but it’s not as simple as one hardcoded value (yes, so-called magic numbers in code are generally a Very Bad Thing™, but in a simple case like this there’s no real problem doing so).
With the label in place, we can now draw the switch widget itself:
local wgtAccelerometerControl = widget.newSwitch{
  left = display.contentWidth - 140, top = display.contentCenterY - 10,
  initialSwitchState = usingAccelerometer,
  onPress = function(inEvent)
    usingAccelerometer = inEvent.target.isOn;
  end
};
wgtAccelerometerControl:scale(2, 2);
wgtAccelerometerControl:setReferencePoint(display.TopLeftReferencePoint);
self.view:insert(wgtAccelerometerControl);
A switch widget is your basic, run-of-the-mill Boolean type of widget. It’s either on or off, yes or no. By default, you get what is known as an on/off switch, but you can also create a radio or checkbox, two of the more commonly seen types of Boolean widgets. You can do this by passing either radio or checkbox as the value of the style attribute that is passed as part of the options object if you so choose.
Note Take a look at that funky syntax here: there’s no opening and closing parentheses around the option object passed to widget.newSwitch(). This is just another form a method call can take if it only accepts a single table as an argument. You can add the parentheses if you wish, and in fact my own personal style is to always use them. However, I wanted to demonstrate this for you if for no other reason than a lot of Corona’s documentation uses this form, and I don’t want it to hit you out of left field the first time you see it!
The left and top attributes are of course the position of the widget, corresponding to x and y, and initialSwitchState is a Boolean value that determines whether the switch is on or off when initially drawn. Here, the value of the usingAccelerometer variable tells you that.
Any time the value of switch changes—that is, when the user flips it on or off—you will need to update the value of that usingAccelerometer variable, of course, and that’s where the onPress attribute comes into play. Here, I define an inline function as its value, since it’s a very simple function and I felt it would just clutter the code up to have it stand alone (or be a method of the scene object). Recall earlier when discussing events I mentioned that one of the things passed as part of the event object is the target—that is, the object that was touched? That’s the case here, and the attribute of a switch widget that gives you the current value is isOn, hence inEvent.target.isOn gives us the new value for usingAccelerometer.
Once the widget creation is completed, there are two more tasks to do. The first is to double the size of the switch, since the default size struck me as a little too small for a good touch target. The scale() method takes a horizontal and vertical value that defines how much to scale the widget by, two times in this case. Last, like the title text, the reference point is changed to make positioning a little easier. In this case, we get the right edge of the screen via display.contentWidth and then back off from that value by 140 pixels, enough for the double-sized widget to fit without flowing off the right side of the screen.
The final element to create is another widget so the user has a way to get back to the menu, this time a basic button widget:
  self.view:insert(widget.newButton{
    left = display.contentCenterX - 120, top = display.contentHeight - 65,
    label = "Back To Main Menu", fontSize = 24,
    width = 260, height = 60, cornerRadius = 8,
    onEvent = function()
      utils:log("settingsScene", "Back To Main Menu tapped");
      storyboard.gotoScene("menuScene", "crossFade", 500);
    end
  });

end
Its creation is much the same as the switch widget, with a few extra attributes. The label attribute is of course the text on the button; fontSize is the size of that label text; width and height are the horizontal and vertical size of the button, respectively; and cornerRadius is how much of a curve you want the edges to have. You can also do things like change the color of the text (labelColor), offset the text by some amount (xOffset and yOffset), change the font to use for the text (font), give the text an embossed effect (emboss), and change the color and size of the border around the button (strokeColor and strokeWidth).
Again, an inline event handler is used. In this case, the onEvent attribute defines that handler, and in fact, this is a bit of a shortcut. You see, a button widget supports onPress, onRelease, and onDrag events that correspond to the various phases a touch on it can go through (onPress and onRelease would always occur but onDrag may not). You can hook one or all of them as you wish, or optionally, you can hook just onEvent, and then check the phase attribute of an event object passed in to differentiate the different phases. Here, though, the phases doesn’t actually matter, so there’s no check for it, and in fact I don’t even bother to receive the event object that’s passed in; it’ll just be dropped on the floor, so to speak.
Before I move on, although these are the only two widgets used in the game, I want to give you at least a brief overview of some of the others that are available in the widget.* namespace:
- The PickerWheel, shown in Figure 4-5, allows you to select values for one or more data elements each from a range of predefined possible values, all with a skeumorphic interface.
Figure 4-5 . PickerWheel widget
- The ScrollView presents an area of the screen that the user can scroll by dragging their finger around. I haven’t included an image of this since it’s not really much to look at on the printed page, but just imagine how you scroll around pages in a web browser on your phone, and you are picturing a ScrollView.
- The SegmentedControl widget, shown in Figure 4-6, is a multivalue toggle switch where you can select one of a number of predefined, mutually exclusive options. This mimics the types of push-button controls typically seen on old stereo systems where, when you press one button, any others that were previously pressed down will pop back up and only the new selection will be selected down.

Figure 4-6 . SegmentedControl widget
- The Slider, an example of which you can see in Figure 4-7, allows the user to select a value from a defined range of values by dragging the slider nub across the slider bar.

Figure 4-7 . Slider widget
- There is also a Spinner widget, which is a rotating circular indicator that lets the user know there is activity going on. This widget needs to be seen in action rather than printed in a book, so I’ll just move on.
- The Stepper widget in Figure 4-8 allows the user to choose a value from a range of values using single-step increments, up or down.

Figure 4-8 . Stepper widget
- To help you divide a screen into multiple sections there’s the TabBar widget, shown in Figure 4-9. This appears along the bottom of the screen most of the time, and as the user clicks a given tab, the screen changes to reveal different content.

Figure 4-9 . TabBar widget
- Last, the TableView widget, shown in Figure 4-10, is the more or less canonical way to display a large list of information for the user to browse through in mobile designs. The user can scroll the list up and down by dragging, expand items for more details (if that is one of your design goals), and select items if you apply the proper code.

Figure 4-10 . TableView widget
As you can see, Corona offers most of the widgets you would need to build most basic user interfaces, and this is an area that Corona Labs is currently putting a lot of effort into building, so it’s quite possible there will be an even wider variety of widgets to choose from by the time you read this. As I hope you can see, you can build not just games with Corona but regular, productive applications, too, while still get all the cross-platform goodness you do for games. If you don’t mind me saying so, this is very exciting indeed!
Some Unused Scene Event Handlers
As with the other scenes, a number of lifecycle event handlers are present but empty. These are willEnterScene(), enterScene(), exitScene(), didExitScene() and destroyScene(). I think by now you’ve read enough about this, so enough said!
Wrapping up the Settings Scene
Just like the last two scenes, the lifecycle event handlers are set up and the scene object is returned. I’ll save a little ink by not showing it here, but rest assured, it’s just like the other two!
Summary
In this chapter, you explored three of the four scenes that comprise Astro Rescue: the title scene, menu scene, and settings scene. Along the way, I introduced a big chunk of the Corona API, including graphics that are both preexisting in the image file as well as those drawn from scratch, audio, UI widgets, and some general-purpose functionality including math functions. I also showed you the transition library for the first time, and you put all of this together to form the functionality behind these scenes.
In Chapter 5, you will begin to tear into the actual game-related code of Astro Rescue itself, and that’s where you’ll be spending the bulk of the remainder of this book. In the process, you’ll gain experience with a lot more of the Corona API, although much of what you were exposed to in this chapter will come back into play many times, although often in different ways.