
![]()
Automated Delivery
Did you know that NuGet is more than just a tool to manage dependencies in your software projects? Since NuGet is both a tool and a means of publishing and consuming packages, those packages may be used for scenarios other than the ones we’ve already covered. Agreed, packages will mostly contain assemblies, but they can also contain PowerShell scripts and other files. What if there were tools out there leveraging this idea?
Meet Octopus Deploy and Chocolatey. Both projects started during the earliest NuGet release wave and started using NuGet for more than it was originally intended. We’ll cover both tools in this chapter, because they are great for optimizing your deployments. Octopus Deploy can be used to deploy your application packages to various environments (think of test, staging, and production environments) and to automate deployment to web and database servers. Chocolatey, on the other hand, is leveraging NuGet to distribute and install software packages on the system level, distributed through a NuGet feed.
Both tools distribute software, but each does so in its own way and with its own goals. This chapter will explain how you can use Octopus Deploy to deploy your .NET solutions, packaged as a NuGet package, to your test, staging, and production servers. We’ll also cover Chocolatey and how you can use it to install software prerequisites on either your machine or your servers.
Deploying Artifacts with Octopus Deploy
Let’s start with some background. Imagine you have a web application, and you need to deploy it to test, staging, and production environments. How do you deploy your application today? Most people are using one or more of the following solutions:
- The application is copied to a USB drive or DVD and given to a system administrator, who copies all files to the target machine.
- The web application is built on one of the developer’s machines. That developer connects to the target server by using FTP, Remote Desktop, or a file share and then copies over all files, either manually or using a batch file.
- A batch script runs on the build server and copies all files to the target machine.
- Microsoft’s Web Deploy is used to deploy the web application to the target servers.
All the methods we’ve just mentioned (and probably a lot more) are valid ways of deploying an application. Unfortunately, most of them are not standardized through the use of either a process or a tool supporting that process.
We’ve seen this all before. If you look a few years back, the same story could be told about builds. Some shops let one lead developer create the final build. Others had a script in place that could be run either locally or on a server. Build processes are becoming more and more standardized. Most software developers have some sort of build server in place—think TeamCity, Team Foundation Server (TFS) build, and CruiseControl.NET. These build servers are all focusing on one thing: making it easy to create builds in a standardized manner.
Today, deployments are in the situation builds were a few years ago. Some teams do it manually; some have a script; some have a code monkey to deploy their product. Why not make deployments easy as well? Why not standardize them so every deployment is exactly the same? Microsoft is trying to do this by using Web Deploy; others are creating different solutions, including Octopus Deploy, the deployment solution based on NuGet that we’ll describe in this section.
What Is Octopus Deploy?
Octopus Deploy is a tool supporting a conventions-based process of automating deployments. It can be downloaded from www.octopusdeploy.com. The general idea is to create your source code and check it into source control, making use of standard conventions like web.config transforms and using appSettings. Your build server, such as TeamCity or TFS, compiles this source code and packages this project into a NuGet package. This package is then published on a NuGet feed.
This is the moment where Octopus Deploy comes into play: you define a project and its target machines and environments. Octopus Deploy will then download the latest release of your software from a NuGet feed. It uploads each package to the target machines, which run a small agent called a Tentacle.
On each machine you plan to deploy to, the Tentacle agent accepts the NuGet package from Octopus Deploy and installs it by using a set of conventions, such as configuration file transforms and calling PowerShell scripts. A schematic overview of Octopus Deploy’s deployment flow is shown in Figure 7-1.

Figure 7-1. High-level overview of Octopus Deploy deployment process (image courtesy of http://octopusdeploy.com/documentation/getting-started)
In this chapter, we will not cover all options and conventions available in Octopus Deploy. We will only explain the basics of getting a deployment server up and running and how to deploy a simple application. All details—conventions, ways to configure your build server, and more—can be found on the Octopus Deploy web site at http://octopusdeploy.com/documentation/.
Installing Octopus Deploy
This section will guide you through installing Octopus Deploy. Since Octopus Deploy consists of the web portal for configuring and creating new deployments (Octopus Server) as well as agents to perform the actual deployments (Tentacle), we’ll split this section into two parts.
![]() Note To make things easy and for the purpose of demonstration, we’ll install both Octopus Server and Tentacle on the same machine. In production environments, you would ideally deploy the server component to one server where you can manage deployments and releases, and install the tentacles to every machine on which software will be deployed.
Note To make things easy and for the purpose of demonstration, we’ll install both Octopus Server and Tentacle on the same machine. In production environments, you would ideally deploy the server component to one server where you can manage deployments and releases, and install the tentacles to every machine on which software will be deployed.
Octopus Deploy comes with an installer that can be downloaded from the official web site (http://octopusdeploy.com/downloads). This page lists two downloads: Octopus Server and Octopus Tentacle. We’ll download the Octopus.<some version>.msi file. Save this file to disk, and double-click the installer.
You’ll be greeted by a friendly Octopus Deploy Server Setup Wizard, a favor you can return by just clicking Next until you have to click Install. If you stick to the defaults, after clicking the Install button, Octopus Deploy Server will be installed into %ProgramFiles%Octopus. At the end of the installation, you’ll have the opportunity to immediately run the configuration wizard. Make sure you leave this option selected, and click Finish. This is where the real work comes in, as shown in Figure 7-2: Welcome to Octopus!
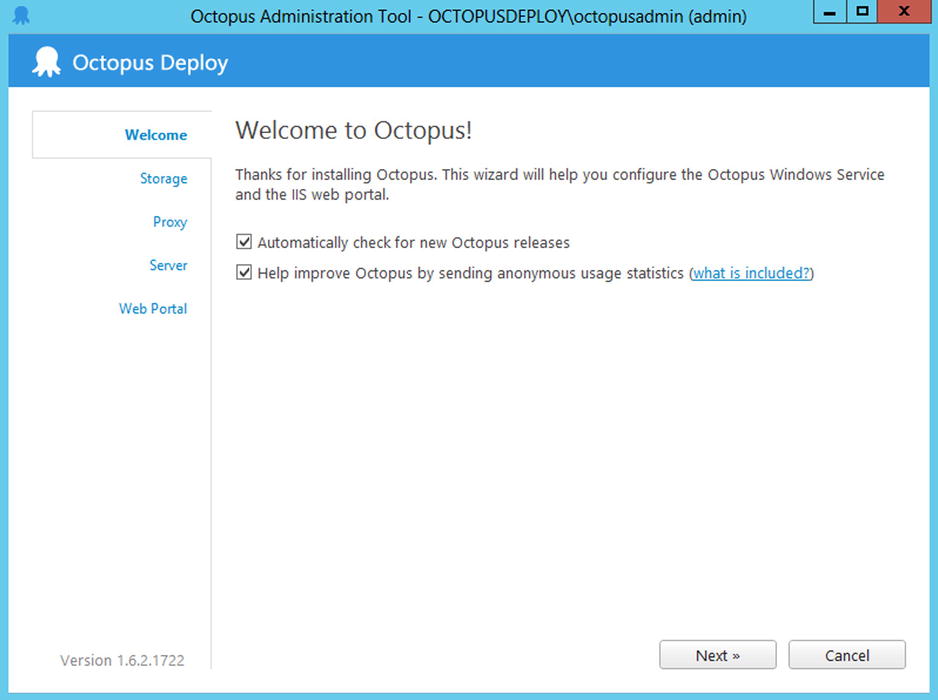
Figure 7-2. Welcome to Octopus configuration screen
The Octopus Deploy Configuration wizard has a few steps, allowing you to configure the fresh installation of Octopus Deploy Server:
- Storage: Octopus Deploy uses an embedded RavenDB database to store its data. You can change the location where the data is saved. By default, Octopus Deploy Server will store its data in C:OctopusData.
- Proxy: If the server on which you deployed Octopus Deploy Server is behind a network proxy, you’ll need to configure it manually in this wizard. By default, Octopus Deploy Server will use the proxy settings as configured in Internet Explorer.
- Octopus Deploy Windows Service: Has to be installed to push out deployments. Click the Install button to do so.
- Web Portal: Has to be installed to use the web portal to configure deployments and releases. You can configure your preferred authentication method and the IIS port number. Click the Create Site button to create the web portal and take note of the public URL.
If installation succeeds, you are good to go, and Octopus Deploy will be available on the URL you’ve just created. Browsing that URL displays the Octopus Deploy portal shown in Figure 7-3. Since we have not configured any environments or projects yet, it looks a bit empty. But don’t worry: after installing Tentacle, we’ll configure Octopus Deploy further.
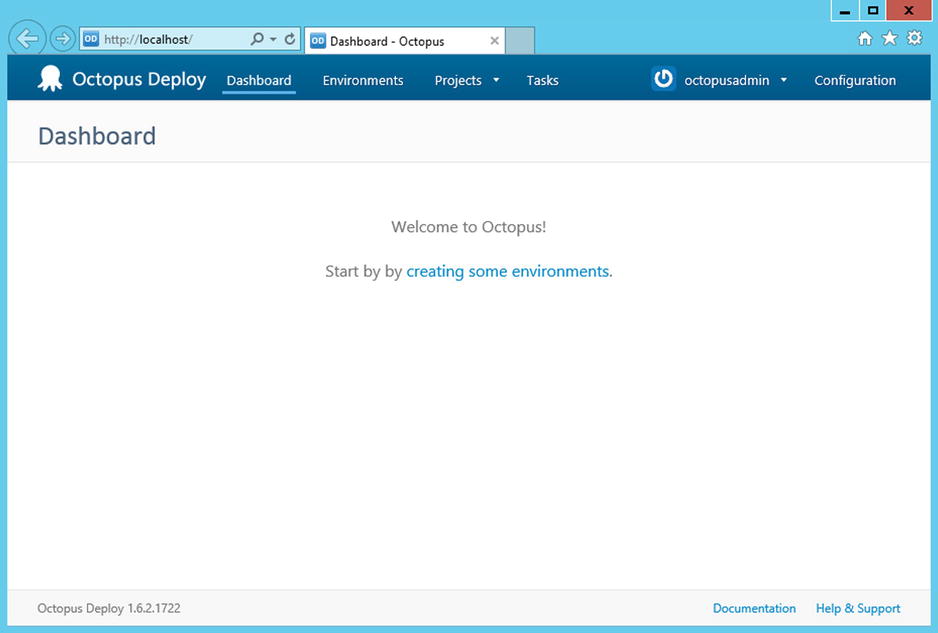
Figure 7-3. Octopus Deploy Server web portal right after installation
![]() Note If for some reason you have issues with your installation, you might want to check the Octopus server installation instructions on the documentation web site (http://octopusdeploy.com/documentation/install/octopus).
Note If for some reason you have issues with your installation, you might want to check the Octopus server installation instructions on the documentation web site (http://octopusdeploy.com/documentation/install/octopus).
Installing and Configuring a Tentacle
Octopus Tentacle comes with a very similar installer, which can also be downloaded from the official web site at www.octopusdeploy.com/Download. Recall that this page lists different downloads. This time, we’ll download the Octopus.Tentacle.<some version>.msi file. Save this file to disk, and double-click the installer.
Again, a friendly Octopus Deploy screen welcomes you to the installation. After accepting the license agreement, you’ll be able to configure the installation path. By default, Tentacle gets installed into %ProgramFiles%Octopus Tentacle. After clicking the Install button, the Tentacle Administration tool is shown because you now need to connect the server to its Tentacles.
Octopus Deploy uses certificates to secure the connection and create a trust relationship between the server and a Tentacle. Each Octopus Tentacle has its own Tentacle thumbprint, as shown in Figure 7-4.
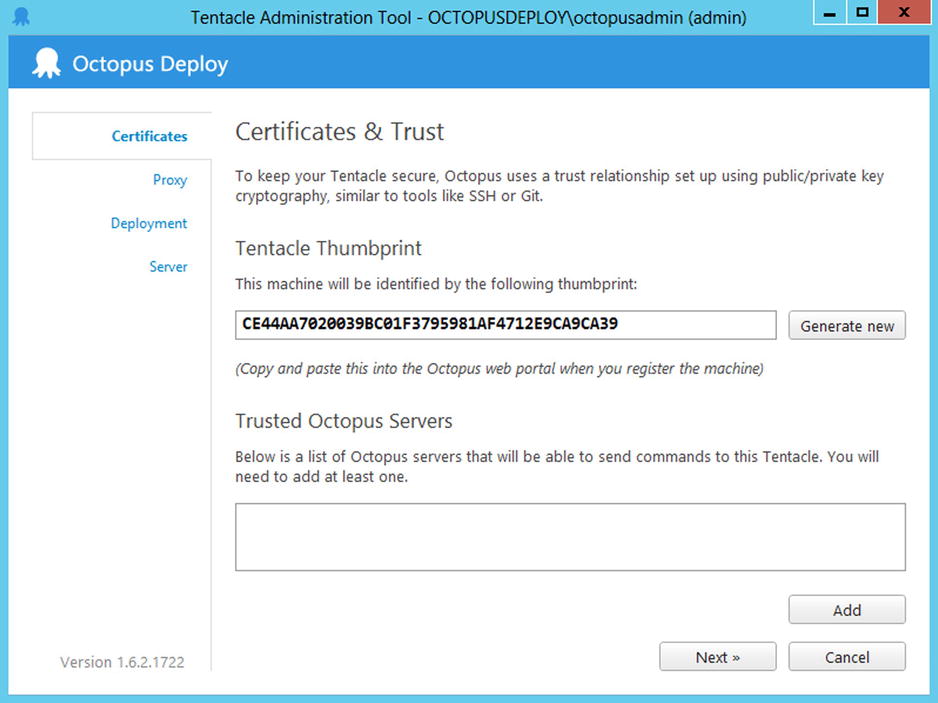
Figure 7-4. The Tentacle Administration tool showing the Tentacle thumbprint
To create the trust relationship, you’ll need to add a trusted Octopus server. To do so, click the Add button. The Tentacle Administration tool will prompt to you for a thumbprint that identifies the Octopus Deploy server you want to trust.
The Octopus Deploy server thumbprint can be found in the web portal Configuration section. Click the Configuration link in the top menu and select the Certificates tab. You’ll find the thumbprint presented onscreen, as shown in Figure 7-5. Copy this value in the Tentacle Administration tool prompt and click OK.

Figure 7-5. The Octopus Deploy server Configuration screen showing the certificate thumbprint
After clicking Next in the Tentacle Administration Tool Wizard, you’ll again be able to configure network proxy settings (by default, the Internet Explorer proxy settings are used). The next step in the wizard allows you to specify the Tentacle port number and the application installation path (by default C:OctopusApplications).
The last screen in the wizard asks you to deploy the Tentacle Windows Service. Simply click the Install button to proceed. You are now ready to start using Octopus Deploy.
![]() Note If for some reason you have issues with your installation, you might want to check the Octopus Tentacle installation instructions on the documentation web site (http://octopusdeploy.com/documentation/install/tentacle).
Note If for some reason you have issues with your installation, you might want to check the Octopus Tentacle installation instructions on the documentation web site (http://octopusdeploy.com/documentation/install/tentacle).
Deploying a Project by Using Octopus Deploy
This section will walk you through your first Octopus Deploy deployment. We’ll start by setting up our Internet Information Services (IIS) environment to make sure Octopus Deploy knows where to deploy our web application. Next, we’ll create a simple HelloWorld web application that we’ll package by using NuGet. Finally, we’ll use Octopus Deploy to deploy this application to a web server.
Let’s start off with listing all Octopus Deploy conventions to give you some background on why we are doing certain things.
Performing Convention-Based Deployments
Octopus Deploy relies heavily on conventions, a set of rules to which your environment and packages must adhere, in order to make it easier for Octopus Deploy to discover all tasks it should execute when deploying an application. The following are the major conventions:
- The XML configuration convention assumes that your configuration files all have a filename ending with .config and that they are XML files. Octopus Deploy will update these files when deploying and also updates connection strings and application settings. More details about this convention can be found at http://octopusdeploy.com/documentation/features/xml-config.
- The PowerShell convention defines that the Octopus Tentacle will look for PreDeploy.ps1, Deploy.ps1, and PostDeploy.ps1 PowerShell scripts in the root folder of your NuGet package. If found, they will be executed. This convention can be useful to add configuration scripts into a NuGet package. More details about this convention can be found at http://octopusdeploy.com/documentation/features/powershell.
- The IIS WebSite convention defines that the Octopus Tentacle will install the NuGet package containing your application to the web site with a name matching the name of your package. More about this convention can be found at http://octopusdeploy.com/documentation/features/iis.
The IIS WebSite convention is the most important to take into account. It states that if we create a NuGet package named HelloWorld, we should also make sure that the IIS web site to which we’ll deploy must be named HelloWorld, as shown in Figure 7-6. Note that the web root of your web site does not matter; Octopus Deploy will update this for every deployment.

Figure 7-6. An IIS web site name must be identical to the NuGet package identifier
Shipping an Application in a NuGet Package
To deploy a web application by using Octopus Deploy, your application should be shipped as a NuGet package. This means creating a NuGet package containing your project’s assemblies and artifacts. One way to do this is to publish your application to a local folder and package the application from there, either manually or using a build server.
There is another method that we slightly prefer because it is easier to set up. But before we go there, let’s set up a quick sample. Create a new ASP.NET MVC application in Visual Studio, and make sure it is named HelloOctopus. This application will be the one we’ll ship using NuGet, a task that can be done using the excellent OctoPack package. In the Package Manager Console, issue the following command:
Install-Package OctoPack
This will inject the tools and instructions in your Visual Studio solution required to create an Octopus-compatible NuGet package from your project. The OctoPack package adds a new build target to your project that is typically located under your solution root, .octopackOctoPack.targets.
We’re not quite finished yet. OctoPack will look for a HelloWorld.nuspec file in your project, a package manifest like the ones we have created several times before over the course of this book. Add the HelloOctopus.nuspec file to your project, and copy the code from Listing 7-1. Make sure you don’t use any replacement tokens, as those are not supported by the OctoPack command-line tool.
Listing 7-1. NuGet package manifest for the HelloWorld application
<?xml version="1.0"?>
<package >
<metadata>
<id>HelloOctopus</id>
<version>2.0.0.0</version>
<title>HelloOctopus</title>
<authors>Xavier Decoster & Maarten Balliauw</authors>
<owners> Xavier Decoster & Maarten Balliauw </owners>
<description>Hello World from Octopack!</description>
<requireLicenseAcceptance>false</requireLicenseAcceptance>
<copyright>Copyright 2011 - 2013</copyright>
</metadata>
</package>
In order for the OctoPack package to be created, you’ll need to instruct the build system to do so. This can be done in several ways. If you look at the octopack.targets MSBuild file, you’ll notice the following MSBuild property setting:
<RunOctoPack Condition="'$(RunOctoPack)'==''">false</RunOctoPack>
The default value is false, so no package will be created. You can set it to true, or you can pass the RunOctoPack=True property to an MSBuild command line, or you might come up with something similar depending on the build context. You’ll find a recipe in Chapter 8, where we’ll use TeamCity to automate Octopus Deploy package creation and deployments. For now, you can simply set it to true, which will ensure that each compilation also creates an OctoPack package.
After compilation, you should see a HelloOctopus.2.0.0.0.nupkg file in your application’s bin folder. Note that you can change the configuration in which OctoPack produces the package by adjusting the OctopusPackageConfiguration element in the OctoPack.targets file. Ensure that all assemblies and content are copied into the NuGet package. Figure 7-7 shows our package’s contents in NuGet Package Explorer.

Figure 7-7. Using NuGet Package Explorer to verify package contents
The final step in shipping an application through NuGet is of course to push it to a NuGet feed. We’ve pushed the HelloOctopus package to our ProNuGet feed on MyGet, www.myget.org/F/pronuget/. Feel free to use that one when configuring Octopus Deploy if you don’t want to create a package yourself.
Configuring the Octopus Deploy Environment
Before we can deploy an application to a web server by using Octopus Deploy, we’ll have to define five things in Octopus Deploy. Don’t worry; this is just some initial configuration, so there’s no need to run through these steps on every deployment you want to create.
- Which environments do we have?
- Which servers are in those environments?
- Which NuGet feed has to be used to pull shipped applications from?
- Which projects do we have?
- Which packages have to be deployed for this project?
After making sure these items are configured, Octopus Deploy can be used to easily deploy an application across multiple environments.
Log in to the Octopus Deploy web portal. As a first step, we’re going to configure a deployment environment. This is a logical unit of servers, typically named test, staging, and production. Of course, more than one environment can be created, and if you have a chucknorris environment as well, feel free to configure it. Click the Add Environment button, and provide a name and description for it.
After creating an environment, one or more servers should be added to it. Click the Add Machine button to configure a server on which Octopus Tentacle is installed. By default, Tentacles are listening on port 10399, which means we can simply add our localhost Octopus Tentacle by entering http://localhost:10399 in the Tentacle URL. You’ll also need to provide a thumbprint for the Tentacle URL to be used on that machine. You can find it in the Octopus Deploy Tentacle Administration tool. This server will serve as an IIS server and host our deployed web applications, so adding the IIS role (or whatever name you prefer) makes it recognizable. Figure 7-8 shows you an example of a machine being added to the production environment.

Figure 7-8. Adding Octopus Tentacle to a production environment
To verify connectivity and a trust relationship between Octopus Deploy Server and the Tentacle on this environment, click Check Health to schedule a task that will perform the health check for you. If all is good, you should see a green confirmation icon next to the server in your environment, as shown in Figure 7-9.

Figure 7-9. Octopus Deploy Server succesfully performed a health check on a Tentacle for a configured environment server
So far, we have configured an environment and added a machine to it. Since Octopus Deploy uses NuGet to distribute application packages to its Tentacles, we’ll have to configure the NuGet feed to use. In the Settings menu, click the Add Feed button, and enter the URL serving your application packages. Feel free to use our www.myget.org/F/pronuget feed on which we’ve published the HelloOctopus application created earlier. It is a public feed, so you can leave the Username and Password fields for authentication blank. Figure 7-10 shows you an example.
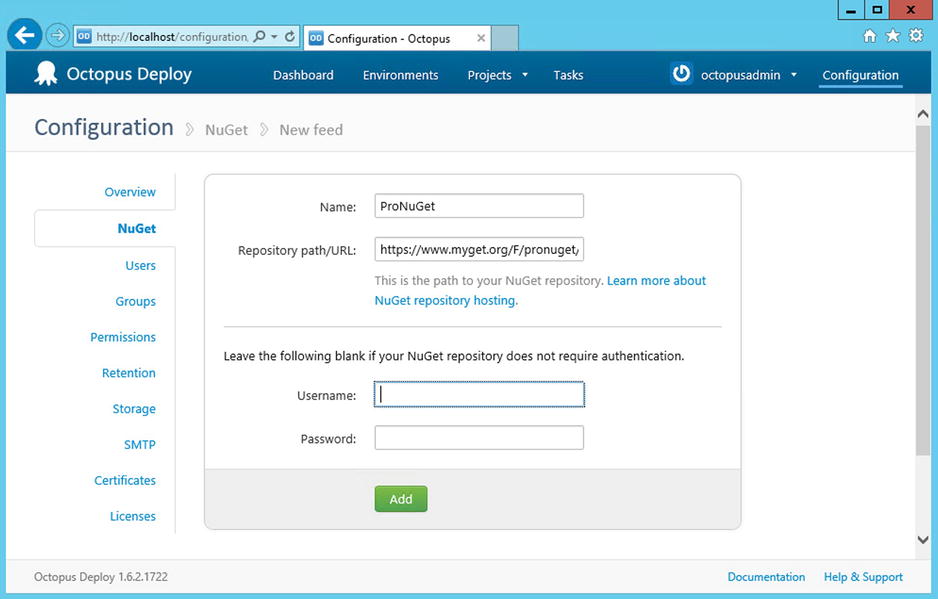
Figure 7-10. Defining the NuGet feed to pull application packages from
We’re almost good to go now. The only thing missing is a project and a deployment. A project in Octopus Deploy is a logical unit of packages. For example, if you are building a three-tier application, the project will group all three tiers. There is no need to create a new project per tier! Also, there’s no need to create a project for each environment either: Octopus Deploy can deploy a project to an environment of choice in a later step.
On the Projects page, click the Add Project Group button. Provide a name and then click the Create button, as shown in Figure 7-11.

Figure 7-11. Adding a project group in the Octopus Deploy web portal
Next, click the Create Project button within this newly created project group. Enter a project name and description and then click the Add button to add it to your project group, as shown in Figure 7-12.

Figure 7-12. Create a new project and add it to a project group in the Octopus Deploy web portal
The newly created project will appear in the Projects page and drop-down menu. When you navigate to this project, you will notice that the project Overview page is rather empty. The reason for that is the project does not know which application packages should be deployed. Navigate to the project’s Steps page and click the Add Step button to add a deployment step to your project. A deployment step indicates that a certain package from a certain feed should be deployed to a web, application, or database server. Figure 7-13 shows that we’ll choose the Deploy a NuGet Package step type.

Figure 7-13. Add a new deployment step to an Octopus Deploy project in order to configure deployment of a NuGet package
Figure 7-14, Figure 7-15, and Figure 7-16 illustrate how we configure this deployment step: we’ll fetch the HelloOctopus package from the ProNuGet feed and make sure we deploy it to the correct installation path as configured in IIS. In addition, we’ll choose to delete all files present in the target location before this step executes to ensure we have a clean deployment every single time. Speaking of environment, we specify the IIS role to ensure this step gets executed only on a server configured with the IIS role, as we did in Figure 7-8. We have no specific XML configuration transformations so far, but we can live with the default settings. If we ever decide to make use of this feature, our deployment step will already pick them up.

Figure 7-14. Configuring a package deployment step in the Octopus Deploy web portal
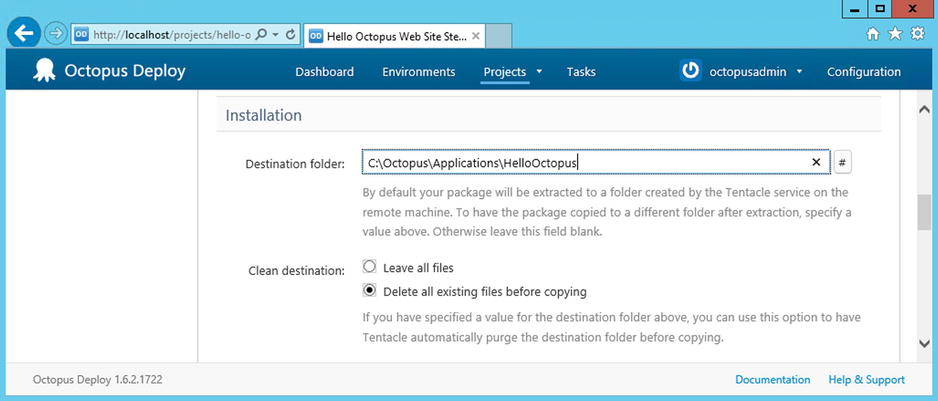
Figure 7-15. Configuring an installation path for a package deployment step in the Octopus Deploy web portal

Figure 7-16. Configuring XML transformations and IIS for a package deployment step in the Octopus Deploy web portal
After clicking the Add button, we’re ready to deploy the HelloOctopus application to our servers.
Creating and Deploying a Release
Octopus Deploy defines a release simply as a version of a deployment of several packages to the target environment. Figure 7-17 shows the screen that is presented when you click the Create Release button under the HelloOctopus project we’ve just created. The Create Release form will automatically fill in the release version based on the selected package that should be deployed. This is the place where NuGet comes in: you can select a package from all package versions available on the configured NuGet feed.

Figure 7-17. Creating a release
When you click the Create Release button at the bottom of the page, the actual deployment is not executed yet. Your release is queued, and a release manager in your team can still inspect the release before deployment through the web portal shown in Figure 7-18. Once a release is approved, you can click the Deploy This Release button to trigger the actual deployment of your web application to an environment of choice.

Figure 7-18. A new release waiting to be deployed in the Octopus Deploy web portal
During deployment, just as with a build server, you can see what Octopus Deploy is doing: a release log is created, where you can see all steps of a deployment as well as eventual warnings or errors. Note that release logs are kept in Octopus Deploy’s database. Just as with builds, it’s important to be able to roll back a release and/or to inspect what happened during a certain release. Part of this release log is shown in Figure 7-19. Note that the HelloOctopus 2.0.0.0 package is downloaded from a NuGet feed and then sent off to an Octopus Deploy Tentacle. Packages deployed using Octopus Deploy cannot have dependencies on other packages.

Figure 7-19. The Octopus Deploy release and deployment details
If the release yields “Success!”, your application will be deployed to the IIS web site configured earlier. Note that Octopus Deploy automatically applied any configuration transforms to the web site, starting from web.config (or app.config). Octopus Deploy always applies the web.release.config first, and if the package is being deployed to an environment different from your release environment, it will also apply any available web.(environment).config transformations. For example, when you deploy to an environment with the name QA, Octopus Deploy will transform the web.config file by first applying the transformations of web.release.config, followed by web.QA.config.
The big benefit of Octopus Deploy is that you can simply release a single package and deploy it to multiple different environments without having to create a new release version in Octopus Deploy. This also means that no modifications to the package can be done between various stages of the deployment pipeline, ensuring that what you deploy to the acceptance environment is exactly what will get deployed onto production as well.
Deploying Software with Chocolatey
The first part of this chapter focused on deploying a NuGet package remotely, but we’ll now do the opposite and look at a very interesting way of installing a NuGet package locally—no, not within your code base, but on your system. Obviously, these NuGet packages will contain something of interest for the entire system. How about an application? That’s right, an application! You can wrap an application installer into a NuGet package and have a common means of distributing those applications to various systems.
![]() Note If you are interested in how you can use NuGet in other scenarios, make sure to read Chapter 9, where we explain how to use NuGet as a protocol for delivering content and how you can use the NuGet.Core assembly to create similar experiences to the ones provided by Octopus Deploy and Chocolatey.
Note If you are interested in how you can use NuGet in other scenarios, make sure to read Chapter 9, where we explain how to use NuGet as a protocol for delivering content and how you can use the NuGet.Core assembly to create similar experiences to the ones provided by Octopus Deploy and Chocolatey.
Very early in the life of NuGet, Rob Reynolds and others in the community played with the idea of a systemwide package manager, much like apt-get, which is a very popular command-line advanced packaging tool (APT) used on (mainly Debian-based) Linux systems. Rob created one for Windows based on the NuGet command line and infrastructure, and called it Chocolatey (after chocolatey nougat). Who doesn’t like chocolate, after all (did we tell you we are from Belgium)?
If you’re like us, you probably have quite a few tools installed on your workstation—tools that are nowhere to be found on your corporate standard workstation image, tools that actually make your device a workstation. Quite often, we find ourselves installing new tools as well. We don’t realize the number of tools we use until we don’t have them. Try working for a day on someone else’s workstation to find out. If you have to switch workstations or repave your device, you better have a list of the tools you need.
Even if you have such a list, you have to keep track of the location where you can find the latest version and manually go over the list to download, unblock, extract, and install the application yourself. This is a very time-consuming process during which you cannot do anything productive. What if you could feed this list to a tool that does it for you while you grab a cup of coffee and your coworkers are struggling to keep up? What if this tool automatically fetches the latest versions available for every application in your list, so you no longer have to track the version or the download location of each application? What if, when returning from a well-deserved holiday, you could use that same tool to automatically update all your applications on the list to the latest version? Meet Chocolatey.
Chocolatey can be seen as a tool enabler or as a silent application installer. You can develop tools and applications and release them as NuGet packages with Chocolatey. And you can release any Windows application or tool, not just .NET applications. That also means that Chocolatey is not necessarily developer focused, unlike NuGet.
![]() Tip To get an instant Chocolatey experience, you can watch a video on YouTube showing Chocolatey in action: http://bit.ly/chocolateyVideo.
Tip To get an instant Chocolatey experience, you can watch a video on YouTube showing Chocolatey in action: http://bit.ly/chocolateyVideo.
Installing Chocolatey
Chocolatey has very few requirements. You have to have the .NET 4 Framework and PowerShell 2 installed. Installing Chocolatey really takes only a matter of seconds. You have multiple installation options, so just pick the one you prefer. Chocolatey itself exists as a NuGet package, so if you get a hold of the package, you get an opportunity to install it.
As of v1.0, Chocolatey installs by default into the %SystemDrive%Chocolatey folder. Older versions target %SystemDrive%NuGet instead. If you are not OK with that, you can define the desired installation directory before running the installation. To do so, adjust the user environment variable named ChocolateyInstall, and set it to the folder you want Chocolatey to install to.
Using PowerShell
Using PowerShell is the easiest installation method. Because of PowerShell’s security strategy, make sure you have set your execution policy to Unrestricted before installing Chocolatey. You can check your current execution policy by running the Get-ExecutionPolicy command in any PowerShell console. If it returns anything other than Unrestricted, you should run the Set-ExecutionPolicy Unrestricted command. To change the PowerShell execution policy, you should open a PowerShell console with elevated privileges, so run it as Administrator. On Windows 7, you simply right-click the PowerShell icon in the Start menu, and select Run as Administrator. Figure 7-20 illustrates how to change the PowerShell execution policy.

Figure 7-20. Ensuring the PowerShell execution policy is set to Unrestricted
If your PowerShell execution policy is set to Unrestricted, you can run the following one-liner to install the latest version of Chocolatey on your system; Figure 7-21 shows you the Chocolatey installation process in a PowerShell console.
iex ((New-Object Net.WebClient).DownloadString(" http://bit.ly/psChocInstall "))

Figure 7-21. Installing Chocolatey from within PowerShell
If you have PowerShell ninja skills and want to find out what happens behind the scenes, you can take a look at the install script on GitHub (yes, Chocolatey is open source as well!). The install script can be found at the following location:
https://raw.github.com/chocolatey/chocolatey/master/chocolateyInstall/InstallChocolatey.ps1
Another way to install Chocolatey is by downloading the two files from the GitHub repository at the following location:
https://github.com/ferventcoder/chocolatey/tree/master/chocolateyInstall
Simply run the installChocolatey.cmd batch file to finish the installation.
Using NuGet Package Manager Console
By now, you are familiar with the NuGet Package Manager Console, so you can install Chocolatey from within Visual Studio as well. This installation method is no one-liner and requires you to have a solution open in Visual Studio. Don’t forget to select the NuGet.org feed as the package source.
Whereas the PowerShell installation method executed the remote unsigned install.ps1 script directly from the GitHub repository, the NuGet Package Manager Console installation method will make use of the Chocolatey NuGet package, available from the NuGet.org feed.
To install Chocolatey by using the Package Manager Console, simply run the following commands:
Install-Package Chocolatey
Initialize-Chocolatey
Uninstall-Package Chocolatey
Figure 7-22 shows you the output of running the Install-Package Chocolatey command. If you read the instructions, you see you have to run Initialize-Chocolatey once, and after that, you can safely uninstall the package by using the Uninstall-Package Chocolatey command. If you read the output a bit more carefully, you’ll notice there is another, alternative method of installing Chocolatey—using NuGet outside Visual Studio.

Figure 7-22. Installing Chocolatey from within Visual Studio by using the Package Manager Console
After installing Chocolatey, it has to be initialized. Figure 7-23 shows the output for the Initialize-Chocolatey command, which adds Chocolatey’s installation directory to your system’s PATH environment variable. It also creates several shortcut commands, for example cup which is a shortcut for chocolatey update.

Figure 7-23. Initializing Chocolatey from within Visual Studio
If you installed the Chocolatey package by using the nuget.exe command line, for instance, you can run the ChocolateySetup.psm1 file in a PowerShell console, followed by the Initialize-Chocolatey command.
The initialization of Chocolatey also mentioned another interesting thing: every tool or application you install by using Chocolatey will be automatically available from within every command prompt on that system, because the install path is in the system environment path. You also get a glimpse of the various commands that Chocolatey exposes. Let’s see what tasty ingredients Chocolatey has to offer.
Using Chocolatey
Chocolatey is a command-line tool that exposes quite a few options for managing applications. You can install a single application or batch the installation of an application list. You can update a single application or update all applications that have been installed using Chocolatey at once. Let’s take a look at the various commands.
![]() Tip For the latest up-to-date Chocolatey commands reference, you can visit the following URL: https://github.com/chocolatey/chocolatey/wiki/CommandsReference.
Tip For the latest up-to-date Chocolatey commands reference, you can visit the following URL: https://github.com/chocolatey/chocolatey/wiki/CommandsReference.
Installing Tools and Applications
We are going to use Chocolatey to install Notepad++, our favorite replacement for the Windows built-in Notepad text editor. We can do this because Notepad++ is also available as a NuGet package on the Chocolatey Gallery feed at http://chocolatey.org (see Figure 7-24).

Figure 7-24. Searching for Notepad++ in the Chocolatey Gallery
Another way to find out whether your favorite tool or application has been packaged and made available on Chocolatey is by using the Chocolatey command line. Chocolatey has a chocolatey list command (or clist for short) that you could use for that. To list all available packages in the Chocolatey Gallery, you can run the following command (this might take a while to finish):
chocolatey list
or
clist
If you want to filter the list, simply add the beginning of the application name to the command, as shown here:
chocolatey list notepad
or
clist notepad
The preceding command will yield results for both Notepad2 and Notepad++ (or NotepadPlusPlus), so you can pick the one you prefer. We will go for Notepad++.
To actually install the application, you need to use the install command (or the cinst alias). For Notepad++, this looks as follows:
chocolatey install notepadplusplus
or
cinst notepadplusplus
Figure 7-25 illustrates the installation process for Notepad++, and Figure 7-26 shows the complete output logged by Chocolatey after successfully installing Notepad++ on your system.

Figure 7-25. Progress indication of the installation process of the Notepad++ Chocolatey package

Figure 7-26. The Chocolatey gods answered your request and successfully installed Notepad++
What is interesting is that Chocolatey packages can have dependencies, and Chocolatey will also download and install these. For example, a graphical interface for Git can have a dependency on a command-line version of Git that is shipped as another Chocolatey package. Installing the first will bring down the latter as well.
As easy as it is to install a single application by using Chocolatey, you could actually batch the installation of multiple tools and applications at once. Because Chocolatey comes as a command-line tool and registers itself in the PATH environment variable, it is very convenient to call Chocolatey commands from any location on your system. Listing 7-2 shows how you can install a sequence of tools in one go by using Chocolatey. Save this listing into a script file (for example, installMyTools.ps1 or installMyTools.bat) to distribute it to your colleagues, who can then simply double-click the file to execute this script on their machines as well.
Listing 7-2. An Example Batch File to Sequentially Install Various Tools by Using Chocolatey
cinst sysinternals
cinst notepadplusplus
cinst adobereader
cinst msysgit
cinst fiddler
cinst filezilla
cinst putty -version 0.62
cinst tortoisesvn
cinst tortoisehg
cinst tortoisegit
cinst iisexpress -source webpi
Note that the install command will install the package unless the package is already installed on the system. If you want to reinstall the package, you should use the -force option. A few more options are available to pass on to the install command, and these are discussed in the “Distributing Chocolatey Goodness” section, when we will talk about configuring the native installer that is triggered by the Chocolatey package.
This is a very useful way of making sure your system is configured with the tools desired in one go. We’ve given the example of easily repaving your computer or quickly configuring a new system, but you could also use it to make sure all developers have the same (version of) specific tooling installed on their systems when working on your code base. By checking this script file into source control, everyone on the team can run it locally with ease.
In addition to manually creating batch files and duplicating a bunch of Chocolatey commands (cinst for instance) on every line, you could also just describe the packages you want and perform a single Chocolatey operation to process the file. Installing a list of packages would then result in a single install command, passing in a file containing your packages list to install. This also allows for internal optimization by Chocolatey to perform this operation.
What would be the best way to describe the packages you want to install onto your system? Think about the parallelism with NuGet: how does NuGet describe which packages should be installed into a project? Does the packages.config file ring a bell to you?
The Chocolatey install command supports targeting a packages.config file. Simply list the package IDs and versions for the Chocolatey packages you want to have installed on your system in the exact same XML format as NuGet does to denote project package dependencies. Chocolatey supports a tiny deviation from the default vanilla packages.config file that NuGet uses. You can add a very convenient source attribute to each of the package elements in the packages.config file, to indicate what source should be used to fetch the package. Listing 7-3 defines the packages listed in Listing 7-2. Save this file, and give it a name (for instance, MyFavoriteChocolateyPackages.config). Note that you can add the version attribute within each package element to denote the desired package version.
Use cinst MyFavoriteChocolateyPackages.config to perform the batch installation of these packages onto your system. The packages are installed in the order defined in the file.
Listing 7-3. An Example packages.config File to Sequentially Install Various Tools by Using Chocolatey
<?xml version="1.0" encoding="utf-8"?>
<packages>
  <package id="sysinternals" />
  <package id="notepadplusplus" />
  <package id="adobereader" />
  <package id="msysgit" />
  <package id="fiddler" />
  <package id="filezilla" />
  <package id="putty" version="0.62" />
  <package id="tortoisesvn" />
  <package id="tortoisehg" />
  <package id="tortoisegit" />
  <package id="iisexpress" source="webpi" />
</packages>
Last, but definitely not least, there is a third option to easily tell Chocolatey which packages you want to have installed on your system. What if you’re like us and don’t like messing around with script files, distributed over various systems, and trying to remember which one was the latest one? If you need to repave your system, or want to tell someone how to install a bunch of tools, you want to give simple instructions—a simple command, preferably a single line, with no files involved.
You might have guessed it: we will be using a feed for this. Chocolatey supports installing all listed packages directly from a custom feed. To do so, you need to create your own custom Chocolatey repository—you could use a MyGet.org feed for this—and target it in your commands. As such, you now have a central place to maintain your list of favorite tools and keep them up-to-date. Simply invite people to target your feed URL, and you can easily share this list with your colleagues and friends. Upload or mirror the packages you need on your feed, and off you go. The Chocolatey command involved is the following one:
cinst all –source [feedURL]
This is a great way of installing many tools at once, but what if one of those tools is not available as a package on the Chocolatey Gallery? What if you want to install a tool (for instance, IIS Express) using the Microsoft Web Platform Installer? You could use Web PI, the Web Platform Installer command-line tool, but you might not have this additional tool yet on the system. No problem for the Chocolatey gods: Chocolatey has built-in support for Web PI. In fact, webpi is a command available in Chocolatey:
chocolatey webpi IISExpress
or
cwebpi IISExpress
Another way to install applications by using Web PI as a source instead of the Chocolatey NuGet Gallery is by using the –source switch of the Chocolatey install command.
cinst IISExpress –source webpi
![]() Tip Once you have installed the Web PI command-line tool (using cinst webpicommandline, for instance), you could use Chocolatey to list the available applications for the Web Platform Installer, using the clist –source webpi command.
Tip Once you have installed the Web PI command-line tool (using cinst webpicommandline, for instance), you could use Chocolatey to list the available applications for the Web Platform Installer, using the clist –source webpi command.
It goes without saying that Chocolatey has been influenced and inspired by tooling outside the .NET community, such as apt-get or RubyGems. If you want to benefit from Chocolatey goodness while working with Ruby, you’ll be happy to learn that Chocolatey also has built-in support for RubyGems. According to Wikipedia, “RubyGems is a package manager for the Ruby programming language that provides a standard format for distributing Ruby programs and libraries (in a self-contained format called a gem), a tool designed to easily manage the installation of gems, and a server for distributing them” (http://en.wikipedia.org/wiki/RubyGems).
To install RubyGems by using Chocolatey, use the chocolatey gem or cgem command, followed by the package name. This command defaults to the latest version of the package available, so if you want to get a specific version of the package, you should use the –version option. The command to install the latest version of RubyGems (for instance, GemCutter) using Chocolatey would look as follows:
chocolatey gem gemcutter
or
cgem gemcutter
Much as you could for the built-in Web PI support, you could also install RubyGems by using the install command and specifying Ruby as the source to be used, as follows:
cinst gemcutter –source ruby
This command will result in the exact same operation being performed as when using the cgem command.
Keeping Your Tool Belt Up-to-Date
Of course, you don’t want to simply install a bunch of tools and applications and then work with those happily ever after. Those applications evolve, and your tools have updates—a good reason to keep those installed applications up-to-date as well.
There’s a very handy way of updating an application installed through Chocolatey. Simply use the update command, and target an installed package name to update that application to the latest version available. In addition, there is a very convenient short notation for the chocolatey update command: cup (as in cup of Chocolatey).
chocolatey update notepadplusplus
or
cup notepadplusplus
Just as easily as you can batch the installation of multiple packages on your system, you can keep all these tools up-to-date with one simple command:
chocolatey update all
or
cup all
Much as you can on the NuGet command line, you can also perform an in-place update of Chocolatey itself. Simply run the following command to update Chocolatey to the latest version:
chocolatey update
or
cup
If you want to determine whether an update is available for any of your installed Chocolatey packages without immediately triggering the actual update operation, you could use the version command. This command will output the found version and the latest version of those packages:
chocolatey version all
or
cver all
Again, this command can be used similarly to the update command. If you do not specify all or a package name, it will perform the action against the Chocolatey command-line tool itself. To check whether Chocolatey itself is up-to-date, run cver or chocolatey version.
Distributing Chocolatey Goodness
No, not distributing chocolates! At this point, we want you to contribute useful Chocolatey packages to the Chocolatey Gallery at http://chocolatey.org. That’s right; you can produce packages yourself and make them available to the broader community as well.
Although you’ll find quite a few useful packages already hosted on the Chocolatey Gallery, you might occasionally look for a missing one. If you ever find one of your favorite must-have tools or applications missing on the Chocolatey Gallery, you might consider creating and publishing a package for it yourself.
You know by now how to create various types of vanilla NuGet packages (Chapter 3 explained this in detail). There are a few things you should know about creating and publishing Chocolatey packages, however.
![]() Note When we refer to vanilla NuGet packages, we are referring to the original NuGet packages, to make a clear distinction with Chocolatey NuGet packages.
Note When we refer to vanilla NuGet packages, we are referring to the original NuGet packages, to make a clear distinction with Chocolatey NuGet packages.
As with NuGet vanilla, you’ll need to start from a .nuspec file. Let’s take a look at the Notepad++ Chocolatey package we just installed onto our system.
![]() Tip To browse the Chocolatey packages installed on your system through Windows Explorer, simply navigate to the %SystemDrive%Chocolateylib folder. You should notice a folder structure very similar to the $(SolutionDir)packages folder that NuGet vanilla installs solution-level packages into.
Tip To browse the Chocolatey packages installed on your system through Windows Explorer, simply navigate to the %SystemDrive%Chocolateylib folder. You should notice a folder structure very similar to the $(SolutionDir)packages folder that NuGet vanilla installs solution-level packages into.
Open notepadplusplus.6.4.2.nupkg (if you find a different version, note that version 6.4.2 was the latest version available at the time of this writing) by using NuGet Package Explorer. You should see something unusual: where’s the Notepad++ installer? The package has almost no content at all, as shown in Figure 7-27.

Figure 7-27. The Chocolatey package for Notepad++ has no content except for the installation script
You should notice, however, a single script file called chocolateyInstall.ps1 in the tools folder. Using this filename by convention allows Chocolatey to recognize a Chocolatey package and makes sure NuGet vanilla is not doing anything with this package inside Visual Studio. This file will contain the script that will install this package onto your system. So to create a Chocolatey package, you should start with having a chocolateyInstall.ps1 script file in the package’s tools folder. Don’t worry about the image file for now, because it is just the logo for the package to be displayed on the Chocolatey Gallery web site.
Taking a closer look at the contents of the chocolateyInstall.ps1 file, you might be surprised again: it contains only a single line of PowerShell! If you aren’t surprised, probably things just got clearer to you. The reason a Chocolatey package is so small and has almost no content is because the content is usually hosted elsewhere. Most of these tools already have a download URL on their originating web sites. This allows the installChocolatey.ps1 script in your package to simply point to that URL and avoids copying the installers of the tool into your package. That’s why Chocolatey packages are small, fast to download, and allow Chocolatey to provide immediate feedback during the installation process.
If we take a closer look at the one-liner in the installChocolatey.ps1 file, you’ll see the following piece of code:
Install-ChocolateyPackage 'notepadplusplus' 'exe' '/S' ' http://download.tuxfamily.org/notepadplus/6.4.2/npp.6.4.2.Installer.exe '
It is calling the Install-ChocolateyPackage cmdlet and passing in some values to the following arguments:
- PackageName: notepadplusplus
- PackageType: exe
- SilentArgs: /S
- Url: http://download.tuxfamily.org/notepadplus/6.4.2/npp.6.4.2.Installer.exe
In short, the Install-ChocolateyPackage cmdlet will download a file from an URL and install it on your system. The PackageName argument is arbitrary. You can name it whatever you want, but it would make sense to use the NuGet package ID of the package you are currently creating. The PackageType should either be exe or msi, depending on the installer that will be downloaded, which is referenced in the Url parameter.
If you want to provide a silent installation experience, without any wizards popping up asking for user input (mostly true for automated installations), you should pass in some value for the SilentArgs parameter. If you don’t pass any value for this argument, you’ll experience the default installation of the target installer. Please use the notSilent tag in your package’s NuGet metadata if you choose a nonsilent installation experience.
The SilentArgs arguments are being passed on to the exe or msi installer. For a PackageType of msi, this is easy: use /quiet. For an exe package, things are a bit different, because there is no standard format. Try any of these values to provide a silent installation experience: /s, /S, /q, /Q, /quiet, /silent, /SILENT, /VERYSILENT.
In addition to the arguments used by the NotepadPlusPlus package, you could use a few other arguments in your own packages. One of them is the Url64bit argument, which could point to an alternative URL for the installer of the x64 version of the tool or application.
The chocolatey install or cinst command also has a few additional options available for use when installing a Chocolatey package. You can, for instance, pass on a set of arguments to the native installer being triggered by the package installation. This could be useful if you know some of the arguments being used or have some custom ones defined for your own installer. You can pass on these arguments to the InstallArguments parameter. By default, this parameter is empty and will be appended to any arguments already passed in by the package installation script. If you do not want to append these arguments and want to override all arguments the package already passes in, you could use the OverrideArguments switch. There’s one last, additional shortcut to make the package install in a nonsilent model: the NotSilent option. This will make the installer use the default interactive behavior, if any, disregarding any SilentArgs being passed on to it by the Chocolatey package installation script. You’ll find a summary of these commands in Table 7-1.
Table 7-1. Passing Arguments to a Native Installer via Chocolatey
| Option | Description | Alternative Notation |
|---|---|---|
| InstallArguments | Specifies the installation arguments to be passed on to the native installer. Default behavior is to append these arguments to any arguments being passed on in the installChocolatey.ps1 script. | -ia -installArgs |
| OverrideArguments | Specifies whether InstallArguments should be appended or overrides any arguments being passed internally in the package. | -o -overrideArgs |
| NotSilent | Specifies that the native installer should be run in nonsilent mode, whatever the value of the SilentArgs parameter inside the installChocolatey.ps1 script. |
![]() Caution You can actually include executables in your Chocolatey packages if you have the right to distribute. If you feel uncertain about this, make sure you check out https://github.com/chocolatey/chocolatey/wiki/Legal for more information on legalities and distributions.
Caution You can actually include executables in your Chocolatey packages if you have the right to distribute. If you feel uncertain about this, make sure you check out https://github.com/chocolatey/chocolatey/wiki/Legal for more information on legalities and distributions.
So, to create a Chocolatey package, you only have to create a .nuspec manifest, reference the installChocolatey.ps1 file in its tools folder, and call the Install-ChocolateyPackage cmdlet within the script to point to the URL of your favorite tool’s installer. Listing 7-4 shows how the .nuspec manifest could look (metadata shortened for clarity):
Listing 7-4. An Example NuGet Manifest for Creating a Chocolatey Package
<?xml version="1.0"?>
<package xmlns=" http://schemas.microsoft.com/packaging/2010/07/nuspec.xsd ">
  <metadata>
    <id>notepadplusplus</id>
    <version>6.4.2</version>
    ...
    <description>Notepad++ is a free ...</description>
    <summary>Notepad++ is a free ...</summary>
    <tags>notepad notepadplusplus notepad-plus-plus chocolatey</tags>
  </metadata>
  <files>
    <file src="toolschocolateyInstall.ps1" target="toolschocolateyInstall.ps1" />
  </files>
</package>
In addition to the Install-ChocolateyPackage cmdlet, you might find the following helpers useful:
- Install-ChocolateyPowerShellCommand
- Install-ChocolateyZipPackage
All of these helper methods have built-in error handling, so there’s no need to check for errors yourself when calling them from within installChocolatey.ps1. For more information on these helpers, check https://github.com/chocolatey/chocolatey/wiki/CreatePackages. This web page also provides information regarding some other helper methods you could use supporting some more-advanced scenarios.
To create the Chocolatey package itself, the .nupkg file, Chocolatey exposes a chocolatey pack command, or cpack for short. Similar to the NuGet pack command, simply call cpack myPackage.nuspec (or chocolatey pack myPackage.nuspec if you like typing a lot), and out comes a Chocolatey package.
All that is left now is to make it available to the public for consumption. To do so, use the chocolatey push command, or cpush for short. Note that you must be a registered user on http://chocolatey.org and have a valid API key to be able to push your package to the Chocolatey Gallery. The package will be pushed, not published. Publishing will happen shortly, after the package has been reviewed by the Chocolatey gods.
Summary
We’ve looked at two projects in the NuGet ecosystem that focus on distributing applications using NuGet rather than distributing dependencies.
Octopus Deploy can be used to deploy your application packages to a variety of test, staging, and production environments and to automate deployment to web and database servers. You learned that Octopus Deploy is the next step in formalizing the development process; build servers were introduced to automate and manage builds, and now, software like Octopus Deploy tries to provide a solution for the next step in the process: deployments.
We switched sides from remote deployments using NuGet packages to installing applications and tools, shipped in NuGet packages, using the Chocolatey command line. We touched briefly on how Chocolatey builds a bridge between NuGet and the Microsoft Web Platform Installer and RubyGems. You also learned how you can automate software installations, even in batches, and how you can keep those packages up-to-date with minimal effort. We also shed light on how easy it is to create and distribute tools and applications yourself by using Chocolatey.
In the next chapter, we’ll look at extending NuGet, a logical next step in creating software using NuGet in a tailor-made process.