
![]()
Hosting Your Own NuGet Server
In Parts 1 and 2 of this book, we introduced you to package management with NuGet. By now, you know everything you need to know to get started with NuGet and consume or produce packages. In Chapter 4, we demonstrated how you can easily publish those packages onto any NuGet server.
Based on this knowledge, we will now start with the fun part! So far, we have mainly been targeting the official NuGet Gallery. The public NuGet feed is aimed at the distribution of open source libraries and components. We really want to encourage you to share your cool projects and contribute to those projects and libraries you really enjoy! Contributing is a wonderful learning experience, and before you know it, you will be able to call yourself an active member of the community.
While the NuGet model is very interesting, the team behind NuGet realized that not everyone is developing open source software for a living and wants to contribute their valuable in-house software packages to this official NuGet package source. Many companies eventually might want to set up their own package repositories, preferably using NuGet, to escape from dependency hell and overcome common package management issues.
This chapter will dive a bit deeper into why you may want to host your own NuGet feed and what it takes to set up your own NuGet repositories. We’ll start with the labor-intensive option of creating our own NuGet server, after which we’ll have a look at some of the alternatives out there. And after reading this chapter, you will be able to set up your own NuGet repositories!
Why Host Your Own NuGet Feed?
A good place to start this chapter is with one of the W questions: why host your own NuGet feed? To be honest, there are many valuable reasons to do this, reasons that we’ll touch on briefly in this chapter and that will become more clear in the next chapters, for example, when we explain continuous package integration.
The first and obvious reason to host your own NuGet feed is simple. By default, your NuGet world consists of only the official NuGet package source. Anyone can post packages to this, and all packages are public. A big consequence of this is that to distribute your company’s internal application framework using NuGet, your only option would be to publish it to the official NuGet package source. Are you sure you want to submit all your in-house–developed intellectual property and make it public? Probably not. Your own, private NuGet feed would come in handy in such a situation.
Maybe you do want to push packages to either the official NuGet package source or to your own feed. And maybe you want to do that from your build server. Why not first push those packages to your personal NuGet feed before doing the actual push to the target feed? This workflow ensures that you can safely validate submitted packages before publishing them officially.
Another reason for setting up a personal NuGet feed may be that you want to provide your developers access to only approved packages, that is, packages that have been tested and validated for use in your company’s software projects. The easiest way to do this is to set up your own NuGet feed and “mirror” specific packages from NuGet.org. As a result, your feed will be limited to only packages that you as a team lead approve.
Hold on; there are more reasons for setting up your own NuGet feed. Good reason number four is simply that the official NuGet package source is growing every hour. What if you are interested only in packages related to ASP.NET MVC? Or only packages meant to be used with Windows Phone 8 development? This problem can easily be solved by creating a feed that contains just packages of interest, with no packages related to technologies you’re not even using in your projects.
Packages on the official NuGet package source are maintained by their respective package authors. This means that whenever a package author updates a NuGet package or removes a package from the official NuGet package source, your developers may have difficulties consuming existing NuGet package references. It may be a good idea to mirror these packages and host your own NuGet feed simply to make sure packages that are being used are always available, regardless of what the package author decides to do with it.
Yet another reason to set up a personal NuGet feed is security: NuGet feeds can prompt users to authenticate to consume packages listed on the feed. Combine that fact with your corporate Active Directory or Lightweight Directory Access Protocol (LDAP) account, and you’ll notice that it becomes very easy to authenticate users to a private feed by using their corporate credentials. What if you want some users to just consume packages while others are permitted to publish them? You can do all of this on your private NuGet feed!
Another reason for hosting your own NuGet feed may be your network connection. Maybe the official NuGet package source has a high latency where you are located, or a corporate firewall prevents you from connecting there. A solution can be to host your own NuGet feed within your firewall and keep both speed and security high.
![]() Note The reasons we’ve listed here are based on our own experience with customers and our employers. There are probably a number of other reasons to host your own NuGet feed.
Note The reasons we’ve listed here are based on our own experience with customers and our employers. There are probably a number of other reasons to host your own NuGet feed.
Setting Up a Simple NuGet Package Repository
The easiest and fastest way of setting up your own NuGet package repository is by setting up a simple network share to act as the physical repository. A folder containing a bunch of NuGet packages (.nupkg) will be treated as a NuGet package source. This is a very cheap way of getting started with NuGet today with almost no effort! No matter what type of NuGet repository you will end up with later, they all have one thing in common: under the hood, simple binary large object (BLOB) storage is used. A network share is a good starting point, as we will show you later in this chapter, because you can easily extend it with more-advanced NuGet server functionality. It all builds on top of a simple package repository. Before spending much effort in a full-fledged NuGet server, we strongly suggest you get started with this minimal setup and get familiar with the concepts while taking immediate benefit from NuGet’s package management.
Figure 5-1 illustrates a network share acting as a NuGet package repository in Windows Explorer. You can simply host your packages in a central folder on any network-attached storage (NAS) device or server.

Figure 5-1. A Windows Explorer view on a network share acting as a NuGet package repository
![]() Tip If you are the only person who will be using a simple package repository, you can achieve the same results by using a local folder instead, as we showed while testing your packages in Chapter 3.
Tip If you are the only person who will be using a simple package repository, you can achieve the same results by using a local folder instead, as we showed while testing your packages in Chapter 3.
To start using this network share as a NuGet package source, you’ll need to configure the NuGet Visual Studio extension to use it. To do so, click Tools ![]() Options, and navigate to the Package Manager
Options, and navigate to the Package Manager ![]() Package Sources tab (see Figure 5-2). For network shares, you can provide the path to the shared folder using the Univeral Naming Convention (UNC) format: \serversharefilepath. The only thing left to do is to communicate this package source setting to your fellow team members. Congratulations! You have just created your own private NuGet package repository!
Package Sources tab (see Figure 5-2). For network shares, you can provide the path to the shared folder using the Univeral Naming Convention (UNC) format: \serversharefilepath. The only thing left to do is to communicate this package source setting to your fellow team members. Congratulations! You have just created your own private NuGet package repository!

Figure 5-2. Configuring a network share as a NuGet package source in Visual Studio
![]() Note While a network share is a great way of sharing some NuGet packages across a team, it comes with a serious disadvantage: NuGet will always open and parse all NuGet packages on this file share when querying from Visual Studio or the Package Manager Console. Since there is no indexing of metadata going on behind the scenes, the more packages stored in this network share, the slower searching and installing will become.
Note While a network share is a great way of sharing some NuGet packages across a team, it comes with a serious disadvantage: NuGet will always open and parse all NuGet packages on this file share when querying from Visual Studio or the Package Manager Console. Since there is no indexing of metadata going on behind the scenes, the more packages stored in this network share, the slower searching and installing will become.
Creating a Basic NuGet Server
The NuGet team realized that people would need to set up a NuGet server with support for API keys, an OData feed on top of the physical package repository, and maybe a web interface as well. We’ve also explained that NuGet itself is fully open source, so you can grab the bits and pieces and tweak it to your needs. However, you might want to make sure your NuGet server implementation can evolve together with the public one and consider building on top of the released versions instead of extending the sources directly.
NuGet is really well designed in terms of extensibility. There are two main components that make a NuGet server: NuGet.Core and NuGet.Server. Of course, using the open source mantra that “it doesn’t exist unless it’s on NuGet,” these two components are available as NuGet packages.
Since we want to host a NuGet feed, we will need a simple web application that can serve as a basic NuGet server. We will choose an ASP.NET MVC web application, but know that it would work as well for the more classical ASP.NET Web Forms approach. Let’s get started and create an empty ASP.NET MVC web application in Visual Studio. From the well-known File ![]() New Project dialog box, you select ASP.NET MVC 4 Application in the Web category, as shown in Figure 5-3.
New Project dialog box, you select ASP.NET MVC 4 Application in the Web category, as shown in Figure 5-3.
![]() Tip If you are unfamiliar with ASP.NET MVC, we recommend reading Pro ASP.NET MVC 4 Framework by Adam Freeman (Apress, 2013).
Tip If you are unfamiliar with ASP.NET MVC, we recommend reading Pro ASP.NET MVC 4 Framework by Adam Freeman (Apress, 2013).
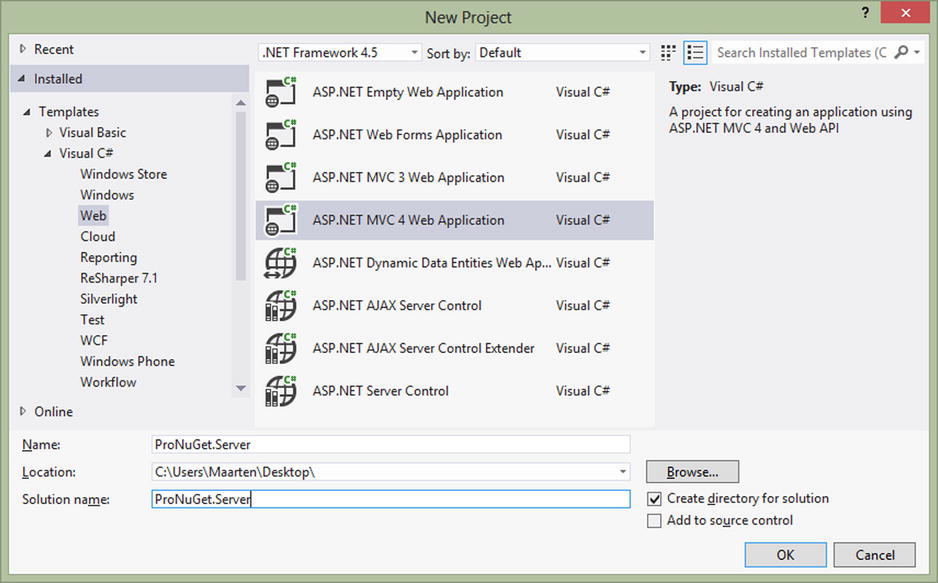
Figure 5-3. Creating a new ASP.NET MVC web application project in Visual Studio 2012
Choose a location for your project and give it a meaningful name. We have chosen ProNuGet.Server for this example. After clicking the OK button, you’ll be prompted by a dialog box to choose the desired recipe for your ASP.NET MVC web application. You can choose an empty project, an Internet application, or an intranet application. If you feel like building everything from scratch, you should pick the Empty option. If you want to get a template for an Internet application, preconfigured with Forms Authentication, the Internet Application recipe will be most suitable for you. For the purpose of this book, we want to build a NuGet server hosted on the corporate intranet, which is likely to be the most realistic scenario for a custom NuGet server implementation. Hence we will continue our sample using the Intranet Application recipe, as illustrated in Figure 5-4.

Figure 5-4. Selecting the Intranet Application recipe for an ASP.NET MVC web application
CONFIGURING INTRANET AUTHENTICATION
The Intranet Application recipe comes preconfigured for Windows Authentication, and the readme file will be opened by default, providing you with detailed instructions on how to configure authentication on Internet Information Services (IIS) or IIS Express.
To use the Intranet Application template, you’ll need to enable Windows Authentication and disable Anonymous Authentication. For detailed instructions (including instructions for IIS 6.0), please visit http://go.microsoft.com/fwlink/?LinkID=213745. To guide you through this process, we provide the following instructions for IIS 7, 7.5, 8, and IIS Express.
IIS 7, 7.5, and 8
- Open IIS Manager and navigate to your web site.
- In Features view, double-click Authentication.
- On the Authentication page, select Windows Authentication. If Windows Authentication is not an option, you’ll need to make sure Windows Authentication is installed on the server. To enable Windows Authentication, follow these steps:
- a. In Control Panel, open Programs and Features.
- b. Select the option Turn Windows Features On or Off.
- c. Navigate to Internet Information Services
 World Wide Web Services Security, and make sure the Windows Authentication node is selected.
- In the Actions pane, click Enable to use Windows Authentication.
- On the Authentication page, select Anonymous Authentication.
- In the Actions pane, click Disable to disable anonymous authentication.
IIS Express
- Right-click the project in Visual Studio and select Use IIS Express.
- Click your project in the Solution Explorer to select it.
- If the properties pane is not open, make sure to open it (press F4).
- In the properties pane for your project, complete the following:
- a. Set Anonymous Authentication to Disabled.
- b. Set Windows Authentication to Enabled.
You can install IIS Express by using the Microsoft Web Platform Installer.
For Visual Studio, visit http://go.microsoft.com/fwlink/?LinkID=214802.
For Visual Web Developer, visit http://go.microsoft.com/fwlink/?LinkID=214800.
If all went well, you should now have a standard ASP.NET MVC intranet web application, fully running with Windows Authentication. Pressing F5 (or selecting Debug ![]() Start Debugging) in Visual Studio should give you the result shown in Figure 5-5.
Start Debugging) in Visual Studio should give you the result shown in Figure 5-5.

Figure 5-5. First run of the ASP.NET MVC intranet application
With minimal effort, you managed to create a nice-looking, fully functional intranet application. If you look closely at what’s included in this Intranet Application recipe, you’ll notice something very cool: this project template already is consuming NuGet packages!
![]() Tip Creating an ASP.NET MVC recipe of your own is a very interesting approach in an enterprise scenario. It’s an easy way to quickly start new projects or solutions, preconfigured, for instance, to consume specific NuGet packages, such as a default company design theme, corporate frameworks, and so on.
Tip Creating an ASP.NET MVC recipe of your own is a very interesting approach in an enterprise scenario. It’s an easy way to quickly start new projects or solutions, preconfigured, for instance, to consume specific NuGet packages, such as a default company design theme, corporate frameworks, and so on.
Although this is not an ASP.NET MVC book, we highly value the importance of its early adoption of NuGet and the way it opens up possibilities to quickly set up a fully functional web application by selecting the building blocks you want.
If we want to turn this web application into a NuGet server, we need to install some additional building blocks. As you, by now, are getting familiar with the NuGet Package Manager, you might have guessed those building blocks could be found on NuGet.org. You would have guessed right! The very building blocks of NuGet itself are available on NuGet.org. We mentioned earlier you’d need the NuGet.Core and NuGet.Server packages, so let’s go ahead and install those into our web application project. Run the following command from within the NuGet Package Manager Console, targeting the web project:
Install-Package NuGet.Server
Installing the NuGet.Server package will add a set of packages to your project, including the NuGet.Core package because NuGet.Server depends on it. After installation, you’ll notice that Default.aspx and some other files were installed into your project. Because the NuGet.Server package is targeting an ASP.NET Web Forms application, we’ll manually adjust the Home view to contain the contents from Default.aspx. To do so, open the ViewsHomeIndex.cshtml file, and paste the markup code of Default.aspx. After adjusting the Home view, your file should look similar to Listing 5-1.
Listing 5-1. Default Home Page for NuGet.Server in an MVC Web Application
@using System.Configuration
@{
ViewBag.Title = "Home Page";
}
<h2>@ViewBag.Message</h2>
<div>
<h2>
You are running NuGet.Server
v@(typeof(NuGet.Server.DataServices.Package)
.Assembly.GetName().Version)</h2>
<p>
Click <a href="@VirtualPathUtility.ToAbsolute("∼/nuget/Packages")">here</a> to view
your packages.
</p>
<fieldset style="width: 800px">
<legend><strong>Repository URLs</strong></legend>In the package manager settings,
add the following URL to the list of Package Sources:
<blockquote>
<strong>@Helpers.GetRepositoryUrl(Request.Url, Request.ApplicationPath)</strong>
</blockquote>
@if (String.IsNullOrEmpty(ConfigurationManager.AppSettings["apiKey"]))
{
<text>To enable pushing packages to this feed using the nuget command line tool
(nuget.exe). Set the api key appSetting in web.config.</text>
}
else {
<text>Use the command below to push packages to this feed using the nuget
command line tool (nuget.exe).</text>
}
<blockquote>
<strong>nuget push {package file} -s @Helpers.GetPushUrl(Request.Url,
Request.ApplicationPath) {apikey}</strong>
</blockquote>
</fieldset>
@if (Request.IsLocal) {
<p style="font-size: 1.1em">
To add packages to the feed put package files (.nupkg files) in
the folder "@NuGet.Server.Infrastructure.PackageUtility.PackagePhysicalPath".
</p>
}
</div>
![]() Note If you are familiar with ASP.NET MVC, you obviously could plug in these changes anywhere in your application that you want. This sample page contains both the physical and virtual paths to the NuGet package source. It also contains instructions on how to configure Visual Studio to use your brand new NuGet repository.
Note If you are familiar with ASP.NET MVC, you obviously could plug in these changes anywhere in your application that you want. This sample page contains both the physical and virtual paths to the NuGet package source. It also contains instructions on how to configure Visual Studio to use your brand new NuGet repository.
Configuring the Packages’ Location
You now have set up a basic NuGet server, preconfigured with a NuGet OData feed and a default package location. Any .nupkg file that you put in the packages’ location will be immediately picked up by the OData feed the moment you query it for packages.
Go ahead and copy a few packages into the {applicationPath}packages folder. You should see your packages listed when using a browser such as Internet Explorer to navigate to the OData feed located on {applicationUrl}/nuget/packages.
![]() Tip You could change the location of the packages—by default, located under {applicationPath}packages—by configuring a virtual directory in IIS to point to any path you want. The package location doesn’t even have to be on the same machine. Just make sure you configure security permissions accordingly.
Tip You could change the location of the packages—by default, located under {applicationPath}packages—by configuring a virtual directory in IIS to point to any path you want. The package location doesn’t even have to be on the same machine. Just make sure you configure security permissions accordingly.
Starting from NuGet.Server version 1.5, you can also point the application to a specific location for packages by setting the packagesPath application setting in web.config, as shown in Listing 5-2.
Listing 5-2. Setting the packagesPath Configuration Setting for NuGet.Server v1.5
<appSettings>
    <!-- Set the value here to specify your custom packages folder. -->
    <add key="packagesPath" value="C:MyPackages" />
</appSettings>
If you start the application now, you should see something similar to the page shown in Figure 5-6.

Figure 5-6. First run of the NuGet server implementation
In order for your team members to start using this NuGet feed, they need to add the package source to the NuGet configuration in Visual Studio. The NuGet.Server package has configured the routing of your application for you and located the NuGet repository URL under {applicationUrl}/nuget. This is the package source URL you’ll need to configure in Visual Studio.
You now have everything in place to start building a fully fledged NuGet server in ASP.NET MVC. Instead of manually placing packages into the packages’ folder, you could build a complete package management user interface, where you could upload packages, for instance. We’ll leave it up to you to build it, because these needs will most likely be different for each organization. If your organization wants to use multiple package repositories and feeds, you’ll need to deploy and configure this web site multiple times as well, because the NuGet.Server package supports only a single feed per web application.
In short, the NuGet.Server package is very useful if you have only basic requirements or if you want to build the web application hosting the NuGet feed completely from scratch. If you want something more feature-rich and don’t want to develop everything yourself, you might consider the NuGet Gallery implementation, which is also used at NuGet.org. We’ll discuss it in the next section.
You can still use the nuget.exe command-line tool to push and publish packages to your own feed. To enable this functionality, you’ll need to configure your server with an API key. This is done through another application setting in your server’s web.config file, as shown in Listing 5-3.
Listing 5-3. Setting the Packages’ Path Configuration Setting for NuGet.Server v1.5.
<appSettings>
    <!-- Set the value here to allow people to push/delete packages from the server.
         NOTE: This is a shared key (password) for all users. -->
    <add key="apiKey" value="" />
</appSettings>
When the key is omitted or empty, which is the case by default, pushing packages to the feed is disabled. Note that this API key is shared among all users of your private NuGet feed. In other words, everyone who’s using your feed will need to use the same key when pushing or publishing packages to your repository. By setting the API key in the configuration file, this also means that you can’t change this as easily as a registered user on NuGet.org could do. Changing this setting requires access to the web.config file.
As we will explain later in this chapter, MyGet has the concept of an API key per user, which allows unique permissions on such a feed on a per user basis. If you’re fine with a shared API key for the entire feed, a NuGet.Server-based implementation is probably good enough to suit your needs.
![]() Note As with the network share approach, the NuGet.Server package does not provide indexing and caching of NuGet packages that are hosted. It will always open and parse all NuGet packages on this server when querying from Visual Studio or the Package Manager Console. The more packages stored in this network share, the slower searching and installing will become. Do know that the NuGet.Server package is extensible and that package indexing can be implemented at will.
Note As with the network share approach, the NuGet.Server package does not provide indexing and caching of NuGet packages that are hosted. It will always open and parse all NuGet packages on this server when querying from Visual Studio or the Package Manager Console. The more packages stored in this network share, the slower searching and installing will become. Do know that the NuGet.Server package is extensible and that package indexing can be implemented at will.
If you like the look and feel of the official NuGet Gallery at www.nuget.org, you might be very pleased to learn that you can actually host the exact same web application yourself. The NuGet Gallery is built using ASP.NET MVC and can be installed on your own web server as well as on Microsoft’s cloud computing platform, Windows Azure.
This section will show you how you can download, compile, and deploy the NuGet Gallery source code to your own web server.
The NuGet Gallery has to be compiled and installed from its source code. There are two options to obtain the source code for the NuGet Gallery:
- If you are familiar with the Git version control system, you can easily clone the NuGet Gallery Git repository by using the git clone https://github.com/NuGet/NuGetGallery command. This will download the latest source code version from GitHub to your local disk.
- A zip file containing the exact same source code can be downloaded by browsing to https://github.com/NuGet/NuGetGallery/zipball/master. This URL will trigger a download of the latest version of the NuGet Gallery source code. You can save and extract the zip file to your local disk.
Make sure the source code is extracted on your local disk. We’ll use these extracted sources to compile and deploy the NuGet Gallery.
Creating a SQL Server Database
Many applications, including NuGet Gallery, require a SQL Server database to store their data. NuGet Gallery can make use of SQL Server and SQL Server Express, a free version of which can be downloaded from www.microsoft.com/sqlserver/en/us/editions/express.aspx.
The NuGet Gallery database has to be created on a SQL Server instance. Once you are connected to the SQL Server instance of your choice—we use our local SQL Server instance represented by the dot (.) notation—you can right-click Databases in the Object Explorer window, and select New Database from the contextual menu, as shown in Figure 5-7.

Figure 5-7. Creating a new SQL Server database using SQL Server Management Studio
We will call our database NuGetGallery, but this name can be anything you find meaningful.
The folder where you initially extracted the NuGet Gallery source code will contain a folder named Website. This folder contains a web.config file, which you should edit and update according to your situation. Open this file in Visual Studio (or your XML editor of choice), and update the appSettings and connectionString section accordingly. Table 5-1 lists the available configuration keys and their descriptions.
Table 5-1. Overview of Possible NuGet Galery Configuration Settings
| Setting Name | Required? | Description |
|---|---|---|
| GalleryOwner | Yes | The name and e-mail address of the NuGet Gallery owner. Update this to your own name and e-mail address. |
| Gallery:ReleaseName | No | The release name for the NuGet Gallery. This is used only at www.nuget.org and displayed in the footer. |
| Gallery:ReleaseSha | No | The release hash for the NuGet Gallery. This is used only at www.nuget.org and displayed in the footer. |
| Gallery:ReleaseBranch | No | The release branch name for the NuGet Gallery. This is used only at www.nuget.org and displayed in the footer. |
| Gallery:ReleaseTime | No | The release time for the NuGet Gallery. This is used only at www.nuget.org and displayed in the footer. |
| Gallery:RequireSSL | No | Specifies whether the use of SSL is required. When set to true, the NuGet Gallery will enforce use of the HTTPS scheme in all URLs. |
| Gallery:SiteRoot | Yes | The site root of the NuGet Gallery. This should be updated to the same root URL as where you will be installing NuGet Gallery. For example, if you are installing NuGet Gallery on the domain name nuget.mycorp.com, this setting must be updated to http://nuget.mycorp.com/. |
| Gallery:ConfirmEmailAddresses | No | Specifies whether new users should confirm their e-mail address before gaining access to the NuGet Gallery. |
| NuGetGallery connection string | Yes | This connection string is used to connect to the SQL Server database created earlier. Update the connection string to reflect the connection details for your SQL Server database. |
We recommend setting the Gallery.ConfirmEmailAddresses option in web.config to false when creating the first user. Once that user is created, it is best to set this back to true. After updating the web.config file, you are ready to compile NuGet Gallery.
Before being able to deploy and use the NuGet Gallery server, you will have to compile it. In the source code folder for the NuGet Gallery, there is a PowerShell script called Build-Solution.ps1. This script can be run from a PowerShell console and will download all dependencies required to compile the NuGet Gallery (using NuGet, of course). It will also run all unit tests and compile the NuGet Gallery source code to a web application, which you can deploy on your web server.
To compile NuGet Gallery, open a PowerShell console (by choosing Start ![]() All Programs
All Programs ![]() Accessories
Accessories ![]() Windows PowerShell
Windows PowerShell ![]() Windows PowerShell), navigate to the folder on your local disk where the NuGet Gallery sources have been extracted, and run the command .Build-Solution.ps1. Figure 5-8 shows you a part of the output of this compilation process.
Windows PowerShell), navigate to the folder on your local disk where the NuGet Gallery sources have been extracted, and run the command .Build-Solution.ps1. Figure 5-8 shows you a part of the output of this compilation process.

Figure 5-8. The build script output for NuGet Gallery’s Build-Solution.ps1 script
After this script has been run, the folder where you initially extracted the NuGet Gallery source code will contain a folder named Website. This is the actual application you’ll have to deploy to your server in order to run your own NuGet feed.
Our next action is initializing the database schema. The NuGet Gallery uses Entity Framework Code-First and can create its database schema by running all database migrations from the Package Manager Console. Open the NuGetGallery.sln file in Visual Studio, and from the Package Manager Console run Update-Database to ensure that the database schema and initial data are created. Example output is shown in Figure 5-9.

Figure 5-9. Output of the Update-Database cmdlet in the Package Manager Console
Finalizing Your NuGet Gallery Installation
After you have deployed the NuGet Gallery to your web server, navigate to the URL where the NuGet Gallery web site can be found. We have installed NuGet Gallery on a local IIS server available at http://localhost : 46613/. You will be greeted by a similar web site to www.nuget.org (in fact, www.nuget.org runs on the same code you have just deployed).
Since you are installing NuGet Gallery, chances are you will be the administrator for the installation as well. To enable the administration user interface, you will have to register on your NuGet Gallery first. Click the Register link in the top-right corner of NuGet Gallery, and specify the username and password you would like to use. Figure 5-10 shows you this registration page in action.

Figure 5-10. Create a new account on your NuGet Gallery
If you haven’t set the Gallery.ConfirmEmailAddresses setting in web.config to false, an additional step is involved before being able to log in with the newly created user. Since this is the first user being created, and settings (for example, the mail server to use) have not yet been updated, NuGet Gallery creates a registration e-mail in the WebsiteApp_DataMail folder. Open this folder, and double-click the e-mail message generated after registering your username. This confirmation e-mail contains an URL that is used to validate the registration. Navigate to this link and validate your registration.
After confirming your registration, you are a regular user of your NuGet Gallery. This means you can create and upload NuGet packages just as anyone else would.
To become the administrator of your NuGet Gallery, you will have to upgrade your account to an administrator account. To do so, connect to the NuGetGallery database you’ve created on SQL Server and run the following query:
INSERT INTO [dbo].[Roles] ([Name])
     VALUES ( 'Admins' )

INSERT INTO [dbo].[UserRoles] ([UserKey],[RoleKey])
     VALUES ( (SELECT TOP 1 [Key] FROM [dbo].[Users]), 1)
This query adds the first user in your NuGet Gallery (which should be your newly created account, as you are the only user at this time) and assigns it the Admins role. From now on, you’ll be able to manage the application, indexes, and database directly from the URL http://localhost:46613/Admin/.
Congratulations, you are now running your own version of www.nuget.org! Publishing and consuming packages is now identical to the gallery described in Chapter 4. It is, after all, the same software you are running now.
![]() Note The NuGet team created an additional project on GitHub, https://github.com/NuGet/NuGetOperations, providing a set of operations tools designed for the official NuGet.org site. While these tools were created for running and maintaining that web site, some might be useful for running your own NuGet Gallery. The project features a PowerShell console for managing the NuGet Gallery, tools for backup, and so on.
Note The NuGet team created an additional project on GitHub, https://github.com/NuGet/NuGetOperations, providing a set of operations tools designed for the official NuGet.org site. While these tools were created for running and maintaining that web site, some might be useful for running your own NuGet Gallery. The project features a PowerShell console for managing the NuGet Gallery, tools for backup, and so on.
Using NuGet as a Service: MyGet
So far, you’ve learned how to set up a NuGet server based on a local directory or a file share, as well as using an open source NuGet server implementation. But why do everything yourself if someone else can do it for you? At least, that’s what we thought when creating MyGet.
MyGet is our attempt to create a hosted private NuGet feed. It offers everyone the possibility to create their own, private, filtered NuGet feeds for use in the Visual Studio Package Manager. It can contain packages from NuGet.org as well as private packages. In short, it supports all usage scenarios we mentioned at the start of this chapter (in the “Why Host Your Own NuGet Feed?” section). And it’s easy to set up. Plus, it comes with a free plan.
This section will take you through some characteristics of MyGet and show you some features that you would have to develop yourself when using one of the solutions mentioned earlier in this chapter. But let’s start at the beginning: where do you find MyGet, and how can you create a NuGet feed?
Creating a NuGet Feed on MyGet
Before being able to create a NuGet feed, you have to sign in to MyGet. The MyGet web site can be found at www.myget.org. If you navigate to this web site using your browser of choice, you’ll be greeted with the MyGet front page shown in Figure 5-11. Because we envisioned MyGet to be easy to use, we have chosen not to provide a user registration page. Locate the Sign In link in the top-right corner, or find the big green Get Started for Free button to log in to MyGet.

Figure 5-11. The MyGet front page after navigating to www.myget.org
The sign-in page does not require you to have a login for MyGet. Instead, it cleverly uses one of many external identity providers, such as Microsoft Account, Google Accounts, Facebook, Yahoo!, GitHub, StackExchange, and OpenID. Simply click the logo of your identity provider of choice, and you will immediately be signed in to MyGet.
At your very first login, you will be prompted for some additional information, as shown in Figure 5-12. MyGet will ask you for your name, e-mail address, and a username/password combination. We advise you to immediately choose a username and password on this page, as that combination will be used to authenticate against your private NuGet feeds when working with the NuGet Visual Studio extension or the Package Manager Console.
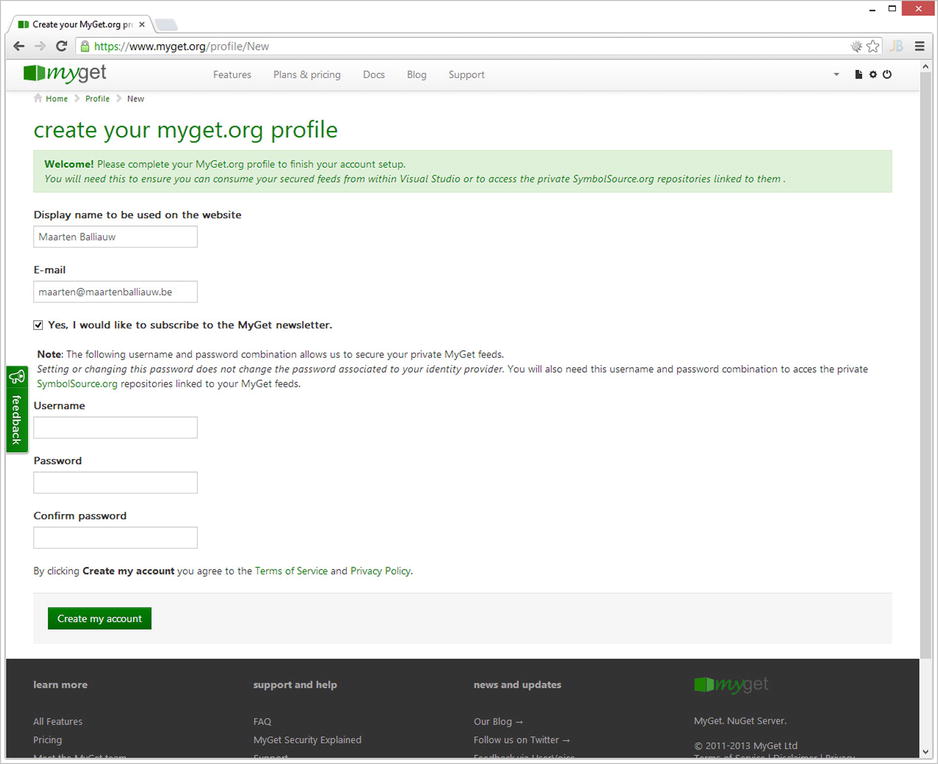
Figure 5-12. Some additional profile information is requested the first time you sign in to MyGet
After updating and saving your profile, you’re ready to go. Creating a NuGet feed by using MyGet can be done through the Create New Feed icon, which can be found in the top navigation bar, right next to your username. This will take you to the page shown in Figure 5-13. A feed, of course, requires a name, which has to be unique across MyGet. Popular feed names such as myget, nuget, and pronuget (the name of our book) may be taken by someone else, just as is the case with domain names on the Internet. Name your feed carefully: you cannot change the feed name later. The second piece of information asked for is a short description for the feed. This can be anything you want to identify the feed in your list of feeds.

Figure 5-13. Create your own NuGet feed
After clicking the Continue button, you’ll be taken to the list of packages hosted in this feed. As Figure 5-14 shows, this page contains a number of tabs on the left (Packages, Feed Details, Feed Activity, Feed Security, and so on). The list of packages hosted on your new feed will still be empty.

Figure 5-14. The overview page of your newly created NuGet feed
The Packages tab contains the list of packages you are hosting on this feed. Obviously, this list is empty when you’ve just created a new feed. The Feed Details tab contains all details about your feed: the feed URL that you can add to the list of package sources in Visual Studio, your API key (which can be used to push packages from the NuGet command line or from NuGet Package Explorer), and some other information. The other tabs are also worth exploring—for example, Feed Security contains all settings related to who may access your feed and what privileges one has on the feed.
On the Feed Details tab, find the URL to your NuGet feed. My feed URL is www.myget.org/F/pronuget-sample/. As shown in Figure 5-15, you can simply register this feed in the NuGet Visual Studio extension’s list of available package sources. After doing so, you can consume your own NuGet feed in the same manner as you would any other NuGet feed: search packages, install and uninstall packages, and so on.

Figure 5-15. Adding a NuGet feed hosted on MyGet to the NuGet Visual Studio extension list of available package sources
Congratulations, you’ve now created your first NuGet feed by using MyGet!
Mirroring Packages from the Official NuGet Package Source
When we first developed MyGet, our idea was nothing more than a web application that enables you to mirror packages from the official NuGet package source. There are plenty of reasons for doing this: it allows you to essentially filter the official NuGet package source and displays only packages you’ve selected to be on your feed. If you want to provide your developers access to approved packages that have been tested and validated for use in your company’s software projects, it’s easy to create a NuGet feed containing only those packages.
Packages on the official NuGet package source are maintained by their respective package authors and not by Microsoft or any other party. This means external people have control over dependencies used in your software projects! Whenever a package author updates a NuGet package or removes a package from the official NuGet package source, your developers may have difficulties consuming existing NuGet package references. The easy way to solve this is to mirror packages from the official NuGet package source. And that’s what we’ll do in this section.
After logging in to your MyGet account, navigate to the list of packages in a feed you’ve created. If you haven’t created a feed yet, start by creating one using the steps outlined in the previous section.
Clicking the Add a Package button will take you to the screen shown in Figure 5-16. This screen has several options to add packages to your MyGet feed. We’ll be using the From NuGet option, which allows you to add a package from the official NuGet package source. The other options, From an Uploaded Package and From Packages.config, will be demonstrated later in this chapter.

Figure 5-16. Adding a package from the official NuGet package source
![]() Note The From Packages.config tab allows you to upload the packages.config file from a project you’ve created and will add multiple packages from the official NuGet package source at once. This is by far the quickest way to mirror a series of packages that are required in your project(s).
Note The From Packages.config tab allows you to upload the packages.config file from a project you’ve created and will add multiple packages from the official NuGet package source at once. This is by far the quickest way to mirror a series of packages that are required in your project(s).
The From NuGet tab offers a rich search interface: packages from the official NuGet package source can be searched for by using a number of criteria. For example, you can choose to search only in the latest versions of packages or in earlier versions. You can search titles, summaries, and tags, as well as define how the search should be performed (Starts with Term or Contains Term).
In the Search box, start typing a keyword related to the package you want to mirror onto your MyGet feed, or simply enter the package identifier if you know it. After a second, search results will come in, and you’ll be able to select a package to add to your MyGet feed. Make sure to select the Mirror Packages check box and click the Add button to add a package to your MyGet feed. In Figure 5-16, we’ve searched for the package identifier jQuery and clicked the Add button.
![]() Caution By default, the Mirror Packages check box is not selected. This means that the package metadata, but not the package itself, will be added to your MyGet feed. To ensure that the package itself is copied onto your MyGet feed, we recommended selecting the Mirror Packages check box. This ensures that a package author deleting a package from the official NuGet package source does not affect your MyGet feed.
Caution By default, the Mirror Packages check box is not selected. This means that the package metadata, but not the package itself, will be added to your MyGet feed. To ensure that the package itself is copied onto your MyGet feed, we recommended selecting the Mirror Packages check box. This ensures that a package author deleting a package from the official NuGet package source does not affect your MyGet feed.
In Chapter 4, we showed you how to contribute and publish packages to the official NuGet package source. While doing so is interesting for open source projects, you may not want to publish the frameworks developed by your company or other intellectual property to the official NuGet package source. Everyone can consume packages from that feed, which means your intellectual property would be on the streets.
A solution is to host your own NuGet feed, something we’ve described throughout this chapter. Using MyGet, you can combine mirrored packages from the official NuGet package source with your own NuGet packages—all gathered in the same NuGet feed, your NuGet feed.
As with the official NuGet package source, adding packages to a feed can be done using a web interface and the NuGet command line. The next section will show you how to do this.
Adding Custom NuGet Packages through the MyGet Web Interface
Just like adding a package from the official NuGet package source to your MyGet feed, adding a custom NuGet package is done through MyGet’s web interface at www.myget.org. After logging in to your MyGet account, navigate to the list of packages in a feed you’ve created. You’ll see the list of packages on your feed under the Packages tab.
Click the Add a Package button to go to the screen where packages can be added. Navigate to the From an Uploaded Package tab, and you’ll see the screen shown in Figure 5-17.

Figure 5-17. Adding a custom package to a MyGet feed by using the web interface
This screen allows you to select one or multiple packages from your local hard disk. Optionally, dependencies can be included as well as mirrored. For example, if you create a package that depends on one or more packages from the official NuGet package source, selecting the Include Dependencies check box will add those packages to your MyGet feed, next to the packages you are uploading. Optionally, these packages can also be mirrored, as we explained in the previous section.
Clicking the Upload button will send the packages you’ve selected to upload to your MyGet feed. When the upload succeeds, your feed will show all packages you’ve added previously as well as any packages just uploaded.
Adding Custom NuGet Packages by Using the NuGet Command Line
When doing a lot of work with NuGet, you may prefer to use the NuGet command line to push packages to your MyGet feed. Also, when automating package creation and publishing (for example, on a build server), using the NuGet command line may come in handy. This section will show you where to find the MyGet API key and how to push a package to a MyGet feed by using that key.
The first step in using the NuGet command line to push a NuGet package to your MyGet feed will be obtaining an API key. After logging in to MyGet and navigating to the Feed Details tab, as shown in Figure 5-18, you’ll find all your feed details: the URL to add in the NuGet Visual Studio extension and your MyGet API key. By the time this book is in your hands, this tab will also display all information related to integrating MyGet and SymbolSource.org (refer to Chapter 4 to learn more about SymbolSource).

Figure 5-18. The Feed Details tab displaying all sorts of integration information
The API key displayed on the Feed Details tab is 5c2c8507-428f-4283-af20-a35328a14bac (in our case—yours will be different). As you saw in Chapter 4, most NuGet commands support the –Source switch. The nuget push command supports this switch as well and supports pushing packages to feeds other than the default official NuGet package source. The following command pushes a package named ProNuGetStringExtensions to the pronuget feed on MyGet, using the API key obtained from the Feed Details tab:
nuget push ProNuGetStringExtensions.1.0.nupkg 5c2c8507-428f-4283-af20-a35328a14bac -Source http://www.myget.org/F/pronuget-sample
Obviously, this API key can also be used in the NuGet Package Explorer (NPE) to publish NuGet packages directly from the user interface to any MyGet feed on which you are allowed to publish packages.
Applying Security Settings to Your Feed
One of the reasons listed at the beginning of this chapter for setting up your own NuGet feed was security. Security is a large word with many nuances and possible scenarios, many of which are supported by MyGet. For example, some users can manage users and packages, while some can only manage packages, and others can only consume packages. This section will guide you through MyGet’s security model and show you how to set up security and permissions in MyGet.
MyGet features a rich security model for your feeds. You, as a feed owner, always have the richest set of permissions possible. You can assign privileges to specific users with an account on MyGet. Table 5-2 lists all possible permissions and what they mean.
Table 5-2. MyGet’s Permissions

All of these privileges can be combined at will to create your unique security configuration. A common scenario is creating a private feed (which by default only the feed owner can access). Imagine you want to give some colleagues the privilege to consume packages after logging in by using their MyGet usernames and passwords. The following configuration should do the trick:
- You: Owns this feed (This cannot be changed.)
- Colleague X: Can consume this feed
- Colleague Y: Can consume this feed
If you want to allow Colleague X to manage all packages on this feed, you can assign that user the Can Manage All Packages for This Feed privilege. Optionally, the Can Manage Users and All Packages for This Feed privilege will enable thus user to manage user permissions as well.
Inviting Other Users to Your Feed
To give other users certain privileges, they have to be invited to your MyGet feed. This can be done on the Feed Security tab for your feed. This tab lists all users who currently have access to your feed as well as a list of pending users, that is, users who have been invited to your feed but haven’t confirmed yet. An example of the Feed Security tab is shown in Figure 5-19.

Figure 5-19. The Feed Security tab enables you to assign specific privileges to other users
The Add Feed Privileges button will open a dialog box that allows you to invite a user to your feed by entering a known username or an e-mail address. You can immediately assign a privilege to this user to ensure that the correct privilege will be assigned once the user confirms the invitation. Figure 5-20 shows an invitation for [email protected] to whom, once the invitation is confirmed, the Can Manage All Packages for This Feed privilege will be assigned.

Figure 5-20. Inviting other users to a feed and assigning them a specific privilege
Once you’ve clicked the Add User button, an e-mail will be sent to the e-mail address provided. The user being added to your feed will receive this e-mail and can choose to claim the privileges you’ve assigned or to simply ignore the invitation. An example e-mail is shown in Figure 5-21. Once the user confirms this e-mail by clicking the link provided in the e-mail body, the user will be granted access to your feed with the privileges chosen in the Add Feed Privileges dialog box.
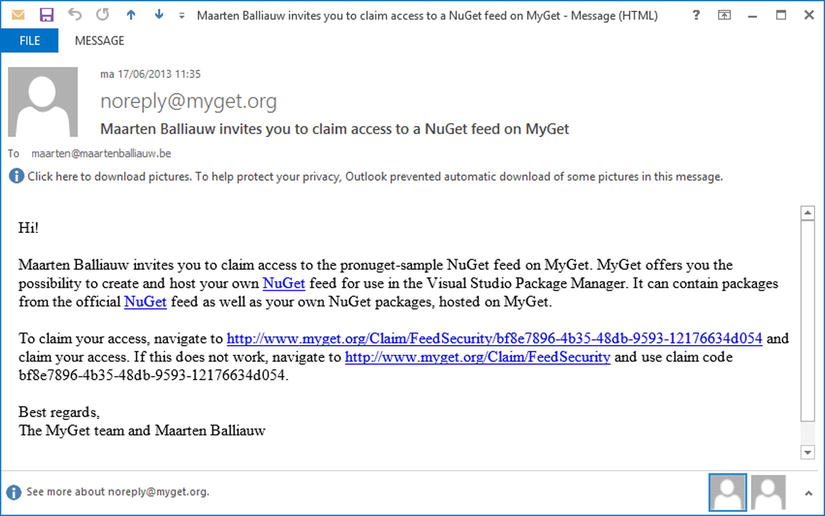
Figure 5-21. The invitation e-mail sent to a user whenever you grant specific privileges on your private feed
After inviting a user to your feed, you can change the privileges previously assigned. For example, a user who could previously only consume packages may now be granted the privilege of contributing packages to your feed. Also, a user who could previously manage all packages on the feed can be locked down into a privilege where only consuming packages, not managing them, is permitted.
The Feed Security tab for your feed lists all users who currently have access to your feed as well as a list of users who have been invited to your feed but haven’t confirmed their privileges yet. The drop-down list next to a user’s name allows you to modify the currently assigned privilege (see Figure 5-22).

Figure 5-22. Managing user privileges
![]() Note When you’re assigning the Has No Access to This Feed privilege to a certain user, the user will be removed from the list of users. If, afterward, you want to assign a different privilege to this user, the user should be sent a new invitation by using the Add Feed Privileges button.
Note When you’re assigning the Has No Access to This Feed privilege to a certain user, the user will be removed from the list of users. If, afterward, you want to assign a different privilege to this user, the user should be sent a new invitation by using the Add Feed Privileges button.
What Else Is There?
MyGet is probably one of the most mature NuGet repositories out there. It offers a lot of functionality around managing packages, feeds, and security. Depending on your subscription plan, it provides private feeds and integration with your Active Directory. It also comes with a feature called Build Services , which enables you to link a Git, Mercurial, Subversion, GitHub, Bitbucket, or CodePlex repository and automatically compiles your source code into NuGet packages.
It also allows working with the “staging feed” scenario, where continuous integration packages or unstable packages can be hosted on MyGet and later pushed upstream to the NuGet Gallery or another feed (see http://blog.myget.org/post/2013/03/04/Package-sources-feature-out-of-beta.aspx).
MyGet also integrates with SymbolSource.org and provides a symbol server for your packages. As described in Chapter 4, a symbol server can be used to debug NuGet package source code right from within Visual Studio.
Another interesting feature is a retention policy. MyGet can be configured to keep only x versions of a package on a feed. This prevents the feed from cluttering up with prerelease versions and so on.
Using ProGet
There are a number of commercial NuGet repositories available. One of them is ProGet by Inedo. ProGet is a NuGet package repository that lets you host and manage your own personal or enterprise-wide NuGet feeds. It can be downloaded and installed on a server in your network. ProGet comes in several versions: free and paid. Let’s have a look at the free version.
Downloading and Installing ProGet
ProGet can be downloaded from www.inedo.com/proget/download. It comes in two versions; one contains a SQL Server database engine, and the other does not. If you already have SQL Server running, the smaller download is right for you.
During installation, we have to select the license we want to use. We can select the free version or try a trial (or enter a license key if obtained). During the installation, you can specify the path to which ProGet has to be installed. If you select to use your own SQL Server database, the database connection string should be specified during installation, as can be seen in Figure 5-23. During the final installation stages, you can specify whether you want to host ProGet as an IIS web application or using the embedded web server.

Figure 5-23. ProGet database connection settings
After installation, ProGet will be opened in your browser. Since an unregistered ProGet version will work for only six days, we want to make sure our license key is entered into the system. A license key should be sent to your e-mail address after installation. Click the Administration link and log in with username Admin and password Admin. Next, navigate to the Licensing and Activation option and enter the key sent to you by e-mail. Figure 5-24 shows an example of a correctly configured license key.

Figure 5-24. License key validation with ProGet
From the administration dashboard, you may want to change the default username and password for the administrator user as well.
Consuming NuGet Packagesby Using ProGet
ProGet provides the ability to create multiple feeds. It comes with a default feed, but additional feeds can be created through the administration area. The default feed URL is http://localhost:8885/nuget/Default (the port number may be different in your situation) and can be registered in Visual Studio, as you can see in Figure 5-25.

Figure 5-25. Registering the ProGet feed in Visual Studio
You can now add NuGet packages from the ProGet feed. By default, ProGet will proxy all packages from the official NuGet package source. This means that in Visual Studio you will see the exact same packages as can be seen in the official NuGet package source.
ProGet can cache packages from NuGet.org so that they are available from ProGet even if there is no Internet connection available. This behavior can be enabled for all packages in the feed through the administration area, or by cherry-picking the packages that should be available directly from the ProGet server. When navigating to a package in the ProGet interface, the Pull to ProGet button can be used to download a copy of the upstream package, as can be seen in Figure 5-26.

Figure 5-26. Pull the package to ProGet
As you’ve seen so far, ProGet does a great job at proxying the official NuGet package source. It also supports adding your own packages, as we will see in the next section.
Adding Your Own NuGet Packages
So far, we have used ProGet for mirroring and proxying packages from the official NuGet package source. It is also possible to add your own packages. This can be done from the ProGet interface by clicking the Add Package button.
After clicking the button, you will be presented with several options. Packages can be added by uploading them through the web interface, by pushing them using the NuGet command line, or by creating a new package through the web interface. Figure 5-27 shows how a package can be uploaded to the ProGet server.

Figure 5-27. Uploading a package to ProGet
As you’ve seen, ProGet allows mixing packages from the official NuGet package source and your own packages on one feed.
What Else Is There?
ProGet comes with several other features. Depending on the license (free vs. commercial), ProGet comes with LDAP support and a symbol server. Hosting multiple feeds on one ProGet server is supported, as well as linking more upstream package sources than just the official NuGet package source.
If you notice that your team is consistently pulling the same project from a remote feed, you can download the package to your local ProGet package source to cache it instead. Entire feeds can be downloaded to ProGet to have an onsite cache/backup of external dependencies.
ProGet also offers an SDK and an API, which allow you to integrate with their product. For example, by using the SDK, a custom store for feeds can be created.
Using TeamCity as a NuGet Repository
Many organizations make use of TeamCity (www.jetbrains.com/teamcity) as their build- and continuous integration server. It comes with several features around NuGet: builds can generate NuGet packages, and TeamCity can push these out to an external NuGet feed. Another option is to expose generated artifacts as NuGet packages by using TeamCity’s built-in NuGet server.
While TeamCity comes with great NuGet support, it is focused around continuous integration. For example, the built-in NuGet feed can be used to expose build artifacts from TeamCity but does not support adding custom packages.
Pushing Packages to a NuGet Feed
When a build configuration in TeamCity creates NuGet packages as part of the build process, you can push these packages out to a NuGet server such as NuGet Gallery, MyGet, or ProGet. This makes perfect sense: when building software components that you want to use during development, TeamCity can build these components, run unit tests for them, and once successful, publish generated NuGet packages to a NuGet server for consumption by team members or customers.
Build configurations in TeamCity consist of one or more build steps. In TeamCity 7, several NuGet-related build steps have been introduced: installing NuGet packages, creating NuGet packages, and pushing NuGet packages. Let’s have a look at that last one.
Before being able to push packages to an external NuGet server, at least one version of NuGet should be installed into TeamCity. From the TeamCity portal, you can do this under Administration ![]() NuGet Settings under the NuGet Commandline tab. The versions of NuGet installed here will be made available in the NuGet build steps afterward. As can be seen from Figure 5-28, we can select the version of nuget.exe to install, and you can upload your own version of NuGet as well.
NuGet Settings under the NuGet Commandline tab. The versions of NuGet installed here will be made available in the NuGet build steps afterward. As can be seen from Figure 5-28, we can select the version of nuget.exe to install, and you can upload your own version of NuGet as well.

Figure 5-28. Adding a NuGet version to TeamCity
After at least one NuGet version has been installed, you can make pushing NuGet packages to an external feed a part of your build process. From any build configuration, you can add a new build step of the type NuGet Publish. This build step is able to upload packages created during the build to an external NuGet server. You can select the version of nuget.exe to use and specify the feed to which the package(s) have to be pushed. The API key for pushing packages has to be specified as well. An example configuration of this build step can be seen in Figure 5-29.

Figure 5-29. Pushing NuGet packages as part of a TeamCity build
The packages to upload can be specified as well. In the configuration seen in Figure 5-29, a wildcard pattern is used to match all .nupkg files created in a given directory during build.
Once this build step is added, TeamCity will push NuGet packages created to an external NuGet server for consumption by team members or customers.
Exposing Build Artifacts by Using TeamCity’s NuGet Feed
As you may know, TeamCity ends a build with exposing build artifacts, the libraries, executables, or other items generated during the build. If a build generates NuGet packages and the NuGet package is configured as a build artifact, TeamCity can expose it by using the built-in NuGet server.
From the TeamCity Administration under NuGet Settings, the NuGet server can be enabled, as can be seen in Figure 5-30. Once the server is enabled, TeamCity will provide you with an URL that can be added to Visual Studio in order to consume the packages hosted on TeamCity. If guest access is enabled, TeamCity will provide you with a second URL that provides anonymous access to NuGet package build artifacts that are publicly available.

Figure 5-30. Enabling the TeamCity built-in NuGet server
The URL shown in the TeamCity portal can be used in Visual Studio. If guest access is disabled, you will have to provide credentials when consuming the feed. Figure 5-31 shows a list of packages fetched from TeamCity’s NuGet server.

Figure 5-31. Consuming NuGet packages hosted on a TeamCity server
While having a built-in NuGet server in TeamCity is great, it is not a full NuGet server. The TeamCity NuGet server is a different view on build artifacts but does not provide the capabilities that are available in other NuGet servers out there. If you are using TeamCity for builds and continuous integration, it does, however, make perfect sense to either push packages created to an external NuGet server or to consume prerelease packages from TeamCity’s built-in feed directly.
Using Other NuGet Repositories
So far, we’ve seen there are several free and commercial NuGet repository servers available. Next to network shares, NuGet.Server, the NuGet Gallery, MyGet, ProGet, and TeamCity, other solutions exist.
A free open source NuGet repository called NuRep is available from https://bitbucket.org/thinkbeforecoding/nurep. It comes with support for one feed and can host your own NuGet packages. It also comes with a symbol server so that you can debug NuGet packages in Visual Studio.
Other commercial NuGet repositories are JFrog Artifactory (available from www.jfrog.com) and Sonatype Nexus (available from www.sonatype.org/nexus). Both these repositories were originally built for Java and Maven repositories but also provide NuGet capabilities.
As you can see, there are a lot of different options available for hosting your own NuGet package repositories. Covering them all would be beyond the scope of this book. We did want to give you an overview of some of the available solutions out there, as a development process in which NuGet is leveraged will not do without having a NuGet server, whether free or commercial.
Preventing Disruptions in the Continuum
Just as a source repository is designed for working with sources, a package repository is designed to work with packages. It is commonly understood that it is important to keep the source repository operational and available to the development teams at all times. If they can’t collaborate on their source repository, they are disabled in their work.
The importance of a NuGet feed should not be underestimated. NuGet package repositories are the home of your software dependencies, required to build your software. They’re also the release catalog for those who want to consume your own packages. Depending on a NuGet feed implicitly turns it into a critical system for software development. This is especially true but not limited to those who use NuGet package restore.
If a package can’t be restored during the build because the package source is unavailable, the build will fail. If a project team needs to consume a specific package from your NuGet feed in order to continue their work while the feed is unavailable, the team is blocked. It’s obvious that package source availability is key to preventing disruptions in the work of development teams.
This effectively means you should treat all your NuGet package sources as critical systems, very similar to the way you treat your source repositories: high availability, data retention, backups, SLA, and security are words that come to mind. This is where MyGet really shines: you can mirror packages from external repositories onto MyGet feeds, backups and data retention options are offered as a service, and there’s a granular security system for you to configure.
Nevertheless, whenever you depend on a package source, even if you solely depend on the NuGet Gallery or MyGet feeds, you should consider the implications of what happens when the flow is disrupted. There’s always a possibility that you will lose connectivity, and this can be caused on your side, on the server side, or anywhere in between. Mirroring and caching are good strategies to ensure you always have a fallback scenario in place.
Summary
In this chapter, we’ve gone further than simply consuming packages and publishing packages to the official NuGet package source. We’ve shown you a variety of reasons that you may want to have your own NuGet feed.
The reasons for hosting your own NuGet feed are as simple as filtering the official NuGet package source and mirroring packages from it, and as complex as advanced scenarios involving security, privacy, and protecting intellectual property.
A lot of different options for creating and hosting your own NuGet package repositories are available. We’ve covered several options of creating your own NuGet feed. The easiest solution was using a folder or network file share to distribute packages. The NuGet.Server package and the NuGet Gallery allowed you to expose NuGet feeds and packages through an URL and allow you to expose your own NuGet feed to the Internet or intranet if you want.
We’ve also seen commercial options. MyGet, a hosted private NuGet feed solution, allows you to set up your own NuGet feed in seconds and provides a rich set of security options to configure your feed according to your needs. ProGet can be installed in your own network and comes with features such as proxying external NuGet feeds.
Many companies are already using TeamCity for their continuous integration. TeamCity comes with a built-in NuGet server that exposes build artifacts as a NuGet feed.
We’ve ended this chapter with some considerations to make when using NuGet in your development environment. Introducing a package source into the development flow also introduces a new critical system. A system all development teams depend on should comply with the highest SLA one can offer to prevent disruptions in their work: availability, retention, and security are key aspects to consider.
In this chapter, the fun began—we’ve gone beyond consuming and creating packages, to hosting your own NuGet feed. The next chapters will go even further as they explore some scenarios for integrating NuGet in your software development process as well as show how to leverage NuGet in other scenarios than pure package management.