
![]()
Building a Basic Web API
A web API is just an application programming interface (API) over the web (that is, HTTP). When the resources of an application can be manipulated over HTTP using the standard HTTP methods of GET, POST, PUT, and DELETE, you can say that the application supports a web API for other applications to use. Because HTTP is platform-agnostic, HTTP services can be consumed by disparate devices across different platforms.
A central concept of HTTP services is the existence of resources that can be identified through a uniform resource identifier (URI). If you equate resources to nouns, then actions on a resource can be equated to verbs and are represented by the HTTP methods such as GET, POST, PUT, and DELETE. For an application that deals with the employees of an organization, each employee is a resource the application deals with.
Let us see how an employee’s details can be retrieved with an HTTP service. The URI is http://server/hrapp/employees/12345. It includes the employee ID and serves as an identifier to the resource, which is an employee in this case. Actions on this resource are accomplished through the HTTP verbs. To get the details of an employee, you will perform an HTTP GET on the URI http://server/hrapp/employees/12345. To update this employee, the request will be an HTTP PUT on the same URI. Similarly, to delete this employee, the request will be an HTTP DELETE request, again on the same URI. To create a new employee, the request will be an HTTP POST to the URI without any identifier (http://server/hrapp/employees).
In the case of POST and PUT, the service must be passed the employee data or the resource representation. It is typically XML or JSON that is sent as the HTTP request message body. An HTTP service sends responses in XML or JSON, similar to the request. For example, a GET to http://server/hrapp/employees/12345 results in a response containing JSON representing the employee with an ID of 12345.
HTTP service responds with the HTTP status code indicating success or failure. For example, if the employee with identifier 12345 does not exist, the HTTP status code of 404 - Not found will be returned. If the request is successful, the HTTP status code of 200 - OK will be returned.
The ASP.NET Web API framework enables you to create HTTP-based services through the powerful ASP.NET MVC programming model familiar to many developers. So, we have the URI http://server/hrapp/employees/12345, and a client issues a GET. To respond to this request, we need to write code somewhere that retrieves the employee details for 12345. Obviously, that code has to be in some method in some C# class. This is where the concept of routing comes into play.
The class in this case typically will be one that derives from the ApiController class, part of the ASP.NET Web API framework. All you need to do is to create a subclass of ApiController, say EmployeesController, with a method Get(int id). The ASP.NET Web API framework will then route all the GET requests to this method and pass the employee ID in the URI as the parameter. Inside the method, you can write your code to retrieve the employee details and just return an object of type Employee. On the way out, the ASP.NET Web API framework will handle serialization of the employee object to JSON or XML. The web API is capable of content negotiation: A request can come in along with the choices of the response representation, as preferred by the client. The web API will do its best to send the response in the format requested.
In the case of requests with a message payload such as POST, the method you will need to define will be Post(Employee employee) with a parameter of type Employee. The ASP.NET Web API framework will deserialize the request (XML or JSON) into the Employee parameter object for you to use inside the method. The web API dispatches a request to an action method based on HTTP verbs.
ASP.NET MVC 4 ships as part of Visual Studio 2012 and as an add-on for Visual Studio 2010 SP1. ASP.NET Web API is a part of MVC 4.0. There is a new project template called WebAPI available to create web API projects. You can have both API controllers and MVC controllers in the same project.
1.1 Choosing ASP.NET Web API or WCF
If you have worked with the .NET Framework for any amount of time, you must have encountered the term WCF (Windows Communication Foundation), the one-stop framework for all service development needs in the .NET Framework. Why the new framework of ASP.NET Web API then?
The short answer is that ASP.NET Web API is designed and built from the ground up with only one thing in mind—HTTP—whereas WCF was designed primarily with SOAP and WS-* in mind, and Representational State Transfer (REST) was retrofitted through the WCF REST Starter Kit. The programming model of ASP.NET Web API resembles ASP.NET MVC in being simple and convention-based, instead of requiring you to define interfaces, create implementation classes, and decorate them with several attributes. However, ASP.NET Web API is not supposed to supersede WCF.
It is important to understand the coexistence of WCF and ASP.NET Web API. WCF has been around for a while, and ASP.NET Web API is a new kid on the block, but that does not mean WCF is meant to be replaced by ASP.NET Web API. Both WCF and ASP.NET Web API have their own place in the big picture.
ASP.NET Web API is lightweight but cannot match the power and flexibility of WCF. If you have your service using HTTP as the transport and if you want to move over to some other transport, say TCP, or even support multiple transport mechanisms, WCF will be a better choice. WCF also has great support for WS-*.
However, when it comes to the client base, not all platforms support SOAP and WS-*. ASP.NET Web API–powered HTTP services can reach a broad range of clients including mobile devices. The bottom line: it is all about trade-offs, as is the case with any architecture.
Let’s try to understand the differences in programming models by looking at a simple example: an employee service to get an employee of an organization, based on the employee ID. WCF code (see Listing 1-1) is voluminous, whereas ASP.NET Web API code (see Listing 1-2) is terse and gets the job done.
Listing 1-1. Getting an Employee the WCF Way
[ServiceContract]
public interface IEmployeeService
{
        [OperationContract]
        [WebGet(UriTemplate = "/Employees/{id}")]
        Employee GetEmployee(string id);
}

public class EmployeeService : IEmployeeService
{
        public Employee GetEmployee(string id)
        {
                return new Employee() { Id = id, Name = "John Q Human" };
        }
}

[DataContract]
public class Employee
{
         [DataMember]
        public int Id { get; set; }

         [DataMember]
        public string Name { get; set; }

        // other members
}
Listing 1-2. Getting an Employee the ASP.NET Web API Way
public class EmployeeController : ApiController
{
        public Employee Get(string id)
        {
                return new Employee() { Id = id, Name = "John Q Human" };
        }
}
A couple of things are worth mentioning here: First, the web API is exactly the same as a normal MVC controller except that the base class is ApiController. Features of MVC that developers like, such as binding and testability, which are typically achieved through injecting a repository, are all applicable to a web API as well.
If you are experienced with ASP.NET MVC, you may be wondering how different a web API is; after all, the MVC controller’s action method can also return JsonResult. With JsonResult action methods, a verb is added to the URI (for example, http://server/employees/get/1234), thereby making it look more like RPC style than REST. Actions such as GET, POST, PUT, and DELETE are to be accomplished through HTTP methods rather than through anything in the URI or query string. ASP.NET Web API also has far superior features, such as content negotiation. ASP.NET MVC’s support for JsonResult is only from the perspective of supporting AJAX calls from the JavaScript clients and is not comparable to ASP.NET Web API, a framework dedicated to building HTTP services.
The following are the scenarios where ASP.NET Web API as the back end really shines and brings the most value to the table:
- Rich-client web applications : ASP.NET Web API will be a good fit for rich-client web applications that heavily use AJAX to get to a business or data tier. The client application can be anything capable of understanding HTTP; it can be a Silverlight application, an Adobe Flash–based application, or a single-page application (SPA) built using JavaScript libraries such as JQuery, Knockout, and so on, to leverage the power of JavaScript and HTML5 features.
- Native mobile and non-mobile applications : ASP.NET Web API can be a back end for native applications running on mobile devices where SOAP is not supported. Because HTTP is a common denominator in all the platforms, even the native applications can use a .NET back-end application through the service façade of a web API. Also, native applications running on platforms other than Windows, such as a Cocoa app running on Mac, can use ASP.NET Web API as the back end.
- Platform for Internet of Things (IOT) : IOT devices with Ethernet controllers or a Global System for Mobile Communications (GSM) modem, for example, can speak to ASP.NET Web API services through HTTP. A platform built on .NET can receive the data and do business. Not just IOT devices, but other HTTP-capable devices such as radio frequency ID (RFID) readers can communicate with ASP.NET Web API.
ASP.NET Web API is meant for developing web APIs. In other words, although it can technically work, it is not the right candidate for supplementing your ASP.NET web application’s AJAX needs, especially when the AJAX use cases are very few.
1.2 Exposing an In-Memory List over HTTP
In this exercise, you will create a simple web API that basically exposes an in-memory List<Employee> over HTTP, for a client application to manipulate the list members. Although this exercise could have relatively limited applicability to a practical web API implementation, it is a stepping stone toward understanding how to use the ASP.NET Web API framework to build your web API.
- Run Visual Studio and create a new ASP.NET MVC 4 Web Application. Give the project a name of HelloWebApi and click OK, as shown in Figure 1-1.
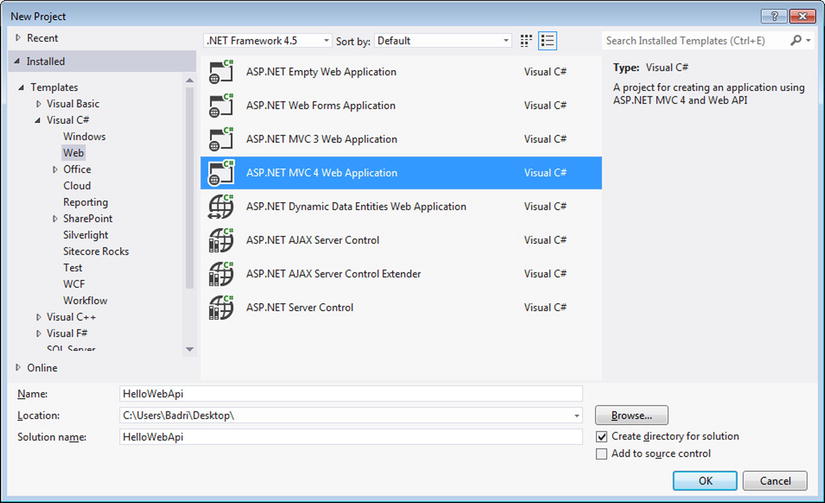
Figure 1-1. A new ASP.NET MVC 4 web application
- Select the Web API template and click OK. You can leave the “Create a unit test project” box unchecked and the Razor option selected in the View Engine dropdown, as shown in Figure 1-2.
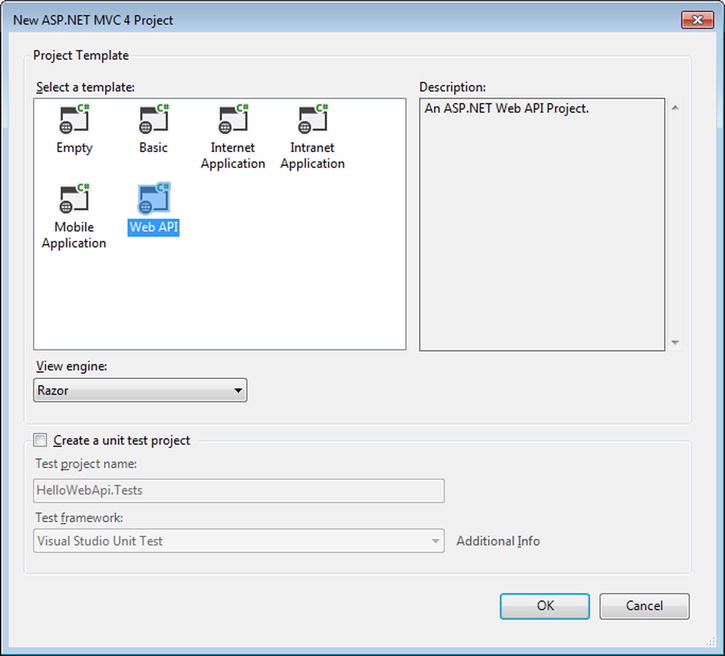
Figure 1-2. Selecting the Web API Template
- Right-click the Controllers folder in the Solution Explorer of Visual Studio. Select Add ➤ Controller and give a name of EmployeesController for the controller. Leave the option Empty API Controller selected in the Template dropdown and click Add, as shown in Figure 1-3. Notice that the generated controller class inherits from ApiController, a class that is part of the ASP.NET Web API framework.
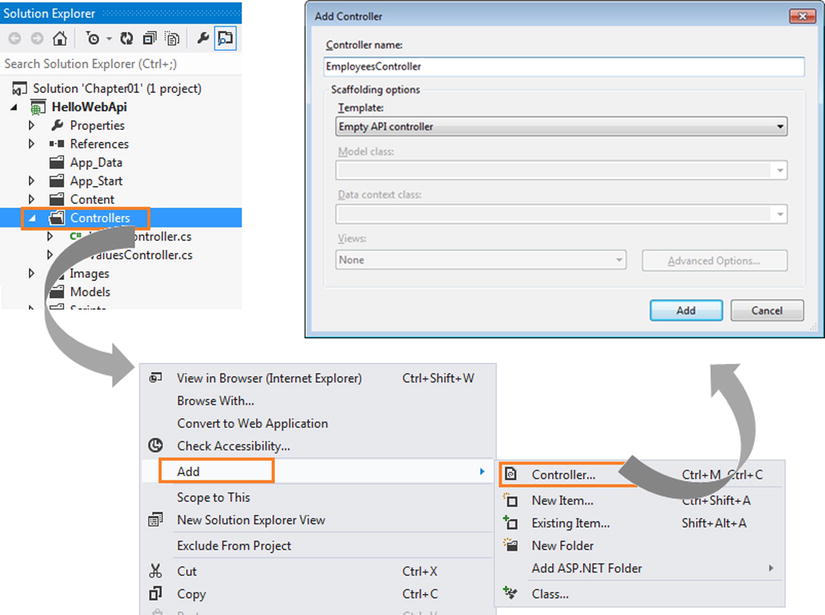
Figure 1-3. Adding a controller
- Right-click the Models folder in the Solution Explorer of Visual Studio. Select Add ➤ Class to add a new class with a name of Employee.
- Add the code shown in Listing 1-3 to the Employee class.
Listing 1-3. The Employee Class
public class Employee
{
    public int Id { get; set; }
    public string FirstName { get; set; }
    public string LastName { get; set; }
} - Create a new static field at the controller level, as shown in Listing 1-4. This will be the list that our web API exposes over HTTP.
Listing 1-4. The List of Employees
public class EmployeesController : ApiController
{
    private static IList<Employee> list = new List<Employee>()
    {
        new Employee()
        {
            Id = 12345, FirstName = "John", LastName = "Human"
        },

        new Employee()
        {
            Id = 12346, FirstName = "Jane", LastName = "Public"
        },

        new Employee()
        {
            Id = 12347, FirstName = "Joseph", LastName = "Law"
        }
    };

    // Action methods go here
}
 Note Since you used the Employee class, which is in a different namespace than HelloWebApi.Models in the controller class, you will need to add a using directive. In Visual Studio, the Employee references in the preceding code will have a wavy underline in red; right-click any of them and select Resolve ➤ using HelloWebApi.Models. This will add the necessary directive. This is a standard procedure and I will not repeat this step in later exercises, for the sake of brevity.
 - Add five action methods, as shown in Listing 1-5. It is important to use the name as shown in the listing. You will learn more about why you must follow this naming convention in the next exercise.
Listing 1-5. The Action Methods to Get, Post, Put, and Delete Employees
// GET api/employees
public IEnumerable<Employee> Get()
{
    return list;
}

// GET api/employees/12345
public Employee Get(int id)
{
    return list.First(e => e.Id == id);
}

// POST api/employees
public void Post(Employee employee)
{
    int maxId = list.Max(e => e.Id);
    employee.Id = maxId + 1;

    list.Add(employee);
}

// PUT api/employees/12345
public void Put(int id, Employee employee)
{
    int index = list.ToList().FindIndex(e => e.Id == id);
    list[index] = employee;
}

// DELETE api/employees/12345
public void Delete(int id)
{
    Employee employee = Get(id);
    list.Remove(employee);
} - Build the Visual Studio solution and run it by pressing F5. Internet Explorer, which is the default browser associated with Visual Studio, shows the home page with a URL of http://localhost:55778/. (My ASP.NET Web API project uses port 55778. Your project will use a different one and based on that, Internet Explorer will display a different port in the URL.)
- In the address bar type http://localhost:<port>/api/employees Replace <port> with the actual port your application runs on.
Note As you work through the exercises in this book, you will create several new projects, and the port will change every time you create a new ASP.NET MVC project. Remember to replace the port specified in the example code with your application’s actual port.
- When Internet Explorer asks if you want to open or save, click Open and choose Notepad as the program to open the file. Notepad will display JSON as shown in Listing 1-6. I have formatted the output for your reading pleasure.
Listing 1-6. JSON Output
[
   {
      "Id":12345,
      "FirstName":"John",
      "LastName":"Human"
   },
   {
      "Id":12346,
      "FirstName":"Jane",
      "LastName":"Public"
   },
   {
      "Id":12347,
      "FirstName":"Joseph",
      "LastName":"Law"
   }
] - You can also get the details of a specific employee by performing an HTTP GET on http://localhost:55778/api/employees/12345. In this case, you get the JSON output shown in Listing 1-7.
Listing 1-7. JSON Output for an Individual Employee
{
    "Id":12345,
    "FirstName":"John",
    "LastName":"Human"
} - If you see the preceding two JSON outputs, you have just created your first web API and exposed the in-memory list of employees to the outside world over HTTP!
Currently, we have tested only the HTTP GET but we will test the other methods in the upcoming exercises.
![]() Note The steps outlined in this exercise are the fundamental steps to create a basic ASP.NET Web API project. In the rest of the exercises throughout this book, I will not repeat these steps, but you will need to perform them as and when required to get your project to a point where you can start working on the steps of a specific exercise. Once you have set up a project, you can reuse it for multiple exercises, and there is no need to create a new project for every exercise.
Note The steps outlined in this exercise are the fundamental steps to create a basic ASP.NET Web API project. In the rest of the exercises throughout this book, I will not repeat these steps, but you will need to perform them as and when required to get your project to a point where you can start working on the steps of a specific exercise. Once you have set up a project, you can reuse it for multiple exercises, and there is no need to create a new project for every exercise.
1.3 Choosing Configuration over Convention
In this exercise, you will override the default behavior of the ASP.NET Web API framework in selecting the action method of the controller based on the HTTP method. The default convention is to give the action method the same name as the HTTP method or to name the method so that it starts with the HTTP method. For example, I used Get in the previous exercise to handle HTTP GET. So the action method can be GetEmployee, or GetAllEmployees, or GetEmployeeById.
Similarly, the action methods of Post, Put, and Delete will respectively handle HTTP POST, PUT, and DELETE. Of course, an action method with a weird name such as PutTheLimeInTheCokeYouNut can still be matched by the ASP.NET Web API framework to handle HTTP PUT because the method name begins with Put, which corresponds to HTTP PUT. To override this convention, you can apply the AcceptVerbs attribute or use the equivalent shorthand notation of HttpGet, HttpPost, HttpPut, HttpDelete, and so on.
- Comment out all the action methods in the EmployeesController class that we created in Exercise 1.2, retaining only the static list. The controller class after this change will look like Listing 1-8.
Listing 1-8. The EmployeesController Class with Action Methods Commented Out
public class EmployeesController : ApiController
{
    private static IList<Employee> list = new List<Employee>()
    {
        new Employee()
        {
            Id = 12345, FirstName = "John", LastName = "Human"
        },

        new Employee()
        {
            Id = 12346, FirstName = "Jane", LastName = "Public"
        },

        new Employee()
        {
            Id = 12347, FirstName = "Joseph", LastName = "Law"
        }
    };

    // Following action methods are commented out
} - Add the RetrieveEmployeeById method to the EmployeesController class, as shown in Listing 1-9. Listing 1-9 shows two action methods that do not follow the naming convention mapped to the required HTTP method through the usage of AcceptVerbs and HttpGet attributes. You can copy and paste one of the methods but not both, for the obvious reason that the code will not compile with duplicate method names.
Listing 1-9. Using AcceptVerbs
[AcceptVerbs("GET")]
public Employee RetrieveEmployeeById(int id)
{
        return list.First(e => e.Id == id);
}

[HttpGet]
public Employee RetrieveEmployeeById(int id)
{
        return list.First(e => e.Id == id);
} - Build the Visual Studio solution and run it by pressing F5. Internet Explorer, which is the default browser associated with Visual Studio, shows the home page.
- In the address bar, type http://localhost:55778/api/employees/12345. When Internet Explorer asks if you want to open or save, click Open and choose Notepad as the program to open the file. Notepad displays JSON, the same as in the previous exercise. The only difference now is the action method that handles the GET request; it is now the RetrieveEmployeeById method and not the Get method.
- You can use custom names for action methods handling other verbs as well. See Listing 1-10 for the UpdateEmployee method that handles PUT. You do not need to copy and paste this code into the EmployeesController that you are working on, since you will not test PUT methods until the next chapter.
Listing 1-10. Action Method Handling PUT
[HttpPut]
public void UpdateEmployee(int id, Employee employee)
{
            int index = list.ToList().FindIndex(e => e.Id == id);
            list[index] = employee;
}
It is possible to switch the selection of an action method from the HTTP style, which is along the lines of REST, to the RPC style, which is based on the action method, as specified in the URI. This is same way that ASP.NET MVC selects action methods.
- Comment out the RetrieveEmployeeById action method you added earlier. At this point, the EmployeesController class will have only the static field list and will be same as the code shown in Listing 1-8. The following code simply repeats Listing 1-8 for your easy reference.
public class EmployeesController : ApiController
{
    private static IList<Employee> list = new List<Employee>()
    {
        new Employee()
        {
            Id = 12345, FirstName = "John", LastName = "Human"
        },

        new Employee()
        {
            Id = 12346, FirstName = "Jane", LastName = "Public"
        },

        new Employee()
        {
            Id = 12347, FirstName = "Joseph", LastName = "Law"
        }
    };

    // All action methods are commented out
} - Add the methods shown in Listing 1-11 to EmployeesController. The listing shows the code for implementing two RPC-style methods. The URIs corresponding to RpcStyleGet and GetEmployeeRpcStyle action methods are respectively http://localhost:55778/api/employees/rpcstyleget and http://localhost:55778/api/employees/getemployeerpcstyle/12345.
Listing 1-11. Action Methods RPC Style
[HttpGet]
public IEnumerable<Employee> RpcStyleGet()
{
    return list;
}

public Employee GetEmployeeRpcStyle(int id)
{
    return list.First(e => e.Id == id);
} - Of course, for this RPC-style selection of an action method to work, you have to make an entry in the WebApiConfig.cs file under App_Start folder, as shown in Listing 1-12. Make sure the code in bold type is added before the existing MapHttpRoute, as shown in the listing.
Listing 1-12. Configuring RPC-Style Action Methods
public static class WebApiConfig
{
    public static void Register(HttpConfiguration config)
    {
        config.Routes.MapHttpRoute(
            name: "RpcApi",
            routeTemplate: "api/{controller}/{action}/{id}",
            defaults: new { id = RouteParameter.Optional }
        );

        config.Routes.MapHttpRoute(
            name: "DefaultApi",
            routeTemplate: "api/{controller}/{id}",
            defaults: new { id = RouteParameter.Optional }
        );
    }
} - Build the Visual Studio solution and run it by pressing F5. Internet Explorer displays the home page.
- Type http://localhost:55778/api/employees/getemployeerpcstyle/12345 in the address bar of the browser. When Internet Explorer asks if you want to open or save, click Open and choose Notepad as the program to open the file. Notepad displays JSON, just as in the previous exercise. The only difference now is that the action method that handles the GET request is GetEmployeeRpcStyle, which is part of the URI route data. Review the URI you used. It is no longer in the REST style. The action method is also part of the URI and is in RPC-style.
- Now that you have tested RPC-style action methods, remove the RPC-style mapping from the WebApiConfig class, as shown in Listing 1-13. The code shown with strikethrough is what you will delete from the WebApiConfig class.
Listing 1-13. WebApiConfig Class with RPC-style Mapping Removed
public static class WebApiConfig
{
    public static void Register(HttpConfiguration config)
    {
        config.Routes.MapHttpRoute(
            name: "RpcApi",
            routeTemplate: "api/{controller}/{action}/{id}",
            defaults: new { id = RouteParameter.Optional }
        );

        config.Routes.MapHttpRoute(
            name: "DefaultApi",
            routeTemplate: "api/{controller}/{id}",
            defaults: new { id = RouteParameter.Optional }
        );
    }
}
Now, you will change the default route template to see how ASP.NET Web API works.
- Change the WebApiConfig class under App_Start folder to modify the route template, as shown in Listing 1-14.
Listing 1-14. WebApiConfig Class with Default Route Template Modified
public static class WebApiConfig
{
    public static void Register(HttpConfiguration config)
    {
        config.Routes.MapHttpRoute(
            name: "DefaultApi",
            routeTemplate: " webapi/{controller}/{id}",
            defaults: new { id = RouteParameter.Optional }
        );
    }
} - Build the Visual Studio solution. Type http://localhost:55778/api/employees in the address bar of the browser.
- You will see the message “The resource cannot be found.” Basically, ASP.NET Web API is not able to route your GET request to the correct controller and action method.
- Type http://localhost:55778/webapi/employees in the address bar of the browser.
- It starts working. So, it is clear that the route template defined in the Register method of WebApiConfig.cs file under App_Start folder is important for the framework to choose the controller and the action method. By default, the route template comes with api, which is a literal path segment, and two placeholder variables, {controller} and {id}. Because a project created using the Web API template can have both API controllers and MVC controllers, the api literal path segment is used by default to avoid collisions with MVC routing.
- Change the WebApiConfig class under App_Start folder, as shown in Listing 1-15. The literal Webapi is changed to api, and a new placeholder variable orgid with a constraint is introduced.
Listing 1-15. WebApiConfig Class with a New Variable in Route Template
public static class WebApiConfig
{
    public static void Register(HttpConfiguration config)
    {
        config.Routes.MapHttpRoute(
                         name: "DefaultApi",
                         routeTemplate: " api/{orgid}/{controller}/{id}",
                         defaults: new { id = RouteParameter.Optional },
                         constraints: new { orgid = @"d+" }
                  );
        );
    }
} - Rebuild the solution and press F5 to run it. Type http://localhost:55778/api/employees in the address bar of the browser. You’ll see the message 404 —The webpage cannot be found.
- Type http://localhost:55778/api/123/employees in the address bar of the browser. It starts to work again. Notice the additional segment with a value of 123 in the URI.
- In EmployeesController, comment out all the action methods, retaining only the static field. Add a new action method, as shown in Listing 1-16.
Listing 1-16. EmployeesController with Action Method Receiving OrgID
public Employee Get( int orgid, int id)
{
    return list.First(e => e.Id == id);
} - Add a breakpoint to this action method. Rebuild the solution and run the project by pressing F5.
- Type http://localhost:55778/api/123/employees/12345 in the address bar of the browser.
- When the execution breaks, inspect the parameters: orgid and id. They are both mapped to 123 and 12345 respectively.
- Type http://localhost:55778/api/abc/employees/12345 in the address bar of the browser.
You get a 404 —The webpage cannot be found. So, by adding a new {orgid} variable and adding a constraint, we have made sure the URI must include a new URI segment immediately after api and that it must be a number. When we define an action parameter matching the placeholder variable name, the URI path is mapped to the action parameter.
- Restore the WebApiConfig class to its out-of-box state, like so:
public static class WebApiConfig
{
    public static void Register(HttpConfiguration config)
    {
        config.Routes.MapHttpRoute(
            name: "DefaultApi",
            routeTemplate: "api/{controller}/{id}",
            defaults: new { id = RouteParameter.Optional }
        );
    }
}
1.4 Playing by the Rules of HTTP
In this exercise, you will create a web API that plays by the rules of HTTP. It is natural for a developer to assume that the CRUD operations create, read, update, and delete correspond to the HTTP methods POST, GET, PUT, and DELETE. Equating GET with reading and DELETE with deleting are correct, but POST for creating and PUT for updating are not fully accurate.
GET is guaranteed not to cause any side effects and is said to be nullipotent ; nothing happens to the system’s state, even when it is called multiple times or not called at all. In other words, the system state will be the same for all the following scenarios: (1) the method was not called at all, (2) the method was called once, and (3) the method was called multiple times. PUT and DELETE are idempotent; the effect to the system state will be the same as that of the first call, even when they are called multiple times subsequently. There is no stopping, for example, if you implement the logic that changes the state of the system in the action method handling GET. It is not only a deviation from the standards, it is also an inferior implementation from a security standpoint.
![]() Note The HTTP specification (http://www.w3.org/Protocols/rfc2616/rfc2616-sec9.html#sec9.1) calls GET a “safe” method. It also mentions GET under idempotent methods, because a nullipotent method is also idempotent. I use the term nullipotent because it clearly indicates that GET must be “safe”; that is, there must not be any side-effects.
Note The HTTP specification (http://www.w3.org/Protocols/rfc2616/rfc2616-sec9.html#sec9.1) calls GET a “safe” method. It also mentions GET under idempotent methods, because a nullipotent method is also idempotent. I use the term nullipotent because it clearly indicates that GET must be “safe”; that is, there must not be any side-effects.
The usage of the appropriate HTTP status codes is another important aspect of building HTTP-compliant services. By default, 200 – OK is returned, indicating success. 401 – Not authorized is sent when a user requests an action on a resource that requires the user to be authenticated and that user has either not provided the credentials or provided invalid credentials. Sending a 200 – OK and a message in the response body that authentication failed is not something an HTTP-compliant service will do.
In this exercise, I show you the standard way of implementing the CRUD action methods in your HTTP-compliant ASP.NET Web API.
1.4.1 Retrieving Resource(s)
The HTTP GET method is useful for retrieving resource representations. For example, http://server/api/employees lists all employees, while http://server/api/employees/12345 retrieves a specific employee (12345 is the identifier of the employee).
GET methods have no request body. The response body is a JSON/XML representation of the resource requested—either a list of employees or a specific employee. ASP.NET Web API has out-of-box formatters for JSON and XML, but it is not hard to create a custom formatter. I’ll cover custom formatters in Chapter 3 and Chapter 5. It is very important not to implement logic in a GET method that changes the state of the system, because HTTP GET is nullipotent.
- Comment out all the action methods in EmployeesController from the previous exercise. At this point, the EmployeesController class will have only the static field list and will be same as the code shown in Listing 1-8 earlier. The following code is just a repeat of Listing 1-8 for your easy reference.
public class EmployeesController : ApiController
{
    private static IList<Employee> list = new List<Employee>()
    {
        new Employee()
        {
            Id = 12345, FirstName = "John", LastName = "Human"
        },

        new Employee()
        {
            Id = 12346, FirstName = "Jane", LastName = "Public"
        },

        new Employee()
        {
            Id = 12347, FirstName = "Joseph", LastName = "Law"
        }
    };

    // All action methods are commented out
} - Add a new action method to handle GET, as shown in the Listing 1-17. It retrieves one specific employee based on the ID. If there is no employee matching the ID, 404 - Not Found status code is returned.
Listing 1-17. Retrieval of a Specific Employee by ID
public Employee Get(int id)
{
    var employee = list.FirstOrDefault(e => e.Id == id);

    if(employee == null)
    {
        throw new HttpResponseException(HttpStatusCode.NotFound);
    }

    return employee;
} - Rebuild the solution and make a GET request by typing a URI in the address bar of Internet Explorer. The URI should contain an employee ID for which there is no corresponding resource, such as http://localhost:55778/api/employees/45678.
404 - Not Found is returned, and Internet Explorer shows the same with the message that The webpage cannot be found.
It is possible to retrieve a list of employees matching a condition. For example, you can filter the employees based on the department to which they belong. In this case, the department is sent in the query string: http://localhost:port/api/employees?department=2. ASP.NET Web API matches the query parameter (department) to the parameter on the action method. If the department in the request is not a valid department number, the 422 - Unprocessable Entity status code is returned. This is not a standard HTTP status code but is defined in the HTTP extension for WebDAV. It is acceptable to send the status code 400 - Bad Request as well.
- To the Employee model class, add a new property, as shown in Listing 1-18.
Listing 1-18. Employee Class with Department
public class Employee
{
        public int Id { get; set; }
        public string FirstName { get; set; }
        public string LastName { get; set; }

        public int Department { get; set; }
} - Modify the IList<Employee> list in EmployeesController, as shown in Listing 1-19, to populate the Department property.
Listing 1-19. Employee List with Departments
private static IList<Employee> list = new List<Employee>()
{
    new Employee()
    {
        Id = 12345, FirstName = "John", LastName = "Human" , Department = 2
    },

    new Employee()
    {
        Id = 12346, FirstName = "Jane", LastName = "Public" , Department = 3
    },

    new Employee()
    {
        Id = 12347, FirstName = "Joseph", LastName = "Law" , Department = 2
    }
}; - Add the action method shown in Listing 1-20 to EmployeesController.
Listing 1-20. Retrieval of Employees by Department
public IEnumerable<Employee> GetByDepartment(int department)
{
    int[] validDepartments = {1, 2, 3, 5, 8, 13};

    if (!validDepartments.Any(d => d == department))
    {
        var response = new HttpResponseMessage()
        {
            StatusCode = (HttpStatusCode)422, // Unprocessable Entity
            ReasonPhrase = "Invalid Department"
        };

        throw new HttpResponseException(response);
    }

    return list.Where(e => e.Department == department);
} - Rebuild the solution and make a GET request by typing the URI http://localhost:55778/api/employees?department=2 in the address bar of Internet Explorer.
The resulting JSON will include only John and Joseph.
It is possible to apply multiple conditions based on parameters. For example, http://localhost:port/api/employees?department=2&lastname=Smith can be used to filter for all Smiths in department number 2. The action method in this case can have two parameters, department and lastName. An alternative is to use a model class that represents the input, as shown in Listing 1-21. For ASP.NET Web API to bind the query parameters to the complex type Filter, you must use the FromUri attribute. You’ll learn more about this in Chapter 5.
- Comment out all the action methods in EmployeesController and add the action method shown in Listing 1-21.
Listing 1-21. Retrieving an Employee by Applying Two Conditions
public IEnumerable<Employee> Get([FromUri]Filter filter)
{
    return list.Where(e => e.Department == filter.Department &&
                                             e.LastName == filter.LastName);
} - Create a class named Filter, under the Models folder. The code should be as shown in Listing 1-22.
Listing 1-22. The Filter Class
public class Filter
{
    public int Department { get; set; }
    public string LastName { get; set; }
} - Rebuild the solution and make a GET request by typing the URI http://localhost:55778/api/employees?department=2&lastname=Human in the address bar of Internet Explorer. Pay attention to the upper case ‘H’.
Now, the resulting JSON will include only John.
1.4.2 Creating a Resource with a Server-Generated Identifier
A resource such as an employee can be created by an HTTP POST to the URI http://localhost:port/api/employees. There is no ID that is specified in the URI. In this case, the request body contains the JSON/XML representation of the resource being added, which is the new employee. The response body will be a JSON/XML representation of the resource, the new employee who was just added into the system. The difference between the request and the response representations is that the employee ID that was generated by the system is present in the response representation, while it is absent in the request. Hence, this type of resource creation is analogous to INSERT SQL statements on tables with the primary key generated by the database engine, with the client having no say on what the new ID can be.
In Exercise 1.2, we returned the Employee type. In response to this, the ASP.NET Web API framework returned a 200 – OK status code, and we did not have control over the status code that must be returned. By returning an object of type HttpResponseMessage, we can have better control over what is returned to the client, including the HTTP status code. In the case of resource creation using POST, returning the HTTP status code of 201 – Created and the URI of the new resource created in the location response header as shown in Listing 1-23 will better conform to HTTP/1.1 than sending a blanket 200 – OK status code.
Listing 1-23. Creating an Employee using HTTP POST
public HttpResponseMessage Post(Employee employee)
{
    int maxId = list.Max(e => e.Id);
    employee.Id = maxId + 1;

    list.Add(employee);

    var response = Request.CreateResponse<Employee>(HttpStatusCode.Created, employee);

    string uri = Url.Link("DefaultApi", new { id = employee.Id });
    response.Headers.Location = new Uri(uri);
    return response;
}
You will need a tool like Fiddler to create a POST request and view the response. For the purpose of this exercise, Listing 1-24 shows the response message for POST. If you are already familiar with Fiddler, you can issue a POST and inspect the response. I’ll cover Fiddler in Chapter 2.
Listing 1-24. Response Status Code and Headers
HTTP/1.1 201 Created
Date: Mon, 26 Mar 2013 07:35:07 GMT
Location: http://localhost:55778/api/employees/12348
Content-Type: application/json; charset=utf-8
![]() Note To create a resource using HTTP POST, you must use a URI without the ID, for example, http://localhost:port/api/employees. Requesting a POST on a URI with an ID, for example http://localhost:port/api/employees/12348, where 12348 is an ID that does not exist, must be rejected with a 404 - Not Found. See Exercise 1.4.5.
Note To create a resource using HTTP POST, you must use a URI without the ID, for example, http://localhost:port/api/employees. Requesting a POST on a URI with an ID, for example http://localhost:port/api/employees/12348, where 12348 is an ID that does not exist, must be rejected with a 404 - Not Found. See Exercise 1.4.5.
1.4.3 Creating a Resource with a Client-Supplied Identifier
A resource such as an employee can be created by an HTTP PUT to the URI http://localhost:port/api/employees/12348, where the employee with an ID of 12348 does not exist until this PUT request is processed. In this case, the request body contains the JSON/XML representation of the resource being added, which is the new employee. The response body can be a JSON/XML representation of the resource, the new employee that was just added into the system. But in this case the response body can be omitted, since there will not be any difference between the request and the response resource representations. Listing 1-25 shows the code to create employee using PUT.
Listing 1-25. Creating an Employee using HTTP PUT
public HttpResponseMessage Put(int id, Employee employee)
{
    if (!list.Any(e => e.Id == id))
    {
        list.Add(employee);

        var response = Request.CreateResponse<Employee>
                                                   (HttpStatusCode.Created, employee);

        string uri = Url.Link("DefaultApi", new { id = employee.Id });
        response.Headers.Location = new Uri(uri);
        return response;
    }

    return Request.CreateResponse(HttpStatusCode.NoContent);
}
This type of resource creation using PUT is applicable for scenarios where the client decides the key or the ID for the resource. Hence, this type of resource creation is analogous to INSERT SQL statements that specify the primary key.
![]() Note To test POST, PUT, and DELETE, you will need a tool like Fiddler, covered in Chapter 2.
Note To test POST, PUT, and DELETE, you will need a tool like Fiddler, covered in Chapter 2.
1.4.4 Overwriting a Resource
A resource can be overwritten using HTTP PUT. This operation is generally considered the same as updating the resource, but there is a difference. To issue a PUT request, you must send the representation of the resource in the request in its entirety. Partial updates are not allowed. For example, this SQL statement:
UPDATE employee SET last_name = 'Schindler' where employee_id = 12345
updates only one field in the record. This type of functionality must not be supported by PUT, which is analogous to deleting a record and reinserting it, in the SQL world.
A PUT request is issued to an URI, for example http://localhost:port/api/employees/12345, where the employee with an ID of 12345 already exists in the system. Listing 1-26 shows the action method handling PUT to overwrite a resource.
Listing 1-26. Overwriting an Employee using HTTP PUT
public HttpResponseMessage Put(int id, Employee employee)
{
    int index = list.ToList().FindIndex(e => e.Id == id);
    if (index >= 0)
    {
        list[index] = employee; // overwrite the existing resource
        return Request.CreateResponse(HttpStatusCode.NoContent);
    }
    else
    {
        list.Add(employee);

        var response = Request.CreateResponse<Employee>
                                                    (HttpStatusCode.Created, employee);

        string uri = Url.Link("DefaultApi", new { id = employee.Id });
        response.Headers.Location = new Uri(uri);
        return response;
    }
}
1.4.5 Updating a Resource
A resource such as an employee in our example can be updated by an HTTP POST to the URI http://server/api/employees/12345, where the employee with an ID of 12345 already exists in the system. Listing 1-27 shows the action method handling POST to update an employee. If an employee of the ID same as the incoming ID is not present, the request is rejected with a 404 - Not Found status code.
Listing 1-27. Updating an Employee using HTTP POST
public HttpResponseMessage Post(int id, Employee employee)
{
    int index = list.ToList().FindIndex(e => e.Id == id);

    if (index >= 0)
    {
        list[index] = employee;

        return Request.CreateResponse(HttpStatusCode.NoContent);
    }

    return Request.CreateResponse(HttpStatusCode.NotFound);
}
1.4.6 Partially Updating (Patching) a Resource
HTTP POST can support partial updates to a resource. But there is a separate PATCH method. Request for Comments (RFC) 5789 “PATCH Method for HTTP” adds this new HTTP method, PATCH, to modify an existing HTTP resource.
In applying partial updates, an issue is that since the ASP.NET Web API framework deserializes the resource representation in the request to an object parameter, it is not easy to differentiate between the case where a specific field is present but null and where it is absent.
For example, suppose the Employee type has a property, Age, that is defined as an int? (nullable integer). If you do not want this property to be updated, you can leave the property out of the request representation and it will remain null in the deserialized object parameter. If you want to reset the age from a value to null, then you will want the property to be null but present in the request representation, but in this case also, the deserialized object parameter will have the Age property as null. So the above two cases cannot be differentiated, and a partial update using POST is a bit complex to achieve.
Fear not! Microsoft ASP.NET Web API OData package ships with a dynamic proxy Delta<T>. This will keep track of the differences between the object that ASP.NET Web API deserialized based on the resource representation in the request and the object stored in your persistence store. In this exercise, you will use Delta<T> in an action method handling HTTP PATCH.
- Right-click References in the Visual Studio Solution Explorer and select Manage NuGet Packages.
- Search for odata. You will see Microsoft ASP.NET Web API OData package. Install this into your project, as shown in Figure 1-4. The version and the last published date may be different by the time you read this book.
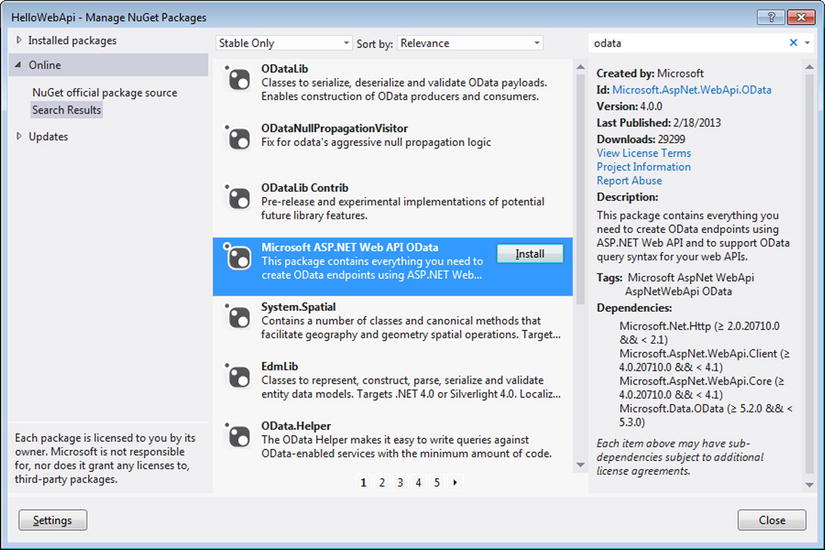
Figure 1-4. Installing Microsoft ASP.NET Web API OData Package
- This brings in the System.Web.Http.OData namespace that contains Delta<T>.
- Implement an action method in EmployeesController, as shown in Listing 1-28. The second parameter of the action method takes in an object of type Delta<Employee>. The Delta<Employee> object is a dynamic lightweight proxy for the Employee object. It allows you to set any property of the Employee object, but it also tracks the properties that are set. When the Patch method is called, it copies across only those properties that are set when the ASP.NET Web API framework deserialized the resource representation in the request.
Listing 1-28. Patching an Employee using HTTP PATCH
public HttpResponseMessage Patch(int id, Delta<Employee> deltaEmployee)
{
    var employee = list.FirstOrDefault(e => e.Id == id);
    if (employee == null)
    {
        throw new HttpResponseException(HttpStatusCode.NotFound);
    }

    deltaEmployee.Patch(employee);

    return Request.CreateResponse(HttpStatusCode.NoContent);
} - Since I use an in-memory list as the data source, the call to the Patch method is sufficient to partially update the corresponding properties of the Employee object in the list. For example, the request in Listing 1-29 will update only the LastName property of the employee with ID of 12345 to Longbottom. Of course, you can verify that none of the other properties are updated by setting a breakpoint in the property setters, but in order to issue a PATCH request, you will need to use a tool like Fiddler, covered in Chapter 2.
Listing 1-29. A PATCH Request
PATCH http://localhost:55778/api/employees/12345 HTTP/1.1
Host: localhost:55778
Content-Length: 25
Content-Type: application/json

{"LastName":"Longbottom"}
![]() Caution Delta<T> was meant to be used with ODataMediaTypeFormatter. In this exercise, I used it with the default JsonMediaTypeFormatter. For this reason, it does run into a few issues, notably that it cannot work with Int32 values. Also, it does not work with collections and complex types.
Caution Delta<T> was meant to be used with ODataMediaTypeFormatter. In this exercise, I used it with the default JsonMediaTypeFormatter. For this reason, it does run into a few issues, notably that it cannot work with Int32 values. Also, it does not work with collections and complex types.
1.4.7 Deleting a Resource
Similar to PUT, DELETE is idempotent as well. After the first request to delete a resource, which is successful, if there are subsequent DELETE requests to the same resource, we will have a problem in finding the resource in subsequent requests. Should we send 200 – OK for first request and 404 – Not Found for subsequent requests? 204 – No Content can be uniformly sent for the first as well as subsequent requests, as shown in Listing 1-30. ASP.NET Web API ensures the status code of 204 - No Content is returned, since the return type of the action method is void.
Listing 1-30. Deleting an Employee
public void Delete(int id)
{
    Employee employee = Get(id);
    list.Remove(employee);
}
![]() Note If you do not delete the resource immediately but only mark it for deletion for some other process to pick it up and delete at a later point in time, do not send 200 - OK or 204 - No Content as the status code in the response to DELETE request. Instead, send 202 - Accepted.
Note If you do not delete the resource immediately but only mark it for deletion for some other process to pick it up and delete at a later point in time, do not send 200 - OK or 204 - No Content as the status code in the response to DELETE request. Instead, send 202 - Accepted.
Summary
The ASP.NET Web API framework enables you to create HTTP-based services through the powerful ASP.NET MVC programming model familiar to developers. The programming model of ASP.NET Web API is similar to ASP.NET MVC in that it is simple and convention-based.
In this chapter, you first created a simple web API that exposes an in-memory list over HTTP, for a client application to manipulate the list members. Then you overrode the default behavior of the ASP.NET Web API framework in selecting the action method of a controller based on the HTTP method. The default convention is to name the action method either same as the HTTP method or starting with the HTTP method name. To override this convention, you applied the AcceptVerbs attribute. You also created RPC-style action methods instead of the default REST-style action methods.
Finally, you created a web API that plays by the rules of HTTP. It is natural for a developer to assume the CRUD operations create, read, update, and delete correspond to the HTTP methods POST, GET, PUT, and DELETE. You saw that it’s correct to equate GET for reading and DELETE for deleting, but POST for creating and PUT for updating are not fully accurate. A resource can be created as well as modified by both POST and PUT. A resource can be created by an HTTP POST to the URI without the ID. A resource can also be created by an HTTP PUT to the URI with the ID. If the employee with the specified ID does not already exist, the new resource is created with the client-specified ID. So, the former method of using an HTTP POST is analogous to INSERT SQL statements on tables with the primary key generated by the database engine and the latter case is analogous to INSERT SQL with the primary key specified by the caller.
A resource can be overwritten using HTTP PUT. This operation is generally regarded as updating the resource but there is a difference. To issue a PUT request, you must send the representation of the resource in the request in its entirety. Partial updates are not allowed. PUT is analogous to deleting a record and re-inserting it, in the SQL world. HTTP POST can support partial updates to a resource. But there is a separate PATCH method. Request for Comments (RFC) 5789 “PATCH Method for HTTP” adds this new HTTP method, PATCH, to modify an existing HTTP resource.
In the next chapter, you will see how to test the POST, PUT and DELETE methods that you created in this chapter, using the web debugging tool Fiddler. Also, you will learn how to implement tracing for your code as well as for the framework code.