
![]()
The Backbone Ecosystem
Now that you’ve seen what can be built with Backbone as it exists out of the box, it’s time to delve deeper into more advanced techniques that can make your application development easier and keep your code cleaner.
After just a few years, Backbone already has an impressive online community, with a number of open source projects that help address what some see as deficiencies in the library.
This chapter will take a look at these third-party components and investigate where they can help you in the development of your Backbone applications. The components are split into different purposes to make it easier to browse through the ever-increasing number of options.
At the end of this chapter you’ll find a table summarizing all the third-party components discussed.
Code Samples
Each of the projects listed in this chapter have some code samples. You can access them from the GitHub repository shared at https://github.com/jamessugrue/beginning-backbone.
The following plug-ins will help you when dealing with the user interface of your Backbone applications.
LayoutManager
Hosted at http://layoutmanager.org/, Tim Branyen’s LayoutManager helps assemble layouts and subviews within your Backbone application. As well as helping to structure layouts, the project helps you keep in control of nested views and ensures proper memory management for views created during the life cycle of your application. On top of all of this, LayoutManager provides beforeRender() and afterRender() callbacks so that you can reliably tell when your view has completed rendering.
Let’s take a look at how to integrate the project into a simple application and see how it impacts your work with views.
If you have any of the following application requirements, it’s likely that LayoutManager will be useful:
- You have a number of subviews within the application.
- The application layout changes frequently, with views being added and removed, and you need to ensure there are no memory leaks.
- You want to know when each view is about to render or has completed its render cycle.
- You want to share events across a view and its subviews.
- Managing nested views is becoming unwieldy in your app.
You’ll first need to download a version of the library to use in your application. This can be found on the project’s GitHub listing as backbone.layoutmanager.js. As with all external libraries so far, this should be placed in the js/external directory, and it should be included after jQuery, Backbone, and Underscore in index.html because it is dependent on all those libraries.
<script src="js/external/jquery-1.10.2.js"></script>
<script src="js/external/underscore.js"></script>
<script src="js/external/backbone.js"></script>
<script src="js/external/handlebars.js"></script>
<script src="js/external/backbone.layoutmanager.js"></script>
Using LayoutManager
In our example in Chapter 7, we had a number of views on a single page. We didn’t look at how subviews could be managed and instead treated each view as an individual case. LayoutManager brings in the concept of an overall layout to the application onto which the subviews are attached.
Let’s first look at the creation of the simplest possible layout, which is essentially the same as a Backbone view. To illustrate the concepts, simple HTML will be used throughout this section, but remember that you can use any type of templates and views, even those created in the previous chapter.
The HTML page will need to have two parts added: a div that acts as the main container for the layout and a template to use in the rendering of the layout content.
<div class="container">
</div>

<script type="template" id="layout">
 <p>A simple layout</p>
</script>
As in our larger app example, we’ll keep our main JavaScript source in a separate app.js file.
<script src="js/app/app.js"></script>
The creation of the layout requires two attributes to be set: the main element that the layout is contained within (the div with the container class) and the template to render the content with (the script with an ID of layout).
$(function() {
        var layout = new Backbone.Layout({
    el : '.container',

    template: '#layout'
});
layout.render();
});
The final call to the layout’s render function will complete the building of the HTML page and display it on the browser.
The real power of LayoutManager comes with the addition of subviews within the layout. First let’s add an element where we expect to place the subview in the layout template’s HTML, as shown here:
<script type="template" id="layout">
                 <p>A simple layout</p>
                 <div id="subview"></div>
        </script>
A template for the subview itself should also be made available.
<!-- View template -->
 <script type="template" id="view">
   <i>This is the sub view content...</i>
 </script>
Back in app.js, the view needs to be defined before the layout is used.
var SimpleSubview = Backbone.Layout.extend({
     template: "#view"
   });
To append views to the layout, a views hash is used, in a similar way to the events and routes definitions from previous chapters. This has identifies the element that should contain the view on the left side, with a reference to the Backbone View object on the right, binding the nested view to the layout.
var layout = new Backbone.Layout({
    el : '.container',
    template: '#layout',
    views: {
        '#subview' : new SimpleSubview()
    }
});
layout.render();
The result of this code is the rendering of the layout as before along with the subview content.
This approach to structuring your views affords a number of advantages to your application.
Event listeners can be declared at the layout level, in the same way as in a normal view. However, as you have references to all the subviews, these events can be considered global view events.
The layout life cycle can be properly tracked with the addition of a callback for beforeRender and afterRender to the Layout object:
var layout = new Backbone.Layout({
    //other layout definition

    beforeRender: function(){
        console.log('About to render'),
    },

    afterRender: function(){
        console.log('Render completed'),
    }
});
Finally, all views that you have already created can be augmented to act as layouts themselves, by declaring the following line at application-level scope (typically at the start of app.js):
Backbone.Layout.configure({ manage: true});
This can be a great way to alter existing Backbone apps to use the improved view mechanics that are provided by LayoutManager.
Backgrid
Backgrid.js (http://backgridjs.com/) provides a set of user interface elements that are dedicated to displaying data sets in a tabular fashion. The project also provides the ability to sort and edit this data, which comes from your Backbone collections and models.
If your application is data heavy and you require the ability to display, edit, and sort this data in tables, Backgrid is a great option. It reduces the amount of custom code required to provide editing in tables, which can only be a good thing.
As with most Backbone extensions, you will need to ensure you have the trio of Backbone, Underscore. and jQuery available on your page before including backgrid.js. The source can be downloaded from https://github.com/wyuenho/backgrid, under the lib directory.
<script src="js/external/backgrid.js"></script>
As this library provides a number of features for the presentation layer, you will also need to include backgrid.css on your page.
<link rel="stylesheet" href="css/backgrid.css">
Using Backgrid
Before you can see the Backgrid in action, you’ll need to get a model and collection defined to use in the construction of the grid. Here we’ll create a simple collection for use, but in your real-world applications, you’ll be able to use any existing collection.
//Model and Collection definitions
var Book = Backbone.Model.extend({});
var Library = Backbone.Collection.extend({});

//define contents
var backboneBook = new Book({name: 'Beginning Backbone', author: 'James Sugrue', year: '2013-12-24'});
var nodeBook = new Book({name: 'Pro Node.js for Developers', author: 'Colin J. Ihrig', year: '2013-11-01'});
var proJavascriptBook = new Book({name: 'Pro JavaScript Techniques', author: 'John Resig', year: '2006-02-01'});

//create collection
var myLibrary = new Library();
myLibrary.set([backboneBook, nodeBook, proJavascriptBook]);
Once the collection is in place, you can then define which columns to display. Each column object has a name attribute, which maps the column to a particular attribute in the model, as well as a display label and a cell type.
var columns = [ {
 name: "name",
 label: "Name",
 cell: "string"
}, {
 name: "author",
 label: "Author",
 cell: "string"
}, {
 name: "year",
 label: "Year",
 editable: false,
 cell: "date",
}];
The creation of the grid simply accepts two parameters: the collection and the columns.
// Initialize a new Grid instance
var grid = new Backgrid.Grid({
 columns: columns,
 collection: myLibrary
});
From there the final step is to render the grid onto the HTML page. The following example assumes that you have an element with the container class available:
<div class="container"></div>
The grid is then simply appended onto this element.
$(".container").append(grid.render().$el);
Running the previous example provides a table view of all your data; that is, it can be sorted by clicking the table header. Each element that is marked editable can be edited in place on the table. With a minimal amount of coding, you have a complete data grid available in your application.
Pagination is possible by utilizing other third-party components. Along with the ten built-in cell types, a number of additional extensions are available for more complex grids.
Backbone UI
BackboneUI, hosted at http://perka.github.io/backbone-ui/, adds the data binding that other MV* libraries provided. This means that models and collections can be represented as UI components, and this data is passed differently to the parts of the HTML page.
If the model and collection objects that are used in your app can be closely bound to simple UI elements such as menus, buttons, and tables, it can be worth looking at Backbone UI to reduce the number of templates and custom HTML required.
As well as the usual dependencies for Backbone-related projects, you will need to add the Laconic library, shared at https://github.com/joestelmach/laconic.
<script src="js/external/laconic.js"></script>
The source distribution of Backbone UI contains two files, which you will need to include in your HTML page: backbone-ui.js and backbone-ui.css.
<link rel="stylesheet" href="css/backbone-ui.css">
     ......
    <script src="js/external/backbone-ui.js"></script>
With this simple configuration in place, you’re ready to use Backbone UI in your own application.
Using Backbone UI
Once you have your models and collections in place, using Backbone UI couldn’t be simpler. In a similar fashion to Backgrid, UI components are built-in JavaScript and appended to particular elements on the DOM of your HTML page.
For example, to create a button that displays the name of the book object as its text, a Button object is created with the instance of the model that is being used, along with the mapping of the model property to the user interface, using the content attribute.
var button = new Backbone.UI.Button({
 model: backboneBook,
 content: 'name'
}).render();
Once an element with the container class can be found in the HTML page, the following would render a button with the text Beginning Backbone:
$(".container").append(button.el);
The previous example assumes the same model and collection is being used as in the Backgrid code example.
Backbone UI contains a number of other UI widgets that can be bound to models, including the following:
- Calendar (requires Moment.js)
- Checkbox
- Date Picker (requires Moment.js)
- Link
- Text Area
- Text Field
- Time Picker
There are also a number of components that can be bound to models with alternatives, a term used to identify a collection that is used to present other values. These widgets are multivalue widgets such as menus and drop-down lists.
For example, you may want to create a menu widget to allow the selection of one of the books from the library. In this case, the model property continues to point to a particular book instance, while the alternatives property is mapped to the myLibrary collection.
var menu = new Backbone.UI.Menu({
 model: backboneBook,
 content: 'name',
 alternatives: myLibrary,
 altLabelContent: 'name'
}).render();

$(".container").append(menu.el);
The other multiselect input elements provided in Backbone UI are as follows:
- Menu
- Pulldown
- RadioGroup
- ListView
- TableView
The library also provides a number of widgets, Scroller and TabSet, that are do not bind to a model. To give you complete control over the look and feel of your application, Backbone UI provides an option to use your own custom skin, a collection of CSS, and image files.
Backbone.stickit
One of the major complaints that people have about Backbone is that you need to look after a lot of the boilerplate code between the models and views so that when the model changes, you need to update the view accordingly. While the event handling system that we have seen in use across the previous chapters is useful, Backbone.stickit (http://nytimes.github.io/backbone.stickit/) provides a complete binding.
The library works without any additional markup in your HTML and even promises to make your templates cleaner because there is less need to interpolate variables while the view is rendering.
If you find the wiring of model attribute changes to refreshes of a view’s data to be too cumbersome, Backbone.stickit is one of the best alternatives. It blends into the life cycle of a Backbone view seamlessly, with some simple code. JavaScript developers who have used Knockout or Ember may be more comfortable with the binding support that is provided by Backbone.stickit.
Integrating Backbone.stickit into your application is a painless process. Just download the source from http://nytimes.github.io/backbone.stickit/ and include the library in your HTML page.
<script src="js/external/backbone.stickit.js"></script>
Using Backbone.stickit
First you will need to have a model prepared to visualize in a Backbone view. Once again, we’ll use the simple Book model from previous chapters.
var Book = Backbone.Model.extend({});
//define contents
var backboneBook = new Book({name: 'Beginning Backbone', author: 'James Sugrue', year: '2013-12-24'});
Before we move into creating the view, the other thing that will be required in this sample is a div with a particular class, in this case container, on the HTML page.
<div class="container">
    </div>
When creating a view that utilizes Backbone.stickit bindings, you will need to define a bindings hash in the model. Each binding takes a pair of strings; the first is the CSS selector for the section of the template that will store the variable, and the second is the attribute in the model that is being bound to. In the following example, the binding for the name attribute in the model is to an element with the ID title in the view’s HTML.
//Define the Library View
MyView = Backbone.View.extend({

    el : '.container',
In
    bindings: {
        "#title" : 'name',
        '#author' : 'author'
    },
    model : null,
    content: null,
    initialize: function(options){
        this.model = options.model;
    },

    render: function(){
        var self = this;
        self.$el.html('<div id="title"/> <input id="author" type="text">'),
    self.stickit();
        return self;
   },
});
The second important part to notice is that the render calls a self.stickit() function, which enforces the binding.
When the view is created, with the model passed through as a parameter, it displays the values as expected.
var view1 = new MyView({model: backboneBook});
view1.render();

backboneBook.set('name', 'Beginning Backbone.js'),
However, the real power of Backbone.stickit() is in how, with any change to the bound model attributes, the view will automatically update. The following piece of code will update the model every six seconds. By inserting this code, notice how the HTML updates automatically.
var count = 1;
        setInterval(function(e){
                count++;
                backboneBook.set('name', 'New Name ' + count);
        }, 6000);
When the view is being disposed, you can remove all bindings by calling view.unstickit(). There are also a number of callback functions that can be added when defining your bindings that allow more control over whether the view gets updated, as well as functions that can be invoked when the update of the view is complete.
Backbone.Notifications (https://github.com/fatiherikli/backbone-notifications) is a global notification system for your Backbone app. The library provides the CSS and JavaScript required for notifications dealing with pop-ups (flash), loading, and progress bars.
Why Use Backbone.Notifications
When building an application from scratch, adding in notifications for error and success conditions can be a little cumbersome and is often ignored by developers. However, with such a simple library available that looks after both the logic and presentation of notifications to the user, it’s difficult to resist adding Backbone.Notifications.
You can see a complete list of sample notifications at the project web site, hosted at http://fatiherikli.github.io/backbone-notifications/.
Once you have downloaded the source from https://github.com/fatiherikli/backbone-notifications, simply include the CSS and JavaScript files from the src directory.
<link rel="stylesheet" href="css/backbone-ui.css">
     .....
    <script src="js/external/backbone-ui.js"></script>
The CSS is an important inclusion here because it deals with the presentation of the notifications on the screen. Of course, you can change these styles to fit in with your application easily.
Using Backbone.Notifications
Backbone.Notifications will work with any Backbone objects because they already have the Events functionality included. However, if you want to use the library on non-Backbone objects, you can extend the object with Backbone.Events, as described in the following code snippet:
var notifications  {};
    _.extend(notifications, Backbone.Events);
To keep things clear, the example we’ll implement here will use one of the model objects that we have already created.
var Book = Backbone.Model.extend({});
var backboneBook = new Book({name: 'Beginning Backbone', author: 'James Sugrue', year: '2013-12-24'});
Before you can trigger any notifications, you will need to create a new Notifier object and append that to an element in the HTML page, usually the body. When creating the Notifier, you will need to specify which object will trigger the notification, in this case, backboneBook.
new Notifier({
           model: backboneBook
       }).render().$el.appendTo("body");
Any time you want to trigger an event, such as a save complete or error, you can simply cause a notification to be displayed by calling the trigger function on the object.
backboneBook.trigger("success", "Book saved");
The first parameter of this function is the type of notification to use, such as start:loader, end:loader, start:progress, end:progress, update:progress, error, success, or flash.
At the least, this library provides a consistent and simple way to build notifications into your Backbone application.
Models and Collection Extensions
So far, we’ve considered extensions available specifically for display and input purposes, but there are also many options available for extending the functionality of models and collections.
Backbone.trackit
Backbone.trackit (https://github.com/NYTimes/backbone.trackit) is another project from the New York Times that manages changes in Backbone models, providing the ability to undo previous changes and trigger events when there are unsaved changes.
As you’ve already seen in Chapter 3, Backbone keeps a record of only the current and previous sets of values for the attributes. While useful, this functionality doesn’t go far enough for apps with more complex user interactions, where you want to record multiple changes. This is where Backbone.trackit comes in.
It’s worth noting that this does not provide a complete undo/redo stack. For such an extension, check out Backbone.memento.
To include Backbone.trackit in your application, simply download backbone.trackit.js from the dist folder on https://github.com/NYTimes/backbone.trackit, and include the script in your HTML page.
<script src="js/external/backbone.trackit.js"></script>
Once again, the simple Book model will be used to illustrate Backbone.trackit.
var Book = Backbone.Model.extend({
    urlRoot: 'http://localhost:8080/books/',
});
//define contents
var backboneBook = new Book({name: 'Beginning Backbone', author: 'James Sugrue', year: '2013-12-24'});
Rather than being a cross-application configuration, Backbone.trackit can be applied to individual model objects, using the startTracking function.
backboneBook.startTracking();
Once tracking has started, the unsavedAttributes function will return the attributes in the model that have not yet been saved. The log statements in the following piece of code will continue to accrue the set of attributes that have been changed:
backboneBook.set('name', 'Beginning Backbone.js'),
console.log(backboneBook.unsavedAttributes());

backboneBook.set('author', 'J Sugrue'),
console.log(backboneBook.unsavedAttributes());
However, once a successful save has occurred, the call to unsavedAttributes() will return false. If you want to reset the attributes to avoid saving the changes, call the resetAttributes() function.
console.log('Author is ' + backboneBook.get('author'));
backboneBook.resetAttributes();
console.log('Author is ' + backboneBook.get('author'));
The previous code performs a complete reset of the attribute changes made since tracking started or the last successful save was made.
Derick Bailey’s Backbone.memento extension (https://github.com/derickbailey/backbone.memento) provides a stack to push and pop changes to Backbone models and collections. This provides a more complete undo/redo stack for your Backbone apps.
While Backbone.trackit can be useful for keeping track of model changes, more complex web apps, such as document editing systems, may require the ability to perform multiple undo or redo operations. This is exactly what Backbone.memento can provide.
Simply download backbone.memento.js from the GitHub project page, https://github.com/derickbailey/backbone.memento, and include the script in your own HTML page.
<script src="js/external/backbone.memento.js"></script>
Using Backbone.memento
For each model or collection that you want to add undo/redo support to, you need to extend the initialize method with two extra lines to add Backbone.memento to the object.
var Book = Backbone.Model.extend({
    urlRoot: 'http://localhost:8080/books/',
    initialize: function(){
        var memento = new Backbone.memento(this);
        _.extend(this, memento);
    }

});
While the previous code deals with models, the same syntax can be applied to a collection. You can also have the Backbone.memento plug-in ignore changes made to particular attributes and not include them in the stack using an ignore array.
Every time you want to save the state of the model to the stack, a store function can be called for the model; to reset to a previous state, the restore function can be used. The following code example illustrates this flow:
//define contents
var backboneBook = new Book({name: 'Beginning Backbone', author: 'James Sugrue', year: '2013-12-24'});

console.log('Before set: ' + backboneBook.get('name'));
backboneBook.set('name', 'Beginning Backbone.js'),
backboneBook.store();
console.log('After store: ' + backboneBook.get('name'));

backboneBook.set('name', 'Beginning Backbone')
console.log('After set: ' + backboneBook.get('name'));
backboneBook.restore();
console.log('After restore: ' + backboneBook.get('name'));
The result of the execution will be as follows:
Before set: Beginning Backbone
After store: Beginning Backbone.js
After set: Beginning Backbone
After restore: Beginning Backbone.js
As you can see, even after changing the name of the book after the first call to store, the restore call reverts the change.
Backbone.localStorage
Everything that we’ve covered so far has assumed that the model/collection data gets stored on a server, over a REST interface. Backbone.localStorage (https://github.com/jeromegn/Backbone.localStorage) overrides Backbone.Sync to allow you to use HTML5 local storage as the data store.
Why Use Backbone.localStorage
Not every application will need to save all data to a server. You may want some collections to save to a local database on the client machine to store items such as preferences. With Backbone.localStorage you can target specific collections to use this local storage, while allowing other collections to use the standard sync method of HTTP.
Configuration
Including Backbone.localStorage in your application is as simple as downloading the latest version of backbone.localStorage.js from the GitHub repository, https://github.com/jeromegn/Backbone.localStorage, and including the JavaScript in your HTML page.
<script src="js/external/backbone.localStoage.js"></script>
Using Backbone.localStorage
Backbone.localStorage is an unintrusive plug-in that just requires you to create collections that target HTML5 local storage instead of remote server storage. To do this, the definition of your collection will need a new localStorage parameter.
localStorage : new Backbone.LocalStorage("libraryapp:MyLibrary"),
The string parameter used when creating the new LocalStorage instance is the unique identifier for your application contents.
var Book = Backbone.Model.extend({});
var Library = Backbone.Collection.extend({
    model: Book,
    localStorage : new Backbone.LocalStorage("MyLibrary"),
});

//define contents
var backboneBook = new Book({name: 'Beginning Backbone', author: 'James Sugrue', year: '2013-12-24'});
var nodeBook = new Book({name: 'Pro Node.js for Developers', author: 'Colin J. Ihrig', year: '2013-11-01'});
var proJavascriptBook = new Book({name: 'Pro JavaScript Techniques', author: 'John Resig', year: '2006-02-01'});
//create collection
var myLibrary = new Library();
Note that, at the time of writing, for your model items to be correctly stored in local storage, you need to use the create function of the collection rather than the set function.
myLibrary.create(backboneBook);
myLibrary.create(nodeBook);
Now when you inspect the local storage of your application through Chrome Developer Tools, on the Resources tab, you should find the details of the two books you have added to the collection, as in Figure 7-1.
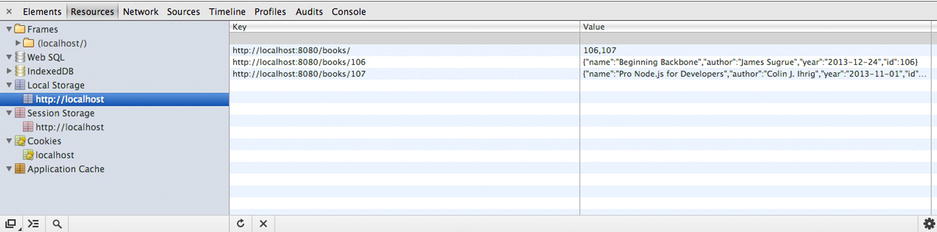
Figure 7-1. The local storage of the application following execution of the previous example
Backbone.dualStorage
Backbone.dualStorage (https://github.com/nilbus/Backbone.dualStorage) goes a step further than Backbone.localStorage, providing a local caching mechanism for your data so that if your app goes offline, data continues to be stored and can be synced with the server when connectivity is restored.
This plug-in is particularly useful for mobile apps built on Backbone, because connectivity can be an issue. If you are finding that data is being lost as a result of dropped connections or server downtime, this can be a relatively painless way of dealing with the problem. Also, this allows users to have a complete application experience at all times. For users roaming between countries, this can be an essential mobile feature.
To include Backbone.dualStorage in your application, simply download the library from https://github.com/nilbus/Backbone.dualStorage and include it in your HTML page.
<script src="js/external/backbone.dualstorage.js"></script>
Backbone.dualStorage is one of the easiest of all the Backbone plug-ins to use in your project because its default behavior requires no code changes.
//Model and Collection definitions
var Book = Backbone.Model.extend({});
var Library = Backbone.Collection.extend({
    model: Book,
    url: 'http://localhost:8080/books/',
});

//define contents
var backboneBook = new Book({name: 'Beginning Backbone', author: 'James Sugrue', year: '2013-12-24'});
var nodeBook = new Book({name: 'Pro Node.js for Developers', author: 'Colin J. Ihrig', year: '2013-11-01'});
var proJavascriptBook = new Book({name: 'Pro JavaScript Techniques', author: 'John Resig', year: '2006-02-01'});

//create collection
var myLibrary = new Library();
myLibrary.create(backboneBook);
myLibrary.create(nodeBook);
Running the previous code results in a cached copy appearing in the local storage for your app. Once again, check Chrome Developer Tools for proof of this, as in Figure 7-2.
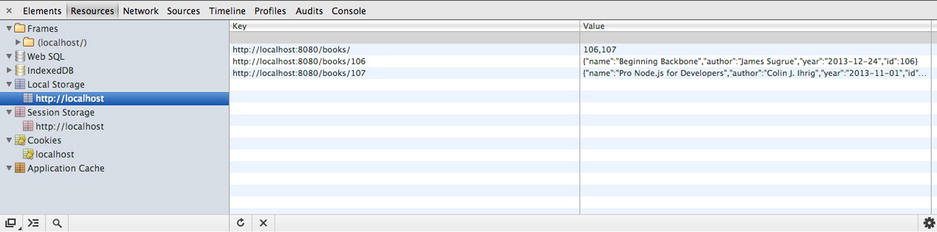
Figure 7-2. Chrome Developer Tools showing the locally cached items
If you detect that the client and server are out of sync, you can call a special synchronization function on the collection to send all local changes to the server.
myLibrary.syncDirtyAndDestroyed();
Note that you will need to write your own code to detect the loss and reestablishment of connections.
If you require some collections to act differently, you can set them to be never cached by using the remote: true parameter on creation. You can also set the collection to only save changes locally by using the local: true parameter.
Backbone.ViewModel
Backbone.ViewModel, available from http://github.com/tommyh/backbone-view-model, allows you to create a model that can deal with more complex views. If you had your model change attributes just for the view, these attributes could be synced to the server. So, it makes sense to have a separation of your view model to the persistent model.
When the views in your application require a lot of conversion from what is stored in the real persistence model before it is displayed, a proper separation of concerns may be necessary.
Backbone.ViewModel is just a single JavaScript file that contains a different type of model definition. This can be downloaded from https://github.com/tommyh/backbone-view-model and just needs to be included in your HTML page.
<script src="js/external/view-model.js"></script>
Using Backbone.ViewModel
Backbone.ViewModel will extend a normal model that you have created, allowing you to specify a set of computed attributes that will be used for the view. First let’s create a simple model that will be the basis for the view.
var Book = Backbone.Model.extend({});
var backboneBook = new Book({name: 'Beginning Backbone', author: 'James Sugrue', year: '2013-12-24'});
The ViewModel will be based on this model, which gets stored as an attribute in the ViewModel object as source_model. When creating a ViewModel object, the computed_attributes hash allows you to create functions that will transform the representation of the properties in the source_model attribute.
var BookViewModel = Backbone.ViewModel.extend({
     'truncated_book_title' : function(){
       return this.get('source_model').get('name').substring(0, 10) + '...';
     },
     'author' : function(){
           return this.get('source_model').get('author'),}
 }
});
While this is useful for the truncation of the book title, you will also need to expose variables from the original model that you need displayed in the view.
Notice in the render function of the view, you are now dealing with the attributes that appear in the ViewModel.
//Define the Library View
MyView = Backbone.View.extend({

 el : '.container',

 model : null,
 content: null,

 initialize: function(options){
   this.model = options.model;
 },

 render: function(){
   var self = this;
   self.$el.html('Author is  ' + this.model.get('author') + ' Title is ' + this.model.get('truncated_book_title'));

   return self;
   },
});
When creating the instance of the view, the ViewModel is passed through as the model rather than backboneBook, which itself is a parameter to the ViewModel.
var backboneBookViewModel = new BookViewModel({source_model: backboneBook});

var view1 = new MyView({model: backboneBookViewModel});
view1.render();
While this can make your code a little more complex, some applications may want to enforce the separation of persistence and view models in such a way. I prefer to use Handlebars helpers to modify the attributes at render time.
Backbone-Validator
A number of extensions are available to help you validate your models beyond the built-in Backbone validate() function. One of these is Backbone-Validator (https://github.com/fantactuka/backbone-validator), which provides model validation as well as allowing events to be bound to views to display validation errors if required.
When applications need a lot of validation and the view needs to display any validation errors, this plug-in removes a large amount of custom code that would be required when using standard Backbone JavaScript code. Form-based applications are the most obvious beneficiaries of this plug-in.
Backbone-Validator just needs to be downloaded from https://github.com/fantactuka/backbone-validator and included in your HTML page.
<script src="js/external/backbon-validator.js"></script>
Using Backbone-Validator
Any model can be extended to use Backbone-Validator -by passing through a validation hash, which includes the attribute name to validate along with a number of validation settings, such as whether it can be blank, what format it should use, and what message to display when the validation fails.
The following example adds this validation to the Book model:
//Model and Collection definitions
var Book = Backbone.Model.extend({
 validation:
 {
   name: {
     blank: false,
     message: 'Every book needs a name'
   },

 }
});
This can be easily tested by creating a Book object without setting the name attribute.
var backboneBook = new Book();
console.log('Is this valid? ' + backboneBook.isValid());
The result of the previous log statement would return false. Additionally, if you force a set function to use validation, you will force the validationError array of the object to be populated.
backboneBook.set({name: ''}, {validate: true});
console.log(backboneBook.validationError);
Most importantly, you can have your view bind callbacks that deal with invalid fields quite easily, by adding a call to bindValidation in the initialize function for the view.
//Define the Library View
MyView = Backbone.View.extend({

 el : '.container',

 model : null,
 content: null,

 initialize: function(options){
   this.model = options.model;
   this.bindValidation();
 },

 onInvalidField: function(attrName, attrValue, errors, model){
   alert(attrName + ' has an invalid value'),
 },

 render: function(){
   var self = this;
   self.$el.html('Author is  ' + this.model.get('author') +  ' Book title is  '  this.model.get('name'));
   return self;
   },
});

var view1 = new MyView({model: backboneBook});
view1.render();
The previous code will result in an alert displaying when an invalid field is used in the model passed to the view. The extension includes a number of validators, covering formats, lengths, and whether a value is required.
Query Engine
While it is easy to find variables in small collections, for more complex real-world applications you may need a little more power in searching and filtering for larger collections. Query Engine (https://github.com/bevry/query-engine) provides these capabilities out of the box, even supporting NoSQL queries, and will run on a node.js server as well as your browser.
If you are dealing with large collections and need to provide a lot of search, filter, and query functionality in your application, Query Engine will make your code easier to follow and will probably perform better than a custom-made solution. It would make sense to use this library if you are building an application that provides searching of databases and you don’t want to defer all filtering to the server side.
To include QueryEngine in your project, you just need to download the query-engine.js file from https://github.com/bevry/query-engine/blob/master/out/lib/query-engine.js and include it in your HTML page.
<script src="js/external/query-engine.js"></script>
Using QueryEngine
QueryEngine provides two states for the custom QueryCollection class: standard and live. Live collections will listen out for collection events so that any change made in the collection causes any related query to be rerun.
Rather than creating a standard Backbone.Collection, you will need to create a QueryCollection, using queryEngine.QueryCollection.extend, as in the following code:
//Model and Collection definitions
var Book = Backbone.Model.extend({
});
var Library = queryEngine.QueryCollection.extend({
model: Book,
});
With this setup, any of the QueryCollection functions are now available. For example, the following piece of code sets up the collection to contain four books:
//define contents
var backboneBook = new Book({name: 'Beginning Backbone', author: 'James Sugrue', year: '2013-12-24'});
var nodeBook = new Book({name: 'Pro Node.js for Developers', author: 'Colin J. Ihrig', year: '2013-11-01'});
var proJavascriptBook = new Book({name: 'Pro JavaScript Techniques', author: 'John Resig', year: '2006-02-01'});
var backboneBook2 = new Book({name: 'Backbone: The Sequel', author: 'James Sugrue', year: '2014-12-01'});

//create collection
var myLibrary = new Library();
myLibrary.set([backboneBook, nodeBook, proJavascriptBook, backboneBook2]);
Now to find all books with a particular author, the findAll function can be used, with the appropriate filter attributes:
var results =  myLibrary.findAll({author: 'James Sugrue'});
console.log('Returned ' + results.length + ' results'),
In the results variable, there will be two models included that correlate to the books with the author James Sugrue.
ModelAttrs
ModelAttrs (https://github.com/rhysbrettbowen/Backbone.ModelAttrs) is a simple Backbone plug-in that allows you to retrieve and set attributes with a more concise, jQuery-like format.
If you find the model.set('attribute name', 'attribute value') type of syntax too verbose and would rather use a more concise format, ModelAttrs can be a simple alteration to your project code.
ModelAttrs is a really small JavaScript file that can be downloaded from https://github.com/rhysbrettbowen/Backbone.ModelAttrs and included in your HTML page.
<script src="js/external/attrs.js"></script>
Using ModelAttrs
To use ModelAttrs, you will need to convert your model object to a ModelAttrs object using the toAttrs function that is provided with the library.
toAttrs(<model>)
The following code shows how to get a variable from an existing Backbone model using the library:
//Model definition
var Book = Backbone.Model.extend({
});

//define contents
var backboneBook = new Book({name: 'Beginning Backbone', author: 'James Sugrue', year: '2013-12-24'});

var backboneAttrs = toAttrs(backboneBook);

console.log(backboneAttrs.name());
Now you are able to get the name of the book by calling the .name() function rather than using backboneBook.get('name').
Setting a variable is just as simple, and most importantly, setting the variable will be reflected in the original model object, as in the following code:
backboneAttrs.name('Beginning Backbone.js'),
console.log(backboneAttrs.name());
console.log(backboneBook.get('name'));
The Backbone ecosystem isn’t limited just to extensions to the library. With the power of the developer tools available in Chrome and Firefox, you may think that there is no need for anything more. However, there is an add-on available for Firefox named Backbone Eye (http://dhruvaray.github.io/spa-eye/) that helps developers understand the behavior of a Backbone application without the need to debug JavaScript.
The add-on extends Firebug, so once you have both the Firebug and Backbone Eye add-ons installed, you will see a new tab in your Firebug browser, as in Figure 7-3.
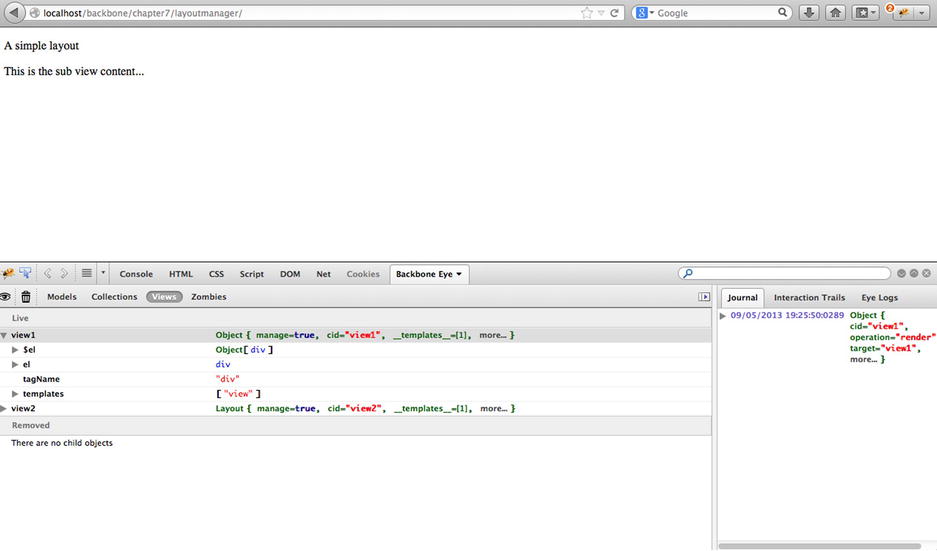
Figure 7-3. Backbone Eye add-on in action
Figure 7-3 is the result of inspecting the example used for the LayoutManager plug-in using Eye. Models, collections, and views are all enumerated within the tool. However, the most important view is the Zombies aspect, which gives a listing of objects that are still in use, even after being removed from the application using Backbone’s remove or destroy calls.
The Interaction Tools view draws sequence diagrams illustrating the interaction flows between the views, models, and applications in your project.
Backbone Eye can be a really useful tool when new developers join a project and need to get an understanding of the code base. It can also be a great way of zeroing in on memory leaks.
Quick Reference
Table 7-1 describes all the projects listed in this chapter. All projects are licensed under the MIT license.
Table 7-1. Quick Reference of Projects Mentioned in This Chapter
Project |
Description |
|---|---|
LayoutManager |
Provides management of views and subviews within Backbone apps. |
Backgrid |
Provides data grid user interface elements, such as tables. |
BackboneUI |
Offers a number of widgets that provide full data binding between the widget and model. |
Backbone.stickit |
Dynamically updates Backbone views when a model changes without any additional code. |
Backbone.Notifications |
Provides global notifications on the user interface with minimal code. |
Backbone.trackit |
Allows multiple changes in model attributes to be tracked. |
Backbone.memento |
Provides full undo/redo stack for changes in the model during the application life cycle. |
Backbone.localStorage |
Provides the option to store collection data in local HTML5 storage instead of on the server. |
Backbone.dualStorage |
Provides an adapter that caches changes in local storage, allowing for offline use of a Backbone app. |
Backbone.ViewModel |
Creates a separation between the persisted model and that used for the view. |
Backbone.Validator |
Enhanced validation for models, including view bindings for any validation errors. |
QueryEngine |
Powerful search and filtering functions for Backbone collections. |
ModelAttrs |
More concise setting and getting of attribute values from Backbone models. |
Summary
In this chapter, we looked at a number of projects that can help to strengthen your Backbone applications. Some great extensions exist for both the view and model layers, allowing Backbone to achieve additional capabilities that some feel are missing in the basic Backbone offering.
This chapter has only scratched the surface of what is available throughout the Backbone community. There are often multiple projects that will help solve similar problems, so if a library described here doesn’t quite fit your requirements, you should take a look at some alternatives. For a comprehensive listing of community projects, check out Jeremy Ashkenas’ listing at https://github.com/jashkenas/backbone/wiki/Extensions,-Plugins,-Resources.