With the first release of VMware ESXi, installation options were limited to running ESXi Embedded on an original equipment manufacturer (OEM) flash device or to installing ESXi Installable from CD-ROM to a limited number of local disk options. With VMware ESXi 4.1, the installation options have been expanded to include booting from a number of different sources and using scripted installs.
In this chapter, you will learn to:
Set up and configure VMware ESXi Embedded
Use the various ESXi Installable media options
Configure to boot ESXi with PXELINUX and gPXE
Install VMware ESXi using graphical mode
Install VMware ESXi using scripted mode
As discussed in Chapter 1, “Introduction to VMware ESXi 4.1,” ESXi Embedded refers to the version of VMware ESXi that comes original equipment manufacturer (OEM)-installed on a flash device in certified hardware. ESXi Embedded is available from a number of hardware venders, including Dell, Hewlett Packard (HP), and IBM. This option allows the administrator to plug the server into the network, boot up, and have the host configured within vCenter Server within a very short period of time. With ESXi Embedded, no local hard drive is required, which eliminates a point of failure, simplifies server management, and reduces power consumption and heat generation.
With ESXi Embedded, there is no install process such as that discussed in Chapter 2, “Getting Started with a Quick Install.” Rather, ESXi Embedded will boot from the embedded boot device and be ready for configuration. If your network is set up with a Dynamic Host Configuration Protocol (DHCP) server, the ESXi Embedded host will obtain an IP address and be ready for network configuration and setting of the root password with the vSphere client. As previously shown, these tasks can also be accomplished with the Direct Console User Interface (DCUI) or vSphere Command-Line Interface (vCLI) commands.
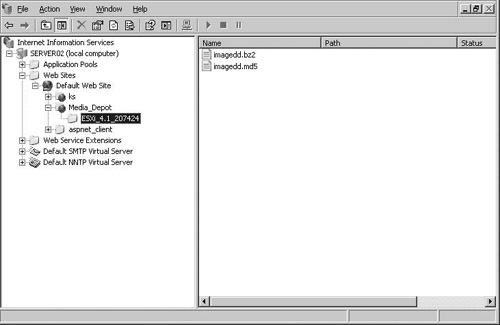
To prepare your ESXi Embedded host for configuration, you should first confirm that the host is set to boot from the proper boot device:
While your ESXi host is powering on, press the key that will enter the host’s Basic Input/ Output System (BIOS) setup. Depending on the model of server, that may require pressing Del or a certain function key.
Edit the boot device priority to set the ESXi Embedded boot device to be the first boot device. A sample of this is shown in Figure 4.1.
Save the BIOS change and reboot the host.

The host should boot to the VMware ESXi DCUI screen. If the host is not able to start VMware ESXi, you may need to review the BIOS settings or run the recovery process for ESXi Embedded found in Chapter 11, “Under the Hood with the ESXi Tech Support Mode.”
Once the host has booted to VMware ESXi Embedded, you will be ready to configure the management port. During the autoconfiguration phase, ESXi will assign vmnic0 to vSwitch0 for management access. If there is a DHCP server available, VMware ESXi will obtain an IP address for the host. If the network interface card (NIC) assigned as vmnic0 is not on your management network, you can change this default choice by manually changing the NIC used in the DCUI. With the DCUI, you will also be able to set the IP address to be used for management traffic as well as the hostname and DNS server settings. You can access the DCUI at the console of the host or by accessing the host with a remote management card.
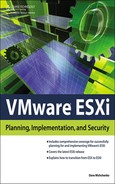
To configure the network adapter, follow these steps:
Press F2 to log in to the DCUI. If the password for the root account has not been set, log in with a blank password.
Select the Configure Management Network option and press Enter.
Select Network Adapters and press Enter.
The Network Adapters screen, shown in Figure 4.2, lists the network adapters that VMware ESXi recognizes in your system. Select the network adapter to use for management traffic and press the Space bar to enable the network adapter. If you do not want to use vmnic0 for management traffic, select the network adapter and press the Space bar to disable the adapter for management traffic.
Press Enter to close the Network Adapters screen.
Press Esc on the Configure Management Network screen to return to the main DCUI screen.
You will be prompted to confirm the change to your management network. Select Yes to apply the change and restart the management network.
If you have not set a static IP address for management traffic, you can set that with the DCUI, vSphere Client, or vCLI, as described in Chapter 2. The autoconfiguration process will have also set a blank password for the root account. The process for setting the root password is also discussed in Chapter 2.
One of the configuration tasks that you will need to take care of that is unique to ESXi Embedded is setup of a scratch partition for the VMkernel swap file. The autoconfiguration process for ESXi will attempt to create a 4GB Virtual File Allocation Table (VFAT) scratch partition on which to store the system swap file should the partition not exist on another partition. With ESXi Embedded, there is no partition space available for this, so you will need to configure the swap file to reside on one of your datastores. In prior versions of ESXi, this was a requirement to configure prior to joining the host to a High Availability (HA) cluster. This is no longer the case, but the scratch partition is used to generate a support bundle, so it remains a worthwhile option to configure. See Chapter 11 for the process to create a support bundle.
To enable the scratch partition for use by the userworld swap file, you can follow this process in the vSphere client either connected to the host directly or via vCenter Server:
If you are connecting via vCenter Server, select the ESXi host.
Click the Configuration tab and then click Advanced Settings in the Software section.
Select
ScratchConfigto display the four scratch configuration options.ScratchConfig. CurrentScratchLocationandScratchConfig.CurrentSwapStatewill display the currently configured scratch location and whether the scratch partition is enabled for you. The option will be grayed out and in this case will not be configured.Select
ScratchConfig.ConfiguredScratchLocationand enter a valid directory with at least 1GB of free space.Click OK to close the Advanced Configuration window.
Reboot your ESXi host to apply the configuration change.
You can configure the scratch partition on either local or shared storage. While you may see the best performance with the swap file on a local disk, with ESXi Embedded this will not be an option, so you will need to use shared storage. If you plan to configure multiple hosts to use the same logical unit number (LUN) for storage of the swap file, you’ll need to ensure that a unique folder is created for each host and that the ConfiguredScratchLocation path reflects that unique folder.
With VMware ESXi 4.0 and earlier versions, ESXi Installable could be booted only from CD-ROM and installed in graphical mode as shown in Chapter 2. With VMware ESXi 4.1, a number of new methods and options have been added to better meet the diverse needs of the environments in which ESXi will be installed. The new options include selecting the storage and access of the installation media, choosing a method of booting the installer, and specifying a mode in which the installer is to run.
The default installation option is to boot VMware ESXi from a CD-ROM; then the install process uses graphical mode and the CD-ROM as the source of the installation media. You can modify this process with the following options. First, storage and access for the ESXi installation image can be via:
Second, the installer can now be booted from:
CD-ROM (default)
Preboot Execution Environment (PXE)
Third, the installer can be run in one of two modes:
Interactive graphical (default)
Scripted
Lastly, when run as a scripted installation, the script can be stored and accessed on:
Within the ESXi Installer ramdisk (default)
On the installation CD-ROM
HTTP/HTTPS
FTP NFS
Through the following sections of this chapter, you’ll look at the various preceding components to understand how to set up each one. Then the components will be put together to demonstrate how you can automate your VMware ESXi install process.
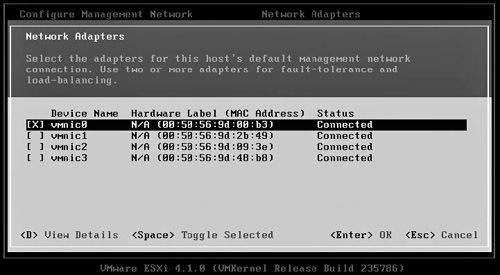
Before proceeding, it is worthwhile to examine how the components will fit together for a completely automated PXE installation. This process is shown in Figure 4.3. Not all the components are strictly required for an installation. For example, you can PXE boot the ESXi installer and then run a graphical installation. Likewise, you can boot from the installation CD and then choose to run a scripted installation. An installation script is a plain text file containing commands that allow the install to proceed without intervention. Together, these components will help you create an infrastructure that enables you to install many hosts with a minimal effort.
If your installation process will use all the components discussed in this chapter, the installation will follow this process:
The target host is powered on.
The PXE client on the host obtains an IP address lease from your DHCP server. The lease contains the IP address for your Trivial File Transfer Protocol (TFTP) server and the network boot loader (PXELINUX or gPXE) to use.
The ESXi host downloads and executes the network boot loader. PXELINUX or gPXE loads the configuration file which enables the host to load the VMkernel and ramdisk files for the installation process.
The system boots the ESXi installer. If an installation script is specified in the configuration file then it is loaded and parsed by the installer.
The ESXi installer loads the install image from the media depot.
The ESXi installer copies the install image to the host’s boot disk and applies the installation script. The host reboots to complete the installation.
With the default media storage option, you download the ISO image from vmware.com, burn it to a CD-ROM, and then insert the CD-ROM into each host on which you want to install VMware ESXi. This can be time intensive for a large number of hosts and difficult for remote locations.
With VMware ESXi 4.1, you can create a media depot, which is a network-accessible location that contains the ESXi installation media. This media depot can be stored on FTP, HTTP, HTTPS, or NFS.
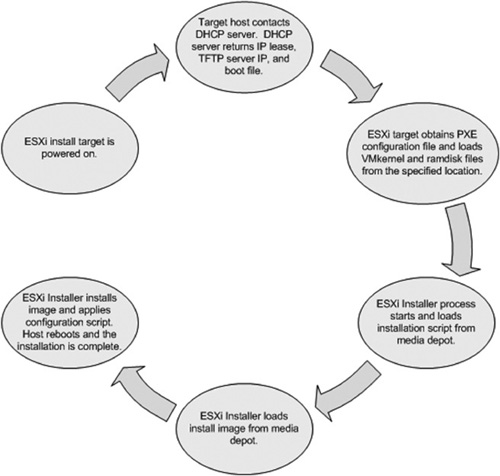
To create a media depot on an HTTP server, you perform the following steps. In this example, Microsoft Internet Information Services (IIS) was used and a virtual directory was created to hold the media depot.
Create a folder on the Web server to store the VMware ESXi installation files. The files
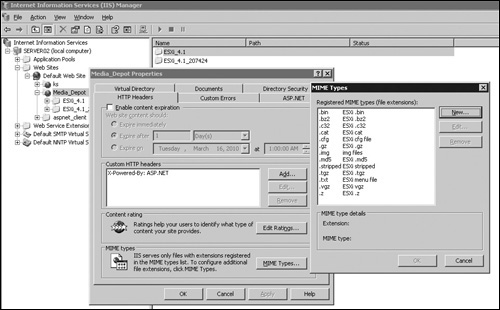
imagedd.bz2andimagedd.md5from the installation media should be copied to the destination folder as shown in Figure 4.4, in which the files were copied toC:Inetpub Media DepotESXi_4.1_207424.Create a new virtual directory with IIS Manager. The virtual directory should point to the media depot folder created in step 1.
Tip
When using Microsoft IIS for the media depot, you may need to edit the Multipur-pose Internet Mail Extensions (MIME) types configured for the virtual directory to allow for the download of the VMware ESXi installation files. By default, IIS will not allow for the download of files that you will have copied to the media depot.
After you have configured your media depot, you can create a test script file that will use the media depot files for the installation. Scripting an ESXi installation will be covered later in this chapter, but for now you’ll see a simple example of its use. You’ll want to create a sample file as shown in the following listing. The default setting for the
installparameter will be to use thecdromoption. In this example, that has been updated tourland the URL for the media depot has been specified. Once you have created this file, you’ll want to save it on an HTTP(S), FTP, or NFS server for access during the installation process.# Accept the VMware End User License Agreement vmaccepteula # Set the root password for the DCUI and Tech Support Mode rootpw mypassword # Choose the first discovered disk to install onto autopart --firstdisk --overwritevmfs # The installation media is in the media depot install url http://server02.mishchenko.net/media_depot/ESXi_4.1_207424/
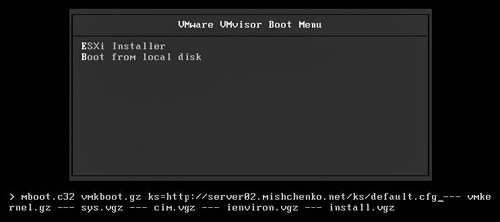
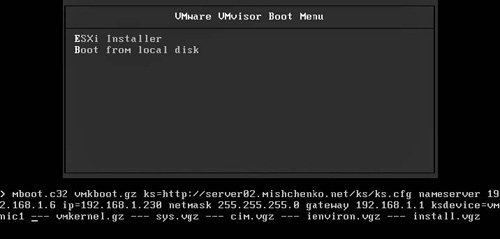
You’ll then want to start the installation process for VMware ESXi. You can boot from the CD-ROM or a PXE source. On the VMware VMvisor Boot Menu screen, press Tab to enter additional boot options.
After
vmkboot.gz, add theksoption and enter the URL to the script file that you created earlier, as shown in Figure 4.5. Press Enter to continue the scripted installation.
Once the installation has completed, you’ll be able to verify in the log files for the Web server that the install image file imagedd.bz2 for ESXi was downloaded from the Web server for the copy-to-disk process rather than using the image file on the install CD-ROM or PXE install source.
Note
With a traditional operating system (OS) installation, the installer creates partitions on the host’s storage and then copies all the required files for the OS to boot. With the ESXi installer, a dd image is copied to the boot device, and there is neither partitioning done for system partitions nor copying of individual boot files. dd is a common Unix program used for copying raw data. For ESXi, the dd image contains all the partition data and system files that ESXi requires to run.
If you plan to use an NFS media depot, the install command in the script file will need to specify the host and folder to use with the server and folder options:
install nfs ––server=server02.mishchenko.net ––dir=/media_depot/ESXi_4.1_207424/
With VMware ESXi 4.1, it is now supported for you to use PXE to boot the ESXi Installer. PXE uses both a DHCP server and a TFTP server to bootstrap an operating system over your network. With a PXE install, you can boot and install ESXi in the same manner as you would with the installation CD-ROM without requiring installation media in either the host’s physical or virtual CD-ROM device.
In the following two sections, you’ll see how to set up PXE installing with both a Linux and Windows environment. Later in this chapter, you’ll see how to set up an installation script to automate the install process. For both environments, you’ll require the following components:
DHCP server. The host on which you intend to install VMware ESXi contacts the DHCP server to obtain an IP address. The address lease also includes the DHCP options 066 Boot Server Host Name and 067 Bootfile Name. The host uses that information to access the TFTP server and request the network boot loader file.
TFTP server. The TFTP server hosts two items. First the ESXi host contacts the server to download the PXELINUX or gPXE network boot image. After executing the boot image, the ESXi host downloads the files from the ESXi necessary to start and run the ESXi Installer.
PXELINUX/gPXE (SYSLINUX). PXELINUX is a derivative of SYSLINUX designed to network-boot Linux.
Network server (FTP, HTTP, or NFS). This is an optional component that you use to store either a script file for the installation process or the installation image. Without a network server, you are limited to interactive PXE installations.
If you are working in a Windows environment, the first step to setting up PXE booting is to configure your DHCP server. You may already have that server running, so the following steps will just cover what is necessary to configure your DHCP server to point clients to the TFTP server. The following process uses the DHCP server included with Windows Server 2003 R2:
Open the DHCP management console and connect to the DHCP server that you will be configuring.
Open the DHCP scope that you will be updating.
Right-click on Scope Options and select Configure Options.
On the General tab, scroll down the list of options until you see 067 Boot Server Host Name and 068 Bootfile Name.
Enable the Boot Server Host Name option, and in the Data Entry field, enter either the IP address or hostname for the TFTP server.
Enable the Bootfile Name option and in the Data Entry field, enter
pxelinux.0.Click OK to save your changes. The scope options should now list the two new options.
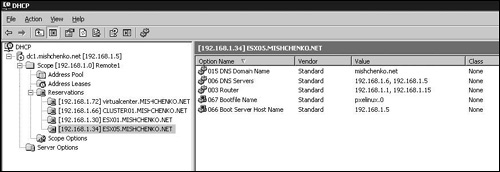
Rather than configuring these options at the scope level, you may want to create a DHCP reservation for your ESXi host. In that case, you right-click on the Reservation node and select New Reservation. You will enter the name, the IP address for the reservation, the MAC address of the adapter in the ESXi host that you will use for the installation, and optionally a description. Once you have created the reservation, you right-click on it and select Configure Options. You can then follow the preceding steps to add the necessary DHCP options. When you have completed your changes, you should see the two-option setup as shown in Figure 4.6.
Once you have configured your DHCP server, you are ready to set up a TFTP server. The following example uses tftpd32, but as you’ll see, it is fairly easy to set up another package or modify an existing TFTP server to allow for the booting of the ESXi Installer.
Download the installation package for tftpd32 from http://tftpd32.jounin.net/ and start the installer.
The default installation choices are sufficient for your use to boot the ESXi Installer. Once the installation has completed, start the Tftpd32 shortcut that was created in the Tftpd32 program group.
When tftp32d starts a TFTP server, TFTP client, DHCP server, and Syslog server are started. The DHCP server will be in listening mode only. You can click on Setting and disable the services you don’t want running.
In the Settings screen, you’ll also be able to set the Base directory, which is used for storage for the TFTP server. You can optionally set the TFTP Security option to Read Only, as the ESXi PXE boot process will not be writing any data to the TFTP server.
On the Settings screen, check the Allow As virtual root option. This is required to allow the PXE boot process to access files within subfolders on the TFTP server.
Once you have made your changes, click OK to save them. Then close and restart tftpd32 to apply the new settings.
You can optionally test your setup to ensure that both the DHCP and TFTP server setups are correct. When you boot your ESXi host and select to boot from the network adapter, the NIC should be able to obtain an Internet Protocol (IP) address and then make a connection to the TFTP server. The process should then generate an error as the file pxelinux.0, as you had configured for the Bootfile Name DHCP option, does not exist on the TFTP server yet. The Log Viewer tab for tftpd32 should also show a connection attempt and “file not found” error.
The next step in your setup is to add the necessary PXELINUX files to the TFTP server. You can find a link to download the latest release of PXELINUX from http://syslinux.zytor.com/ or http://www.kernel.org/pub/linux/utils/boot/syslinux/. The download includes the entire SYSLINUX package, but you’ll only need the file pxelinux.o from the download.
Extract the SYSLINUX download and find the file
/core/pxelinux.o.Copy the file
pxelinux.oto the folder that you are using for TFTP server data.In the TFTP server data folder, create a subfolder called
pxelinux.cfg. The configuration file for PXELINUX is created in this folder.Within the
pxelinux.cfgfolder, you need to create at least a single configuration file calleddefault. The file should have no file extension. Insert the following text into the file and save it:default Local prompt 1 timeout 30 display menu.txt F1 help.txt label ESXi kernel esxi41/mboot.c32 append esxi41/vmkboot.gz ---esxi41/vmkernel.gz --- esxi41/sys.vgz --- esxi41/cim.vgz --- esxi41/ienviron.vgz --- esxi41/install.vgz localboot 0x80 localboot 0x80
In the root of the TFTP server data folder, create a folder called
esxi41.From the ESXi installation media, copy the following files. If you are using a scripted install and media depot, you do not have to copy the files
imagedd.bz2andimagedd. md5.In the root of the TFTP server data folder, create the files
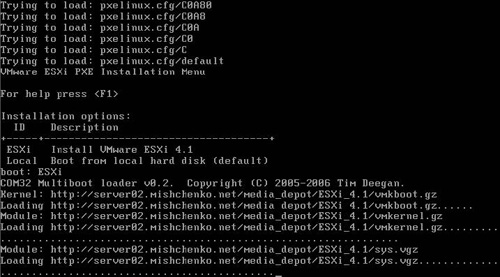
menu.txtandhelp.txt.Menu.txtwill be used to create a boot menu showing the available options you have configured in the configuration file. Without a menu file, you will have to know the label names configured within the configuration file, which can be a problem if you start to add multiple boot options. A sample for the menu file follows. Thehelp.txtfile can contain instructions or troubleshooting information and would be accessed if you press F1.VMware ESXi PXE Installation Menu For help press <F1> Installation options: ID Description +----+----------------------------------+ ESXi Install VMware ESXi 4.1 Local Boot from local hard disk (default)
Once you have made your changes, click OK to save them. Then close and restart tftpd32 to apply the new settings.
At this point, you are ready to run an interactive PXE installation. Power on your ESXi host, and in the BIOS, select to boot from the system’s network card. How you do so varies from system to system, but you can probably press F12 to start a network boot or press Esc to access a boot menu. If the boot menu does not show an option to boot from a network card, you may have to edit the BIOS boot options to enable this option.
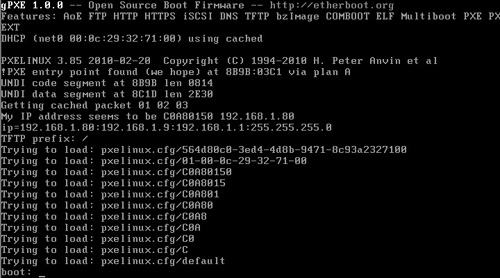
Once your host has passed through the BIOS startup and initialized the host’s network card ROM, the NIC attempts to obtain an IP address by broadcasting for a DHCP server. The DHCP server that you had configured earlier should respond with a DHCP lease containing the required IP information as well as the DHCP options for the TFTP server and boot file to use for a PXE boot. Your ESXi host contacts the TFTP server to download and start pxelinux.0, which will in turn load the configuration file that you created. The host’s display should appear similar to Figure 4.7.
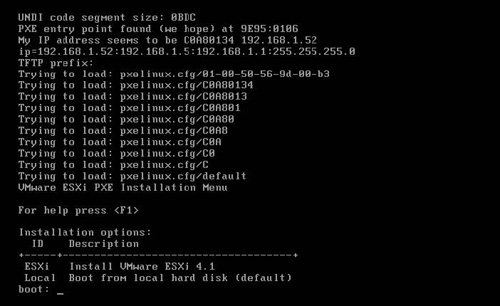
Notice that the PXE boot process attempts to load a number of configuration files prior to finding and loading the file default. PXELINUX first searches for a configuration file based on the MAC address of the NIC being used. For a MAC address of 00:0c:29:32:71:00, PXELINUX searches for a configuration file called 00-0c-29-32-71-00. If the program finds such a file, your host uses that configuration instead of searching for other files. Note that the file should have all letters in lowercase. If a configuration file based on the host’s MAC address is not found, a search is made for a configuration file based on the hexadecimal conversion of the host’s IP address. In the case of Figure 4.7, the host has an IP address of 192.168.1.52. This converts to a value in hexadecimal of C0A80134. PXELINUX starts a search for that file, and if it finds no match, one hex digit is removed to see whether a further match can be found.
The PXELINUX search pattern opens the possibility for you to tailor configuration files on a per-host or subnet level. As you’ll see later in this chapter, a kick start script (highlighted with boldface in this listing) can be added to the configuration file to automate the installation process. In such a case, you might create a sample configuration file such as the following and name the file to match the MAC address for the host to which it will apply:
default Local
prompt 1
timeout 5
label ESX05
kernel esxi41/mboot.c32
append esxi41/vmkboot.gz ks=http://server02.mishchenko.net/ks/esx05.cfg
   --- esxi41/vmkernel.gz --- esxi41/sys.vgz --- esxi41/cim.vgz
   --- esxi41/ienviron.vgz --- esxi41/install.vgz
label Locallocalboot 0x80
The file would be saved as 00-0c-29-32-71-00. When the ESXi host boots, no menu would be displayed, but entering ESX05 would start a scripted install process. If you press Enter or wait five seconds for the timeout to expire, the host would boot from the server’s primary boot device.
In the following section, you’ll see how to set up a Linux host to run the DHCP and TFTP roles to allow for the running of the ESXi Installer via a PXE boot. If you’re adding another DHCP server to your network, ensure that it will not conflict with an existing server. If you are planning to isolate your management network for your VMware ESXi host, you may find it a better solution to use an existing DHCP server on your main network. It is likely the case that the router providing access to the management network can be configured to provide DHCP relay, removing the need to have a dedicated DHCP server on the management network. If you plan to place your TFTP server on an open network, consider the fact that TFTP provides no security, and installation scripts, as you’ll see later in this chapter, contain sensitive configuration information.
The setup in the following pages also makes use of gPXE. gPXE was formerly known as Ether-boot and is an Open Source PXE bootloader. gPXE works with the built-in PXE support that your hosts will have, but extends PXE with the use of additional protocols such as HTTP, iSCSI, and ATA over Ethernet. Using gPXE to boot your ESXi Installer is significantly faster than using PXELINUX and a TFTP server for transfer of the installer files. While TFTP is simple and lightweight to implement, the protocol is not designed to be robust. When transferring large files, the TFTP server may suffer from reliability issues, resulting in the failure of the ESXi installation process. With gPXE, only the gpxelinux binary file and configuration file are transferred to your ESXi host from the TFTP server. gPXE can instead use a Web server for the transfer of the kernel and ramdisk required to boot the installer. This will ensure more reliable network transfers under heavy loads.
Note
The general release of VMware ESXi 4.1 will not officially support gPXE installations. Please refer to the release notes for future updates of VMware ESXi for details regarding official support for gPXE.
There are obviously several options that you can choose for a Linux host. The following example uses an Ubuntu Server VMware image from www.thoughtpolice.co.uk, which hosts a number of VMware images that you might find useful.
Note
Ubuntu uses sudo rather than a root account. To execute a command that you would usually have to switch to the root account to run, you should instead prefix the command with sudo, as described in step 4 of the following procedure.
To set up the Linux image and configure DHCP and TFTP servers, use the following process:
Download the appropriate VMware image for Linux that you want to use and extract the files.
The download used in this example comes configured as a standalone VMware virtual machine. You can use VMware Converter (http://www.vmware.com/products/converter/) to import the VMware image to an existing VMware ESXi and then power on your new virtual machine.
At the console of the Ubuntu server, log in with the supplied credentials.
The server should be configured with a static IP address. You want to edit the network configuration by running the command
sudo vi /etc/network/interfaces. The section foreth0should be replaced with something similar to the following. To save the file, press Esc, type in:wq, and then press Enter. You’ll then want to run the commandsudo /etc/init.d/networking restartto apply your changes.auto eth0 iface eth0 inet static address 192.168.1.9 netmask 255.255.255.0 network 192.168.1.0 broadcast 192.168.1.255 gateway 192.168.1.1
You’ll first want to install and configure a DHCP server. You can run the following command to accomplish this:
sudo apt-get install dhcp3-server
The install process attempts to start the DHCP server process, but this will fail until further configuration can be made.
You next configure several files. Run the command
sudo vi /etc/default/dhcp3-serverand find the line containingINTERFACES="". Change that entry toINTERFACES="eth0"and then save and close the file in the same manner used to edit the interfaces file in step 4.The second file you need to configure is
/etc/dhcp3/dhcpd.conf. You should update the file to have the options shown in the following example. This example will assign IP addresses in the range of 192.168.1.75 to 192.168.1.95 and also provide a default gateway, DNS servers, and default domain name.default-lease-time 600; max-lease-time 7200; option subnet-mask 255.255.255.0; option broadcast-address 192.168.1.255; option routers 192.168.1.1; option domain-name-servers 192.168.1.5, 192.168.1.6; option domain-name "mischenko.net"; subnet 192.168.1.0 netmask 255.255.255.0 { range 192.168.1.75 192.168.1.95; }To start the DHCP server, run the command
sudo /etc/init.d/dhcp3-server restart.To install a TFTP server on your Linux server, you follow a similar process to setting up the DHCP server. You start with the
installcommand:sudo apt-get install tftpd-hpa
You next want to edit the file
/etc/default/tftd-hpa. Ensure that theRUN_DAEMONoption is set to yes, as follows:RUN_DAEMON="yes" OPTIONS="-l -s /var/lib/tftpboot"
Restart the TFTP server by running the command
sudo /etc/initd.d/tftpd-hpa restart.
Caution
When editing configuration files as you’ve seen done in the prior steps, it is always a good idea to back up the file before changing it, just in case you need to revert back to the original file. You can do that by simply running the cp command. To back up the TFTP configuration file, you run sudo cp /etc/default/tftd-hpa /etc/default/ tftd-hpa.backup.
Now that your DHCP and TFTP servers are running, you’re ready to configure the components to gPXE boot the ESXi Installer. As you’ll have seen in the Windows section, the first step to enable this is to configure the DHCP server with the necessary information for the ESXi host to find the TFTP server.
You start this process by editing the file /etc/dhcp3/dhcpd.conf. As you are using gPXE, you add the following text to the file. The next-server option specifies the IP address or hostname for the TFTP server and filename tells the client ESXi host which file to load from the TFTP server.
allow booting;
allow bootp;
# gPXE options
option space gpxe;
option gpxe-encap-opts code 175 = encapsulate gpxe;
option gpxe.bus-id code 177 = string;
class "pxeclients" {
match if substring(option vendor-class-identifier, 0, 9) = "PXEClient";
next-server 192.168.1.9;
if not exists gpxe.bus-id {
filename "/gpxelinux.0";
}
}
After you have changed your configuration, run the command sudo /etc/init.d/dhcp3-server restart to restart the DHCP server. If you plan to use PXELINUX with your setup, the configuration change to dhcpd.conf is as follows. The rest of the setup for PXELINUX is the same as described in the Windows section, except that you place the files in the default location of /var/lib/tftpboot/ on the Linux host.
allow booting;
allow bootp;
# PXELINUX options
class "pxeclients" {
match if substring(option vendor-class-identifier, 0, 9) = "PXEClient";
next-server 192.168.1.9;
filename = "pxelinux.0";
}
The next step in the process is to set up gPXE on the TFTP server. As mentioned earlier, only the gpxelinux.o binary and the configuration file need to be on the TFTP server. The files for the ESXi Installer can be hosted on a Web server or other server that gPXE will support.
Copy the file
gpxelinux.oto the root of the TFTP server’s data folder. The file can be found in thegpxefolder of the SYSLINUX download that was used for the Windows PXE Boot setup. In the case of the Linux server used for this setup, you would place the file in/var/lib/tftpboot.In the TFTP server data folder, create a subfolder called
pxelinux.cfg. The configuration file for gPXE to use will be created in this folder.Within the
pxelinux.cfgfolder, you need to create at least a single configuration file calleddefault. The file should have no file extension. Create a configuration file similar to the following example and then save the file:default Local prompt 1 timeout 30 display http://server02.mishchenko.net/media_depot/menu.txt F1 http://server02.mishchenko.net/media_depot/help.txt label ESXi kernel http://server02.mishchenko.net/media_depot/ESXi_4.1/mboot.c32 append http://server02.mishchenko.net/media_depot/ESXi_4.1/vmkboot.gz --- http://server02.mishchenko.net/media_depot/ESXi_4.1/vmkernel.gz --- http://server02.mishchenko.net/media_depot/ESXi_4.1/sys.vgz --- http://server02.mishchenko.net/media_depot/ESXi_4.1/cim.vgz --- http://server02.mishchenko.net/media_depot/ESXi_4.1/ienviron.vgz --- http://server02.mishchenko.net/media_depot/ESXi_4.1/install.vgz label Local localboot 0x80
On your Web server, you can create a menu and help file with the same contents as discussed in the section “PXE Booting in a Windows Environment.”
From the ESXi installation media, you need to copy the following files to your Web server. If you are using a scripted install and media depot, you need not copy over the files
imagedd.bz2andimagedd.md5.Check the security settings on your Web server to ensure that the download of the files you copied over will be allowed. If you are using Microsoft IIS, you must edit the MIME types to include the extensions for the files you added, as in shown in Figure 4.8.
You are now ready to test your configuration. Boot up your target ESXi host, and in the BIOS, select to boot from the system’s network card. How you do so varies from system to system, but you probably will be able to press F12 to start a network boot or press Esc to access a boot menu. As was shown in the prior section, the host’s NIC obtains an IP address and the necessary information to connect to the TFTP server. In this case, the ESXi host downloads gpxelinux.o and a configuration file to start the PXE installation process.
As shown in Figure 4.9, gPXE searches the pxelinux.cfg folder for configuration files based on the MAC address of the ESXi host and the IP address assigned to it. As discussed earlier, this provides the opportunity to configure a custom gPXE install menu for a specific host or subnet. Once you have selected the gPXE menu choice, gPXE begins to load the appropriate files. Figure 4.10 shows the files being loaded from a Web URL rather than the TFTP server, as was the case when setting up PXELINUX.
You have seen the installation process using graphical mode in Chapter 2, and while the install process is fairly simple, some aspects are worth further review. One of the important aspects to note is that the ESXi Installer wipes the target disk chosen for the installation of ESXi. This includes prior operating system partitions, hardware vendor partitions, previous installs of VMware ESX or ESXi, and any Virtual Machine File System (VMFS) datastores. If you’re upgrading a host from VMware ESX to ESXi, you need to migrate any virtual machine data off the installation drive before you attempt to install VMware ESXi.
When installing ESXi, choose an serial attached SCSI (SAS), serial AT attachment (SATA), or small computer systems interface (SCSI) disk as an installation destination. Installing ESXi onto a Fibre Channel (FC) storage area network (SAN) device is now officially supported. It is not supported for you to install to network attached storage (NAS) or iSCSI SAN storage. You may also choose to install ESXi onto a supported flash device. If you choose to use FC SAN for the installation, be aware that each ESXi host requires a separate installation LUN. LUNs cannot be shared between hosts for the installation partitions. LUNs dedicated to VMFS datastores can be shared between hosts, just as is the case with ESX.
Prior to installing VMware ESXi, there are a few other prerequisites to be aware of:
You should verify that the host’s hardware clock is set to Coordinated Universal Time (UTC). VMware ESXi runs with the UTC time zone and there is no option to change that. The vSphere client translates the time displayed to you based on the time zone that is used on your PC. But should you export log files, be aware that the time stamps will be in UTC. This is especially important if you pass the logs on to another support group for troubleshooting purposes, as the time zone for logs that the support personnel look at may differ, resulting in them looking at the wrong part of the ESXi logs that you provide.
You should consider disconnecting network storage. This will decrease the time that the ESXi Installer requires to enumerate installation targets and will eliminate the possibility that you will choose to install to the wrong partition. As mentioned earlier, the ESXi Installer wipes all partitions on the disk target that you select during the installation process.
You should not have both ESXi Installable and ESXi Embedded on the same host. If you’re moving to ESXi Installable, you should at least disable booting from the flash device in the BIOS, but it would be better to remove the device completely.
As seen earlier, an interactive installation of VMware ESXi is probably the easiest installation process you’ll ever go through. The process is as follows.
Download the VMware ESXi installation ISO image from vmware.com. You can either burn the image to a physical CD or mount it as a virtual CD-ROM with the host’s remote control card.
Power on the ESXi and in the BIOS set the host to boot from the CD-ROM. You may also want to check that Intel VT is enabled on an Intel server so that you will be able to run 64-bit guest operating systems and, if you plan to use VMDirectPath, that the appropriate BIOS option is enabled for either Advanced Micro Devices (AMD) Input/ Output Memory Management Unit (IOMMU) or Intel Directed I/O (VT-x).
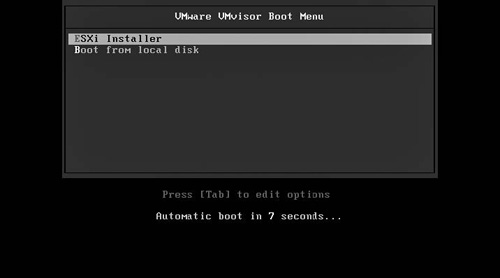
When the host boots from the CD, you’ll initially see the VMware VMvisor Boot Menu. This will allow you to change boot options, as you’ll see shortly.
The boot process then continues to the Welcome screen, where you press Enter to continue.
The VMware End User License Agreement will appear. After you have reviewed it, press F11 to continue.
The ESXi Installer then enumerates the host’s storage and provides a list of support installation targets. The order of display is determined by the BIOS and may not match the order you are expecting. Ensure that the target selected is where you actually intend to install ESXi. After you have selected the target disk for installation, you are required to confirm your choice.
Press F11 to begin the installation.
Once the installation has completed, the status is displayed and you are prompted to remove the installation CD and reboot the host. When the host reboots, it automatically creates the scratch partition. This is unlike the behavior for ESXi Embedded, as was discussed earlier in this chapter.
Once your host reboots, you can configure the host. If the host was previously running ESX, you can move the virtual machine data back to the host.
One important thing to be aware of for the installation process is how to pass an option to the VMkernel during the boot process. You’ll usually configure VMkernel boot options within the vSphere client, as shown in Figure 4.11. But for the install process, your only option is to add the options to the boot statement used to load the ESXi Installer.
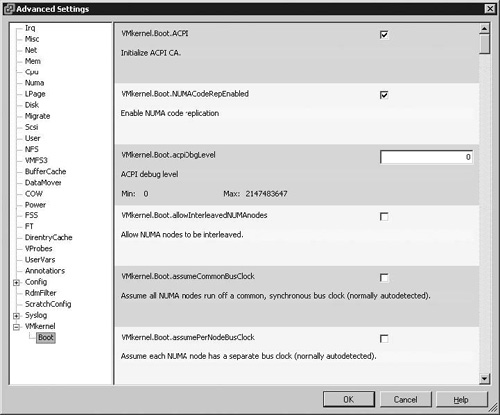
A list of the options that can be used is shown in Table 4.2. It is unlikely that you’ll use these options without the guidance of VMware Support, but you will notice that the options correspond with what you will find in the vSphere client at Configuration > Software > Advanced Settings.
Table 4.2. VMkernel Boot Options
|
|
|
|
|
|
|
|
|
|
|
|
|
|
|
|
|
|
|
|
|
|
|
|
|
|
|
|
|
|
|
|
|
|
|
|
|
|
|
|
|
|
|
|
|
|
|
|
|
|
|
|
|
|
|
|
|
|
|
|
|
|
|
|
|
|
|
|
|
|
|
|
|
|
|
Bootstrap options are added when the VMware VMvisor Boot Menu screen appears during the install process, as shown in Figure 4.12. Press the Tab key to display the boot command and you can then add any options after vmkboot.gz. Figure 4.13 shows the options noACPI and nopowerManagement added to the VMkernel boot command.
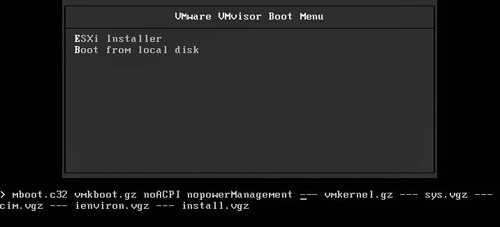
After the VMkernel has initialized, you’ll be able to verify that the options were in fact enabled. The following sample shows that both the noACPI and nopowerManagement options (highlighted with boldface in this listing) have been applied during the VMkernel initialization. Boot options can also be added when you’re booting a VMware ESXi host that has already been installed. The difference in that case is that you’ll need to press Shift + O on the VMware VMvisor Boot Menu screen instead of pressing the Tab key as you do during the installation. As mentioned earlier, it is unlikely that you’ll need to enter any boot options unless VMware Support directs you to do so for troubleshooting purposes. The exception is when specifying the configuration script to use for an unattended installation and other installation initialization parameters, as will be discussed in the next section of this chapter.
May 23 04:32:10 syslogd started: BusyBox v1.9.1-VMware-visor-654
May 23 04:32:10 vmklogger: Successfully daemonized.
May 23 04:32:10 vmkernel: cpu0:0)BootConfig: 52: netNumPortsets = 128
…
May 23 04:32:10 vmkernel: TSC: 2487286550 cpu0:0)BootConfig: 115:
    powerManagement = FALSE
…
May 23 04:32:10 vmkernel: TSC: 2487481892 cpu0:0)Boot: 314: cmdline 'vmkboot.gz
    noACPI nopowerManagement bootUUID=7b74833b3e445d315642e8157483517e '
May 23 04:32:10 vmkernel: TSC: 2487494198 cpu0:0)Boot: 1102: vmk.gz : 0x21b
    - 0xa21
May 23 04:32:10 vmkernel: TSC: 20007785924 cpu0:0)Initializing chipset …
May 23 04:32:10 vmkernel: TSC: 20010942868 cpu0:0)ALERT: Chipset: 219:
    using mpsIntRouting/noACPI option, make sure it is on purpose
May 23 04:32:10 vmkernel: TSC: 20011012154 cpu0:0)MPS: 209: ioapic 001 (0)
    @ fec00000 version 0x11
…
Although the VMware ESXi installation process is a fairly simple matter and fairly quick, manually installing a large number of hosts is still a time-consuming task. You’ll find the option to an unattended installation script a welcome addition to ESXi 4.1, especially if you’ve been using kickstart scripts for your vSphere ESX installations.
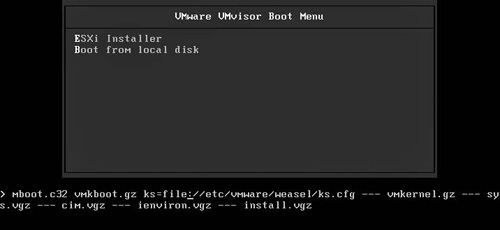
You can start looking at installation scripts by running the script that comes on the installation media. At the VMware VMvisor Boot Menu, you will need to press the Tab key as discussed in the previous section to add the script option as shown in Figure 4.14. The default script is located at /etc/vmware/weasel/ks.cfg. Note that the ks option does require a double slash when using the file location so the syntax used in Figure 4.14 is correct.
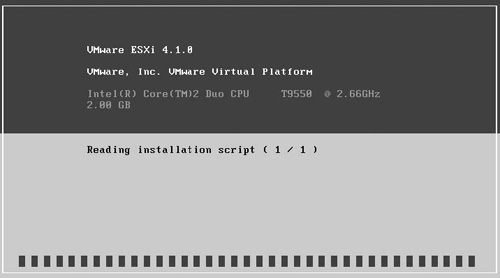
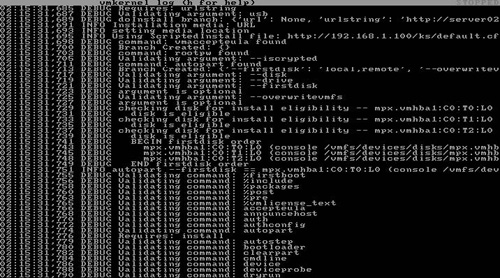
After the VMkernel initializes and has loaded all required modules, the Welcome screen usually appears for an interactive install. With a scripted install, the installation script is parsed as shown in Figure 4.15. If there are any problems with the script, you will have the option to continue if a warning is displayed or you will have to abort the install should an error in the script be detected.
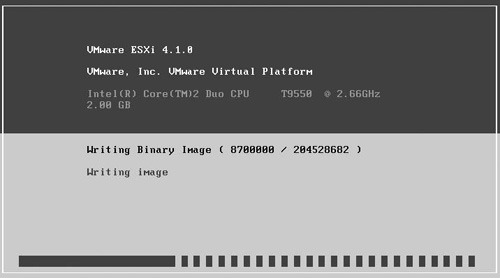
If the installation script is parsed with no errors, the ESXi Installer continues the installation process by writing the install image to disk as shown in Figure 4.16.
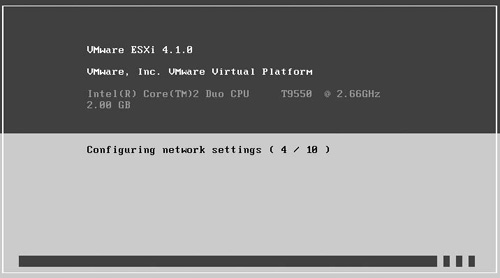
Once the installation image has been copied to disk, the ESXi Installer applies further configuration changes from the installation script. Figure 4.17 shows the networking options applying to the ESXi installation. If the installation completes successfully, you are prompted to reboot your host. If you’re booting from CD, you may need to update the BIOS boot order to boot from your new ESXi installation.
The default installation script contains the following commands. The first four options in the script are required. The script must accept the End User License Agreement (EULA), set a root password, choose the installation disk target with the autopart command, and select the installation media. The password can be encrypted, as you’ll see later in this section, but in this case the password for the root account is plain text and the script sets this to mypassword. The autopart command instructs the installer to choose the non-USB disk found and to overwrite any existing VMFS datastores on that disk. The install command selects the CD-ROM being used as the source for the installation image.
The network command is optional and in this case sets the management port for the ESXi host to use DHCP and to be linked to the NIC detected as vmnic0. The %post section of the default script highlights the unsupported abilities of an installation script. In this case, a python script is run to create the file /finshed.stamp with the time that the installation completed. If you’re planning to use the %post section in a script, you should be aware that the root folder will be a ramdisk initialized by the ESXi Installer and thus any files written to /, /tmp, or /var will be lost after the host is rebooted. If, for example, you want to save the installation file for review, the %post script could be written to mount an NFS share and copy the install log file to that share or to the VMFS datastore created during the installation.
# Accept the VMware End User License Agreement
vmaccepteula
# Set the root password for the DCUI and Tech Support Mode
rootpw mypassword
# Choose the first discovered disk to install onto
autopart --firstdisk --overwritevmfs
# The installation media is in the CD-ROM drive
install cdrom
# Set the network to DHCP on the first network adapter
network -- bootproto=dhcp --device=vmnic0
# A sample post-install script
%post -- unsupported-- interpreter=python -- ignorefailure=true
import time
stampFile = file('/finished.stamp', mode='w'
stampFile.write( time.asctime() )
If you’ve been running installation scripts for vSphere ESX, you’ll likely already have a set strategy for running installation scripts. With little difficulty, you’ll be able to modify those scripts to run on ESXi. If you’re new to scripted installations for vSphere, you’ll need to give some thought to whether to run a single install script for all your ESXi hosts or to manage individual scripts for each host.
If you create individual scripts, you will be able to set a static IP address for each ESXi host you’ll install this way. In the section “PXE Booting the ESXi Installer” in this chapter, you learned how you can configure PXE booting to use a specific PXELINUX or gPXE configuration file for each host you have.
If you choose to use a custom script for each host, you can then configure PXELINUX or gPXE to use a specific ESXi installation script for each host. Should you choose to maintain a single script, you’ll need to use DHCP for the management network and then change that to a static IP address after the installation. VMware recommends the use of static IP addresses for your ESXi hosts. You could use a static IP address in a single script for all your host installations, but if you were to fail to change the IP address of a host after an installation, this could lead to a duplicate IP address between two of your hosts and you would not be able to manage the one host over the network.
You will also have to decide where you will store your installation scripts. You’ll be able to use the following storage options:
Within the ESXi Installer ramdisk (the default option)
On the installation CD-ROM
Using NFS
Using HTTP/HTTPS
Using FTP
If you plan to use NFS, the ESXi Installer attempts to connect to the share with the login of root and a blank password.
Tip
At the time of the writing of this book, storing the installation script on a USB device is not an available option. This may change with the Generally Available (GA) release of VMware ESXi 4.1.
The storage option you choose for your installation script determines the syntax of the ks command that you enter on the VMware VMvisor Boot Menu screen. Table 4.3 lists the available options.
Table 4.3. Installation Script Storage Options
ks=Option | Description |
|---|---|
| The installation script is located on the CD-ROM drive attached to the machine. |
| The installation script is at |
| The installation script is located at the specified FTP server URL. |
| The Installation script is located at the specified Web server URL. |
| The installation script is located at |
To enter the ks command, you’ll follow the process used for the default installation script shown earlier in this section, updating the URL and storage type to match where you have stored your script.
Along with configuring the ks bootstrap command, you’ll also be able to configure the networking setup used for your ESXi installation process. These additional options are summarized in Table 4.4.
Table 4.4. Additional Bootstrap Commands for the ESXi Installer
Command | Description |
|---|---|
| Accepts the format for the boot network adapter as supplied by PXELINUX. |
| Sets a static IP address to be used for downloading the script and the installation media. The |
| Sets the subnet mask for the network interface. |
| Sets the default gateway for the installation. |
| Configures the VLAN for the VMkernel network interface. |
| Tries to use a network adapter |
| Specifies a DNS server to be used during the installation. |
With the additional bootstrap commands, you can either edit the PXELINUX or gPXE configuration files you use for your installations or add them manually at the VMware VMvisor Boot Menu, as shown in Figure 4.18.
If you’ve written kickstart scripts for vSphere ESX, the command options in the following section will be familiar. But you should be aware that the partitioning commands autopart, clearpart, and part are different from what you would use with kickstart scripts. If your current ESX scripts set specific sizes for the system partition, you will need to change that. As there is no Service Console to configure with ESXi, the ESXi Installer will size all the system partitions.
If you’re creating a new script, you will have to include the following four commands, as they are considered required. If one of these options is missing or incorrectly formatted, your automated installation will generate an error and will not be able to proceed.
Your script should either include the command accepteula or vmaccepteula. These commands require no options and, as implied, allow the installation script to accept the End User License Agreement for the installation process.
The autopart command specifies the disk that is used as the target for the ESXi Installer. The installer clears all existing partitions on this disk, copies over the system disk image, and then partitions the remaining space as a VMFS datastore. Unlike with an ESX install script, you do not specify any system partitions, as ESXi uses a default partition schema and thus you do not need to configure the /tmp or /var partitions, for example, as you would with an ESX script.
Table 4.5 lists the options accepted by the command.
Table 4.5. autopart Command Options
Command | Description |
|---|---|
| This specifies the disk to partition. See Table 4.6 for a list of acceptable disk device names. |
| You can use this option flag to direct the installer to use a specific order for the target disk. The acceptable disk-type options are |
| This flag is required to overwrite any VMFS partition on the disk targeted for the installation of the ESXi system partitions. It is required if you plan to install over an existing ESXi or ESX installation. |
Within your installation script, this command appears similar to the following:
autopart --firstdisk=local,remote --overwritevmfs
The install command specifies that your script is to run a fresh install, which is the only option for a scripted installation. Table 4.7 lists the command’s options.
Table 4.7. install Command Options
Command | Description |
|---|---|
| Specifies the media source to use for the installation media. |
| Used with the |
| Specifies the directory on the NFS server to mount for the installation media. |
| Defines the location of the installation media and has a type of |
The default installation script specifies that the installation should be made from the CD being used to boot the installer, so the command in the script is install cdrom. If you plan to use another media option, you would update the entry to something like the following:
install url http://server02.mishchenko.net/Media_depot/ESXi_4.1/
This command sets the password for the root account. The password can be between 6 and 64 characters and should conform to the password requirements discussed in Chapter 2. Table 4.8 lists the command’s options.
Table 4.8. rootpw Command Options
Command | Description |
|---|---|
| This optional flag specifies that the password has been encrypted. |
| The password for the root account must be included either in clear text or encrypted form. |
Ideally you will have the password in encrypted form. To generate the encrypted password on a Linux machine, you can run the command grub-md5-crypt, as shown in the following example. If you’re using Windows, you can search online for an MD5 calculator, which you can use to generate an MD5 hash for your password.
sudo grub-md5-crypt
Password: ********
Retype password: ********
$1$E4XdT/$xYUqVgsVE1gEeyTqLazX41
The clearpart command can be used to remove partitions from the system before creating new ones. Table 4.9 lists the command’s options.
Table 4.9. clearpart Command Options
Command | Description |
|---|---|
| This specifies the disk to partition. See Table 4.6 for a list of acceptable disk device names. |
| This flag causes your script to ignore the drives flag and instructs the installer to clear all partitions on all disks visible to the installer. |
| Your script will require this flag if the options |
| This flag causes the installer to initialize the disk label to the default for your architecture. |
| You can use this option flag to direct the installer to use a specific order for the target disk. The acceptable disk-type options are |
| This flag is required to overwrite any VMFS partition on the disk targeted for the installation of the ESXi system partitions. It is required if you plan to install over an existing ESXi or ESX installation. |
If you include the dryrun command, the installation script is parsed and checked, but the ESXi Installer does not actually perform the installation. You can see the troubleshooting section later in this chapter for information on accessing the installation log.
This command sets the keyboard type to be used in the DCUI. Table 4.10 lists the command’s options.
These commands set the license string for the host. If the option is not included, the host is set to run in evaluation mode for 60 days. In this mode, the host is licensed at the vSphere Enterprise Plus edition. Table 4.11 lists the commands’ options.
The network command configures the VMkernel management port to which you’ll connect with the vSphere client or vCenter Server. You can set the host to use a static IP address or DHCP. VMware recommends using a static IP address. Table 4.12 lists the network command’s options.
Table 4.12. network Command Options
Command | Description |
|---|---|
| This flag sets the management port to use either a static IP address or DHCP. |
| This flag specifies which network port is linked to the default vSwitch. You can specify either the MAC address of the network card or the |
| This sets an IP address for the management port and is required with the |
| This flag sets the subnet mask for the management port and is used with the |
| This sets the default gateway for the management port and is required with the |
| This designates the primary and optionally secondary DNS server for the management port. It is used with the |
| This specifies the hostname to be used for the system. This only works with |
| This specifies a VLAN to use for the management port and can be set to an integer between 0 and 4095. |
| This flag instructs the installer whether to create the default VM Network port group. The default value is 1, which does create the port group. |
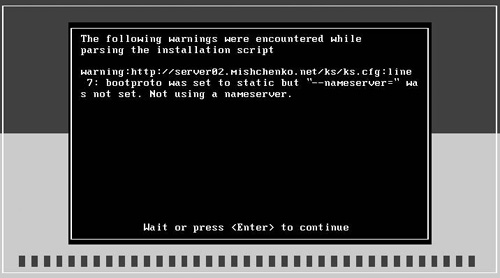
The default behavior of the installation script process is to continue if warnings are encountered, but to halt on errors. If your script were missing the install command, this would generate an error and the installation process would terminate. But if the script were to set a static IP address but did not include the nameserver flag, it would generate a warning and you would be able to proceed with the installation, as shown in Figure 4.19. If you include the paranoid command, the script terminates when it encounters any error or warning.
The part or partition commands allow your script to create addition data-stores on your host. Only a single datastore per disk can be created. You cannot use the part command on the same disk used for the ESXi system partition as specified by the autopart command, as the installer automatically creates a VMFS datastore with the remaining space on that disk after the system partitions are created. Table 4.13 lists the available options.
Table 4.13. part Command Options
Command | Description |
|---|---|
| This specifies the name for the datastore. |
| This sets the minimum partition size in megabytes. |
| If you include this flag, this allows the datastore to grow to use all available space on the disk or up to the limit set by the |
| This sets the maximum size for a partition to grow in megabytes. |
| This specifies the disk to partition. See Table 4.6 for a list of acceptable disk device names. |
| You can use this option flag to direct the installer to use a specific order for the target disk. The acceptable disk-type options are |
| This option sets the file system type for the partition and can be set only to |
When you select this option, you can include an additional script to be parsed and run by the ESXi Installer. You can have multiple include commands within your script. The include command is followed by the name of the script that you want to include, as shown in the following example:
%include partition.cfg
You can use this option to specify a script to be run before the kickstart installation script is evaluated. Table 4.14 lists the available options.
Table 4.14. %pre Command Options
Command | Description |
|---|---|
| This flag specifies the interpreter to use. The default is |
| This argument is required to acknowledge that use of the command is unsupported. |
In the following example, the %pre script is used to generate a partition script that is then included in the configuration script:
%pre --intepreter=busybox --unsupported
cat > /tmp/part.cfg <<EOF
part datastore2 --fstype=vmfs3 --size=200000 --onfirstdisk="remote"
part datastore3 --fstype=vmfs3 --size=100000 --grow
   --ondisk="mpx.vmhba1:C0:T0:L0"
EOF

# Disk Partitioning
%include partition.cfg
You can use the %post command to include a script that will be executed after the installation process has been completed. If you specify multiple %post commands in the script, they will be executed in the order in which they appear in the script. Table 4.15 lists the available options.
Table 4.15. %post Command Options
Command | Description |
|---|---|
| This flag specifies the interpreter to use. The default is |
| This argument is required to acknowledge that use of the command is unsupported. |
| You can specify the timeout for executing the script. If the script has not completed before the timeout has expired, it will be forcibly terminated. |
| If this option is set to |
The default installation script discussed earlier contains a sample of the %post command, and in that instance the command is used to generate a timestamp file marking the completion of the installation process.
As with the %pre and %post commands, the %firstboot command is not supported. This command creates an init script that will be executed the first time the host boots after the installation process. You can specify multiple %firstboot sections and assign an order of execution with the ––level argument. The default level will be 999, and if you examine / etc/vmware/init/init.d, you will see that various system init scripts have a level of 0 to 199 assigned to them, so you should typically assign a level higher than 200. Table 4.16 describes the command’s options.
Table 4.16. %firstboot Command Options
Command | Description |
|---|---|
| This flag specifies the interpreter to use. The default is |
| This argument is required to acknowledge that use of the command is unsupported. |
| The level that you assign to the script determines the order in which the init script will be executed. The default value is 999. |
The %firstboot command offers some significant capabilities to customize your ESXi installations. Most of the esxcfg commands that you’ll have dealt with in the ESX Service Console will also be available in the ESXi console and you’ll be able also run python scripts. You should be aware that the script is not checked during the installation, so you will not know how it runs until the host has booted for the first time after the installation. Any syntax errors are detected when it runs; see the troubleshooting section later in this chapter to learn how you can obtain log data for the %firstboot commands.
The following sample script makes use of the commands found in the previous section to automate the installation of VMware ESXi. The required commands of vmaccepteula, rootpw, install, and autopart are included. In this case, the root password has been encrypted. The install command is set to use an HTTP media depot for the installation disk image. The autopart command tells the installer to use the first disk found and to overwrite any existing VMFS datastore.
A number of optional commands are also included. The keyboard command is set to be Russian and a serial number is set for the host. The serial number is validated by the installer, so if you use an invalid serial number, such as the one in the sample, or have not properly formatted the serial number, an error will be generated when the script is initially parsed at the start of the automated installation process. The script also uses the paranoid command, which ensures that the script is parsed without any warning; otherwise, the installation will be aborted.
The network command is used to set a static IP address for the host, the hostname, and DNS servers to use. The vmnic to use for the management port is not specified, so vmnic0 defaults to this purpose. The commands clearpart and part are used to clear the partitions on two other disks in the ESXi host and then create new VMFS datastores on them. The size for the datastores is set to 1200MB, which is the minimum value that you can use, but the --grow flag instructs the installer to use all available space on those disks.
The last part of the script uses the %firstboot command to execute a script during the initial boot of the new ESXi installation. As mentioned earlier, this portion of the script is not checked during the installation process, so you won’t know of any errors until after the first time the host has booted up. The %firstboot command is used to include console commands that will create a new vSwitch with vmnic2 and vmnic3 and then add a virtual machine port group called DMZ on VLAN 200. The script then mounts an NFS datastore and finally takes a configuration backup with the installer stores on the NFS share.
# Accept the VMware End User License Agreement
vmaccepteula

# Set the root password for the DCUI and Tech Support Mode
rootpw --iscrypted $1$vFXeT/$oqg2GUIgz9ucneF4YsKq9.

# Install from media depot
install url http://server02.mishchenko.net/Media_Depot/ESXi_4.1/

# partitioning command
autopart --firstdisk --overwritevmfs

# set keyboard type
keyboard Russian

# set serial number
serialnum --esx=10ADP-14OE5-NZO08-0ODH2-821KJ

# abort script if any warnings are generated
paranoid

# Network settings for the management port
network --bootproto=static --ip=192.168.1.34 --gateway=192.168.1.1
   --netmask=255.255.255.0 --hostname=esx05.mishchenko.net
   --nameserver="192.168.1.5,192.168.1.6"

# formatting of other datasources to maximum of LUN size
part datastore2 --fstype=vmfs3 --size=1200 --grow --ondisk=mpx.vmhba1:C0:T1:L0
part datastore3 --fstype=vmfs3 --size=1200 --grow --ondisk=mpx.vmhba1:C0:T2:L0

# initial configuration after install process
%firstboot --unsupported --interpreter=busybox
esxcfg-vswitch --add vSwitch1
esxcfg-vswitch --link=vmnic2 vSwitch1
esxcfg-vswitch --link=vmnic3 vSwitch1
esxcfg-vswitch --add-pg=DMZ vSwitch1
esxcfg-vswitch --pg=DMZ vSwitch1 --vlan=200
esxcfg-nas --add --host 192.168.1.100 --share /NFS2 NFS2
sleep 60
cd /vmfs/volumes/NFS2/
mkdir ESX05
backup.sh 0 /vmfs/volumes/NFS2/ESX05
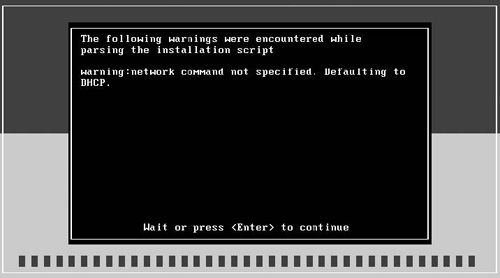
If there is a problem in your script, a warning or error message will be displayed after the ESXi Installer has parsed the configuration script. A sample of a warning is shown in Figure 4.20. In this case, the network command was not found in the script, but the installation process would be able to continue after a timeout had expired or you had pressed the Enter key to continue. If you had used the paranoid command in the script, the installation process would have terminated and prompted you to reboot the host. If your script has an error, such as missing the install command, you would be informed of the error and only be able to reboot the host.
In most cases, such as the error in Figure 4.20, the error or warning message will be self-explanatory and you’ll be able to correct your script based on the information provided. That may not always be the case; at the conclusion of the script, you may be informed that a warning was generated and that you should review the log file for more information.
To begin gathering information about the script problem, you can access the VMkernel log file. At the console of the host or in your remote control session, press Alt+F12. The display will change from the installation DCUI screen to display the VMkernel log, as shown in Figure 4.21. The file displayed on this screen corresponds with the file /var/log/messages on the host. You can scroll back and forth through the log file to see the commands run by the installation script and any warnings or errors that were generated. You can press the H key to access a help menu and then Alt+F2 to return to the main installation screen.
You may also want to access the console to open the installation log file. In some cases, the installation may complete, but the program will inform you that there were warning messages and that you should check the log file. To get to the log file, press Alt+F1 to access the console. You will be prompted for a login and you can enter root. The password will be blank. Once you have logged in, you will have access to the console, as shown in Figure 4.22.
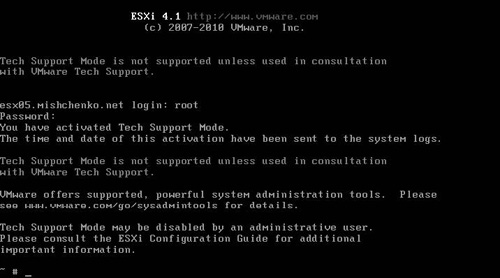
You’ll find the log files in the folder /var/log. The messages file will be the VMkernel log file that you can access by pressing Alt+F12. You will also see the file esxi_install.log, which is a symlink to the install log file weasel.log. You can view the contents of those files with the command cat or the vi editor. As the ESXi Installer will have initialized a network connection, you could optionally copy the log files to another host with the scp command. Alternatively, you could enable Secure Shell (SSH) on the host by following these steps:
Run the command
vi /etc/initd.conf.Edit
inetd.confto remove the#from in front of the first line with#ssh.Press Esc and then enter
:wqto save the file and quitvi.Run the command
ps|grep inetdto identify the process ID forinetd.Restart the
inetdprocess with the commandkill <process id>-HUP, where<process ID>is the same ID from step 4.
Note
The method shown to enable SSH during the installation process should not be used on your ESXi host once the installation is complete. Refer to Chapter 3, “Management Tools,” for the method to enable Remote Tech Support Mode for SSH access to your host.
Once you’ve completed these steps, you’ll be able to connect with your preferred SSH client and download the log files that you need to troubleshoot your issue. If you’re having problems with disk formatting, you could run the command fdisk –l to identify the device names corresponding to the formats provided in Table 4.6.
If you’re troubleshooting a problem with the %firstboot portion of the script, you’ll have to wait until after the first reboot to access the log files. After the reboot, you can enable Tech Support Mode to access either the local console or SSH, as described in Chapter 3. Once you have access, you can check the install log file /var/log/esxi_install.log. As you’ll see later, /var/log is part of the ESXi ramdisk and files within that folder are not preserved across a server restart. In this case, however, the installer bundles the log file into the file onetime. tgz and stores that file on the system partition that will be mounted as /bootbank when the host next reboots. The bootstrap command to start the VMkernel on /bootbank includes a link to this file, so the log file will be accessible after the first reboot following installation. The esxi_install.log file contains elements such as the following.
Installation script name and URL
List of disk LUNs detected by the VMkernel.
Media depot source as configured by the
installcommandParsing and validation of the installation script
Download status of the installation media
Partitioning and formatting of datastores
Application of commands in the configuration script
Creation of the
onetime.tgzarchive for ESXi configuration files and command scripts that will be run after installation
The onetime.tgz file also contains the file /etc/vmware/init/init.d/999.firstboot_001. If you used the ––level flag with the %firstboot command, you will see that reflected in the filename. If you have used the scripting command keyboard, you will also see 999.firstboot. keyboard, 999.firstboot_license for the license command, and, as a required command, 999.firstboot_password for the password command. There is also a file called 999. firstboot_remove.
If you’ve used busybox as the interpreter for your %firstboot script, you’ll be able to open the file and review the syntax of your commands. The keyboard and license files contain scripts that manipulate configuration data within the /etc folder. The 999.firstboot_password file executes the python script /var/lib/firstboot/999.firstboot_password.py. This script in turn edits /etc/shadow to insert the MD5 hash for the password you used in the installation script.
The 999.firstboot_remove script cleans up your %firstboot script and other scripts for commands, such as the keyboard and password commands, which are run after the install process. The script starts the python script /var/lib/firstboot/999.firstboot_remove.py, which edits /bootbank/boot.cfg to remove the bootstrap entry to the onetime.tgz file and also deletes the onetime.tgz file.
With the initial release of VMware ESXi 3.5, two editions were available: Embedded and Installable. Although both were fast to install and easy to configure initially, the manual installation steps for both did not lend the release well to mass installations.
VMware ESXi 4.1 has overcome those limitations by officially supporting PXE boot installations and the introduction of scripted installations. If you’re using scripts for your ESX installations, you’ll be able to update those to run with ESXi, and with the configuration options for PXELINUX or gPXE, you’ll find it easy to create a configuration file that passes a specific installation script for each of your hosts.