In Chapter 1, “Introduction to VMware ESXi 4.1,” you had a broad overview of VMware ESXi, including its architecture and management model. You also reviewed how VMware ESXi compared to and differed with VMware ESX. In this chapter, you will learn how to begin using VMware ESXi. This will include a discussion of:
Hardware requirements for running VMware ESXi
A basic installation of VMware ESXi Installable
Postinstallation configuration for VMware ESXi
Installation of the vSphere Client
One of the critical decisions you’ll make in implementing VMware ESXi is the hardware you’ll use for your project. If you’ve worked with earlier versions of ESX, you’ll be aware that the Hardware Compatibility List (HCL) for VMware vSphere is much stricter than for that of other operating systems that you might install, such as Linux or Windows. VMware tends not to support a broad range of hardware for vSphere; the support offered instead focuses on a smaller number of systems and devices that have been thoroughly tested, resulting in end-user experiences of higher hardware stability.
The best place to start your search for hardware is the HCL at www.vmware.com/go/hcl. Many vendors have systems listed, and you’re likely to find a number of systems that have been certified by your preferred hardware vendor. Some vendors will also maintain their own specific HCL for vSphere ESX and ESXi, so it is worthwhile to check their Web sites to have access to the latest hardware support data. When you review a system on VMware’s HCL, you will want to check the notes for the system to see whether there are any special requirements and verify that the system has been certified with ESXi. In some cases, the system may be certified for either ESXi or ESX but not both.
Sizing a server is beyond the scope of this book, but the process you use to select your hardware will be the same as it would be if you were selecting a system for vSphere ESX. VMware ESXi 4.1 will run on 64-bit CPUs with a 1 CPU core all the way up to systems with 64 logical processors (the logical processor count per host is defined as CPU sockets × cores/socket × threads/core). Likewise, for memory ESXi can scale from a minimum of 2GB to 1TB for host memory. Thus, you’ll be able to make a choice between scaling out with more systems that have fewer CPUs and memory or scaling up with fewer systems with more CPUs and memory. As you’ll find on the HCL, ESXi is also supported on all form factors, including rack mount, blade, and pedestal.
Your choice of storage architecture is also an important part of your hardware decision. Many advanced features of vSphere, such as vMotion and Fault Tolerance, require shared storage, so you will be looking at Fibre Channel, Internet Small Computer System Interface (iSCSI) or Network File System (NFS) storage for your ESXi hosts. The HCL lists the supported storage options and compatibility for host bus adapters as well. As with selecting a server, it is import that you review the notes for your potential storage solution to check specific compatibility with ESXi and to see whether there are any specific requirements for an officially supported system.
Your networking hardware is also an important part of your hardware decision. Practically, you’ll just require a single network interface card (NIC) port to get started, but if you are deploying in a rack server environment with 1GB network links, your ESXi deployment will typically use six NIC ports to allocate to management traffic, virtual machine traffic, and storage traffic allowing for redundant network links. In a blade server environment, you may have fewer network ports per server, so you may have to combine network types onto a fewer number of NICs using virtual local area networks (VLANs). Likewise, as 10GB networking becomes a more viable option, you may design your host with two network ports and separate your network traffic types solely with VLANs. Although it won’t be required for most deployments of ESXi, your networking hardware must be capable of supporting up to 32 NIC ports depending on the model of network card selected. With ESXi, you won’t be configuring any Service Console ports as you would with ESX, but you will still want to separate the VMkernel port used for management either physically with additional NIC ports or logically with VLANs from the virtual machine network load as well as isolating VMkernel ports used for storage, vMotion, and Fault Tolerance.
VMware ESXi does depart in similarity with ESX on a few installation disk options. Unlike ESX, ESXi is only experimentally supported for installation on a storage area network (SAN) logical unit number (LUN). However, ESXi is supported for installation on flash devices. ESXi Embedded is deployed on a flash drive device and, starting with ESXi Installable 4.0, you can now install ESXi onto a supported flash device. Should you want to install ESXi Installable onto a flash device, you should verify the vender’s support of this option. With Hewlett Packard (HP), for example, you can install ESXi onto an HP 4GB SD Flash device (HP part number 580387-B21). If you choose HP’s BL460 G6 blade models, you can simply slide a blade out of the chassis, insert the SD card, and be ready to install ESXi onto a diskless server. Using a flash device may not be seen as such a reliable choice for a local install of ESXi as using physical disks, but it is important to note that once ESXi has booted, most of its system disk activity occurs within the RAM drive that is created each time that ESXi boots and not to the universal serial bus (USB) device. Likewise, if you plan to use only local storage with ESXi, you need not split disk input/output (I/O) for your VMFS datastore and the ESXi install, because ESXi does not impose a significant load on the physical disks for system I/O.
Tip
When you start your deployment of VMware ESXi, you’ll ideally start with a lab environment to get familiar with the software. You may not have HCL hardware for that purpose, but that shouldn’t stop you from getting a lab environment up and running. If you have some older 64-bit servers around that have been on the HCL in the past, those might work fine with ESXi or you can check out VMware’s Community Hardware list at http://communities.vmware.com/community/vmtn/general/cshwsw. If you have the right workstation, you can also run VMware ESXi within a virtual machine on VMware Workstation. With sufficient CPU resources and 8GB of memory, you can create an ESXi environment on your PC including two ESXi virtual machines and one virtual machine for running vCenter Server and iSCSI or NFS for shared storage. Chapter 4, “Installation Options,” will include some instructions for running ESXi as a virtual machine should you choose to go this route for a training environment.
As noted in the introduction, VMware ESXi is available in the following two different versions: VMware ESXi Embedded and VMware ESXi Installable. Both versions function identically but have different deployment methods. This quick install with VMware ESXi will use the Installable version. The installation CD-ROM (ISO) image can be downloaded from VMware’s download site at http://www.vmware.com/downloads. The download for VMware ESXi is available as part the vSphere product downloads. You select to download the ISO image for VMware ESXi and after accepting the End User License Agreement, you can download the image via your Web browser or with VMware’s download manager.
Tip
The download page for the VMware ESXi ISO image lists both an md5sum and sha1sum checksum for the download. To ensure that the download was successful, it is worthwhile to verify the checksum. On a Linux PC, you can run md5sum <filename> to generate the value, or for a Windows PC, a number of shareware downloads, such as MD5summer from http://www.md5summer.org/, are available to generate a checksum. If the value generated does not match the value posted on the download page, you should download the VMware ESXi image again.
If you are planning to install VMware ESXi on a Dell, HP, or IBM server, you need to download a customized install image for those brands. These customized installation images include enhanced Common Information Model (CIM) providers that can collect information on the following:
Software inventory. CIM provider versions, Basic Input/Output System (BIOS) versions, and Ethernet adapter driver versions.
Storage providers. Redundant Array of Independent Disks (RAID) controllers, enclosures, physical drive status, and logical volume information.
Networking providers. Ethernet ports, port link status, statistics, Internet Protocol (IP) and Media Access Control (MAC) addresses.
PCI providers. Peripheral Component Interconnect (PCI) devices, adapter card and slot information.
Sensor providers. Server intrusion, system temperature for components such as central processing unit (CPU) and memory, system board voltage, and system fan speeds.
The customized images also provide improved integration for VMware ESXi with these vendors’ system management packages, such as HP Systems Insight Manager or Dell OpenManage Server Administrator, and enables better monitoring and management of your host. When a new version of VMware ESXi is released, for example ESXi 4.1, a vendor customized image is released as well. That is also the case for update releases that represent a minor version change for VMware ESXi. When ESXi 4.1 Update 1 is released, you will also see a vender release for that specific update. These customized releases can sometimes lag behind the general release for a VMware ESXi version, but improvements in the CIM providers make the delay worthwhile and it’s best to check with the vendor’s Web site to see whether the current VMware ESXi release has a customized version released.
Once you have downloaded the VMware ESXi ISO image, you can burn it to a CD or mount it to the server’s remote control card if it is equipped with one. VMware ESXi is supported for remote installation with Dell Remote Access Card (DRAC) 4/ 5, HP Integrated Lights-Out (iLO), and iLO2 and IBM Remote Supervisor Adapter (RSA) cards. If you choose to install via a remote management card, you should ensure that the card has been upgraded to a recent firmware release, as only specific versions are supported for remote installations.
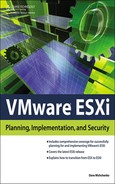
To begin the installation process, ensure that the server is set to boot from the host’s CD-ROM or the remote control card’s virtual CD-ROM. If you are reconfiguring the host’s BIOS, it is a good opportunity to check other BIOS settings such as Intel Virtualization (VT-x) or Intel Directed I/O (VT-d). You should enable the VT-x option if you intend to use 64-bit operating systems in your virtual machines. You will want to enable the VT-d option if you want to use VMDirectPath with your virtual machines. Once the host begins to boot from the VMware ESXi Installable CD, the VMware VMvisor boot menu appears, as shown in Figure 2.1. At this screen, it is possible to add pass boot options to the VMkernel that will boot for the install process. This may be necessary to support installation on your hardware, or it can be used to start an installation script.
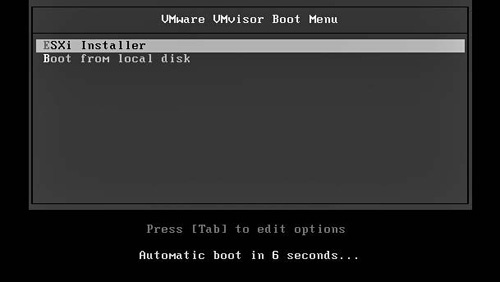
The installer welcome screen shown in Figure 2.2 will be displayed once the VMkernel has completed the boot process. Pressing the Esc key will cancel the install process, shut down the VMkernel, and restart the host. The Repair option will perform a repair process on the system partitions for VMware ESXi; this process will be covered later in Chapter 11, “Under the Hood with the ESXi Tech Support Mode.” Press the Enter key to proceed with the installation process.
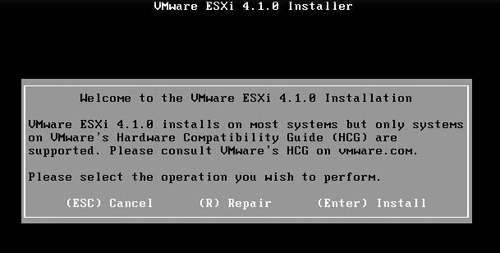
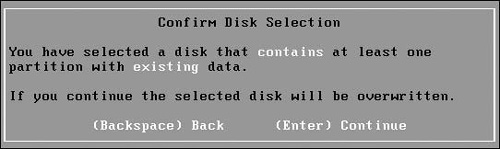
The next screen displays the End User License Agreement (EULA) for VMware ESXi. You can use the arrow keys to scroll through the EULA and then press F11 to continue the installation process. The VMkernel will then scan the storage connected to the host and present visible disks on the Select a Disk screen displayed in Figure 2.3. If your host is connected to network storage, you might consider disconnecting it, as this will decrease the time required for VMware ESXi to scan available storage. When selecting a disk to use for the installation, note that the disk order is determined by the BIOS and may be out of order. As the installation process will wipe the entire installation disk, ensure that the correct disk is being chosen and then press Enter to continue the process. Should the VMware ESXi installer find existing disk partitions, the Confirm Disk Selection screen will appear with a warning about deleting existing partitions (see Figure 2.4). Press the Enter key to continue.
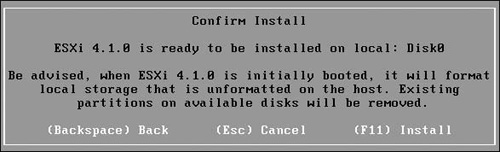
The Confirm Install screen will then be displayed as shown in Figure 2.5. If you press the Backspace key, you will be able to select another disk to use for the installation. Press the F11 key to begin installing VMware ESXi to the selected disk.
The install process will proceed quickly and typically be completed in less than 90 seconds. The installation process will then display the status of the installation and request that you press the Enter key to restart the host. At this point, the host will operate in a 60-day evaluation mode and be licensed at the vSphere Enterprise Plus licensing level. Remove the installation CD and reboot the host. You may have to enter the BIOS of the host and set the installation drive used as the primary boot device. Your host will now be ready for configuration with the Direct Console User Interface (DCUI).
When VMware ESXi boots for the first time after an installation, the host is given a default configuration. The remaining space on the installation drive will be formatted with a 1MB block size and allocated as Datastore1. The network interface identified as vmnic0 will be added to vSwitch0 and both a VMkernel port called Management Network and a virtual machine port group called VM Network will be created in vSwitch0.
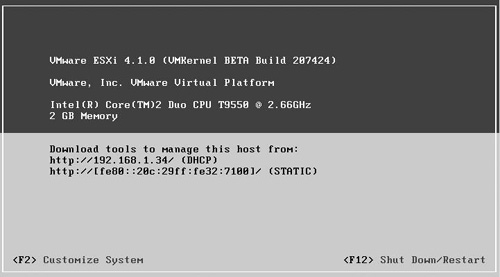
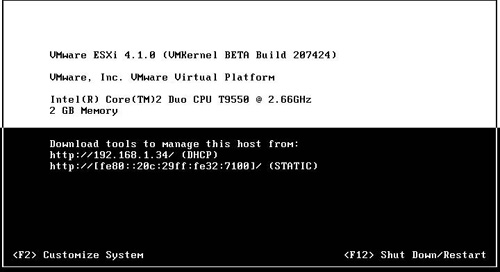
When the VMware ESXi host has completed booting, the DCUI screen will be displayed on the host as shown in Figure 2.6. The first post-installation task is to set the password for the root login, because this will be blank after the install.
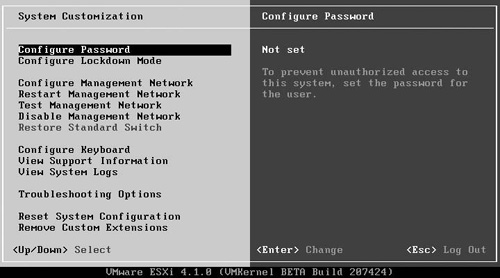
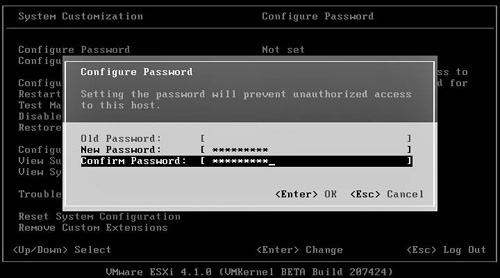
Press the F2 key to select the Customize System option and you will then be presented with a login screen. The Login Name will be set to root and you can press the Tab key to switch to the Password field and then press Enter to log in. On the System Customization screen that is displayed in Figure 2.7, the first configuration option is Configure Password. The option description on the right side of the screen shows the password status as Not set. Press the Enter key to change the password for the root account, as shown in Figure 2.8. Once the password has been set, the status will be displayed as Set on the System Customization screen.
Note
When setting the password for the root account, keep in mind that VMware ESXi has certain password requirements. A valid password for the local accounts on the host requires a mix of the following four character classes: uppercase letters, lowercase letters, digits, and other characters. Should you choose a seven-character-long password, it would require use of three of the four classes, while a six-character-long password would require all the classes. If you select an eight-character-long password, you will only require a single character class. Keep in mind that an uppercase letter that begins a password and a digit that ends it do not count toward the character class count.
The next step in the DCUI is to set the IP address that will be used to manage the host. By default, VMware ESXi is configured to use Dynamic Host Configuration Protocol (DHCP) for the management IP address. If a DHCP server is available on the network to which vmnic0 is attached, an IP address is obtained, as shown in Figure 2.6. If no DHCP server is present, the host assigns itself a link local IP address that is on the 169.254.x.x/16 subnet. In such a case, you will need physical access to the VMware ESXi host to access the DCUI or you can configure the host via the server remote control card.
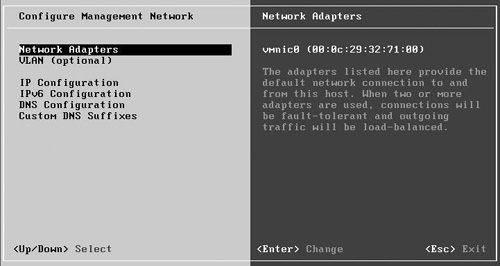
On the main DCUI screen, press F2 to select the Customize System option. If you have set the password for the root account, you will be prompted to log in. On the System Customization screen, select the Configure Management Network option. The display on the right side of the DCUI shows the current hostname, which may be obtained from the domain name service (DNS) server assigned by DHCP, the current IP and IPv6 addresses for the host, and the DHCP server used if one could be contacted. Press the Enter key to access the Configure Management Network screen shown in Figure 2.9. On this screen, you can view the network adapters that are present in the VMware ESXi host, set a virtual local area network (VLAN) ID for the management network VMkernel port, set the IP or IPv6 addresses for the host, and set the DNS configuration and suffixes to use.
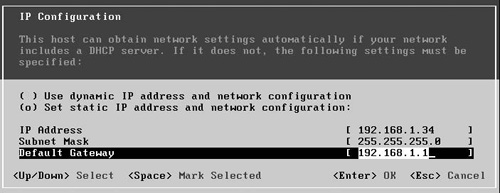
These options will be further discussed in Chapter 3, “Management Tools,” but for now, you can select the IP Configuration option to access the IP setting for the VMware ESXi host. The screen shown in Figure 2.10 appears. Choose the static IP address option and then enter in the appropriate IP address, subnet mask, and gateway for the network. Press Enter to save the changes and return to the Configure Management Network screen.
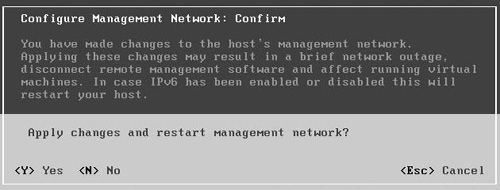
If you have completed your changes on the Configure Management Network screen, press Esc to return to the System Customization screen. Doing so will bring up the confirmation screen shown in Figure 2.11. Selecting Yes commits the network changes made and restarts the management network. Doing so will disrupt any existing connections made to the host via the vSphere client, vCenter Server, or other management tools. Select No to discard the changes you made on the Configure Management Network screen or press Esc to return to the Configure Management Network screen to make further changes. Once you have set the IP address for the host, you’ll be ready to download the vSphere client and to begin to work with your VMware ESXi host.
As mentioned earlier in the chapter, installation and management of VMware ESXi are supported with a number of remote management cards, including DRAC 4 and 5, HP iLO and iLO2, and IBM Management Module (MM) and RSA II. If you are using another brand of hardware, you’ll likely find that the remote card will work just fine with ESXi. A remote card is beneficial for the install process and DCUI management for servers at remote sites or when you don’t have easy physical access to a host.
When using a remote access card, it is recommended to have the latest firmware installed for the best results with the card. But if the network stability is poor, you may find that an install using the virtual CD feature will fail, in which case you’ll have to consider an alternative such as using ESXi Embedded or installing ESXi from a Preboot Execution Environment (PXE) server.
With some remote access cards, you may find that the default color scheme for the DCUI does not display that well within the remote management application. If you experience this problem, you can change the DCUI display to high contrast mode. At the DCUI Welcome screen, press the F4 key to switch to high contrast mode as shown in Figure 2.12. You can press F4 again to switch back to the regular display mode again. You will only be able to change the display mode at the Welcome screen. If you have already logged in to the DCUI, you will need to press the Esc key to log out, switch to high contrast mode, and then log in again. You should also note that after you restart your VMware ESXi, the display reverts back to the default display mode.
The VMware vSphere client is a Windows application that provides a graphical user interface (GUI) environment for managing your VMware ESXi host. You can connect directly to your ESXi host and authenticate with either a local account or your Active Directory (AD) login if the ESXi host has been set up for use with AD Integration. Because this will be an initial install of ESXi, AD Integration will not be configured; therefore, you will only be able to log in with the root login. In Chapter 3, you will learn how to create additional local accounts on ESXi. Chapter 6, “System Monitoring and Management,” covers the setup steps that allow you to use your AD login to connect to your host. Additionally, once you have deployed vCenter Server, you can connect to it with the same vSphere client using your AD login and manage all of your VMware ESXi hosts via a single management point. Some vSphere features, such as cloning and vMotion, are available only when the vSphere client is connected to vCenter Server.
The vSphere client can be installed from the vCenter Server installation media, but the simplest method is simply to download the client from the VMware ESXi host. To download the vSphere client from your ESXi host, follow these steps:
From your Windows host open a Web browser.
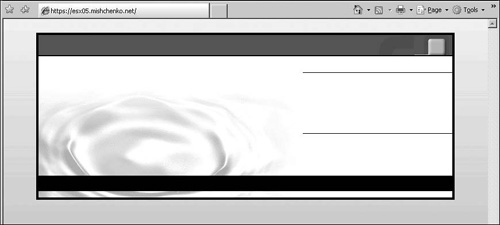
Type in the URL for the ESXi host. You may use the IP address that you configured for the management port earlier or enter the fully qualified domain name (FQDN) if you have configured your DNS servers with the hostname of your ESXi host. A welcome page should appear.
Tip
If the welcome page appears but does not contain text, as shown in Figure 2.13, edit the security options for your Web browser to add the host’s IP address or domain name to the Trusted or Local Intranet sites.
Click on the Download vSphere Client link under Getting Started. With ESXi 4.1, the vSphere client download is now hosted on VMware’s Web servers.
A security dialog box appears. Depending on your browser security settings, the dialog box will offer an option to Save or Run the
VMware-viclient.exedownload.Once the installer begins for the VMware vSphere Client 4.1, you will be asked to select the language for the installer and you’ll have the choice between Chinese (Simplified), English (United States), German (Germany), and Japanese. Select the appropriate language and click OK.
You can click on Next on the Welcome screen to continue with the installation.
Click on the radio button labeled I Agree to the Terms in the License Agreement and then click Next.
Enter a username and organization and then click Next.
Select the destination folder for the installation and then click Next.
Click on Install to begin the installation and then Finish to complete the process.
Note
Each version of ESXi and ESX requires a specific version of the vSphere or virtual interface (VI) client. You cannot connect to an ESX 3.5 host with version 4.1 of the vSphere client. However, a single management PC can have multiple versions of the client installed, and examining Add/Remove Programs in Control Panel will show the various versions installed. When you need to connect directly to a host or to vCenter Server, you need only start the VMware vSphere client shortcut that exists on your desktop or in the VMware program group. Once you have entered in the host IP address or hostname and your login credentials and clicked Login, the vSphere client determines the version of the host or vCenter Server to which you are connecting and launches the appropriate client version. If you attempt to connect to a version of host or vCenter Server for which you do not have a matching vSphere or VI client installed, you will be prompted to download and install that client.
Once the vSphere client has been installed, you are ready to launch it and use it to manage your VMware ESXi host. Your client requires IP connectivity to the IP address configured for the management port. The required ports for managing your VMware ESXi host directly or as part of vCenter are discussed in Chapter 7, “Securing ESXi.” Use the following steps to log in to your ESXi host.
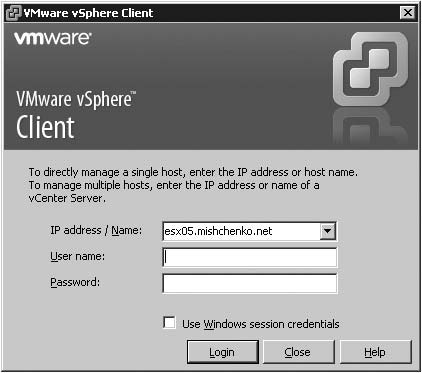
To start the vSphere client, click the Start menu and run the VMware vSphere Client from the VMware program group.
On the login screen shown in Figure 2.14, enter the IP address for your ESXi host or its FQDN. Enter the username root and the password that you configured earlier in the DCUI. If you have not yet set a password for the ESXi host, leave the field blank. You can use the Use Windows session credentials option if you have enabled AD Integration on your VMware ESXi host or if you are connecting to vCenter Server.
Click on the Login button to connect to the host.
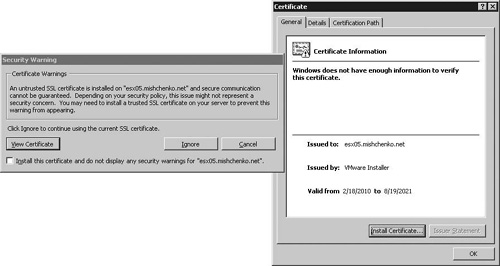
The Security Warning screen appears as shown in Figure 2.15. Click the Ignore button to continue connecting to the host.
Tip
The vSphere client, other vSphere products, and third-party tools communicate with the VMware ESXi host over HTTPS and by default the host will be configured with a self-signed certificate for the host localhost.localdomain. For a highly secure environment, the Secure Sockets Layer (SSL) certificate used by the host can be changed; this is covered in Chapter 7.
Once you have connected to the VMware ESXi host, the VMware Evaluation Notice screen appears, informing you that the evaluation license will expire in 60 days. After you clear the message, you can select the Summary tab for the host to view any configuration issues. In Figure 2.16, the vSphere client has detected that the password has not yet been set for the host and that no datastore exists. If you have already set the root password in the DCUI, you will not see the password warning. The Configuration tab shows a related error that The VMware ESX Server does not have persistent storage. You can correct the datastore error when using VMware ESXi Embedded, as ESXi will be booting from a USB flash drive, not a hard drive.

Take the following steps to set the password for the root account that has not been changed with the DCUI or vCLI:
In the vSphere client, select the Local Users & Groups tab.
Right-click on the root user and select Edit.
Check the Change password option and then enter the password in both the Password and Confirm fields.
Click the OK button to save the password change.
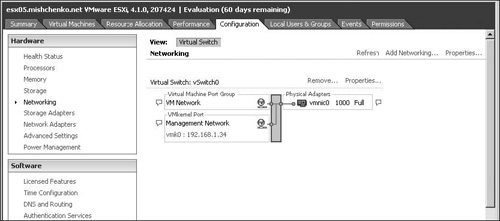
You can also use the vSphere client to make these networking changes. Select the Configuration tab and then click Networking. The default network configuration of a single vSwitch with vmnic0 discussed earlier can be seen in Figure 2.17.
To change the IP address for the management network, follow these steps.
Click on the Properties link for vSwitch0.
In the vSwitch0 Properties window, select the Management Network port and then click Edit.
Select the IP Settings tab on the Management Network Properties window.
Check the radio button labeled Use the Following IP Settings and then set the IP address and subnet mask.
To change the VMkernel default gateway, click the Edit button, enter the new gateway, and then click OK to return the IP Settings tab.
Click the OK button to commit your change. The Recent Tasks pane will show the Update Virtual NIC task. If the IP address of the host has changed, you will need to exit the vSphere client and connect to the new IP address.
Using the vSphere client with VMware ESXi is similar to using VMware ESX 3.0, 3.5, and 4.0. But there are noticeable differences when navigating the vSphere client. When you view the Memory page on the Configuration tab, only the values for Total, System, and Virtual Machines are displayed. As VMware ESXi does not have the service console that is a part of VMware ESX, an entry for Service Console is not displayed, nor is the Properties link to change the Service Console memory settings. Likewise, the Security Profile page displays only services configured to run on VMware ESXi rather than the firewall settings that configures the Linux iptables-based firewall running in Service Console.
As the reason for deploying VMware ESXi is to create and manage virtual machines, the following steps will walk through the process of deploying a new virtual machine (VM) from an Open Virtualization Format (OVF) template. Given the importance of the vCLI for managing your host, the vSphere Management Assistant (vMA) OVF will be imported to the VMware ESXi host.
Select File and then choose Deploy OVF Template.
The vMA template can be deployed from a URL or from a file. Enter the URL http://download3.vmware.com/software/vma/vMA-4.1.0.0-268837.ovf or browse to the location of the OVF file on your management PC. The download OVF for the vMA will include both the OVF file and the associated Virtual Machine Disk (VMDK) file.
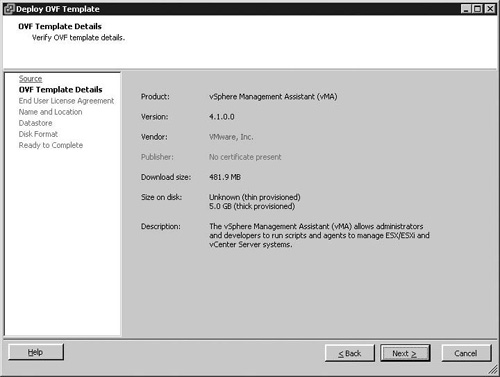
Review the details of the OVF package as shown in Figure 2.18 and then click the Next button to continue.
Click on the Accept button after reviewing the EULA and then click Next to continue.
Specify the name for the VM and then click the Next button.
Select the datastore on which to store the VM files and click Next.
Select between thin and thick provisioned for the disk format and then click Next.
Click Finish to import the vMA to your host.
Note
The OVF is a standard that describes the metadata about a virtual machine in the format of an Extensible Markup Language (XML) file. Rather than distributing a VMDK file for import to a host, the OVF virtual machine metadata includes configuration settings for the VM such as CPU, network, and storage. The OVF can also include other components, such as an EULA, minimum requirements, and security features. The OVF is also not limited to just a single VM, but can deploy multiple VM configurations for multitiered services that require interdependent VMs.
Once the import of vMA template has completed, you should be able to see the virtual machine listed in the inventory for your ESXi host. You can right-click on the virtual machine and then select Power > Power On. The virtual machine will start up and you can click on the Console tab for the vMA appliance to gain access to the initial configuration screen for the vMA. After a short process, your vMA appliance will be ready for use and you can begin trying some of the vCLI commands discussed in this chapter.
With the growing acceptance of VMware ESXi, there is broad hardware support for ESXi. Also, the same server that you might choose to use with ESX is likely supported for use with ESXi. ESXi is quickly installed on your hardware, and within a short period, you can be using the familiar vSphere client to configure and manage your ESXi host. ESXi includes the DCUI for basic management and configuration, and you can download the vMA appliance, which includes the vCLI. With the vCLI, you have access to a command set similar to that which you have used with the ESX service console.