This chapter covers character creation using a custom new editor tool, and discusses the usual attributes associated with an RPG based on character race, class, and so on. You will learn how to take the designs of the character classes and make use of them in the game by applying the player character’s attributes to the combat system and other aspects of any traditional RPG, such as gaining experience and leveling up. Some of these issues will be dealt with in more detail in upcoming chapters, whereas the foundation is laid here for working with character data.
Here’s what we’ll cover in this chapter:
All of the previous chapters have focused on the difficult task of getting a fully animated player to walk around in a scrolling game world. Both the animation and the movement should be semi-realistic, and tile-collision detection should prevent the player from walking through solid and impassable tiles (which still requires some work but is coming together), and using portals. Now that these basic problems have been solved, we can get into the game’s design and the nuances of combat and NPC interaction.
Attributes determine what a character is capable of doing in the game, whether it’s swinging a sword, firing arrows, or defending against attacks from others. The player attributes are the most important part of the character creation process that follows.
Strength represents the character’s ability to carry weight and deal damage with a melee weapon. It is generally good for the warrior and paladin classes, which use melee weapons. Strength is used to calculate the attack damage for the character if a hit is successful (see “Dexterity” for details on the “to hit” factor). First, the player has to hit the target before damage is calculated. So, even an enormous amount of STR will rarely come into play if dexterity is too low. Therefore, both of these attributes are crucial for a melee fighter! STR is of little use to a priest (who favors intellect) and is of minor import to a hunter (who relies more on dexterity).
Dexterity represents the agility of a character, the skillful use of one’s hands. This affects the ability to wield melee weapons and shields effectively to block and parry attacks and to hit accurately with a ranged weapon such as a bow. Low DEX leads to a somewhat clumsy character, while high DEX means the character can perform complex actions (perhaps wielding two weapons). Dexterity determines the defense and the chance to hit factors in combat. See Chapter 16, “Fighting, Getting XP, and Leveling Up,” for more details on combat calculations. The “chance to hit” value is rolled against the defender’s defense value to determine if an attack is successful. Thus, it is of little use for a level 1 character to attack someone who is level 20, because he will not be able to land hits, let alone do any damage.
Stamina represents a character’s endurance, the ability to continue performing an activity for a long period of time, and it is used directly in the calculation of hit points (health). High STA provides a character with the ability to engage in lengthy battles without rest, while low STA causes a character to get tired quickly and fall in battle. Although every class benefits from stamina, it is more vital for the melee characters since they engage in “in your face” combat. Although a low STA will lead a hunter or priest to fall just as quickly, they aren’t likely to take as many hits since they attack at range.
Intellect represents the character’s ability to learn, remember things, and solve problems. A very high INT is required by the priest class, while relatively low INT is common in fighters where brute force is more important than mental faculties. Also, INT affects the amount of experience gained for performing actions such as defeating enemies and completing quests, so a character with high INT will level up more quickly. This is important for the ranged classes since they usually have fewer battles.
Charisma represents the character’s attractiveness, which affects how others respond to the character. High CHA attracts people, while low CHA repels them—although in the violent world of Celtic Crusader, a “pretty boy” is of little use even to the ladies. In the converse, low CHA also represents the ugliness of a monster such as an undead zombie. CHA does not represent just a character or monster’s scariness, but is more related to personality and physical attractiveness. In other words, it is possible for a dangerous creature (such as a dragon) to be beautiful.
Hit points, or HP, represent the amount of health a character has. HP is calculated initially (at level 1) by adding a D8 roll to the character’s stamina. Then, each time the character levels, additional HP is added with another die roll. Thus, it is entirely possible to create a weakling of a warrior (by consistently rolling badly) who has less HP than even a priest. It’s all left to chance, which is what makes RPGs so universally compelling. Purists will play with their rolled stats, while less serious players will re-roll their character until they get the points that they want. Generally, the class modifiers make up for bad initial rolls.
One of the most rewarding aspects of an RPG is gaining experience by performing actions in the game (usually combat) and leveling up your character. When you start the game, the character is also just starting out as a level 1 with no experience. This reflects the player’s own skill level with the game itself, and that is the appeal of an RPG: You, the player, gain experience with the game while your character gains experience at the same time in the virtual world. You grow together and become a seamless “person.”
Both you and your character improve as you play the game, so you transfer some of your own identity to the character, and in some cases, younger players even assume some of the identity of their inspiring hero. This fascinating give-and-take relationship can really draw someone into your game if you design it well! Like I have said, cut back on the magic and let players really get in the game world and experience some good, solid combat to make the whole experience feel more real, and less detached. You want to do everything possible to suspend the players’ disbelief that they are in a game—you want to bring them into your game world by doing things that cause them to invest emotionally in their characters.
The most common way to gain experience is through combat with monsters and enemy characters. We will study combat in detail in Chapter 16, “Fighting, Getting XP, and Leveling Up,” and quests in Chapter 19, “Creating the Quest Editor.” These are the only two ways to get experience and level up. Since there are a lot of calculations involved in the chance to hit, armor class, melee attack, ranged attack, spell attack, and other factors, I will reserve Chapter 16 for a discussion of the details.
The standard, or base, classes can be used for the player as well as for the non-player characters (NPCs). You should feel free to create as many classes as you want to make your game world diversified and interesting. The classes I have described here are just the usual classes you find in an RPG, which you might consider the stock classes. Each class also has subclasses, or specialties within that class. For instance, Paladins are really just a subclass of the Knight, which may include Teutonic Knight, Crusader, and so on.
When you are designing a game, you can make it as historically accurate or as fictional as you want; don’t feel compelled to make every class realistic or historically based. You might make up a fictional type of Knight subclass, such as a Dark Knight or Gothic Knight, with some dark magic abilities. However, I want to encourage you to shy away from overdoing the magic system in a game. Many RPGs have character classes that might be thought of as wizards on steroids, because the whole game boils down to upgrading spells and magic, with little emphasis on “realistic” combat.
You would be surprised by how effective an RPG can be with just a few magic abilities. You can really go overboard with the hocus pocus, and that tends to trivialize a well-designed storyline and render interesting characters into fireball targets. No warrior should be able to do any magic whatsoever. Think about it: The warriors are basically barbarians—massive, hulking fighters who use brute force to bash skulls on the battlefield (think Arnold Schwarzenegger in the Conan movies). This type of character can become civilized and educated, but so many games blur the line here and allow any class to develop magical abilities. (I’m just pointing out some obvious design concerns with characters. If you really want a world of magic, then go ahead and create magical characters; that sounds like a really fun game, as a matter of fact!) If you are designing a traditional RPG, then be realistic with your classes and keep the magic reasonable. Think about The Lord of the Rings; these stories are a source of inspiration for every RPG ever made. Everything since J.R.R. Tolkien has been derivative!
The character editor tool has the ability to apply modifiers to the basic stats, but this is a manual process. If you add new classes to the cboClass list in the editor, then you’ll have to make changes to the modifiers manually in the code (hint: look for the code in cboClass_SelectedIndexChanged()).
One design consideration that we might use is the concept of class modifiers. Say you have a set of stock classes like those listed in the upcoming tables. Instead of re-creating a class from scratch using similar values, you can create a subclass based on the parent class—and modify the attributes by a small amount to produce the new class with custom attributes.
Say, for instance, that you want to create a new type of Warrior called the Berserker, which is an extremely stupid and ugly character with immense strength and stamina. Sounds a little bit scary, doesn’t it? By setting the base class of the Berserker to Warrior, you can then modify the base class at any time and the Berserker automatically is changed along with the base class (Warrior). This works great for balancing the gameplay without requiring that you modify every single subclass that you have used in the game. Since our character class system in Celtic Crusader will be based on classes, we can easily subclass the base character classes to create new types of characters in this manner.
Hint
It goes without saying that female characters are fun to play with in an RPG. Unfortunately, we have no female equivalents to the four player characters represented in Celtic Crusader. Yes, there are some female NPCs available in the artwork from Reiner Prokein, but not for the primary character classes. If you have artwork available, I encourage you to add a gender property to the character editor. Gender is not extremely important to the gameplay, as it turns out.
Tables 14.1 to 14.4 present my idea of a character class structure that is programmed into the editor. Since this only applies to the editor, and not to any game source code, you may modify the editor to use your own preferred values and classes.
Table 14.1. Warrior Attributes
Attribute | Roll | Modifiers (+15) |
|---|---|---|
Strength | 2D6 | +8 |
Dexterity | 2D6 | +3 |
Stamina | 2D6 | +4 |
Intellect | 2D6 | 0 |
Charisma | 2D6 | 0 |
Hit Points | 1D8 | +STA |
Table 14.2. Paladin Attributes
Attribute | Roll | Modifiers (+15) |
|---|---|---|
Strength | 2D6 | +3 |
Dexterity | 2D6 | +3 |
Stamina | 2D6 | +8 |
Intellect | 2D6 | 0 |
Charisma | 2D6 | +1 |
Hit Points | 1D8 | +STA |
Table 14.3. Hunter Attributes
Attribute | Roll | Modifiers (+15) |
|---|---|---|
Strength | 2D6 | +2 |
Dexterity | 2D6 | +8 |
Stamina | 2D6 | +4 |
Intellect | 2D6 | 0 |
Charisma | 2D6 | +1 |
Hit Points | 1D8 | +STA |
Table 14.4. Priest Attributes
Attribute | Roll | Modifiers (+15) |
|---|---|---|
Strength | 2D6 | 0 |
Dexterity | 2D6 | +6 |
Stamina | 2D6 | +1 |
Intellect | 2D6 | +8 |
Charisma | 2D6 | 0 |
Hit Points | 1D8 | +STA |

To keep your game character classes balanced, it’s important to use a standard total for all modifiers so that they all add up to the same amount. I have based the following class modifiers on a total of 15 points. In testing the game, it seemed that values much lower made the hero characters less impressive (compared to, say, a peasant), while values much higher resulted in unusually powerful characters. If you want a character to have one very high attribute, then that will have to be balanced with an equally low value for another. Note also that monsters need not follow this standard—go ahead and use whatever factors you want to create unique foes. The goal of this point modifier system is to create player characters that are based on the same fixed number of attribute points.
Hint
The character class modifiers should add up to a total of 15 points. The points can be applied to any of the attributes. These mod values are then added to 2D6 rolls to come up with the total attribute values.
The warrior class represents the strongest melee fighter who deals enormous crushing blows against his opponents, but who is not especially accurate at lower levels. Warriors are like home run hitters, in that they tend to knock it out of the park or strike out. In gameplay, a low-level warrior will miss a lot but then do massive damage when he does land a blow, which usually takes out most lower-level creatures. At higher levels, warriors gain an appreciable amount of DEX that compensates for the initial low starting value. Since the warrior is a rage-filled barbarian, he has low INT and CHA because these attributes are not important. Warriors can wear chain or plate armor, and have abilities like rage and berserk that boost his attributes during combat. Drawing from inspiration such as Tolkien, one might look to Gimli.
The paladin is a balanced melee fighter with massive survivability. Classically, a paladin was a melee fighter with some healing abilities, making him a cross between warrior and priest. If you want to follow this traditional view of the paladin class, you may do so. I have taken a simpler approach to the paladin, making him slightly less damaging than the warrior but able to take more damage. While the single point in CHA might seem like a waste, it reflects the nature of the paladin as an attractive, heroic knight. He has abilities that give a temporary boost to his weapons and armor points. Paladins can wear chain or plate armor, preferring the most brightly polished pieces of gear they can find. Drawing from popular inspiration, one might look to the Tolkien characters Baromir or Eomer.
The hunter is a ranged class with no melee combat ability, but capable of dealing massive damage with a bow. Hunters are fast on their feet, wear light leather armor, and usually have many different types of arrows for their favorite bow. Hunters have a high DEX to improve ranged chance to hit, with less use for traits like STR and INT. Abilities revolve around ranged attack modifiers that improve accuracy (chance to hit). A good example from which to draw inspiration is the Tolkien character Legolas.
The priest class represents a holy man of the cloth who has been forced to fight the rampaging undead horde that has been destroying everything in its path. A priest is unlike a traditional magic user, both unwilling and unable to call on the evil powers required to conjure magic known to traditional wizards and mages (whom he would consider opponents). A priest uses holy power to fight evil, undead creatures, never to attack other human beings. His abilities include healing and exorcism. A loose example from Tolkien’s universe might be Arwen.
In addition to these player character classes, you might want to create base classes for some of the regular people in the world, like townsfolk, peasants, farmers, and so on. These non-combat NPCs might all just share the same character class (with weak combat skills, poor experience, and so on). We will need NPCs like this for the quest system coming up later. (See Table 14.5.) NPCs do not need to follow the same modifier rules reserved for player character classes (which, again, should be thought of as heroes). Note that NPCs and monsters generally have more HP than their levels imply to improve gameplay by increasing the difficulty early on—which makes the player eager to level up quickly.
We can also create fantasy creatures and monsters described in Tables 14.6 to 14.9. These creatures are unprecedented because they have no equal on the “good side.” But you will not want to make all of the bad guys too powerful—save that for the unusual monsters that are rarely encountered or the game will be way too hard to play. You will generally want to have at least one type of bad guy for each type of character class available to the player, and duplicate that character all over the game world. In addition, you must add weaker enemy characters that make good fodder for the player to help with leveling up. Another thing to remember is that monsters do not gain experience and level up, so they should start out with higher level stats than a typical level 1 player character. Since the human but otherwise bad characters share the same stats as the human good guys, we don’t need to define them separately.
Table 14.6. Level 4 Skeleton Warrior
Attribute | Roll | Modifiers |
|---|---|---|
Strength | 4D6 | +10 |
Dexterity | 4D6 | +6 |
Stamina | 4D6 | +8 |
Intellect | 4D6 | 0 |
Charisma | 0 | 0 |
Hit Points | 4D8 | +STA |

Table 14.7. Level 8 Skeleton Archer
Attribute | Roll | Modifiers |
|---|---|---|
Strength | 8D6 | +14 |
Dexterity | 8D6 | +20 |
Stamina | 8D6 | +16 |
Intellect | 8D6 | 0 |
Charisma | 0 | 0 |
Hit Points | 8D8 | +STA |
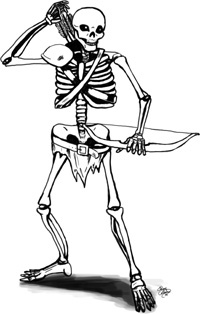
Table 14.8. Level 12 Viking Guard
Attribute | Roll | Modifiers |
|---|---|---|
Strength | 12D6 | +20 |
Dexterity | 12D6 | +18 |
Stamina | 12D6 | +16 |
Intellect | 12D6 | 0 |
Charisma | 0 | 0 |
Hit Points | 12D8 | +STA |
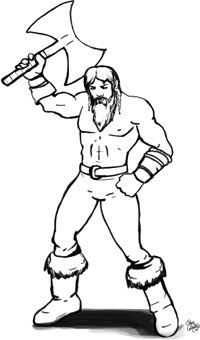
Table 14.9. Level 16 Zombie
Attribute | Roll | Modifiers |
|---|---|---|
Strength | 16D6 | +22 |
Dexterity | 16D6 | +12 |
Stamina | 16D6 | +28 |
Intellect | 16D6 | 0 |
Charisma | 0 | 0 |
Hit Points | 16D8 | +STA |

Remember, these are generic class types, or races, not individuals. Since we don’t need to follow a modifier standard, you may get as creative as you want. Since these classes represent various level ranges, the attributes are calculated with die roll specifications and modifiers (both of which are supported in the character editor).
If you want to create a level 10 monster, then I recommend rolling 10D6 for its attributes. If the desired level is L, then each attribute roll is LD6. The modifiers may then be used to adjust the dice rolls to ensure minimum or maximum values are reached for the monster’s intended abilities. For instance, if you want to create a zombie with a minimum of 20 STR while still using the attribute roll, then add 20 to the STR roll and the result will be 20 + STR. As long as the minimums are capped to zero, it’s okay to add negative modifiers. If you want to specify a monster’s level specifically in the editor data, go ahead and add it as a new property—I just prefer to get away from the numbers game and let the player learn each monster’s abilities by fighting them (in the interest of improving the suspense of disbelief!).
As a final note, there is no reason to roll the charisma attribute for monsters so I have set CHA to 0 in these tables. If you have some purpose for this attribute in your own game, by all means go ahead and use it!
Skeleton warriors are the mainstay of the undead horde army, and as such, they can be found almost everywhere in the game world. At level 4, these guys are pretty tough for a new player but are soon dealt with handily once the player goes up a few levels. The skeleton warrior has high strength and stamina, and a lot of hit points!
Skeleton archers were once support units for the Viking army that became undead, so there aren’t as many as the warrior class but they tend to be better trained and hit much harder—at range. They are crack shots with their arrows so be sure to close in fast and take them out before they get too many shots off.
Viking guards are remnants of the Viking army who were not involved in the debacle that gave rise to the undead army, and they’re lucky to have been spared! Normal Viking troops are somewhat like a traditional warrior but with training they have achieved a high hit rating as well as high strength, so not only can they hit, they hit hard!
Zombies are also part of the undead horde of former Vikings, but due to some mishap they retained most of their original appearance and clothing, and did not get fully transformed into undead skeletons. As a result, zombies are confused about their existence and believe they still need to feed. They carry no weapons or armor because they were not in the army, but rather Viking citizens brought to colonize the land and further push out the native inhabitants. Despite having no weapons, zombies are extremely dangerous because they can take an extraordinary amount of damage before they fall.
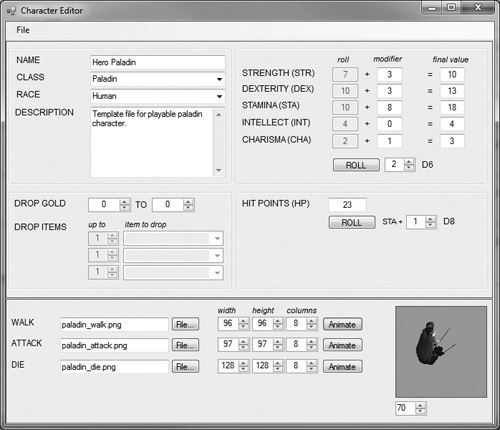
The character editor is a VB program designed to create and edit game characters. Each character will be stored in its own file with an extension of .char, although this data is also just xml like the level editor data. Figure 14.1 shows the Character Editor program running.
I generally do not see the point of sharing source for a complex form-based application like this editor, because you can’t create the editor from just this source code and it’s too complex to list the properties for every control in an attempt to build it, tutorial style. As a compromise, I will go over the source code and explain each function clearly if it is not already self-explanatory.
Hint
The “DROP GOLD” and “DROP ITEMS” fields are not used yet, but reserved for Chapter 17, “Creating the Item Editor” and Chapter 18, “Looting Treasure and Drop Items.” When we have the code to work with these data fields, then we can edit monster character files and specify what we want them to drop, but first we need an item editor. Furthermore, when quests are working, we’ll want certain characters to drop certain items to satisfy quests!
This is not the complete source code for the character editor, just an explanation of the major functions in the code, in the interest of saving space. All of the user interface events (like button clicks) have been left out since they are just logistical and not vital to an understanding of the editor.
Public Class Form1
    Dim device As Graphics
    Dim surface As Bitmap

    Dim animationImage As Bitmap
    Dim sprite As Sprite
    Dim rand As Random
    Dim g_filename As String
    Dim currentAnim As String

    Private Sub Form1_Load(ByVal sender As System.Object, _
            ByVal e As System.EventArgs) Handles MyBase.Load
       surface = New Bitmap(Size.Width, Size.Height)
       PictureBox1.Image = surface
       device = Graphics.FromImage(surface)
       sprite = New Sprite(device)
       animationImage = Nothing
       rand = New Random()
   End Sub
The btnWalkFile_Click() subroutine is called by the first “File. . .” button, next to the Walk animation filename field. This button is used to bring up the Open File dialog in order to choose a bitmap file to load for the walk animation.
Private Sub btnWalkFile_Click(ByVal sender As System.Object, _
        ByVal e As System.EventArgs) Handles btnWalkFile.Click
   Open1.DefaultExt = ".png"
   Open1.Filter = "Bitmap Files|*.png;*.png;*.jpg"
   Open1.Multiselect = False
   Open1.Title = "Load Bitmap File"
   Open1.InitialDirectory = Environment.CurrentDirectory
   Dim result As DialogResult
   result = Open1.ShowDialog(Me)
   If result <> DialogResult.OK Then Return
   txtWalkFile.Text = IO.Path.GetFileName(Open1.FileName)
   animationImage = LoadBitmap(txtWalkFile.Text)
End Sub
The btnAttackFile_Click() subroutine is called by the second “File. . .” button, next to the Attack animation filename field. This button is used to bring up the Open File dialog in order to choose a bitmap file to load for the attack animation.
Private Sub btnAttackFile_Click(ByVal sender As System.Object, _
        ByVal e As System.EventArgs) Handles btnAttackFile.Click
   Open1.DefaultExt = ".png"
   Open1.Filter = "Bitmap Files|*.png;*.png;*.jpg"
   Open1.Multiselect = False
   Open1.Title = "Load Bitmap File"
   Open1.InitialDirectory = Environment.CurrentDirectory
   Dim result As DialogResult
   result = Open1.ShowDialog(Me)
   If result <> DialogResult.OK Then Return
   txtAttackFile.Text = IO.Path.GetFileName(Open1.FileName)
   animationImage = LoadBitmap(txtAttackFile.Text)
End Sub
The btnDieFile_Click() subroutine is called by the third “File. . .” button, next to the Die animation filename field. This button is used to bring up the Open File dialog in order to choose a bitmap file to load for the die animation.
Private Sub btnDieFile_Click(ByVal sender As System.Object, _
        ByVal e As System.EventArgs) Handles btnDieFile.Click
   Open1.DefaultExt = ".png"
   Open1.Filter = "Bitmap Files|*.png;*.png;*.jpg"
   Open1.Multiselect = False
   Open1.Title = "Load Bitmap File"
   Open1.InitialDirectory = Environment.CurrentDirectory
   Dim result As DialogResult
   result = Open1.ShowDialog(Me)
   If result <> DialogResult.OK Then Return
   txtDieFile.Text = IO.Path.GetFileName(Open1.FileName)
   animationImage = LoadBitmap(txtDieFile.Text)
End Sub
The Timer1_Tick() subroutine performs animation using the specified sprite sheet for either the walk, attack, or die animation files. A scratch sprite is used to animate all three of the sprite sheets, depending on which “Animate” button was pressed.
Private Sub Timer1_Tick(ByVal sender As System.Object, _
        ByVal e As System.EventArgs) Handles Timer1.Tick
    If currentAnim = "walk" Then
        sprite.Width = numWidth.Value
        sprite.Height = numHeight.Value
        sprite.Columns = numColumns.Value

    ElseIf currentAnim = "attack" Then
        sprite.Width = numWidth2.Value
        sprite.Height = numHeight2.Value
        sprite.Columns = numColumns2.Value
    ElseIf currentAnim = "die" Then
        sprite.Width = numWidth3.Value
        sprite.Height = numHeight3.Value
        sprite.Columns = numColumns3.Value
    End If
    sprite.TotalFrames = sprite.Columns * 8
    sprite.Image = animationImage
    sprite.Animate(0, sprite.TotalFrames - 1)
    device.Clear(Color.DarkGray)
    sprite.Draw()
    PictureBox1.Image = surface
End Sub
The btnRoll_Click() subroutine rolls the random “dice” calculations for the five main character attributes: STR, DEX, STA, INT, and CHA.
Private Sub btnRoll_Click(ByVal sender As System.Object, _
        ByVal e As System.EventArgs) Handles btnRoll.Click
    txtRollStr.Text = rand.Next(1, 6 * numDCount.Value).ToString()
    txtRollDex.Text = rand.Next(1, 6 * numDCount.Value).ToString()
    txtRollSta.Text = rand.Next(1, 6 * numDCount.Value).ToString()
    txtRollInt.Text = rand.Next(1, 6 * numDCount.Value).ToString()
    txtRollCha.Text = rand.Next(1, 6 * numDCount.Value).ToString()
End Sub
The loadFile() subroutine loads a .char file containing xml data for a character. The getElement() function assists with the loading of each field in the xml data with error handling in case of a load error. As each field is copied into the user interface TextBox and NumericUpDown controls, data type conversions are performed as needed.
Private Function getElement(ByVal field As String, _
        ByRef element As XmlElement) As String
   Dim value As String = ""
   Try
       value = element.GetElementsByTagName(field)(0).InnerText

     Catch ex As Exception
         REM ignore error, just return empty
         Console.WriteLine(ex.Message)
     End Try
     Return value
End Function
Private Sub loadFile(ByVal filename As String)
    Try
        REM open the xml file
        Dim doc As New XmlDocument()
        doc.Load(filename)
        Dim list As XmlNodeList = doc.GetElementsByTagName("character")
        Dim element As XmlElement = list(0)
        REM read data fields
        txtName.Text = getElement("name", element)
        cboClass.Text = getElement("class", element)
        cboRace.Text = getElement("race", element)
        txtDesc.Text = getElement("desc", element)
        txtStr.Text = getElement("str", element)
        txtDex.Text = getElement("dex", element)
        txtSta.Text = getElement("sta", element)
        txtInt.Text = getElement("int", element)
        txtCha.Text = getElement("cha", element)
        txtHP.Text = getElement("hitpoints", element)
        txtWalkFile.Text = getElement("anim_walk_filename", element)
        numWidth.Value = Convert.ToInt32( _
            getElement("anim_walk_width", element))
        numHeight.Value = Convert.ToInt32( _
            getElement("anim_walk_height", element))
        numColumns.Value = Convert.ToInt32( _
            getElement("anim_walk_columns", element))
        txtAttackFile.Text = getElement( _
            "anim_attack_filename", element)
        numWidth2.Value = Convert.ToInt32( _
            getElement("anim_attack_width", element))
        numHeight2.Value = Convert.ToInt32( _
            getElement("anim_attack_height", element))
        numColumns2.Value = Convert.ToInt32( _
            getElement("anim_attack_columns", element))

        txtDieFile.Text = getElement( _
            "anim_die_filename", element)
        numWidth3.Value = Convert.ToInt32( _
            getElement("anim_die_width", element))
        numHeight3.Value = Convert.ToInt32( _
            getElement("anim_die_height", element))
        numColumns3.Value = Convert.ToInt32( _
            getElement("anim_die_columns", element))
        numGold1.Value = Convert.ToInt32( _
            getElement("dropgold1", element))
        numGold2.Value = Convert.ToInt32( _
            getElement("dropgold2", element))
    Catch ex As Exception
        MessageBox.Show(ex.Message)
    End Try
End Sub
The saveFile() subroutine has the job of building the xml schema as well as saving the character data to an xml file based on that schema.
Private Sub saveFile(ByVal filename As String)
    Try
        REM create xml schema
        Dim table As New DataTable("character")
        table.Columns.Add(New DataColumn("name", _
            System.Type.GetType("System.String")))
        table.Columns.Add(New DataColumn("class", _
            System.Type.GetType("System.String")))
        table.Columns.Add(New DataColumn("race", _
            System.Type.GetType("System.String")))
        table.Columns.Add(New DataColumn("desc", _
            System.Type.GetType("System.String")))
        table.Columns.Add(New DataColumn("str", _
            System.Type.GetType("System.Int32")))
        table.Columns.Add(New DataColumn("dex", _
            System.Type.GetType("System.Int32")))
        table.Columns.Add(New DataColumn("sta", _
            System.Type.GetType("System.Int32")))
        table.Columns.Add(New DataColumn("int", _
            System.Type.GetType("System.Int32")))

        table.Columns.Add(New DataColumn("cha", _
            System.Type.GetType("System.Int32")))
        table.Columns.Add(New DataColumn("hitpoints", _
            System.Type.GetType("System.Int32")))
        table.Columns.Add(New DataColumn("anim_walk_filename", _
            System.Type.GetType("System.String")))
        table.Columns.Add(New DataColumn("anim_walk_width", _
            System.Type.GetType("System.Int32")))
        table.Columns.Add(New DataColumn("anim_walk_height", _
            System.Type.GetType("System.Int32")))
        table.Columns.Add(New DataColumn("anim_walk_columns", _
            System.Type.GetType("System.Int32")))
        table.Columns.Add(New DataColumn("anim_attack_filename", _
            System.Type.GetType("System.String")))
        table.Columns.Add(New DataColumn("anim_attack_width", _
            System.Type.GetType("System.Int32")))
        table.Columns.Add(New DataColumn("anim_attack_height", _
            System.Type.GetType("System.Int32")))
        table.Columns.Add(New DataColumn("anim_attack_columns", _
            System.Type.GetType("System.Int32")))
        table.Columns.Add(New DataColumn("anim_die_filename", _
            System.Type.GetTypeC"System.String")))
        table.Columns.Add(New DataColumn("anim_die_width", _
            System.Type.GetType("System.Int32")))
        table.Columns.Add(New DataColumn("anim_die_height", _
            System.Type.GetType("System.Int32")))
        table.Columns.Add(New DataColumn("anim_die_columns", _
            System.Type.GetType("System.Int32")))
        table.Columns.Add(New DataColumn("dropgold1", _
            System.Type.GetType("System.Int32")))
        table.Columns.Add(New DataColumn("dropgold2", _
            System.Type.GetType("System.Int32")))

        REM copy character data into datatable
        Dim row As DataRow = table.NewRow()
        row("name") = txtName.Text
        row("class") = cboClass.Text
        row("race") = cboRace.Text
        row("desc") = txtDesc.Text
        row("str") = txtStr.Text
        row("dex") = txtDex.Text

        row("sta") = txtSta.Text
        row("int") = txtInt.Text
        row("cha") = txtCha.Text
        row("hitpoints") = txtHP.Text
        row("anim_walk_filename") = txtWalkFile.Text
        row("anim_walk_width") = numWidth.Value
        row("anim_walk_height") = numHeight.Value
        row("anim_walk_columns") = numColumns.Value
        row("anim_attack_filename") = txtAttackFile.Text
        row("anim_attack_width") = numWidth2.Value
        row("anim_attack_height") = numHeight2.Value
        row("anim_attack_columns") = numColumns2.Value
        row("anim_die_filename") = txtDieFile.Text
        row("anim_die_width") = numWidth3.Value
        row("anim_die_height") = numHeight3.Value
        row("anim_die_columns") = numColumns3.Value
        row("dropgold1") = numGold1.Value
        row("dropgold2") = numGold2.Value
        table.Rows.Add(row)

        REM save xml file
        table.WriteXml(filename)
        table.Dispose()
    Catch es As Exception
        MessageBox.Show(es.Message)
    End Try
End Sub
In addition to rolling for the character’s five primary stats, we can also roll the hit points for a character using this button event. It’s very simple: a random value from 1 to 8 (1D8) is added to the existing stamina value to come up with the character’s hit points. Obviously you will want to roll the stats first before calling this.
Private Sub btnRollHP_Click(ByVal sender As System.Object, _
        ByVal e As System.EventArgs) Handles btnRollHP.Click
   Dim stamina As Integer = Convert.ToInt32(txtSta.Text)
   Dim hp As Integer = stamina + rand.Next(1, 8)
    txtHP.Text = hp.ToString()
End Sub
The three Animate buttons cause the specified animation to be rendered.
Private Sub btnAnimate3_Click(ByVal sender As System.Object, _
        ByVal e As System.EventArgs) Handles btnAnimate3.Click
    currentAnim = "die"
    animationImage = LoadBitmap(txtDieFile.Text)
    Timer1.Interval = numRate.Value
    Timer1.Enabled = Not Timer1.Enabled
End Sub
Private Sub btnAnimate2_Click(ByVal sender As System.Object, _
        ByVal e As System.EventArgs) Handles btnAnimate2.Click
    currentAnim = "attack"
    animationImage = LoadBitmap(txtAttackFile.Text)
    Timer1.Interval = numRate.Value
    Timer1.Enabled = Not Timer1.Enabled
End Sub
Private Sub btnAnimate1_Click(ByVal sender As System.Object, _
        ByVal e As System.EventArgs) Handles btnAnimate.Click
    currentAnim = "walk"
    animationImage = LoadBitmap(txtWalkFile.Text)
    Timer1.Interval = numRate.Value
    Timer1.Enabled = Not Timer1.Enabled
End Sub
Private Sub numRate_ValueChanged(ByVal sender As System.Object, _
        ByVal e As System.EventArgs) Handles numRate.ValueChanged
    Timer1.Interval = numRate.Value
End Sub
Now we come to the code responsible for applying the class-specific attribute modifiers discussed earlier. This is all manual code, which is not the best way to do it, but this approach keeps the code and user interface simpler. Otherwise, we’re looking at a secondary form and additional data files to keep track of the stats. Since there are only a few actual classes shared by most characters and monsters in the game, this is the approach I have decided to take for now. Remember, you can always change the modifiers directly in the editor’s fields as well as change the final value for each attribute manually.
Private Sub cboClass_SelectedIndexChanged( _
        ByVal sender As System.Object, ByVal e As System.EventArgs) _
        Handles cboClass.SelectedIndexChanged

    Dim cls As String = cboClass.Text.ToLower()
    If cls = "warrior" Then
        txtModStr.Text = "8"
        txtModDex.Text = "3"
        txtModSta.Text = "4"
        txtModInt.Text = "0"
        txtModCha.Text = "0"
    ElseIf cls = "paladin" Then
        txtModStr.Text = "3"
        txtModDex.Text = "3"
        txtModSta.Text = "8"
        txtModInt.Text = "0"
        txtModCha.Text = "1"
    ElseIf cls = "hunter" Then
        txtModStr.Text = "2"
        txtModDex.Text = "8"
        txtModSta.Text = "4"
        txtModInt.Text = "0"
        txtModCha.Text = "1"
    ElseIf cls = "priest" Then
        txtModStr.Text = "0"
        txtModDex.Text = "6"
        txtModSta.Text = "1"
        txtModInt.Text = "8"
        txtModCha.Text = "0"
    End If
End Sub
You know what type of data you want to use in the game based on the descriptions of the various classes discussed so far, and that data is now editable with the new character editor tool. How, then, do you make use of these character files in the game? We already have a very convenient Level class that makes the game world scroll very easily with code like this:
Private level As Level
level = New Level(game, 25, 19, 32)
level.loadTilemap("sample.level")
level.loadPalette("palette.png", 5)
After loading the level, we can scroll and draw the level with simple properties based entirely on the data inside the .level file! I want the same kind of functionality for game characters as well! We have a great character editor available, but it uses a lot of data to define a character with unique properties, so we need a class to handle characters as well. I want to be able to load a .char file and have the class automatically load up the three sprite sheets (for walking, attacking, and dying). The class should also keep track of which “state” it’s in, and draw the appropriate sprite animation automatically based on the animation state and all of the animation properties, completely wrapped up in a single Draw() routine. Here’s an example:
hero = New Character(game)
hero.Load("paladin.char")
hero.Position = New Point(400 - 48, 300 - 48)
...
hero.Draw()
The Character class is the biggest class of the entire book so far, but that doesn’t mean it’s overly complex, it just has a lot of data to keep track of and makes use of a lot of convenient properties. This is a very user-friendly class, but that means there’s a lot of code up front in the class. The end result is much less code in our game for dealing with characters. This class will necessarily require changes in the upcoming chapters to accommodate features that we haven’t covered yet, like gaining experience and leveling (which are not found in the class yet!). Not to worry, our characters will gain experience and level up—and loot treasure and go on quests too! The properties in the class have been omitted to conserve space—so this is not a complete source code listing, just a reference.
Public Class Character
    Public Enum AnimationStates
        Walking
        Attacking
        Dying
    End Enum
    Private p_game As Game
    Private p_position As PointF
    Private p_direction As Integer
    Private p_state As AnimationStates

    REM character file properties
    Private p_name As String
    Private p_class As String
    Private p_race As String
    Private p_desc As String
    Private p_str As Integer
    Private p_dex As Integer
    Private p_sta As Integer
    Private p_int As Integer
    Private p_cha As Integer
    Private p_hitpoints As Integer
    Private p_dropGold1 As Integer
    Private p_dropGold2 As Integer
    Private p_walkFilename As String
    Private p_walkSprite As Sprite
    Private p_walkSize As Point
    Private p_walkColumns As Integer
    Private p_attackFilename As String
    Private p_attackSprite As Sprite
    Private p_attackSize As Point
    Private p_attackColumns As Integer
    Private p_dieFilename As String
    Private p_dieSprite As Sprite
    Private p_dieSize As Point
    Private p_dieColumns As Integer

    Public Sub New(ByRef game As Game)
        p_game = game
        p_position = New PointF(0, 0)
        p_direction = 1
        p_state = AnimationStates.Walking

        REM initialize loadable properties
        REM some code omitted due to space
    End Sub

    REM class properties omitted

    Public ReadOnly Property GetSprite() As Sprite
        Get

              Select Case p_state
                  Case AnimationStates.Walking
                      Return p_walkSprite
                  Case AnimationStates.Attacking
                      Return p_attackSprite
                  Case AnimationStates.Dying
                      Return p_dieSprite
                  Case Else
                      Return p_walkSprite
              End Select
         End Get
    End Property

    REM This function animates and draws the character sprite
    REM based on the current state (walking, attacking, or dying)
    Public Sub Draw()
        Dim startFrame As Integer
        Dim endFrame As Integer
        Select Case p_state
            Case AnimationStates.Walking
                p_walkSprite.Position = p_position
                If p_direction > -1 Then
                     startFrame = p_direction * p_walkColumns
                     endFrame = startFrame + p_walkColumns - 1
                     p_walkSprite.AnimationRate = 30
                     p_walkSprite.Animate(startFrame, endFrame)
                 End If
                 p_walkSprite.Draw()
            Case AnimationStates.Attacking
                 p_attackSprite.Position = p_position
                 If p_direction > -1 Then
                     startFrame = p_direction * p_attackColumns
                     endFrame = startFrame + p_attackColumns - 1
                     p_attackSprite.AnimationRate = 30
                     p_attackSprite.Animate(startFrame, endFrame)
                 End If
                 p_attackSprite.Draw()
             Case AnimationStates.Dying
                 p_dieSprite.Position = p_position
                 If p_direction > -1 Then

                 startFrame = p_direction * p_dieColumns
                 endFrame = startFrame + p_dieColumns - 1
                 p_dieSprite.AnimationRate = 30
                 p_dieSprite.Animate(startFrame, endFrame)
             End If
             p_dieSprite.Draw()
     End Select
End Sub

REM Load a character .char file
Public Function Load(ByVal filename As String)
    Try

        REM open the xml file
        Dim doc As New XmlDocument()
        doc.Load(filename)
        Dim list As XmlNodeList = doc.GetElementsByTagName("character")
        Dim element As XmlElement = list(0)

        REM read data fields
        p_name = getElement("name", element)
        p_class = getElement("class", element)
        p_race = getElement("race", element)
        p_desc = getElement("desc", element)
        p_str = getElement("str", element)
        p_dex = getElement("dex", element)
        p_sta = getElement("sta", element)
        p_int = getElement("int", element)
        p_cha = getElement("cha", element)
        p_hitpoints = getElement("hitpoints", element)
        p_walkFilename = getElement("anim_walk_filename", element)
        p_walkSize.X = Convert.ToInt32( _
            getElement("anim_walk_width", element))
        p_walkSize.Y = Convert.ToInt32( _
            getElement("anim_walk_height", element))
        p_walkColumns = Convert.ToInt32( _
            getElement("anim_walk_columns", element))
        p_attackFilename = getElement( _
            "anim_attack_filename", element)
        p_attackSize.X = Convert.ToInt32( _
            getElement("anim_attack_width", element))

        p_attackSize.Y = Convert.ToInt32( _
            getElement("anim_attack_height", element))
        p_attackColumns = Convert.ToInt32( _
            getElement("anim_attack_columns", element))
        p_dieFilename = getElement( _
            "anim_die_filename", element)
        p_dieSize.X = Convert.ToInt32( _
            getElement("anim_die_width", element))
        p_dieSize.Y = Convert.ToInt32( _
            getElement("anim_die_height", element))
        p_dieColumns = Convert.ToInt32( _
            getElement("anim_die_columns", element))
        p_dropGold1 = Convert.ToInt32( _
            getElement("dropgold1", element))
        p_dropGold2 = Convert.ToInt32( _
            getElement("dropgold2", element))
    Catch ex As Exception
        MessageBox.Show(ex.Message)
        Return False
    End Try

    REM create character sprites (with error handling)
    Try
        If p_walkFilename <> "" Then
            p_walkSprite = New Sprite(p_game)
            p_walkSprite.Image = LoadBitmap(p_walkFilename)
            p_walkSprite.Size = p_walkSize
            p_walkSprite.Columns = p_walkColumns
            p_walkSprite.TotalFrames = p_walkColumns * 8
        End If
        If p_attackFilename <> "" Then
            p_attackSprite = New Sprite(p_game)
            p_attackSprite.Image = LoadBitmap(p_attackFilename)
            p_attackSprite.Size = p_attackSize
            p_attackSprite.Columns = p_attackColumns
            p_attackSprite.TotalFrames = p_attackColumns * 8
        End If
        If p_dieFilename <> "" Then
            p_dieSprite = New Sprite(p_game)
            p_dieSprite.Image = LoadBitmap(p_dieFilename)

                 p_dieSprite.Size = p_dieSize
                 p_dieSprite.Columns = p_dieColumns
                 p_dieSprite.TotalFrames = p_dieColumns * 8
             End If
         Catch ex As Exception
              MessageBox.Show(ex.Message)
              Return False
         End Try
         Return True
    End Function

    Private Function getElement(ByVal field As String, _
             ByRef element As XmlElement) As String
         Dim value As String = ""
         Try
             value = element.GetElementsByTagName(field)(0).InnerText
         Catch ex As Exception
              REM ignore error, just return empty
              Console.WriteLine(ex.Message)
         End Try
         Return value
    End Function

    REM note: portions of this source code have been omitted
    REM refer to the complete project in the chapter's resources

End Class
Now I’d like to discuss how you can prepare a sprite for use in this game. Each sprite is somewhat different in the number of frames it uses for each type of animation, as well as the types of animation available. All of the character sprites that I’m using in Celtic Crusader have the full eight-direction walking animation sequences, as well as frames for attacking with a weapon. Some sprites have a death animation, and some have running and falling. Normally, to keep the game as uniform as possible, you would use character sprites that have the exact same number of animation frames for the key animation that takes place in the game so that it’s easy to switch character classes without changing any source code. But since our editor stores the sprite data in the character data files, we don’t need to worry about keeping the animations all uniform. Figure 14.2 shows the walking animation sprite sheet for the paladin class.

The source artwork from Reiner’s Tilesets does not come in this format, but it comes with each frame of animation stored in a separate bitmap file. The easiest way to combine these frames into a sprite animation sheet is with Cosmigo’s Pro Motion sprite animation program. Because Pro Motion works best with single animation strips, I decided to import each group of bitmaps for the character’s walking animation in all eight directions. Using Pro Motion, I converted all 64 frames of animation into a single sprite sheet.
Nothing beats experimentation, so it is up to you to use the freely available sprites provided by Reiner’s Tilesets (and other sources) to enhance Celtic Crusader to suit your own needs. We can only accomplish so much in this book, so I want to give you as many tools, tips, and tricks as I can possibly squeeze in at this time. There are thousands of sprites and tiles available at www.reinerstilesets.de that you can use for your own games! There is a sprite for everything you can possibly imagine adding to an RPG!
All of the characters and monsters discussed in this chapter have been chosen very carefully because we have artwork available for them. Generally, when a game is being designed from the ground up, the game designer will not limit himself to what artwork is available, because none exists before the game goes into development. But in our case, we have all of this artwork provided by Reiner Prokein (www.reinerstileset.de). I strongly recommend that you start with artwork and design your game characters around that instead of designing first and looking for artwork later (unless you know a talented artist who can do the work!).
All of the sprite sheets used in Celtic Crusader were significantly manipulated from their original sources provided by Reiner Prokein. All of the sprites arranged in columns and rows in a sprite sheet and transparent regions have been converted to an alpha channel in each file, which is saved in the Portable Network Graphics (PNG) file format. When you visit Reiner’s website, you will not find sprite sheets like these, as they are provided in individual bitmaps. Just be aware that additional work will be required on your part to add new characters or animations to your game. Figure 14.3 shows the three sheets used for the warrior character—note the different number of columns for each sheet, which is handled by the character editor and the Character class!

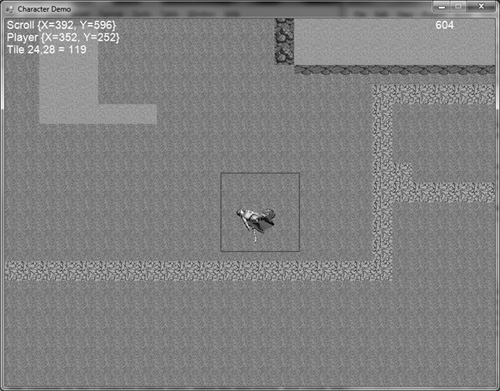
Let’s take the new Character class and artwork for a spin. The Character Demo program is not much different, functionally, from the Portal Demo in the previous chapter. However, all of the character code is now transferred over to the Character class, which knows how to load a .char file (created by the character editor tool), parse the xml fields, and create the three sprites needed for each character. In addition, the three animation states can be changed using the standard numeric keys 1, 2, and 3. The result is shown in Figure 14.4. The demo looks a little bit goofy since you have to move in order to show the attack and die animations, but that’s okay, as those animations will not be used during normal walking, only when another action is triggered. The point is, the Character class works!
Since the code for the Character Demo is derived from the previous chapter’s example, I will instead just show you the relevant sections of code related to the new Character class, and let you open the project to see the complete sources. Since the Character class mimics some of the Sprite class’ properties and also makes available the current sprite object via the GetSprite() function, we can replace most of the Sprite-specific code in this demo with Character-based code without making significant changes.
First, we declare a new Character variable:
Private hero As Character
Next, we create the hero object and set its initial position.
hero = New Character(game)
hero.Load("paladin.char")
hero.Position = New Point(400 - 48, 300 – 48)
In the Form1_KeyUp() event, the AnimationState property is changed with the 1, 2, and 3 keys, to test the three different character states (which are Walking, Attacking, and Dying).
Private Sub Form1_KeyUp(ByVal sender As System.Object, _
        ByVal e As System.Windows.Forms.KeyEventArgs) _
        Handles MyBase.KeyUp
   Select Case (e.KeyCode)
        Case Keys.Escape : End
        Case Keys.Up, Keys.W : keyState.up = False
        Case Keys.Down, Keys.S : keyState.down = False
        Case Keys.Left, Keys.A : keyState.left = False
        Case Keys.Right, Keys.D : keyState.right = False
        Case Keys.Space
            If portalFlag Then
               level.GridPos = portalTarget
            End If
        Case Keys.D1
            hero.AnimationState = Character.AnimationStates.Walking
        Case Keys.D2
            hero.AnimationState = Character.AnimationStates.Attacking
        Case Keys.D3
            hero.AnimationState = Character.AnimationStates.Dying
    End Select
End Sub
In the main loop function, doUpdate(), we simply call hero.Draw(), which both animates and draws the character sprite. This Draw() function is so smart that it even figures out automatically which sprite to draw based on the AnimationState.
If ticks > drawLast + 16 Then
    drawLast = ticks

    REM draw the tilemap
    level.Draw(0, 0, 800, 600)

    REM draw the hero
    hero.Draw()
  ...
End If
The new character editor tool and the Character class that knows how to work with the new .char files have together dramatically improved our game’s potential gameplay with even more data-driven features! It is now possible to design a totally new character or monster, edit the sprite sheet images, and save the new character to a data file, then load it up inside the Celtic Crusader game and have the new character moving around in a matter of minutes, with only a few lines of code! This is really getting exciting, because it means you aren’t stuck with just what the designer has put into a game (at least, a game based on these tools). If you want to tweak a character, you won’t have to edit any source code, you’ll just open the file in the character editor, make the changes, save it, then try it out in the game again. That’s the beautiful thing about game editor tools, and why this is such a hot topic in the game industry, with skilled tool programmers in high demand.