
Chapter 5. Camera, Photos, and Video
The Droid 2 does more than just let you make phone calls and run apps—with a built-in 5-megapixel camera and a camcorder, it does double-duty as a multimedia machine as well.
This chapter gives you all the details about taking and viewing photos and videos with your Droid 2, and viewing pictures and videos transferred to your Droid 2 from your computer.
Opening the Gallery
There are four ways to get photos or videos into your Droid 2:
Transferring them from your PC or Mac (see Chapter 12 for details).
Taking a photo using the Droid 2’s built-in camera.
Downloading them from the Web.
Getting them by email.
No matter how you get them, though, you view them in the same way, by using the Gallery app. Here’s how to use it:
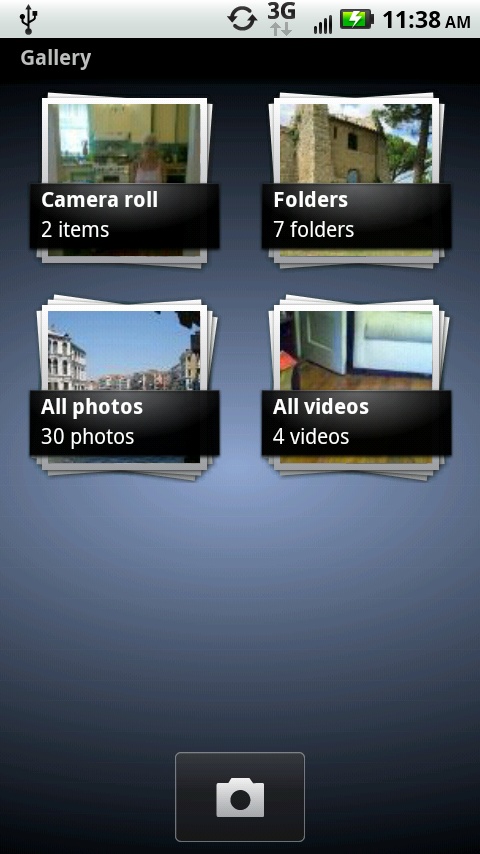
In the Application Tray, tap the Gallery icon.
The Gallery screen appears. At top left is your Camera roll, which contains all the photos you’ve taken with the Droid 2. It displays a thumbnail of the last photo you took. Also on the screen are other collections of your photos and videos, each also showing a thumbnail of the last photo or video taken. The Folders collection shows all your photos organized by folder—for example, Family, Tahiti (you should be so lucky!), and so on. You’ll also find “All photos”, which contains every photo on your Droid 2, and “All videos”, which similarly lists all the videos on your Droid 2.
Tap “Camera roll” or a collection.
The screen fills with 24 thumbnails of the photos in the roll, list, or album, and the top portions of four more thumbnails. For a moment, the date that the first photo was taken appears at the top of the screen, but it vanishes quickly. Scroll through the list by flicking.
Note
Turn your Droid 2 sideways in the gallery, and you’ll see the photos in what’s called the 3D Gallery. Like the music album gallery described on Choosing from the 3D Gallery, it’s a 3D animated interface that lets you flip through pictures, videos, and albums.
Tap the photo you want to view.
The photo displays on the Droid 2’s big, beautiful screen. Now you can see why you wanted the Droid 2—that extra screen real estate compared with other smartphones pays off when viewing photos. For a moment, two icons appear onscreen: the slideshow button
 , and the information button
  . The slideshow button launches a slideshow on your Droid 2, and the information button provides a variety of details about the photograph, like its size.
Depending on the photo’s length-to-width ratio, it may not fill the entire screen. If it doesn’t, you’ll see black space along the sides or at the top and bottom.


Viewing Pictures
Now that you’ve got photos on your screen, the fun begins—viewing them in different ways, and flicking through them.
Zooming means magnifying a photo, and you’ve got the power to do that at your fingertips—literally. Double-tap any part of the photo, and you zoom in on that area; double-tap again and you zoom out. You can also use the thumb-and-forefinger spread technique (see Copying and Pasting Text) to zoom in more precise increments. Once you’ve zoomed in this way, you can zoom back out by using the two-finger pinch technique.
Panning means to move the photo around the Droid 2’s screen after you’ve zoomed in, so you can see different areas. Use your finger to drag the photo around.
Rotating means to turn your Droid 2 90 degrees so that it’s sideways. When you do so, the photo rotates and fills the screen using the new orientation. This technique is especially useful when you have a horizontal photo that looks small when your Droid 2 is in its normal vertical position. Rotate the phone, and like magic, the picture rotates and fills the screen properly. If you’ve got the phone held horizontally, and you’re viewing a vertical picture, simply rotate the phone 90 degrees, and your photo rotates as well.
Flicking (Copying and Pasting Text) advances you to the next or previous photo in your list. Flick from right to left to view the next photo, and from left to right to view the previous one.


Photo Info and Slideshows
Tap a photo, and two small icons appear on your screen:
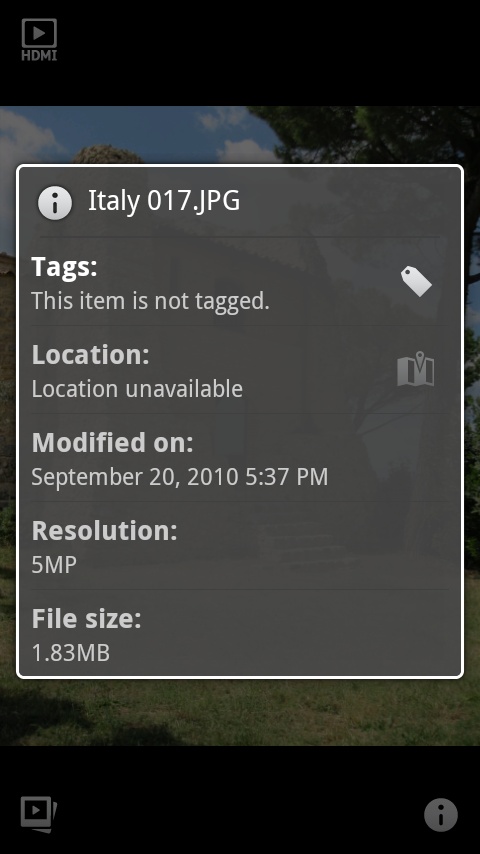
Tap the photo information button
, and a screen appears that shows a variety of information about the picture, including whether there are any tags, where it was taken (if that information is available), resolution, file size, and when it was last modified.Note
A tag is a keyword that you can attach to a photo’s file information to make it easy to find later. The tag isn’t visible in the photo itself. You can add any tag you want, such as “Family,” “Food,” and so on. Some cameras automatically add tags to photos, including the date and time they were taken. The Droid 2, as you’ll see on What’s with All the Icons on the Top of the Screen?, can also add geotag information—the location where the photo was taken.
Tap the slideshow button
and a slideshow of all the photos in that folder starts to play, beginning with the current photo.You can change almost everything about how the Droid 2 plays slideshows. When you’re in the Gallery (not when you’re viewing a slide), press the Menu key and then select Settings. From there, you can change how long each photo is displayed before the next one appears, whether to shuffle the photos or play them in order, whether to use transition effects between slides (and if so, which to use), and whether to repeat the slideshow from the beginning when it ends, or simply have it stop.

Editing Photos, Sharing Photos, and More
You can do a lot more with photos on the Droid 2 than just view them or create slideshows with them. You can use a surprisingly powerful built-in photo editing tool, share photos with others, and more. To do any of this, when you’re viewing a photo, press the Menu key, and you’ll find these options:
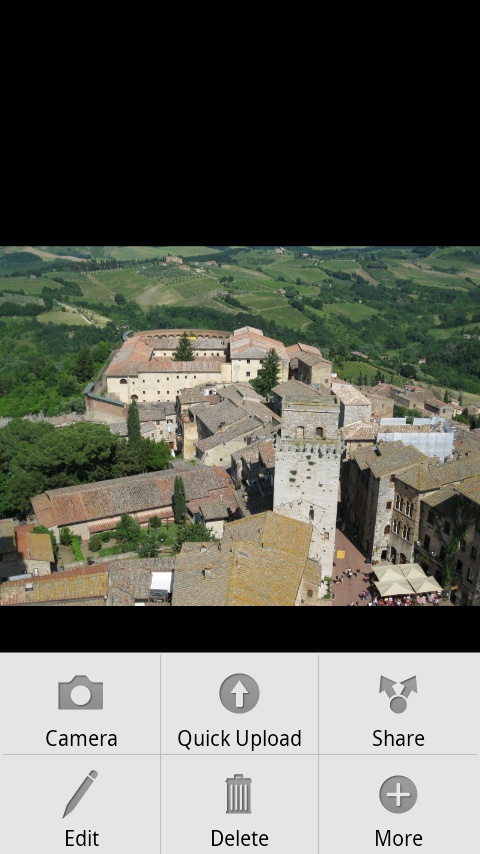
Camera. Launches the Camera app so you can take photos. See Taking Still Photos for details.
Quick Upload. If you share photos with others via a social networking site such as Facebook, or use an online photo service such as Photobucket or Picasa, you can upload photos to it using this option. If you haven’t yet set up the service to work with your Droid 2, you’ll have to do that. Just follow the instructions on the website. When you choose this option, the entire album of photos you’re viewing will be uploaded, not just one.
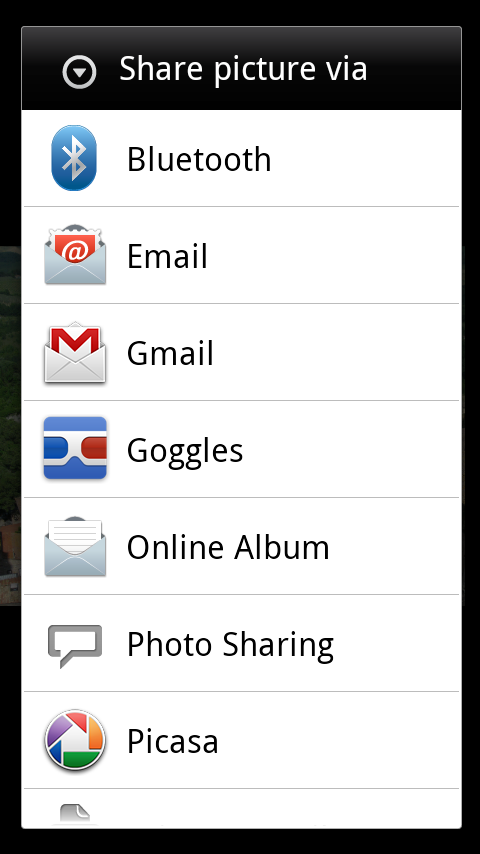
Share. Here’s another way to share photos with others. Unlike the Quick Upload option, this one shares only the photo you’re currently viewing. You can share it in many different ways, including email, a Bluetooth connection, social networking sites, and photo-sharing sites. Tap the sharing method you want, and then follow the onscreen instructions.
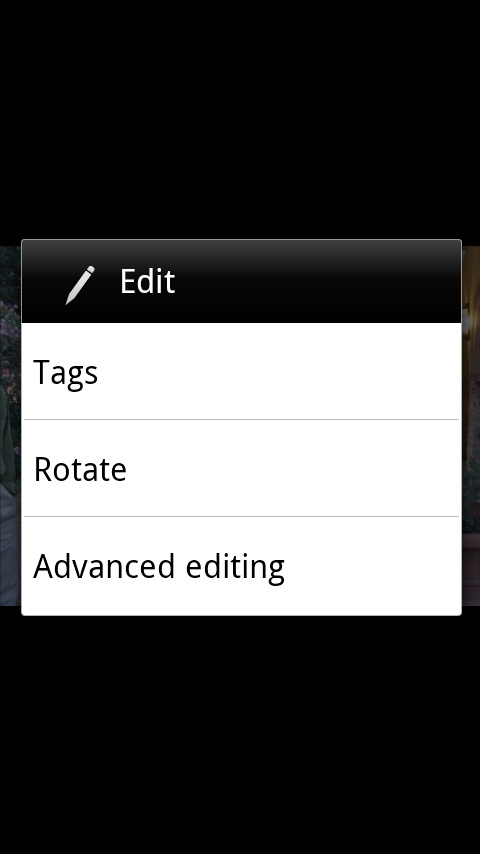
Edit. When you use the Droid 2, it’s easy to forget that it’s a computer, and a surprisingly powerful one. And like any computer, it can run powerful photo editing tools. Get to them by tapping this item.
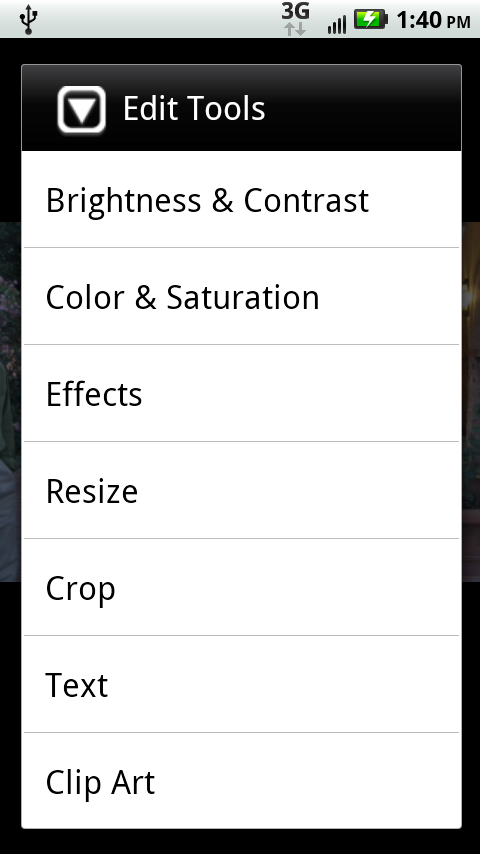
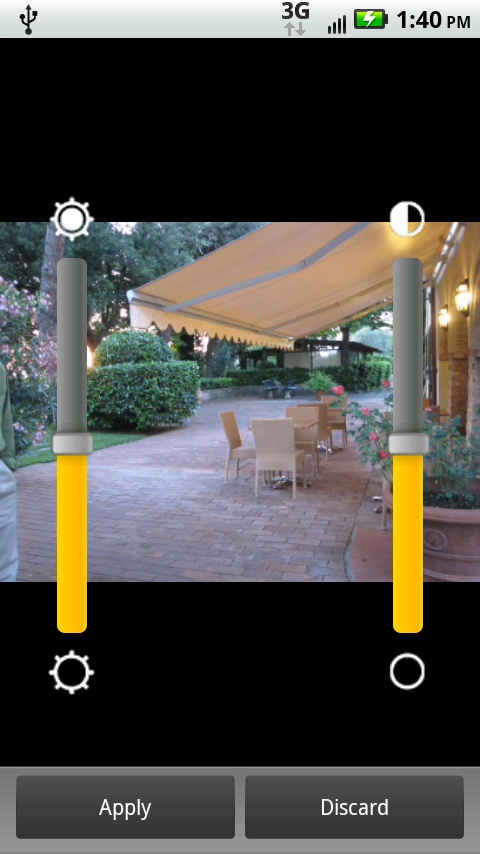
The first screen offers basic editing tools—adding tags, or rotating a photo. For more tools, tap “Advanced editing”, and you come to a screen that shows all the ways you can edit the photo, such as changing the brightness and contrast, the color and saturation, adding special effects such as turning a color photo black and white, resizing the image, and more. Tap what you want to do, and an easy-to-use screen appears. For example, tap Brightness & Contrast, and the photo loads with two sliders on it, one for controlling brightness and the other for controlling contrast. As you move the slider, you see the editing take effect. When you’re done, tap Apply. To discard your changes, tap Discard.
Delete. Tap to delete the photo.
More. Leads to three options: Set as, Print, and Settings.
Tap “Set as”, and you can use this photo as the photo for a new contact (tap Contacts), use the photo as your wallpaper (wallpaper), or use the photo for an existing contact (tap “Set profile picture”).
Tap Print, and you can print from your Droid 2 to a retail store that offers remote, wireless photo printing. If your phone knows your location (Buzz and Latitude), it automatically displays a list of nearby stores with that service. Otherwise, you can search for a store by typing in your location.
Tap Settings, and you go to the screen that controls slideshow settings.
Working with Multiple Photos
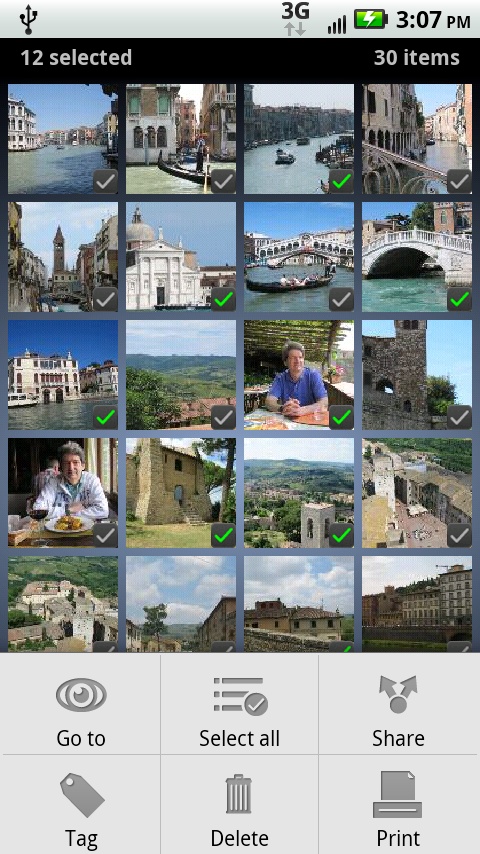
In the previous section, you learned about ways to work with individual photos. But what if you want to work with multiple photos at once—give them all the same tag, delete them all, share a specific group of them, or print them all? It’s easy.
When you’re viewing photos in the Gallery, press the Menu key. From the menu that appears, tap Select Items ![]() .
.
Note
When you press the Menu key and you’re viewing photos in the Gallery, the menu that appears includes selections for launching the Camera app, starting a slideshow, and accessing Settings. In addition, there’s a “Go to” button that lets you view all photos taken during any one of the previous four months, or taken last week.
The current collection of photos you’re viewing appears, with small checkboxes at the bottom of each photo. Tap the photos you want to select—the boxes turn green when selected. If you want to select all photos, press the Menu key and choose “Select all”.


Now that you’ve selected your photos, press the Menu key. You can now share, delete, or print the photos in the same way you share, delete, or print individual photos. You can also add the same tag to them all by pressing the Tag key and then typing the tag you want to add.
Videos in the Gallery
The way you view and work with videos in the Gallery is essentially identical to the way you work with photos, with just a few minor differences:
Rotate your Droid 2 by 90 degrees when you’re viewing videos, since they’re usually taken with a horizontal orientation, as are the ones you take on your Droid 2.
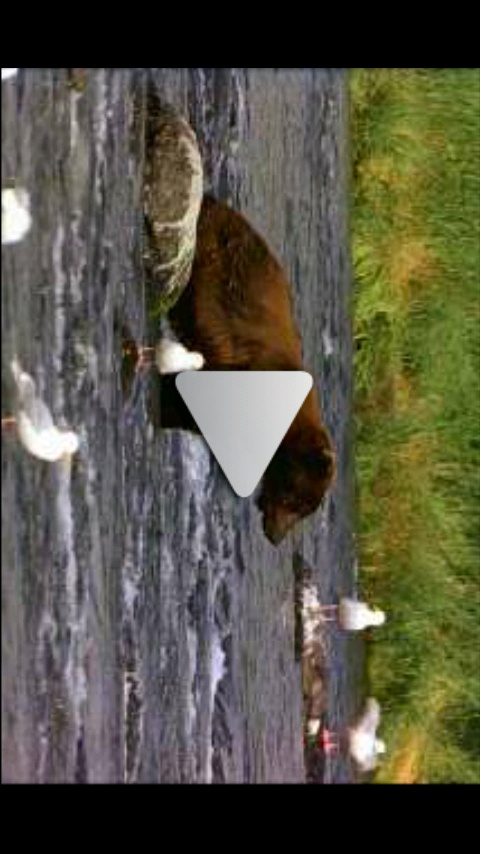
When you tap a video, it opens with a right-facing triangle—the Play button. Tap the triangle to play the video. When the video plays, a circle moves along a progress bar to show where you are in the video. Drag the circle forward or back to move forward or back in the video. Tap the Pause button to pause the video; tap the Play button to start playing it again.
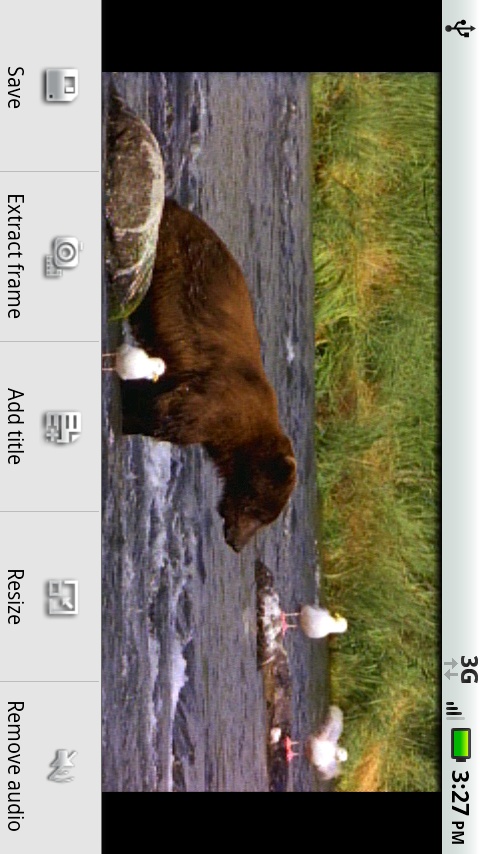
To edit a video, select it, press the Menu key, and then tap Edit. The video opens in a video editing tool. To edit the video, press the Menu key again. Across the bottom of the screen you’ll find all your editing options, including adding a title, resizing the video, and removing audio.

Taking Still Photos
The Droid 2 features a 5-megapixel camera, located on the back of the phone, in the upper-left corner. Because it’s a camera wrapped inside a computer, it offers plenty of extras, such as multi-shot feature (taking six pictures, one after another), a self-portrait mode, and a panoramic assist that takes multiple photos of a wide area and stitches them together into a panorama. And there’s a lot more as well.
To launch the camera, hold down the Droid 2’s Camera key—the small black button on its bottom right. (If you’re holding the Droid 2 horizontally, the button is on the upper right.) If you prefer, you can tap the Camera icon in the Application Tray.
Note
You have to unlock the Droid 2 before you can use the camera. So if you press the camera when the Droid 2 is locked, it won’t respond.
Frame your shot on the screen. You can use the camera either in the normal vertical orientation, or turn it 90 degrees for a wider shot. In the middle of the viewfinder, you see a white box. The Droid 2 uses that area for its focus, to figure out the photo’s best overall brightness (its exposure), and to calculate the overall white balance, what is often called the color cast.
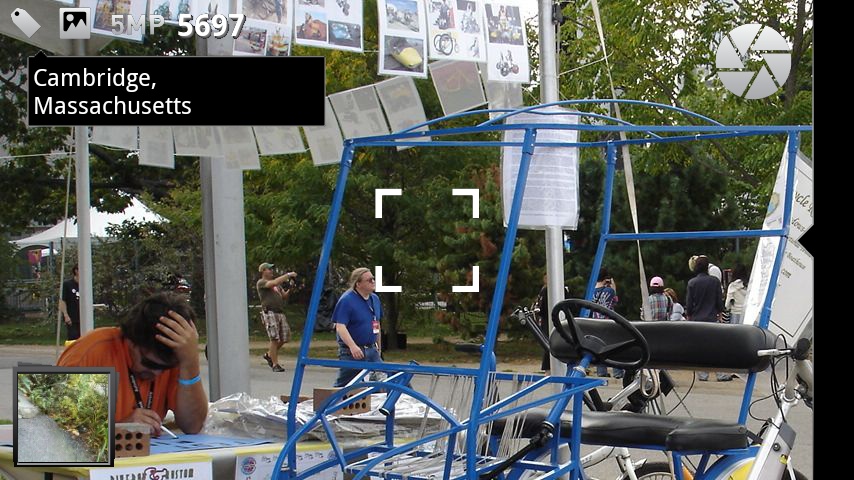
Sometimes, though, the exact center of the screen is not necessarily the most important part of the photo. If that’s the case, simply drag the square to the area of the screen that’s most important. The Droid 2 then uses that area to determine focus, brightness, and white balance.
Zoom in and out by using the Droid 2’s volume keys, which are on the same side as the Camera key. When you’ve got everything the way you want it, there are two ways to take your photo:
Press the Camera key halfway, which tells the camera it’s time to focus. The white box turns green when the photo is in focus. Then press the key down all the way to take the shot.
To forgo having the Droid 2 focus for you, just tap the onscreen shutter button.
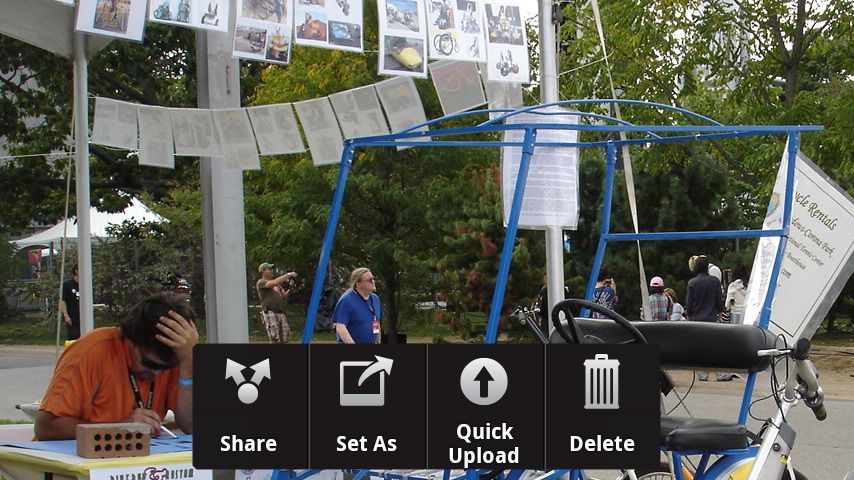
No matter which method you choose, you’ll hear the familiar snap sound of a photo being taken. As soon as you take the photo, a message flashes onscreen: “Touch image for more options”. Tap the screen, and a screen with four options appears: Share, Set as, Quick upload, and Delete. These are a subset of the options you can choose from when you’re viewing a photo in the Gallery and you press the Menu key. For details, see Editing Photos, Sharing Photos, and More.
Note
The Droid 2 doesn’t save your photo to the SD card until the message disappears from the screen, once you’ve chosen your options.
If you keep the photo, a small thumbnail of it stays in the lower left-hand corner of the viewfinder. Tap the thumbnail to get to the Camera Roll—all the photos you’ve taken on the Droid 2. (The Camera Roll doesn’t include any photos you’ve transferred from your computer.)
Note
To learn how to transfer photos between your Droid 2 and your computer, turn to Connecting Your Droid 2 to Your Computer.
What’s with All the Icons on the Top of the Screen?
When you turn on the camera, you see a group of icons and numbers on the upper-left portion of the screen, if you’re holding the Droid 2 horizontally. If you hold it vertically, they range along the upper-right part of the screen. Once you decipher them, they give you useful information about the camera and the photo you’re about to take (or have just taken):
Location information
 . If you let your Droid 2 use location services (Backup Assistant), this option tells it to find your current location and add it as a tag to your photo. The tag displays here and then quickly fades away. Adding the location tag is commonly known as geotagging.
GPS indicator
 . When this icon appears, it means that your GPS is on.
Camera indicator
 . When you see this icon, it means that you’re using the still camera. (An icon of a video camera appears when you’re using video instead.)
Auto location tag
 . When you see this icon, it means that you’ve told the Droid 2 to automatically put the location tag into your photo. To turn it off (or back on again), press the Menu key, select Tags, and turn off the checkbox next to “Auto location tag”.
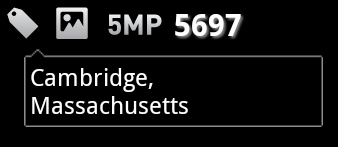
Resolution
 . Tells you the resolution at which you’re going to take the photo.
Number of photos left
 . Tells how many more photos will fit onto your SD card (if you take them using the current resolution).
Customizing Your Photo Shooting
Want to make sure you take the best photo possible for your light conditions, and also add special effects, like a sepia tone? Simple—tap the screen, and a menu appears that lets you do sepia and more:
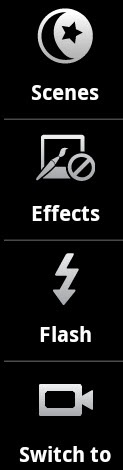
Scenes
 . Helps make sure that you take the best photo possible for your current conditions. Tap the button and flick through your options, including Auto, which is best for a wide range of photos; Portrait, for upper-body shots; Landscape, for big outdoor scenes; Sport, for any situation with a lot of movement; Night portrait, for taking portraits in low-light conditions; Sunset, for twilight conditions; Macro, for close-ups of flowers and other objects; and Steady Shot, to reduce blurring.
Effects
 . Tap when you’re in the mood for some awesome special effects, including Black and White; Negative for reversing the colors into what looks like a film negative; Sepia for making it look like an old-fashioned brown-toned photo; and Solarize for adding a psychedelic-poster effect. Finally, there are Red Tint, Blue Tint, and Green Tint, which do the same thing as putting a red, blue, or green color filter over the lens (why you’d want green-skinned pictures of your family members is up to you).
Flash
 . Lets you turn the flash on or off, or lets the Droid 2 determine whether to use the flash. In some lighting conditions, you won’t be able to do this, because the Droid 2 will control it automatically.
Using the Best Picture Mode
The Droid 2 gives you more control over your photos, even helping you stitch together big panoramic photos. Press the Menu key and select “Picture modes”. You’ve got the following choices:
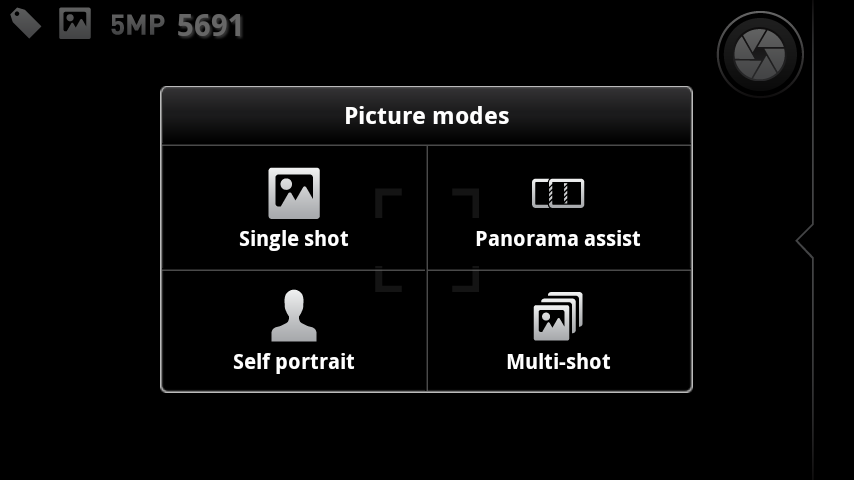
Single shot is what you use most of the time, when you don’t need the Droid 2 to do anything special. It’s the mode your camera is in normally.
Self portrait uses a bit of magic to help you take your own picture. Prop up your camera so that it’s pointing at a place where your face will be, select this mode, and then walk over to where the Droid 2 is pointed and say “Cheese!” As soon as the camera sees your face in the viewfinder, it takes the picture automatically.
Panorama assist lets you take multiple overlapping pictures of a wide panoramic shot. The Droid 2 stitches them together into a single, large panorama. The Droid 2 guides you to take each photo so that it’s overlapping properly.
Tip
You can combine picture modes with Scenes and Effects. For example, you can take a solarized panorama. (You won’t win any photography contests this way, but you can do it.)
Here’s how it works: Tap the button, and a screen appears asking for the capture direction. If you’re taking a vertical panorama, choose either “Move up” or “Move down”, depending on whether you’ll be starting at the bottom or the top. (Choose “Move up” if you’ll start at the bottom, and “Move down” if you’ll start at the top.) If you’re taking a horizontal panorama, choose either “Move left” or “Move right”. (Choose “Move left” if you’ll shoot from right to left, and “Move right” if you’ll shoot from left to right.)
Now take your picture. After you take the first picture, a small box appears with a thumbnail of what you’ve just taken, and a second blank box appears either above it, below it, to the left of it, or to the right of it, depending on the capture direction you chose. A boxed arrow leads from the small thumbnail of your photo to the new, empty box. Move the camera in the direction you want to take the panorama; the boxed arrow moves along with it. As soon as the boxed arrow fits precisely in the empty box, the Droid 2 snaps the photo. Another box appears. Move the camera in the direction indicated, and repeat the steps until you’ve captured the entire panorama. When you have, the Droid 2 then stitches the panorama together.
Don’t expect panoramas to be perfect. You may notice bending or a jump where the photos are attached.
Multi-shot takes six shots quickly, one right after another. Select this, and when you take a photo, it takes six shots in quick succession. After you take the photos, it displays all six of them; you can then tap any individual photo to delete, edit, and so on, as you would normally for a photo.
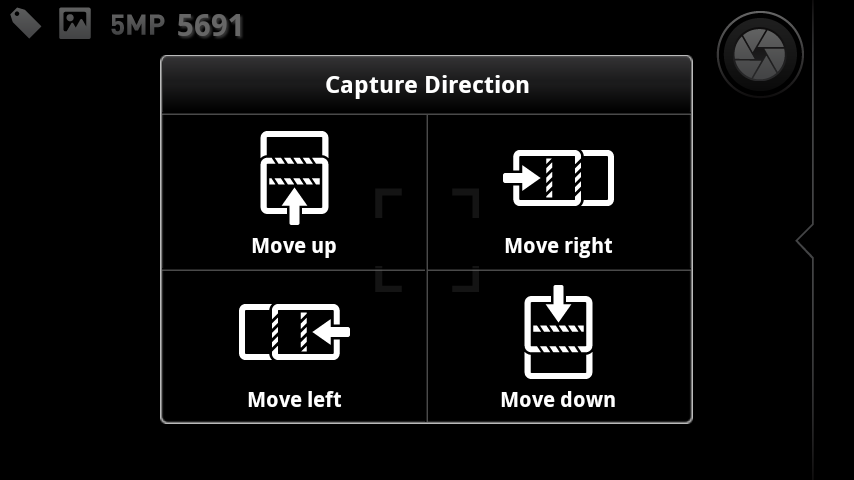
Photo Settings
Given the sophistication of the Droid 2, it should come as no surprise that you get plenty of settings to fiddle around with. You certainly don’t need to spend your time doing it, because right out of the box, the settings are good for most photo situations. Most people probably won’t want to while away their time changing these settings, but if you want to change the picture resolution, and choose whether to use features such as face detection, then by all means dig right in.
When you’re in the Camera app, press the Menu key and then tap Settings. Here’s what you can change:
Picture resolution. You get to choose from five settings, ranging from Very Small (1 megapixel) up to Large (5 megapixels) and Widescreen.
Video resolution. Controls the camcorder’s resolution. It ranges from a low of 176 x 144, all the way up to 720 x 480.
Quick upload album. Tap to choose your preferred way for the Droid 2 to upload photo albums. For details about album uploads, see Editing Photos, Sharing Photos, and More.
Review time. Sets the amount of time the “Touch image for more options” message appears on your screen. Out of the box, it’s 2 seconds. You can change it to 4 seconds, 6 seconds, or have the photo be saved automatically with no message at all.
Face detection. When this option is turned on, the Droid 2 camera automatically finds and focuses on faces when you take a photograph. When you’re using this feature, you won’t be able to use the Camera key to focus; face detection does it for you automatically.
Tip
To add tags to your photos, in addition to the location tag, press the Menu key, select Tags, and then tap Custom Tags. Next tap Select to add tags. From now on, every photo you take will get these tags, unless you turn off the checkbox next to Custom Tags. While Custom Tags is turned on, there’s no way to have individual tags you’ve created appear on some photos but not others; it’s all or none.
ISO equivalent sensitivity. Adjusts how sensitive the sensor is to light. The higher the setting, the faster the shutter speed, which can cut down on blur in low-light situations. Your choices are Automatic, 100, 200, 400, and 800. For photo geeks, the higher numbers do the same thing as using “faster” (high ISO) film in a film camera. 100 and 200 are good for outdoor situations; 400 and 800 are for indoors. Or just leave it on Automatic and let the Camera app do its thing.
Exposure. Changes the light setting for the viewfinder so you can control how light or dark a photo appears. Choices are between –3 (the darkest) to 3 (the brightest). It’s normally set to 0.
Shutter animation. Normally when you take a photo, the screen goes blank for a second, and then the photo appears. If you’d like, though, you can see an animation instead, such as fading down in a circle when the screen goes blank, and then coming up in a circle when it appears again. Tapping this button gives you that option. Choose among None, Circle, and Curtain.
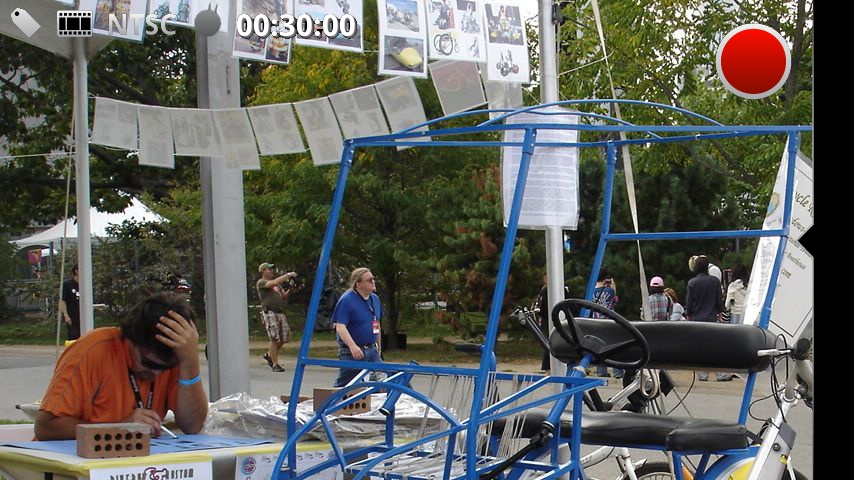
Taking Video
Recording video is much the same as taking a still photo. Put the Droid 2 into Camera mode, tap the screen, and then tap the ![]() icon to switch to Camcorder mode. (Repeat the steps but tap the
icon to switch to Camcorder mode. (Repeat the steps but tap the ![]() icon to switch back to the camera.)
icon to switch back to the camera.)
To start recording, hold down the Camera key all the way, or tap the red button, and you’re recording video. The red button turns into a gray square. To stop recording, press the square. To record without sound, press the Mute button, and to turn sound back on, tap it again.
There are some differences between taking still photos and recording videos. With video:
You can’t zoom in and out.
It may take a while for the “Touch video for more options” message to appear because there’s a lot more data to save.
If you tap the screen when the “Touch video for more options” message appears, you have fewer choices than you do with photo—you can delete the video, share it, or start taking a new video. When you start taking a new video, the one you just took is automatically saved.
The scenes you can choose from (tap the screen and then tap Scenes) are different from the ones you can choose for still photos. Your choices are Everyday, for normal video capture and stereo sound; Outdoors, for capturing video outdoors (because it reduces wind sounds); Concert, because it does the best job of reducing distortion in loud music; Narrative, for when you want to comment on the scene you’re capturing; and Subject, when you want to record a person sitting or standing right in front of the camera.
When you’re in the viewfinder and press the Menu key, a Video Modes option appears, rather than Picture Modes. You can choose from four different modes—Normal video; Video Message, which configures the capture settings for sending video via MMS (Multimedia Message Service); Slow motion; and Fast motion.
Note
The effects you can apply to your videos are exactly the same ones that you can apply to still photos.
Editing Videos
To edit your videos, you’ll have to head back into the Gallery. Open the video you want to edit, press the Menu key, and then select Edit→“Advanced editing”, and you can edit your video by doing things such as cutting any dead air at the beginning or end of the video, adding a title, removing the audio track, and so on.

YouTube
What fun is video if you can’t share it? You can always send video files to your friends via email or text message…or share it with the world by uploading it to YouTube. Keep your Droid 2 handy, and who knows, your cute laughing baby or sleepy kitten may be the next viral video sensation.
Note
When viewed on the Web, YouTube requires the use of a technology called Flash to play videos. Early versions of the Android operating system do not play Flash (some other phones, notably the iPhone, ban Flash altogether). So YouTube uses a different format for videos destined for the YouTube app built into the Droid 2. However, depending on your version of Android, you may be able to view videos using the Droid 2’s built-in browser. To find out, head to www.youtube.com, open a video, and then tap its start control to play it. You can choose whether to play the video using the Droid 2’s built-in YouTube player, or have your browser play it. If your Droid 2 doesn’t have the most updated version of Android—at least version 2.2—and Flash Player, it can’t play the video.
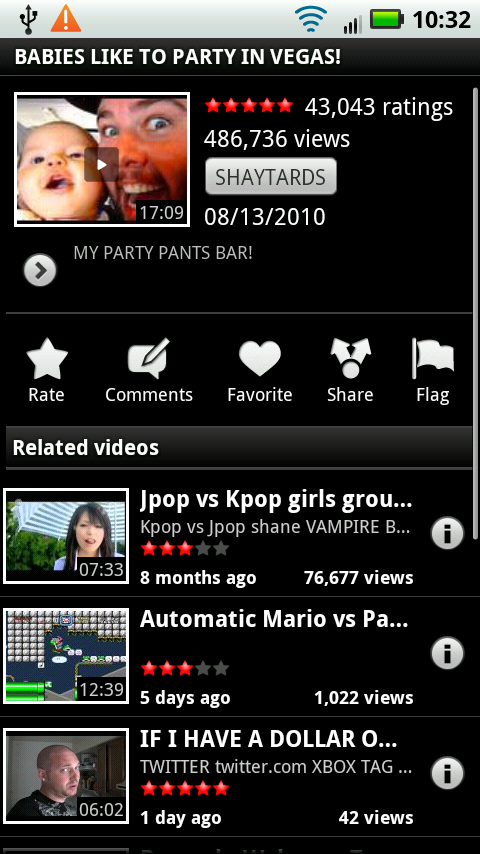
To visit YouTube and search, watch, and share videos, launch the YouTube app in the Application Tray. You come to a page that’s basically a short list of the most popular YouTube videos—the most viewed videos, the most discussed videos, and the top-rated videos, as well as videos recommended for you, based on past videos you’ve watched.
Want more information about any of the videos? Tap the little i button ![]() to see the video’s rating, the number of times it’s been viewed, and who created it. From this screen, you can also do the usual YouTube things: rate the video, comment on it, add it to your Favorites list, share it, or flag it as being inappropriate. You also see a list of related videos. To return to the main YouTube screen, press the Back key.
to see the video’s rating, the number of times it’s been viewed, and who created it. From this screen, you can also do the usual YouTube things: rate the video, comment on it, add it to your Favorites list, share it, or flag it as being inappropriate. You also see a list of related videos. To return to the main YouTube screen, press the Back key.

Note
When you flag a video as being inappropriate, YouTube will review the video to see whether it violates the company’s guidelines for pornography, drug abuse, gratuitous violence, predatory behavior, and so on.
Playing a Video
To play a video, tap it. Your screen changes to a horizontal orientation, so turn Droid 2 90 degrees counterclockwise. The video begins playing automatically.
If you’ve got a Wi-Fi or 3G connection, all’s well. The video will play smoothly and display at a good resolution. If you’re not connected via Wi-Fi or 3G, though, you may be in for a rough ride—grainy resolution, jerky motion, or possibly no play at all.
When you play the video, the usual controls appear for Pause ![]() , Forward
, Forward ![]() , and Back
, and Back ![]() . There’s also the familiar progress bar across the bottom that lets you move forward or back. At the lower-right of the screen there’s an HQ (high quality) button. Tap it to reload the video at a higher quality.
. There’s also the familiar progress bar across the bottom that lets you move forward or back. At the lower-right of the screen there’s an HQ (high quality) button. Tap it to reload the video at a higher quality.

To control the volume, don’t use YouTube controls. Instead, use the Droid 2’s volume sliders, which are located on the top left of the phone as you’re watching the video.
Note
Just how popular is YouTube? Here are the numbers: Every day, people watch 2 billion videos on YouTube. Hundreds of thousands of videos are uploaded daily, 24 new hours of video every minute. And these numbers are getting bigger by the day.
After a few seconds of watching a video, the controls disappear. To make them come back, touch the screen.
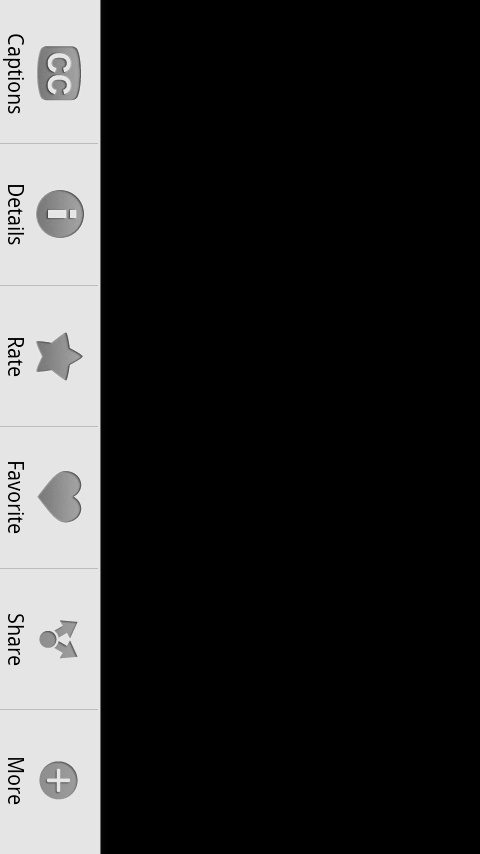
While you’re watching (or pausing) any video, there’s more you can do with it. Tap the Menu key, and a menu appears at the bottom of the screen, where you can turn on closed captions (if available); rate the video; add it to your favorites; share it with others via email, text messaging, or Bluetooth transfer; or access its details screen. Tapping the More button lets you see comments others have made about the video, flag the video, or go back to the YouTube main screen.
Finding Videos
With the countless videos available on YouTube, finding one you want to play is easy.
As explained earlier, on the main YouTube screen you’ll find lists of the most viewed videos, the most discussed videos, and the top-rated videos. Beneath each list is a button you can tap to see more in each category.
If you’ve added any videos to your Favorites list, YouTube will put together a “Recommended for you” list of videos it thinks you’ll like, based on the videos on your Favorites list.
You can find videos in several other ways as well:
Search. Tap the search button at upper right and then type a search phrase. YouTube looks through the titles, descriptions, and keywords to find a video that matches what you’re looking for.
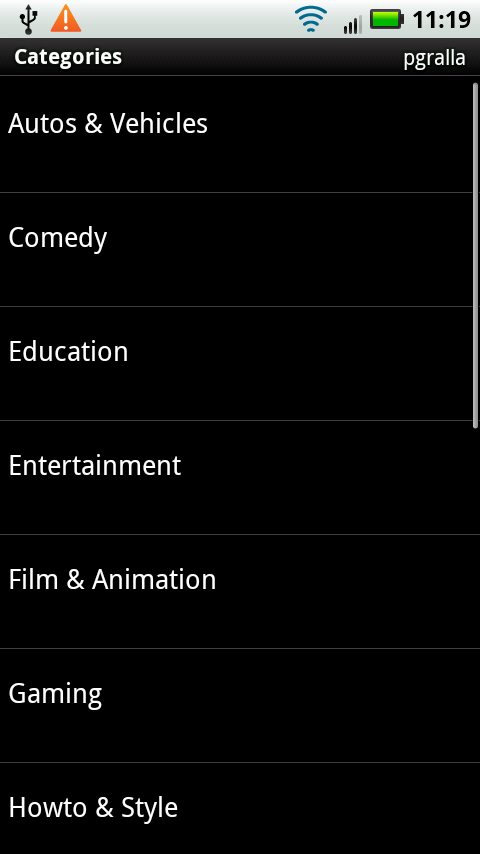
Categories. Press the Menu key and select Categories. You come to a list of videos arranged by categories, such as Comedy, Film & Animation, Sports, and others. Tap any category, and you come to a list of the most popular videos that week in that category.
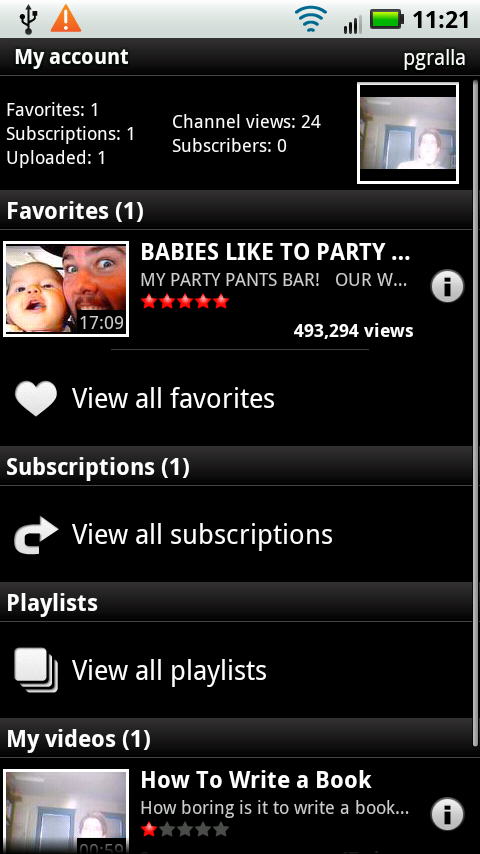
Favorites, Playlists, Subscriptions, My Videos. You can use these search options only if you have a YouTube account. You can get an account for free at www.youtube.com, so if you plan to use YouTube much, it’s worth doing. Tap the Menu key, and then select “My account”. You see the list of your Favorites, as well as the videos you’ve created and uploaded yourself in the My Videos area. In addition, you see subscriptions you’ve made to different YouTube channels—videos produced on a regular basis about a particular topic or person, like your favorite band, technology, a person who posts videos you like, and so on. This area also shows Playlists, groups of videos you’ve grouped together, in the same way you create music playlists in a music player.
Recording and Uploading Videos
Want to be a content producer, and shoot your own videos and upload them to YouTube? Your Droid 2 has everything you need to do it.
First, record your video: In the Application Tray, tap the Camcorder button or, on the YouTube main screen, tap the Video button ![]() to turn on the Droid 2’s video camera. Record and save your video. (For more details about how to record videos, see Taking Video.)
to turn on the Droid 2’s video camera. Record and save your video. (For more details about how to record videos, see Taking Video.)
Once you’ve saved your video and are back in YouTube, tap the Menu key and select Upload. You must have a YouTube account to upload a video. Select the video you want to upload, follow the onscreen instructions, and the video uploads to YouTube.