
Chapter 2. Spring Roo on the Web
If you model your business data in the forest and nobody accesses it, did you really model it? In the last chapter, we looked at Spring Roo’s sophisticated support for easy data modeling, but this is not an end in of itself. To be useful, you need to connect your applications to your users, and the most obvious way to do this today is to build a web application that they can interface with. Spring Roo provides excellent support here, as well. Spring Roo supports many web technologies, including Spring MVC, Spring Webflow, Flex, GWT, Vaadin, and Flex.
We’ll review some of these technologies in this chapter.
Spring MVC
Spring MVC is a model-view-controller framework, which, as its name implies, has three essential parts. MVC is a well-known pattern in web frameworks. Its most redeeming quality is that it encourages clean, well-layered, decoupled applications that promote application growth to support new requirements. The “front controller” in the diagram is the Spring MVC DispatcherServlet, which needs to be registered in web.xml. It routes all requests coming into the web application to registered Spring MVC Controllers. Controllers are just POJO Spring beans that have annotations that describe the mapping between a URL (and the HTTP method—GET, PUT, POST, DELETE, etc.—used to access that URL) and the methods in a controller.
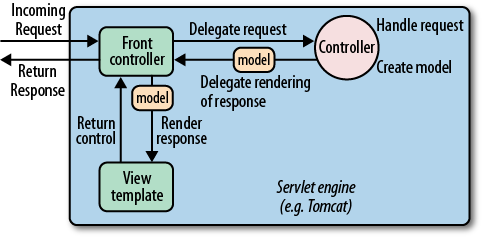
Controller methods are expected to process the request—perhaps access a backend service, invoke business logic, etc.—and then set up model (your JPA entities) data that’s used to driven the generation of a view. The view—often—is a JSP page or some other sort of template, or it’s a representation of some sort of data. This representation of data can be in XML, or JSON, or any other encoding you desire.
As Spring MVC uses Spring, it is completely configurable. Every aspect of it—from the view resolution mechanism, the views, the controllers, and the request dispatcher itself—can be configured. While Spring MVC is extremely flexible, it can be overwhelming for the uninitiated. By default, Spring MVC ships with common-sense defaults enabled, but building a typical application using Spring MVC can still be tedious because of all the technologies you’re likely to want to integrate with it in order to build the best web application possible: JSPX for clean, XML-centric view templates, JavaScript to add dynanicism and interactivity to the client, HTML (which of course is used to describe the structure of the pages rendered in the browser), JSR 303-based bean validation to handle validation on your entities, REST (to expose clean, easily reused services in terms of the common idioms of the web), CSS to support declarative styling, Apache Tiles to support templating and page fragment reuse, internationalization, and much more. Spring Roo can be of great help here because it relegates all of these concerns to hushed whispers while you orchestrate your symphony.
Getting started with Spring MVC is a snap with Spring Roo. Let’s
take our first step and create a Controller to manipulate our
Customer JPA entity:
controller scaffold --entity ~.domain.Customer --class ~.web.CustomerController
This command will take an unusual amount of time. The first time Spring Roo generates a web artifact for you, it automatically upgrades your Roo project to be a web project. Up until this point, Spring Roo was only building a .jar archive, not a .war. A .war archive requires a different directory structure, and configuration.
Sit back, and watch the fireworks. Spring Roo will set up a default web project that will install the correct configuration and numerous files that we’ll reuse in the rest of the project, such as images, JavaScript assets, styles, and JSP tag libraries. It’ll correctly update the Maven build to have all the dependencies that are required. We won’t include the output here because there’s simply too much. Try it out for yourself, and you’ll agree: this is all code that you don’t want to write yourself.
And, of course, Roo has generated a controller. Open up the
Controller class, com.crmco.crm.web.CustomerController. Just as
with the entities before, this class is spartan. Most of the magic is in
the adjacent ITD files. You’ll see two ITDs, one for the pureplay
controller duties, and—surprise!—another controller to expose the data
from the finder method we generated earlier.
Taking Our Application for a Spin
We’ll dissect all of the newly generated code in a minute, but if you’re anything like me, you’re itching to see something working. Let’s use the soothing, anti-itch salve of instant gratification and have a look at our application. If you’ve been following along in SpringSource Tool Suite, then this next bit’s drag ’n drool simple: drag the project root in the Package Explorer on to the web server in the Servers tab on the bottom left.
Note
The server is called “VMware vFabric tc Server Developer Edition v2.5,” which is quite a mouthful. We’ll just call it tcServer Developer Edition, going forward. TcServer describes SpringSource’s hardened, production and operations-friendly version of the leading Apache Tomcat 7 web server. TcServer Developer Edition, which comes bundled and preconfigured with SpringSource Tool Suite, is a free-for-development version of that product that comes bundled with all sorts of niceties, including sophisticated monitoring to help you profile and optimize your application during development. Naturally, you could use any other of the bundled WTP servers, including Tomcat, if you’d like, but I think you’ll find tcServer Developer Edition a nice fit.
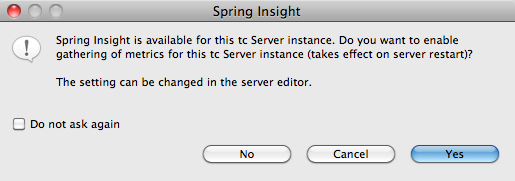
Once you’ve dragged the application onto the tcServer Developer Edition instance, start it by clicking on the green button with a white, right-facing arrow in the middle of it. It’ll launch, and ask you if you’d like to enable Spring Insight to gather metrics, as shown in Figure 2-2:
Choose “Yes.” The application should start up and be available at http://localhost:8080/crm/customers. Figure 2-3 shows what this will look like.
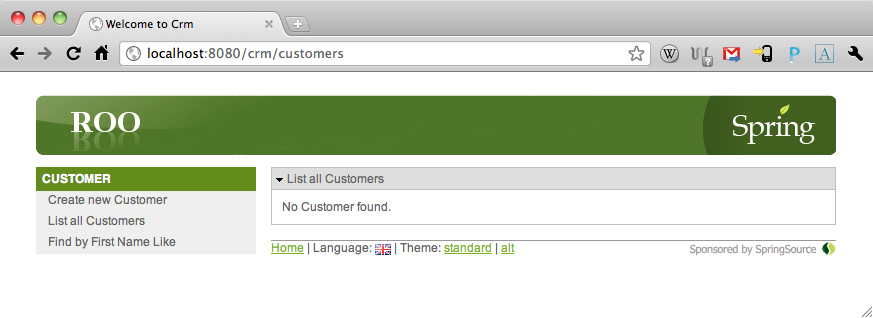
Pretty hot, right? What? Not a fan of the green? The look and feel is entirely customizable, and we’ll address that shortly. But first, take a look around—click on some of the links. You can see that Roo’s already generated forms so that you can search for customers, create them, update them, and list them. On the bottom of the page, you will see a few links where you can change the language displayed as well as the theme used. If you don’t need these options, then they’re easily removed, but it’s nice to know they’re already configured for you.
“You Win … a Braaand Neeew Web Application!”
Not really. Quite the opposite, actually. If you’ve been using Spring in web development before, then this application’s going to be very familiar. In fact, if you’ve ever written an application that’s as sophisticated and as large as the application that’s just been created for you, then you’re very familiar with these technologies, because you’ve no doubt spent a lot of time in front of them. So, nothing new about it. Just the familiar technologies you already know.
For those of you who haven’t seen an application that tackles as much as this one does, we’ll review some of the highlights.
Let’s look at what’s been configured in the
web.xml. Roo has registered a listener—ContextLoaderListener—that is used to hoist
Spring application contexts into existence. This is typically done to
hoist into existence application contexts whose beans are visible to all
other contexts. You might, for example, use this to start up the
application context that contains your services, data sources, and other
beans that might need to be shared across multiple other contexts.
Roo has registered the DispatcherServlet, which is of course the
central class not only in Spring MVC, but Spring’s entire web stack. The
DispatcherServlet can also hoist Spring
application contexts into existence. You might register several DispatcherServlets in a single application—one
for Spring MVC, one for Spring Web Services, etc., as your needs demand,
so beans registered in an application context by a DispatcherServlet are often web-tier and
DispatcherServlet-specific in nature,
and are often in service to that particular DispatcherServlet. It also knows how to enlist
beans of certain types defined in the application context in specific
types of service. For example, a HttpRequestHandler is a very low-level type of
Spring bean that can be used in responding to HTTP requests.
Roo’s also registered a few error-page elements to map an Exception and a 404 to the appropriate (preconfigured) Spring MVC resources.
Roo has registered several filters for us, to handle many different issues:
HttpMethodFilterOf the HTTP verbs—
PUT,GET,DELETE,POST, etc.—your average browser only knows two of them,GETandPOST. This filter is a proxy that adapts requests coming from a form in a browser using known conventions into the appropriate invocation on the server side.OpenEntityManagerInViewFilterThis filter keeps a JPA
EntityManageropen while requests are being served by Spring MVC. This lets you navigate the relationships on your JPA entities in the view tier, eschewing the dreadedLazyInitailizationExceptionthat you’d normally get if you didn’t have an active session open.CharacterEncodingFilterAllows one to specify a character encoding for requests. Current browsers typically do not set a character encoding, even if specified in the HTML page or form, so this is a convenient way to sanitize requests.
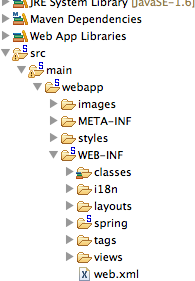
Spring Roo has also generated a slew of layout code. The layout
code’s neatly organized in several directories, the kind of meticulous
neatness you’d expect from a team leader with years of experience in
scalable application development practices. Let’s look at some of these
directories in depth, particularly those under src/main/webapp/WEB-INF/:
Directory | Description |
WEB-INF/i18n | This file contains the internationalized messages for your application. Spring makes it very easy to access internationalized messages anywhere. |
WEB-INF/layouts | Where you should keep your Apache Tiles layout definitions (not the individual fragments that are arranged into layouts) |
WEB-INF/spring | Suggested (though not required) folder for your Spring configuration files. |
WEB-INF/tags/forms | Self-contained directory for tags that can be used to bind backing model objects to form fields. You can modify these fields (with some very small provisos) and Spring Roo will tolerate them. These tags also embed Dojo JavaScript where appropriate to provide client-side interactivity. |
WEB-INF/tags/menu | Self-contained directory for tags to display the menu and navigation for your application. |
WEB-INF/tags/util | Self-contained directory for tags to handle common scenarios like loading JavaScript, theming, and wrapping blocks in panels. |
WEB-INF/views | Directory where common fragments used across all your pages—like footers and sidebars and so on—are stored, as well as fragments for individual pages, in nested folders. |
Not too shabby! There’s a lot here, and—as we’ll see—it can all be
tailored to spec, and in keeping with best practices typical of enterprise
Java application development. All of this was generated (this one time)
just to support the controller that we asked Roo to generate for us. Which
brings us back around to the rabbit that got us down this particular hole
in the first place, our CustomerController, and the scaffolding it
generated…
Scaffolding
One of the best parts about Spring Roo—a framework that knows so very much about your domain model—is that it can use that knowledge to inform how it creates the web tier. The most natural extension of this idea is of scaffolding. Scaffolding, as it’s famously called in Ruby on Rails and Groovy and Grails, describes the generation of views designed to manipulate the entities created.
Scaffolding is useful for a number of reasons. First, scaffolding views cuts the development time in half, getting you to a point where you can start prototyping a system and entering data. Sure, no automated tool’s going to generate the perfect web application for you, but nobody said it would. Instead, it’ll generate a web application, built to the highest standards in Spring web development, that you can then iteratively push to the finish line, changing the code as you go.
In running the controller scaffold command, we told Spring Roo to
generate code to support the creation, update, and deletion of the
Customer entity that we generated. It happily obliged,
filling in all the gaps required to get our plain old Java project
converted into a web application, and generating the required Spring MVC
controller and supporting web views. The controller is presented below in
its entirety:
package com.crmco.crm.web;

import com.crmco.crm.domain.Customer;
import org.springframework.roo.addon.web.mvc.controller.RooWebScaffold;
import org.springframework.stereotype.Controller;
import org.springframework.web.bind.annotation.RequestMapping;

@RooWebScaffold(path = "customers", formBackingObject = Customer.class)@RequestMapping("/customers")
@Controller
public class CustomerController {
}
Just as with the entities before this, the controller that Spring
Roo’s generated for us is remarkably underwhelming. We can see a few
telltale annotations of the same sort as were on the entities,
specifically the @RooWebScaffold annotation, which is
another marker annotation that signals to Roo that you want to “opt-in” to
the services that Roo can provide. Specifically, the scaffolding provided
by Spring Roo lives in an adjacent ITD, called
CustomerController_Roo_Controller. Open that up and you
can see that Roo’s generated all sorts of controller methods. These
controllers methods are used in conjunction with the JSP pages that Spring
Roo’s generated.
The scaffolding isn’t a one-way trip. You can, for example, change
the path attribute in the RooWebScaffold annotation,
and the path referenced in the scaffolding ITD will update accordingly in
all of the places it’s referenced. You might, for example, change the path
to say “clients,” instead, and your entire web application—including the
web tier artifacts—will update appropriately. Note, however, that it’s
left the old directory, views/customers/ in place for the web tier
artifacts, and simply added a new directory in the same folder called
views/clients.
As we’ve seen before, Spring Roo is very intelligent about how it balances its mandate to automate as much of the required code as possible with your (natural) wish to exert control on certain aspects of the application. When building the domain model, Spring Roo uses the clean separation of concerns enforced by the ITDs and the Java classes to ensure that it never steps on your toes. The rules are simple, you can use the command line to generate Java, XML, or other artifacts that you’re then expected to maintain. As you edit the Java artifacts, Roo manages the required boilerplate in an ITD file—usually adjacent to the artifact—which you are not expected to modify, or even consciously be aware of. The only time thereafter that Spring Roo will modify your Java code directly, for example, is when you explicitly ask it to, from the shell.
This separation is less clear on the web tier. In this case, Roo has
generated user editable artifacts—the .JSPX files—that
it will also need to maintain. In particular, when you update an entity,
it will try to update the corresponding JSPX pages and
controllers appropriately.
The first thing to note is the file extension—JSPX—which might be new to some of you. Roo generates XML centric JSP files, not the standard JSP files that are still so common, unfortunately. JSPX files are easier to restructure because they’re valid XML, and they also comport enough information in their structure that Roo can do smart things about refactoring them, even if you’ve updated the view since it was first generated.
The second thing that strikes us is the sheer number of files. The
page that contains the form to create clients lives in src/main/webapps/WEB-INF/views/clients/create.jspx.
Open the create.jspx and—above
all—don’t panic. The few stanzas you see before you really are all the
code required to display the page you saw in your browser. You’re standing
on the shoulders of giants here, and that should be comforting, but I
suspect you want to know why this works, not just
that it works.
When Roo created our application it created a file called src/main/webapp/WEB-INF/spring/webmvc-config.xml,
which in turn configures the Spring MVC framework. Roo’s taking advantage
of that aforementioned flexibility and has configured how Spring MVC
resolves views. If you recall those scaffolding methods in the CustomerController_Roo_Scaffold.aj, they all had
return statements with strings, like this:
   @RequestMapping(method = RequestMethod.GET)
   public String CustomerController.list(
    @RequestParam(value = "page", required = false)
     Integer page,
     @RequestParam(value = "size", required = false) Integer size,
     Model uiModel) {
        ...
        return "clients/list";
    }
This string—“clients/list”—is a
bit of indirection. It’s used by Spring MVC to resolve the view, but it
doesn’t specify a specific asset. Instead, it specifies a logical view
name, which the configured view resolves can resolve accordingly. In this
case, Roo’s configured a TilesView on a
URL view resolver, and configured a few Apache Tiles template definition
files. These templates define the “shell” of the page—the navigation,
header, footer, etc. The only thing that changes on all requests is the
bit in the middle—the content unique to each URL. When Tiles looks at
these indirect, logical view names, it resolves them to views that can be
used to flesh out the missing part of the template. In the case of the
“create” page, it loads “clients/create.jspx.” So that’s why the form’s
missing any evidence of any of the other stuff on the page.
Even so, the page has very few lines to support what looks like a complex form. But these tags may be novel to you. They are part of the assortment of tags that came with the code-generated Spring Roo application. If you’d like to exert control over how forms look in Spring Roo, then you can simply modify these tag files and you can exert control through the entire application. In essence, Roo’s made it easy for you to build a very modular view, quickly.
How Spring Roo Builds the Scaffolding
Spring Roo builds these forms based on the relationships that it can infer from the JPA mappings. Note that Spring Roo doesn’t strictly rely on the JPA associations, instead it relies on a generic model of the relationships that Roo maintains. This generic model could conceivably be used by other addons to plug in other types of models besides JPA.
There are tags for all the common types of data types. Roo does a great job mapping data types to the appropriate tags for forms or for display: booleans get checkboxes, small strings get an input field, large strings get text areas, and dates are rendered using a Dojo-based JavaScript date-picker. Roo employs its knowledge about your domain model’s relationships to correctly display a select form element for them (e.g., sets, and enums).
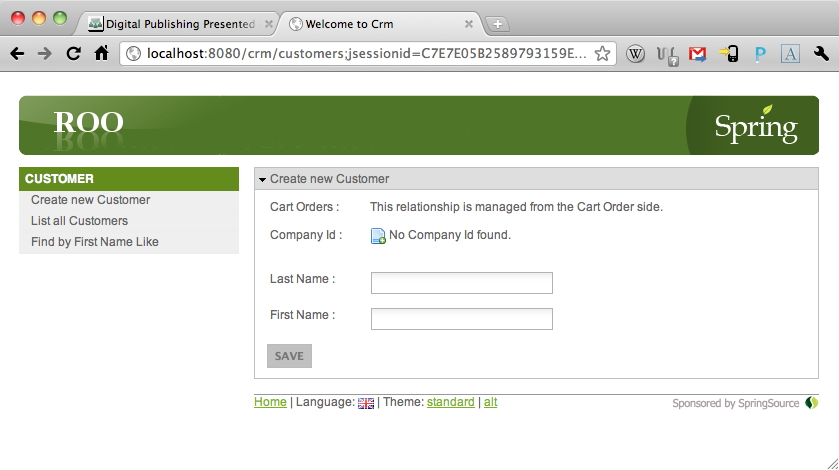
There is an empty label in the customer scaffolding form indicating that there’s no company specified (Figure 2-5). It’ll give you an icon that you can click, but this will fail, since there’s no scaffolding to support creating company entities. Since Roo hasn’t generated any scaffolding for our other entities, it can’t do much to ensure that the customer has a company, which is a required entity. This is also evident when you create a new customer—the application blows chunks because the foreign key for the company is null. We can create some scaffolding for all the entities in one go with the following command:
controller all --package ~.web
Once that’s done, redeploy and try the application again.
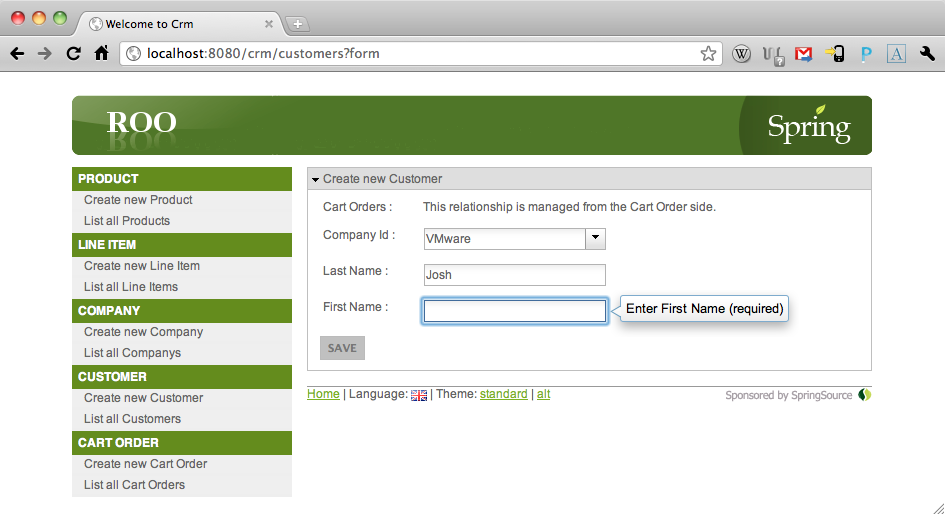
Now, you’ll see that the blue icon takes you to a resource where you can create a new company. Create one (say, “VMware,” or “O’Reilly”), save it, and then return to the customers view. You’ll see that the empty label’s been replaced with a drop-down from which you can choose an entity.
Note
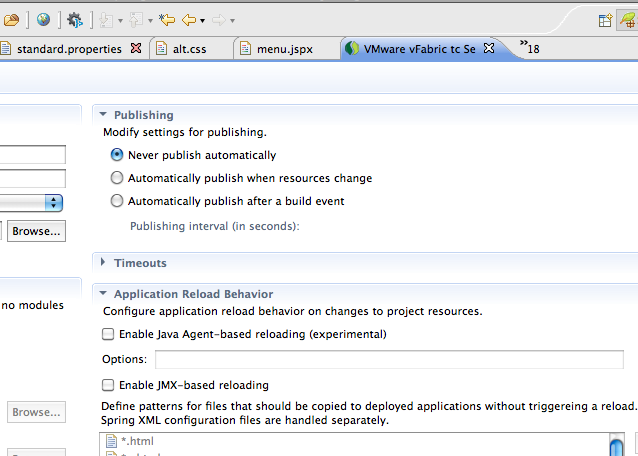
A note about redeployments. The tcServer Developer Edition WTP server instance will republish a deployed application anytime you change any of the resources or files. Any change will set this off, as long as you save the file you’ve modified. This behavior’s unhelpful, most of the time. Double click on the WTP and make sure you’ve got the Overview tab selected. Expand the Publishing tab and choose “Never Publish Automatically.” In this configuration, you’ll have to manually restart the WTP instance whenever you’d like to see updates.
Usually, these redeployment cycles are trivial—Tomcat (and tcServer, which is based on it) enjoy the fastest deployment times of any enterprise Java servers. However, things could always be better, and SpringSource Tool Suite can help out here, too. Enable the “Application Reload Behavior” found in the same dialog box. This functionality gives you near instantaneous redeployment without ever restarting the server. This is a lot of power for one little checkbox!
Now you’ve got a fully working system to create and manage your entities. Each entity has a page (“/list”) that displays a grid of the available entities, and there are forms to view individual entities, create new ones and update or delete existing ones. Spring Roo’s resilient to changes, too. Open up the Customer entity and add a new Date field. You can use the command line, as before, or simply type in the following:
@NotNull @DateTimeFormat(style = "S-") private Date birthday;
Save the entity and then watch the console; Spring Roo will update all of the existing scaffolding code. You’ll need to also update the database table with the new column. Issue this SQL on the console.
alter table customer
  add column birthday date not null;
Redeploy. A new date picker widget will be visible on the form. You can reorder the fields of the form in src/main/webapp/WEB-INF/views/customers/create.jspx.
Spring Roo will not override your changes, but it will still correctly add new ones when you change the entities. The secret Roo’s flexibility is the z attribute on the form field elements.
<field:datetime
     dateTimePattern="${customer_birthday_date_format}"
     field="birthday"
     id="c_com_crmco_crm_domain_Customer_birthday"
     required="true"
     z="3+6qO83ESYHcRPLijiOzV7iRvjU="
/>
It’s a hash that Roo calculates, based on the element name (name
only, not namespace), attribute names present in element, attribute
values present in the element. As long as this hash doesn’t change
(which is true as long as you don’t do anything to change the identify,
as described by this hash, of the element), then Roo can safely make
changes to the element while you change everything see about the form,
including position in the form and the surrounding HTML. If you make a
change to the element manually, Spring Roo will notice this and update
the “z” attribute to the value “user-managed.” Roo doesn’t manage all
views in a project; typically it just manages the artifacts under the
src/main/webapps/WEB-INF/views
folder, and the menu.jspx
file.
We’re a fair bit into this little book of ours, and we’ve learned a lot, but it’s worth noting just how much effort it would take to rebuild this entire application, soup to nuts:
persistence setup --database H2_IN_MEMORY --provider HIBERNATE
database reverse engineer --package ~.domain --schema PUBLIC
controller all --package ~.web
In addition to the above command line invocations, we also modified the Customer entity’s Java class directly, but you could just as easily have used the Roo command line to add those fields. All in all, we’ve achieved a lot for so very little.
Spring MVC’s got a lot of redeeming features that make it the most powerful web framework available to the Java developer today. Its annotation-driven programming model, the out-of-the-box abstractions to handle every manner of view (Tiles, PDFs, CSV and Excel spreadsheets, images, RESTful payloads like JSON and XML, etc.), its robust support for requirements typical of any serious Java application, all contribute to Spring MVC’s appeal.
Spring WebFlow
Spring MVC applications, by default, don’t require an HTTP session. For many applications, an HTTP session is an extra weight that adds no value. The one place where HTTP sessions are valuable is in dealing with transient, client-specific state that has to be propagated across multiple requests. You might, for example, use an HTTP session to store the state associated with a shopping cart and checkout process. Typically such processes require the skilled management of object state over a series of several pages; they require foundational support for navigating backwards and forwards, much like a state machine. This sort of state is difficult to manage, however. There can only be one HTTP session associated with a client, no matter how many requests are made, which of course has the makings of a classic concurrency problem. Sessions are a shared resource. Spring WebFlow provides a framework specifically for managing problems like this.
You can install Spring WebFlow quickly by issuing the following command:
web flow
Spring WebFlow builds on top of Spring MVC, and shares common configuration and dependencies. Spring MVC and Spring Web Flow work well together, providing a powerful combo-punch for all the challenges you might face. The majority of your application will typically be developed in Spring MVC, with Spring WebFlow filling in the gaps where you need stateful, “conversational” interaction. Spring WebFlow, once configured, works by reading in descriptions of “flows,” described using Spring namespaces. These flows describe how pages in should be strung together in sequences.
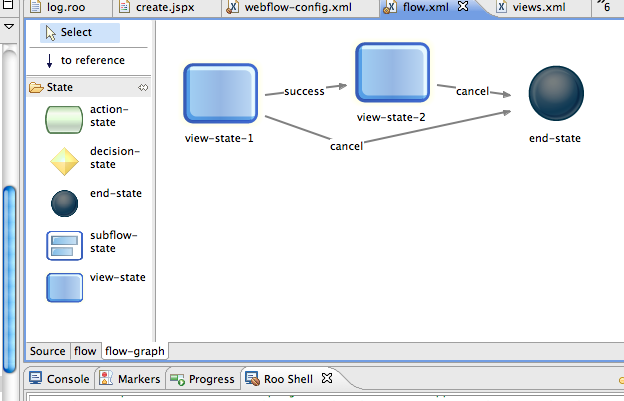
Let’s look at the sample flow and folder that’s created when you install Spring Web Flow.
<?xml version="1.0" encoding="UTF-8" standalone="no"?>
<flow xmlns="http://www.springframework.org/schema/webflow" xmlns:xsi="http://www.w3.org/2001/XMLSchema-instance" xsi:schemaLocation="http://www.springframework.org/schema/webflow http://www.springframework.org/schema/webflow/spring-webflow-2.0.xsd">
    <view-state id="view-state-1" view="sampleflow/view-state-1">
        <transition on="success" to="view-state-2"/>
        <transition on="cancel" to="end-state"/>
    </view-state>
    <view-state id="view-state-2" view="sampleflow/view-state-2">        <transition on="cancel" to="end-state"/>
    </view-state>

    <end-state id="end-state" view="sampleflow/end-state"/>
</flow>
The flow contains three meaningful stanzas: two view-states, and one end-state. These are only two of the many
types of states that Spring WebFlow provides. Each state describes
itself—in this case a view-state describes a view to dispatch to—as well
as the transitions it might take. Spring WebFlow resolves views in the
same way as Spring MVC, and here the values for view—sampleflow/view-state-2., and sampleflow/view-state-1 -map to Apache Tiles
definitions, which in turn map to the JSPX files, just like the strings
returned from controller methods in Spring MVC. SpringSource Tool Suite
provides fantastic support for visualizing Spring Web Flows, just click
on the “flow-graph” tab at the bottom of the editor panel when this flow
is open. It produces a visualization of the graph. This visual view of
the graph is editable; you can add new nodes to the graph by dragging
elements from the pallette on the left onto the graph or alter the graph
nodes by double clicking on the them and modifying their
properties.
The specifics of Spring WebFlow are beyond the scope of this book, but getting started is easy—simply install the configuration from here, and then consult the comprehensive documentation at http://www.springsource.org/go-webflow2.
Integrating Roo with other Web Frameworks
Spring Roo is an enabler—a gateway drug. It simplifies to the point of triviality the configuration and installation of technologies in service of your application. As powerful as Spring Roo is, it does not do its work alone. It relies on the Spring framework and other, sister frameworks to provide the runtime functionality—to actually make these integrations work, to make them meaningful. As we move through the next section, remember that Spring itself has integrations with more technologies than any other technology and that half of the work of surfacing these technologies in Spring Roo is often just having a way to enable the integration in a Roo project. The best integrations, however, offer ways to improve development-time productivity with these technologies. In this section, we’ll take a look at a few web frameworks that provide compelling integrations for Roo users.
Some of the most exciting integrations today are in the web framework space. People are building dynamic, highly interactive applications today that are a rich mix of client side technologies like JavaScript, CSS, HTML, or Flex, and server side technologies like Spring MVC.
For the integrations in the rest of this chapter, let’s assume a known starting point. Delete your project, and create a new one using the New Roo project dialog in SpringSource Tool Suite (File > New > Spring Roo Project) and reset the entities with the following Roo shell commands before trying out the technology specific commands:
persistence setup --database H2_IN_MEMORY --provider HIBERNATE
database properties set --key database.url --value jdbc:h2:tcp://localhost/~/roo_crm
database reverse engineer --package ~.domain --schema PUBLIC
GWT
The first technology on our rich-client roundup is the Google Web Toolkit, or GWT. GWT is a cross compiler—it takes Java syntax code and compiles it into JavaScript. The libraries available to the developer using this cross compiler resemble a subset of the Java standard libraries, as well as several Java abstractions that are essentially mirrors of the common APIs that you would access running JavaScript in a browser, like the DOM.
To add new functionality to a GWT application, you can build complex abstractions using Java, or you can write JSNI—JavaScript Native Interface—adapter code and provide a Java binding for it. This has been used by many to, for example, expose the ExtJS JavaScript library as a Java API which can then be used in GWT code.
The GWT provides a convenient way for Java developers to build highly interactive, dynamic JavaScript applications with rich, client-side state. GWT applications may communicate with the server using a type of serialization that GWT recognizes.
Writing large, rich, cross-browser applications is easy with GWT. Java’s built in support for encapsulation and reuse lends itself to larger codebases. The JavaScript that GWT produces is very optimized—it’s as if you had the most intelligent JavaScript coder writing your code for you. The Java-to-JavaScript compiler can do things that you’d never do if you were writing JavaScript directly, including function inlining and obfuscation. The result is JavaScript code that’s blazing fast, if a bit ugly to look at.
To use GWT successfully, you need to set up the appropriate Eclipse plugins, configure GWT itself, and then connect your server side services to the client-side code.
To get started, simply run the following command:
web gwt setup
This single command takes care of everything and leaves you with a
working GWT-based UI for your entities, in much the same fashion as the
original Spring MVC application. Below is a screenshot. You can restart
the Spring application inside of tcServer, and then start the GWT client
side code itself. SpringSource Tool Suite already has all the Google
plugins pre-configured to support development with GWT. Your Maven
builds already been configured to correctly compile the GWT application
code as well. To test your GWT code, open up the GWT entry point—an XML
file at the root of your Roo base package (com.crmco.crm.ApplicationScaffold.gwt.xml—and
right click on it in the Source code editor window. Choose Run As >
Web Application. This will launch a browser with your code. During
development, GWT runs in “hosted mode.” Hosted mode is an environment
that lets GWT connect your code to the IDE (and the debugger). To
support Hosted Mode, you need a plugin in your browser that can
communicate back to your IDE. You will be prompted to install this
plugin if you don’t already have it when you first run this
application.
The application should look something like this:
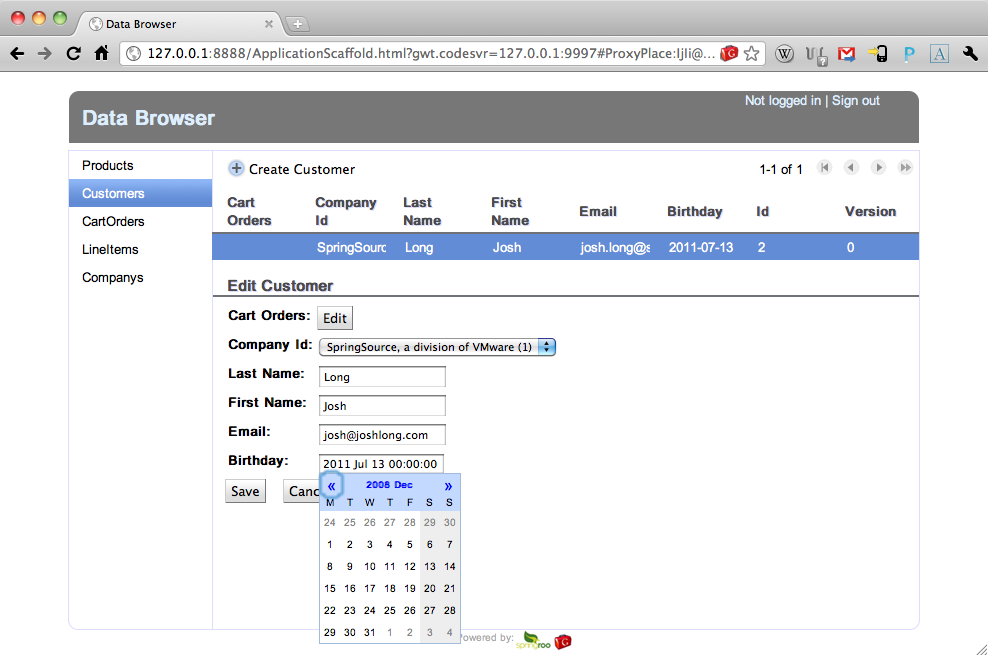
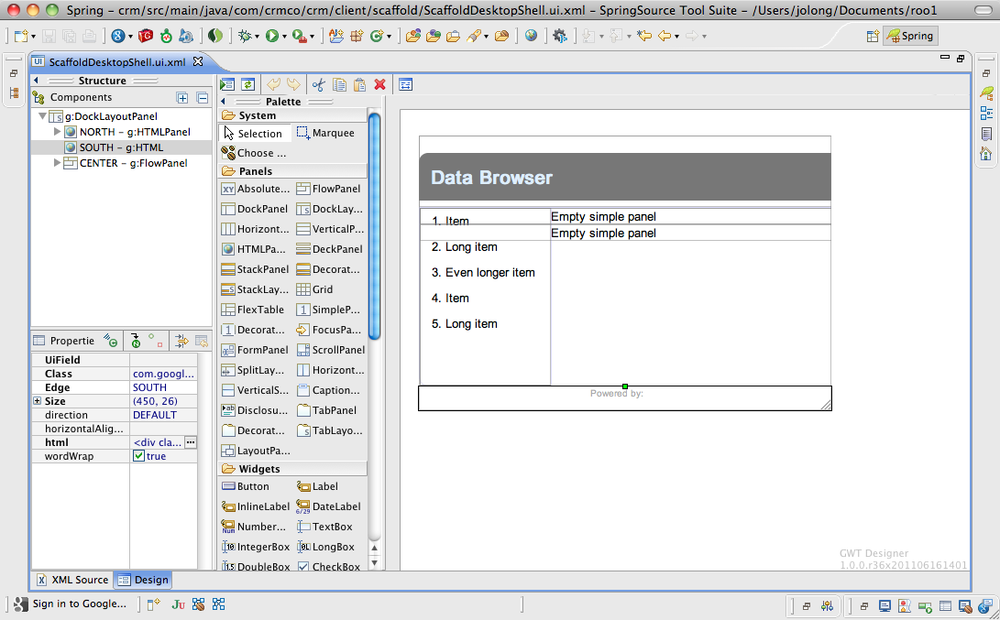
SpringSource Tool Suite includes all the sophisticated tooling to support development with GWT. Indeed, the Google plugin that comes prebundled with SpringSource Tool Suite also supports other Google technologies, like Google App Engine. Incidentally, Spring has the distinct position of being the only enterprise Java framework that works portably on all the major cloud environments, including Google App Engine, Amazon Elastic Beanstalk, and of course, CloudFoundry. The Google plugin includes a visual designer for GWT, which you can use by clicking on a GWT XML artifact and then clicking on the “Design” tab at the bottom.
GWT is an example of SOFEA -- service oriented front end applications. In an SOFEA application, clients make requests against server side resources to activate business logic and marshal server side state back and forth using dumb objects (which smells suspiciously like a DTO). This has the benefit that server side state is kept to minimum, assuming of course that the services invoked are stateless as well. However, the resulting code is filled with much more boilerplate code and more prone to security concerns.
Vaadin
Vaadin is different. Vaadin is built on top of GWT, and comes with a large array of components, but these components are different than typical GWT widgets. Vaadin widgets, as run on the client side, are simply stateless “proxy” widgets that delegate all their business logic (and state management) to a server side peer. Thus, Vaadin applications make a lot more calls to the server, and the server keeps all the UI state, not the client as with GWT. Because all the business logic runs on the server side, and because all the UI state exists on the server side, the client needs only to be responsive and to convey state changes to the server. Keeping the important business logic on the server simplifies things a lot—it means you can avoid tedious code to serialize Java objects back and forth as JavaScript objects, and any concerns about security are minimized because all the business logic runs on the server side, away from prying eyes.
A cursory examination of the code in our previous GWT example will reveal a lot of boilerplate code. Roo certainly got the ball rolling for us, but if the code it generated is any indication, then there’s a lot of code to be written for a typical GWT application. Vaadin solves this problem by providing a rich set of components and framework code that greatly reduces the developer footprint.
To use Vaadin with Spring Roo, you first have to install it. It is not shipped out of the box with Spring Roo, but instead is part of the huge, ever expanding ecology of Spring Roo addons.
pgp trust --keyId 0xBF0451C0
download accept terms of use
addon install bundle --bundleSymbolicName com.vaadin.spring.roo.addon
Once this is done, you can now start using the Spring Roo Vaadin addon. Issue the following command to have the Roo addon generate scaffolding for our entities, in the same way that we used the MVC and GWT addons to generate scaffolding.
vaadin setup --applicationPackage ~.web --baseName crm --themeName crm --useJpaContainer false
This will install Vaadin, add the required Java dependencies,
update web.xml, etc. It installs
some helper and utility code in the com.crmco.crm.web package. Inspect that
package and you’ll see a handful of classes, a far cry from the reams of
code implanted by the GWT addon. Let’s see what Vaadin can do for us in
terms of scaffolding. Run the following command to generate CRUD
forms.
vaadin generate all --package ~.web.ui --visuallyComposable true
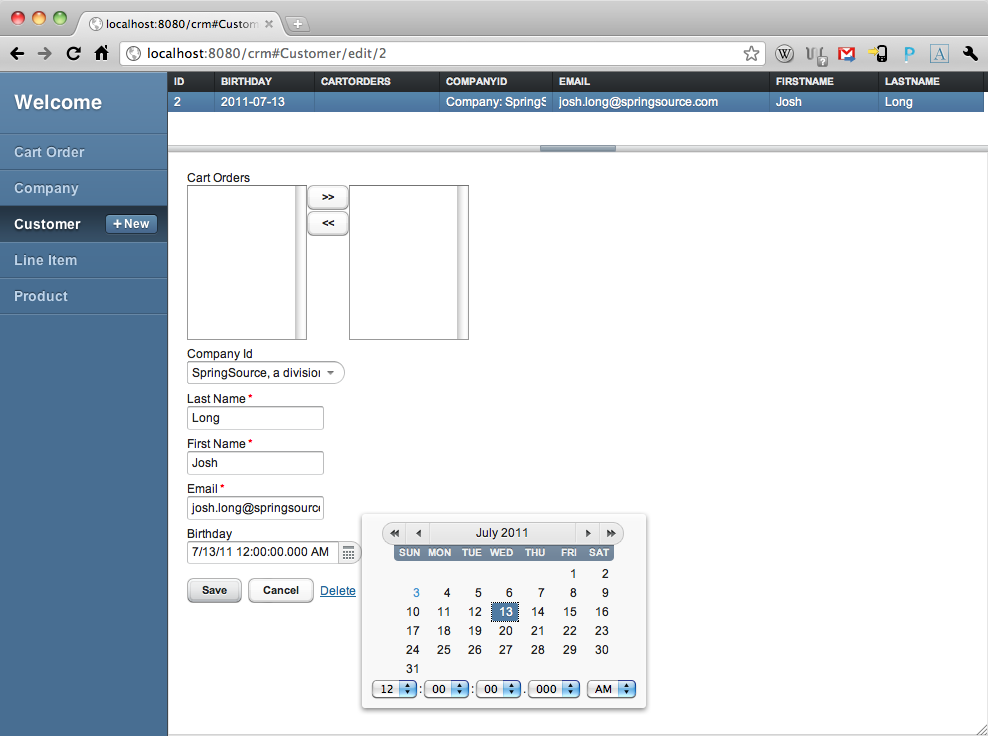
The generated Vaadin application is pretty striking, and doesn’t
take a lot of code! Vaadin also has a visual designer that you can use.
You need to add the Vaadin Eclipse plugin to SpringSource Tool Suite. In
SpringSource Tool Suite, go to Help > Install New Software, and in
the “Work With:” field, enter the URL of the Vaadin Eclipse update site,
http://vaadin.com/eclipse. Select the “Vaadin”
tree, and install everything. Follow the prompts. Once everything’s
configured, you can open any Vaadin form in the Vaadin visual designer.
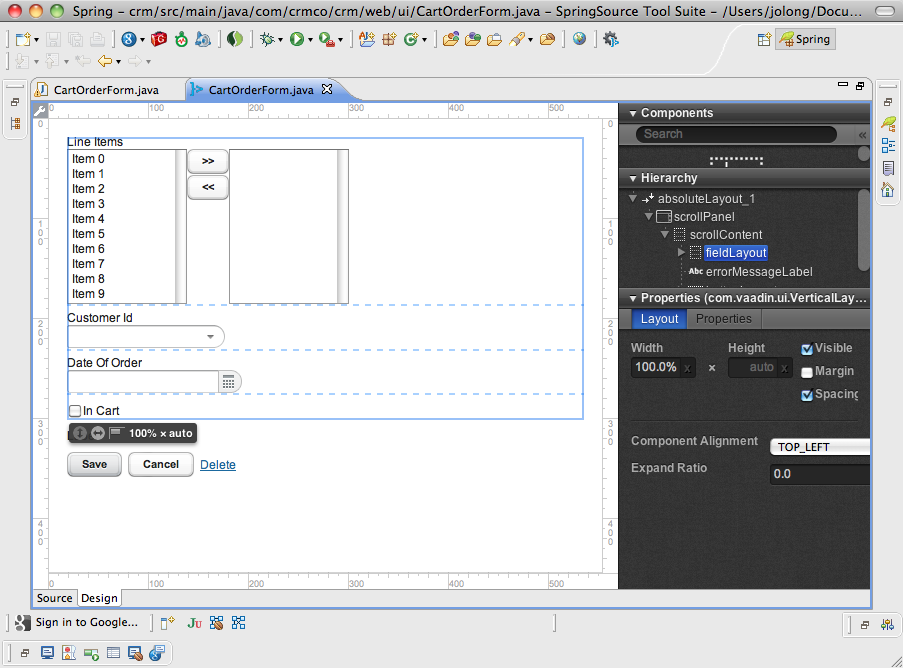
Right click on the
com.crmco.crm.web.ui.CartOrderForm, choose Open With
> Vaadin Editor. If you find yourself looking at source code, then
look at the bottom of the editor pane and click on the Design tab. You
should be shown a visual approximation of the design, just as with the
GWT designer. You can select elements and modify them in the visual
tool, as well.
Where to go from Here
While we haven’t covered all the supported technologies, there are numerous other addons that support Flex, Wicket, and many other technologies.
Many of these technologies—like Flex, GWT, and Vaadin—are geared specifically to form-intensive, rich-client-type applications, and not to being a general purpose web framework like Spring MVC. We think you’ll find that most applications are best served by introducing Spring MVC (and perhaps Spring WebFlow) as the base, and then—as islands of richer, page-centric functionality are required—by introducing something like Vaadin.